Table of Contents

Related Manuals for Fluke 522A/6


Summary of Contents for Fluke 522A/6
- Page 1 5522A Multi-Product Calibrator Operators Manual January 2011 © 2011 Fluke Corporation. All rights reserved. Printed in USA. Specifications are subject to change without notice. All product names are trademarks of their respective companies.
- Page 2 Fluke authorized resellers shall extend this warranty on new and unused products to end-user customers only but have no authority to extend a greater or different warranty on behalf of Fluke. Warranty support is available only if product is purchased through a Fluke authorized sales outlet or Buyer has paid the applicable international price.
- Page 3 OPERATOR SAFETY SUMMARY WARNING HIGH VOLTAGE is used in the operation of this equipment LETHAL VOLTAGE may be present on the terminals, observe all safety precautions! To avoid electrical shock hazard, the operator should not electrically contact the output HI or sense HI terminals or circuits connected to these terminals. During operation, lethal voltages of up to 1020 V ac or dc may be present on these terminals.
-
Page 5: Table Of Contents
Table of Contents Chapter Title Page Introduction and Specifications............1-1 Introduction......................1-3 Safety Information ..................... 1-4 Overload Protection ................... 1-5 Operation Overview................... 1-5 Local Operation ..................... 1-5 Remote Operation (RS-232)................1-6 Remote Operation (IEEE-488) ..............1-6 Where to Go from Here ..................1-7 Instruction Manuals ................... - Page 6 How to Replace the Mains Power Fuse ............. 2-3 How to Select Line Voltage................2-4 How to Connect to Line Power................2-4 How to Select Line Frequency................2-4 How to Contact Fluke ..................2-6 Placement......................2-7 Cooling Considerations..................2-7 Features ....................3-1 Introduction......................
- Page 7 How to Test Watts, VA, VAR Performance ..........4-60 How to Test Harmonics Volts Performance ..........4-62 How to Test Harmonics Amps Performance..........4-63 How to Calibrate a Fluke 51 Thermometer ........... 4-64 How to Test the Thermometer ..............4-64 How to Calibrate the Thermometer............4-65 Remote Operations ................
- Page 8 5522A Operators Manual How to Test the RS-232 UUT Port via IEEE-488 Port ......... 5-18 How to Change between Remote and Local Operation ........5-20 Local State ..................... 5-20 Local with Lockout State................5-20 Remote State....................5-20 Remote with Lockout State ................5-21 RS-232 Interface Overview ................
- Page 9 Contents (continued) Introduction......................6-3 Command Summary by Function ..............6-3 Commands ......................6-10 Maintenance..................7-1 Introduction......................7-3 How to Replace the Line Fuse ................7-3 How to Replace the Current Fuses..............7-4 How to Clean the Air Filter ................7-5 General Cleaning ....................
- Page 10 5522A Operators Manual The Leveled Sine Wave Function ..............9-15 Shortcuts for Setting the Frequency and Voltage .......... 9-16 The MORE OPTIONS Menu ................ 9-16 How to Sweep Through a Frequency Range ..........9-17 Frequency Response Calibration Procedure for an Oscilloscope....9-18 How to Calibrate the Time Base of an Oscilloscope .........
- Page 11 Contents (continued) Trigger Signal Specifications (Edge Function) ..........10-7 Trigger Signal Specifications (Square Wave Voltage Function)....10-7 TV Trigger Signal Specifications ..............10-7 Oscilloscope Input Resistance Measurement Specifications......10-7 Oscilloscope Input Capacitance Measurement Specifications ...... 10-8 Overload Measurement Specifications ............10-8 Oscilloscope Connections..................
- Page 12 5522A Operators Manual Leveled Sinewave Verification: Amplitude ..........10-43 Leveled Sinewave Verification: Frequency ..........10-44 Leveled Sinewave Verification: Harmonics..........10-44 Leveled Sinewave Verification: Flatness ............10-46 Marker Generator Verification ..............10-53 Pulse Generator Verification: Period............. 10-54 Pulse Generator Verification: Pulse Width ........... 10-54 Input Impedance Verification: Resistance.............
- Page 13 Contents (continued) How to Set the Repeat Frequency ..............11-17 How to Set the Modulation Pattern ............... 11-17 How to Set the Flicker Amplitude..............11-17 Values...................... 11-18 Δ How to Set Phase and Reference in the AMPL Function ......11-18 Δ...
- Page 14 5522A Operators Manual...
- Page 15 Title Page 1-1. Symbols........................1-4 2-1. Standard Equipment ....................2-3 2-2. Line Power Cord Types Available from Fluke ............2-5 3-1. Front-Panel Features ....................3-4 3-2. Rear-Panel Features ....................3-10 3-3. Factory Defaults for SETUP Menus Power-Up Defaults ........3-22 4-1.
- Page 16 5522A Operators Manual 7-2. Replacement Current Fuses..................7-6 7-3. Verification Tests for DC Voltage (Normal) ............7-8 7-4. Verification Tests for DC Voltage (AUX) ............. 7-9 7-5. Verification Tests for DC Current (AUX) ............. 7-9 7-6. Verification Tests for Resistance ................7-10 7-7.
- Page 17 Contents (continued) 10-17. SC1100 Option Leveled Sinewave Verification: Flatness ........10-46 10-18. SC1100 Option Marker Generator Verification............. 10-53 10-19. SC1100 Option Pulse Generator Verification: Period ........... 10-54 10-21. SC1100 Option Pulse Generator Verification: Pulse Width ........10-54 10-21. SC1100 Option Input Impedance Verification: Resistance ........10-55 10-22.
- Page 18 5522A Operators Manual...
- Page 19 1-3. Allowable Duration of Current >11 A ..............1-10 2-1. How to Access the Fuse and Select Line Voltage..........2-5 2-2. Line Power Cord Types Available from Fluke ............2-6 3-1. Front-Panel Features ....................3-4 3-2. Rear-Panel Features ....................3-10 3-3.
- Page 20 5522A Operators Manual 5-5. Testing the RS-232 UUT Port via RS-232 Host Port..........5-17 5-6. Testing the RS-232 UUT Port via IEEE-488 Port ..........5-19 5-7. IEEE-488 Remote Message Coding............... 5-24 5-8. Status Register Overview ..................5-36 5-9. Serial Poll Status Byte (STB) and Service Request Enable (SRE) ......5-37 5-10.
- Page 21 Chapter 1 Introduction and Specifications Title Page Introduction......................1-3 Safety Information ....................1-4 Overload Protection ..................... 1-5 Operation Overview..................... 1-5 Local Operation ....................1-5 Remote Operation (RS-232)................1-6 Remote Operation (IEEE-488) ................ 1-6 Where to Go from Here ..................1-7 Instruction Manuals .....................
- Page 22 5522A Operators Manual...
-
Page 23: Introduction
Programmable entry limits that prevent the operator from entering values that exceed preset output limits. • Simultaneous output of voltage and current, up to an equivalent of 20.9 kW. • Pressure measurement when used with Fluke 700 Series pressure modules. -
Page 24: Safety Information
Overvoltage is as specified by terminal markings. Conforms to European Union Do not dispose of this product as unsorted directives municipal waste. Go to Fluke’s website for recycling information. Risk of Danger. Important information. Hazardous voltage See manual. -
Page 25: Overload Protection
Introduction and Specifications Overload Protection • Read all safety Information before you use the Product. • Do not use the Product if it operates incorrectly. • Replace the mains power cord if the insulation is damaged or if the insulation shows signs of wear. •... -
Page 26: Remote Operation (Rs-232)
COM ports at the PC or terminal. A set of four commands control the operation of the SERIAL 2 TO UUT serial port. See Chapter 6 for a discussion of the UUT_* commands. The SERIAL 2 TO UUT port is also used to connect to the Fluke 700 Series Pressure Modules. -
Page 27: Where To Go From Here
One of each manual listed above is shipped with the instrument. Order additional copies of the manuals separately using the part number provided. For ordering instructions, refer to the Fluke Catalog, or ask a Fluke sales representative (see “Service Information” in Chapter 2). -
Page 28: General Specifications
5522A Operators Manual General Specifications The following tables list the 5522A specifications. All specifications are valid after allowing a warm-up period of 30 minutes, or twice the time the 5522A has been turned off. (For example, if the 5522A has been turned off for 5 minutes, the warm-up period is 10 minutes.) All specifications apply for the temperature and time period indicated. -
Page 29: Detailed Specifications
Introduction and Specifications Detailed Specifications Detailed Specifications DC Voltage Absolute Uncertainty, tcal ±5 °C Stability ±(ppm of output +μV) Resolution μV Range Max Burden 24 hours, ±1 °C 90 days 1 year ±(ppm, output +μV) 0 to 329.9999 mV 65 Ω 15 + 1 20 + 1 3 + 1... - Page 30 5522A Operators Manual Noise Range Bandwidth 0.1 Hz to 10 Hz p-p Bandwidth 10 Hz to 10 kHz rms 0 to 329.999 μA 2 nA 20 nV 0 to 3.29999 mA 20 nA 200 nV 2.0 μA 0 to 32.9999 mA 200 nA 0 to 329.999 mA 2000 nA...
-
Page 31: Resistance
Introduction and Specifications Detailed Specifications Resistance Absolute Uncertainty, tcal ±5 °C ±(ppm of output +floor) Resolution Floor (Ω) Range Allowable Current ppm of output Ω Temp and temp since ohms zero cal 90 days 1 year 12 hrs ±1 °C 7 days ±5 °C 0 to 0.001... -
Page 32: Ac Voltage (Sine Wave)
5522A Operators Manual AC Voltage (Sine Wave) Absolute Uncertainty, Max Distortion and tcal ±5 °C Noise Range Frequency Resolution 10 Hz to 5 MHz ±(ppm of output + μV) Burden Bandwidth 90 days 1 year ±(% output + floor) Normal Output 1.0 mV to 10 Hz to 45 Hz 600 + 6... - Page 33 Introduction and Specifications Detailed Specifications AC Voltage (Sine Wave) (cont.) Absolute Uncertainty, Max Distortion and tcal ±5 °C Noise Resolution 10 Hz to 5 MHz Range Frequency ±(% of output + μV) Burden Bandwidth 90 days 1 year ±(% output + floor) AUX Output 10 mV to 10 Hz to 20 Hz...
-
Page 34: Ac Current (Sine Wave)
5522A Operators Manual AC Current (Sine Wave) Max Distortion & Absolute Uncertainty, Noise 10 Hz to tcal ±5 °C Compliance 100 kHz BW Inductive Range Frequency ±(% of output + μA) adder ±(μA/V) ±(% of output + Load μH floor) 90 days 1 year LCOMP Off... - Page 35 Introduction and Specifications Detailed Specifications AC Current (Sine Wave) (cont.) Absolute Uncertainty, Max Distortion & tcal ±5 °C Noise 10 Hz to Inductive Range Frequency ±(% of output + μA) 100 kHz BW Load μH ±(% of output + floor) 90 days 1 year LCOMP On...
-
Page 36: Capacitance
5522A Operators Manual Capacitance Absolute Uncertainty, Allowed Frequency or tcal ±5 °C Charge-Discharge Rate [1] [2] [3] ±(% of output + floor) Range Resolution Min and Max to Typical Max for Typical Max for 90 days 1 year Meet <0.5 % Error <1 % Error Specification 220 to... -
Page 37: Temperature Calibration (Thermocouple)
Introduction and Specifications Detailed Specifications Temperature Calibration (Thermocouple) Absolute Uncertainty Absolute Uncertainty Source/Measure Source/Measure Range Range tcal ±5 °C tcal ±5 °C Type °C Type °C ± °C ± °C 90 days 1 year 90 days 1 year 600 to 800 0.42 0.44 -200 to -100... -
Page 38: Temperature Calibration (Rtd)
5522A Operators Manual Temperature Calibration (RTD) Absolute Uncertainty Absolute Uncertainty tcal ±5 °C tcal ±5 °C Range Range RTD Type RTD Type ± °C ± °C °C °C 90 days 1 year 90 days 1 year -200 to -80 0.04 0.05 -200 to -80 0.03... -
Page 39: Power And Dual Output Limit Specifications
Introduction and Specifications Detailed Specifications AC Power (45 Hz to 65 Hz) Specification Summary, PF=1 Current Range 3.3 to 9 to 33 to Voltage Range 90 to 329.99 mA 8.999 mA 32.999 mA 89.99 mA Absolute Uncertainty, tcal ±5 °C, ±(% of watts output) 33 to 329.999 mV 0.13 0.09... -
Page 40: Phase
5522A Operators Manual Phase 1-Year Absolute Uncertainty, tcal ±5 °C, (Δ Φ °) 10 to 65 to 500 Hz to 1 to 5 to 10 to 65 Hz 500 Hz 1 kHz 5 kHz 10 kHz 30 kHz 0.10 ° 0.25 °... -
Page 41: Additional Specifications
Introduction and Specifications Additional Specifications VARs When the Power Factor approaches 0.0, the Watts output uncertainty becomes unrealistic because the dominant characteristic is the VARs (volts-amps-reactive) output. In these cases, calculate the Total VARs Output Uncertainty, as shown in example 3: Example 3 Output: 100 V, 1 A, 60 Hz, Power Factor = 0.174 (Φ=80) Voltage Uncertainty Uncertainty for 100 V at 400 Hz is, 150 ppm + 2 mV, totaling: 100 V x 190 x 10... -
Page 42: Ac Voltage (Sine Wave) Extended Bandwidth
5522A Operators Manual in this example, the specification is 0.015 % +4 mV as the 0.015 % is the same, and the floor is twice the value (2 x 2 mV). AUX (50th Harmonic) Output: 100 mV, 5 kHz ..........From “AC Voltage (Sine Wave) Specifications” the auxiliary output specification for 100 mV, 5 kHz, is 0.15 % + 450 mV. - Page 43 Introduction and Specifications Additional Specifications AC Voltage (Non-Sine Wave) (cont.) Frequency Max Voltage Triangle Wave & 1-Year Absolute Uncertainty, Resolution Truncated Sine tcal ±5 °C, ±(% of output + % of range) Range, p-p Auxiliary Output (Dual Output Mode) 0.01 to 10 Hz 5.0 + 0.5 Two digits on each range 10 to 45 Hz...
-
Page 44: Ac Voltage, Dc Offset
5522A Operators Manual AC Voltage, DC Offset 1-Year Absolute Uncertainty, Max Peak tcal ±5 °C Range (Normal Channel) Offset Range Signal ±(% dc output + floor) Sine Waves (rms) 3.3 to 32.999 mV 0 to 50 mV 80 mV 0.1 + 33 μV 0.1 + 330 μV 33 to 329.999 mV 0 to 500 mV... -
Page 45: Ac Current, Square Wave Characteristics
Introduction and Specifications Additional Specifications AC Current (Non-Sine Wave) (cont.) Triangle Wave & 1-Year Absolute Uncertainty tcal ±5 °C Truncated Sine Wave Max Current Frequency ±(% of output + % of range) Range Resolution 10 to 45 Hz 0.25 + 0.5 93 to Six digits 45 Hz to 1 kHz... - Page 46 5522A Operators Manual 1-26...
-
Page 47: Preparing For Operations
Unpack and Inspect....................2-3 How to Replace the Mains Power Fuse ............... 2-3 How to Select Line Voltage................. 2-4 How to Connect to Line Power................2-4 How to Select Line Frequency................2-4 How to Contact Fluke ..................2-6 Placement......................2-7 Cooling Considerations..................2-7... - Page 48 5522A Operators Manual...
-
Page 49: Introduction
Chapter 7, “Maintenance.” If reshipping the calibrator, use the original container. If it is not available, you can order a new container from Fluke by indicating the Calibrator's model and serial number. Table 2-1. Standard Equipment... -
Page 50: How To Select Line Voltage
If you need a different type, refer to Table 2-2 and Figure 2-2 for a list and illustration of the line power plug types available from Fluke. After you verify that the line voltage selection is set correctly and that the correct fuse for that line voltage is installed, connect the calibrator to a properly grounded three-prong outlet. - Page 51 Line Voltage Indicator Changing Line Fuse Changing Line Voltage gjh004.eps Figure 2-1. How to Access the Fuse and Select Line Voltage Table 2-2. Line Power Cord Types Available from Fluke Type Voltage/Current Fluke Option Number North America 120 V/15 A LC-1...
-
Page 52: How To Contact Fluke
LC-6 LC-7 nn008f.eps Figure 2-2. Line Power Cord Types Available from Fluke How to Contact Fluke To order accessories, receive operating assistance, or get the location of the nearest Fluke distributor or Service Center, call: USA: 1-888-99-FLUKE (1-888-993-5853) Canada: 1-800-36-FLUKE (1-800-363-5853) -
Page 53: Placement
Preparing for Operations Placement Placement Warning To prevent possible electrical shock, fire, or personal injury, make sure that the Product is grounded before use. You may place the calibrator on a bench top or mount it in a standard-width, 24-inch (61-cm) deep equipment rack. - Page 54 5522A Operators Manual...
-
Page 55: Features
Chapter 3 Features Title Page Introduction......................3-3 Front-Panel Features .................... 3-3 Rear-Panel Features ..................... 3-3 Softkey Menu Trees..................... 3-3... - Page 56 5522A Operators Manual...
-
Page 57: Introduction
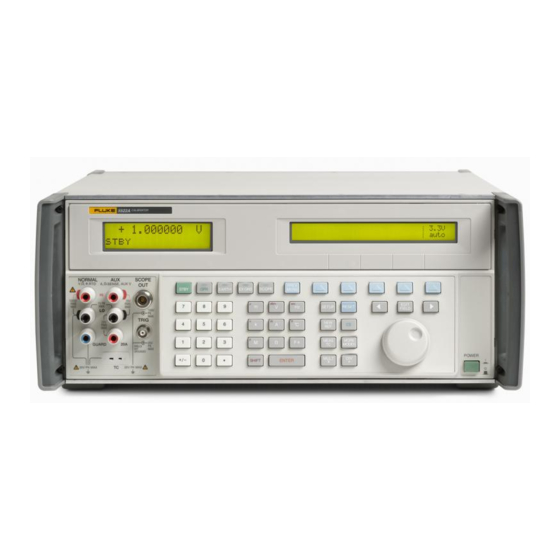
Introduction This chapter is a reference for the functions and locations of the 5522A Calibrator's front and rear-panel features. Please read this information before operating the calibrator. Front panel operating instructions for the calibrator are provided in Chapter 4, “Front Panel Operation”;... - Page 58 5522A Operators Manual 5522A CALIBRATOR PREV STBY EARTH EXGRD SCOPE MENU EDIT SETUP RESET FIELD MEAS MORE MODES MULT • ENTER SHIFT POWER gjh005.eps Figure 3-1. Front-Panel Features Table 3-1. Front-Panel Features Output Display The Output Display is a two-line backlit LCD that shows output amplitudes, frequency and calibrator status.
- Page 59 Features Softkey Menu Trees in the lower left corner of the Output Display. In standby mode, the NORMAL, AUX and 20A output terminals are internally disconnected from the 5522A. The 5522A starts up in standby mode. The 5522A automatically switches to standby if one of the following occurs: The RESET key is pressed.
- Page 60 5522A Operators Manual 11 12 5522A CALIBRATOR PREV STBY EARTH EXGRD SCOPE MENU EDIT SETUP RESET FIELD MEAS MORE MODES MULT ENTER • SHIFT POWER gjh009.eps Figure 3-1. Front-Panel Features (cont.) Table 3-1. Front-Panel Features (cont.) The NEW REF (New Reference) key is active during error mode operation, and establishes the present output value as a new reference for meter error computation.
- Page 61 The power switch turns the power on and off. The switch is a latching push-push type. When the switch is latched in, power is on. The MORE MODES key provides access to the measure pressure function. You need a Fluke 700 Series pressure module to measure pressure ...
- Page 62 5522A Operators Manual 5522A CALIBRATOR PREV STBY EARTH EXGRD SCOPE MENU EDIT SETUP RESET FIELD MEAS MORE MODES MULT • ENTER SHIFT POWER gjh010.eps Figure 3-1. Front-Panel Features (cont.) Table 3-1. Front-Panel Features (cont.) The ENTER key loads a newly entered output value shown on the Control Display into the 5522A, which appears on the Output Display.
- Page 63 Features Softkey Menu Trees Table 3-1. Front-Panel Features (cont.) The TC (Thermocouple) minijack is used for thermocouple simulation during thermometer calibration, and thermocouple measurements. You must use the correct thermocouple wire and plug when using this connector. For example, if simulating a type K thermocouple, use type K thermocouple wire and type K plug for making connections ...
- Page 64 The SERIAL 2 TO UUT connector is used for transmitting and receiving RS-232 serial data between the 5522A and a Unit Under Test (UUT) or a Fluke 700 Series pressure module. Chapter 6, “Remote Commands” describes how to use the RS-232 serial interface for UUT communications. Chapter 4 described how to measure pressure.
- Page 65 Features Softkey Menu Trees Table 3-2. Rear-Panel Features (cont.) Warning To avoid shock hazard, connect the factory supplied three- conductor line power cord to a properly grounded power outlet. Do not use a two-conductor adapter or extension cord; this will break the protective ground connection. Use the rear-panel CHASSIS GROUND terminal for a protective grounding wire if there is any question about the effectiveness of instrument earth grounding through...
- Page 66 5522A Operators Manual SETUP Front Panel Key AK AL Next Section gjh006.eps Figure 3-3. Setup Softkey Menu Tree 3-12...
- Page 67 Features Softkey Menu Trees to X to G to B SHOW SPECS is an online summary of the programmed output specifications. to AG to F to C If self test does not pass, error codes are displayed. (See chapter 7, "Maintenance") to E to D SERIAL # displays the serial number of the instrument.
- Page 68 5522A Operators Manual Actual revision numbers replace the numbers in each of the above. Format NV (non-volatile) Memory should be used with caution. Changes are non-reversible. The softkeys function only when the rear-panel CALIBRATION switch is set to ENABLE, except for the softkey SETUP, which is not dependent on the CALIBRATION switch position.
- Page 69 Features Softkey Menu Trees to O to K to I HOST selects the IEEE-488 (gpib) (factory default) parallel port or RS-232 (serial) port. You cannot operate both IEEE-488 and RS-232 simultaneously. STALL refers to the method of controlling data flow: software control (xon/off), hardware control (rts/cts) or none.
- Page 70 5522A Operators Manual to M REMOTE I/F (Interface) has selections term (terminal) (factory default) and comp (computer). EOL (End of Line character) is either Carriage Return/Line Feed (CRLF), CR (Carriage Return) or LF (Line Feed). to N to K EOF (End of File) indicates the action taken at the end of a file by entering one or two ASCII characters.
- Page 71 Features Softkey Menu Trees GPIB (General Purpose Interface Bus) selects the port address when using the IEEE-488 bus. The factory default is 4. to R to Q DISPLAY BRIGHTNESS and DISPLAY CONTRAST apply to both the Output Display and Control Display.
- Page 72 5522A Operators Manual to S1 to S2 to T to S3 gjh032.eps Figure 3-4. SETUP Softkey Menu Displays (cont.) 3-18...
- Page 73 Features Softkey Menu Trees to V to U The values set here become the new limits and can be changed only with new entries or returned to factory defaults using Format NV Memory SETUP (see menu F). SHOW SPECS is an online summary of the programmed output specifications. to Y to AC to AA...
- Page 74 5522A Operators Manual Select the desired CAL (Calibration) feature: CAL to calibrate the 5522A (see the Service Manual); CAL DATES to review when the 5522A Calibrator was last calibrated; CAL REPORTS to printout the calibration data. to Z to X to AB (Only if scope to AE...
- Page 75 Features Softkey Menu Trees to AF GO ON and ABORT softkeys are used in the 5522A Calibrator calibration procedure. See the Service Manual for more information. (Only if scope option installed) to AF to AG to AH to AJ gjh033.eps Figure 3-4.
- Page 76 5522A Operators Manual Table 3-3. Factory Defaults for SETUP Menus Power-Up Defaults SETUP Menu Parameter Setting (Figure 3-4.) User report string (*PUD Cleared. string) > 0.1% Error units SC-600 option overload test 10 s safety timeout Temperature standard its-90 Host interface gpib (IEEE-488) UUT serial interface 8 bits, 1 stop bit, xon/xoff, parity none,...
-
Page 77: Front Panel Operation
Chapter 4 Front Panel Operation Title Page Introduction......................4-3 How to Turn on the Calibrator................4-3 Warming up the Calibrator .................. 4-4 How to Use the Softkeys ..................4-4 How to Use the Setup Menu ................4-4 How to Use the Instrument Setup Menu ............4-5 Utility Functions Menu.................. - Page 78 How to Test Watts, VA, VAR Performance ..........4-60 How to Test Harmonics Volts Performance ..........4-62 How to Test Harmonics Amps Performance..........4-63 How to Calibrate a Fluke 51 Thermometer ............. 4-64 How to Test the Thermometer ..............4-64 How to Calibrate the Thermometer............. 4-65...
-
Page 79: Introduction
Introduction Warning The Calibrator is capable of supplying lethal voltages. To avoid shock hazard, do not make connections to the output terminals when any voltage is present. Placing the instrument in standby may not be enough to avoid shock hazard, since the O key could be pressed accidentally. -
Page 80: Warming Up The Calibrator
5522A Operators Manual nn062f.eps After self-test, the control display shows the reset condition (below). nn063f.eps For a discussion of the softkey selection shown above (auto/locked), see “Auto Range Versus Locked Range” later in this chapter. Warming up the Calibrator When you turn on the Calibrator, allow a warm-up period of at least 30 minutes for the internal components to stabilize. -
Page 81: How To Use The Instrument Setup Menu
Front Panel Operation How to Use the Setup Menu nn064f.eps This is the primary instrument setup menu. The list below describes submenus available through each softkey and tells you where you can find further information in the manuals. • CAL (Calibration) Opens the calibration menu. You use softkeys in this menu to view the calibration dates, print a calibration report, and perform calibration, and to run the Zero calibration routine. -
Page 82: Utility Functions Menu
5522A Operators Manual Utility Functions Menu The Setup Menu softkey labeled UTILITY FUNCTNS (Utility Functions) provides access to Self Test, Format Nonvolatile Memory, and Instrument Configuration. nn066f.eps • SELF TEST This softkey opens a menu with calibrator self-test choices. • FORMAT NV MEM (Format Nonvolatile Memory) Opens a menu to restore all or part of the data in the nonvolatile memory (EEPROM) to factory defaults. -
Page 83: How To Reset The Calibrator
Front Panel Operation How to Reset the Calibrator How to Reset the Calibrator At any time during front panel operation (not remote operation), you can return the Calibrator to the power-up state by pressing R, except after an error message, which is cleared by pressing a blue softkey. -
Page 84: Operate And Standby Modes
5522A Operators Manual Operate and Standby Modes When the OPERATE annunciator is lit and OPR is displayed, the output value and function shown on the Output Display is active at the selected terminals. When STBY is displayed in the Output Display, all calibrator outputs are open-circuited except for the front panel thermocouple (TC) terminals. -
Page 85: Recommended Cable And Connector Types
(thermal emfs), use connectors and conductors made of copper or materials that generate small thermal emfs when joined to copper. Avoid using nickel-plated connectors. Optimum results can be obtained by using Fluke Model 5440A-7002 Low Thermal EMF Test Leads, which are constructed of well-insulated copper wire and tellurium copper connectors. -
Page 86: External Guard
5522A Operators Manual sourced output, a softkey LOs appears, which allows you to tie or open an internal connection between the NORMAL LO terminal and AUX LO terminal. When tied and Z is on, then both LO terminals are tied to chassis ground. External Guard The guard is an electrical shield, isolated from the chassis, that protects the analog circuitry. - Page 87 Front Panel Operation How to Connect the Calibrator to a UUT When calibrating thermocouples, it is especially important to use the correct hookup wire and miniconnector between the Calibrator front panel TC terminal and the UUT. You must use thermocouple wire and miniconnectors that match the type of thermocouple. For example, if simulating a temperature output for a type K thermocouple, use type K thermocouple wire and type K miniplugs for the hookup.
- Page 88 5522A Operators Manual 5522A CALIBRATOR SENSE INPUT 4-WIRE SENSE SOURCE 5522A SOURCE SENSE gjh014.eps Figure 4-2. UUT Connection: Resistance (Four-Wire Compensation) TRUE RMS MULTIMETER 5522A CALIBRATOR MIN MAX RANGE HOLD PEAK MIN MAX mA A 5522A gjh015.eps Figure 4-3. UUT Connection: Resistance (Two-Wire Compensation) 4-12...
- Page 89 Front Panel Operation How to Connect the Calibrator to a UUT TRUE RMS MULTIMETER 5522A CALIBRATOR MIN MAX RANGE HOLD PEAK MIN MAX mA A 5522A gjh016.eps Figure 4-4. UUT Connection: Resistance (Compensation Off) 5522A CALIBRATOR TRUE RMS MULTIMETER MIN MAX RANGE HOLD PEAK MIN MAX...
- Page 90 5522A Operators Manual TRUE RMS MULTIMETER 5522A CALIBRATOR MIN MAX RANGE HOLD PEAK MIN MAX mA A gjh018.eps Figure 4-6. UUT Connection: Capacitance (Compensation Off) TRUE RMS MULTIMETER 5522A CALIBRATOR MIN MAX RANGE HOLD PEAK MIN MAX mA A gjh019.eps Figure 4-7.
- Page 91 Front Panel Operation How to Connect the Calibrator to a UUT TRUE RMS MULTIMETER 5522A CALIBRATOR MIN MAX RANGE HOLD PEAK MIN MAX mA A gjh020.eps Figure 4-8. UUT Connection: DC Current/AC Current CHART RECORDER INPUT 5522A CALIBRATOR gjh021.eps Figure 4-9. UUT Connection: Temperature (RTD) 4-15...
-
Page 92: Rms Versus P-P Amplitude
5522A Operators Manual 5522A CALIBRATOR K/J THERMOMETER ON/OFF HOLD OFFSET Connection wiring must match thermocouple type, e.g., K, J, etc. gjh022.eps Figure 4-10. UUT Connection: Temperature (Thermocouple) RMS Versus p-p Amplitude The Calibrator ranges for sinusoidal ac functions are specified in rms (root-mean-square; the effective value of the wave form). -
Page 93: Auto Range Versus Locked Range
Front Panel Operation Auto Range Versus Locked Range Auto Range Versus Locked Range A softkey is provided to toggle between the ranging method auto or locked. This feature is available only for single-output dc volts and dc current outputs. nn063f.eps When auto is selected (the default setting), the calibrator automatically selects the range that provides the best output resolution. -
Page 94: How To Set Dc Voltage Output
5522A Operators Manual How to Set DC Voltage Output Complete the following procedure to set a dc voltage output at the front panel NORMAL terminals. If you make an entry error, press Gto clear the display, then reenter the value. ... -
Page 95: How To Set Ac Voltage Output
Front Panel Operation How to Set Output nn063f.eps • Range (Operating Range) selects autorange (auto) or lock (locked) for the present range. When auto (the default setting) is selected, the calibrator automatically selects the range that provides the best output resolution. When locked is selected, the calibrator will not change ranges when you are editing the output. - Page 96 5522A Operators Manual nn227f.eps Note At voltage outputs of 100 V and above (nominal), you may notice a slight high-pitched sound. This is normal. 1. Press a multiplier key, if necessary. For example, press c. 2. Output in volts. Press V. Output in dBm.
- Page 97 Front Panel Operation How to Set Output nn075f.eps 6. Press O to activate the calibrator output. Several softkey labels appear on the Control Display in the ac voltage function, depending on which waveform is selected: DUTY, OFFSET and WAVE. nn076f.eps •...
-
Page 98: How To Set Dc Current Output
5522A Operators Manual How to Set DC Current Output Complete the following procedure to set a dc current output between AUX HI and LO or AUX 20A and LO, depending on the current level selected. Current greater than ±3 A is sourced between the AUX 20A and LO terminals. -
Page 99: How To Set Ac Current Output
Front Panel Operation How to Set Output How to Set AC Current Output Complete the following procedure to set an ac current output at the AUX or 20A terminals. If you make an entry error, press G to clear the display, then reenter the value. -
Page 100: How To Set Dc Power Output
5522A Operators Manual nn321f.eps • Φ & REF MENUS (Phase Difference and 10 MHz reference source.) Selects the phase difference between the NORMAL and AUX outputs, selects internal or external 10 MHz reference, and sets the phase difference between an external master 5522A (using 10 MHz IN/OUT) and the NORMAL output. - Page 101 Front Panel Operation How to Set Output Calibrator to a UUT” by adapting the voltage and current connections. 3. Set the UUT to measure dc power on the desired range. 4. Press the numeric keys and decimal point key to enter the desired voltage output (maximum seven numeric keys).
-
Page 102: How To Set Ac Power Output
5522A Operators Manual nn322f.eps • I OUT selects AUX or 20A terminals. Current outputs 3 A or above are always on the 20A terminals. • “LO”s ties or opens a connection between front panel NORMAL LO and AUX LO terminals. The front panel NORMAL LO and AUX LO terminals must be tied together either at the UUT or at the Calibrator. - Page 103 Front Panel Operation How to Set Output nn084f.eps 8. Press the numeric keys and decimal point key to enter the desired current output (maximum six numeric keys). For example, 234.567. 9. Press a multiplier key, if necessary. For example, press c. 10.
- Page 104 5522A Operators Manual nn088f.eps • WAVE MENUS (Waveform Menus) Opens submenus for selecting the type of harmonic, waveform, front panel LO terminal condition, and phase. • HARMONIC MENUS (Harmonic Frequency Menus) Opens submenus for selecting harmonic outputs. See “Setting Harmonics” later in this chapter. •...
-
Page 105: How To Set A Dual Dc Voltage Output
Front Panel Operation How to Set Output How to Set a Dual DC Voltage Output Note Tie the terminals NORMAL LO and AUX LO together at the UUT or at the Calibrator, via the “LO”s softkey selection “tied.” The calibrator produces a dual dc voltage output by sourcing one dc voltage on the NORMAL outputs and a second on the AUX terminals. -
Page 106: How To Set A Dual Ac Voltage Output
5522A Operators Manual 14. Press E. The calibrator clears your entry from the Control Display and copies it into the Output Display (below is typical). nn090f.eps 15. Press O to activate the calibrator output. A softkey labeled “LO”s appears on the Control Display. nn091f.eps •... - Page 107 Front Panel Operation How to Set Output 123.456 mV (below). nn084f.eps Note The AUX output is limited to 3.3 V rms for sine waves, 6.6 V p-p for square waves, 9.3 V p-p for triangle and truncated sine waves. 8. Press the numeric keys and decimal point key to enter the desired voltage output at the AUX terminals (maximum six numeric keys).
- Page 108 5522A Operators Manual nn095f.eps • V @ NOR (Voltage at NORMAL Terminals) V @ AUX (Voltage at AUX Terminals) This is an information-only softkey position and does not have an associated function. It shows the output function is dual ac voltage. •...
-
Page 109: How To Set Resistance Output
Front Panel Operation How to Set Output “Adjusting the Phase” and “Synchronizing the Calibrator using 10 MHz IN/OUT” later in this chapter. How to Set Resistance Output Complete the following procedure to set a synthesized resistance output at the Calibrator front panel NORMAL terminals. -
Page 110: How To Set Capacitance Output
5522A Operators Manual • OHMS ZERO Press to recalibrate internal circuitry for the ohms function (allow several minutes). • COMP (Compensation) Applies 4-wire compensation, 2-wire compensation or turns compensation off. Compensation is available for resistances up to (but not including) 110 kΩ. -
Page 111: How To Set Temperature Simulation (Thermocouple)
Front Panel Operation How to Set Output nn101f.eps • COMP (Compensation) Applies 2-wire compensation or turns compensation off. Compensation refers to methods of connecting the Calibrator to the UUT to cancel out test lead resistance (NOT capacitance). Compensation is available for capacitances of 110 nF and above. - Page 112 5522A Operators Manual nn102f.eps 7. Press E. The calibrator clears your entry from the Control Display and copies it into the Output Display (below is typical). nn103f.eps 8. Press O to activate the calibrator output. Four softkey labels appear on the Control Display.
- Page 113 Front Panel Operation How to Set Output nn104f.eps • Out@TC terminal (Output at the front panel TC terminals) Displays the actual dc voltage at the front panel TC terminals. This is a display only, not a softkey function. • TC MENUS (Thermocouple Menu) Shows submenus for thermocouple outputs. •...
-
Page 114: How To Set Temperature Simulation (Rtd)
5522A Operators Manual or NONE if the Calibrator is in Standby. When the Reference Source is External, the display shows the value you entered for external reference. • OUTPUT (Temperature Output Device) Selects the temperature device: thermocouple (tc) or resistance temperature detector (rtd). Select tc. •... -
Page 115: How To Measure Thermocouple Temperatures
Front Panel Operation How to Set Output nn103f.eps 8. Press O to activate the calibrator output. Four softkey labels appear on the Control Display. Press the OUTPUT softkey to toggle the rtd selection, displaying the rtd setup menu and four softkey positions. Note °... - Page 116 5522A Operators Manual 3. Press U to display the TC menus (below). nn106f.eps 4. The measured temperature appears in the Output Display (below is typical). (The lower-case m blinks on when a measurement is being taken.) nn107f.eps • Meas@TC terminal (Measurement at the front panel TC terminals) Displays the actual dc voltage at the front panel TC terminals.
-
Page 117: Waveform Types
Front Panel Operation Waveform Types outputs. • Open TCD (Open Thermocouple Detect) Selects on or off for the Open TCD feature. When Open TCD is on, a small electrical pulse checks for thermocouple continuity that, in most cases, will have no effect on the measurement. If you are measuring the thermocouple with the Calibrator in parallel with another temperature measuring device, select off for Open TCD. -
Page 118: Triangle Waves
5522A Operators Manual Peak RMS (70% Peak) Period nn026f.eps Figure 4-11. Sine Wave Triangle Waves When the wave selection is tri, the triangle wave is present on the calibrator outputs (Figure 4-12). The variables for the triangle wave are amplitude, frequency, and dc offset voltage. -
Page 119: Truncated Sine Wave
Front Panel Operation How to Set Harmonics Period Peak to Peak Decrease Duty Cycle Increase Duty Cycle nn028f.eps Figure 4-13. Square Wave and Duty Cycle Truncated Sine Wave When the wave selection is truncs, a truncated sine wave current or voltage signal is present on the calibrator outputs (Figure 4-14). -
Page 120: How To Adjust The Phase
5522A Operators Manual nn108f.eps 3. Press the softkey FUNDMTL to select the Calibrator front panel terminals for the fundamental output, either NORMAL or AUX. The harmonic appears on the AUX terminals. 4. Press the softkey HARMNIC to enter the desired harmonic (1 to 50), with a maximum frequency output of 10 kHz. -
Page 121: How To Adjust The Phase
Front Panel Operation How to Adjust the Phase gjh070.eps When one output is a harmonic of the other, the phase shift is based on the phase angle or power factor (cosine) of the harmonic signal. For example, when the AUX output is 4-45... -
Page 122: How To Enter A Phase Angle
5522A Operators Manual generating a 60-Hz signal, and the NORMAL output is generating a 120 Hz (2nd Harmonic) signal, a phase shift of 60° (PF of .5) would move the AUX signal 60° of 120 Hz (30° of 60 Hz). How to Enter a Phase Angle Complete the following procedure to enter a phase shift in degrees. -
Page 123: How To Enter A Dc Offset
Front Panel Operation How to Enter a DC Offset nn112f.eps 7. Press E. The calibrator clears your entry from the “New pf=” line and copies it to the “Power Factor =” line of the Control Display. 8. Press P one or more times to return to previous menus. How to Enter a DC Offset When the calibrator single output is an ac voltage of sine waves, triangle waves, square waves or truncated sine waves, you can apply a +dc offset. -
Page 124: Editing And Error Output Settings
5522A Operators Manual nn114f.eps 3. Press the E key to enter the offset and then P. Editing and Error Output Settings All Calibrator outputs can be edited using the front panel Edit Field knob and associated L, W, and e keys. In addition, multiply X and divide D keys edit the output by decades. -
Page 125: How To Display The Uut Error
The Calibrator has two methods of displaying the UUT error. The first method, called the “nominal” method is used in the Fluke 5700A, 5720A, 5500A, and 5520A calibrators. The second method is called “true value”. Both methods are used in this Calibrator. -
Page 126: How To Use Multiply And Divide
5522A Operators Manual 4. Press the softkey ERROR SETUP 5. Press the softkey ERR REF to toggle between “nominal” and “tru val”. How to Use Multiply and Divide The Calibrator output value (or reference value if you have edited the output) can be multiplied by a factor of 10 by pressing the X key. -
Page 127: How To Measure Pressure
The Calibrator can be used as a pressure calibrator when you use it with the following accessories: To measure pressure: • Fluke 700-Series Pressure Module • Model 700PCK Pressure Calibration Kit (necessary because it provides the interface module) To source pressure: •... -
Page 128: How To Synchronize The Calibrator Using 10 Mhz In/Out
NORMAL ENABLE INSTALLED OPTIONS CALIBRATION - SC600 - SC1100 - PQ SERIAL 2 TO UUT FLUKE CORPORATION EVERETT WA, USA SERIAL 1 NO INTERNAL USER SERVICEABLE FROM HOST PARTS. REFER SERVICE TO QUALIFIED SERVICE PERSONNEL IEEE-488 LR65268C (LEM CERTIFIED) CAUTION... -
Page 129: How To Source Ac Current And Parallel-Connected 5522As
Front Panel Operation How to Synchronize the Calibrator using 10 MHz IN/OUT Φ & REF SETUP. 4. Press the REF CLK softkey to select “ext.” 5. Press the P key. To use an external 10 MHz reference on a temporary (volatile) basis, proceed as follows: 1. -
Page 130: Three-Phase Power Calibration
5522A Operators Manual 5522A #1 10 MHz Load/Meter 5522A #2 10 MHz gjh023.eps Figure 4-16. Two Calibrators Sourcing Current in Parallel Three-Phase Power Calibration You can configure three Calibrators to calibrate a three-phase power meter. This example uses the assumption that you want to apply a perfectly balanced calibration output with a unity power factor. -
Page 131: Sample Applications
Calibrating a Fluke Model 51 Digital Thermometer How Calibrate an 80 Series Digital Multimeter This example goes through the steps necessary to calibrate a Fluke 80 Series DMM. Note These procedures are included here as an example. The 80 Series Service Manual contains the authoritative testing and calibration procedures for 80 Series DMMs. -
Page 132: Cables
Z or not. This decision-making process is covered next. Cables Fluke 5440A-7002 Low-Thermal Cables are recommended for many calibrations connections, but they are not specifically required for 80 Series calibration. Thermal emf errors that the Low-Thermal cables are designed to reduce are not significant when calibrating a 3-1/2 digit meter. - Page 133 Front Panel Operation Sample Applications 3. Test the dc voltage function as follows: a. Turn on the DMM and set its function switch to . b. Set the warmed up calibrator to 3.5 V dc. Press O. c. Use the output adjustment controls to adjust the calibrator output for a reading of +3.5000 on the DMM display.
- Page 134 5522A Operators Manual 7. Test the Ohms function as follows: a. Press R on the calibrator and set the DMM function switch to . b. Set the calibrator to 190.0 Ω with 2-wire compensation (see Figure 4-3). Press O.
- Page 135 Front Panel Operation Sample Applications AC Current Frequency 35.0 mA 1.0 kHz 350.0 mA 60 Hz 350.0 mA 1.0 kHz Press Y on the calibrator and switch the DMM function switch to w. Set the calibrator output to 350 μA at 0 Hz. and press O. Verify the error is within specification.
-
Page 136: How To Calibrate The Meter
5522A Operators Manual Set the calibrator output to 3.5 A at 60 Hz and press O. Verify the error is within specification. g. Repeat the previous step with the following calibrator settings: AC Current Frequency 3.5 A 1.0 kHz 10.0 mA 60 Hz 10.0 mA 1.0 kHz... - Page 137 Front Panel Operation Sample Applications Warning Ensure that the calibrator is in standby mode before making any connection between the calibrator and Tester. Dangerous voltages may be present on the leads and connectors. Table 4-3. Watts Performance, Text Screen Calibrator Outputs Performance Limits Normal...
-
Page 138: How To Test Harmonics Volts Performance
5522A Operators Manual 2. Verify that the EARTH indicator is lit; if not, press Z. 3. Set the calibrator output to 5.0 V at 60 Hz on the NORMAL output and 30 mV at 60 Hz on the AUX output. 4. -
Page 139: How To Test Harmonics Amps Performance
Front Panel Operation Sample Applications Table 4-4. Harmonics Performance for Volts, Harmonics Screen 5522A Fluke Performance Limits Normal Output Tester Harmonic Amplitude Harmonic Phase Amplitude Phase cursor (deg.) 7.00 7.00 7.00 7.00 7.00 7.00 11. Press Y to remove the voltage from the Tester. -
Page 140: How To Calibrate A Fluke 51 Thermometer
Operators Manual How to Calibrate a Fluke 51 Thermometer The Fluke 51 Thermometer measures temperature using a type J or K thermocouple. The calibrator simulates both thermocouples, simplifying testing and calibration. The following demonstrates how the calibrator is used to calibrate this thermometer. -
Page 141: How To Calibrate The Thermometer
When changing thermocouple types, be use to change the corresponding hiookup wire. For example, K-type thermocouple wire changes to J-type thermocouple wire. How to Calibrate the Thermometer The following procedure refers to the Fluke 51 as the Unit Under Test (UUT). Use copper hookup wire for all connections, except for steps 17 to 20. Caution... - Page 142 5522A Operators Manual 13. Allow the UUT reading to settle and then adjust the T1 offset adjustment (R7) for a display reading of 25.2 °C ±0.1 °C. 14. Change the calibrator output to 5380.7 °C. This places 53.807 mV on the tc terminals.
-
Page 143: Remote Operations
Chapter 5 Remote Operations Title Page Introduction......................5-3 How to Set up the IEEE-488 Port for Remote Control........5-5 IEEE-488 Port Setup Procedure ..............5-7 How to Test the IEEE-488 Port............... 5-7 How to Set up the RS-232 Host Port for Remote Control ........5-9 RS-232 Host Port Setup Procedure .............. - Page 144 5522A Operators Manual Terminators ....................5-32 Incoming Character Processing..............5-33 Response Message Syntax ................5-33 Checking 5522A Status ..................5-34 Serial Poll Status Byte (STB) ................5-35 Service Request (SRQ) Line ............... 5-37 Service Request Enable Register (SRE)............5-37 Programming the STB and SRE..............5-37 Event Status Register (ESR)................
-
Page 145: Introduction
(PC) equipped with one or more IEEE-488 ports. You can write your own computer programs for system operation using the command set, or you can purchase optional Fluke calibration software MET/CAL or 5500/CAL, and property management software MET/TRACK. Typical IEEE-488 configurations are shown in Figure 5-1. - Page 146 5522A Operators Manual IEEE-488 Port IEEE-488 Port 5522A Calibrator Controller System for a UUT without a remote port. 5522A Calibrator Controller System for a UUT with an IEEE-488 remote port. or to 5522A SERIAL 2 RS-232 COM Port TO UUT Port Port 5522A Calibrator...
-
Page 147: How To Set Up The Ieee-488 Port For Remote Control
Calibrator operates as a talker/listener. A PC equipped with an IEEE-488 interface, controls the the Calibrator. Compatible software for IEEE-488 operation may be purchased from Fluke, including METCAL and METRACK. Another software package, 5500/CAL, is also available but operates only on the RS-232 serial interface. - Page 148 5522A Operators Manual SERIAL 1 FROM HOST COM Port Port 5522A Calibrator Controller System for a UUT without a remote port. SERIAL 1 RS-232 FROM HOST COM Port COM Port Port Port 5522A Calibrator Controller System for a UUT with an RS-232 port (via PC). SERIAL 2 RS-232 COM Port...
-
Page 149: Ieee-488 Port Setup Procedure
Remote Operations How to Set up the IEEE-488 Port for Remote Control IEEE-488 Port Setup Procedure Complete the following procedure to set up the Calibrator for remote operations using the IEEE-488 remote control port. The purpose is to select GPIB as the interface and to select the GPIB address for the interface. - Page 150 Calibrator for GPIB operation. Note the GPIB Address Port (default is 4). 2. Connect the PC and Calibrator IEEE-488 ports using a standard IEEE-488 cable. (See Chapter 9, “Accessories,” for IEEE-488 cables available from Fluke.) 3. From the programs menu, select "NI-488.2M software for...(your operating system)".
-
Page 151: How To Set Up The Rs-232 Host Port For Remote Control
SERIAL 1 FROM HOST port (Figure 5-2). You can enter individual commands from a terminal, write your own programs using, for example, a Windows-based language such as Visual Basic, or run optional Windows-based Fluke software such as 5500/CAL or MET/CAL. - Page 152 5522A Operators Manual Select To Step 4 nn121f.eps 4. Negotiate the softkey selections shown below to select the HOST serial port parameters to match the PC COM parameters. (Individual softkey functions are discussed in Chapter 3, “Features.”) If operating the port with a computer program instead of individual commands from a terminal, select Remote I/F comp.
-
Page 153: How To Test The Rs-232 Host Port
Remote Operations How to Set up the RS-232 Host Port for Remote Control nn122f.eps 5. Press (not ) several times until the message STORE CHANGES/DISCARD CHANGES appears or, if there were no changes, the reset display. If you select STORE CHANGES, the serial and host port setting are saved in the instrument non-volatile memory. -
Page 154: How To Test Rs-232 Host Port Operation With A Terminal
5522A Operators Manual Null Modem Cable SERIAL 1 FROM HOST COM Port Port 5522A Calibrator Controller gjh044.eps Figure 5-4. Testing the RS-232 Host Port Terminal This procedure uses the Terminal accessory supplied with Windows (or equal) to test RS-232 Host port operation. To use this method, you must select term as the Remote I/F in Step 4 in the procedure “RS-232 Host Port Setup Procedure.”... - Page 155 Remote Operations How to Set up the RS-232 Host Port for Remote Control shown below. Select COM as required. Click OK. nn309f.bmp 6. Verify the Calibrator is powered and in the reset condition. (If in doubt, press on the Calibrator front panel.) 7.
-
Page 156: How To Test Rs-232 Host Port Operation With Visual Basic
5522A Operators Manual nn323f.eps If you want to experiment with other commands in the command set, see Chapter 6, “Remote Commands.” When finished, select the Exit command from the File menu to close the Terminal accessory. Hint: To save the communication parameters in Terminal for future operations, first select Save from the File menu and then assign a name, for example, host.trm. -
Page 157: How To Set Up The Rs-232 Uut Port For Remote Control
Remote Operations How to Set up the RS-232 UUT Port for Remote Control nn325f.eps 6. Click the Command2 button. Observe the Calibrator Control Display changes back to the reset condition (below). (The Command3 button is used for RS-232 UUT port testing later in this chapter.) nn323f.eps 7. -
Page 158: How To Test The Rs-232 Uut Port Via Rs-232 Host Port
5522A Operators Manual nn125f.eps How to Test the RS-232 UUT Port via RS-232 Host Port Choose or adapt one of the following test procedures to test the Calibrator RS-232 UUT port via the RS-232 Host port. Connect the UUT and PC as shown in Figure 5-5. Note the use of a modem cable (NOT null modem) for UUT connection. -
Page 159: How To Test Rs-232 Uut Port Operation Via A Terminal
Remote Operations How to Set up the RS-232 UUT Port for Remote Control Modem Cable Null Modem Cable SERIAL 2 RS-232 COM Port TO UUT Port Port 5522A Calibrator Controller gjh045.eps Figure 5-5. Testing the RS-232 UUT Port via RS-232 Host Port Terminal This procedure uses the Terminal accessory supplied with Windows (or equal) to test RS-232 UUT port operation. -
Page 160: How To Test Rs-232 Uut Port Operation With Visual Basic
5522A Operators Manual 5. When finished testing UUT commands, select the Exit command from the File menu to close the Terminal accessory. How to Test RS-232 UUT Port Operation with Visual Basic Complete the following procedure to test RS-232 UUT port operation via the RS-232 Host port using a Visual Basic test program. - Page 161 Remote Operations How to Set up the RS-232 UUT Port for Remote Control Modem Cable IEEE-488 Cable SERIAL 2 RS-232 TO UUT Port Port 5522A Calibrator Controller gjh046.eps Figure 5-6. Testing the RS-232 UUT Port via IEEE-488 Port Complete the following procedure to test RS-232 UUT port operation via the IEEE-488 port using the Win32 Interactive Control utility.
-
Page 162: How To Change Between Remote And Local Operation
5522A Operators Manual 9. The prompt reads <ud0:>. From this prompt, type <ibwrt "uut_sendb 82,69,77,83,11,13"> 10. Press the ENTER (or RETURN) key. This command will send REMS<CR><LF> to the UUT serial port. After the command is entered, the Win32 Interactive Control shows the status of the command. -
Page 163: Remote With Lockout State
Remote Operations RS-232 Interface Overview The left side of the Control Display shows information regarding the present output function. However, front panel operation is restricted to use of the power switch and the "Go To Local" softkeys. Pressing either of these softkeys, using RS-232 to send the command LOCAL, or IEEE-488 to send the GTL (Go To Local) message returns the Calibrator to the local state. -
Page 164: Ieee-488 Interface Overview
5522A Operators Manual Table 5-2. RS-232 Interface Wiring Mnemonic Description Clear to Send DB-9 Type DB connector, 9 pins DB-25 Type DB connector, 25 pins Data Carrier Detect Data Communications Equipment Data Set Ready Data Terminal Equipment Data Terminal Ready Ground Ring Indicator RLSD... -
Page 165: Ieee-488 Interface Overview
Remote Operations IEEE-488 Interface Overview IEEE-488.1 IEEE-488.1 is the hardware portion of the interface. The parallel signal lines are divided into eight lines for the data bus, three lines for the handshake, and five lines for bus management. The handshake lines take care of the timing for data exchange. The bus management lines control the operation of data exchange. - Page 166 5522A Operators Manual MESSAGE DATA HAND- DESCRIPTION SHAKE MANAGEMENT MESSAGE NAME Addressed Command Group M AC Attention U UC Data Byte M DD B8 B7 B6 B5 B4 B3 B2 B1 Data Accepted U HS Data Valid U HS Device Clear M UC U ST End Of String...
-
Page 167: How To Use Commands
Remote Operations How to Use Commands How to Use Commands Communications between the controller and the Calibrator consists of commands, queries, and interface messages. Although the commands are based on the 488.2 standard, they can be used on either the IEEE-488 or RS-232 interface, except for a few specialized RS-232 commands described in “Commands for RS-232 Only.”... -
Page 168: Interface Messages (Ieee-488)
5522A Operators Manual Interface Messages (IEEE-488) Interface messages manage traffic on the IEEE-488 interface bus. Device addressing and clearing, data handshaking, and commands to place status bytes on the bus are all directed by interface messages. Some of the interface messages occur as state transitions of dedicated control lines. -
Page 169: Compound Commands
Remote Operations How to Use Commands Table 5-4. IEEE-488 Interface Messages (Received) (cont.) Mnemonic Name Function My Talk Address Addresses a specific device on the bus as a talker. The controller sends MTA automatically whenever it directs a device-dependent or common query to a specific instrument. -
Page 170: Coupled Commands
5522A Operators Manual where the Calibrator sources 1 V ac at 60 Hz, and then goes into operate, or they could be combined into a compound command, OUT 1 V, 60 HZ ; OPER using a semi-colon as a separator. Care must be taken when a compound command includes any of the coupled commands. -
Page 171: Sequential Commands
Remote Operations How to Use Commands You can also use the status commands *OPC and *OPC? to detect completion of overlapped commands. (See “Checking 5522A Status.”) Sequential Commands Commands that execute immediately are called sequential commands. In Chapter 6, the command shows a checkbox for sequential commands. The majority of the commands are sequential. -
Page 172: Commands For Ieee-488 Only
5522A Operators Manual Commands for IEEE-488 Only The IEEE-488 checkbox indicates commands that are used for the IEEE-488 interface. This is all the commands, except for those used for RS-232 operations. (See “Commands for RS-232 Only.”) All commands are transferred over the IEEE-488 as data, except for the commands LOCAL, REMOTE, and LOCKOUT, which are implemented per IEEE Standards as messages (see Table 5-7). - Page 173 Remote Operations How to Use Commands Table 5-8. Units Accepted in Parameters and Used in Responses (cont.) Units Meaning Resistance in units of ohms KOHM Resistance in units of kilohms MOHM Resistance in units of megohms Capacitance in units of nanofarads Capacitance in units of picofarads Capacitance in units of microfarads Capacitance in units of millifarads...
-
Page 174: Extra Space Or Tab Characters
5522A Operators Manual Indefinite Length The Indefinite Length format accepts data bytes after the #0 until the ASCII Line Feed character is received with an EOI signal (for RS-232 just a line feed or carriage return will terminate the block). Definite Length The Definite Length format specifies the number of data bytes. -
Page 175: Incoming Character Processing
Remote Operations How to Use Commands Incoming Character Processing The Calibrator processes all incoming data as follows (except Binary Block Data as described under Parameter Syntax Rules): 1. The most significant data bit (DIO8) is ignored. 2. All data is taken as 7-bit ASCII. 3. -
Page 176: Checking 5522A Status
5522A Operators Manual Table 5-10. Response Data Types (cont.) Data Type Description A special data type defined by the IEEE-488.2 standard. This type is Binary Block Data used in *PUD? query. It is defined as follows: #(non-zero digit) (digits) (user data) The non-zero digit specifies the number of characters that will follow in the <digits>... -
Page 177: Serial Poll Status Byte (Stb)
Remote Operations Checking 5522A Status Serial Poll Status Byte (STB) The Calibrator sends the serial poll status byte (STB) when it responds to a serial poll. This byte is cleared (set to 0) when the power is turned on. The STB byte is defined as shown in Figure 5-9. -
Page 178: Instrument Status Change Registers
5522A Operators Manual Instrument Status 8 7 6 5 4 3 2 1 0 Change Enable Registers & & Write using & ISCE0 (1 to 0 transition) & ISCE1 (0 to 1 transition) & ISCE (1 to 0 AND 0 to 1) &... -
Page 179: Service Request (Srq) Line
Remote Operations Checking 5522A Status ISCB Requesting service. The RQS bit is set to 1 whenever bits ESB, MAV, EAV, or ISCB change from 0 to 1 and are enabled (1) in the SRE. When RQS is 1, the 5522A asserts the SRQ control line on the IEEE-488 interface. -
Page 180: Event Status Register (Esr)
5522A Operators Manual INPUT @6, A% ! RETRIEVE THE REGISTER CONTENTS PRINT “SRE = “;A% RETURN The following BASIC program generates an error and checks the Serial Poll Status Byte. Enable the EAV bit with the example above. ! THIS PROGRAM GENERATES AN ERROR AND CHECKS IT PRINT @6, “OUT 1300V”... -
Page 181: Programming The Esr And Ese
Remote Operations Checking 5522A Status Power on. This bit is set to 1 if line power has been turned off and on since the last time the ESR was read. Command error. The 5522A’s IEEE-488 interface encountered an incorrectly formed command. -
Page 182: Instrument Status Register (Isr)
5522A Operators Manual By setting the bits in the ESE, you can mask (disable) the associated bits in the ESR. For example, to prevent the occurrence of a command error from causing bit 5 (ESB) in the serial poll status byte to go to 1, you can reset (to 0) bit 5 in the ESE register. The following sample program accomplishes this by checking the status of the CME bit, then toggling it if it is 1. -
Page 183: Programming The Isr, Iscr, And Isce
Remote Operations Checking 5522A Status RPTBUSY SETTLED REMOTE UUTBFUL UUTDATA HIVOLT MAGCHG TMPCAL OPER RPTBUSY Set to 1 when a calibration report is being printed to the serial port. SETTLED Set to 1 when the output has stabilized to within speclfication or the TC measurement has settled and is available. -
Page 184: Output Queue
5522A Operators Manual 100 PRINT “ISCR0 = “;B% ! DISPLAY ISCR0 110 PRINT “ISCE0 = “;C% ! DISPLAY ISCE0 100 PRINT “ISCR1 = “;D% ! DISPLAY ISCR1 110 PRINT “ISCE1 = “;E% ! DISPLAY ISCE1 120 END Convert the returned variables into binary, and you can read the status of the instrument. For example if a register contains 128, its binary equivalent is: 00000000 10000000. -
Page 185: Writing An Srq And Error Handler
Remote Operations Remote Program Examples be placed in standby and the output may be changed to accommodate the new external connection. The setting may be set even if the present output does not use the setting (for example, setting the current post while sourcing voltage). •... -
Page 186: Verifying A Meter In The Ieee-488 Bus
Fluke 45 to take a reading. It displays Calibrator output, the Fluke 45 reading, and the meter error in ppm. The program assumes that the Calibrator uses the IEEE-488 interface with bus address is 4 and the Fluke 45 is on the Calibrator SERIAL 2 TO UUT port. -
Page 187: Taking A Thermocouple Measurement
Remote Operations Remote Program Examples in the output buffer. You should always follow an command with a read command. *OPC? The read command causes program execution to pause until the addressed instrument responds. The following sample program shows how you can use *OPC?. 10 PRINT @4, “OUT 100V,1KHZ;OPER;... -
Page 188: Using The Rs-232 Uut Port To Control An Instrument
5522A Operators Manual 250 INPUT @6, M,U$ 260 GOTO 200 Using the RS-232 UUT Port to Control an Instrument The SERIAL 2 TO UUT RS-232 port is used to pass commands on to another instrument. For example, a meter that is being calibrated can have its RS-232 port connected the Calibrator SERIAL 2 TO UUT serial port. -
Page 189: Remote Commands
Chapter 6 Remote Commands Title Page Introduction......................6-3 Command Summary by Function ................ 6-3 Commands ......................6-10... - Page 190 5522A Operators Manual...
-
Page 191: Introduction
Introduction This chapter documents the IEEE-488/RS-232 remote commands for the Calibrator (hereafter referred to as “the Calibrator”). Remote commands duplicate activities that can be initiated from the front panel in local operation. Following the summary table is a complete alphabetical listing of all commands complete with protocol details. Separate headings in the alphabetical listing provide the parameters and responses, plus an example for each command. - Page 192 5522A Operators Manual Table 6-2. Error Mode Commands Command Description Sets the edit field. PRI is specified for the output value in single output functions and the EDIT primary output value in dual output functions. EDIT? Returns the edit field setting. ERR_REF Selects the error reference source.
- Page 193 Remote Commands Command Summary by Function Table 6-3. External Connection Command (cont.) Command Description RTD_TYPE? Returns the Resistance Temperature Detector (RTD) type. Sets whether the internal temperature sensor or an external reference value is used for TC_REF Thermocouple (TC) outputs and measurements. Returns the source and value of the temperature being used as a reference for TC_REF? thermocouple simulation and measurement.
- Page 194 5522A Operators Manual Table 6-4. Oscilloscope Commands (cont.) Commands Description VIDEOMARK? Returns the VIDEO mode line marker location. Zeros the pressure module or sets the zero offset for capacitance measurement using ZERO_MEAS the -SC600. Returns the zero offset for the pressure module or capacitance measurement using the - ZERO_MEAS? SC600.
- Page 195 Remote Commands Command Summary by Function Table 6-5. Output Commands (cont.) Command Description REFCLOCK Sets the reference clock source (internal or through the 10 MHz IN BNC connector). REFCLOCK? Returns the reference clock source (internal or through the 10 MHz IN BNC connector). If two Calibrators are synchronized using 10 MHz IN/OUT, sets the phase difference REFPHASE between the NORMAL terminals on the slave Calibrator and the NORMAL terminals of...
- Page 196 5522A Operators Manual Table 6-7. RS-232 Host Port Commands (cont.) Command Description SPLSTR? Returns the string programmed for serial remote mode Serial Poll responses. SRQSTR Sets the serial remote mode SRQ (Service Request) response (up to 40 characters). SRQSTR? Returns the string programmed for Serial Mode SRQ response. UUT_RECVB? Returns binary data from the UUT serial port as integers.
- Page 197 Remote Commands Command Summary by Function Table 6-9. Setup and Utility Commands (cont.) Command Description Returns the power-up and reset default for the reference clock source (internal or REFCLOCK_D? through the 10 MHz IN BNC connector). If two Calibrators are synchronized using 10 MHz IN/OUT, sets the power-up and reset REFPHASE_D default phase difference between the NORMAL terminals on the slave Calibrator and the NORMAL terminals of the master Calibrator.
-
Page 198: Commands
5522A Operators Manual Table 6-10. Status Commands (cont.) Command Description ISCE0? Returns the contents of the Instrument Status 1 to 0 Change Enable register. ISCE1 Loads two bytes into the Instrument Status 0 to 1 Change Enable register. ISCE1? Returns the contents of the Instrument Status 0 to 1 Change Enable register. Returns the OR of the contents of the Instrument Status 1 to 0 Change Register and the ISCR? Instrument Status 0 to 1 Change Register and clears both registers. - Page 199 Remote Commands Commands Coupled Commands These are called coupled commands Coupled (examples: CUR_POST and OUT) because they “couple” in a compound command sequence. Care must be taken to be sure the action of one command does not disable the action of a second command and thereby cause a fault. For more information, see “Coupled Commands”...
- Page 200 5522A Operators Manual IEEE-488 RS-232 Sequential Overlapped Coupled CUR_POST (Current Post command) Selects the binding posts for current output. This also applies to power outputs. The current post setting is retained until the power is turned off or the R button is pressed. Parameters: AUX (selects the AUX terminals) (selects the 20A terminals)
- Page 201 Remote Commands Commands (900 ohms) Z900 (1000 ohms = dBv) Z1000 (1200 ohms) Z1200 Example: DBMZ Z600 IEEE-488 RS-232 Sequential Overlapped Coupled DBMZ? (dBm Impedance query) Returns the impedance used for dBm outputs (ac volts). Response: (character) Impedance keyword Example: DBMZ? returns Z600 IEEE-488 RS-232...
- Page 202 5522A Operators Manual Response: <value> signed offset amplitude Example: returns +1.44E-03 DC_OFFSET? Returns 1.44 mV as the value of the applied dc offset. If +0.00000E+00 is returned, the dc offset is zero. IEEE-488 RS-232 Sequential Overlapped Coupled (Displacement Power Factor command) Sets the displacement power factor (phase angle) between the Calibrator front panel terminals NORMAL and AUX (for sine waves output only).
- Page 203 Remote Commands Commands IEEE-488 RS-232 Sequential Overlapped Coupled EARTH (Earth Ground command) Selects whether or not the Calibrator front panel NORMAL LO terminal is tied to chassis (earth) ground. Once set, the Calibrator retains the earth setting until power off or reset. Parameters: OPEN (disconnect front panel LO terminal from chassis ground) TIED (connect front panel LO terminal to chassis ground) Example:...
- Page 204 5522A Operators Manual IEEE-488 RS-232 Sequential Overlapped Coupled ERR? (Error query) Returns the first error code contained in the Calibrator error queue, then removes that error code from the queue. Following the error code is an explanation of the error code, similar to but sometimes containing more specific information than the EXPLAIN? command.
- Page 205 Remote Commands Commands Parameter: <value> (decimal equivalent of the ESE byte, 0 to 255) Example: *ESE 140 Load decimal 140 (binary 10001100) to enable bits 7 (PON), 3 (DDE) and 2 (QYE). IEEE-488 RS-232 Sequential Overlapped Coupled *ESE? (Event Status Enable query) Returns the contents of the Event Status Enable (ESE) register.
- Page 206 5522A Operators Manual IEEE-488 RS-232 Sequential Overlapped Coupled EXTGUARD? (External guard query) Returns whether the internal guard shields are connected or disconnected from earth (chasis) ground. Response: (character) ON (external guard is on, i.e., external) (character) OFF (external guard is off, i.e., internal) Example: EXTGUARD? returns ON IEEE-488...
- Page 207 Remote Commands Commands Features Temperature its-90 Display Contrast* level 7,7 Standard Host Connection gpib (IEEE-488) Display Brightness* level 1,0 GPIB Port Address RTD Power Up pt385 Default Type Serial Ports 8 bits, 1 stop bit, xon/xoff, Thermocouple parity none, 9600 baud Power Up Default Type EOL (end of line)
- Page 208 2. Model number 3. Serial number 4. Firmware revision levels for the Main CPU+Front Panel CPU+Inguard Example: *IDN? returns FLUKE,5522A,5248000,1.0+1.3+1.8 Returns Fluke manufacturer, model 5522A, serial number 5248000, main firmware version 1.0, encoder firmware 1.3, and inguard PGA 1.8. IEEE-488 RS-232 Sequential...
- Page 209 Remote Commands Commands Load the error mode and increment the selected edit field by .00001 mV. IEEE-488 RS-232 Sequential Overlapped Coupled ISCE (Instrument Status Change Enable command) Loads two bytes into the two 16-bit ISCE mask registers (ISCE1 and ISCE0). (See “Instrument Status Change Enable Registers” in Chapter 5 for more information.) Parameter: <value>...
- Page 210 5522A Operators Manual Example: ISCE1 6272 Load decimal 6272 (binary 0001010001000000) to enable bits 12 (SETTLED), 10 (REMOTE) and 6 (HIVOLT). IEEE-488 RS-232 Sequential Overlapped Coupled ISCE1? (Instrument Status 0 to 1 Change Enable query) Returns the two bytes from the 16-bit ISCE1 register.
- Page 211 Remote Commands Commands Returns decimal 6272 (binary 0001010001000000) if bits 12 (SETTLED), 10 (REMOTE), and 6 (HIVOLT) are set to 1. IEEE-488 RS-232 Sequential Overlapped Coupled LCOMP (Inductive compensation command) Activates or deactivates inductive load compensation for ac current output. For current output, compensation is allowed when the frequency is less than 440 Hz and the amplitude is less than 0.33 A.
- Page 212 5522A Operators Manual Returns the present value of the voltage and current limits (reset values shown). IEEE-488 RS-232 Sequential Overlapped Coupled LOCAL (Local command) Puts the Calibrator into the local state, clearing the remote state (see the REMOTE command) and front panel lockout (see the LOCKOUT command). This command duplicates the IEEE-488 GTL (Go To Local) message.
- Page 213 Remote Commands Commands IEEE-488 RS-232 Sequential Overlapped Coupled MULT (Multiply command) Multiplies the reference magnitude (as selected with the EDIT command or default to the primary output). The reference magnitude is the present reference in either direct mode or in error mode. Parameter: <value>...
- Page 214 5522A Operators Manual IEEE-488 RS-232 Sequential Overlapped Coupled *OPC? (Operations Complete query) Returns a 1 after all pending operations are complete. This command causes program execution to pause until operations are complete. (See *WAI.) Response: (all operations are complete) Example: *OPC? returns 1 Returns 1 when all pending operations are complete.
- Page 215 Remote Commands Commands If you change the frequency of an ac function and the harmonic output is not explicitly set at the same time with the HARMONIC command, the harmonic will be set to 1. Use multipliers e.g., k, M, μ with the OUT command, as desired. Parameters: <value>...
- Page 216 5522A Operators Manual <fundamental frequency value> Examples: OUT? returns -1.520000E+01,V,0E+00,0,0.00E+00 OUT? returns 1.88300E-01,A,0E+00,0,4.420E+02 OUT? returns 1.23000E+00,V,2.34000E+00,V,6.000E+01 OUT? returns 1.92400E+06,OHM,0E+00,0,0.00E+00 OUT? returns 1.52000E+01,V,1.88300E-01,A,4.420E+02 OUT? DBM returns 2.586E+01,DBM,0E+00,A,4.420E+02 OUT? returns 1.0430E+02,CEL,0E+00,0,0.00E+00 OUT? FAR returns 2.19740000E+02,FAR,0E+00,0,0.00E+00 OUT? V returns 4.2740E-03,V,0E+00,0,0.00E+00 OUT? OHM returns 1.40135E+02,OHM,0E+00,0,0.00E+00 The respective values for the above examples are: –15.2 V 188.3 mA, 442 Hz...
- Page 217 (Pressure Module query) Queries the attached pressure module for its model and serial number. Responses: (Indefinite ASCII) A message containing four fields separated by commas as follows: 1. Manufacturer 2. Model number 3. Serial number 4. Firmware revision (0) Example: FLUKE,700P05,9467502,0 6-29...
- Page 218 5522A Operators Manual IEEE-488 RS-232 Sequential Overlapped Coupled PRES_MEAS (Pressure Measurement mode command) Changes the operating mode to pressure measurement. Parameter: (Optional) Pressure units Example: PRES_MEAS PSI Displays the previously selected units if no parameter is supplied. IEEE-488 RS-232 Sequential Overlapped Coupled PRES_UNIT...
- Page 219 Remote Commands Commands (meters of water) MH2O (bar) (Pascal) (grams per centimeter squared) G/CM2 (Inches of water @ 60 degrees Farhenheit) INH2O60F Example: PRES_UNIT_D PSI The pressure unit is set to the default at power on and reset. PRES_UNIT_D? IEEE-488 RS-232 Sequential Overlapped...
- Page 220 5522A Operators Manual IEEE-488 RS-232 Sequential Overlapped Coupled *PUD? (Protected User Data query) Returns the contents of the *PUD (Protected User Data) memory in definite length format. Response: #2nn<nn characters> Example: *PUD? returns #216CAL LAB NUMBER 1 Returns #2 then 16 then 16 characters of text (including spaces) stored in the nonvolatile memory.
- Page 221 Remote Commands Commands Example: RANGELCK? returns OFF Returns OFF when the range for dc volts or dc current is not locked (autoranging enabled). IEEE-488 RS-232 Sequential Overlapped Coupled REFCLOCK (Reference Clock command) Sets the reference clock source (internal or through the 10 MHz IN BNC connector).
- Page 222 5522A Operators Manual Returns 0 when the output is not being edited. Example: REFOUT? returns 2.500000E-01 Returns .250 when the output is being edited and the reference is, for example, 250 mV. IEEE-488 RS-232 Sequential Overlapped Coupled REFPHASE (Reference Phase command) If two Calibrators are synchronized using 10 MHz IN/OUT, sets the phase difference between the primary channel on the Calibrator relative to the sync pulse on the 10 MHz IN or OUT terminal.
- Page 223 Remote Commands Commands IEEE-488 RS-232 Sequential Overlapped Coupled REMOTE (Remote command) Places the Calibrator into the remote state. This command duplicates the IEEE-488 REN (Remote Enable) message. When in the remote state, the Control Display shows the softkey “REMOTE CONTROL Go to Local.” Pressing this softkey returns the Calibrator to local operation If the front panel is locked out, the Control Display shows the softkey “REMOTE CONTROL LOCAL LOCK OUT.”...
- Page 224 5522A Operators Manual Command Value Command Value OUT_IMP TSENS_TYPE PHASE 0DEG WAVE NONE,NONE PRES_UNIT <PRES_UNIT_D value> ZCOMP RANGELCK ZERO_MEAS Changes made to the setup menus that are not saved in memory are discarded on reset. Response: (None) Example: *RST Place the Calibrator in a reset condition, evoking the commands and values shown above. IEEE-488 RS-232 Sequential...
- Page 225 Remote Commands Commands Returns PT3926 when a 100-ohm RTD with curve α=0.003926 ohms/ohm/°C is set as the RTD type. IEEE-488 RS-232 Sequential Overlapped Coupled RTD_TYPE_D (Resistance Temperature Detector Type Default command) Sets the default Resistance Temperature Detector (RTD) at power on and reset, which is saved in the Calibrator non- volatile memory.
- Page 226 5522A Operators Manual <interface>, TERM (terminal), COMP (computer) <flow control>, XON (xon/xoff), NOSTALL (none), RTS (rts/cts) <number data bits>, DBIT7 (7 bits) or DBIT8 (8 bits) <number stop bits>, SBIT1 (1 bit) or SBIT2 (2 bits) <parity>, PNONE (none), PODD (odd),PEVEN (even) <end of line char.>...
- Page 227 Remote Commands Commands Example: SPLSTR “SPL: %02x %02x %04x %04x\n” Set the SPLSTR to the default values SPL: %02x %02x %04x %04x\n. IEEE-488 RS-232 Sequential Overlapped Coupled SPLSTR? (Serial Poll Response String query) Returns the string programmed for Serial Poll response.
- Page 228 5522A Operators Manual IEEE-488 RS-232 Sequential Overlapped Coupled SRQSTR? (Service Request String query) Returns the string programmed for Serial Mode SRQ response. This is the format of the Service Request String; actual values come from the registers. Also see the SPLSTR command. Response: <string>...
- Page 229 Remote Commands Commands Add a temperature offset of +10 °C to the thermocouple measurements. IEEE-488 RS-232 Sequential Overlapped Coupled TC_OFFSET? (Thermocouple Temperature Measurement Offset query) Returns the temperature offset used for thermocouple measurements (±500 °C). Responses: <value> CEL (offset in Celsius) (optional) <value>...
- Page 230 5522A Operators Manual If INT is returned, the reference temperature return is 0 unless you are in a thermocouple mode of operation and the Calibrator is in Operate. Responses: INT, <value of reference temperature>,CEL (or FAR) EXT, <value of reference temperature>,CEL (or FAR) Example: TC_REF? returns INT,2.988E+01,CEL Returns Internal, 29.88, Celsius, when the thermocouple reference is internal and at...
- Page 231 Remote Commands Commands Returns K when the thermocouple type for simulating a temperature output is a K-type thermocouple. IEEE-488 RS-232 Sequential Overlapped Coupled TC_TYPE_D (Thermocouple Type Default command) Sets the default thermocouple (TC) sensor type, which is saved in the Calibrator non-volatile memory. (While saving configuration data in the non-volatile memory, a period of about 2 seconds, the Calibrator does not respond to remote commands.) The TC type is set to the default at power on and reset.
- Page 232 5522A Operators Manual Example: TEMP_STD ITS_90 See the temperature standard to ITS-90. IEEE-488 RS-232 Sequential Overlapped Coupled TEMP_STD? (Temperature Degree Standard command) Returns the temperature standard ipts-68 (1968 International Provisional Temperature Standard) or its-90 (1990 International Temperature Standard). Parameters: IPTS_68 ITS_90 Example: TEMP_STD? returns ITS_90...
- Page 233 Remote Commands Commands (Resistance Temperature Detector) Example: TSENS_TYPE? returns TC Returns TC when the temperature sensor type is a thermocouple. IEEE-488 RS-232 Sequential Overlapped Coupled *TST? (Self Test command) Initiates self-test and returns a 0 for pass or a 1 for fail. If any faults are detected, they are displayed on screen (terminal mode) or are logged into the fault queue where they can be read by the ERR? query (computer mode).
- Page 234 5522A Operators Manual Example: UUT_RECV? returns #211+1.99975E+0 Returns (for example) a measurement from the UUT. The format is #2 (two numbers follow) 11 (characters follow) +1.99975E+0 (11 characters). IEEE-488 RS-232 Sequential Overlapped Coupled UUT_RECVB? (UUT Receive Binary Data query) Returns binary data as integers from the UUT serial port.
- Page 235 Remote Commands Commands Character String Follow the instructions above and after the character string, add a \n for CR or \r for LF or both, where the alpha character is entered in lower case. For example, in the terminal mode to send the string REMS in this format with both CR and LF, the command would be UUT_SEND “REMS\n\r”.
- Page 236 5522A Operators Manual shown below in bold type. (To return to the factory defaults, see the FORMAT SETUP command.) Responses: <baud rate value>, 300, 600, 1200, 2400, 4800, 9600 <flow control>, XON (xon/xoff), NOSTALL (none), RTS (rts/cts) <number data bits>, DBIT7 (7 bits) or DBIT8 (8 bits) <number stop bits>, SBIT1 (1 bit) or SBIT2 (2 bits) <parity>...
- Page 237 Remote Commands Commands IEEE-488 RS-232 Sequential Overlapped Coupled WAVE (Waveform command) Sets the waveforms for ac outputs. If the Calibrator is sourcing one output, one parameter is required. If the Calibrator is sourcing two outputs, two parameters are required or one parameter to set the waveform to both outputs. Waveform choices are SINE (sine wave), TRI (triangle wave), SQUARE (square wave), TRUNCS (truncated sine wave), or NONE (waveform does not apply).
- Page 238 5522A Operators Manual Example: ZCOMP? returns NONE Returns NONE when no impedance compensation is applied to the resistance, capacitance or RTD output. IEEE-488 RS-232 Sequential Overlapped Coupled ZERO_MEAS (Zero Offset for Pressure Measurement command) Zeros the pressure module or sets the zero offset for capacitance measurement using the -SC600.
-
Page 239: Maintenance
Chapter 7 Maintenance Title Page Introduction......................7-3 How to Replace the Line Fuse ................7-3 How to Replace the Current Fuses............... 7-4 How to Clean the Air Filter ................. 7-5 General Cleaning ....................7-6 Performance Tests....................7-7... - Page 240 5522A Operators Manual...
-
Page 241: Introduction
Introduction This chapter explains how to perform the routine maintenance and calibration task required to keep a normally operating 5522A Calibrator in service. These tasks include: • Replacing the fuse • Cleaning the air filter • Cleaning the external surfaces •... -
Page 242: How To Replace The Current Fuses
5522A Operators Manual Table 7-1. Replacement Line Fuses Part Number Fuse Description Line Voltage Setting 109215 5A/250 V Time Delay 100 V or 120 V 851931 2.5A/250 V Time Delay 200 V or 240 V Line Voltage Indicator Changing Line Fuse Changing Line Voltage... -
Page 243: How To Clean The Air Filter
Maintenance How to Clean the Air Filter 4 A/500 V Ultra Fast (3 A Output) 25 A/250 V Fast (20 A Output) gjh068.eps Figure 7-2. Current Fuse Replacement 3. Lift off the fuse door. 4. Remove the fuse and replace it with a new fuse of the same rating. Table 7-2. -
Page 244: General Cleaning
5522A Operators Manual c. Shake out the excess water, then allow the filter element to dry thoroughly before reinstalling it. 4. Reinstall the filter element by performing the filter removal steps in reverse order. oq062f.eps Figure 7-3. Accessing the Air Filter General Cleaning For general cleaning, wipe the case, front panel keys, and lens using a soft cloth slightly dampened with water or a non-abrasive mild cleaning solution that does not harm... -
Page 245: Performance Tests
Maintenance Performance Tests Performance Tests To verify that the 5522A meets its specifications, you can use Tables 7-3 through 7-15. The tables are for qualified metrology personnel who have access to a standards laboratory that is properly equipped to test calibration equipment of this level of accuracy. - Page 246 5522A Operators Manual Table 7-4. Verification Tests for DC Voltage (AUX) Range Output Lower Limit Upper Limit 329.999 mV 0.000 mV -0.350 mV 0.350 mV 329.999 mV 329.000 mV 328.551 mV 329.449 mV 329.999 mV -329.000 mV -329.449 mV -328.551 mV 3.29999 V 0.33000 V 0.32955 V...
- Page 247 Maintenance Performance Tests Table 7-5. Verification Tests for DC Current (AUX) (cont.) Range Output Lower Limit Upper Limit 2.99999 A 1.09000 A 1.08979 A 1.09021 A 2.99999 A -1.09000 A -1.09021 A -1.08979 A 2.99999 A 2.99000 A 2.98906 A 2.99094 A 2.99999 A -2.99000 A...
- Page 248 5522A Operators Manual Table 7-6. Verification Tests for Resistance (cont.) Range Output Lower Limit Upper Limit 109.9999 kΩ 33.0000 kΩ 32.9991 kΩ 33.0009 kΩ 109.9999 kΩ 109.0000 kΩ 108.9974 kΩ 109.0026 kΩ 329.9999 kΩ 119.0000 kΩ 118.9950 kΩ 119.0050 kΩ 329.9999 kΩ...
- Page 249 Maintenance Performance Tests Table 7-7. Verification Tests for AC Voltage (Normal) (cont.) Range Output Frequency Lower Limit Upper Limit 32.999 mV 30.000 mV 50 kHz 29.970 mV 30.030 mV 32.999 mV 30.000 mV 100 kHz 29.898 mV 30.102 mV 32.999 mV 30.000 mV 450 kHz 29.770 mV...
- Page 250 5522A Operators Manual Table 7-7. Verification Tests for AC Voltage (Normal) (cont.) Range Output Frequency Lower Limit Upper Limit 32.9999 V 30.0000 V 20 kHz 29.9928 V 30.0072 V 32.9999 V 30.0000 V 50 kHz 29.9904 V 30.0096 V 32.9999 V 30.0000 V 90 kHz 29.9759 V...
- Page 251 Maintenance Performance Tests Table 7-8. Verification Tests for AC Voltage (AUX) (cont.) Range Output, AUX Frequency Lower Limit Upper Limit 329.999 mV 300.000 mV 30 kHz 287.100 mV 312.900 mV 3.29999 V 3.00000 V 9.5 Hz 2.825 V 3.175 V 3.29999 V 3.00000 V 10 Hz...
- Page 252 5522A Operators Manual Table 7-9. Verification Tests for AC Current (cont.) Range Output Frequency Lower Limit Upper Limit 3.2999 mA 1.9000 mA 1 kHz 1.8983 mA 1.9017 mA 3.2999 mA 1.9000 mA 10 kHz 1.8921 mA 1.9079 mA 3.2999 mA 1.9000 mA 30 kHz 1.8842 mA...
- Page 253 Maintenance Performance Tests Table 7-9. Verification Tests for AC Current (cont.) Range Output Frequency Lower Limit Upper Limit 2.99999 A 0.33000 A 5 kHz 0.32735 A 0.33265 A 2.99999 A 0.33000 A 10 kHz 0.31840 A 0.34160 A 2.99999 A 1.09000 A 10 Hz 1.08827 A...
- Page 254 5522A Operators Manual Table 7-10. Verification Tests for Capacitance (cont.) Test Frequency Range Output Lower Limit Upper Limit or Current 3.2999 nF 2.0000 nF 1 kHz 1.9824 nF 2.0176 nF 10.9999 nF 7.0000 nF 1 kHz 6.9767 nF 7.0233 nF 10.9999 nF 10.9000 nF 1 kHz...
- Page 255 Maintenance Performance Tests Table 7-11. Verification Tests for Thermocouple Simulation Output, °C TC Type Lower Limit, mV Upper Limit, mV 0.00 °C (0.0000 mV) -0.0030 0.0030 100.00 °C (1.0000 mV) 0.99696 1.00304 -100.00 °C (-1.0000 mV) -1.00304 -0.99696 10 μV/°C 1000.00 °C (10.0000 mV) 9.99660 10.00340...
- Page 256 5522A Operators Manual Table 7-13. Verification Tests for Phase Accuracy, V and V Range, Range, Output, Output, Lower Upper Phase ° Normal Frequency Limit ° Normal V Limit° Output, V Output 65 Hz -0.10 0.10 400 Hz -0.25 0.25 1 kHz -0.50 0.50 5 kHz...
- Page 257 Maintenance Performance Tests Table 7-14. Verification Tests for Phase Accuracy, V and I Range, Range, Output, Output, Phase Lower Upper Normal Frequency ° Limit ° Limit ° Normal V Output, V Output 65 Hz 329.99 mA 300.00 mA -0.10 0.10 30.000 mV 1 kHz 329.99 mA...
- Page 258 5522A Operators Manual Table 7-15. Verification Tests for Frequency Range, Normal Output, Normal, Frequency Lower Limit Upper Limit Output, V 3.29999 3.00000 119.00 Hz 118.99970 Hz 119.00030 Hz 120.0 Hz 119.99970 Hz 120.00031 Hz 1000.0 Hz 999.9975 Hz 1000.0025 Hz 100.00 kHz 99,999.75 Hz 100,000.25 Hz...
-
Page 259: Accessories
Chapter 8 Accessories Title Page Introduction......................8-3 Rack Mount Kit ....................8-4 IEEE-488 Interface Cable ..................8-4 RS-232 Null-Modem Cables................8-4 5520A-525A/LEADS ..................8-4... - Page 260 5522A Operators Manual...
-
Page 261: Introduction
Carry Case with removable front/back panels 5500A/HNDL Side Handle 5520A-525A/LEADS Comprehensive Lead Set Fluke 700 series of pressure modules. Requires Fluke 700-PCK for operation 700-Pxx with the 5522A Calibrator 700-PCK Pressure module calibration kit Replacement fuse; 5 A/250 V Time Delay (100 V or 120 V line voltage) 109215... -
Page 262: Rack Mount Kit
5522A Operators Manual Table 8-1. Options and Accessories Model Description Y5537 24 in. (61 cm) Rack Mount Kit for 5522A Y8021 Shielded IEEE-488 Cable 0.5 m (1.64 ft) Y8022 Shielded IEEE-488 Cable 2 m (6.56 ft) Y8023 Shielded IEEE-488 Cable 4 m (13 ft) Rack Mount Kit The Y5537 rack mount kit provides all the hardware necessary to mount the 5522A on slides in a 24-inch (61 cm) equipment rack. -
Page 263: Sc600 Oscilloscope Calibration Option
Chapter 9 SC600 Oscilloscope Calibration Option Title Page Introduction......................9-3 SC600 Oscilloscope Calibration Option Specifications ........9-3 Oscilloscope Connections..................9-4 How to Start the SC600 Option ................9-7 The Output Signal.................... 9-8 How to Adjust the Output Signal ..............9-8 How to Key in a Value................ - Page 264 5522A Operators Manual Video Function Commands ................9-31 Overload Function Commands................ 9-31 Impedance/Capacitance Function Commands..........9-32 Verification Tables ....................9-33 DC Voltage Verification.................. 9-33 AC Voltage Amplitude Verification..............9-34 AC Voltage Frequency Verification..............9-35 Wave Generator Amplitude Verification: 1 MΩ Output Impedance ....9-35 Wave Generator Amplitude Verification: 50 Ω...
-
Page 265: Introduction
Introduction The 5500A-SC600 Option (the SC600 Option) provides functions that help you maintain your oscilloscope’s accuracy by verifying and calibrating the following oscilloscope characteristics: • Vertical deflection characteristics are calibrated and verified. The VOLT function lets you compare the voltage gain to the graticule lines on the oscilloscope. •... -
Page 266: General Specifications
5522A Operators Manual General Specifications Voltage Function Specifications DC Signal Square Wave Signal Voltage Function 50 Ω Load 50 Ω Load 1 MΩ Load 1 MΩ Load Amplitude Characteristics ±1 mV to ±1 mV to 0 to ±6.599 V 0 to ±130 V Range ±6.599 V p-p ±130 V p-p... -
Page 267: Leveled Sine Wave Specifications
SC600 Oscilloscope Calibration Option General Specifications Leveled Sine Wave Specifications Leveled Sine Wave Frequency Range Characteristics into 50 Ω 50 kHz (reference) 50 kHz to 100 MHz 100 to 300 MHz 300 to 600 MHz Amplitude Characteristics (for measuring oscilloscope bandwidth) Range (p-p) 5 mV to 5.5 V <100 mV: 3 digits... -
Page 268: Pulse Generator Specifications
5522A Operators Manual Pulse Generator Specifications Positive pulse into 50 Ω Pulse Generator Characteristics Typical rise/fall times <2 ns Available Amplitudes 2.5 V, 1 V, 250 mV, 100 mV, 25 mV, 10 mV Pulse Width Range 4 ns to 500 ns 5 % of pulse width ±2 ns Uncertainty Pulse Period... -
Page 269: Overload Measurement Specifications
SC600 Oscilloscope Calibration Option Oscilloscope Connections Overload Measurement Specifications Typical ‘On’ Current Maximum Time Limit DC or AC Source Voltage Typical ‘Off’ Current Indication Indication (1 kHz) 5 to 9 V 100 to 180 mA 10 mA Setable 1 s to 60 s Oscilloscope Connections Using the cable supplied with the SC600 Option, connect the SCOPE output on the Calibrator to one of the channel connectors on your oscilloscope (see Figure 9-1). -
Page 270: The Output Signal
5522A Operators Manual gjh050.eps The Output Signal The following description assumes that you have selected VOLT mode from the SCOPE menu. The Control Displays appears as follows with VOLT mode selected: gjh051.eps The location of the output signal is indicated on the Control Display (the display on the right side). -
Page 271: How To Adjust Values With The Rotary Knob
SC600 Oscilloscope Calibration Option How to Start the SC600 Option Note Units and prefixes printed in red in the upper-left corner of the keys are μ accessed through the b key. For example, to enter 200 s, press 2 0 0 b c b H. If you make an error, press G to clear the Control Display and return to the menu. -
Page 272: How To Use And
5522A Operators Manual How to Use X and D The X and D keys cause the current value of the signal to jump to a pre-determined cardinal value, whose amount is determined by the current function. These keys are described in more detail under the descriptions for each function. How to Reset the Oscilloscope Option You can reset all parameters in the 5522A to their default settings at any time during front panel operations by pressing the R key on the front panel. -
Page 273: The V/Div Menu
SC600 Oscilloscope Calibration Option How to Calibrat the Voltage Amplitude on an Oscilloscope amplitude signals. You can also toggle the trigger off and on by pressing ??. • V/DIV MENU Opens the voltage scaling menu, which lets you select the scale of the signal in volts per division. -
Page 274: How To Calibrate The Pulse And Frequency Response On An Oscilloscope
5522A Operators Manual gjh054.eps Perform the following sample procedure to calibrate the vertical gain. 1. Connect the calibrator to Channel 1 on the oscilloscope, making sure the oscilloscope is terminated at the proper impedance (1 MΩ for this example). Verify that the O key on the 5522A is lit, indicating that the signal is connected. -
Page 275: The Edge Function
TD PULSE Press once to thrn the Tunnel Diode Pulser drive signal on, again to turn the Pulser drive off. This signal sources up to 100 V p-p to drive a Tunnel Diode Pulser (Fluke Part Number 606522, Tektronix 067-0681-01, or equivalent. •... -
Page 276: Pulse Response Calibration With A Tunnel Diode Pulser
The default setting is 25 mV @ 1 MHz. For example, on a Fluke PM3392A oscilloscope, start with a signal of 1 V @ 1 MHz. 3. Adjust the scale on your oscilloscope to achieve a good picture of the edge. For example, on a Fluke PM3392A oscilloscope with a 1 V @ 1 MHz signal, use 200 mV/div. -
Page 277: The Leveled Sine Wave Function
SC600 Oscilloscope Calibration Option How to Calibrate the Pulse and Frequency Response on an Oscilloscope 5522A CALIBRATOR gjh037.eps Figure 9-2. Tunnel Diode Pulser Connections The Leveled Sine Wave Function The Leveled Sine Wave (Levsine) function uses a leveled sine wave, whose amplitude remains relatively constant over a range of frequencies, to check the oscilloscope’s bandwidth. -
Page 278: Shortcuts For Setting The Frequency And Voltage
5522A Operators Manual disconnect the signal, press Y. You cannot change the impedance while you are in Levsine mode. • MORE OPTIONS Opens additional menu items, which are described in detail under “The MORE OPTIONS Menu.” • SET TO LAST F Toggles between the current frequency setting and the reference value of 50 kHz. -
Page 279: How To Sweep Through A Frequency Range
SC600 Oscilloscope Calibration Option How to Calibrate the Pulse and Frequency Response on an Oscilloscope • RATE Used when FREQ CHANGE is set to “sweep” to select a sweep speed of 100 kHz, 1 MHz, or 10 MHz. A slower sweep rate lets you watch the frequency change very slowly. After a faster sweep, you may want to pinpoint a certain frequency with a slower sweep over a subset of your previous frequency range. -
Page 280: Frequency Response Calibration Procedure For An Oscilloscope
5522A Operators Manual want to pinpoint a certain frequency with a slow sweep over a subset of your previous frequency range. Frequency Response Calibration Procedure for an Oscilloscope This sample procedure, which verifies the frequency response on your oscilloscope, is usually performed after the pulse response is verified. -
Page 281: How To Calibrate The Time Base Of An Oscilloscope
SC600 Oscilloscope Calibration Option How to Calibrate the Time Base of an Oscilloscope 4.2 divisions, as shown below. To increase the frequency slowly, fine-tune it using the rotary knob. To do this, press e to place a cursor in the Output Display, press e again to place it in the frequency field, and use the L and W keys to move it to the digit you want to change. -
Page 282: Time Base Marker Calibration Procedure For An Oscilloscope
5522A Operators Manual duty cycle square wave.) Note that selections available under SHAPE depend on the selected marker period (frequency) as follows: Selection Period (Frequency) Sine 10 ns – 2 ns (100 MHz – 500 MHz) Spike 5 s – 20 ns (0.2 Hz – 50 MHz) Square 5 s –... -
Page 283: How To Test The Trigger Sc600 Option
SC600 Oscilloscope Calibration Option How to Test the Trigger SC600 Option Peaks are aligned with center axis gl011i.eps 4. Repeat this procedure for all time marker values recommended for your oscilloscope. Repeat for digital and analog mode as required. Some oscilloscopes may need the magnification changed while calibrating in analog mode. -
Page 284: How To Test Video Triggers
5522A Operators Manual • OUTPUT @ SCOPE Indicates the location of the signal output. If the signal does not appear on the oscilloscope, press O. To disconnect the signal, press Y. • WAVE Scrolls through the three types of waveforms that are available. You can select a square, sine, or triangle wave as the output. -
Page 285: How To Verify Pulse Capture
SC600 Oscilloscope Calibration Option How to Verify Pulse Capture • MODE Indicates you are in VIDEO mode. Use the softkey to change modes and open the corresponding menus for the other four oscilloscope calibration modes. Default video settings are +100 %, format = NTSC, and videomark = 10. How to Verify Pulse Capture gjh063.eps You can press the MODE softkey to cycle through the functions in the order shown, or... -
Page 286: How To Measure Input Resistance And Capacitance
5522A Operators Manual How to Measure Input Resistance and Capacitance gjh064.eps You can press the MODE softkey to cycle through the functions in the order shown, or you can press P to return directly to the OTHER modes menu. Each option in the Impedance/Capacitance (MEAS Z) menu is described below. •... -
Page 287: How To Test Overload Protection
SC600 Oscilloscope Calibration Option How to Test Overload Protection 1. Set the oscilloscope for 1 MΩ input impedance. Note that input capacitance testing cannot be done with 50Ω input impedance. 2. Use the MEASURE softkey to select “cap”. 3. With the output cable connected to the Calibrator but not connected to the oscilloscope, press the SET OFFSET softkey to cancel stray capacitances. -
Page 288: Remote Commands And Queries
5522A Operators Manual Perform the following procedure to test the overload protection of an oscilloscope: 1. Connect the calibrator to Channel 1 on the oscilloscope. 2. Select the voltage type (DC or AC) using the OUT VAL softkey. 3. Key in the voltage level. (The default value is 5 V.) 4. - Page 289 SC600 Oscilloscope Calibration Option Remote Commands and Queries Table 9-1. SCOPE Command Parameters (cont.) Parameter Description/Example EDGE Oscilloscope EDGE mode. Programs 25 mV peak-to-peak, 1 MHz, output at the SCOPE BNC, standby if from OFF or previously in standby. FUNC? returns EDGE. Example: SCOPE EDGE;...
- Page 290 5522A Operators Manual OPER, STBY, *OPC, *OPC?, and *WAI all operate as described in Chapter 6. The state of the oscilloscope’s output while in SCOPE mode is reflected by the bit in the ISR that is assigned to SETTLED. The FUNC? query returns SDCV, SACV, LEVSINE, MARKER, EDGE, and WAVEGEN for the corresponding oscilloscope modes.
- Page 291 SC600 Oscilloscope Calibration Option Remote Commands and Queries SCOPE? (IEEE-488, RS-232, Sequential) Returns the oscilloscope’s current mode of operation. Returns OFF if the oscilloscope is off. Parameters: None Response: <character> (Returns OFF, VOLT, EDGE, LEVSINE, MARKER, or WAVEGEN.) TRIG (IEEE-488, RS-232, Sequential) Programs the oscilloscope’s trigger output BNC.
-
Page 292: Edge Function Commands
5522A Operators Manual Sets the impedance to 1 M in Meas Z mode. TZ1MOHM Sets the impedance to cap in Meas Z mode. TZCAP Sets the instrument to DC in Overload mode. TOLDC Sets the impedance to AC in Overload mode. TOLAC Example: RANGE TP20DB... -
Page 293: Video Function Commands
SC600 Oscilloscope Calibration Option Remote Commands and Queries Video Function Commands VIDEOFMT (IEEE-488, RS-232, Sequential) Selects the format for VIDEO mode. Parameters: NTSC, PAL, PALM (for PAL-M), or SECAM Example: VIDEOFMT SECAM VIDEOFMT? (IEEE-488, RS-232, Sequential) Returns the VIDEO mode format. Parameters: None Response: NTSC, PAL, PALM (for PAL-M), or SECAM... -
Page 294: Impedance/Capacitance Function Commands
5522A Operators Manual TLIMIT? (IEEE-488, RS-232, Sequential) Returns the programmed OPERATE time limit for the OVERLD mode signal. Response: <Integer> Time limit in seconds. TLIMIT_D (IEEE-488, RS-232, Sequential) Sets the default OPERATE time limit for the OVERLD mode signal. Parameters: 1 to 60 (seconds) Example: TLIMIT_D 15 TLIMIT_D? -
Page 295: Verification Tables
SC600 Oscilloscope Calibration Option Verification Tables Verification Tables The verification test points are provided here as a guide when verification to one-year specifications is desired. DC Voltage Verification Table 9-2. SC600 Option DC Voltage Verification (1 MΩ output impedance unless noted) Nominal Value (V dc) Measured Value (V dc) Deviation (V dc) -
Page 296: Ac Voltage Amplitude Verification
5522A Operators Manual Table 9-2. SC600 Option DC Voltage Verification (cont.) (1 MΩ output impedance unless noted) Nominal Value (V dc) Measured Value (V dc) Deviation (V dc) 1-Year Spec. (V dc) -0.499 0.0002895 0.00029 -0.5 0.00029 1.35 0.000715 -1.35 0.000715 2.19 0.001135... -
Page 297: Ac Voltage Frequency Verification
SC600 Oscilloscope Calibration Option Verification Tables Table 9-3. SC600 Option AC Voltage Amplitude Verification (cont.) (1 MΩ output impedance unless noted) Nominal Value Measured Value 1-year Spec. Frequency (Hz) Deviation (V p-p) (V p-p) (V p-p) (V p-p) -0.11 1000 0.00015 1000 0.00054... - Page 298 5522A Operators Manual Table 9-5. SC600 Option Wave Generator Amplitude Verification (1 M output impedance) (cont.) Nominal Value Frequency Measured Deviation 1-Year Spec. Wave Shape (V p-p) (Hz) Value (V p-p) (V p-p) (V p-p) square 0.219 1000 0.00667 square 0.22 1000 0.0067...
-
Page 299: Wave Generator Amplitude Verification: 50 Ω Output Impedance
SC600 Oscilloscope Calibration Option Verification Tables Ω Wave Generator Amplitude Verification: 50 Output Impedance Table 9-6. SC600 Option Wave Generator Amplitude Verification (50 output impedance) Nominal Value Frequency Measured Deviation 1-Year Spec. Wave Shape (V p-p) (Hz) Value (V p-p) (V p-p) (V p-p) square... -
Page 300: Leveled Sine Wave Verification: Amplitude
5522A Operators Manual Table 9-6. SC600 Option Wave Generator Amplitude Verification (50 output impedance) (cont.) Nominal Value Frequency Measured Deviation 1-Year Spec. Wave Shape (V p-p) (Hz) Value (V p-p) (V p-p) (V p-p) triangle 0.109 1000 0.00337 triangle 0.449 1000 0.01357... -
Page 301: Leveled Sine Wave Verification: Frequency
SC600 Oscilloscope Calibration Option Verification Tables Leveled Sine Wave Verification: Frequency Table 9-8. SC600 Option Leveled Sine Wave Verification: Frequency Nominal Value Frequency Measured Value Deviation (Hz) 1-Year Spec. (Hz) (V p-p) (Hz) 50 kHz 0.125 500 kHz 1.25 5 MHz 12.5 50 MHz 500 MHz... -
Page 302: Leveled Sine Wave Verification: Flatness
5522A Operators Manual Table 9-9. SC600 Option Leveled Sine Wave Verification: Harmonics (cont.) Nominal Value Measured Deviation 1-Year Spec. Harmonic Frequency (V p-p) Value (dB) (dB) (dB) 2nd harmonic 4 MHz 3rd+ harmonic 4 MHz 2nd harmonic 8 MHz 3rd+ harmonic 8 MHz 2nd harmonic 10 MHz... - Page 303 SC600 Oscilloscope Calibration Option Verification Tables Table 9-10. SC600 Option Leveled Sine Wave Verification: Flatness (cont.) Nominal Value Measured Value 1-Year Spec. Frequency Deviation (V p-p) (V p-p) (V p-p) (V p-p) 0.005 480 MHz 0.0003 0.005 570 MHz 0.0003 0.005 580 MHz 0.0003...
- Page 304 5522A Operators Manual Table 9-10. SC600 Option Leveled Sine Wave Verification: Flatness (cont.) Nominal Value Measured Value 1-Year Spec. Frequency Deviation (V p-p) (V p-p) (V p-p) (V p-p) 0.01 50 kHz 0.01 30 MHz 0.00025 0.01 70 MHz 0.00025 0.01 120 MHz 0.0003...
- Page 305 SC600 Oscilloscope Calibration Option Verification Tables Table 9-10. SC600 Option Leveled Sine Wave Verification: Flatness (cont.) Nominal Value Measured Value 1-Year Spec. Frequency Deviation (V p-p) (V p-p) (V p-p) (V p-p) 0.039 390 MHz 0.00166 0.039 400 MHz 0.00166 0.039 480 MHz 0.00166...
- Page 306 5522A Operators Manual Table 9-10. SC600 Option Leveled Sine Wave Verification: Flatness (cont.) Nominal Value Measured Value 1-Year Spec. Frequency Deviation (V p-p) (V p-p) (V p-p) (V p-p) 0.07 600 MHz 0.0029 0.099 50 kHz 0.099 30 MHz 0.001585 0.099 70 MHz 0.001585...
- Page 307 SC600 Oscilloscope Calibration Option Verification Tables Table 9-10. SC600 Option Leveled Sine Wave Verification: Flatness (cont.) Nominal Value Measured Value 1-Year Spec. Frequency Deviation (V p-p) (V p-p) (V p-p) (V p-p) 0.25 360 MHz 0.0101 0.25 390 MHz 0.0101 0.25 400 MHz 0.0101...
- Page 308 5522A Operators Manual Table 9-10. SC600 Option Leveled Sine Wave Verification: Flatness (cont.) Nominal Value Measured Value 1-Year Spec. Frequency Deviation (V p-p) (V p-p) (V p-p) (V p-p) 590 MHz 0.0161 600 MHz 0.0161 50 kHz 30 MHz 0.0121 70 MHz 0.0121 120 MHz...
- Page 309 SC600 Oscilloscope Calibration Option Verification Tables Table 9-10. SC600 Option Leveled Sine Wave Verification: Flatness (cont.) Nominal Value Measured Value 1-Year Spec. Frequency Deviation (V p-p) (V p-p) (V p-p) (V p-p) 290 MHz 0.0261 360 MHz 0.0521 390 MHz 0.0521 400 MHz 0.0521...
-
Page 310: Edge Verification: Amplitude
5522A Operators Manual Table 9-10. SC600 Option Leveled Sine Wave Verification: Flatness (cont.) Nominal Value Measured Value 1-Year Spec. Frequency Deviation (V p-p) (V p-p) (V p-p) (V p-p) 580 MHz 0.2201 590 MHz 0.2201 600 MHz 0.2201 Edge Verification: Amplitude Table 9-11. -
Page 311: Edge Verification: Duty Cycle
SC600 Oscilloscope Calibration Option Verification Tables Edge Verification: Duty Cycle Table 9-13. SC600 Option Edge Verification: Duty Cycle Nominal Value Measured Value Deviation Frequency 1-Year Spec. (%) (from 50%) (V p-p) 1 MHz Edge Verification: Rise Time Table 9-14. SC600 Option Edge Verification: Rise Time Nominal Value Measured Value 1-Year Spec. -
Page 312: Marker Generator Verification
5522A Operators Manual Marker Generator Verification Table 9-16. SC600 Option Marker Generator Verification Period (s) Measured Value (s) Deviation (s) 1-Year Spec. (s) 0.0251 s 0.00405 s 0.05 3.75E-06 s 0.02 5E-8 0.01 2.5E-8 1e-7 2.5E-13 5e-8 1.25E-13 2e-8 5E-14 1e-8 2.5E-14 5e-9... -
Page 313: Input Impedance Verification: Resistance
SC600 Oscilloscope Calibration Option Verification Tables Input Impedance Verification: Resistance Table 9-19. SC600 Option Input Impedance Verification: Resistance Nominal Value (Ω) Measured Value (Ω) Deviation (Ω) 1-Year Spec. (Ω) 0.04 0.05 0.06 600000 1000000 1000 1500000 1500 Input Impedance Verification: Capacitance Table 9-20. - Page 314 5522A Operators Manual 9-52...
-
Page 315: Sc1100 Oscilloscope Calibration Option
Chapter 10 SC1100 Oscilloscope Calibration Option Title Page Introduction......................10-3 SC1100 Option Specifications................10-3 Oscilloscope Connections..................10-8 How to Start the SC1100 Option ................. 10-8 The Output Signal.................... 10-9 How to Adjust the Output Signal ..............10-9 How to Key in a Value................10-9 How to Adjust Values with the Rotary Knob .......... - Page 316 5522A Operators Manual Overload Function Commands................ 10-33 Impedance/Capacitance Function Commands..........10-34 Verification Tables ....................10-35 DC Voltage Verification.................. 10-35 AC Voltage Verification.................. 10-37 AC Voltage Frequency Verification..............10-38 Wave Generator Amplitude Verification: 1 MΩ Output Impedance ....10-39 Wave Generator Amplitude Verification: 50 Ω Output Impedance....10-40 Edge Verification: Amplitude .................
-
Page 317: Sc1100 Option Specifications
Introduction The 5520A-SC1100 Option (hereafter referred to as the SC1100) provides functions that help you maintain your oscilloscope’s accuracy by verifying and calibrating the following oscilloscope characteristics: • Vertical deflection characteristics are calibrated and verified. The VOLT function lets you compare the voltage gain to the graticule lines on the oscilloscope. •... -
Page 318: Volt Specifications
5522A Operators Manual Calibration (tcal)..........15 °C to 35 °C Storage ............... -20 °C to +70 °C Electromagnetic Compatibility ......Designed to operate in Standard Laboratory environments where the Electromagnetic environment is highly controlled. If used in areas with Electromagnetic fields >1 V/m, there could be errors in output values. All testing for this specification used new cables and connectors. -
Page 319: Edge Specifications
SC1100 Oscilloscope Calibration Option General Specifications Edge Specifications 1-Year Absolute Uncertainty, Edge Characteristics into 50 Ω Load tcal ± 5 °C ≤300 ps Rise Time (+0 ps / -100 ps) ±(2 % of output + 200 μV) Amplitude Range (p-p) 5.0 mV to 2.5 V Resolution 4 digits... -
Page 320: Time Marker Specifications
5522A Operators Manual Time Marker Specifications Time Marker into 50 Ω 5s to 50 ms 20 ms to 100 ns 50 to 20 ns 10 ns 5 to 1 ns ±(25 + t x 1-Year Absolute Uncertainty at ±2.5 ppm ±2.5 ppm ±2.5 ppm ±2.5 ppm... -
Page 321: Pulse Generator Specifications
SC1100 Oscilloscope Calibration Option General Specifications Pulse Generator Specifications Pulse Generator Characteristics Positive pulse into 50 Ω Typical rise/fall times <1.5 ns Available Amplitudes 2.5 V, 1 V, 250 mV, 100 mV, 25 mV, 10 mV Pulse Width Range 4 to 500 ns 5 % ±2 ns Uncertainty (typical) Pulse Period... -
Page 322: Oscilloscope Connections
5522A Operators Manual Oscilloscope Input Capacitance Measurement Specifications Scope input selected 1 MΩ Measurement Range 5 to 50 pF Uncertainty ±(5 % of input + 0.5 pF) Measurement made within 30 minutes of capacitance zero reference. Scope option must be selected for at least five minutes prior to any capacitance measurement, including the zero process. -
Page 323: The Output Signal
SC1100 Oscilloscope Calibration Option How to Start the SC1100 Option gjh050.eps The Output Signal The following description assumes that you have selected VOLT mode from the SCOPE menu. The Control Displays appears as follows with VOLT mode selected: gjh051.eps The location of the output signal is indicated on the Control Display (the display on the right side). -
Page 324: How To Adjust Values With The Rotary Knob
5522A Operators Manual Note Units and prefixes printed in red in the upper left corner of the keys are μ accessed through the b key. For example, to enter 200 s, press 2 0 0 b c b H. If you make an error, press G to clear the Control Display and return to the menu. 2. -
Page 325: How To Reset The Sc1100 Option
SC1100 Oscilloscope Calibration Option How to Calibrate the Voltage Amplitude on an Oscilloscope How to Use X and D The X and D keys cause the current value of the signal to jump to a pre-determined cardinal value, whose amount is determined by the current function. These keys are described in more detail under the descriptions for each function. -
Page 326: The V/Div Menu
5522A Operators Manual trigger can be useful for many oscilloscopes that have difficulty triggering on low amplitude signals. • V/DIV MENU Opens the voltage scaling menu, which lets you select the scale of the signal in volts per division. This menu is described below in detail, under “The V/DIV Menu.”... -
Page 327: How To Calibrate The Pulse And Frequency Response On An Oscilloscope
SC1100 Oscilloscope Calibration Option How to Calibrate the Pulse and Frequency Response on an Oscilloscope Before you start this procedure, verify that you are running the SC1100 Option in VOLT mode. If you are, the Control Display shows the following menu. gjh054.eps Perform the following sample procedure to calibrate the vertical gain: 1. -
Page 328: The Edge Function
TD PULSE Press once to turn the Tunnel Diode Pulser drive signal on, again to turn the Pulser drive off. This signal sources up to 100 V p-p to drive a Tunnel Diode Pulser (Fluke Part Number 606522, Tektronix 067-0681-01, or equivalent.) •... - Page 329 6. Remove the input signal by pressing Y. Pulse Response Calibration Using a Tunnel Diode Pulser You can use the calibrator to drive a tunnel diode pulser (Fluke Part Number 606522, or Tektronix 067-0681-01, or equivalent), allowing you to check for pulse edge rise times as fast as 125 ps.
-
Page 330: The Leveled Sine Wave Function
5522A Operators Manual 5522A CALIBRATOR gjh037.eps Figure 10-2. Tunnel Diode Pulser Connections The Leveled Sine Wave Function The Leveled Sine Wave (LEVSINE) function uses a leveled sine wave, whose amplitude remains relatively constant over a range of frequencies, to check the oscilloscope’s bandwidth. -
Page 331: Shortcuts For Setting The Frequency And Voltage
SC1100 Oscilloscope Calibration Option How to Calibrate the Pulse and Frequency Response on an Oscilloscope • OUTPUT @ SCOPE terminal (50Ω) Indicates the location and impedance of the signal output. If the signal does not appear on the oscilloscope, press O. To disconnect the signal, press Y. -
Page 332: How To Sweep Through A Frequency Range
5522A Operators Manual the sweep function are provided under “Sweeping Through a Frequency Range.” • RATE Used when FREQ CHANGE is set to “sweep” to select a sweep speed of 100 kHz, 1 MHz, or 10 MHz. A slower sweep rate lets you watch the frequency change very slowly. After a faster sweep, you may want to pinpoint a certain frequency with a slower sweep over a subset of your previous frequency range. -
Page 333: Oscilloscope Frequency Response Calibration Procedure
SC1100 Oscilloscope Calibration Option How to Calibrate the Pulse and Frequency Response on an Oscilloscope Note When you interrupt the frequency sweep by pressing HALT SWEEP, the FREQ CHANGE method switches back to “jump.” 5. Repeat the procedure if necessary. For example, if you did a fast sweep, you may want to pinpoint a certain frequency with a slow sweep over a subset of your previous frequency range. -
Page 334: How To Calibrate The Time Base Of An Oscilloscope
5522A Operators Manual gl009i.bmp 4. Increase the frequency to 400 MHz (for 400-MHz instruments), or 500 MHz (for 500-MHz instruments). To enter 400 MHz, press 4 0 0 M H; then press E. 5. Continue to increase the frequency slowly until the waveform decreases to 4.2 divisions, as shown below. -
Page 335: The Time Marker Function
SC1100 Oscilloscope Calibration Option How to Calibrate the Time Base of an Oscilloscope The Time Marker Function The Time MARKER function, which is available through the MARKER menu, lets you calibrate the timing response of your oscilloscope. To access the MARKER menu, press the softkey under MODE until “marker”... -
Page 336: Time Base Marker Calibration Procedure For An Oscilloscope
5522A Operators Manual Time Base Marker Calibration Procedure for an Oscilloscope This sample procedure uses the Time MARKER function to check the horizontal deflection (time base) of your oscilloscope. See your oscilloscope’s manual for the exact time base values recommended for calibration. Before you begin this procedure, verify that you are in MARKER mode. -
Page 337: How To Test The Trigger Functions Of An Oscilloscope
SC1100 Oscilloscope Calibration Option How to Test the Trigger functions of an oscilloscope How to Test the Trigger functions of an oscilloscope The oscilloscope’s ability to trigger on different waveforms can be tested using the wave generator. When the wave generator is used, a square, sine, or triangle wave is transmitted and the wave’s output impedance, offset, and voltage can be varied in order to test the triggering capability at different levels. -
Page 338: How To Test Video Triggers
5522A Operators Manual How to Test Video Triggers gjh062.eps The video mode generates video signals in various formats. The mode is used to test the video trigger capability of an oscilloscope. You can press the MODE softkey to cycle through the functions in the order shown, or you can press P to return directly to the OTHER modes menu. -
Page 339: How To Verify Pulse Capture
SC1100 Oscilloscope Calibration Option How to Verify Pulse Capture How to Verify Pulse Capture gjh063.eps The pulse mode is a general-purpose pulse generator with pulse widths from 4 ns to 500 ns. It can be used to check many of the advanced trigger functions of an oscilloscope, such as pulse capture. -
Page 340: How To Measure Input Resistance And Capacitance
5522A Operators Manual How to Measure Input Resistance and Capacitance gjh064.eps You can press the MODE softkey to cycle through the functions in the order shown, or you can press P to return directly to the OTHER modes menu. Each option in the Impedance/Capacitance (MEAS Z) menu is described below: •... -
Page 341: Input Capacitance Measurement
SC1100 Oscilloscope Calibration Option How to Test Overload Protection Input Capacitance Measurement With MEAS Z mode selected, perform the following procedure to measure the input capacitance of an oscilloscope: 1. Set the oscilloscope for 1 MΩ input impedance. Note that input capacitance testing cannot be done with 50 Ω... - Page 342 5522A Operators Manual At any time, you can also set the overload time limit with S, INSTMT SETUP softkey, OTHER SETUP softkey, TLIMDEF softkey, and then choose 1s to 60 s. Perform the following procedure to test the overload protection of an oscilloscope: 1.
-
Page 343: Remote Commands And Queries
SC1100 Oscilloscope Calibration Option Remote Commands and Queries Table 10-1. SCOPE Command Parameters (cont.) Parameter Description/Example Oscilloscope EDGE mode. Programs 25 mV peak-to-peak, 1 MHz, output at the EDGE SCOPE BNC, standby if from OFF or previously in standby. FUNC? returns EDGE. Example: SCOPE EDGE;... - Page 344 5522A Operators Manual OPER, STBY, *OPC, *OPC?, and *WAI all operate as described in Chapter 6. The state of the oscilloscope’s output while in SCOPE mode is reflected by the bit in the ISR that is assigned to SETTLED. The FUNC? query returns SDCV, SACV, LEVSINE, MARKER, EDGE, and WAVEGEN for the corresponding oscilloscope modes.
- Page 345 SC1100 Oscilloscope Calibration Option Remote Commands and Queries TRIG (IEEE-488, RS-232, Overlapped) Programs the oscilloscope’s trigger output BNC. Parameters: OFF (Turns the trigger output off.) (Turns the trigger output on. Frequency is the same as the DIV1 signal at SCOPE output.) (Turns the trigger output on.
-
Page 346: Edge Function Commands
5522A Operators Manual RANGE (IEEE-488, RS-232, Sequential) Programs the instrument range in PULSE, MEAS Z, OVERLD modes. Parameters: TP0DB TP8DB TP20DB TP28DB TP40DB TP48DB Pulse Range 2.5 V 1.0 V 250 mV 100 mV 25 mV 10 mV TZ50OHM TZ1MOHM TZCAP Impedance Measure... -
Page 347: Video Function Commands
SC1100 Oscilloscope Calibration Option Remote Commands and Queries TMWAVE? (IEEE-488, RS-232, Sequential) Returns the MARKER mode waveform setting. Parameters: None Response: <character> (Returns SINE, SPIKE, SQUARE, or SQ20PCT.) Video Function Commands VIDEOFMT (IEEE-488, RS-232, Sequential) Selects the format for VIDEO mode. Parameters: NTSC, PAL, PALM (for PAL-M), or SECAM Example: VIDEOFMT SECAM... -
Page 348: Impedance/Capacitance Function Commands
5522A Operators Manual Parameters: 1 to 60 (seconds) Example: TLIMIT 30 TLIMIT? (IEEE-488, RS-232, Sequential) Returns the programmed OPERATE time limit for the OVERLD mode signal. Response: <Integer> Time limit in seconds. TLIMIT_D (IEEE-488, RS-232, Sequential) Sets the default OPERATE time limit for the OVERLD mode signal. Parameters: 1 to 60 (seconds) Example: TLIMIT_D 15... -
Page 349: Verification Tables
SC1100 Oscilloscope Calibration Option Verification Tables Verification Tables The verification test points are provided here as a guide when verification to one-year specifications is desired. DC Voltage Verification Table 10-2. SC1100 Option DC Voltage Verification (1 MΩ output impedance unless noted) Measured Value Deviation Nominal... - Page 350 5522A Operators Manual Table 10-2. SC1100 Option DC Voltage Verification (cont.) Measured Value Deviation Nominal 1-Year Spec. (V dc) Value (V dc) (V dc) (V dc) 0.499 0.0002895 -0.499 0.0002895 0.00029 -0.5 0.00029 1.35 0.000715 -1.35 0.000715 2.19 0.001135 -2.19 0.001135 0.00114 -2.2...
-
Page 351: Ac Voltage Verification
SC1100 Oscilloscope Calibration Option Verification Tables Table 10-3. SC1100 Option DC Voltage Verification at 50 Ω (cont.) Calibrator Measured Value Mainframe Reading x correction Tolerance (V DC) (V DC) Output -109.9 mV 0.0003148 V 499 mV 0.0012875 V -499 mV 0.0012875 V 2.19 V 0.005515 V... -
Page 352: Ac Voltage Frequency Verification
5522A Operators Manual Table 10-4. SC1100 Option AC Voltage Verification (cont.) (1 MΩ output impedance unless noted) Nominal Value Measured Value 1-year Spec. Frequency (Hz) Deviation (V p-p) (V p-p) (V p-p) (V p-p) 200 mV 10000 0.00054 2.2 V 0.00224 2.2 V 5000... -
Page 353: Wave Generator Amplitude Verification: 1 Mω Output Impedance
SC1100 Oscilloscope Calibration Option Verification Tables Ω Wave Generator Amplitude Verification: 1 M Output Impedance Table 10-7. SC1100 Option Wave Generator Amplitude Verification (1 M output impedance) Nominal Frequency Measured Deviation 1-Year Spec. Wave Shape Value (V p-p) (Hz) Value (V p-p) (V p-p) (V p-p) square... - Page 354 5522A Operators Manual Table 10-7. SC1100 Option Wave Generator Amplitude Verification (1 M output impedance) (cont.) Nominal Frequency Measured Deviation 1-Year Spec. Wave Shape Value (V p-p) (Hz) Value (V p-p) (V p-p) (V p-p) triangle 0.219 1000 0.00667 triangle 0.899 1000 0.02707...
-
Page 355: Edge Verification: Amplitude
SC1100 Oscilloscope Calibration Option Verification Tables Table 10-8. SC1100 Option Wave Generator Amplitude Verification (50 output impedance) (cont.) Nominal Frequency Measured Deviation 1-Year Spec. Wave Shape Value (V p-p) (Hz) Value (V p-p) (V p-p) (V p-p) sine 0.0449 1000 0.001447 sine... -
Page 356: Edge Verification: Frequency
5522A Operators Manual Edge Verification: Frequency Table 10-10. SC1100 Option Edge Verification: Frequency Nominal Value Frequency Measured Value Deviation (Hz) 1-Year Spec. (V p-p) (Hz) (Hz) 1 kHz 0.0025 10 kHz 0.025 100 kHz 0.25 1 MHz 10 MHz Edge Verification: Duty Cycle Table 10-11. -
Page 357: Leveled Sinewave Verification: Amplitude
SC1100 Oscilloscope Calibration Option Verification Tables Tunnel Diode Pulser Verification Table 10-13. SC1100 Option Tunnel Diode Pulser Verification Nominal Value Frequency (Hz) Measured Value Deviation (V p-p) 1-Year Spec. (V p-p) (V p-p) (V p-p) 0.2202 10000 0.2202 1.1002 10000 1.1002 2.0002 10000... -
Page 358: Leveled Sinewave Verification: Frequency
5522A Operators Manual Leveled Sinewave Verification: Frequency Table 10-15. SC1100 Option Leveled Sinewave Verification: Frequency Nominal Value Frequency Measured Value Deviation (Hz) 1-Year Spec. (V p-p) (Hz) (Hz) 50 kHz 0.125 500 kHz 1.25 5 MHz 12.5 50 MHz 500 MHz 1250 1000 MHz 2500... - Page 359 SC1100 Oscilloscope Calibration Option Verification Tables Table 10-16. SC1100 Option Leveled Sinewave Verification: Harmonics (cont.) Nominal Measured Deviation 1-Year Spec. Harmonic Frequency Value (V p-p) Value (dB) (dB) (dB) + harmonic 2 MHz harmonic 4 MHz + harmonic 4 MHz harmonic 8 MHz + harmonic...
-
Page 360: Leveled Sinewave Verification: Flatness
5522A Operators Manual Leveled Sinewave Verification: Flatness Table 10-17. SC1100 Option Leveled Sinewave Verification: Flatness Nominal Value Measured Value Deviation 1-Year Spec. Frequency (V p-p) (V p-p) (V p-p) (V p-p) 0.005 10 MHz 0.005 30 MHz 0.000175 0.005 70 MHz 0.000175 0.005 120 MHz... - Page 361 SC1100 Oscilloscope Calibration Option Verification Tables Table 10-17. SC1100 Option Leveled Sinewave Verification: Flatness (cont.) Nominal Value Measured Value Deviation 1-Year Spec. Frequency (V p-p) (V p-p) (V p-p) (V p-p) 0.0099 360 MHz 0.000496 0.0099 390 MHz 0.000496 0.0099 400 MHz 0.000496 0.0099...
- Page 362 5522A Operators Manual Table 10-17. SC1100 Option Leveled Sinewave Verification: Flatness (cont.) Nominal Value Measured Value Deviation 1-Year Spec. Frequency (V p-p) (V p-p) (V p-p) (V p-p) 0.025 580 MHz 0.0011 0.025 590 MHz 0.0011 0.025 600 MHz 0.0011 0.025 1000 MHz 0.0011...
- Page 363 SC1100 Oscilloscope Calibration Option Verification Tables Table 10-17. SC1100 Option Leveled Sinewave Verification: Flatness (cont.) Nominal Value Measured Value Deviation 1-Year Spec. Frequency (V p-p) (V p-p) (V p-p) (V p-p) 0.07 10 MHz 0.07 30 MHz 0.00115 0.07 70 MHz 0.00115 0.07 120 MHz...
- Page 364 5522A Operators Manual Table 10-17. SC1100 Option Leveled Sinewave Verification: Flatness (cont.) Nominal Value Measured Value Deviation 1-Year Spec. Frequency (V p-p) (V p-p) (V p-p) (V p-p) 290 MHz 0.0021 360 MHz 0.0041 390 MHz 0.0041 400 MHz 0.0041 480 MHz 0.0041 570 MHz...
- Page 365 SC1100 Oscilloscope Calibration Option Verification Tables Table 10-17. SC1100 Option Leveled Sinewave Verification: Flatness (cont.) Nominal Value Measured Value Deviation 1-Year Spec. Frequency (V p-p) (V p-p) (V p-p) (V p-p) 0.399 480 MHz 0.01606 0.399 570 MHz 0.01606 0.399 580 MHz 0.01606 0.399...
- Page 366 5522A Operators Manual Table 10-17. SC1100 Option Leveled Sinewave Verification: Flatness (cont.) Nominal Value Measured Value Deviation 1-Year Spec. Frequency (V p-p) (V p-p) (V p-p) (V p-p) 600 MHz 0.0321 1000 MHz 0.0321 10 MHz 30 MHz 0.0181 70 MHz 0.0181 120 MHz 0.0241...
-
Page 367: Marker Generator Verification
SC1100 Oscilloscope Calibration Option Verification Tables Table 10-17. SC1100 Option Leveled Sinewave Verification: Flatness (cont.) Nominal Value Frequency Measured Value Deviation (V p-p) 1-Year Spec. (V p-p) (V p-p) (V p-p) 70 MHz 0.0511 120 MHz 0.0681 290 MHz 0.0681 360 MHz 0.1361 390 MHz... -
Page 368: Pulse Generator Verification: Period
5522A Operators Manual Table 10-18. SC1100 Option Marker Generator Verification (cont.) Period (s) Measured Value (s) Deviation (s) 1-Year Spec. (s) 0.01 25.0E-9 100.0E-9 250.0E-15 50.0E-9 125.0E-15 20.0E-9 50.0E-15 10.0E-9 25.0E-15 5.0E-9 12.5E-15 2.0E-9 5.0E-15 1.0E-9 2.5E-15 Pulse Generator Verification: Period Table 10-19. -
Page 369: Input Impedance Verification: Resistance
SC1100 Oscilloscope Calibration Option Verification Tables Input Impedance Verification: Resistance Table 10-21. SC1100 Option Input Impedance Verification: Resistance Nominal Value Certified Value Measured Value Deviation (Ω) 1-Year Spec. (Ω) (Ω) (Ω) (Certified – (Ω) Measured Value) 0.04 0.05 0.06 600000 1000000 1000 1,500,000... - Page 370 5522A Operators Manual 10-56...
-
Page 371: Pq Option
Chapter 11 PQ Option Title Page Introduction......................11-3 5522A PQ Specifications..................11-3 5522A PQ Option Specifications................. 11-3 Composite Harmonic Function Specifications ..........11-3 AC Voltage Specifications ................11-4 AC Voltage Auxiliary Specifications (Dual Output Mode Only) ....11-5 AC Current Specifications, LCOMP OFF............11-5 AC Current Specifications, LCOMP OFF (continued) ........ - Page 372 5522A Operators Manual Φ & REF Menus..................... 11-16 Composite Harmonics Function (Volts and Volts)..........11-16 Φ & REF Menus....................11-17 Δ Delta ( )Amplitude, Flicker Function (Volts)............. 11-17 Δ Delta ( ) Amplitude Mode (Volts)..............11-17 How to Select the Flicker Function ..............11-17 How to Set the Repeat Frequency ..............
-
Page 373: 5522A Pq Specifications
Introduction The 5522A-PQ Option (hereafter the PQ Option) provides calibration functions to maintain power quality monitoring equipment. The following functions are provided: • Harmonic Distortion simulation (Composite Harmonics Function) Allows the user to specify up to 15 tones (harmonics) including all even and odd values to the 63rd. -
Page 374: Ac Voltage Specifications
5522A Operators Manual Note All harmonic specifications below include the fundamental. For waveforms with no harmonics other than the fundamental, the RMS uncertainty is the same as the non-PQ mode of the 5520A. AC Voltage Specifications Harmonic Harmonic Absolute RMS Composite Harmonic Amplitude Phase... -
Page 375: Ac Voltage Auxiliary Specifications (Dual Output Mode Only)
PQ Option 5522A PQ Option Specifications AC Voltage Auxiliary Specifications (Dual Output Mode Only) Harmonic Harmonic Phase Absolute RMS Range, Harmonic Amplitude Harmonic Amplitude Uncertainty Uncertainty of Composite Uncertainty Frequency Range ( % of (Relative to Composite Waveform Waveform (% of Fundamental + V) Fundamental) Fundamental) (% RMS + V) -
Page 376: Ac Current Specifications, Lcomp Off (Continued)
5522A Operators Manual AC Current Specifications, LCOMP OFF (continued) Harmonic Absolute RMS Harmonic Amplitude Harmonic Phase Range, Amplitude Uncertainty of Harmonic Uncertainty Uncertainty Composite Range Composite Frequency (% of (Relative to Waveform (% of Waveform Fundamental + A) Fundamental) Fundamental) (% RMS + A) 0.5 °... -
Page 377: Flicker Simulation Mode
PQ Option Flicker Simulation Mode Voltage Range 1 mV to 1020 V Current Range 29 μA to 20.5 A Frequency of Fundamental 50 and 60 Hz ±100 % Amplitude Modulation Range Frequency of Modulation 0.1 to 40 Hz Type of Modulation Square or Sine Short Term (10 minute) uncertainty of amplitude modulation ±0.1 % of nominal output + 0.05% of range... -
Page 378: Composite Harmonics Function (Volts)
5522A Operators Manual Composite Harmonics Function (Volts) This section describes the Composite Harmonics Function in the Volts Mode. Amps, Volt-Volt, and Volt-Amp Modes, have similar menus and operation. How to Enter the PQ Modes To gain access to the power quality (PQ) functions, press ... -
Page 379: Recall Wave
PQ Option Composite Harmonics Function (Volts) RECALL WAVE Pressing the RECALL WAVE blue softkey displays the menu shown below. From this menu, the user can: • recall the 2 preinstalled IEC waves • recall the 5 preinstalled NRC waves • recall up to five custom user-created waves nn354f.eps SAVE WAVE... -
Page 380: Harmonic Number
5522A Operators Manual In the EDIT WAVE Menu, a wave that has either been in use, or a wave that has been recalled can be edited. Although it is possible to define a new waveform using the EDIT WAVE menu option, it is not recommended as the user will have to check harmonics A through O to ensure they are all off. -
Page 381: How To Edit Waves
PQ Option Composite Harmonics Function (Volts) Note The resultant waveform has the RMS value as shown on the left-hand display of the calibrator. Depending upon how many harmonics were entered, this value is most likely different than the fundamental value. Note The build time that the calibrator requires is dependent upon the complexity of the waveform. -
Page 382: How To Recall Saved Waves
The IEC waves (IEC A and IEC D) are waveforms referred to by the International Electrotechnical Commission (IEC) in IEC 61000-3-2, Limits for Harmonic Current Emissions. The Fluke Corporation implementation is based on formulas provided by the National Physical Laboratory (NPL) in the United Kingdom. These formulas specify limits for harmonic current emissions. -
Page 383: Nrc Waves
PQ Option Composite Harmonics Function (Amps) equipment. The IEC D waveform is the limit for Class D equipment. These waveforms, when used in the PQ current output mode, are particularly useful for checking the performance of instruments that are designed to check these limits. NRC Waves NRC 2 and NRC 4 are voltage waveforms captured in actual fieldwork by the NRC. -
Page 384: How To Set Lcomp
5522A Operators Manual desired current into the calibrator. For example, press “1 A” . The following menu appears: nn336f.eps Because the calibrator is now set up to output current, any previously created wave is removed. A new wave can be created by pressing the SET WAVE blue softkey. The menu shown below appears. -
Page 385: Composite Harmonics Function (Volts And Amps)
PQ Option Composite Harmonics Function (Volts and Amps) test to the proper terminals. Composite Harmonics Function (Volts and Amps) The operation of this mode is similar to the Composite Harmonics Mode described for voltage outputs. After entering the PQ Mode and accessing the Composite Harmonic Function, explained previously in this section, enter the desired voltage and current into the calibrator. -
Page 386: Φ & Ref Menus
5522A Operators Manual I OUT AUX when current is present at the AUX output and I OUT 20A if the current is present at the 20A output. In the PQ mode, the operation of the Output Information behaves slightly different than in the normal operating mode described in Chapter 4. -
Page 387: Φ & Ref Menus
PQ Option Delta (()Amplitude, Flicker Function (Volts) From this menu, the user may edit the wave harmonics. Refer to "Editing Wave Harmonics" earlier in this section. Note Building a wave can be time consuming, especially if using one of the preinstalled waves. -
Page 388: How To Set The Flicker Amplitude
5522A Operators Manual How to Set the Flicker Amplitude The ΔV/V blue softkey brings up a screen in the Control Display allowing the user to specify the amplitude of the deviation as a percentage of the nominal output value. The percentage value may be positive or negative. -
Page 389: More Information
PQ Option Delta (() Amplitude, Single (Sags & Swells) Function (Volts) nn363f.eps More Information For more information regarding the Delta (Δ) Amplitude and Flicker Function in Current mode, refer to "Delta (Δ) Amplitude, Flicker Function (Volts)". Delta (Δ) Amplitude, Single (Sags & Swells) Function (Volts) This mode allows the user to output a single or one-time amplitude deviation. -
Page 390: How To Set Triggers
5522A Operators Manual How to Set Triggers Press the SET TRIGS blue softkey. The SET TRIGS menu, shown below, appears in the Control Display. The Post Trigger Delay is used to provide a variable-length delay after the calibrator receives a *TRG command over the remote interface or manually from the front panel. -
Page 391: How To Set Triggers
PQ Option Delta (() Amplitude, Single (Sags & Swells) Function (Current) The ΔAMPL Menu, shown below, appears in the Control Display, assuming a current (amps) value has been entered. nn351f.eps How to Set Triggers Refer to "Setting Triggers" earlier in this chapter. How to Set the Ramp-up Period Press the RAMP-UP blue softkey. -
Page 392: Remote Commands
5522A Operators Manual nn366f.eps This menu allows editing of the delta () amplitude of both the volts and the current in the single (sag or swells) mode. 5. To edit the delta () volts part of this waveform, press the V/V blue softkey. At the prompt, enter -25 percent, then press , and finally 6. - Page 393 PQ Option Delta (() Amplitude, Single (Sags & Swells) Function (Current) CHM? <PRESET NUMBER> (IEEE-488, RS-232, Sequential) Return the contents of one of the 5 composite harmonic preset waveforms. <PRESET NUMBER> is 1 to 5. The return format is the same as CHTONES? Example: CHM? 2 ______________________________________________________________________ CHMRECALL <OUTPUT CH.>, <USER DEFINED WAVEFROM NUMBER>...
- Page 394 5522A Operators Manual fundamental in degrees. Numbers outside +/- 180 are automatically forced into that range by adding or subtracting a multiple of 360. Example: CHTONES PRI,3,33pct,0,5,20pct,0,7,16pct,0,9,11pct,0,11,9pct,0 Example: CHTONES SEC,3,0.11,-180,5,0.04,0,7,0.02,-180,0,0,0,0,0,0 _______________________________________________________________________ CHTONES? <OUTPUT CH.> (IEEE-488, RS-232, Sequential) Return present settings for harmonics in the format of harmonic number, amplitude, and phase.
- Page 395 PQ Option Delta (() Amplitude, Single (Sags & Swells) Function (Current) _______________________________________________________________________ EVTMODE <E_MODE> (IEEE-488, RS-232, Coupled) Set the event mode for Delta Amplitude operation <E_MODE> is REPEAT --- Flicker operation SINGLE --- Sag/Swell operation Example: EVTMODE SINGLE _______________________________________________________________________ EVTMODE? (IEEE-488, RS-232, Sequential) Returns the event mode in Delta Amplitude operation.
- Page 396 5522A Operators Manual PQ <MODE> (IEEE-488, RS-232, Coupled) Enter/Exit the Power Quality mode. <MODE> is OFF --- for normal 5522 mode CH --- for Composite Harmonic mode DAMPL --- for Sag/Swell or Flicker mode Example: PQ CH --- Enter the Composite Harmonics mode _______________________________________________________________________ (IEEE-488, RS-232, Sequential) Returns the Power Quality calibration mode.
-
Page 397: Example Strings
PQ Option Delta (() Amplitude, Single (Sags & Swells) Function (Current) RAMPTIME? (IEEE-488, RS-232, Sequential) Read the current Ramptime setting. Example: RAMPTIME? _______________________________________________________________________ RPTFREQ <MOD_FREQ> (IEEE-488, RS-232, Coupled) Set the modulation frequency in Flicker mode. <MOD_FREQ> 0.001Hz to 30.0Hz Example: RPTFREQ 10Hz Example: RPTFREQ 5 _______________________________________________________________________ RPTFREQ? -
Page 398: Performance Tests
5522A Operators Manual Performance Tests To verify the PQ option meets its specifications, refer to the performance tests in this section. The tables are for use by qualified metrology personnel only. These tables refer to waveforms that are described elsewhere in this manual, as well as other special waveforms that need to be created in the Composite Harmonics mode. - Page 399 PQ Option Verification Table Table 11-1. PQ Option Verification Table (cont.) Verification Tests for AC Amplitude Specification Specification Harmonic Fundamental Phase Voltage (deg) 100.00% 3.0000 0.0070 100.00% 3.0000 0.0070 100.00% 3.0000 0.0070 100.00% 3.0000 0.0070 100.00% 3.0000 0.0070 100.00% 3.0000 0.0070 100.00% 3.0000...
- Page 400 5522A Operators Manual Table 11-1. PQ Option Verification Table (cont.) Verification Tests for AC Amplitude Specification Specification Harmonic Fundamental Phase Voltage (deg) Range 329.99 V rms 150.0000 0.3100 Wave 100.00% 54.627 0.1299 RMS Output 150 V 100.00% 54.627 0.1299 0.75 Frequency 50 Hz 100.00%...
- Page 401 PQ Option Verification Table Table 11-1. PQ Option Verification Table (cont.) Verification Tests for AC Amplitude Specification Specification Harmonic Fundamental Phase Voltage (deg) Range 329.99 V 230.0000 0.4700 Wave NRC 7030 1 100.00% 206.5460 0.8512 RMS Output 230 V 10.00% -115.5 20.6550 0.8512 0.75...
- Page 402 5522A Operators Manual Table 11-1. PQ Option Verification Table (cont.) Verification Tests for Amplitude Specification Specification Harmonic Fundamental Phase AC Current (deg) Verification Tests for AC Current, LCOMP OFF Range 329.9 mA rms 0.11000 1.22E-03 Wave 100.00% 0.03821 1.38E-04 RMS Output 0.11 A 100.00% 0.03821...
- Page 403 PQ Option Verification Table Table 11-1. PQ Option Verification Table (cont.) Verification Tests for Amplitude Specification Specification Harmonic Fundamental Phase (deg) AC Current 20.00% 0.3317 0.0133 20.00% 0.3317 0.0133 20.00% 0.3317 0.0133 Range 20.5 A 4.80000 0.0196 Wave IECA 100.00% 2.89500 0.0129 RMS Output 4.8 A...
- Page 404 5522A Operators Manual Table 11-1. PQ Option Verification Table (cont.) Verification Tests for Amplitude Specification Specification Harmonic Fundamental Phase (deg) AC Current Range 20.5 A 5.80000 0.0216 Wave IECD 100.00% 5.04200 0.0150 RMS Output 5.8 A 46.90% 2.36600 0.0150 Frequency 50Hz 26.20% 1.32200 0.0150...
- Page 405 The frequency range of human hearing; normally 15 - 20,000 Hz. artifact standard An object that produces or embodies a physical quantity to be standardized, for example a Fluke 732A dc Voltage Reference Standard. base units Units in the SI system that are dimensionally independent. All other units are derived...
- Page 406 5522A Operators Manual buffer 1. An area of digital memory for temporary storage of data. 2. An amplifier stage before the final amplifier. burden voltage The maximum sustainable voltage across the terminals of a load. compliance voltage The maximum voltage a constant-current source can supply. control chart A chart devised to monitor one or more processes to detect the excessive deviation from a desired value of a component or process.
- Page 407 Glossary floor The part of the uncertainty specification of an instrument that is typically a fixed offset plus noise. Floor can be expressed as units, such as microvolts or counts of the least significant digit. For the 5522A, the floor specification is combined with fixed range errors in one term to determine total uncertainty.
- Page 408 5522A Operators Manual life-cycle cost The consideration of all elements contributing to the cost of an instrument throughout its useful life. This includes initial purchase cost, service and maintenance cost, and the cost of support equipment. linearity The relationship between two quantities when a change is the first quantity is directly proportional to a change in the second quantity.
- Page 409 Glossary offset error Same as zero error. The reading shown on a meter when an input value of zero is applied is its offset or zero error. parameters Independent variables in a measurement process such as temperature, humidity, test lead resistance, etc.
- Page 410 5522A Operators Manual repeatability The degree of agreement among independent measurements of a quantity under the same conditions. resistance A property of a conductor that determines the amount of current that will flow when a given amount of voltage exists across the conductor. Resistance is measured in ohms. One ohm is the resistance through which one volt of potential will cause one ampere of current to flow.
- Page 411 Glossary specifications A precise statement of the set of requirements satisfied by a measurement system or device. stability A measure of the freedom from drift in value over time and over changes in other variables such as temperature. Note that stability is not the same as uncertainty. standard A device that is used as an exact value for reference and comparison.
- Page 412 5522A Operators Manual true power The actual power (real power) used to produce heat or work. Compare to ‘apparent power.” true value Also called legal value, the accepted, consensus, i.e., the correct value of the quantity being measured. uncertainty The maximum difference between the accepted, consensus, or true value and the measured value of a quantity.
- Page 413 Appendix B ASCII and IEEE-488 Bus Codes...
- Page 414 5522A Operators Manual...
- Page 415 ASCII and IEEE-488 Bus Codes ASCII DEV. MESSAGE ASCII BINARY BINARY DEV. MESSAGE OCTAL DECIMAL OCTAL DECIMAL CHAR. 7654 3210 ATN=TRUE CHAR. 7654 3210 ATN=TRUE BELL SPACE " & < > fb-01.eps...
- Page 416 5522A Operators Manual...
- Page 417 The IEEE-488 connector on the rear panel mates with an IEEE-488 standard cable. The pin assignments of the rear-panel IEEE-488 connector are shown in Figure C-1. IEEE-488 connection cables are available from Fluke as shown in Table C-1. See Chapter 9, “Accessories,” for ordering information.
- Page 418 5522A Operators Manual Serial connection cables are available from Fluke are shown in Table C-2. See Chapter 8, “Accessories,” for ordering information. Table C-2. Serial Port Connection Cables Connection Cable Fluke Part Number 5522A SERIAL 1 FROM HOST PC COM port (DB-9)
- Page 419 RS-232/IEEE-488 Cables and Connectors Serial Connectors 5522A NULL MODEM CABLE SERIAL 1 FROM HOST SERIAL 2 MODEM CABLE RS-232 TO UUT RLSD gjh069.eps Figure C-4. Serial Port Connections (DB-9/DB-9)
- Page 420 5522A Operators Manual 5522A NULL MODEM CABLE SERIAL 1 FROM HOST MODEM CABLE RS-232 SERIAL 2 TO UUT RLSD gjh071.eps Figure C-5. Serial Port Connections (DB-9/DB-25)
- Page 421 Appendix D Error Messages Error Messages The following is a list of the Calibrator error messages. The error message format is shown in Table D-1. Table D-1. Error Messages Format Error Number (Message Class : Description) Text Characters 0 to 65535 QYE Query Error, caused by a full F Error is displayed on the Up to 36 text...
- Page 422 5522A Operators Manual (DDE:FR D) A/D fell asleep (DDE:FR D) Inguard watchdog timeout (DDE:FR) Inguard is obsolete (DDE:FR D) Inguard parity error (DDE:FR D) Inguard overrun error (DDE:FR D) Inguard framing error (DDE:FR D) Inguard fault error (DDE:FR D) Inguard fault input error (DDE:FR D) Inguard fault detect error (DDE:FR D)
- Page 423 Error Messages Error Messages (DDE: ) Cannot enter watts by itself (DDE: ) Output exceeds user limits (DDE: ) Duty cycle must be 1.0-99.0 (DDE: ) Power factor must be 0.0-1.0 (DDE: ) Can't select that field now (DDE: ) Edit digit out of range (DDE: ) Can't switch edit field now...
- Page 424 5522A Operators Manual (DDE:FR ) That requires a -SC600 option (DDE: ) Time limit must be 1s-60s (DDE: ) Can't set ref. phase now (DDE: ) ZERO_MEAS reading not valid (DDE: ) Can't set dampen now (DDE: ) Can't turn EXGRD on now (DDE: ) Slave cannot send SYNCOUT (DDE: FR)
- Page 425 Error Messages Error Messages 1318 (EXE: R ) Bad number 1319 (EXE: R ) Service command failed 1320 (CME: R ) Bad binary number 1321 (CME: R ) Bad binary block 1322 (CME: R ) Bad character 1323 (CME: R ) Bad decimal number 1324 (CME: R )
- Page 426 5522A Operators Manual CalPlus GmbH CalPlus GmbH Niederlassung Hamburg Zentrale Berlin Normannenweg 30 • 20537 Hamburg Heerstraße 32 • 14052 Berlin Tel.: 040 3039595-0 • Fax: 040 3039595-50 Tel.: 030 214982-0 • Fax: 030 214982-50 scopeshop@calplus.de • www.calplus.de office@calplus.de • www.calplus.de...