CAS LP-II Service Manual
Hide thumbs
Also See for LP-II:
- Owner's manual (90 pages) ,
- Network manual (27 pages) ,
- Network manual (25 pages)
Table of Contents
Advertisement
Quick Links
Advertisement
Table of Contents

Related Manuals for CAS LP-II


Summary of Contents for CAS LP-II
- Page 1 LP - II Thermal Label Printing Scale Service Manual Version 3.0...
- Page 3 Attention: Copyright 2006, by CAS Corporation. All rights reserved. No part of this publication may be © reproduced, transmitted, transcribed, stored in a retrieval system, or translated into any language or computer language, in any form or by any means, electronic, mechanical, magnetic, optical, chemical, manual or otherwise, without the prior expressed written permission of this company.
-
Page 4: Table Of Contents
Table of Contents 1 General Introduction ..........................1 Model and Specifications....................2 Dimensions..........................3 2 Unpacking and Assembly Unpacking ..........................4 Assembly of DisplayColumn ....................5 3 Proper Operation Environmental Considerations and Safety................ 6 Leveling and Location......................7 Power Outlet and Requirements ..................8 4 Nomenclature Scale Overview........................ - Page 5 10 Printer Hardware Settings 10.1 Printer Hardware Settings Menu ..................34 10.2 Printer Sensors ........................34 10.2.1 Gap/Peel Calibrate......................34 10.2.2 Gap Sensor Fine Adjust ...................... 35 10.2.3 Peel Sensor Fine Adjust....................... 35 10.3 Print Speed ........................... 35 10.4 Printer Odometer ........................ 36 10.5 Label Type ..........................
- Page 6 15 Installing Options 15.1 Installing the Network Memory Card ................56 15.2 Installing the Paper Cutter ....................56 16 Troubleshooting 16.1 Troubleshooting Chart ......................57 16.2 Additional Errors ........................59 17 Diagrams 17.1 System Block Diagram ......................60 17.2 Connection Diagram ......................61 17.3 Main PCB ........................
-
Page 7: Limited Warranty
CAS product after its shipment from CAS, e.g., the dealer-added boards or chips, or the accuracy of the product after it is shipped from CAS. CAS is not responsible for warranty service should the CAS label or logo or the rating... -
Page 9: General
& limit access to the scale for increased security. Communication is another powerful feature of the LP-II. It comes with an RS-232 port, which can tie a scale to a personal computer (P.C.) for exporting or importing program data. Because PLU and all other data files are kept locally in each scale’s RAM memory, the scale’s speed is the same in a network... -
Page 10: Model And Specifications
1 General Model and Specifications MODEL LP-2, (version 2.23) CHARACTERS PER PLU Ingredients: 2000 characters, PLU Name: 114 characters DISPLAYS WEIGHT: 5 digits (5 max) UNIT PRICE: 6 digits (8 max) TOTAL PRICE: 7 digits (9 max) GENERAL Scrolling Messages : 32 @ 80 Char Users/Clerks : 99 @ 20 Char... -
Page 11: Dimensions
1 General 1.3 Dimensions... -
Page 12: Unpacking And Assembly
2 Unpacking and Assembly 2 Unpacking and Assembly Unpacking Description Desiccant, silica bag LP-2, Display assembly LP-2, Display assembly screws LP-2, Scale body Owner’s Manual, LP-2 Packing box Packing lid Plastic bag, display column Plastic bag, scale Fuse Platter SP-2 software package Thermal labels, 1 roll (installed) Top form-fitted packing foam Bottom form-fitted packing foam... -
Page 13: Assembly Of Displaycolumn
2 Unpacking and Assembly Assembly of Display Column You must follow the instructions in this section in order to assemble the Display Assembly properly. To begin the installation, make sure that the scale is unplugged from any electrical source. Your scale body has a display column bracket in the rear that the display column slides into. -
Page 14: Proper Operation
3 Proper Operation 3 Proper Operation Environmental Considerations & Safety 1) Please avoid the following hostile conditions: Temperatures below or exceeding: Ungrounded electrical outlet -10º C ~ 40º C (14º F ~ 104º F) Excessive vibration Unstable or flimsy surface Wind or fans functioning in direct Shared electrical outlet contact with weighing platform. -
Page 15: Leveling And Location
3 Proper Operation Leveling and Location 1) Location: This scale must be placed on a flat and stable surface. Please keep the scale away from the direct path of oscillating fans, ventilation systems, or strong drafts as these air disturbances can be picked-up by the scale’s very sensitive weighing platform and may cause incorrect weight readings. -
Page 16: Power Outlet And Requirements
If you have any problems or questions regarding this matter, make sure to contact your authorized dealer or the CAS USA Service Department. Note: Be sure to check the LP-2’s serial number plate on the back of the scale for power specifications. -
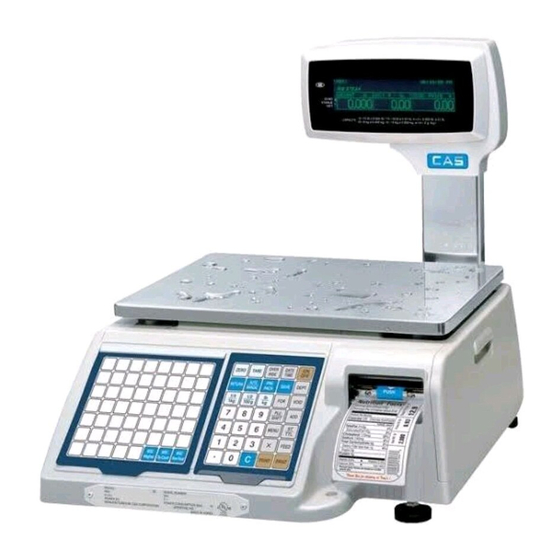
Page 17: Nomenclature
4 Nomenclature 4 Nomenclature Scale Overview 1) Pictured below are important scale components and parts that you should be familiar with. Description Description Description Advertisement Insert, rear Fuse Cap Power Switch Wireless Bridge Connector Gauge, Leveling Printer RS-232C 25 Pin Connector Keyboard, Numeric Serial Number Plate RS-232C 9 Pin Connector... -
Page 18: Display And Indicators
4 Nomenclature Display and Indicators 1) VF Display: The front and rear displays on the LP-2 are dot matrix vacuum fluorescent displays. They will display all information pertinent to operating the scale. LP-2 Display Window: Sales <REG> Auto PrePack Shift Ride 12:12:00 PM This is PLU Commodity Nam TOTAL PRICE $... -
Page 19: Printer
4 Nomenclature Printer 1) Pictured below are important printer components and parts that you should be familiar with. Description Description Description Label/Paper Roll Platen Sensor Assembly, Gap Label Roll Spool Pressure plate & width adjuster Sensor Assembly, Peel-Off Lock-Down Tab Pressure shaft Shaft, Pick-Up Motor Paper Cutter... -
Page 20: The Program Mode Numeric Keypad
4 Nomenclature The Program Mode Numeric Key Pad COPY PAGE ▲ BACK SAVE ◀ ▶ SPACE DELETE PASTE INSERT PAGE ▼ OVER DOWN SHIFT HELP TEST LABEL FEED ENTER Description Numeric keys. Used to enter programming data. Decimal key. Clear key. Used to clear erroneous entries and error conditions. Also stops multi-label printing that is in progress. - Page 21 4 Nomenclature Description PAGE PAGE Page Up & Page Down keys. Use these to navigate 1 screen at a time. DOWN A ~ Z Alpha keys. Used to type text data. Insert/overwrite key. Used to toggle between Insert and overwrite modes for INSERT OVER text typing.
-
Page 22: The Program Mode Plu Keypad
4 Nomenclature 4.5 The Program Mode PLU Key Pad SPACE “ & ‘ À È Ì Ñ Ò Ù Ü < à è ì ñ ò ù ü > CHANGE EDIT DELETE LIST PROGRAM PRINT ASSIGN PRICE PLUs SPEED KEYS TEST SCROLL Description... - Page 23 4 Nomenclature Description LIST PLUs PLU Listing key. SPEED KEYS Speed Key programming key. PRINT TEST Print test key. ASSIGN Scrolling message assignment key. SCROLL...
-
Page 24: Getting Started
5 Getting Started 5 Getting Started Installation of the Label Roll To install the label roll at ANY time you must follow the directions in this section: 1) Press the ON/OFF key and make sure that the display is completely off. Open the printer’s side- access panel. - Page 25 5 Getting Started 3) Take the new roll of labels and find the ending. Peel-off and discard about one foot (12 inches) of labels from the backing before installing the roll into the scale. Place the label in the scale as shown and thread the backing through the appropriate places.
-
Page 26: Menu And Data Entry System
5 Getting Started .2 Menu and Data Entry System Enter Calibration Menu, hold down the ON/OFF key while turn on the power he CAL Main Menu screen looks < CAL: MAIN MENU > like this: 1. CALIBRATION 5. NETWORK OPTIONS Pressing ESC from this menu 2. - Page 27 5 Getting Started < Calibration Mode Diagram > STEP1 STEP2 STEP3 CALIBRATION(MENU) CALIBRATION SPAN CALIBRATION SPAN/ZERO FINE ADJUST GRAVITY CONSTANT CAPACITY & UNITS SYSTEM OPTIONS WEIGHT OPTIONS C211 CAPACITY & UNIT C212 TARE OPTIONS C213 ZERO RANGE C214 CAPTIONS, HEADINGS NON-WEIGHT OPTIONS C221 DECIMAL SETTING...
-
Page 28: Calibration Mode
8. PRICE OPTIONS made. NOTE: Only CAS trained personnel should attempt to make changes in CAL mode. If you are not trained to work on this equipment, please contact the CAS (USA) Service Department for assistance. Non-qualified personnel attempting service the CAS LP-2, risk void the scale’s warrantee. -
Page 29: Calibration Menu
7 Calibrating the Scale 7 Calibrating the Scale Calibration Menu Once at the CAL Main Menu < CAL: MAIN MENU > screen, press the 1 key. 1. CALIBRATION 5. NETWORK OPTIONS 2. SYSTEM OPTIONS 6. SELF TEST 3. DIGITAL FILTERING 7. -
Page 30: Span/Zero Find Adjust
If problems persist, you may have a damaged: A/D Converter (90%). If problems persist, you may have a damaged: Load Cell (5%). Contact the CAS Service Department: Other (5%). NOTE: Any changes made here will affect the NTEP Audit Trail counters (CAL counter only.) *IZR: Initial Zero Range allows +10%-of-Capacity from Calibrated Zero point. -
Page 31: Gravity Constant
7 Calibrating the Scale ZERO: The Zero value is the current Zero value for the scale. It should be +10% from the calibrated zero; however, if you change and save this value, it becomes the calibrated zero value. While the cursor is on the Zero field, you can change this value but, you must press the ENTER key twice for it to take effect. - Page 32 7 Calibrating the Scale Denmark Copenhagen 9.8159 Taiwan Taipei 9.7904 Ecuador Quito 9.7724 Tunisia Tunis 9.7799 Finland Helsinki 9.8189 Turley Ankara 9.8024 Germany Dusseldorf 9.8129 Uruguay Montevideo 9.7964 Great Britain London 9.8144 Anchorage 9.8189 Greece Athens 9.8009 Atlanta 9.7964 Guatemala Guatemala City 9.7844 Boston...
-
Page 33: System Options
8 System Options 8 System Options 8.1 Weight Options Once at the CAL Main menu screen, press the 2 key. < CAL: SYSTEM OPTIONS > The System Options Menu screen will appear as follows. At the 1. WEIGHT OPTIONS System Options Menu screen, 2. -
Page 34: Tare Options
8 System Options 8.1.2 Tare Options NUMERIC Once at the Weight Options Menu screen, press the 2 key for < CAL: TARE OPTIONS > Tare Options. The Tare Options screen will appear as follows. This Tare :[0] 0. Full Tare is what the screen looks like when Tare Mode :[0]... -
Page 35: Captions & Headings
NOTE: Any changes made here will affect the NTEP Audit Trail counters (OPT counter only.) 8.1.4 Captions & Headings For changes to Captions or Headings please consult your Authorized CAS Dealer. These changes are only possible through Service Programming: < SET: CAPTIONS & HEADINGS >... - Page 36 8 System Options The Label Captions screens are very similar varying only in the defaulting data. INS/CAPS (1/4)< SET: LABEL CAPTIONS CURRENCY > Total Price: [TOTAL PRICE $ By-Count Price: [QTY / $ By-Weight lb Price: [PRICE $/lb By-Weight kg Price: [PRICE $/kg Tare lb: [TARE lb INS/CAPS (2/4)<...
-
Page 37: Non-Weight Options
8 System Options The Display Headings screens are very similar; however, Display -Headings has one more screen than The Display Headings screens are very similar; however, Display -Headings has one more screen than INS/CAPS Currency 1 screen 1 of 2. Currency 1 screen 1 of 2. -
Page 38: Keypad Options
8 System Options 8.2.2 Auto Print Threshold 8.2.2 Auto Print Threshold Once at the Non-Weight Options Menu screen, press the 3 key for Auto Print Threshold. The Auto Print Once at the Non-Weight Options Menu screen, press the 3 key for Auto Print Threshold. The Auto Print Threshold screen will then appear as follows: Threshold screen will then appear as follows: Min Weight:... -
Page 39: Clear Memory
8 System Options The second screen looks like this: INS/CAPS (2/2) < CAL: KEYPAD OPTIONS > lb/kg key: If you set this to Y then the lb/kg key will work in sales Numeric Tare Allowed ? (Y/N) :[Y] mode and allow you to switch Double Zero Key Allowed ? (Y/N) :[Y] between lb &... -
Page 40: Select Country
8 System Options The Clear Memory Menu screen will appear as follows: The Clear Memory Menu screen will appear as follows: Non-Volatile Memory: Non-Volatile Memory: This is where all of your PLU data, label formats (100 ~ 999), and non-CAL mode settings are stored. -
Page 41: Digital Filtering
9 Digital Filtering 9 Digital Filtering 9.1 Digital Filter Settings Once at the CAL Main menu NUMERIC screen, press the 3 key. The < CAL: DIGITAL FILTERING > Digital Filtering screen will appear as follows: Motion Band : [ 3] COUNTS Filter Band : [10] COUNTS Filter Sample Times... -
Page 42: Printer Hardware Settings
10 Printer Settings 10.1 Printer Hardware Settings Menu Once at the CAL Main menu screen, press the 4 key. The < CAL: PRINTER HARDWARE SETTINGS > Printer Hardware Settings Menu screen will appear as follows. 1. PRINTER SENSORS 5. ADJUST FEED LENGTH 2. -
Page 43: Gap Sensor Fine Adjust
10 Printer Settings Once the threshold values are printed they will also appear on the top left corner of the < CAL: PRINTER SENSOR CALIBRATION > screen temporarily. Finally, the screen will return to the Printer The Printer will calibrate sensors Sensors menu. -
Page 44: Printer Odometer
10 Printer Settings If you press ENTER or SAVE, the scale will print a TPH (Thermal Print Head) test label at the indicated speed and return to the previous screen. Speed 1 is 4”/second (100 mm/sec); speed 5 is approximately 2”/second (50 mm/sec.) 10.4 Printer Odometer At the Printer Hardware Settings The printer has run for 20.532 Meters... - Page 45 10 Printer Settings Width: This value is the width of the label or paper and NOT the width of the liner backing paper. It must be specified in millimeters. If this value is incorrect then some label formats may print properly but no receipts or reports will print properly.
-
Page 46: Feed Adjust
LP-2 Software Package. If you use the same label stock, you will not need to change this value. Make sure to always use CAS Certified media. Using poor quality media, whether it is thermal paper or labels, may damage your TPH. -
Page 47: Setting Up A Network
11 Network Options 11.1 Setting Up a Network To set up a wireless network using a router and internal wireless bridge (optional), there are several steps which must be done using a PC. Refer to Networking manual for additional information. The following are the instructions for setting up the scale At the CAL menu, press the 5 key for Network Options and the following screen appears. - Page 48 11 Network Options PC IP Address: This is obtained from the Network Connections menu on the computer. You will be given a choice to either assign a number of have one automatically assigned. It is strongly recommended that you choose your own number. Make sure the first three numbers match the IP address Scale UDP Port: When connected to a PC, all port settings should be automatically detected.
-
Page 49: Self Test Mode
12 Self Test Mode 12.1 Self Test Menu Once at the CAL Main menu screen, press the 6 key. The Self < SELF TEST > Test Menu screen will appear as follows. 1.DISPLAY 6.MEMORY SIZE 2.LOADCELL 7.NV MEMORY TEST 3.KEYBOARD 8.SERIAL PORT 4.PRINTER 9.FIRMWARE VERSIONS... -
Page 50: Keyboard Test
12 Self Test Mode ( Raw Counts – Current Zero ) X ( Resolution ÷ Span Value ) ÷ 1000 = Weight Where Resolution = to 60000 for 60 lb, 30000 for 30 kg or lb, 15000 for 15 kg In our case if we place 60 lb on the platter, the raw counts should be 77624. -
Page 51: Printer Test
The rubber roller may be dirty or have something stuck to it. Also, the roller may be perforated. This is a clear indication that the TPH has been damaged or burned out. If you need to replace the TPH, please contact the CAS (USA) Service Department. -
Page 52: Peel Off Test
12 Self Test Mode 12.6 Peel Off Test At the Self Test Menu screen, press < PRINTER PEEL-OFF TEST > the 5 key for Peel-Off Test. The scale will then display the Printer SENSOR CHECK : UNBLOCKED Peel-Off Test screen. If you lay flat a piece of paper on the left side of the Peel Bar, you will see the UNBLOCKED status... -
Page 53: Serial Port Test
12 Self Test Mode 12.9 Serial Port Test At the Self Test Menu screen, press the 8 key for Serial Port Test. The scale will then display the Serial Port Test screen. < TEST: SERIAL COMM TEST > Place loopback plug on 9-pin RS-232C port Press any key when ready Before you continue from this screen, you need to place a loop-back plug on the 9-pin serial port on the side of the scale. -
Page 54: Audit Trails
13 Audit Trails 13.1 Reading the Audit Trail Counters Make sure that the Main Power is OFF (switch on left side of scale.) Press and hold down the PRE PACK key. While you are holding down the PRE PACK key, turn the Main Power ON. Once you here a “chirp”... -
Page 55: Servicing And Parts Replacement
14 Servicing and Parts Replacement 14.1 Platform Safety Overload Adjustment Make sure that the Main Power switch is OFF & that the scale is unplugged. Remove the platter from the platform. Place 1/2 the scale capacity on the right-rear corner of the platform making sure not to obstruct the Allen-bolt. - Page 56 14 Servicing and Parts Replacement Remove the 4 screws on the corners of the uppercase. Remove the key board: Remove the 2 keyboard screws on top of the upper case. Remove the keyboard grounding screw on the Main PCB. Unplug the keyboard cable from J7 on the Main PCB. 8.
-
Page 57: Main Pcb Replacement
14 Servicing and Parts Replacement 14.3 Main PCB Replacement Follow all of the directions in section 0 first. Unplug the main PCB connectors at: J9, CAL Switch. J10, Peel Sensor. J11, Peel Emitter. J13, Thermal print head. J14, Stepper motor. J15, Gap sensor assembly. -
Page 58: Network Board Replacement
14 Servicing and Parts Replacement 14.4 Network Board Replacement The network board is located on top of the Main cpu 1.Follow all of the directions in section 14.2 first 2. R emove th ree screws, two on the le and one in the middle of the right side. 3. -
Page 59: Printer Assembly Replacement
14 Servicing and Parts Replacement 14 6 Load Cell & A/D Converte r Replacement Follow a ll of the directions in sect ion 0 first. Unplug the A/D Converter connec tors at: A. CO N2, Load cell data. B. CO N3, Load cell powe Remove the 5 screws around the perimeter of the load cell assem bly chassis. -
Page 60: Rewind Motor Assembly Replacement
14 Servicing and Parts Replacement 14 7.1 Rewind Motor Assembly Replacement Follow all of the direction s in section 0 first. Unplug connector J16 on main PCB. Remove the Rewind Clamp. While holding the Rewind Support, unscrew the screw inside the its center. Remove the Rewind Support from the Rewind Joint. -
Page 61: Thermal Print Head Replacement
14 Servicing and Parts Replacement 14.7.3 Thermal Print Head Replacement Please make sure not to scrape the undersurface of the Print Head at all times. Make sure that the Main Power switch is OFF & that th scale is unplugg Remove all labels &... -
Page 62: Label Roll Spool Replacement
14 Servicing and Parts Replacement 14.7.6 Label Roll Spool Replacement 1. Make sure that the Main Power switch is OFF & that the scale is unplugged. 2. Remove all labels & backing paper from the printer 3. Remove center screw from label roll spool 4. -
Page 63: Keyboard Replacement
14 Servicing and Parts Replacement 14.9 Keyboard Replacement Make sure th at the Main Power switch is OFF & that the scale is unplugged. 1. Remove the platter from the platform & all labels& backing paper from the printer. 2. Remove the keyboard: A. -
Page 64: Installing Options
15 Installing Options 15.1 Installing the Network Memory Card 1. Make s ure t he power switch is OFF and t he scale is unplug 2. Remove th keyboard: A. The 2 keyboard screws on top of the upper case B. -
Page 65: Troubleshooting
16 Troubleshooting 16.1 Troub leshooting Chart Symptom Possible Causes Possible Solutions Reference Scale will not 1. No power to the Power Plug the Power Cord in to a working outlet 3.3, 4.1, 14.4, 17.5, power ON. Supply. Check/replace fuse. 18.1, 19.7 Check/replace Power Cord. - Page 66 16 Troubleshooting 2. Printer prints but labels are Make sure Print Head is in lock-down position. 4.3, 5.1, 10.3, 12.5, blank. Make sure that there is thermal labels or paper in the 13.4, 14.6, printer and that the media is properly installed. 14.3, 17.5, Check/replace Media (Labels or paper.) 18.2, 19.8...
-
Page 67: Additional Errors
16 Troubleshooting 16.2 Additional Errors A/D Converter Error-Check connection between load cell and A/D converter Replace load cell Replace A/D converter NV Fragmentation Error-Perform NV defragmentation in Calibration menu Calibration Warning-Recalibrate Scale-NOTE: often when this message appears You cannot get into Calibration Mode by holding ON/OFF while powering on. In this case, you must use the calibration switch on top of the main cpu. -
Page 68: Diagrams
17 Diagr ams 17.1 System Block Diagram Display Static Real EPROM Static Flash EPROM Time Converter Memory Clock Address Address /Data bus /Data bus Control Control Chip (Scale) (Printer) Selector Chip -volatile Selector Control Step RS-232 Interrupt Peel off Scan Motor Driver -PROM... -
Page 69: Connection Diagram
17 Diagr 17.2 Connection Diagram ANALOG SMPS DC MOTOR MODULE J21 J22 J17 J18 J19 J20 SERIAL GAP SENSOR CONNECTOR ETHERNET MAIN BOARD STEP M TOR CONNECTOR CASH DRAWER J 13 CONNECTOR J5 J6 J8 J10 J11 ETHERNET PEEL-OFF CAL SWITCH BOARD MODULE SENSOR... - Page 70 8V_GND 74HC123D 74HC123D AVREF CB22 CB23 CB24 CB25 CB26 CB27 CB28 CB29 CB30 CB31 RESET+ 2.2K Title LP-II MAIN BOARD (Ethernet Cash Drawer Version) INIT TPHDATA ESD1 C3875S C3875S PRxD 2.2K TPHCLOCK MTG1 MTG2 MTG3 MTG4 MTG5 MTG6 MTG7 MTG8...
- Page 71 INT7 INT6 RSTDRV INT5 SMEMWB INT4 SMEMRB 47uF/16V 0.1u 10nF 10nF 10nF 10nF 10nF 100nF 100nF FROM LON CONTROLLER PART 100K RD/8019 FROM OUTPUT Title LP-II ETHERNET & MEMORY CARD Size Document Number 6180-PL2-0002-0 Date: Friday, November 09, 2001 Sheet...
-
Page 75: Part's List
U8~1 6216-IS0-1608-0 IC(GAL) ALCE16V8H-25JC/4:LPⅡ U6,18 6232-I00-001N-0 IC(ETHERNET TRANSFORME CL20F001N 6232-IS0-8019-0 IC(ETHERNET CONTROLLER TL8019AS(LP-2)NE 6236-IS0-0245-A IC(C-MOS) 4HC245D (LP-II) 3,14~15 6236-IS0-0573-A IC (C-MOS) 4HC573D (LP-II) U4,5,1 6~17 6527-ID0-2200-0 CHIP RE' 1/10W R1220P-221D (220Ω ) 6527-ID0-3300-0 CHIP RE' 1/10W R1220P-331D (330Ω ) 6527-ID3-0270-0... -
Page 76: Ethernet Option Board Ass'y
18 Part’s List 18.1.3 ETHERNET OPTION BOARD ASS'Y ART-NO RT NAME SPECIFICATION EMARK 180-PL2-0003-0 HERNET PC B (LP-II) 6180-PL2-0003-0 216-IS0-1608-0 (GAL) PALCE16V8H-25J C/4:LPⅡ 232-I00-001N-0 IC(ETHERNET TRANSFORME YCL20F001N 232-IS0-8019-0 (ETHERNET CONTRO LLER RTL8019AS(LP-2 )NET' 6236- IS0-0245-A IC(C- MOS) 74HC245D (LP-II) 14~15... -
Page 77: Analog Pcb Ass'y
FLAT CABLE CONNECTOR 20P*20P*300(LP-II) 7850-W00-5217-0 LAT CABLE CONN ECTOR 26P*26P*170 7850-W00-5227-0 LAT CABLE CONN ECTOR 26P*26P*270(LP-II) 7860-GND-0151-0 ARTH TERMINAL A SS'Y 150mm(UL,CE,CSA)YE L'/GREEN 9400-A00-0024-0 APE (INSULATOR) 88*19*0.13t (TESA) 2600-A00-0069-0 PACER 88*17*2t(LP-2) 7860-GND-1501-0 ROUND TERMINAL ASS'Y 1500mm(UL,CSA,CE)YE L'/GREE 7870-W00-0115-0 EAD WIRE(LP-II) 1P*150mm(SLEEV E)WHITE... -
Page 78: Main Pcb Ass'y
18 Part’s List 18.1.7 MAIN PCB ASS'Y PART-NO PART NAME SPECIFICATION REMAR 6100-PL2-0001-A MAIN PCB (LP-II) 6100-PL2-0001-A 200-IS0-0433-0 IC(CPU PD70433GJ-16-3EB(V55) U17,29 6200-IS0-6242-0 IC(REAL TIME CLOCK) MSM62X42BGS-K 200-IS0-8255-0 IC(PP PD82C55,D71055GB 6202-IS0-1221-0 IC(NV RAM CONTROL) DS1221S(SOIC16P 6202-IS0-6161-0 IC(SRAM) KM6161000BLTI-7 6202-IS0-6810-0 IC(SRAM) KM681000BLG-7L... -
Page 79: Display Pcb Ass'y
ECTOR 332-20P(HIF-3FB-20P 7813-C00-0026-0 SOCKET CONNECTOR 332-26P LP-Ⅱ 7813-C00-0048-A SOCKET CON NECTOR CN10-48P-2.54DSA( LP-2 7860-GND-0050-0 GROUND WIRE 0mm ( Y/G ) LP-II 1507-A00-0318-0 MACHINE SCREW(CON) 3*18(LP-2) 1540-MSU-0300-0 NUT (HEX) 3*05 -SUS 18.1 .8 CAL PCB A SS'Y PART-NO PART NAME PECIFIC... -
Page 80: Ap Sensor Pcb Ass'y
7840-W00-0418-0 CONNECTOR WIRE 4P*180(LP-15) 18.1 .11 KEY PCB A SS'Y PART-NO PART NAME SPECIFICATION MARK 6130-PL2-2001-0 KEY BOARD PCB 6130-PL2-2001-0(LP-II) 6S30-PL2-2001-0 KEY PCB INSERT 6130-PL2-2001-0(LP-II) 7600-STA-1103-A TACT S/W SKHCAD (LP-2) 7813-C00-0020-0 SOCKET CONNECTOR 5332-20P(HIF-3FB-20PA- 18.2 MECHANIC 18.2.1 UPPER CASE ASS'Y... -
Page 81: Display Case Ass'y
18 Part’s List 18.2.2 DISPLAY CASE ASS'Y PART-NO PART NAME SPECIFICATION Q'TY REMARK 2004-A00-0023-0 DISPLAY COVER (F) 52.5*269.5*178.5 2004-A00-0024-0 DISPLAY COVER (R) 21.6*276.75*175.75 1020-A00-0001-0 DISPLAY BRACKET(F) 235*126.5*10*1t 1020-A00-0002-0 DISPLAY BRACKET(R) 235*126.5*10*1t 1030-A00-0060-0 DISPLAY CONN.BRACKET 60*28*25.8*1.6t 1150-A00-0001-0 DISPLAY BAR 78.8*30.8 1210-A00-0024-0 DISPLAY POST HEX.6*23*M3 1800-LP2-0033-0... -
Page 82: Pot Ass'y
18 Part’s List 18.2.4 L/C BRACKET ASS'Y PART-NO PART NAME SPECIFICATION Q'TY REMARK 1100-A00-0035-0 L/C BRACKET LP-2 1100-A00-0036-0 PLATFORM BRACKET LP-2 1030-A00-0062-0 CELL LIMIT PLATE 38*45*20*2t 1503-A00-0412-0 MACHINE SCREW (WPH) M4*12 1535-MSU-0620-0 WRENCH BOLT (WA) M6*20 1502-A00-0408-0 MACHINE SCREW (PH) M4*8 1530-MSU-0620-0 WRENCH BOLT... -
Page 83: Main Bracket Ass'y
18 Part’s List 18.3.2 MAIN BRACKET ASS'Y PART-NO PART NAME SPECIFICATION Q'TY REMARK 1030-A00-0057-0 MAIN BRACKET 197.5*138*20*2t 1150-A00-0002-A HEAD FRAME 101*47.5*47.6 1210-A00-0077-0 PAPER CUT SHAFT φ 7*102.7*5*M3 1210-A00-0031-0 REWIND GUIDE SHAFT φ 6*105*M3 1210-A00- 0032-0 DE BRK SUPPORT .10*101*M4 1150- A00-0003-0 LOWER FRAME 101*35.7*44.7 2010-A00-0003-0... -
Page 84: Paper Guide Ass'y
18 Part’s List 18.3.4 PAPER GUIDE ASS'Y PART-NO PART NAME SPECIFICATION Q'TY REMARK 1210-A00-0037-0 SUPPORT HEX.6*48.4*M4 2000-A00-0068-0 PAPER GUIDE HOUSING 30*15*97.5 2011-A00-0006-0 PAPER GUIDE 36*16.5 1000-A00-0077-0 PAPER GUIDE LOCKER 24*17*0.8t 1000-A00-0045-0 PAPER PRESSURE 24.5*61*19.8*0.8t 1000-A00-0046-0 SUPPORT PRESSURE 22*16.8*13.8*0.8t 1210-A00-0020-0 SHAFT PRESSURE φ... -
Page 85: Appendix A-Country Codes
Appendix A-Country Codes Country Country Country Denmark Djibouti Dominica Dominican Republic Laos Latv Ecuador Leban Egypt otho El Salvador Libe Afghanistan Equatorial Guinea Libya Algeria Eritrea Liecht enstein Andorra Estonia thuania Angola Ethiopia Luxembour Antarctica Ecuador Antigua & Barbuda Argentina Macedonia Armenia Fiji... - Page 86 Appendix A-Country Codes Country Country Country Sri Lanka United Kingdom Qatar Sudan United States Suriname Swaziland Romania Sweden ruguay Russian Federation Switzerland zbekistan Rwanda Syria anuatu Saint Kitts Taiwan atican City Saint Lucia Tajikistan Venezuela Saint Vincent Tanzania Vietnam San Marino Thailand Sao Tome Togo...
-
Page 87: Appendix B-Label Formats
Appendix B-Label Formats Format numbers 1 to 99 are built into LP-2; however, only 56 of the 99 available label formats are used. These formats are a permanent part of the LP-2’s memory and CANNOT be lost or erased. Using the LP- 2 version 2.14 software package, you can program format numbers 100 to 999. - Page 88 For a complete cross-reference and listing, visit us on the web at www.cas-usa.com. These formats are subject to change without notice. Type the format number into a Label Format field to determine if your scale has such a format...
- Page 89 Notes:...
Need help?
Do you have a question about the LP-II and is the answer not in the manual?
Questions and answers