CAS LP-II Owner's Manual
Cas electronic price computing label/receipt printing scale
Hide thumbs
Also See for LP-II:
- Service manual (89 pages) ,
- Network manual (27 pages) ,
- Owner's manual (97 pages)
Table of Contents
Advertisement
Quick Links
Advertisement
Table of Contents

Subscribe to Our Youtube Channel
Related Manuals for CAS LP-II


Summary of Contents for CAS LP-II
- Page 1 LP-II Electronic Price Computing Label/Receipt Printing Scale REV: 3.00 Sep. 2006...
- Page 2 Attention: Copyright 2006, by CAS Corporation. All rights reserved. No part of this publication may be © reproduced, transmitted, transcribed, stored in a retrieval system, or translated into any language or computer language, in any form or by any means, electronic, mechanical, magnetic, optical, chemical, manual or otherwise, without the prior expressed written permission of this company.
-
Page 3: Table Of Contents
ABLE ONTENTS PAGE 1 General 1.1 Model and Specifications......................7 1.2 Dealers and Service........................8 2 Unpacking and Assembly 2.1 Box Contents..........................8 2.2 Assembly of Display Column ....................... 9 3 Proper Operation 3.1 Environmental Considerations and Safety ................10 3.2 Leveling and Location........................ - Page 4 ABLE ONTENTS PAGE 6.3.5 Copying PLUs ..........................52 6.3.6 Edit PLUs ............................. 52 6.3.7 Promotion/Frequent Shopper Program ................53 6.3.8 Deleting PLUs..........................54 6.3.9 Audit Trail PLUs .......................... 54 6.3.10 Speed Key Programming ..................... 55 6.4 Self-Time Print Mode ........................55 6.5 Global Settings ..........................
- Page 5 ABLE ONTENTS PAGE Appendix A; Country Codes......................81 Appendix B; Label Formats ......................83 Appendix c: Quick Reference......................86 Warranty ............................. 88...
-
Page 6: General
1 General 1 General 1.1 Model and Specifications MODEL LP-2, (version 2.25) CHARACTERS PER PLU Ingredients: 2000 char. MAX, PLU Name: 114 char. MAX DISPLAYS WEIGHT: 5 digits (5 max) UNIT PRICE: 6 digits (8 max) TOTAL PRICE: 7 digits (9 max) GENERAL Scrolling Messages : 32 @ 80 Char... -
Page 7: Dealers And Service
CAS products. Our Service: CAS (USA) offers service and support to all of its US products through its vast network of Authorized Dealers. If you cannot find or are unaware of any CAS Authorized Dealers in your area, please visit us on the web at www.cas-usa.com. -
Page 8: Unpacking And Assembly
The scale also comes with a tear bar (not pictured) which is used for continuous strip labels. A CAT-5 or Ethernet crossover cable, which can also be used to connect to a PC can be purchased from your authorized CAS dealer. -
Page 9: Assembly Of Display Column
2 Unpacking and Assembly 2 .2 Assembly of Display Column 1) You must follow the instructions in this section in order to assemble the Display Assembly properly. To begin the installation, make sure that the scale is unplugged from any electrical source. Your scale body has a display column bracket in the rear that the display column slides into. -
Page 10: Proper Operation
3 Proper Operation 3 Proper Operation 3.1 Environmental Considerations & Safety 1) Please avoid the following hostile conditions: Temperatures below or exceeding: Ungrounded electrical outlet -10º C ~ 40º C (14º F ~ 104º F) Excessive vibration Unstable or flimsy surface Wind or fans functioning in direct Shared electrical outlet contact with weighing platform. -
Page 11: Leveling And Location
3 Proper Operation 3.2 Leveling and Location 1) Location: This scale must be placed on a flat and stable surface. Please keep the scale away from the direct path of oscillating fans, ventilation systems, or strong drafts as these air disturbances can be picked-up by the scale’s very sensitive weighing platform and may cause incorrect weight readings. -
Page 12: Dont's
DO NOT hold or attempt to carry the scale by the Pole Display. DO NOT pour water or ANY liquid directly on the scale. DO NOT use any label media that is not recommended by CAS Corp. DO NOT attempt to effect repairs to this equipment. Doing so is against the law in most states. -
Page 13: Cleaning And Maintenance
DO NOT use solvents, harsh, or abrasive chemicals or cleaning devices as these may discolor and even completely remove the trim paint on the keyboards. If you require more thorough cleaning, contact your local Authorized CAS Dealer for service. -
Page 14: Power Outlet Requirements
Do not use any 3-prong to 2-prong adapters or break-off the third prong from the LP-2 power cord. The third prong is necessary and must be properly connected. If you have any problems or questions regarding this matter, make sure to consult an Authorized CAS Dealer or an electrician. - Page 15 3 Proper Operation Note: Be sure to check the LP-2’s serial number plate on the back of the scale for power specifications.
-
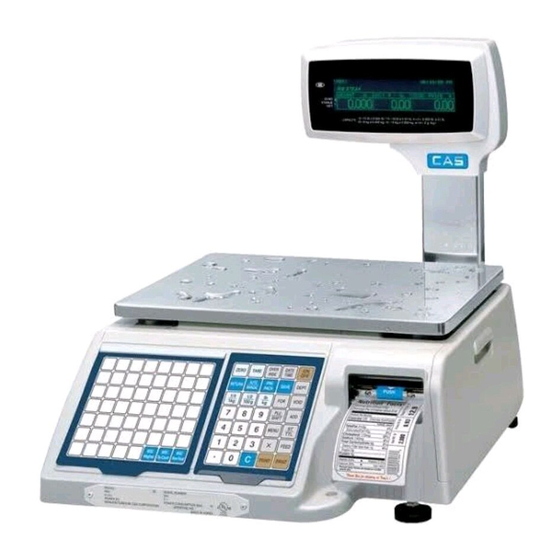
Page 16: Nomenclature
4 Nomenclature 4 Nomenclature 4.1 Scale Overview Pictured Below are some parts you should be familiar with Description Description Description Advertisement Insert, rear Fuse Cap Power Switch Wireless Bridge Connector Gauge, Leveling Printer RS-232C 25 Pin Connector Keyboard, Numeric Serial Number Plate RS-232C 9 Pin Connector Keyboard, Speed Keys Side Access Door, Com port... -
Page 17: Display And Indicators
4 Nomenclature 4.2 Display and Indicators 1) VF Display: The front and rear displays on the LP-2 are dot matrix vacuum fluorescent displays. They will display all information pertinent to operating the scale. LP-2 Display Window: Sales <REG> Auto PrePack Shift Ride 12:12:00 PM This is PLU COMMODITY TOTAL PRIC WEIGHT... -
Page 18: Printer
4 Nomenclature 4.3 Printer 1) Pictured below are important printer components and parts that you should be familiar with. Description Description Description Label/Paper Roll Pin, label roll Sensor Assembly, Gap Label Roll Spool Platen Sensor Assembly, Peel-Off Lock-Down Tab Pressure plate & width adjuster Shaft, Pick-Up Motor Paper Cutter Release Lever, TPH... -
Page 19: The Sales Mode Numeric Key Pad Configuration
4 Nomenclature 4.4 The Sales Mode Numeric Key Pad Configuration ( USA ) TARE OVERRID DATE TIME RETURN AUTO PRE-PACK DEPT MANUAL SHIFT MENU FEED PRINT Description Numeric keys. Used to enter pricing, qty, count, tare, etc. Double zero key. Clear key. - Page 20 4 Nomenclature TARE Tare key. Use to manually enter and remove tare weights. OVERRID Override key. For temporary price change entry. In REG, requires a level 2 password. In MGR, RPK no password needed. DATE Date & Time key. Toggles the display between time, date, scale number, TIME department number, and clerk name.
-
Page 21: The Program Mode Numeric Key Pad Configuration
4 Nomenclature MENU MENU key. This key toggles from Main menu to <REG><MGR><RPK> mode. Subtotal / Total key. Used with the ADD key in order to print customer-totals. Multi-Label key. Use this key to print multiple sales of the same transaction & is also used for selecting the displayed currency. - Page 22 4 Nomenclature ▲ ▼ Up & Down arrow keys. Use to navigate through PGM mode. ◀ ▶ Left & Right arrow keys. Use to navigate through PGM mode. BACK SPACE Backspace key. Used to backspace and delete text data. Description PAGE PAGE DOWN...
- Page 23 4 Nomenclature Carriage Return key. This key is used to insert Carriage Returns into the Text 1, 2, & 3 fields of PLU Create/Edit. The Sales Mode PLU Key Pad Configuration MISC. MISC. MISC. Weighed By-count Non-food Description All of the keys on this keyboard can be Speed keys in Non-Floating Clerk mode.
- Page 24 4 Nomenclature MISC. Miscellaneous Non-Food PLU key. Non-Food If disabled this key works like any other Speed key. In Floating Clerk mode, only this blank keys can be Speed Keys. Clerk-Speed keys for Clerks 1 to 4 numbered from left to right. And last 5 numbered key is the Clerk Select key Floating Clerk mode 1 Only CLERK key for selecting clerks 5 through 99.
- Page 25 4 Nomenclature CHANGE PRICE PLU Price Change key. PLU Create key. EDIT PLU Edit key. DELETE PLU Delete key. Description LIST PLUs PLU Listing key. PROGRAM SPEED KEYS Speed Key programming key. PRINT TEST Print test key. ASSIGN Scrolling message assignment key. SCROLL...
-
Page 26: Quick Set-Up
5 Quick Set-Up 5 Quick Set-Up 5.1 Installation of the Label Roll To install the label roll at ANY time you must follow the directions in this section: 1) Press the ON/OFF key and make sure that the display is completely off. Open the printer’s side- access panel. - Page 27 5 Quick Set-Up 3) Take the new roll of labels and find the ending. Peel-off and discard about one foot (12 inches) of labels from the backing before installing the roll into the scale. Place the label in the scale as shown and thread the backing through the appropriate places.
-
Page 28: Basic Quick Start
5 Quick Set-Up 5.2 Basic Quick Start 1) Turn Power Switch ON if the Power Switch is OFF. 2) After the start-up tests the scale will go to ZERO and show the <REG> mode sales screen. 3) Place an item on the platter. <REG>... - Page 29 5 Quick Set-Up STEP2 STEP3 STEP1 STEP1 MAIN MENU 1. REG: Sale Mode 2.MGR: Manager Mode 3.RPK: Repack Mode 4.PLU: Program PLUs 1.Change PLU Prices 2.Create PLUs 3.Renumber PLUs 4.Edit PLUs 5.Discount/FSP 6.PLU Management 7.Edit Nutrifacts 8.PLU Speed Keys 5.X: Report 1.PLU Sales 1.PLU Sales 2.Misc Sales...
- Page 30 STEP2 STEP3 STEP1 STEP1 5 Quick Set-Up MAIN MENU 8.Store Settings 1.Store Name 1.Add or Edit Users 2.Security Control 2.List All Users 3.Department Name 3.Security Options 4.Scale Assignments 5.Date & Time 9.Global Settings 1.Label Format 2.Discount/FSP 3.Barcode 4.Add-Up TTL Format 5.Misc.
-
Page 31: Programming
6 Programming 6 Programming 6.1 Main Menu The following highlighted selections from the Main Menu make up the Program Menu. < MAIN MENU > 1.REG: Sale Mode 6.Z: Report & Clear 2.MGR: Manager Mode 7.SET: Settings 3.RPK: Repack Mode 8.Store Settings 4.PLU: Program PLUs 9.Global Settings 5.X: Report... -
Page 32: Security Control
6 Programming 6.1.1 RPK: Repack Mode In Repack mode, the transactions will not be added to the totals when reports are generated. This is useful when printing duplicate labels or when an item is marked down. They will be different from other labels in that they will have a letter ‘R’... -
Page 33: Security Control
6 Programming Begin typing using any text or numeric keys. You can press the ▼ arrow key to go to the next line or the ▲ arrow key to go to the previous line. At any time, you may use the INSERT/OVER, SHIFT, text/numeric keys, or the Arrow keys to modify your text. - Page 34 6 Programming Remember that you cannot see passwords that are higher or equal level as your password, except for level 3, which can see ALL passwords. So, you should always use a level 3 password when you wish to edit all or any existing clerk. All level 3 passwords are implicitly set to Dept. = 0, therefore all level 3 passwords can only be set to Dept.
-
Page 35: Department Names
6 Programming STR Settings Global Settings Network Management Quick Program Keys Same as respective menu’s requirements. Key name Required Password level RETURN key in REG mode No password protection. RETURN key in MGR mode OVERRIDE key in REG mode OVERRIDE key in MGR mode No password protection. -
Page 36: Scale Assignments
6 Programming 6.1.6 Scale Assignments Once at the STR: Store Settings menu screen, press the 4 key. The Scale Assignment screen will appear as follows: < STR: SCALE ASSIGNMENT > Scale Number :[ 1] (1~32) Department Number:[ 1] (1~32) Bakery Department This is where you assign your scales to specific departments. -
Page 37: Settings
6 Programming Pressing the SAVE key at any point or the ENTER key while the cursor is on the last field will save the current screen contents and exit. Press the ESC key to exit Time and Date. 6.2 Settings When the screen is at the Main Menu Press 7, enter a level 2 or higher password when prompted, and then the screen will read: <... -
Page 38: Sales Messages
6 Programming 6.2.2 Sales Messages Once at the SET: Settings menu screen, press the 2 key. The Sales Message screen will appear as follows: INS/CAPS /ENG < SET: SALES MESSAGE > CHAR: 1 OF Number :[ 1] (1~32) Message :[■ You can link these sales messages to PLUs. -
Page 39: Scrolling Sequence
6 Programming Remember that you can press SAVE at any time or the ENTER key while the cursor is on the last field, in order to save the current screen contents and move on to the next available message number. The ESC key exits and returns to the previous menu 6.2.4 Scrolling Sequence Once at the SET: Settings menu screen, press the 4 key. -
Page 40: Tax Rates
6 Programming Remember that you can press SAVE at any time or the ENTER key while the cursor is on the last field on the last page, in order to save the current screen contents and move on to the next available scale number. -
Page 41: Adjust Feed Length
6 Programming Label Type 0 is the standard fixed sized, gap label media with liner backing paper. The Length value is the length of the label itself. To capture the Length value, press the ALT key twice. The scale will feed out several labels and automatically detect the length and the gap size. -
Page 42: Origin
Adjust setting. However, you will find that when you use the same label stock, you will get very similar results. Make sure to always use CAS Certified media. Using poor quality media whether it be thermal paper or labels, may damage your LP-2’s thermal print head and void the warrantee. Consult you CAS Authorized dealers about where you can purchase the media you require. -
Page 43: Plu Price Change
6 Programming 6.3.1 PLU Price Change Once at the PLU: PLU Data screen Press 1. The PLU Price Change screen will appear as follows: NUMERIC < PLU: CHANGE PRICE PLU > Dept. Number: [ 1] Bakery Department Number:[ 1] Yellow Sheet Cake Press ALT for memory status Enter the Department number of the PLU you wish to change the price of and press ENTER. -
Page 44: Creating Plus
6 Programming NUMERIC < CHANGE PRICE NON-FOOD PLU 3 > Non-Food PLU Price : $[ 4.56] You can press SAVE at any time or the ENTER key while the cursor is on the last field in order to save the current screen contents and return to the previous menu. - Page 45 By-Weight PLU INS/CAPS /ENG Screen 1 of 8 ( 1/8) < CREATE BY-WEIGHT PLU 10 > Label Format:[ 1] (CAS) LST-8000**** Name Line 1 :[This is a By-Weight PLU Name Line 2 :[■ Name Line 3 :[ INS/CAPS /ENG By-Count PLU ( 1/8) <...
- Page 46 6 Programming You can press the SAVE key at anytime to save the current PLU data and return to the PLU: Create PLU screen. After you enter the Label Format number, you can press the TEST key at any time to get a preview print-out of what the PLU will look like.
- Page 47 6 Programming Group Code: This is a number you can assign to each PLU. It can be from 0 to 99. You can use this to group PLUs together or as a sub-department grouping. Tax Rate Code: For ALL PLUs, this is the Tax Rate (1, 2, or 3) which will be charged by this PLU. If it is 0 then no tax will be charged.
- Page 48 6 Programming Tare Weight: (For By-Weight PLUs only) This is the weight of the container that this PLU will be packaged in. You can enter the tare weight manually or by placing a container on the platter. While the cursor is on the Tare Weight field, place the tare item on the platter making sure that the weight in the Weight field is zero, and then press the ALT key.
- Page 49 6 Programming By-Weight PLU Screen 5 of 8 ( 5/8) < CREATE BY-COUNT PLU 11 > By-Count PLUs Sell By Date : [ 20] days Screen 5 of 8 Cook By Date : [ 20] days Sell/Cook By Dates: These are expiration dates that are numbered in days and added to the Packed on date in order to be calculated.
- Page 50 6 Programming By-Weight & By-Count PLU ( 6/8) < CREATE BY-WEIGHT PLU 10 > Screen 6 of 8 and Non-Food Screen 3 of 5 Code :[ 0=UPC-12 3=EAN-8 Barcode Type :[0] 1=UPC-13 4=Code 39 Barcode Format:[1] 2=EAN-13 By-Weight & By-Count PLU ( 6/8) <...
- Page 51 6 Programming required for food PLUs ( ). This covers all By-Weight and By-Count DNNNNNVPPPP PLUs. Custom: If you select the Barcode Format to be 0, then you can create your own custom format with up to 40 characters. You can use Compressed Formatting to get more than 40 characters. For example, a format string of “42T”...
-
Page 52: Renumbering Plus
6 Programming The last field in the Create PLU menu is Nutrifacts. (8/8) CREATE BY WEIGHT PLU (9999 Nutrition Facts: [ Enter the NUMBER of the nutrifacts data applicable to this PLU. 6.3.3 Renumbering PLUs MAIN MENU – PROGRAM PLUs Once at the PLU: PLU Data screen Press 3. -
Page 53: Copying Plus
6 Programming < PLU LIST > DEPT NAME By-Weight PLU By-Count PLU Non-Food PLU By-Weight PLU By-Weight PLU You can navigate through the pages using the Arrow keys or the PAGE UP and PAGE DOWN keys. Press ESC key to finish and return to the previous screen. 6.3.5 Copying PLUs Once at the PLU: MANAGEMENT screen Press 2. -
Page 54: Promotion/Frequent Shopper Program
6 Programming NUMERIC < PLU: EDIT PLU > Dept. Number: [ 1] Bakery Department Number:[ Press ALT for memory status The Edit PLU program works exactly like the Create PLU program except that you can only enter PLU numbers for existing PLUs, all other PLU numbers will give you PLU DOES NOT EXIST error. -
Page 55: Deleting Plus
6 Programming At PRICE TYPE: enter 0 if the discount is applied to the UNIT PRICE. Enter 1 if the discount applied to the TOTAL PRICE. Enter 2 if the discount is applied as a PERCENTAGE of the price.(for BY COUNT PLUs) IF THE DISCOUNT IS FOR A “BY WEIGHT”... -
Page 56: Speed Key Programming
6 Programming The AUDIT TRAIL function allows a user to track PLU price changes by date, time and clerk ID (if applicable). Use the PAGE DOWN key to scroll through the report. Use the MENU key to exit. 6.3.10 Speed Key Programming Once at the PLU: PLU Data screen Press 8. -
Page 57: Global Label Format
6 Programming When the screen is at the Main Menu Press 9, enter a level 2 or higher password when prompted, and then the screen will read: < GLOBAL SETTINGS > 1.Label Format 4.Add-Up TTL Format 2.Discount/FSP 5.MISC. PLU Format 3.Barcode 6.Printer Fonts From here you can select the various Global Options. -
Page 58: Network Settings (Optional)
6.6 Network Settings (optional) The LP-II can be connected to a network either using a PC or one scale as the master. The network can be hard-wired using an RS-232C or CAT-5 Ethernet cable. In addition, scales with an optional wireless bridge built in can be connected using a router connected to a PC. -
Page 59: Sale Modes
7 Sale Modes 7 Sale Modes 7.1 REG, MGR, and RPK Modes The following highlighted selections from the Main Menu make up the Sale Modes. < MAIN MENU > 1.REG: Sales Mode 6.Z: Report & Clear 2.MGR: Manager Mode 7.SET: Settings 3.RPK: Repack Mode 8.STR:Store Settings 4.PLU: Program PLUs... -
Page 60: Zero Key
7 Sale Modes 7.2.1 ZERO Key From the REG mode screen, we can use the ZERO key to correct for a deviation from zero as long as there are no PLUs or MISC PLUs called-up. The weight can sometimes drift from zero due to debris on the platter, leaving objects on the platter for excessive periods of time, or other environmental factors. -
Page 61: Lb/Kg Key
7 Sale Modes 7.2.3 lb/kg Key From the REG mode screen, you can switch between lb weighing and kg weighing. As long as the Total Price is 0.00 and there are no PLUs called-up, you may press the lb/kg key to switch between lb and kg. -
Page 62: Plu/Shift Key And Speed Keys
7 Sale Modes 7.2.5 PLU/SHIFT Key and Speed keys From the REG mode screen, you can call-up PLUs by typing the PLU number and then pressing the PLU/SHIFT key. You can also call-up PLUs by pressing that PLU’s Speed key, or pressing the PLU/SHIFT key and then that PLU’s Speed key. - Page 63 7 Sale Modes <REG> RIDE 12:12:00 PM Misc By Weight PLU WEIGHT UNIT $ / lb TOTAL PRICE $ ◀ Pressing MISC By-Weight PLU key. ○ <REG> RIDE1 12:12:00 PM Pressing MISC By-Count PLU key. Misc By Count PLU PCS/$PRICE ( 33 oz) TOTAL PRICE $ ◀...
-
Page 64: For Key
7 Sale Modes 7.2.7 FOR key The FOR key is strictly used only for By-Count PLU pricing. Pressing the FOR key toggles between the QTY field, PIECES field, PRICE field, and back to the QTY field. Remember that the toggle wraps around so that the sequence is repeated indefinitely. -
Page 65: 1/2, 1/4, And 100G Keys
Key not enabled error message on the screen. If you wish to enable the use of these keys, please contact your Authorized CAS Dealer as only a state-licensed individual may change this feature on a scale. -
Page 66: Clear Key
7 Sale Modes 7.2.9 CLEAR key The C key is used to clear erroneous entries and to clear PLUs that have been called-up. If you press the MISC By-Weight PLU key, enter a price, and then press the C key only the Unit Price that you entered will be cleared to 0.00. -
Page 67: Save Key
7 Sale Modes 7.2.11 SAVE key By-Weight PLUs auto-clear if the weight goes over zero and stabilizes, and then returns to zero and stabilizes. By-Count and Non-Food PLUs auto-clear whenever you press the ADD or PRINT key. However, if the scale is in SAVE or Pre-Pack mode, then the PLU will not auto-clear. Thus the SAVE key is used to prevent the auto clearing of PLU data. -
Page 68: Pre-Pack Key
Note: The Motion Band Setting controls some weighing aspects of the LP-2 and thus requires you contact your Authorized CAS Dealer because only a state-licensed individual may change this feature on a scale. The Motion Band Setting is set to 1 by default. This means that the weight needs to change by ±1 external display division in order to auto-print. -
Page 69: Return Key
7 Sale Modes PRESS PRINT FOR 3 LABELS 12:12:00 PM Common Nails Type the number of labels you require and press the PRINT key. PRICE ◀ ○ LABELS LEFT=2 12:12:00 PM As the scale prints the labels it will Common Nails count down the label counter. -
Page 70: Override Key
7 Sale Modes The RETURN key is used to delete erroneous sale transactions. This key requires that you be MGR mode in order to use it. You can use the RETURN key to undo erroneous sales transactions like pressing the PRINT key inadvertently, selecting and printing the wrong PLU, an inadvertent Auto-Print in Pre-Pack mode, or perhaps adjusting the sales totals for a damaged or ruined package. -
Page 71: Dept Key
7 Sale Modes PLU’s price will be set to 0.00 and you may enter the temporary price that you wish to use. At any point, you may press the OVERRIDE key to revert to the PLU’s pre-programmed price. Whenever you are using an override price the display will show the override status to the left of the time/date display. -
Page 72: Temporary Date Change
7 Sale Modes 7.2.18 Temporary Date Change The DATE/TIME key can be used to temporarily change the current date (Packed On date). To activate this feature, make sure that you are in REG, MGR or RPK mode. Press the ALT key and then the DATE/TIME key. -
Page 73: Temporary Plu Data Change
7 Sale Modes 7.2.20 Temporary PLU Data Change The PLU/SHIFT key can be used to temporarily change certain PLU data. To activate this feature, make sure that you are in REG, MGR or RPK mode. Press the ALT key and then the PLU/SHIFT key. The display will change to the following: INS/CAPS From here you can enter the... -
Page 74: Rpk Mode
7 Sale Modes 7.4 RPK Mode RPK mode (Re-Packaging mode) works very similarly to REG mode except that you need a level 2 password to access RPK mode and cannot use ADD key. RPK mode however, does not record any sales transactions. -
Page 75: And Z Modes
8 X and Z Modes 8 X and Z Modes 8.1 Reading Sales Summaries: X mode X mode is used to read (i.e. print and display) sales data. When sales data is displayed, only the user display will be on, that is, the customer side display will be off. There are a variety of reports that you can generate from X mode. - Page 76 8 X and Z Modes Press SAVE to print report By-Weight PLU < X1: PLU SALES > From here you can select another Department: [ 1]: Bakery Department department number and/or PLU PLU: Red Delicious Apples number that you wish to display Transactions: Total $: 2.59...
-
Page 77: Misc Plu Sales
8 X and Z Modes insertion and removal of the paper media each time you do reports. On a network the master scale has the data for all scales. 8.1.2 MISC PLU Sales From the X1 or X2 Read Totals screen you can press 2 to select the Misc PLU Sales report. The X1: Misc PLU Sales screen will be displayed. -
Page 78: Department Sales
8 X and Z Modes On a network, the master scale has the Group sales report data for all scales. 8.1.4 Department Sales From the X1 or X2 Read Totals screen you can press 4 to select the Department Sales report. The X1: Dept Sales screen will be displayed. -
Page 79: Hourly Sales
8 X and Z Modes 8.1.6 Hourly Sales From the X1 or X2 Read Totals screen you can press 6 to select the Hourly Sales report. The X1: Hourly Sales screen will be displayed. This screen lists all 24 hours of the day along with pertinent sales data for those hours. -
Page 80: Resetting Sales Summaries: Z Mode
8 X and Z Modes This report tells you: Number of Voids Number of Returns Number of Re-Packs Voided totals Returned total Re-Packed total Number of Price Changes Tax collected for all 3 rates Gross Total Number of Z1 or Z2 resets Last time and date of Z1 or Z2 report Non Resetting Grand Total X1 X-REPORT- SCALE 1... - Page 81 8 X and Z Modes If you generate a Z1 PLU Sales report, then any X1or Z1 PLU Sales reports that you generate immediately after (barring any sales) will give zero sales data for those reports. This is also true for Z2. However, the Z1 and Z2 Summary reports also clear out the data for ALL other reports (options 1 to 7)! If you generate a Z1 Summary report, then any X1or Z1 sales reports that you generate immediately after (barring any sales) will give zero sales data for those reports.
-
Page 82: Appendix A; Country Codes
Appendix A: Country Codes Country Country Country Denmark Djibouti Dominica Dominican Republic Laos Latvia Ecuador Lebanon Egypt Lesotho El Salvador Liberia Afghanistan Equatorial Guinea Libya Algeria Eritrea Liechtenstein Andorra Estonia Lithuania Angola Ethiopia Luxembourg Antarctica Ecuador Antigua & Barbuda Argentina Macedonia Armenia Fiji... - Page 83 Appendix A: Country Codes Country Country Country Sri Lanka United Kingdom Qatar Sudan United States Suriname Swaziland Romania Sweden Uruguay Russian Federation Switzerland Uzbekistan Rwanda Syria Vanuatu Saint Kitts Taiwan Vatican City Saint Lucia Tajikistan Venezuela Saint Vincent Tanzania Vietnam San Marino Thailand Sao Tome...
-
Page 84: Appendix B; Label Formats
Appendix B: Label Formats Format numbers 1 to 99 are built into LP-2; however, only 56 of the 99 available label formats are used. These formats are a permanent part of the LP-2’s memory and CANNOT be lost or erased. Using the SP- 2 software package, you can program format numbers 100 to 999. - Page 85 For a complete cross-reference and listing, visit us on the web at www.cas-usa.com. These formats are subject to change without notice. Type the format number into a Label Format field to determine if your scale has such a format.
- Page 86 Appendix B: Label Formats 58mm X 40mm UPC cas8010/1c2i 65mm X 38mm Non-UPC, Ingredients Hankook HK-aco Non 62mm X 58mm Hankook HanAh Reum ingr.??? 40mm X 62mm UPC, Ingredients Hankook hanahreum 40 X 60 60mm X 60mm UPC, Ingredients Hankook hanahreum 58 X 60sh 46mm X 74mm Non-UPC, Ingredients, Horizontal...
-
Page 87: Appendix C: Quick Reference
Appendix C: Quick Reference How to Call up a To call up a PLU number 3: 1. Press the 3 key Press the PLU key. 2. Press the speed key #3. * Speed Key, shifted (#57~ #112) : Press the PLU/SHIFT key Speed key To call up a speed key #100: Press the PLU/SHIFT and Speed key #44. - Page 88 Appendix C: Quick Reference How to Set Speed Press the MENU key Press the 4 key Enter the password and then press the PRINT key Press the 9 key Set Speed key by pressing the PAGE UP, DOWN keys ADD-UP Mode Call up a PLU Put an item on the platter Press the ADD key...
-
Page 89: Warranty
CAS product after its shipment from CAS, e.g., the dealer-added boards or chips, or the accuracy of the product after it is shipped from CAS. CAS is not responsible for warranty service should the CAS label or logo or the rating... - Page 90 Warranty CAS Corporation, 2006 VER 0.90...
Need help?
Do you have a question about the LP-II and is the answer not in the manual?
Questions and answers