Table of Contents

Related Manuals for Stormshield SN900


Summary of Contents for Stormshield SN900
-
Page 1: User Guide
USER GUIDE Stormshield Network Firewalls PRODUCT PRESENTATION AND INSTALLATION SN Range Date Version Details August 2014 V1.0 Creation November 2014 V1.1 Update May 2015 V1.2 Update (SN910) Reference: snengde_installation-product-SN-range... -
Page 2: Table Of Contents
PRESENTATION AND INSTALLATION GUIDE – SN RANGE CONTENTS CONTENTS FOREWORD APPENDIX A: UPDATING THE LICENSE APPENDIX B: RESETTING THE FIREWALL General conditions of use and user license Assumptions derived from the Common Criteria All models except SN6000 Regulations SN6000 Model INTRODUCTION APPENDIX C: EXTERNAL LOG STORAGE ON SD UPON RECEIVING YOUR FIREWALL... -
Page 3: Foreword
SN3000 and SN6000 products. The aim of this manual is to allow you to quickly integrate a Stormshield Network Firewall into your network but does not provide any information on how to configure the product. For help in configuration, there is a full user guide in the form of online help, which you can look up at http://documentation.stormshield.eu. - Page 4 PRESENTATION AND INSTALLATION GUIDE – SN RANGE FOREWORD These Conditions have been drafted by taking into account the current state of NETASQ technology at the time of these were written. However, NETASQ applies a policy of ongoing development in order to continuously upgrade the Products to better protect Customers.
- Page 5 PRESENTATION AND INSTALLATION GUIDE – SN RANGE FOREWORD The responsibility of NETASQ for any direct damage is limited to the amount received by NETASQ for the purchase of the Product that actually caused the damage. In no event can NETASQ be held responsible for damage indirectly related to the use of the Product(s), including any operating losses due to an interruption in service or any other cause, suffered by the Customer or by any other third parties, even if NETASQ has been advised of the possibility of such damage.
- Page 6 PRESENTATION AND INSTALLATION GUIDE – SN RANGE FOREWORD 3. User license By this license, NETASQ grants the Customer who has registered the Product the personal, non-exclusive, non-transferable and non-assignable right to use the Product for the duration of subscription. The Customer may only use the Product(s) in accordance with its documentation. In particular, the license related to the Product(s) is granted for the sole purpose of enabling the Customer to use the Product, and for no other purpose.
- Page 7 PRESENTATION AND INSTALLATION GUIDE – SN RANGE FOREWORD 4) In general, the Customer guarantees NETASQ that it has met all of its obligations in terms of its national laws and with regard to personal data, and that, where appropriate, it has informed the physical individuals concerned by the use made of said personal data.
-
Page 8: Assumptions Derived From The Common Criteria
Firewall operates within the context of the common criteria certification. For further information on Common Criteria compliance, please go to: http://documentation.stormshield.eu/common-criteria.html Page 8 /59 snengde_installation-product-SN-range v1.2 - Copyright Netasq 2015... - Page 9 Welcome, under the section User awareness, sub-section User password management, available at: http://documentation.stormshield.eu/ A particular administrative role – that of the super-administrator – has the following characteristics: Only the super-administrator is permitted to connect via the local console on NETASQ Firewall- VPN appliances, and only when installing the Firewall or for maintenance operations, apart from actual use of the equipment.
-
Page 10: Regulations
Regulations WEEE (Waste Electrical and Electronic Equipment) directive All Stormshield Network products that are subject to the WEEE directive will be marked with the mandated "crossed-out wheeled bin" symbol. This symbol means that the product meets the requirements laid down by the WEEE directive with regards to the destruction and reuse of waste electrical and electronic equipment. -
Page 11: Introduction
INTRODUCTION INTRODUCTION Thank you for choosing Stormshield Network. Designed to protect networks of all sizes, Stormshield Network - SN range appliances are pre-configured: no hardware or software installation is needed and no UNIX knowledge is necessary, just a user-friendly configuration via a graphical interface. - Page 12 Internet. Administration tools Thanks to the web administration interface, you can administer your Stormshield Network Firewall from the operating system of your choice. The new Firewall configuration interface, accessible from a web browser, benefits from the latest breakthroughs in user friendliness and simplicity of use.
-
Page 13: Upon Receiving Your Firewall
Seals on the packaging Every Firewall is delivered in a cardboard box on which one seal (SN150, SN910, SN2000 and SN3000) or two seals “STORMSHIELD QUALITY SEAL” are affixed. Figure 1: " Stormshield Quality seal" label IMPORTANT If this seal is missing or has been tampered with, contact your distributor as soon as possible to find out why the packaging has been opened. - Page 14 PRESENTATION AND INSTALLATION GUIDE – SN RANGE UPON RECEIVING YOUR FIREWALL Labels on the product Seal label A seal label is pasted on all Firewalls. Once this label is torn, the warranty will be void. Figure 3 : SN6000 seal Figure 4 : other models seals Serial number label This label, pasted on the back panel of the product (on the underside for SN150, SN2000, SN3000 and...
-
Page 15: Contents Of The Packaging
Firewall in a rack. NOTE As SN500, SN700, SN900 and SN910 Firewalls can be installed on a desk or in a rack, their non-slip rubber feet are delivered separately. Only products that cannot be racked (SN150, SN200 and SN300) are sold with the rubber feet already attached. -
Page 16: Safety Rules
Stormshield Network range, and its approved maintenance agents are authorized to do so. A seal label protects all Stormshield Network Firewalls from being opened. Your warranty will be rendered null and void should you dismantle a Stormshield Network Firewall on your own. - Page 17 PRESENTATION AND INSTALLATION GUIDE – SN RANGE SAFETY RULES As per legal safety requirements, anyone performing any operation on a Stormshield Network SN-range product must know and follow the safety indications below: To the attention of maintenance teams: WARNING CAUTION: DANGER OF EXPLOSION IF BATTERY IS INCORRECTLY REPLACED.
-
Page 18: Presentation Of "Sn" Models
PRESENTATION AND INSTALLATION GUIDE – SN RANGE PRESENTATION OF "SN" MODELS PRESENTATION OF "SN" MODELS Stormshield Network SN range models rely on the most advanced technologies to provide high performance and optimum protection. SN150 model The SN150 multi-function Firewall is fanless and comes with an external power adapter. -
Page 19: Other Models
PRESENTATION AND INSTALLATION GUIDE – SN RANGE PRESENTATION OF "SN" MODELS Other models General points SN200, SN300, SN500, SN700 and SN900 models For more information on Ethernet interfaces, please refer to the section Connecting to the network in the chapter INSTALLATION PRECAUTIONS. - Page 20 PRESENTATION AND INSTALLATION GUIDE – SN RANGE PRESENTATION OF "SN" MODELS SN910 model For more information on Ethernet interfaces, please refer to the section Connecting to the network in the chapter INSTALLATION PRECAUTIONS. Front panel: connectors and LEDs Power LED (green) SSD activity LED (red) 1.
- Page 21 PRESENTATION AND INSTALLATION GUIDE – SN RANGE PRESENTATION OF "SN" MODELS SN2000 and SN3000 models For more information on Ethernet interfaces, please refer to the section Connecting to the network in the chapter INSTALLATION PRECAUTIONS. Front panel: connectors and LEDs Online LED (green) Power LED (yellow) 1.
- Page 22 PRESENTATION AND INSTALLATION GUIDE – SN RANGE PRESENTATION OF "SN" MODELS SN6000 model For more information on Ethernet interfaces, please refer to the section Connecting to the network in the chapter INSTALLATION PRECAUTIONS. Front panel: connectors and LEDs Red LED: indicates overheating or hardware failure (fans) Green Power LED: indicates whether the Firewall is powered up.
- Page 23 PRESENTATION AND INSTALLATION GUIDE – SN RANGE PRESENTATION OF "SN" MODELS Presentation SN200 model OUT interface IN interface The SN200 multi-function Firewall is fanless. The product comes with an external power adapter. The SN200 model holds five 1GbE ports spread out in three zones: ...
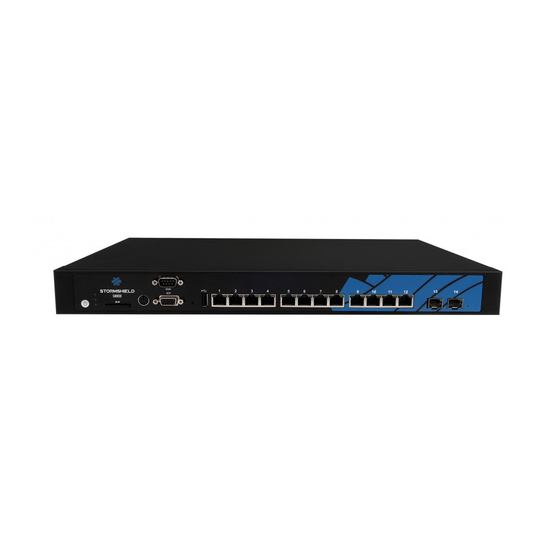
- Page 24 This model is fitted with a multi-core CPU, making it possible to increase processing power. This product has an internal power supply. The SN900 model holds twelve 1GbE ports and two SFP sockets for adding 1GbE transceivers. Specifications of Stormshield Network-approved transceivers are set out in APPENDIX E: FIBER TRANSCEIVERS.
- Page 25 The SN2000 model offers ten 1GbE ports and allows the addition of two extension modules with RJ45 (1GbE) or fiber (1GbE or 10GbE) connectors. Specifications of Stormshield Network-approved extension modules and transceivers are set out in APPENDIX D: EXTENSION MODULES (SN910/SN2000/SN3000/SN6000) APPENDIX E: FIBER TRANSCEIVERS.
-
Page 26: Rj45 Ethernet Connectors
PRESENTATION OF "SN" MODELS RJ45 Ethernet connectors Connectors The Ethernet (Gigabit) ports of the Stormshield Network SN range are configured in auto-sense mode, meaning that they adapt to the configuration of the Ethernet port on the appliance to which they are connected. These ports are therefore compatible with straight or crossover RJ45 Ethernet cables. - Page 27 PRESENTATION AND INSTALLATION GUIDE – SN RANGE PRESENTATION OF "SN" MODELS SN200, SN300, SN500, SN700, SN900 and SN910 models Name Color Status Indication Link established between the Ethernet port and the connected appliance. Left LED Ethernet port switched off or link not established with the...
- Page 28 PRESENTATION AND INSTALLATION GUIDE – SN RANGE PRESENTATION OF "SN" MODELS SN6000 model Front panel Name Color Status Indication Link established between the Ethernet port and the connected appliance. Left LED Ethernet port switched off or link not established with the Green ACT/LINK connected appliance.
-
Page 29: Fiber Ethernet Connectors
PRESENTATION OF "SN" MODELS Fiber Ethernet connectors These Ethernet ports are available by default on SN900 appliances and numbered 13 and 14, as well as on SN910 and numbered 9 and 10. On SN910, SN2000, SN3000 and SN6000 models, Ethernet fiber connectors can be added by inserting extension modules. -
Page 30: Installation Precautions
If you wish to install your appliance in an office, choose a flat and uncluttered surface. Add the non-slip rubber feet to SN500, SN700, SN900 and SN910 models: stick a non-slip rubber foot to the underside of the appliance, close to each corner about 2 cm from the edges. This will ensure the stability of the Firewall and protect it from scratches. -
Page 31: Installation
Installation All Stormshield Network appliances can be installed in 19-inch cabinets. SN500, SN700, SN900 and SN910 appliances are sold with an installation kit containing brackets. SN2000, SN3000 and SN6000 appliances are sold with a set of rails. - Page 32 Secure area (Product > Stormshield Network Firewall > User Guide > Hardware). Installing SN150, SN200 and SN300 models in a 19" rack mount shelf In this non-standard installation, allow a height of more than 1U due to the thickness of the shelf and the presence of rubber feet below the appliance.
-
Page 33: Connecting To The Mains
Firewall. Next, connect the adapter to an appropriate mains socket using the power cord provided. For SN500, SN700, SN900, SN910 and SN2000 models, insert the connector of the power cord (provided with the product) into the power socket on the rear panel of the appliance. Next, plug the other end of the power cord into an appropriate mains socket. -
Page 34: Connecting For The Administration Of The Product
Connecting to the network All models are fitted with RJ45 Gigabit Ethernet ports by default. The SN900 and SN910 models offer by default, two SFP sockets, allowing the insertion of SFP transceivers, provided as an option. SN910, SN2000, SN3000 and SN6000 models also offer one or several slots for different types of extension modules: optional network modules that allow either adding RJ45 Gigabit Ethernet ports or inserting SFP or SFP+ transceivers depending on the module ordered. -
Page 35: Initial Connection To The Product
Minimum configuration for administering a Stormshield Network Firewall Lowest version of the OS (firmware) For SN150, SN200, SN300, SN500, SN700, SN900, SN2000 and SN3000 models, the lowest version of the firmware needed is V1.1.0, for SN6000 model, it is V1.1.1 and for SN910 model, it is V1.2.3. -
Page 36: Connection
Firewall’s internal interface. For a direct connection of the workstation to the Firewall, use the crossover Ethernet cable provided with the product. SN150 model SN200, SN300, SN500, SN700 and SN900 models SN910 model SN2000, SN3000 and SN6000 models IMPORTANT In factory settings, the network port is reserved for the modem or Internet router. -
Page 37: Configuration
If you do not know what these parameters mean, we strongly advise you to read up on TCP/IP as it would be very difficult for you to configure your Stormshield Network Firewall without at least this knowledge. NOTE For a manual configuration, we suggest that you use the IP address 10.0.0.1 and the subnet mask 255.0.0.0. - Page 38 Starting up SN910 Plug your Stormshield Network Firewall into the mains power supply and make sure the power switch is set to the position “ON”. Your Firewall will then start running automatically, Power LED will light up. Then wait several minutes.
- Page 39 PRESENTATION AND INSTALLATION GUIDE – SN RANGE INITIAL CONNECTION TO THE PRODUCT Starting up SN2000 and SN3000 models Press once on the Power button then wait several minutes for the 2 LEDs Online and Power to light up. NOTE When you hear 8 consecutive beeps, you will be able to insert a USB key containing a configuration if necessary.
- Page 40 Stormshield Network administration suite The Stormshield Network Administration Suite, which groups the GLOBAL ADMINISTRATION, REALTIME MONITOR and EVENT REPORTER softwares, can be downloaded from your Secure area. Log on to the following address to access or obtain the access codes to your Secure area: https://mystormshield.eu/...
-
Page 41: Documentation
KNOWLEDGE BASE The technical support department’s knowledge base centralizes various technical entries relating to the use of Stormshield Network products. It aims to improve a better understanding of how they work. Go to the Knowledge base in your Secure area. -
Page 42: Shutting Down
To shut down your Firewall, press once on the ON button. For SN2000 and SN3000 models, the procedure is the same as the one described in the paragraph relating to SN200, SN300, SN500, SN700, and SN900, without the Status LED. -
Page 43: Appendix A: Updating The License
Enter your login and password then confirm or register in order to receive them. The client secure area homepage will appear. Click on “product management”. You will then see a list of all the Stormshield Network products registered in this area. -
Page 44: Appendix B: Resetting The Firewall
APPENDIX B: RESETTING THE FIREWALL APPENDIX B: RESETTING THE FIREWALL It is possible to restore the default factory settings of a Stormshield Network Firewall. This operation will bring the product into its initial configuration. This reinitialization does not modify the firmware version and only affects the active partition. -
Page 45: Sn6000 Model
PRESENTATION AND INSTALLATION GUIDE – SN RANGE APPENDIX B: RESETTING THE FIREWALL SN910 model SN2000 and SN3000 models Hold down the button for about 5 seconds, until you see the Online and Status LEDs blink and/or until you hear an audible signal. The reset procedure will automatically be launched. After a few minutes the initial settings will be recovered and the Firewall will reboot. -
Page 46: Appendix C: External Log Storage On Sd Card
PRESENTATION AND INSTALLATION GUIDE – SN RANGE APPENDIX C: EXTERNAL LOG STORAGE ON SD CARD APPENDIX C: EXTERNAL LOG STORAGE ON SD CARD The External log storage on SD card feature is available on all models in the SN range, except for SN150, SN910, SN2000, SN3000 and SN6000 models. - Page 47 PRESENTATION AND INSTALLATION GUIDE – SN RANGE APPENDIX C: EXTERNAL LOG STORAGE ON SD CARD These logs can be read in the SN Activity Reports web interface in the form of reports, as well as in the SN Event Reporter application. In SN Activity Reports, 5 reports are enabled by default.
-
Page 48: Appendix D: Extension Modules (Sn910/Sn2000/Sn3000/Sn6000)
PRESENTATION AND INSTALLATION GUIDE – SN RANGE APPENDIX D: EXTENSION MODULES (SN910/SN2000/SN3000/SN6000) APPENDIX D: EXTENSION MODULES (SN910/SN2000/SN3000/SN6000) The procedure for removing or inserting an extension module on SN2000, SN3000 or SN6000 Firewalls takes place in three main steps: Step 1 Shut down Firewall. -
Page 49: Procedure For Removing/ Inserting Extension Modules
PRESENTATION AND INSTALLATION GUIDE – SN RANGE APPENDIX D: EXTENSION MODULES (SN910/SN2000/SN3000/SN6000) Sequencing of modules When extension modules are added or removed, ports will be reordered according to the order shown below. SN910 Model N°2 N°3 N°1 SN2000 and SN3000 Models N°1 N°2 N°3... - Page 50 PRESENTATION AND INSTALLATION GUIDE – SN RANGE APPENDIX D: EXTENSION MODULES (SN910/SN2000/SN3000/SN6000) Inserting an extension module on SN910, SN2000 or SN3000 models Using the Power button on the front panel, or from the administration interface, proceed to shut down the Firewall, Once it has fully shut down, ensure that you unplug it from any electrical power supply, Remove the filler panel by unscrewing the 2 knurled screws and extract it by pulling on both screws,...
-
Page 51: Appendix E: Fiber Transceivers
Maximum typical distance supported (subject to optimum quality): 10 km NOTE Only 1 Gbps or 10 Gbps transceivers distributed by Stormshield Network are supported. Twinax cables (10 Gbps) may also be used. Contact your Stormshield partner if you have a specific requirement. Installation... -
Page 52: Appendix F: Managing Ssds
PRESENTATION AND INSTALLATION GUIDE – SN RANGE APPENDIX F: MANAGING SSDs APPENDIX F: MANAGING SSDs The SSD (Solid State Drive) on the SN2000 model is removable. By default on SN3000 and SN6000 models, both SSDs are installed in RAID (RAID 1). These two SSDs are also removable. - Page 53 PRESENTATION AND INSTALLATION GUIDE – SN RANGE APPENDIX F: MANAGING SSDs SN3000 and SN6000 (SSD in RAID1): This procedure is to be carried out on an appliance that is running. After having extracted the defective SSD, insert the new SSD, which you would have obtained from your partner, then type the following command to nraid –z.
-
Page 54: Appendix G: Changing A Power Supply Module (Sn3000 And Sn6000)
(SN3000 AND SN6000) SN3000 WARNNING Certain Stormshield Network SN3000 appliances are not compatible with 48VDC power supply modules and these appliances must not be used with 48VDC modules. Affected products have the following Part number: SN3000-XA10A-101 If your SN3000 is one of such appliances, and you wish to use a 48VDC power supply module, please contact your partner or reseller in order to replace your appliance. -
Page 55: Sn6000
PRESENTATION AND INSTALLATION GUIDE – SN RANGE APPENDIX G: CHANGING A POWER SUPPLY MODULE (SN3000 AND SN6000) Each PSU module is equipped with a light showing its state (two colours: green/red for the AC mains module, blue/red for the 48VDC module): Module working correctly module connected to a power source but not installed in a firewall: green (AC mains)/blue (48VDC). - Page 56 PRESENTATION AND INSTALLATION GUIDE – SN RANGE APPENDIX G: CHANGING A POWER SUPPLY MODULE (SN3000 AND SN6000) 3. Insert the new module with the product label facing upwards. When the module is almost inserted, push until you hear a “click” that indicates that the module is locked in place. Verify that the module is locked in place by pulling gently on the extraction handle: the module must not move.
-
Page 57: Appendix H: Configuration And Administration Via Ipmi (Sn6000)
Settings When starting the product, once the Stormshield logo appears, press <del> to access the BIOS. Next, go to the section "IPMI/BMC network configuration" in the IPMI menu in order to configure the network interface dedicated to IPMI, then save and quit. - Page 58 PRESENTATION AND INSTALLATION GUIDE – SN RANGE APPENDIX H: CONFIGURATION AND ADMINISTRATION VIA IPMI (SN6000) The dashboard of the web interface will look like this: IMPORTANT Change the “ADMIN” administration password immediately in the menu Configuration/Users. You are further advised to place the IPMI interface on a dedicated administration network. If necessary, the following Supermicro documentation will provide a detailed description of the motherboard (page 23, section 1-9) : http://www.supermicro.com/manuals/motherboard/C606_602/MNL-1306.pdf For the full description of IPMI, please refer to this document:...
- Page 59 PRESENTATION AND INSTALLATION GUIDE – SN RANGE documentation@stormshield.eu Page 59 /59 snengde_installation-product-SN-range v1.2 - Copyright Netasq 2015...
Need help?
Do you have a question about the SN900 and is the answer not in the manual?
Questions and answers