
Related Manuals for Stormshield SN Series


Summary of Contents for Stormshield SN Series
- Page 1 GUIDE STORMSHIELD NETWORK SECURITY PRODUCT PRESENTATION AND INSTALLATION 2019 Date: September 2019 Document version: 1.0 Reference: sns-en-SNrange_installation_guide-2019...
-
Page 2: Table Of Contents
SNS - PRODUCT PRESENTATION AND INSTALLATION 2019 Starting Table of contents Shutting down UPDATING THE LICENSE FOREWORD Retrieving the license Recommendations on the operating Installing the license environment Regulations DOCUMENTATION & ASSISTANCE INTRODUCTION APPENDIX A: RESETTING THE FIREWALL UPON RECEIVING YOUR FIREWALL All models except SN6100 and SNi40 SN6100 and SNi40 models Integrity of the product... -
Page 3: Foreword
SN710, SN910, SN2100, SN3100, SN6100 and SNi40 products. The aim of this manual is to allow you to quickly integrate a Stormshield Network Firewall into your network but does not provide any information on how to configure the product. For help in... - Page 4 Always update your firewall if it allows fixing a security flaw. Updates are available here: https://mystormshield.eu. Physical security measures Stormshield Network Firewall-VPN appliances must be installed and stored in compliance with the state of the art regarding sensitive security devices: secured access to the premises, Shielded cables with twisted pairs, labeled cables, etc.
-
Page 5: Regulations
WEEE directive with regards to the destruction and reuse of waste electrical and electronic equipment. RoHS (Restriction of Hazardous Substances) directive For further information on RoHS compliance or on recycling program of Stormshield Network Firewalls (WEEE), please refer to: https://www.stormshield.eu/about/recycling/... -
Page 6: Introduction
INTRODUCTION INTRODUCTION Thank you for choosing Stormshield Network. Designed to protect networks of all sizes, Stormshield Network - SN range appliances are pre-configured: no hardware or software installation is needed and no UNIX knowledge is necessary, just a user-friendly configuration via a graphical interface. - Page 7 SNS - PRODUCT PRESENTATION AND INSTALLATION 2019 INTRODUCTION Stormshield Network Vulnerability Manager, the risk management solution, is based on the detection of applications and the associated vulnerabilities. It allows you to quickly zero in on the most vulnerable hosts, identify affected applications and know which bug fixes to apply.
-
Page 8: Upon Receiving Your Firewall
If this seal is missing or has been tampered with, contact your distributor as soon as possible to find out why the packaging has been opened. Figure 1: " Stormshield Quality seal" label Identification labels These labels indicate the information relating to the Firewall (product reference, part number, serial number, software version installed, etc). -
Page 9: Contents Of The Packaging
Firewall. It has been designed to give your SN Firewall optimum protection (shock resistance, etc.). Upon delivery, check that the following have been included in the packaging: Your Stormshield Network Firewall, A power cord (two for SN2100, SN3100 and SN6100 appliances) A power adapter (SN160, SN160W, SN210, SN210W and SN310),... - Page 10 SNS - PRODUCT PRESENTATION AND INSTALLATION 2019 UPON RECEIVING YOUR FIREWALL For SN510, SN710 and SN910 models, the packaging should also contain four non-slip rubber feet. For the purpose of installing the appliance in a rack, SN510, SN710, SN910 and SN6100 models have brackets mounted by default.
-
Page 11: Safety Rules
Under no circumstances should you take apart a Stormshield Network appliance on your own. Only Stormshield, which markets the Stormshield Network range, and its approved maintenance agents are authorized to do so. A seal label protects all Stormshield Network Firewalls from being opened. - Page 12 Copper Ethernet cables connected to your Stormshield Network Firewall must not be connected to other appliances located in other buildings. As per legal safety requirements, anyone performing any operation on a Stormshield Network SN- range product must know and follow the safety indications below:...
-
Page 13: Sni40 Model
Under no circumstances should you take apart a Stormshield Network appliance on your own. Only Stormshield, which markets the Stormshield Network range, and its approved maintenance agents are authorized to do so. A seal label protects all Stormshield Network Firewalls from being opened. - Page 14 Copper Ethernet cables connected to your Stormshield Network Firewall must not be connected to other appliances located in other buildings. As per legal safety requirements, anyone performing any operation on a Stormshield Network SN- range product must know and follow the safety indications below:...
-
Page 15: Installation Precautions
Conditions of use (all models except SNi40) The Stormshield Network Firewall has been designed to run continuously, in an office or in a server room. If you wish to install your appliance in an office, choose a flat and uncluttered surface. -
Page 16: Conditions Of Use (Sni40 Model)
Do not place objects on your Stormshield Network appliance. IMPORTANT The Stormshield Network Firewall has been tested and found to comply with the limits for a Class A digital device, pursuant to Part 15 of the FCC Rules. These limits are designed to provide reasonable protection against harmful interference when the Firewall is operated in a commercial environment. -
Page 17: Connecting To The Mains
Do not place objects on your Stormshield Network appliance. IMPORTANT The Stormshield Network Firewall has been tested and found to comply with the limits for a Class A digital device, pursuant to Part 15 of the FCC Rules. These limits are designed to provide reasonable protection against harmful interference when the Firewall is operated in a commercial environment. -
Page 18: Connecting To A 24Vdc Power Supply Unit (Sni40)
A slot is available on SN710 and SN910 models, three on SN2100 and SN3100 appliances, and eight on the SN6100. IMPORTANT Use only Stormshield Network-approved SFP (1Gbps), SFP+ (1Gbps /10Gbps) or QSFP+ (40Gbps) transceivers available in the catalogue. For information on the type of network cable to choose according to the network port and the... -
Page 19: Installation In A 19" Cabinet And Rack
INSTALLATION IN A 19" CABINET AND RACK INSTALLATION IN A 19" CABINET AND RACK All Stormshield Network appliances can be installed in 19-inch cabinets (except SNi40). A fastening system for placing the appliance in a rack, in the form of a rack mount shelf, can be included by special order for SN160, SN160W, SN210, SN210W and SN310 models. - Page 20 SNS - PRODUCT PRESENTATION AND INSTALLATION 2019 INSTALLATION IN A 19" CABINET AND RACK Installing SN210, SN210W and SN310 models in a 19" 1U rack mount shelf The minimum vertical space needed for installing the shelf is 1U. In this configuration, the shelf makes it possible to install one or two products.
- Page 21 SNS - PRODUCT PRESENTATION AND INSTALLATION 2019 INSTALLATION IN A 19" CABINET AND RACK Place your firewall in front of its slot at the front left of the shelf, then set it upright until it is firmly in place. Unscrew the right side of the front panel (two screws). Position the kit, then fasten it to the front panel with both screws.
- Page 22 SN2100-SN3100_rack mounting and SN6100 _rack mounting. These documents are provided with SN2100, SN3100 and SN6100 products, and available on the Stormshield Technical Documentation website, under the section PDF download, under Installation guides. The rails that come with the product enable installation in a 19" rack – the depth between the...
- Page 23 SNS - PRODUCT PRESENTATION AND INSTALLATION 2019 INSTALLATION IN A 19" CABINET AND RACK Installing an SNi40 model appliance on a DIN rail To install the appliance in a cabinet, the SNi40 model has a fastener on a 35mm-wide DIN rail (EN50022 standard).
-
Page 24: Presentation Of Sn Models
SNS - PRODUCT PRESENTATION AND INSTALLATION 2019 PRESENTATION OF SN MODELS PRESENTATION OF SN MODELS Stormshield Network SN range models rely on the most advanced technologies to provide high performance and optimum protection. NOTE For more information on Ethernet interfaces, please refer to the section... -
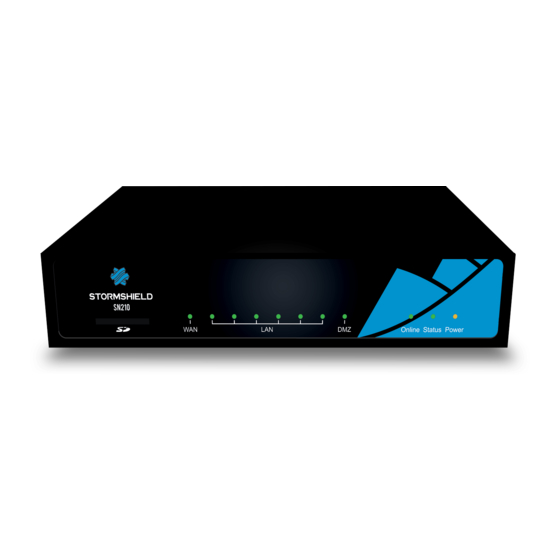
Page 25: Sn210 And Sn210W Models
Only adapters provided with the card must be used. The maximum memory size supported is 2 TB. Stormshield recommends the use of high-endurance/industrial cards or preferably, those that have a built-in MLC flash chip developed by major brands (e.g., SanDisk, Western Digital, Innodisk, Transcend, etc.) and with at least 32 GB of memory. - Page 26 Only adapters provided with the card must be used. The maximum memory size supported is 2 TB. Stormshield recommends the use of high-endurance/industrial cards or preferably, those that have a built-in MLC flash chip developed by major brands (e.g., SanDisk, Western Digital, Innodisk, Transcend, etc.) and with at least 32 GB of memory.
-
Page 27: Sn310 Model
Only adapters provided with the card must be used. The maximum memory size supported is 2 TB. Stormshield recommends the use of high-endurance/industrial cards or preferably, those that have a built-in MLC flash chip developed by major brands (e.g., SanDisk, Western Digital, Innodisk, Transcend, etc.) and with at least 32 GB of memory. -
Page 28: Sn510 And Sn710 Models
The SN710 model holds 8 1GbE ports. It allows the addition of one extension module with RJ45 (1GbE) or fiber (1GbE or 10GbE) connectors. Specifications on Stormshield Network-approved extension modules and transceivers are set out in the sections Extension modules (SN710 and upwards) Fiber Ethernet connectors. -
Page 29: Sn910 Model
The SN910 model holds 8 1GbE ports and 2 SFP sockets for adding 1GbE transceivers. It allows the addition of one extension module with RJ45 (1GbE) or fiber (1GbE or 10GbE) connectors. Specifications of Stormshield Network-approved extension modules and transceivers are set out in sections... -
Page 30: Sn2100 And Sn3100 Models
RJ45 (Gigabit or 10 Gigabit) or fiber (Gigabit, 10 Gigabit or 40 Gigabit) connectors. NOTE For this model, network extension modules are sold separately and need to be ordered. Specifications of Stormshield Network-approved extension modules and transceivers are set out in sections Extension modules (SN710 and upwards) Fiber Ethernet connectors. - Page 31 RJ45 (Gigabit or 10 Gigabit) or fiber (Gigabit, 10 Gigabit or 40 Gigabit) connectors. NOTE For this model, network extension modules are sold separately and need to be ordered. Specifications of Stormshield Network-approved extension modules and transceivers are set out in sections Extension modules (SN710 and upwards) Fiber Ethernet connectors.
-
Page 32: Sn6100 Model
1Gbps/10Gbps transceivers. It allows the addition of 8 extension modules with RJ45 (Gigabit or 10 Gigabit) or fiber (1GbE, 10GbE or 40 GbE) connectors. Specifications of Stormshield Network-approved extension modules and transceivers are set out in sections Extension modules (SN710 and upwards) Fiber Ethernet connectors. - Page 33 SNS - PRODUCT PRESENTATION AND INSTALLATION 2019 PRESENTATION OF SN MODELS Rear panel: connectors The USB 2.0 port can be used for secure configurations or upgrades. You may also plug in a USB key, USB keyboard or approved USB modem. Four independent hot-swappable fans in the event of a breakdown.
-
Page 34: Sni40 Model
6-pole screw terminal connector provided allows connecting to 2 independent sources of power. The SNi40 model holds 5 1GbE ports and 2 SFP sockets for adding 1GbE transceivers. Specifications of Stormshield Network-approved transceivers are set out in the sections Optional Ethernet Transceivers Fiber Ethernet connectors. -
Page 35: Network Connectors
These interfaces have to be connected to other network appliances with an RJ45 Ethernet cable. NOTE A crossover cable is delivered with the Stormshield Network Firewall. This is a Category 5e cable, for running in 10Mbps, 100Mbps or 1Gbps. Check the compatibility of your devices. - Page 36 SNS - PRODUCT PRESENTATION AND INSTALLATION 2019 NETWORK CONNECTORS LEDs of interfaces LEDs associated with Ethernet interfaces provide indications on the status of the connection. following information on the connection: SN160, SN160W, SN210, SN210W and SN310 models Name Color Status Status Front panel LED Green On...
-
Page 37: Fiber Ethernet Connectors
In both cases it is necessary to install a transceiver. SFP transceivers are used for 1Gbps connections, SFP+ for 1Gbps/10Gbps connections or QSFP+ for 40Gbps connections (on SN2100, SN3100 and SN6100). IMPORTANT Use only Stormshield Network-approved transceivers available in the catalogue. LEDs The LEDs indicate the following information: 1 Gbps connectors with SFP transceivers Default ports on SN910 and SNi40 models: a green LED will light up when the link is established and blink depending on the volume of traffic. - Page 38 SNS - PRODUCT PRESENTATION AND INSTALLATION 2019 NETWORK CONNECTORS Extension modules for SN6100: Name Color Status Status Left LED Yellow On Link established between the Ethernet port and the connected appliance. ACT/LINK Ethernet port switched off or link not established with the connected appliance. Blinking The Ethernet port is sending or receiving data.
- Page 39 For 1 Gbps transmissions, such RJ45 over SFP transceivers (1000/100/10Base-T) require copper Ethernet RJ45 cables. These must be Category 5e cables, for running in 10 Mbps, 100 Mbps or 1 Gbps. Check the compatibility of your devices. Stormshield Network-approved Ethernet transceivers SNi40 SN710 and...
-
Page 40: Extension Modules (Sn710 And Upwards)
SNS - PRODUCT PRESENTATION AND INSTALLATION 2019 NETWORK CONNECTORS 40 GIGA QSFP+ transceiver, 40GBASE-LM4 (light blue extraction lever) supported Ethernet 40GBASE-LM4, requires a multi-mode fiber (the connector is QSFP+ supported supported usually orange) or a single-mode fiber (the connector is usually yellow). Wavelength: 1310nm Typical maximum distance supported: 160m with a multi-mode fiber, 1km with a single-mode fiber... - Page 41 SNS - PRODUCT PRESENTATION AND INSTALLATION 2019 NETWORK CONNECTORS Description of extension modules for SN710 models and upwards SN710, SN910, SN2100, SN3100 and SN6100 models accept the following extension modules: 8-port 1 GbE copper module RJ45 connectors 1000/100/10Base-T 4-port 10 GbE copper module (SN2100, SN3100 and SN6100) RJ45 connectors 10G/1000/100Base-T 4-port 1GbE fiber module (not available on SN2100, SN3100 and SN6100 models)
- Page 42 SNS - PRODUCT PRESENTATION AND INSTALLATION 2019 NETWORK CONNECTORS SN2100 and SN3100 Models: SN6100 model: Procedure for inserting or removing extension modules No specific licenses are required for adding extension modules. IMPORTANT Extension modules must only be removed or inserted on appliances that have fully shut down and which are necessarily unplugged from any electrical power supply.
-
Page 43: Recommended Connectors For High Availability (Ha) Links
SNS - PRODUCT PRESENTATION AND INSTALLATION 2019 NETWORK CONNECTORS Removing an extension module on SN710, SN910, SN2100, SN3100 or SN6100 models Using the Power button on the front panel (rear panel for SN6100 appliances), or from the administration interface, proceed to shut down the Firewall, Once it has fully shut down, ensure that you unplug it from any electrical power supply, Unscrew the 2 knurled screws and extract the extension module by pulling on both screws, Put back the filler panel by screwing in the 2 knurled screws,... -
Page 44: Initial Connection To The Product44
SN3100: V3.7.5 SNi40: V2.3.4 Web administration interface The configuration interface on Stormshield Network Firewalls can be accessed via a web browser and benefits from the latest breakthroughs in user friendliness and simplicity of use. It is compatible with the following browsers: Internet Explorer 7 and + Firefox 3.6 and +... -
Page 45: Connections
SNS - PRODUCT PRESENTATION AND INSTALLATION 2019 INITIAL CONNECTION TO THE PRODUCT Connections Connect the network ports as follows: INTERNAL interface (IN): Workstation EXTERNAL interface (OUT): Internet access device The client workstation can either be linked directly to the Firewall’s internal interface or connected to the local network, which is itself connected to the Firewall’s internal interface. -
Page 46: Configuration
If you do not know what these parameters mean, we strongly advise you to read up on TCP/IP as it would be very difficult for you to configure your Stormshield Network Firewall without at least this knowledge. NOTE For a manual configuration, we suggest that you use the IP address 10.0.0.1 and the... - Page 47 SNS - PRODUCT PRESENTATION AND INSTALLATION 2019 INITIAL CONNECTION TO THE PRODUCT Starting up SN160, SN160W, SN210, SN210W and SN310 models Plug your firewall into its power supply; it will start automatically. Wait a few minutes for all 3 LEDs – Online, Status and Power to light up.
- Page 48 SNS - PRODUCT PRESENTATION AND INSTALLATION 2019 INITIAL CONNECTION TO THE PRODUCT Starting up SN910 models Plug your SN Firewall into the mains power supply, it will automatically start up. Ensure that the power supply switch is "ON". Your Firewall will then start running automatically, the Power LED will light up.
- Page 49 Captive portal). Depending on the model, it is signed by default by the authority with the name: NETASQ: CN=serial number of the appliance, O=Secure Internet Connectivity, OU=NETASQ Firewall Certification Authority. Stormshield: CN=Stormshield Products Root CA, O=Stormshield, OU=Cloud Services, C=FR, L=Issy-Les-Moulineaux. To confirm a secure access, the browser must trust the certificate authority that signed the certificate used, which must belong to the browser’s list of trusted certificate authorities.
- Page 50 LICENSE. Stormshield Network administration suite The Stormshield Network Administration Suite, which contains the SN REALTIME MONITOR program, can be downloaded from your Secure area. Log on to the following address to access or obtain the access codes to your Secure area: https://mystormshield.eu/...
-
Page 51: Shutting Down
SNS - PRODUCT PRESENTATION AND INSTALLATION 2019 INITIAL CONNECTION TO THE PRODUCT Shutting down SN160, SN160W, SN210, SN210W, and SN310 Log on to the configuration interface. Go to the Maintenance module (System menu) and click on “Shut down the Firewall”. Then wait for several minutes until the Online and Status LEDs go out. For this model, the LEDs shut off in the following order: Online =>... - Page 52 SNS - PRODUCT PRESENTATION AND INSTALLATION 2019 INITIAL CONNECTION TO THE PRODUCT General remarks The Status LED (Run for SN6100 and SNi40 models) will blink in red (green for SN510 and SN710 models) in the event of a major failure on the product (hardware anomaly, faulty network interface, etc.).
-
Page 53: Updating The License
Enter your login and password then confirm or register in order to receive them. The client secure area homepage will appear. Click on "Product management". You will then see a list of all the Stormshield Network products registered in this area. -
Page 54: Documentation & Assistance
KNOWLEDGE BASE The technical support department’s knowledge base centralizes various technical entries relating to the use of Stormshield Network products. It aims to improve a better understanding of how they work. Go to the Knowledge base in your Secure area. -
Page 55: Appendix A: Resetting The Firewall
APPENDIX A: RESETTING THE FIREWALL APPENDIX A: RESETTING THE FIREWALL It is possible to restore the default factory settings of a Stormshield Network Firewall. This operation will bring the product back to its initial configuration. This reinitialization does not modify the firmware version and only affects the active partition. -
Page 56: Sn6100 And Sni40 Models
SNS - PRODUCT PRESENTATION AND INSTALLATION 2019 APPENDIX A: RESETTING THE FIREWALL SN510 and SN710 models SN310 model SN910 model SN2100 and SN3100 models Hold down the button for about 5 seconds, until you see the Online and Status LEDs blink and/or until you hear an audible signal. -
Page 57: Appendix B: Log Storage
SDXC standard. Only adapters provided with the card must be used. The maximum memory size supported is 2 TB. Stormshield recommends the use of high-endurance/industrial cards or preferably, those that have a built-in MLC flash chip developed by major brands (e.g., SanDisk, Western Digital, Innodisk, Transcend, etc.) and with at least 32 GB of memory. -
Page 58: Log Consultation
SSD or with the help of an SD card with the “External storage” option. Refer to the User Manual, under the Reports section, at: https://documentation.stormshield.eu Page 58/66 sns-en-SNrange_installation_guide-2019 - 09/2019... -
Page 59: Appendix C: Managing Ssds
SNS - PRODUCT PRESENTATION AND INSTALLATION 2019 APPENDIX C: MANAGING SSDS APPENDIX C: MANAGING SSDs An SSD is installed by default on the SN2100 model. A second SSD can be added to it by subscribing to the RAID option (RAID1). By default on SN3100 and SN6100 models, both SSDs are installed in RAID (RAID 1). -
Page 60: Raid Option (Sn2100)
SNS - PRODUCT PRESENTATION AND INSTALLATION 2019 APPENDIX C: MANAGING SSDS the replacement SSD obtained from your partner, until you hear a click. Once you have inserted the new SSD, type the following command to scan this new SSD: nraid –z. Next, type the command to rebuild the RAID: nraid -r RAID option (SN2100) -
Page 61: Appendix D: Changing A Power Supply Module (Sn2100, Sn3100 And Sn6100)
SNS - PRODUCT PRESENTATION AND INSTALLATION 2019 APPENDIX D: CHANGING A POWER SUPPLY MODULE (SN2100, SN3100 AND SN6100) APPENDIX D: CHANGING A POWER SUPPLY MODULE (SN2100, SN3100 AND SN6100) REMINDER Before plugging any equipment into a 48VDC power supply module, please read the SAFETY RULES carefully and follow them. -
Page 62: Sn6100
SNS - PRODUCT PRESENTATION AND INSTALLATION 2019 APPENDIX D: CHANGING A POWER SUPPLY MODULE (SN2100, SN3100 AND SN6100) 1. Disconnect the module from the electrical supply: AC mains supply: disconnect the mains cable. 48VDC supply: first, disconnect the power cord from the 48VDC source. Next, on the module, remove the protective cover , then use a screwdriver to disconnect the three supply wires. - Page 63 SNS - PRODUCT PRESENTATION AND INSTALLATION 2019 APPENDIX D: CHANGING A POWER SUPPLY MODULE (SN2100, SN3100 AND SN6100) 1. Disconnect the module from the electrical supply: AC mains supply: disconnect the mains cable. 48VDC supply: unscrew the knurled screw, then unplug the power cord on the module side.
-
Page 64: Appendix E: Configuration And Administration Via Ipmi (Sn6100)
SN6100 Configuration When starting the product, once the Stormshield logo appears, press <del> to access the BIOS. Next, go to the section "BMC network configuration" in the Server Mgmt menu in order to configure the network interface dedicated to IPMI, then save and quit. - Page 65 SNS - PRODUCT PRESENTATION AND INSTALLATION 2019 APPENDIX E: CONFIGURATION AND ADMINISTRATION VIA IPMI (SN6100) The dashboard of the web interface will look like this: IMPORTANT Change the “admin” administration password immediately. The web interface will make you change it during the initial connection. You are further advised to place the IPMI interface on a dedicated administration network.
- Page 66 All images in this document are for representational purposes only, actual products may differ. Copyright © Stormshield 2019. All rights reserved. All other company and product names contained in this document are trademarks or registered trademarks of their respective companies.
Need help?
Do you have a question about the SN Series and is the answer not in the manual?
Questions and answers