ASL INTERCOM VAR8 Operation And Maintenance Manual
Audio router and system controller
Hide thumbs
Also See for VAR8:
- Product description (54 pages) ,
- Installation manual (23 pages) ,
- Installation manual (20 pages)

Related Manuals for ASL INTERCOM VAR8

Summary of Contents for ASL INTERCOM VAR8
- Page 1 VAR8 and Variants Audio Router and System Controller Operation, Commissioning, Fault- Finding and Maintenance Guide ASL Document Ref.: U-0450-1378.doc Issue: 03 - complete, approved - Date: 18/08/10...
- Page 2 VAR8 and Variants Operation, Commissioning, Fault Finding, and Maintenance Guide This equipment is designed and manufactured to conform to the following EC standards: EN55103-1/E1, EN55103-2/E5, EN50121-4, EN50130-4, EN61000-6-3, ENV50204 Safety EN60065 Failure to use the equipment in the manner described in the product literature will invalidate the warranty.
-
Page 3: Table Of Contents
VAR8 and Variants Operation, Commissioning, Fault Finding, and Maintenance Guide Contents Introduction .............................. 7 Important Notes .......................... 7 Equipment Requirement......................8 SW Versions ..........................8 Configuration Safety Checklist ....................9 Control and Indicators........................... 10 User Interface Description ........................12 Accessing the User Interface....................12 Navigating the Menus....................... - Page 4 VAR8 and Variants Operation, Commissioning, Fault Finding, and Maintenance Guide 11 Music Input Configuration ........................67 11.1 Input Type and Name Configuration ..................67 11.2 Music Input Emergency Class Configuration ................68 11.3 Audio Parameter Configuration ....................69 11.4 Priority Set-up ........................... 72 12 Mute Input Configuration ........................
- Page 5 VAR8 and Variants Operation, Commissioning, Fault Finding, and Maintenance Guide 25.6.10 Frame Ambient Temperature..................123 25.6.11 Amplifier Type and Revision Level ................. 124 25.6.12 Amplifier Detailed Status ....................124 25.6.13 Amplifier Input Surveillance Tone Level ................. 124 25.6.14 Amplifier Output Surveillance Tone Level ..............124 25.6.15 Amplifier DC Line Reading .....................
- Page 6 VAR8 and Variants Operation, Commissioning, Fault Finding, and Maintenance Guide 32 Documents............................162 33 Index..............................163 Service and Warranty ..........................165 Document Change History Issue Amendment Details Date First Draft – Internal Release 21/06/07 CR0518-1099: ACU Fire Microphone ‘Busy’ LED mode (ACU V1.5.0114) 14/12/07 Update DAU to V1.5.0115...
-
Page 7: Introduction
Precautions” section on page of this manual. Only qualified personnel who are very familiar with the VAR8 equipment, the installation and its configuration requirements should ‘Log-on’ to alter the system configuration. Any adjustment of audio parameters or DVA zoning may leave the system in a dangerous state where it will not correctly respond to alarm inputs or may not produce adequate sound pressure levels or intelligibility to comply with Voice Alarm Standards. -
Page 8: Equipment Requirement
If any difficulties are encountered, contact ASL or an appointed ASL distributor, quoting the software version of your unit. The appropriate guide can then be recommended. The software version of the VAR8 is displayed via: the Configuration System Misc Software menu, see Section “24.8 System Software... -
Page 9: Configuration Safety Checklist
VAR8 and Variants Operation, Commissioning, Fault Finding, and Maintenance Guide Configuration Safety Checklist Use this checklist to ensure you have completed all tasks required for BS5839 Pt.8 compliance. “Have I …. Section Page Step(s) Check ( ) Correctly set-up and commissioned AC surveillance on... -
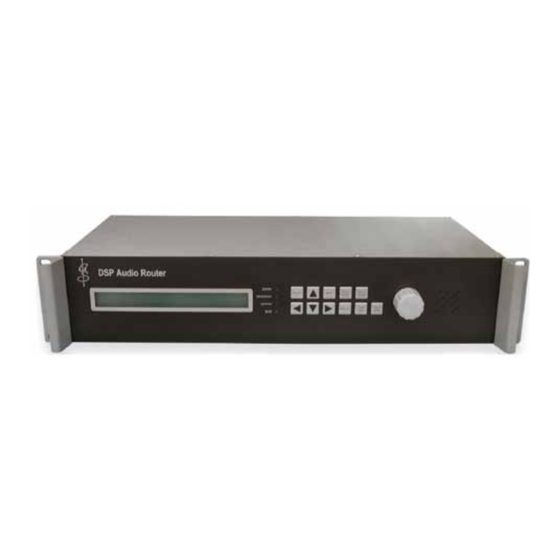
Page 10: Control And Indicators
VAR8 and Variants Operation, Commissioning, Fault Finding, and Maintenance Guide Control and Indicators Control and Indicators Figure 1 Figure 1 LCD Display and User Interface LCD Display and User Interface sue: 02 complete, approved Page 10 of 166 Page 10 of 166... - Page 11 AUDIO MON Selects Audio Monitor sub-menu on the LCD display. Tests all indicators on the VAR8 and on all connected amplifier units. The sounder is also tested. The display shows ‘LAMP + LAMP TEST SOUNDER TEST’ and the menu locks during this time.
-
Page 12: User Interface Description
Accessing the User Interface Accessing the User Interface The VAR8 is password protected in order to prevent unauthorised alteration of the system configuration. The VAR8 is password protected in order to prevent unauthorised alteration of the system configuration. Thus the system configuration cannot be changed unless the operator is ‘Logged on’ by entering the correct Thus the system configuration cannot be changed unless the operator is ‘Logged on’... -
Page 13: Selecting Menu Item And Saving Changes
VAR8 and Variants Operation, Commissioning, Fault Finding, and Maintenance Guide 3.2.2 Selecting Menu Item and Saving Changes Use the keys to move to the next item in the menu. To select a [highlighted] item press the SELECT key. To save changes, press the SELECT key. -
Page 14: Menu Map Of Functions
VAR8 and Variants Operation, Commissioning, Fault Finding, and Maintenance Guide Menu Map of Functions sue: 02 complete, approved Page 14 of 166... -
Page 15: Var8 Commissioning Procedure
Check that the LSDDC (if used) surveillance mode is set as required where it is connected. 6. If the VAR8 is fitted with a Network Interface Card, note that the Network Interface Card is configured, by default, for network operation using 3 audio network channels. If stand-alone operation or 1 or 2 channel only network operation is required, set the links on the Router board, as described in Section “30.2 Link Settings for Stand-Alone, 1 or 2 Channel Only Network Operation”... - Page 16 If a Loop Interface Card is used confirm that the VAR8 is not reporting any communications faults. c. Check that the PAVA fault o/p (if used) is connected to the fire alarm system and indicating correctly in both ‘fault’...
- Page 17 VAR8 and Variants Operation, Commissioning, Fault Finding, and Maintenance Guide 31. Save the Router configuration and archive the configuration file in accordance with ASL Configuration Management procedures. Use the Configuration Tool to upload the Configuration from the Router and save to file. Section “26 PC Configuration...
-
Page 18: Access To The System
VAR8 and Variants Operation, Commissioning, Fault Finding, and Maintenance Guide Access to the System Logging On The Router is password protected in order to prevent unauthorised alteration of the system configuration. Thus the system configuration cannot be changed unless the operator is ‘Logged On’ by entering a valid access code. -
Page 19: Amplifier Commissioning
VAR8 and Variants Operation, Commissioning, Fault Finding, and Maintenance Guide Amplifier Commissioning To Commission the Amplifier System: 1. Ensure that the Frame Learn Check fault is enabled (for V1.5.0115 or later). Menu: Configuration System Router Misc Faults Learn Check. When Learn Check is enabled, the Router checks if the ‘Learn’ function has been performed following power cycle or fault clearance. - Page 20 VAR8 and Variants Operation, Commissioning, Fault Finding, and Maintenance Guide 6. Set the mapping of amplifier slot against outputs so that alarms from the amplifiers are reported to the corresponding outputs. a. First select the amplifier frame from the frame list.
- Page 21 Menu: Configuration Frames Frame#<nn> Slot#<n> AC Level Thresholds The VAR8 presents the input and output AC levels based upon a fixed proportion of the levels being detected. These detected levels can be used as the threshold levels. The user has the option to set other threshold levels.
- Page 22 VAR8 and Variants Operation, Commissioning, Fault Finding, and Maintenance Guide 9. Enable the Earth Leakage monitoring for each amplifier slot configured in step and monitored by a LSDDC or a LSDIC Surveillance Interface Card. An earth leakage fault will be reported when the measured resistance of the speaker line conductor to earth is below the threshold value.
- Page 23 VAR8 and Variants Operation, Commissioning, Fault Finding, and Maintenance Guide 14. Set the amplifier Sleep Mode as required. Menu: Configuration Router Misc Amp sleep The Sleep Mode is provided to maximise the battery life. • ‘Suppressed’ The Sleep Mode is suppressed, and the amplifiers are awake all the time the system is turned on.
- Page 24 VAR8 and Variants Operation, Commissioning, Fault Finding, and Maintenance Guide Reference to Configuration Tool Reference to Configuration Tool Note that Amplifier Frame control functions are not available on the Configuration Tool, except for the Note that Amplifier Frame control functions are not available on the Configuration Tool, except for the “Output/Slot Mapping”, “Amplifier Sleep Mode”, and “Frame Learn Check”...
-
Page 25: Stand-Alone Operation Setup
VAR8 and Variants Operation, Commissioning, Fault Finding, and Maintenance Guide Stand-alone Operation Setup The VAR8 is by default configured for 3-channel network operation mode. If its configuration is cleared at anytime, it defaults to 3-channel network operation mode. To Change the DAU from Network Mode to Stand-Alone Mode: 1. - Page 26 VAR8 and Variants Operation, Commissioning, Fault Finding, and Maintenance Guide Reference to Configuration Tool Reference to Configuration Tool sue: 02 complete, approved Page 26 of 166 Page 26 of 166...
-
Page 27: Network Operation Setup
Slave-ID#1: outputs 1 to 4 • Slave-ID#2: outputs 5 to 8 • Etc. Figure 3 shows the scheme of an Intellevac Network of DAU (4x4 and 8x8) and VAR8 units hosted by a 4x4 Intellevac ACU. sue: 02 complete, approved Page 27 of 166... -
Page 28: System Parameters
Slave Units: Intellevac Distributed Amplifier Units (4x4 DAU or 8x8 DAU) or VAR8 Routers fitted with an ANIC Network Interface Card. • 8x8 DAUs and VAR8 Units are 4x4 from the perspective of the network. The remaining 4 outputs may be locally used but are not addressable across the network. •... -
Page 29: 8X8 Acu Network Topology
8.1.2.2 Main Network Features • Slave Units can be any combination of: Intellevac 4x4 DAUs; Intellevac 8x8 DAUs; VAR8 Routers fitted with an ANIC Network Interface Card; and VAR12/20 Routers using a VAR-NIA interface unit. • Slave-IDs must correspond to the Slave Unit’s physical position in the network. - Page 30 VAR8 and Variants Operation, Commissioning, Fault Finding, and Maintenance Guide Figure 4 Intellevac 8x8 ACU Network Topology UPSTREAM UPSTREAM UPSTREAM Network O/P 20 Network O/P 68 Local VAR8 4x4 DAU VAR8 Network O/P 19 Network O/P 101 Slave-ID Network O/P 18...
-
Page 31: Slave Unit Configuration
VAR8 and Variants Operation, Commissioning, Fault Finding, and Maintenance Guide Slave Unit Configuration Slave Unit Configuration To Configure the DAU as Slave Unit for Network Operation: To Configure the DAU as Slave Unit for Network Operation: 1. Set the RS232 port for network operation. - Page 32 VAR8 and Variants Operation, Commissioning, Fault Finding, and Maintenance Guide 6. Ensure that for all Network Channel inputs the audio parameters are set as follows: a. Surveillance tone detection is enabled and tone level is set to its default setting of –40 dB in order to enable recovery in case of network faults.
- Page 33 VAR8 and Variants Operation, Commissioning, Fault Finding, and Maintenance Guide 8. Define the priority of each Audio Control Unit audio source at the Slave Unit. 8. Define the priority of each Audio Control Unit audio source at the Slave Unit.
- Page 34 VAR8 and Variants Operation, Commissioning, Fault Finding, and Maintenance Guide Input 1 sue: 02 complete, approved Page 34 of 166...
-
Page 35: Audio Control Unit Configuration
VAR8 and Variants Operation, Commissioning, Fault Finding, and Maintenance Guide Audio Control Unit Configuration The VAR8 needs to be configured as Slave Unit at the Audio Control Unit (wall mount Intellevac ACU or rack mount VAR8-ACU). This configuration is described in the Audio Control Unit’s Commissioning and Operation Guide. -
Page 36: Local Input Configuration
VAR8 and Variants Operation, Commissioning, Fault Finding, and Maintenance Guide Local Input Configuration Table 2 summarises the input types supported by the Router’s Mic/Line inputs, and the type of audio source that can be connected to each of these input types. - Page 37 VAR8 and Variants Operation, Commissioning, Fault Finding, and Maintenance Guide Table 3 VAR8 Mic/Line Input Capabilities Inputs Available Input Types Microphone Buttons Router Applicability ASL Fire Microphone Up to 30 microphone Configurable for zone select, DVA routing, play ASL Zoned Fire Microphone buttons DVA, all call, cancel-all-DVAs, route reset.
-
Page 38: Input Type And Name Configuration
VAR8 and Variants Operation, Commissioning, Fault Finding, and Maintenance Guide Input Type and Name Configuration To Configure the Input Type and Name: 1. Select the Mic/Line input connected to the local microphone or other audio source. Menu: Configuration System Router Inputs Mic/Line I/P #<nn>... -
Page 39: Audio Parameter Configuration
VAR8 and Variants Operation, Commissioning, Fault Finding, and Maintenance Guide Audio Parameter Configuration Audio Parameter Configuration To Configure the Input Audio Parameters: To Configure the Input Audio Parameters: 5. Select the input, and then modify the required audio parameters as follows. - Page 40 VAR8 and Variants Operation, Commissioning, Fault Finding, and Maintenance Guide • ASL Microphones produce this surveillance tone as standard and typically this feature would be enabled (set to ‘LF’) if any ASL proprietary microphone is used, in order to provide monitoring of the audio cabling.
- Page 41 VAR8 and Variants Operation, Commissioning, Fault Finding, and Maintenance Guide This can be set to provide the desired changeover fading, e.g. when a broadcast interrupts background music, or a lower priority broadcast. This is typically used on background music where a slow fade-up, in particular, is desirable.
-
Page 42: Priority Set-Up
VAR8 and Variants Operation, Commissioning, Fault Finding, and Maintenance Guide 11. Define the type and level of chime, if any, to be sounded prior to microphone announcement. 11. Define the type and level of chime, if any, to be sounded prior to microphone announcement. -
Page 43: Local Fallback Configuration
VAR8 and Variants Operation, Commissioning, Fault Finding, and Maintenance Guide Local Fallback Configuration Local Fallback Configuration To Configure a Local Fallback: To Configure a Local Fallback: 13. Select the input, and then define which input acts as a fallback in the event of failure, if any. -
Page 44: Microphone Button Configuration
VAR8 and Variants Operation, Commissioning, Fault Finding, and Maintenance Guide Microphone Button Configuration 9.6.1 Paging or Zoneable Fire Microphone Button Configuration Microphone buttons may be programmed for either: • Not-Conf – Section “9.6.1.1 Unused Button” The button has no associated function. It is important that any button that is not in use should be configured as unused, to prevent inadvertent operation. -
Page 45: Unused Button
VAR8 and Variants Operation, Commissioning, Fault Finding, and Maintenance Guide 9.6.1.1 9.6.1.1 Unused Button Unused Button Any button that is not used should be configured as unused, to prevent inadvertent operation. Any button that is not used should be configured as unused, to prevent inadvertent operation. -
Page 46: Microphone Routing Or Zone Select Button
VAR8 and Variants Operation, Commissioning, Fault Finding, and Maintenance Guide 9.6.1.2 Microphone Routing or Zone Select Button The Microphone Routing button function is for zone selection, i.e. when pressed it selects a specified output or group of outputs to which the microphone audio is to be routed when PTT button subsequently is pressed. - Page 47 VAR8 and Variants Operation, Commissioning, Fault Finding, and Maintenance Guide Reference to Configuration Tool Reference to Configuration Tool sue: 02 complete, approved Page 47 of 166 Page 47 of 166...
-
Page 48: Dva Routing/Other Input Routing Button
VAR8 and Variants Operation, Commissioning, Fault Finding, and Maintenance Guide 9.6.1.3 DVA Routing/Other Input Routing Button • DVA Routing is only available for Paging or Zoned Fire Microphones that are connected to Router’s Mic/Line inputs 1 or 2. • Although described as ‘DVA Routing’ this function can route any input or selection of inputs at once, so it can be used to route other non-DVA sources such as background music. - Page 49 VAR8 and Variants Operation, Commissioning, Fault Finding, and Maintenance Guide 3. For microphones provided with security key, program the security key as required by selecting the ‘Protected’ mode, and then the key-switch. By default the button is ‘Not Protected’. When protected, the key must be turned on for the button function to be allowed. One key-switch may be configured to protect more than one button.
- Page 50 VAR8 and Variants Operation, Commissioning, Fault Finding, and Maintenance Guide • Latched: This mode is normally used for emergency DVA message routes, but can also be of use for routing other inputs. When configured for latching operation pressing a DVA Routing button initiates a route; and pressing the associated reset button terminates it.
- Page 51 VAR8 and Variants Operation, Commissioning, Fault Finding, and Maintenance Guide Reference to Configuration Tool Reference to Configuration Tool sue: 02 complete, approved Page 51 of 166 Page 51 of 166...
-
Page 52: Play Dva Button
VAR8 and Variants Operation, Commissioning, Fault Finding, and Maintenance Guide 9.6.1.4 Play DVA Button The button function is ‘play DVA to selected outputs’. When the button is pressed a route is made connecting a DVA audio source from the Slave Unit or the Audio Control Unit to outputs which have been pre-selected using buttons configured for zone selection. - Page 53 VAR8 and Variants Operation, Commissioning, Fault Finding, and Maintenance Guide 4. Program the DVA that will be played to the selected zones when the button is pressed. Menu: Configuration System Router Inputs Mic/Line I/P #<nn> <mic type> Buttons Play DVA Select DVA The inputs may be any of the local or Audio Control Unit audio sources.
- Page 54 VAR8 and Variants Operation, Commissioning, Fault Finding, and Maintenance Guide 6. Select if the DVA should play until the end of the message and then stop (DVA-Full), or cease playing 6. Select if the DVA should play until the end of the message and then stop (DVA-Full), or cease playing immediately that the route is terminated (DVA-Part).
-
Page 55: All Call Button
VAR8 and Variants Operation, Commissioning, Fault Finding, and Maintenance Guide 9.6.1.5 All Call Button The button function is ‘select all zones’. When the button is pressed, all outputs, which have been configured as being affected by any zone selection buttons on the microphone, are selected for broadcast from the microphone, i.e. - Page 56 VAR8 and Variants Operation, Commissioning, Fault Finding, and Maintenance Guide Reference to Configuration Tool Reference to Configuration Tool Selected Zones sue: 02 complete, approved Page 56 of 166 Page 56 of 166...
-
Page 57: Cancel All Dvas Button
VAR8 and Variants Operation, Commissioning, Fault Finding, and Maintenance Guide 9.6.1.6 Cancel All DVAs Button The button function is ‘stop all DVAs’. Pressing the button stops DVAs playing to any zone. The announcement will stop playing immediately, or play until its end depending on how the DVA is configured. - Page 58 VAR8 and Variants Operation, Commissioning, Fault Finding, and Maintenance Guide Reference to Configuration Tool Reference to Configuration Tool sue: 02 complete, approved Page 58 of 166 Page 58 of 166...
-
Page 59: Single Button Microphone Button Configuration
VAR8 and Variants Operation, Commissioning, Fault Finding, and Maintenance Guide 9.6.2 9.6.2 Single Button Microphone Button Configuration Single Button Microphone Button Configuration The PTT button of a Single Button Microphone may be configured to broadcast a single output, or a group of The PTT button of a Single Button Microphone may be configured to broadcast a single output, or a group of outputs. -
Page 60: Unused Audio Inputs
VAR8 and Variants Operation, Commissioning, Fault Finding, and Maintenance Guide Unused Audio Inputs Unused Audio Inputs Any Mic/Line input that is not used should be configured as Unused to prevent inappropriate fault reports. An Any Mic/Line input that is not used should be configured as Unused to prevent inappropriate fault reports. An input configured to Unused is excluded from routing and audio monitoring. -
Page 61: Dva Input Configuration
VAR8 and Variants Operation, Commissioning, Fault Finding, and Maintenance Guide DVA Input Configuration The system is supplied with a default configuration where the DVA inputs are allocated as follows: • DVA Input 1: Evacuate (66-second message length) • DVA Input 2: Alert (66-second message length) •... -
Page 62: Dva Input Emergency Class Configuration
VAR8 and Variants Operation, Commissioning, Fault Finding, and Maintenance Guide 10.2 DVA Input Emergency Class Configuration The Emergency Class is only relevant on networked units, and is used by the ACU to drive the red and green LED of zone select buttons on the ACU’s front panel and on Fire Microphones connected to the ACU as follows: −... - Page 63 VAR8 and Variants Operation, Commissioning, Fault Finding, and Maintenance Guide To Modify the Emergency Class of a DVA Input: To Modify the Emergency Class of a DVA Input: 3. Select the DVA input, and then modify its emergency class as required.
-
Page 64: Audio Parameter Configuration
VAR8 and Variants Operation, Commissioning, Fault Finding, and Maintenance Guide 10.3 Audio Parameter Configuration To Configure the DVA Input Audio Parameters: 4. Select the DVA input, and then modify the required audio parameters as follows. 5. Define a gain to be applied to the DVA input, in respect of any output to which it may be routed. -
Page 65: Priority Set-Up
VAR8 and Variants Operation, Commissioning, Fault Finding, and Maintenance Guide 10.4 10.4 Priority Set-up Priority Set-up • • 19 priority levels are assignable to any of the DVA inputs. 19 priority levels are assignable to any of the DVA inputs. - Page 66 VAR8 and Variants Operation, Commissioning, Fault Finding, and Maintenance Guide Reference to Configuration Reference to Configuration sue: 02 complete, approved Page 66 of 166 Page 66 of 166...
-
Page 67: Music Input Configuration
VAR8 and Variants Operation, Commissioning, Fault Finding, and Maintenance Guide Music Input Configuration The Router provides one unbalanced input typically for background music. Background music can be connected to any of the Mic/Line inputs, in addition to or instead of this dedicated music input. -
Page 68: Music Input Emergency Class Configuration
VAR8 and Variants Operation, Commissioning, Fault Finding, and Maintenance Guide 11.2 11.2 Music Input Emergency Class Configuration Music Input Emergency Class Configuration The Emergency Class is only relevant in networked units, and is used by the ACU and Fire Microphones... -
Page 69: Audio Parameter Configuration
VAR8 and Variants Operation, Commissioning, Fault Finding, and Maintenance Guide 11.3 Audio Parameter Configuration To Configure the Music Input Audio Parameters: 4. Select the music input, and then modify the required audio parameters as follows. Note that the in addition to the unbalanced input (Input 9), a balanced input can be used for background music. - Page 70 VAR8 and Variants Operation, Commissioning, Fault Finding, and Maintenance Guide 8. Define the time over which this audio channel is faded up/down when audio sources change. A slow fade up time is desirable for music inputs. Menu: Configuration System Router Inputs Mic/Line I/P #<nn> Audio Fade •...
- Page 71 VAR8 and Variants Operation, Commissioning, Fault Finding, and Maintenance Guide Figure 8 Sequence of Events for Paging Microphone Chime Overriding a Background Music MUSIC AUDIO MUSIC AUDIO MUSIC FADE UP=T1 FADE DOWN= T2 MICROPHONE MIC AUDIO CHIME AUDIO MICROPHONE FADE UP=T3...
-
Page 72: Priority Set-Up
VAR8 and Variants Operation, Commissioning, Fault Finding, and Maintenance Guide 11.4 11.4 Priority Set-up Priority Set-up • • 19 priority levels are assignable to the Music input. 19 priority levels are assignable to the Music input. • • Assignment of equal priorities means that those inputs operate on a ‘first-come-first-served’... - Page 73 VAR8 and Variants Operation, Commissioning, Fault Finding, and Maintenance Guide Reference to Configuration Tool Reference to Configuration Tool sue: 02 complete, approved Page 73 of 166 Page 73 of 166...
-
Page 74: Mute Input Configuration
VAR8 and Variants Operation, Commissioning, Fault Finding, and Maintenance Guide Mute Input Configuration Mute Input Configuration The Mute input is a special input, which mutes even fire microphones if needed. For this purpose its priority The Mute input is a special input, which mutes even fire microphones if needed. For this purpose its priority is set to ‘0’... -
Page 75: Priority Set-Up
VAR8 and Variants Operation, Commissioning, Fault Finding, and Maintenance Guide 12.2 12.2 Priority Set-up Priority Set-up To Set-up the Mute Input Priority: To Set-up the Mute Input Priority: 3. Select the Mute input, and then allocate priority independently to each of the Router outputs as required. -
Page 76: Output/Zone Configuration
VAR8 and Variants Operation, Commissioning, Fault Finding, and Maintenance Guide Output/Zone Configuration To Configure the Output Parameters: 1. Select the output to be programmed. Menu: Configuration System Router Outputs O/P #<n> 2. Program output name to reflect the actual use of the output, e.g. zone number or description, as required. - Page 77 VAR8 and Variants Operation, Commissioning, Fault Finding, and Maintenance Guide 5. Enable the Router to impose a surveillance tone on the output; and set the surveillance tone level if a 5. Enable the Router to impose a surveillance tone on the output; and set the surveillance tone level if a surveillance interface is used to monitor the amplifier system.
- Page 78 VAR8 and Variants Operation, Commissioning, Fault Finding, and Maintenance Guide Reference to Configuration Tool Reference to Configuration Tool sue: 02 complete, approved Page 78 of 166 Page 78 of 166...
-
Page 79: Permanent Route Configuration
VAR8 and Variants Operation, Commissioning, Fault Finding, and Maintenance Guide Permanent Route Configuration Permanent Route Configuration To Program Permanent Routes: To Program Permanent Routes: 1. Access the following menu, and set-up the required permanent routes. 1. Access the following menu, and set-up the required permanent routes. -
Page 80: Remote I/O Unit Or Fire Loop Interface Configuration
VAR8 and Variants Operation, Commissioning, Fault Finding, and Maintenance Guide Remote I/O Unit or Fire Loop Interface Configuration The VAR8 supports Remote I/O Units and Fire Loop Interfaces connected to its RS485 port. Each of these units has an address on the RS485 bus. - Page 81 VAR8 and Variants Operation, Commissioning, Fault Finding, and Maintenance Guide Reference to Configuration Tool Reference to Configuration Tool sue: 02 complete, approved Page 81 of 166 Page 81 of 166...
-
Page 82: Dva Or Route Triggers Via Contact Configuration
VAR8 and Variants Operation, Commissioning, Fault Finding, and Maintenance Guide DVA or Route Triggers via Contact Configuration Any Router contact or Remote I/O Unit digital input may be configured to trigger a route connecting any desired combination of audio inputs to any combination of outputs. Audio inputs are typically DVAs, however other type of inputs such as microphone, background music, and test tone can also be routed. -
Page 83: Dva Or Route Trigger Via Outer Digital Input (Contact)
VAR8 and Variants Operation, Commissioning, Fault Finding, and Maintenance Guide 16.1 DVA or Route Trigger via outer Digital Input (Contact) To Configure a DVA or Route Trigger via Router Contact: 1. Select input and then program it for ‘Routing’. Menu: Configuration System Router Ctrl Contacts 2. - Page 84 VAR8 and Variants Operation, Commissioning, Fault Finding, and Maintenance Guide Each latching trigger is configurable to initiate routing of any DVA to any output. It is possible to initiate simultaneous routing of multiple DVAs to multiple Outputs. This is so that, for example, ALERT and EVACUATE messages may be broadcast to different zones by a single trigger.
- Page 85 VAR8 and Variants Operation, Commissioning, Fault Finding, and Maintenance Guide Reference to Configuration Tool (Router Digital Input) Reference to Configuration Tool (Router Digital Input) sue: 02 complete, approved Page 85 of 166 Page 85 of 166...
-
Page 86: Dva Or Route Trigger Via Remote I/O Unit Digital Input (Contact)
VAR8 and Variants Operation, Commissioning, Fault Finding, and Maintenance Guide 16.2 DVA or Route Trigger via Remote I/O Unit Digital Input (Contact) To Configure a DVA or Route Trigger via a Digital Input of a Remote I/O Unit Connected to a DAU: 1. - Page 87 VAR8 and Variants Operation, Commissioning, Fault Finding, and Maintenance Guide • Latched: A momentary, or prolonged, activation of a ‘Routing’ contact configured for Latched mode initiates a route; and activating the associated reset contact terminates it unless the corresponding trigger is still asserted.
- Page 88 VAR8 and Variants Operation, Commissioning, Fault Finding, and Maintenance Guide 7. If required, any previously programmed routes may be cleared by selecting the ‘Clear-all’ option. 7. If required, any previously programmed routes may be cleared by selecting the ‘Clear-all’ option.
-
Page 89: Dva Or Route Triggers Via Third Party Fire Loop Interface
VAR8 and Variants Operation, Commissioning, Fault Finding, and Maintenance Guide DVA or Route Triggers via Third Party Fire Loop Interface Third party Fire Loop Interfaces are only supported by the DAU RS485 port. Any Loop Interface contact may be programmed to trigger DVAs, but any local audio source can be routed by the activation of a contact. - Page 90 VAR8 and Variants Operation, Commissioning, Fault Finding, and Maintenance Guide 5. Select if the DVA route should cause busy indication on the LEDs associated with microphone zone 5. Select if the DVA route should cause busy indication on the LEDs associated with microphone zone select buttons.
-
Page 91: Ambient Noise Sensor (Ans) Configuration
VAR8 and Variants Operation, Commissioning, Fault Finding, and Maintenance Guide Ambient Noise Sensor (ANS) Configuration An Ambient Noise Sensor (ANS), or multiple ANS sensors, may be used to adjust the output gain of any zone based on a measure of the ambient noise in the target zone. With the ANS sensors acting to reduce the output gain of the zone from the maximum configured value when the ambient noise in the zone is below a set maximum threshold value. - Page 92 VAR8 and Variants Operation, Commissioning, Fault Finding, and Maintenance Guide 4. Select the Router outputs controlled by this ANS sensor. 4. Select the Router outputs controlled by this ANS sensor. Menu: Configuration System Router Ctrl Remote Unit address <n> Analogue Menu: Configuration System Router Ctrl Remote Unit address <n>...
-
Page 93: Output Configuration For Ans Monitoring
VAR8 and Variants Operation, Commissioning, Fault Finding, and Maintenance Guide 18.2 Output Configuration for ANS Monitoring To Configure Outputs Controlled by ANS Sensors: 1. For each output, configure the ANS parameters as required, where: • Min ANS: This is the minimum threshold value of the ambient noise in the zone (in dBA). This is used to limit the range over which the gain may be reduced. - Page 94 VAR8 and Variants Operation, Commissioning, Fault Finding, and Maintenance Guide Figure 9 ANS Operation Example AMBIENT NOISE LEVEL ANS=+90dBA MAX CONTROL RANGE (+20dB) ANS=+70dBA AREA AMBIENT NOISE BELOW MIN ANS THRESHOLD, THEREFORE MINiMUM GAIN IS USED. AREA ANNOUNCEMENT AMBIENT NOISE ABOVE MAX ANS THRESHOLD, IN PROGRESS THEREFORE MAXIMUM GAIN IS USED.
- Page 95 VAR8 and Variants Operation, Commissioning, Fault Finding, and Maintenance Guide Reference to Configuration Tool Reference to Configuration Tool sue: 02 complete, approved Page 95 of 166 Page 95 of 166...
-
Page 96: Input Configuration For Ans Monitoring
VAR8 and Variants Operation, Commissioning, Fault Finding, and Maintenance Guide 18.3 Input Configuration for ANS Monitoring Ambient noise compensation is applied to outputs, however it is possible to configure the ambient noise compensation to be applied to any particular input routed to an output which has ANS compensation enabled. - Page 97 VAR8 and Variants Operation, Commissioning, Fault Finding, and Maintenance Guide 2. On networked VAR8, for each of the network Mic/Line, DVA, and Music inputs enable or disable the 2. On networked VAR8, for each of the network Mic/Line, DVA, and Music inputs enable or disable the ANS function as required in similar fashion to the local inputs.
- Page 98 VAR8 and Variants Operation, Commissioning, Fault Finding, and Maintenance Guide Network sue: 02 complete, approved Page 98 of 166...
-
Page 99: Volume Control Configuration
VAR8 and Variants Operation, Commissioning, Fault Finding, and Maintenance Guide Volume Control Configuration Volume Controls allow remote control of the volume of specific input sources within a specific zone or zones. Volume Controls are connected to Remote I/O Unit analogue inputs. - Page 100 VAR8 and Variants Operation, Commissioning, Fault Finding, and Maintenance Guide 5. Select the Router inputs whose volume is controlled by the Volume Control when routed to the outputs 5. Select the Router inputs whose volume is controlled by the Volume Control when routed to the outputs associated to the Volume Control.
-
Page 101: Programme Selector Configuration
VAR8 and Variants Operation, Commissioning, Fault Finding, and Maintenance Guide Programme Selector Configuration Programme Selectors allow remote selection of alternative sources to a specific zone or zones. Selecting a Programme Selector position causes the input assigned to this position to be routed to the outputs associated to the Programme Selector. - Page 102 VAR8 and Variants Operation, Commissioning, Fault Finding, and Maintenance Guide 6. Any analogue input that is not used should be configured as ‘Unused’. 6. Any analogue input that is not used should be configured as ‘Unused’. Menu: Configuration System Router Ctrl Remote Unit address <n> Analogue Menu: Configuration System Router Ctrl Remote Unit address <n>...
-
Page 103: External Fault Configuration
VAR8 and Variants Operation, Commissioning, Fault Finding, and Maintenance Guide External Fault Configuration Any Router or Remote I/O Unit digital or analogue input may be configured as an external fault input. An active low contact closure o the port indicates a ‘no fault’ condition, and open circuit on the port shall cause a fault to be reported and logged. - Page 104 VAR8 and Variants Operation, Commissioning, Fault Finding, and Maintenance Guide Reference to Configuration Tool (Router Digital Input) Reference to Configuration Tool (Router Digital Input) sue: 02 complete, approved Page 104 of 166 Page 104 of 166...
-
Page 105: Remote I/O Unit Digital Input As External Fault
VAR8 and Variants Operation, Commissioning, Fault Finding, and Maintenance Guide 21.2 Remote I/O Unit Digital Input as External Fault To Program a Remote I/O Unit Digital Input as External Fault Input: 1. Select Remote I/O Unit’s address on the RS485 bus. - Page 106 VAR8 and Variants Operation, Commissioning, Fault Finding, and Maintenance Guide Reference to Configuration Tool (Remote I/O Unit Digital Input) Reference to Configuration Tool (Remote I/O Unit Digital Input) Digital Input sue: 02 complete, approved Page 106 of 166 Page 106 of 166...
-
Page 107: Remote I/O Unit Analogue Input As External Fault
VAR8 and Variants Operation, Commissioning, Fault Finding, and Maintenance Guide 21.3 Remote I/O Unit Analogue Input as External Fault In order to program a Remote I/O Unit analogue input as external fault input proceed as follows. 1. Select Remote I/O Unit’s address on the RS485 bus. - Page 108 VAR8 and Variants Operation, Commissioning, Fault Finding, and Maintenance Guide Reference to Configuration Tool (Remote I/O Unit Analogue Input) Reference to Configuration Tool (Remote I/O Unit Analogue Input) Analogue Input sue: 02 complete, approved Page 108 of 166 Page 108 of 166...
-
Page 109: Busy Indication Configuration
VAR8 and Variants Operation, Commissioning, Fault Finding, and Maintenance Guide Busy Indication Configuration The digital outputs of a Remote I/O Unit may be assigned as ‘Busy Outputs’. Each such output may be assigned to correspond to the busy state of any Router output or group of outputs. In the case of a group of outputs, it operates as an OR function of the busy state of the outputs, i.e. - Page 110 VAR8 and Variants Operation, Commissioning, Fault Finding, and Maintenance Guide 5. Any digital output that is not used should be configured as ‘Not-Conf’. 5. Any digital output that is not used should be configured as ‘Not-Conf’. Menu: Configuration System Router Ctrl Remote Unit address <n> Digital Out Not-Conf Menu: Configuration System Router Ctrl Remote Unit address <n>...
-
Page 111: Night Time Volume Control Configuration
VAR8 and Variants Operation, Commissioning, Fault Finding, and Maintenance Guide Night Time Volume Control Configuration The Router provides the facility of automatically reducing the volume of announcements at certain times of day, usually during the night. The Night Time Volume Control function limits the level for each output to a configurable maximum level during its active time. - Page 112 VAR8 and Variants Operation, Commissioning, Fault Finding, and Maintenance Guide Reference to Configuration Tool Reference to Configuration Tool sue: 02 complete, approved Page 112 of 166 Page 112 of 166...
-
Page 113: System Configuration
2. It is possible to change the system date and time as required through the following menu. Menu: Configuration System Date/Time The VAR8 date and time are automatically set by the ACU when networked. 24.3 System Name 3. It is possible to assign a name to the system to identify the site. This name is for reference only, and it is modified and shown through the following menu. -
Page 114: Emergency Sounder Operation
‘Error beep with fire mic=Suppressed’ means that the fault sounder is disabled during fire microphone announcements. The fault sounder is automatically suppressed when the VAR8 is networked. This setting only affects the fault sounder when the VAR8 operates in stand-alone mode. -
Page 115: Clearing The Configuration Data And Restoring The Default Settings
VAR8 and Variants Operation, Commissioning, Fault Finding, and Maintenance Guide 24.7 24.7 Clearing the Configuration Data and Restoring the Default Clearing the Configuration Data and Restoring the Default Settings Settings 7. The user can clear all configuration data stored in the Router through the following menu. -
Page 116: Rs232 Asynchronous Port Configuration
VAR8 and Variants Operation, Commissioning, Fault Finding, and Maintenance Guide 24.9 RS232 Asynchronous Port Configuration The RS232 port is internally used for network connection when the unit is networked. This port can be temporarily disconnected from the network, and connected to a PC for configuration and diagnose purposes. - Page 117 VAR8 and Variants Operation, Commissioning, Fault Finding, and Maintenance Guide Reference to Configuration Tool Reference to Configuration Tool Note that the “System Date and Time” (24.2) “Configuration Data” (24.7), and “Software Version” (24.8) Note that the “System Date and Time” (24.2) “Configuration Data” (24.7), and “Software Version” (24.8) functions are not available on the Configuration Tool.
-
Page 118: Diagnostic Tools
VAR8 and Variants Operation, Commissioning, Fault Finding, and Maintenance Guide Diagnostic Tools The system has various useful diagnostic features to enable the location of a fault to be pin-pointed during commissioning and for maintenance purposes. 25.1 Viewing the Routing Status During operation when a fault occurs or an announcement is not completed it is desirable to view the current routing status, which is available via the following menu. -
Page 119: Viewing The Current Ambient Noise Sensor Readings
VAR8 and Variants Operation, Commissioning, Fault Finding, and Maintenance Guide 25.3 Viewing the Current Ambient Noise Sensor Readings The current ambient noise level in a speaker zone monitored by an Ambient Noise Sensor (ANS) may be read for output level commissioning purpose or for testing when the output level is not within the expected level. -
Page 120: Sounder And Lamp Test
Menu: Tests Lamps LEDs are turned off, then on in sequence while the sounder is turned on and off. Then all LEDs on the VAR8 front panel, the ‘fault’ and ‘select’ LED on each amplifier, and all LEDs on frames are turned on for 3 seconds. -
Page 121: Amplifier Changeover Testing
VAR8 and Variants Operation, Commissioning, Fault Finding, and Maintenance Guide • • Menu: Configuration System View Verbose Menu: Configuration System View Verbose Enables the user to scroll through detected frames, and through the slots within the frame. Each entry Enables the user to scroll through detected frames, and through the slots within the frame. Each entry displays the frame number and software version;... -
Page 122: Dip Switch Settings
VAR8 and Variants Operation, Commissioning, Fault Finding, and Maintenance Guide 25.6.3 Dip Switch Settings The settings of the amplifier DIP switches 1 to 6 can be displayed via the following menu. Menu: Test Status Frame#<nn> DIP = SW6 SW5 SW4 SW3 SW2 SW1... -
Page 123: Battery Voltage At Charger
VAR8 and Variants Operation, Commissioning, Fault Finding, and Maintenance Guide 25.6.6 Battery Voltage at Charger The battery voltage at the charger can be displayed via the following menu. Menu: Test Status Frame#<nn> Measured BV 25.6.7 Voltage on First Supply Channel The voltage on first supply channel can be displayed via the following menu. -
Page 124: 25.6.11 Amplifier Type And Revision Level
VAR8 and Variants Operation, Commissioning, Fault Finding, and Maintenance Guide 25.6.11 Amplifier Type and Revision Level The type, revision level, and surveillance mode of the amplifier installed in the selected slot can be displayed via the following menu. Menu: Test Status Frame#<nn> Slot #<nn> Type 25.6.12 Amplifier Detailed Status... -
Page 125: 25.6.15 Amplifier Dc Line Reading
VAR8 and Variants Operation, Commissioning, Fault Finding, and Maintenance Guide 25.6.15 Amplifier DC Line Reading The speaker DC line reading and the number of spurs can be displayed via the following menu. Menu: Test Status Frame#<nn> Slot #<nn> Measured DC Line 25.6.16 Earth Leakage Reading... -
Page 126: Pc Configuration Tool
VAR8 and Variants Operation, Commissioning, Fault Finding, and Maintenance Guide PC Configuration Tool It is recommended that the current Router configuration be uploaded and saved before performing any change. 26.1 Connection In order to establish communication between the Router and the PC running the Configuration Tool follow these steps: 1. -
Page 127: Loading The Configuration From A File
VAR8 and Variants Operation, Commissioning, Fault Finding, and Maintenance Guide 26.4 Loading the Configuration from a File It is possible to load a configuration that has been saved to a file. This can be used to restore the configuration to the Router, or to configure other systems with appropriate modification. Follow these steps to load a configuration saved to a file: Select File→Open from the main menu. -
Page 128: Var8 User Interface Menu
Network Interface EPLD: V6 If the VAR8 Unit in your system has a later version it may mean that some aspects of the menu operation are subtly different from the operation described in this guide, or that enhanced features have been added. - Page 129 VAR8 and Variants Operation, Commissioning, Fault Finding, and Maintenance Guide sue: 02 complete, approved Page 129 of 166...
-
Page 130: Var8 Menu Description
VAR8 and Variants Operation, Commissioning, Fault Finding, and Maintenance Guide 27.1 VAR8 Menu Description VAR8 Menu Description Ref. Item Description/Possible Settings Configuration Access to configuration functions. Tests Access to test functions: TESTS MENU. Faults Access to fault monitoring functions: FAULT MENU. - Page 131 VAR8 and Variants Operation, Commissioning, Fault Finding, and Maintenance Guide VAR8 Menu Description Ref. Item Description/Possible Settings Routing This indicates what input is currently routed to each output. For example: OP1 OP2 OP3 OP4 OP5 OP6 OP7 OP8 L00 L04 N02 L00 L08 N07 L00 L00...
- Page 132 VAR8 and Variants Operation, Commissioning, Fault Finding, and Maintenance Guide VAR8 Menu Description Ref. Item Description/Possible Settings DIP = 000000 Displays the DIP switch settings on the selected frame. DIP = SW6 SW5 SW4 SW3 SW2 SW1 SW1: deep discharge disconnect enable 0 = Automatically switch off the amplifier mainframe if the standby battery supply voltage drops below 21 V.
- Page 133 VAR8 and Variants Operation, Commissioning, Fault Finding, and Maintenance Guide VAR8 Menu Description Ref. Item Description/Possible Settings Frequency Defines the type of input surveillance tone to monitor. Possible values: LF Surv (Low Frequency) HF Surv (High frequency ) No Surv (none) Default value: ‘Not-Surv’...
- Page 134 VAR8 and Variants Operation, Commissioning, Fault Finding, and Maintenance Guide VAR8 Menu Description Ref. Item Description/Possible Settings Int-ID Enables the user to view/edit the Slave Unit network address. Possible values: 01 to 30 Default value: ‘01’ The network ID must correspond to the physical position of the Slave Unit.
- Page 135 VAR8 and Variants Operation, Commissioning, Fault Finding, and Maintenance Guide VAR8 Menu Description Ref. Item Description/Possible Settings Inputs Access to Router input configuration functions. Outputs Access to Router output configuration functions. Ctrl Access to Router contact and Remote I/O Unit (BMB01) configuration functions.
- Page 136 VAR8 and Variants Operation, Commissioning, Fault Finding, and Maintenance Guide VAR8 Menu Description Ref. Item Description/Possible Settings Amp sleep Allows the amplifier sleep mode to be one of: • Suppressed. • Enabled: the amplifiers are shutdown and re-awaked only when an announcement is required and every 20 seconds to allow the surveillance tone to be routed.
- Page 137 VAR8 and Variants Operation, Commissioning, Fault Finding, and Maintenance Guide VAR8 Menu Description Ref. Item Description/Possible Settings Mute input is a special input, which mutes even fire microphones if needed. For this purpose its priority is set to ‘0’ by default. However, the mute input...
- Page 138 VAR8 and Variants Operation, Commissioning, Fault Finding, and Maintenance Guide VAR8 Menu Description Ref. Item Description/Possible Settings Enables the user to configure the settings for ambient noise sensor processing on the selected output: ‘On’/‘Off’: Whether ANS is enabled on the output.
- Page 139 VAR8 and Variants Operation, Commissioning, Fault Finding, and Maintenance Guide VAR8 Menu Description Ref. Item Description/Possible Settings Expand I/O Configures an Expand I/O (also known as Remote I/O, ASL BMB01) unit on the selected multi-drop address. It provides 12 analogue inputs, 12 digital inputs and 12 digital outputs, which may be configured for a variety of purposes.
- Page 140 VAR8 and Variants Operation, Commissioning, Fault Finding, and Maintenance Guide VAR8 Menu Description Ref. Item Description/Possible Settings Control Applicable when the selected contact is configured for Routing. Having selected this option the sub-menus ‘Latching’, ‘Busy=on’, and ‘DVA-Full’ are displayed for routing control configuration.
- Page 141 VAR8 and Variants Operation, Commissioning, Fault Finding, and Maintenance Guide VAR8 Menu Description Ref. Item Description/Possible Settings Routing Configures a Remote I/O Unit Digital Input for Routing, i.e. the contact is activated to trigger a route connecting any combination of inputs to outputs. The outputs in question are the Slave Unit outputs, the inputs may be either Slave Unit audio sources, or Audio Control Unit DVAs.
- Page 142 VAR8 and Variants Operation, Commissioning, Fault Finding, and Maintenance Guide VAR8 Menu Description Ref. Item Description/Possible Settings Selector Enables the user to configure the use of the selected Remote I/O Unit Analogue Input as Programme Selector. The analogue input is connected to a 12-way switch, where each switch position can be configured to route a different input to a group of outputs.
- Page 143 VAR8 and Variants Operation, Commissioning, Fault Finding, and Maintenance Guide VAR8 Menu Description Ref. Item Description/Possible Settings Zoning Allows each output to have an input associated with it (to which it is routed when the Remote I/O contact is activated). The outputs in question are the outputs of the Slave Unit.
- Page 144 VAR8 and Variants Operation, Commissioning, Fault Finding, and Maintenance Guide VAR8 Menu Description Ref. Item Description/Possible Settings Security Determines whether or not the button function is protected by a microphone key- switch, and if so, which key switch. When protected, the key must be turned on for the button function to be allowed.
- Page 145 VAR8 and Variants Operation, Commissioning, Fault Finding, and Maintenance Guide VAR8 Menu Description Ref. Item Description/Possible Settings Enables the user to allocate priority to the input source independently to each of the Router outputs. Equal priorities operate on a first come-first served basis.
- Page 146 VAR8 and Variants Operation, Commissioning, Fault Finding, and Maintenance Guide VAR8 Menu Description Ref. Item Description/Possible Settings Select DVA Applicable when a button is configured for Play DVA. Allows the selected button to have a DVA input associated with it. The outputs in question are the outputs which have been pre-selected using buttons configured for zone selection.
- Page 147 VAR8 and Variants Operation, Commissioning, Fault Finding, and Maintenance Guide VAR8 Menu Description Ref. Item Description/Possible Settings Learn Check Enables the user to enable or disable the amplifier learn check. When Learn Check is enabled, following power cycle or fault clearance, the Router checks if (V1.5.0115 or later)
-
Page 148: Fault Indication And Fault Finding
28.1 Fault Indication When the system has no faults present, the VAR8 displays the current time and date on the LCD display, and indicates that the system is healthy. If a fault occurs, then the unit displays text describing the fault. A display of the fault is alternated with a display of the current date and time. -
Page 149: Viewing Active Faults
28.5.1 Viewing the System Fault Log The system fault log containing all faults logged by the VAR8 can be accessed through the following menu. Menu: Faults→Log→System Multiple faults can be examined by scrolling through the list by means of the front panel keys or rotary knob. -
Page 150: System Fault Finding Guide
Some diagnostic tools are built into the system to further aid fault finding, see Section “25 Diagnostic Tools” on page 118. The following tables describe the fault codes for VAR8 and its variants. 28.6.1 General Faults Fault Code(s) Fault Description... - Page 151 VAR8 and Variants Operation, Commissioning, Fault Finding, and Maintenance Guide Fault Code(s) Fault Description Suggested Action Reported and Logged Remote I/O Unit Comms REMXX REMOTE I/O COMMS Check the Comms and power wiring to Remote I/O Fault Unit. XX=Remote I/O Unit Address Check RS485 termination.
-
Page 152: Frame And Amplifier Related Faults
VAR8 and Variants Operation, Commissioning, Fault Finding, and Maintenance Guide 28.6.2 Frame and Amplifier Related Faults Fault Code(s) Fault Description Suggested Action Reported and Logged Failure of AC Mains FXX/* FRAME MAINS Check mains wiring, mains fuse in IEC inlet and front Supply panel isolator switch on specified mainframe. -
Page 153: Numeric Fault Codes And Their Meaning
VAR8 and Variants Operation, Commissioning, Fault Finding, and Maintenance Guide Fault Code(s) Fault Description Suggested Action Reported and Logged DC Line Fault FXX/Y AMP LINE SHORT line resistance fallen below commissioned value indicating a full or partial short Short XX=Frame Address circuit. -
Page 154: Maintenance
VAR8 and Variants Operation, Commissioning, Fault Finding, and Maintenance Guide Maintenance To comply with BS5839 Part 8: 1998 (a Code of Practice - a recommendation) and BS EN60849: 1998 (a Specification - a requirement), it is important that the system as a whole is operated and maintained appropriately. -
Page 155: Maintenance Instructions
3. All fault indicators and their circuits should be checked, preferably by simulation of fault conditions. The VAR8 should be visually inspected for signs of moisture ingress and other deterioration. Any defect should be recorded in the log book and reported to the responsible person, and action should be taken to correct it. -
Page 156: Replacement Of The Real Time Clock Battery
VAR8 and Variants Operation, Commissioning, Fault Finding, and Maintenance Guide 29.3.1.6 29.3.1.6 Replacement of the Real Time Clock Battery Replacement of the Real Time Clock Battery The RTC battery will require replacement at maximum intervals according to the manufacturer’s instructions The RTC battery will require replacement at maximum intervals according to the manufacturer’s instructions... -
Page 157: Corrective Maintenance
1. A visual examination should be made of any part of the PA/VA system that lies within the fire area or which might have been damaged by the fire. Such parts may include the VAR8 and interconnections. 2. Any defect found should be recorded in the log book and immediate action taken to correct the defect. -
Page 158: Manual Settings
Power on with the above settings selected to clear the access code in the non-volatile memory and restore the default settings of ‘0999’. This will only take a couple of seconds. The VAR8 display indicates when this process is complete. Power off and restore the settings for normal operation. -
Page 159: Default Settings
VAR8 and Variants Operation, Commissioning, Fault Finding, and Maintenance Guide 30.1.3 Default Settings Table 9 VAR8 Default Settings Setting Default Value Access code 0999 Report over-temperature Maximum temperature 70 °C Input Type Unused Inputs 1, 3, and 4 = Network Channel Input Gain −... -
Page 160: Link Settings For Stand-Alone, 1 Or 2 Channel Only Network Operation
• This procedure is required when the VAR8 is fitted with an ANIC8 Network Interface Card, and stand-alone operation, or 1 or 2 network channel only operation is required instead of the default 3 channel network operation. -
Page 161: Safety And Precautions
VAR8 and Variants Operation, Commissioning, Fault Finding, and Maintenance Guide Safety and Safety and 31.5 Lithium Battery Precautions Precautions Danger of explosion if battery is incorrectly replaced. Replace only with the same or equivalent type. 31.1 31.1 Environmental Environmental Dispose of battery carefully to avoid environmental damage. - Page 162 VAR8 and Variants Operation, Commissioning, Fault Finding, and Maintenance Guide Documents Additional reference information may be found in the following documentation, available from the “Data Downloads” page of Application Solutions website: www.asl-electronics.co.uk Table 10 Reference Documents Ref. No Title Filename Ref...
- Page 163 VAR8 and Variants Operation, Commissioning, Fault Finding, and Maintenance Guide Index .......... 145 remote i/o contacts dva routing ..........146 access code............18 dva play mode latched..........48, 52, 82 amplifier ..........146 change-back..........121 latching mode non-latched......... 48, 52, 82 changeover ...........121 .........131, 133...
- Page 164 VAR8 and Variants Operation, Commissioning, Fault Finding, and Maintenance Guide .............138 .......... 141 surveillance remote i/o contacts rtc ..............156 packing .............161, 165 password ............12, 130 ............ 144 security switch default .............12 software version ..........135 slave unit ..........128, 134 permanent routes personnel requirement........7, 12...
-
Page 165: Service And Warranty
VAR8 and Variants Operation, Commissioning, Fault Finding, and Maintenance Guide Service and Warranty Name and Address of Authorised Distributor: This product carries a full warranty. For full details of warranty and service agreements, please contact the Authorised Distributor who supplied the product to you.
Need help?
Do you have a question about the VAR8 and is the answer not in the manual?
Questions and answers