CipherLab CP60 Reference Manual
Windows embedded handheld
Hide thumbs
Also See for CP60:
- Reference manual (270 pages) ,
- Quick start manual (2 pages) ,
- Reference manual (147 pages)
Table of Contents
Advertisement
Quick Links
Advertisement
Table of Contents

Subscribe to Our Youtube Channel
Related Manuals for CipherLab CP60


Summary of Contents for CipherLab CP60
- Page 1 Windows Embedded Handheld 6.5 CP60 / CP60G CP60R / CP60GR (WEH) Version 1.03...
-
Page 2: Disclaimer
The information contained in this document, including all pictures, illustrations and software, is the proprietary information of CIPHERLAB CO., LTD. and its respective legal owners; it is protected by copyright laws and international copyright treaties, as well as other intellectual property laws and treaties, with all rights reserved. -
Page 3: For United States
(ICNIRP), which is 2 W/kg averaged over ten (10) gram of tissue (for example European Union, Brazil and Australia): The highest SAR value for this model phone when tested by CIPHERLAB for use at the body is 1.35 W/kg (10g) -
Page 4: For United States
THESE PRODUCT MODELS HAVE BEEN CERTIFIED IN COMPLIANCE WITH THE GOVERNMENT’S REQUIREMENTS FOR EXPOSURE TO RADIO WAVES. The CP60 series mobile computer has been designed to comply with applicable safety requirements for exposure to radio waves. Your mobile computer is a radio transmitter and receiver. -
Page 5: Safety Precautions
DISPOSE OF USED BATTERIES ACCORDING TO THE INSTRUCTIONS. The use of any batteries or charging devices which are not originally sold or manufactured by CipherLab will void your warranty and may cause damage to human body or the product itself. -
Page 6: Declaration Of Conformity
DECLARATION OF CONFORMITY... -
Page 8: Release Notes
RELEASE NOTES Version Date Notes Replace Declaration of Conformity 1.03 Aug 22, 2014 Add CP60R, CP60GR Mobile Computer in 1.1.1 Overview Add battery setup for CP60R/CP60GR Mobile Computer in 1.4.1 Main Battery Setup Revise chapter structure: 2.1 Barcode Reader Add Field Delimiter in 2.1.1 Launch Reader Configuration – General Settings - Data Output Add 2.2 HF RFID Reader Add HF RFID Reader in Specifications... -
Page 9: Table Of Contents
CONTENTS PREFACE ....................- 2 - Copyright.................... - 2 - Disclaimer................... - 2 - Trademark Recognition ................- 2 - Contact ....................- 2 - For United States .................. - 3 - Safety Notices..................- 3 - Radio wave exposure and Specific Absorption Rate (SAR) information ....- 3 - For United States................ - Page 10 3.4.1. Video Camera Settings ............108 3.5. Pictures & Videos ..............109 OPERATING SYSTEM.................. 111 4.1. Startup ................112 4.1.1. Exit CipherLab Smart Shell ............113 4.2. Today Screen ..............115 4.2.1. Customize Today Screen ............116 4.2.2. Return to Today Screen ............116 4.3. Start Screen................117 4.3.1.
- Page 11 4.3.3. Manage Notofications ............120 4.3.4. Customize Start Screen ............122 4.3.5. Start Screen Icons..............125 4.4. Suspend & Reset Mobile Computer..........127 4.4.1. Suspend Mobile Computer ............127 4.4.2. Wake Up Mobile Computer ............128 4.4.3. Reset Mobile Computer ............129 4.5. Set Screen Lock ..............130 4.5.1.
- Page 12 5.5.2. View Secure Certificates............187 5.5.3. Install Secure Certificates ............187 5.6. Location Discovery..............189 5.6.1. Launch GPS.................189 5.6.2. Use GPS ................190 5.6.3. Use External GPS Receiver With Bluetooth ........190 PHONE ....................199 6.1. About Phone ...............200 6.2. SIM Card ................200 6.2.1. Install SIM Card ..............200 6.3.
- Page 13 RFID Tags Supported ................258 LASER (SE955 & SE965HP)................261 Symbology Settings .................261 Miscellaneous ..................266 AIM Code ID – Code Characters..............266 AIM Code ID – Modifier Characters............267 2D IMAGER (SE4500DL)................271 Symbology Settings .................271 1D Symbologies ..................271 2D Symbologies ..................278 Miscellaneous ..................279 HF RFID READER ..................
-
Page 15: Introduction
A high-specced 5 mega-pixel camera also comes inside to take pictures and shoot videos to deliver better documentation for users. Rated with IP65/67, the rugged CP60 is light-weighted and easy to cradle in your hand, and will be your good help on field works. -
Page 16: Features
Snap-on Charging and Communication Cable (USB or RS-232) Charging & Communication Cradle Pistol Grip Belt Holster for CP60 with Pistol Grip Belt Holster with Shoulder Strap for CP60 without Pistol Grip 4-slot Battery Charger Snap-On Car Charging Kit Vehicle Mount Cradle... -
Page 17: Use Mobile Computer
Chapter 1 USE MOBILE COMPUTER Before the mobile computer takes part in your work, get to know it first. This chapter includes the basic features of the mobile computer including the power supply, memory, and the units that bridge users with the mobile computer. This chapter helps you set the mobile computer to work at the earliest. -
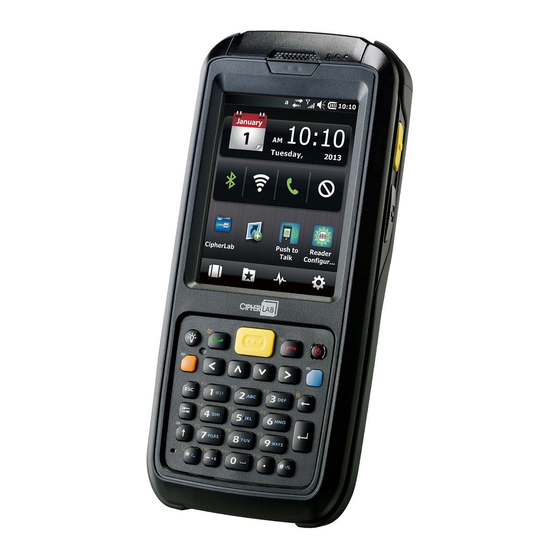
Page 18: Take A Tour
This section shows the major components on the mobile computer and inside battery chamber. You will also learn how to power on/off the mobile computer and how the mobile computer gives information about its status. 1.1.1. OVERVIEW Figure 1: Overview for CP60 / CP60G mobile computer Description Description Receiver (reserved) Sensors (proximity sensor &... - Page 19 Chapter 1 Use Mobile Computer Figure 2: Overview for CP60R / CP60GR mobile computer Description Description Receiver (reserved) Sensors (proximity sensor & light sensor) Status LEDs Touchscreen Scan key Reset button (recessed in keypad) Power button Keypad Microphone (reserved) Charging and communication port Side trigger (user-definable) Application key Scan window...
-
Page 20: Inside Battery Chamber
CP60 Mobile Computer (WEH) Reference Manual 1.1.2. INSIDE BATTERY CHAMBER Inside the battery chamber of the mobile computer are the sockets for SIM card and storage card. Each is equipped with a hinged cover. Battery chamber SIM card slot SD card slot Figure 3: Inside Battery Chamber 1.1.3. -
Page 21: Power On
Chapter 1 Use Mobile Computer 1.2. POWER ON To power on the mobile computer, press the Power button sitting at the upper right of the keypad. The mobile computer powers on. 1.2.1. POWER MENU The mobile computer features a power menu. This menu allows you to select whether you would like to power off the mobile computer, enter suspension, or enter sleeping mode for main battery replacement. - Page 22 CP60 Mobile Computer (WEH) Reference Manual Select this option if you would like to power off the mobile computer. This will close all applications and tasks currently running. All Power Off unsaved data will be lost. To power on the mobile computer, press the power button.
-
Page 23: Notifications
Reader Config Notification Settings page. Speaker good read sound is also programmable through API deployment. For details, see the CP60 Programming Guide. VIBRATOR The mobile computer owes its tactile feedback to the vibrator built inside. Vibration delivered to the mobile computer alerts users of its currents status. -
Page 24: Battery
CP60 Mobile Computer (WEH) Reference Manual 1.4. BATTERY The mobile computer is fed by two batteries, main battery pack and backup battery. The main battery is removable and replaceable from the battery chamber while the backup battery is mounted on the main board inside the mobile computer. -
Page 25: Main Battery Setup
Chapter 1 Use Mobile Computer 1.4.1. MAIN BATTERY SETUP To secure main battery in place, the battery door is equipped with two latches, one on each side. After pressing the battery door in, turn the door latches inwards to lock the battery door in place. - Page 26 CP60 Mobile Computer (WEH) Reference Manual FOR CP60 / CP60G MOBILE COMPUTER Figure 5: Main Battery Setup for CP60 / CP60G Mobile Computer...
- Page 27 Chapter 1 Use Mobile Computer 1) Loosen the handstrap and pull it downwards so the metal hook is positioned at the lower edge of the Velcro band. 2) Unhook the hand strap by pressing the square metal ring lightly in the middle and lifting it upwards in a single motion.
- Page 28 Reference Manual FOR CP60R / CP60GR MOBILE COMPUTER If your mobile computer CP60 Mobile Computer is equipped with an RFID reader, follow the steps below to install the main battery. Figure 6: Main Battery Setup for CP60R / CP60GR Mobile Computer (RFID-equipped) 1) Loosen the handstrap and pull it downwards to allow space to insert the battery.
-
Page 29: Charge Batteries
Chapter 1 Use Mobile Computer 6) Replace the battery door. Fix the upper edge first and then press the lower edge in. Push the door latches back to their original position. Note: (1) When main battery level drops to low level, charge it ASAP or replace it with a charged one. - Page 30 CP60 Mobile Computer (WEH) Reference Manual DIRECT CHARGING USING SNAP-ON CABLE Direct charging of the mobile computer relies on the Snap-on Charging & Communication Cable (hereinafter “snap-on cable”). There is a power jack on the connector of this cable to connect external power.
- Page 31 Chapter 1 Use Mobile Computer DIRECT CHARGING USING CRADLE Direct cradle charging makes use of a Charging & Communication Cradle (hereinafter “cradle”). The cradle is one of the accessories you can opt for. Prior to charging, install main battery as described in Main Battery Setup.
-
Page 32: Monitor Battery Level
CP60 Mobile Computer (WEH) Reference Manual 1.4.3. MONITOR BATTERY LEVEL Main battery is the only source that feeds the mobile computer to work. It also supplies the backup battery on main board to retain the data stored in DRAM. Hence when main battery level gets low, recharge it or change it as soon as possible. - Page 33 Chapter 1 Use Mobile Computer Main battery isn’t being charged. Main battery is being charged. LOW BATTERY ALERTS When main battery level drops below 40% , the mobile computer prompts “Main Battery Low” for a recharge. When further reduced to lower than 20%, the mobile computer prompts “Main Battery Very low”...
- Page 34 CP60 Mobile Computer (WEH) Reference Manual Note: Constant usage of the mobile computer at low battery level can affect battery life. For maximum performance, recharge the battery periodically to avoid battery drain out and maintain good battery health. When main battery drains out, the mobile computer shuts down automatically. Backup battery takes over to hold DRAM data for 30 minutes if it is fully charged.
- Page 35 Chapter 1 Use Mobile Computer Available backup battery level descriptions are: Description Battery Status Backup battery level is full High Backup battery level is low. Charging is recommended. Backup battery level is very low and needs to be charged Critical immediately.
-
Page 36: Power Management
CP60 Mobile Computer (WEH) Reference Manual 1.4.4. POWER MANAGEMENT The mobile computer features “suspension”, a “soft-off” state allowing the mobile computer to consume less power and quickly to wake up. The mobile computer auto-enters “suspension” when one of the following happens: When placed face-down, which suggests the mobile computer isn’t actively used. -
Page 37: Keypad
Chapter 1 Use Mobile Computer 1.5. KEYPAD The mobile computer has a physical keypad and a touchscreen to receive user’s input. Among the two, the touchscreen provides more intuitiveness in interacting with the device. This section shows how to input text using physical keypad and onscreen keyboard. To know how to operate the mobile computer using the touchscreen, see Touch Control. - Page 38 Start Screen for more details about Softkey bar. Send Key available for function assignment via CipherLab utility Button Assignment. Key available for function assignment via CipherLab utility Button Assignment. Opens the previous screen worked on. Closes a menu of an application, or an opened dialog.
- Page 39 Chapter 1 Use Mobile Computer and more. Function key comes with an LED indicator beside it which behaves as follows: When Fn key is pressed once, the LED indicator lights up in orange, and the function engraved in orange on the keypad is delivered to the next pressed key.
- Page 40 CP60 Mobile Computer (WEH) Reference Manual NUMERIC KEYPAD Numeric keypad wedges a set of character keys at the lower half. They are laid out analogously to a telephone keypad, and additionally featured are an key, Tab key Enter key , Backspace key...
- Page 41 Chapter 1 Use Mobile Computer KEYPAD MODES With combined use of the [Alpha] key key and Shift key , enables eight input modes for keys 0-9 on the physical keypad. The icons Title Bar signify current input state. Numeric keypad input modes: Mode Description (Keys 0-9) Trigger and Withdrawal...
- Page 42 CP60 Mobile Computer (WEH) Reference Manual letters and capitalizes the first one. Input mode returns to default by pressing again. Jumps to mode after a single key is pressed. Press both twice to enter this mode. Keypad enters all typed keys as capitalized alphabetic letters.
- Page 43 Chapter 1 Use Mobile Computer The letter follows a period mark and a blank space (because it is seen as the start of a new sentence). The letter is typed after a paragraph break (because it is seen as the start of a new paragraph).
- Page 44 CP60 Mobile Computer (WEH) Reference Manual KEYPAD MODES With combined use of the key, Shift key enables four input modes for the physical keypad. The icons Title Bar signify current input state. QWERTY keypad input modes: Mode Description Trigger and Withdrawal Default mode.
- Page 45 Chapter 1 Use Mobile Computer TEXT INPUT To enter text using QWERTY keypad: Literal Input The QWERTY keypad enters lowercase letters a-z by default when neither nor Shift key is pressed. To enter a letter in uppercase, press Shift key appears on the Title Bar.
-
Page 46: Onscreen Keyboard
CP60 Mobile Computer (WEH) Reference Manual 1.5.2. ONSCREEN KEYBOARD The OS provides users with an onscreen keyboard. Compared to a physical keypad, the onscreen keyboard bears likeness to a laptop keyboard as it has modifiers keys arranged on the left edge and features a “QWERTY” layout. The onscreen keyboard supports entering a series of diacritics for European languages by tapping a modifier key. - Page 47 Chapter 1 Use Mobile Computer Modifier keys are explicated as following Description Ctrl key Once tapped, it becomes color-inverted and causes a special action from OS or the active application when a character key is tapped. It quits once the said action is triggered or when it is tapped again.
- Page 48 CP60 Mobile Computer (WEH) Reference Manual Input Once tapped, it becomes color-inverted and presents a series of accented vowels modifier such as ä, æ, ë, ï, ö, ú or letter variants such as ß and ç which are needed for European languages.
- Page 49 Chapter 1 Use Mobile Computer Lowercase Uppercase OTHER KEYS Description Tab key Navigates among the highlight items in some applications. For text input, it inserts Tab character, which means it moves caret to the next tab stop. Backspace Erases the characters to the left of caret. Enter key Executes a command or confirms input.
- Page 50 CP60 Mobile Computer (WEH) Reference Manual A list of suggested words briefly display over the keyboard Dictionary suggestions CHANGE KEYBOARD ORIENTATION The mobile computer is built-in with a G-sensor and supports screen orientation, which is enabled by default. So when the mobile computer turns sideways or upright, the screen changes its orientation, and onscreen keyboard readjusts itself to the new orientation.
-
Page 51: Handwriting Recognition
Chapter 1 Use Mobile Computer 1.5.3. HANDWRITING RECOGNITION Onscreen text input doesn’t necessarily rely on onscreen keyboard. “Handwriting Recognition” can also get the job done. “Handwriting Recognition” is an input method that interprets and converts user’s handwriting received through touchscreen to text. A few handwriting “input methods”... - Page 52 CP60 Mobile Computer (WEH) Reference Manual BLOCK RECOGNIZER This handwriting system recognizes handwriting by the particular “neography” that relies on user drawing an uppercase letter with a single stroke. The name comes from the feature of its drawing area divided to two blocks to admit each letters-drawing and numbers-drawing.
- Page 53 Chapter 1 Use Mobile Computer LETTER RECOGNIZER “Letter Recognizer” presents a writing pad divided in three areas. Each respectively detects uppercase letters, lowercase letters, and numbers/symbols/punctuations. To enter text: Write letters, numbers, and numbers/symbols in their respective areas as desired. Letter Recognizer then converts them to typed text.
-
Page 54: Edit Text
CP60 Mobile Computer (WEH) Reference Manual 1.5.4. EDIT TEXT On the mobile computer, cut, copy, and paste text within an application or across applications by the menu commands. Some applications don’t support editing some or all of the text they display while others may offer their own way to edit text. -
Page 55: Touch Control
Chapter 1 Use Mobile Computer 1.6. TOUCH CONTROL The mobile computer’s LCD is overlaid by a resistive touch panel and thus forms a resistive touchscreen. Since a resistive touchscreen locates the user’s touch by the force applied on it, by operating with the stylus one can apply minimum force to trigger actions from the touchscreen. - Page 56 CP60 Mobile Computer (WEH) Reference Manual Rotation settings page opens with three orientation modes to select from and an option to suspend the mobile computer when the screen is facing down. Three screen orientation modes Allows mobile computer to enter suspension when facing down 3) Tap the modes that you wish to enable.
-
Page 57: Adjust Backlight
Chapter 1 Use Mobile Computer SIGNATURE MODE The signature mode is for combined usage with the CipherLab application Signature. With this mode enabled, the screen will immediately rotate 180° when the front of the mobile computer is tilted outwards, which is convenient for signing by a second party. - Page 58 CP60 Mobile Computer (WEH) Reference Manual Brightness tabbed page Select whether to enable manual backlight setting Slide to set backlight level as desired 3) Tap OK on the softkey bar to apply the settings. AUTOMATIC BACKLIGHT PROFILES The mobile computer stores three backlight profiles to represent backlight level under different environments.
- Page 59 Chapter 1 Use Mobile Computer Three profiles, Dark, Bright, and Brightest are available in the drop-down box. Select the profile you would like to modify and use the slidebars below to set the backlight levels to your preferences. The screen backlight will change temporarily to show the effect.
-
Page 60: Calibration
CP60 Mobile Computer (WEH) Reference Manual 1.6.4. CALIBRATION A resistive touchscreen needs calibration to work accurately after serving for a period of time. Calibration aligns the coordinates of the touch panel and the LCD underneath to improve touch accuracy. To calibrate the touchscreen: 1) Tap Windows icon on the softkey bar. -
Page 61: Memory
Chapter 1 Use Mobile Computer 1.7. MEMORY The mobile computer packs the following memory units to retain data and instructions from users: Random-access Memory (RAM) 512 MB SDRAM for temporary storage and fast access of active applications. When the main battery pack is absent, SDRAM is fed by backup battery to retain data. Internal Storage 4GB flash memory to store OS (Windows Embedded Handheld 6.5), application files, settings, and other data used by applications. - Page 62 CP60 Mobile Computer (WEH) Reference Manual INTERNAL STORAGE On Start screen, tap Settings | System | Memory . Memory screen opens showing Main tabbed page. This page gives information about the mobile computer’s use of RAM and internal storage. Main tabbed page delivers two labels – Storage and Program: Storage - Internal memory for file storage, such as OS, applications, files and data Program - RAM usage for running applications.
-
Page 63: Insert Sd Card
CP60 Mobile Computer (WEH) Reference Manual 1.7.3. INSERT SD CARD Day-to-day use of the mobile computer might cause the available internal storage to run short. Equip the mobile computer with an external memory unit to expand storage capacity. Follow the steps below to install a SD card: 1) Power off the mobile computer. -
Page 64: Direct Data Communication
CP60 Mobile Computer (WEH) Reference Manual 1.8. DIRECT DATA COMMUNICATION “Direct” data connection means “hardwired” data connection between the mobile computer and a Windows-based PC as opposed to wireless connection. Direct data connection relies on a RS-232 cable or a USB cable (sometimes plus an auxiliary cradle) between the two mentioned devices. -
Page 65: Use Cradle
Chapter 1 Use Mobile Computer 1.8.2. USE CRADLE Direct data communication using a cradle: 1) Seat the mobile computer in a Charging and Communication Cradle (hereinafter “cradle”). 2) Connect the cradle to your PC with a USB cable. Fix the cable to both sides. ActiveSync will automatically detect connection between the two and prompt for data synchronization. -
Page 66: Syncing Tools
CP60 Mobile Computer (WEH) Reference Manual 1.8.3. SYNCING TOOLS Microsoft’s syncing tools enables users to update or back up the data on their handheld computers to desktop computers. Two syncing tools are featured by Microsoft - ActiveSync and Windows Mobile Device Center (hereinafter “WMDC”). -
Page 67: St Usb Sync
Chapter 1 Use Mobile Computer 1.8.5. 1 USB SYNC This section will guide you through USB syncing. For Bluetooth syncing, see Bluetooth ActiveSync. To connect ActiveSync using USB: 1) Download the right syncing tool as described in Syncing Tools and install it on your PC. 2) Connect the mobile computer and your PC as described in Use Cable Cradle. - Page 68 CP60 Mobile Computer (WEH) Reference Manual If you have pressed Next, follow the onscreen instructions and select the data categories you would like to synchronize. Once confirmed, synchronization will begin shortly, and when the process is finished, ActiveSync window will show “Synchronized”...
-
Page 69: Disconnect Usb Activesync
Chapter 1 Use Mobile Computer 1.8.6. DISCONNECT USB ACTIVESYNC To disconnect USB ActiveSync: 1) On your PC, open ActiveSync by double-clicking its icon in the notification area. ActiveSync opens. 2) From the menu bar, click File | Connection Settings. [Connection Settings] window opens. 3) Deselect Allow USB connections. -
Page 70: Activesync Actions To Take
CP60 Mobile Computer (WEH) Reference Manual 1.8.7. ACTIVESYNC ACTIONS TO TAKE Once “Synchronization Relationship” or “Temporary Relationship” is established between two computers, a variety of actions can be taken to enhance resource sharing between them as previously mentioned in Sync Partnership. - Page 71 Chapter 1 Use Mobile Computer ADD/REMOVE PROGRAMS Note basically the applications to be installed to the mobile computer need to be installed on your PC first. So download the application programs to your PC first and install them on your PC so they can be installed onto the mobile computer later.
- Page 72 CP60 Mobile Computer (WEH) Reference Manual 4) Select the application program(s) to install to the mobile computer, and deselect the application program(s) to uninstall from the mobile computer. 5) Press the OK button. ActiveSync proceeds to install programs and/or remove programs to/from the mobile computer.
- Page 73 Chapter 1 Use Mobile Computer 4) Double-click My Windows Mobile-Based Device My Windows Mobile-Based Device opens. 5) Double-click Program Files. Program Files folder opens. This is where the downloaded applications are normally installed on the mobile computer’s local storage. In the folder, each sub-folder stores an application. 6) Open the folder of the application to create shortcut for.
- Page 74 CP60 Mobile Computer (WEH) Reference Manual REMOVE SHORTCUTS FROM START SCREEN Note the inherent shortcuts aren’t removable. Only the added shortcuts are removable. To remove an added shortcut from Start screen, simply use ActiveSync’s Explore delete the shortcut from My Windows Mobile-Based Device\Windows\Start Menu\Programs folder.
- Page 75 Chapter 1 Use Mobile Computer Option Description Automatic Auto-detects proxy This option detects if a proxy should be used when passing connections through the PC. If yes, configure the proxy on the mobile computer. This option best suits connecting to a PC (laptop) that may be used at home (with no proxy), as well as to a corporate network (with proxy).
-
Page 76: Audio Playback
CP60 Mobile Computer (WEH) Reference Manual 1.9. AUDIO PLAYBACK Use a headset for audio playback and hands-free telephone communication. Bluetooth headsets are supported to deliver better mobility. See Bluetooth. 1.9.1. VOLUME CONTROL The mobile computer has two volume control facilities – the physical volume rocker perched on the side of the mobile computer and the onscreen volume gauges featured by the OS. - Page 77 Chapter 1 Use Mobile Computer [Volume] dialog opens presenting the gauges for system volume and phone ringer volume. Two radio buttons [On] and [Off] are featured on the right. Select [On] or [Off] to enable or mute both volumes. Onscreen volume facility Adjusts system volume [On] and [Off] enables or mutes system volume...
- Page 78 CP60 Mobile Computer (WEH) Reference Manual...
-
Page 79: Data Capture
Although highly converged, the mobile comptuer is also a dedicated barcode reader. Reader combinations are as follows: CP60 / CP60G Mobile Computer: equipped with a (laser) 1D reader or 2D imager CP60R / CP60GR Mobile Computer: equipped with a (laser) 1D reader or 2D imager, plus an HF RFID reader A number of symbologies are supported and data about them can be decoded and collected. -
Page 80: Barcode Reader
The mobile computer is capable of reading printed barcodes. The reader module can be a either a (laser) 1D reader or a 2D imager. The mobile computer is installed with a CipherLab utility Reader Configuration to configure the scan engine built inside. Use it to create a profile of settings that best suits your needs. - Page 81 Chapter 2 Data Capture GENERAL SETTINGS General Settings is where all reader settings are accessed from except for symbologies settings. Tap the green arrow next to each item to enter the sub-menu for that given item. Tap to enter each General Settings sub-menu The functions under General Settings include:...
- Page 82 CP60 Mobile Computer (WEH) Reference Manual SCANNER PREFERENCES Scanner Preferences page can be entered by tapping the given item on the Reader Configuration main settings page. The options provided in this page differ according to the type of scan engine (either 1D or 2D) built within the mobile computer.
- Page 83 Chapter 2 Data Capture 1D (LASER) READER SETTINGS Setting Description Default Decode Timeout Sets the maximum time for the decoding process during a 3 sec scan. Configurable between 1 sec to 9 sec. Redundancy Level Sets how many successful readings should be done before Level 1 linear barcodes such as Codabar, MSI, and Interleaved 2 of 5 can be decoded.
- Page 84 CP60 Mobile Computer (WEH) Reference Manual 2D IMAGER SETTINGS Setting Description Default Decode Timeout Sets the maximum time for the decoding process during a 3 sec. scan. Configurable between 1 sec to 9 sec. Redundancy Level Sets how many successful readings should be done before...
- Page 85 Chapter 2 Data Capture DATA OUTPUT Data Output allows users to set the way to output decoded data. To open Data Output settings page: 1) Open Reader Configuration as described in Launch Reader Configuration. 2) Tap the arrow next to Data Output. Data Output settings page opens.
- Page 86 CP60 Mobile Computer (WEH) Reference Manual HOW TO OUTPUT After the output destination is set, configure how to output decoded data, i.e. the “format” to present decoded data. Setting Description Default Auto Enter Adds an ENTER character before or after each scanning act.
- Page 87 Chapter 2 Data Capture NOTIFICATION SETTINGS Notification Settings enables audible, visible and tactile feedback for scanning good read, which helps notify the user of a successful decoding. To open Notification Settings page: 1) Open Reader Configuration as described in Launch Reader Configuration.
- Page 88 CP60 Mobile Computer (WEH) Reference Manual SYMBOLOGY Symbology section sets the symbologies to read, and also enables/disables some feature(s) for a symbology to read, such as: Customize and transmit start/stop characters Verify/transmit check digits, Enable/disable addon digits Convert to another symbology...
- Page 89 Chapter 2 Data Capture Symbology settings page opens listing all symbologies which can be decoded. 1D Symbologies 2D Symbologies SYMBOLOGY SETTINGS Tap the arrow next to each symbology checkbox to access detailed settings for that symbology.
- Page 90 CP60 Mobile Computer (WEH) Reference Manual GENERAL PREFERENCES For certain symbologies, common settings are grouped together and displayed in a detailed settings page for that barcode family. To open the general settings page for a set of symbologies, tap the arrow next to General Preference.
- Page 91 Chapter 2 Data Capture MISCELLANEOUS This section allows enabling code ID transmission for easy identification of the scanned barcode, and enabling picklist mode to enhance decoding accuracy. Miscellaneous Setting Description Default Transmit AIM Code ID Sets whether to include AIM code ID character in the Deselected decoded data.
-
Page 92: Reader Configuration Option Menu
CP60 Mobile Computer (WEH) Reference Manual 2.1.2. READER CONFIGURATION OPTION MENU Reader Configuration provides an option menu which is accessible on the main settings page and provides options to import/export all settings in a re-usable format, reset all settings back to factory default, view copyright and version information, and exit the application. - Page 93 Chapter 2 Data Capture IMPORT AND EXPORT Reader Configuration supports saving the settings and exporting them as an .xml file. Previously exported symbology and scanner settings can be imported again on the mobile computer. This can also be used to implement identical Reader Config settings on two or more devices.
- Page 94 CP60 Mobile Computer (WEH) Reference Manual To export settings: 1) Open Reader Configuration as described in Launch Reader Configuration. 2) Tap Menu button on the softkey bar to open the option menu. 3) Tap Export. An export page opens allowing you to enter and select information about the profile to be saved.
- Page 95 Chapter 2 Data Capture ABOUT This item in the Reader Configuration option menu delivers software version and copyright information. To view information about the software: 1) Open Reader Configuration as described in Launch Reader Configuration. 2) Tap Menu button on the softkey bar to open the option menu. 3) Tap About.
-
Page 96: Launch Reader Demo
2.1.3. LAUNCH READER DEMO Aside from output to destinations as per Keyboard Emulation settings, decoded data can also be displayed using the pre-installed CipherLab utility Reader Demo. To launch Reader Demo: 1) Configure scan engine properties as described in Barcode Reader. -
Page 97: Read Printed Barcodes
Chapter 2 Data Capture 2.1.4. READ PRINTED BARCODES Before you start collecting data, configure the reader module(s) using Reader Configuration, or skip the configuration and go straight to collect data using Reader Demo. To collect data: 1) Use Reader Config to configure the reader module as described in Barcode Reader. - Page 98 CP60 Mobile Computer (WEH) Reference Manual Denotes the decoded barcode type Output of the decoded barcode Figure 17: Reading Printed Barcodes...
-
Page 99: Hf Rfid Reader
Chapter 2 Data Capture 2.2. HF RFID READER For CP60R / CP60GR mobile computers equipped with an HF RFID reader, CipherLab utility HF RFID Configuration is available to configure the RFID reader and test scan RFID tags. 2.2.1. INSERT SAM CARD The CP60R / CP60GR mobile computer supports using up to two SIM-based secure access module (SAM) cards. -
Page 100: Launch Hf Rfid Configuration
CP60 Mobile Computer (WEH) Reference Manual 2.2.2. LAUNCH HF RFID CONFIGURATION To launch HF RFID Configuration: 1) Tap Start Screen | Settings | System | HF RFID Configuration HF RFIDConfig main view opens showing two sections, RFID Test and General Settings. -
Page 101: General Settings
Chapter 2 Data Capture 2.2.3. GENERAL SETTINGS General Settings can set the data output format, notification of successful reading/writing of RFID tags, and check or change ISO14443A Key A and Key B values. The following items are available. Enable RFID Reader (Enabled by default) Data Output Notification Settings ISO14443A Login Key... - Page 102 CP60 Mobile Computer (WEH) Reference Manual Setting Description Default Keyboard Treats decoded data as typed text and outputs it to the active Input on local Emulation application locally on the mobile computer or remotely on a machine connected computer. Options are: Disable: Disables Keyboard emulation whereby decoded data won’t be output.
- Page 103 Chapter 2 Data Capture NOTIFICATION SETTINGS Notification Settings control if a successful decoding is made recognizable through audible, visible and/or tactile feedback. To open Notification Settings page: 1) Launch the RFID reader as described in Launch HF RFID Configuration. 2) Tap the green arrow next to Notification Settings. Setting Description Default...
- Page 104 CP60 Mobile Computer (WEH) Reference Manual ISO14443A LOGIN KEY Some RFID tags support authentication for security concerns, such as Mifare Standard 1K/4K and SLE66R35 tags. The security keys, Keys A and Key B, are two keys that enable the RFID reader to access (read or write) data blocks on a Mifare tag. Enter the keys before...
- Page 105 Chapter 2 Data Capture ISO14443A CHANGE KEY You may change the Keys A and/or B used to access a Mifare tag. To change the value of key A or key B: 1) Launch the RFID reader as described in Launch HF RFID Configuration.
-
Page 106: Hf Rfidconfig Option Menu
CP60 Mobile Computer (WEH) Reference Manual 2.2.4. HF RFIDCONFIG OPTION MENU On the HF RFIDConfig main view is a menu button which allows you to import and export the settings, reset all settings back to default, check software version and developer... - Page 107 Chapter 2 Data Capture RESET TO FACTORY DEFAULT This function restores all settings in HF RFIDConfiguration to default. To reset the settings to default: 1) Launch the RFID reader as described in Launch HF RFID Configuration. 2) Tap Menu button on the softkey bar to open the option menu. 3) Tap Reset to Factory default.
- Page 108 CP60 Mobile Computer (WEH) Reference Manual IMPORT AND EXPORT HF RFID Configuration supports saving the settings and exporting them as an .xml file. Previously exported symbology and scanner settings can be imported again on the mobile computer. This can also be used to implement identical HF RFID Configuration settings on two or more devices.
- Page 109 Chapter 2 Data Capture To export settings: 1) Launch the RFID reader as described in Launch HF RFID Configuration. 2) Tap Menu button on the softkey bar to open the option menu. 3) Tap Export. An export page opens allowing you to enter and select information about the profile to be saved.
- Page 110 CP60 Mobile Computer (WEH) Reference Manual ABOUT Tap About in the HF RFID Configuration option menu to display software version and copyright information. Information about the software...
-
Page 111: Read/Write Rfid Tags
Chapter 2 Data Capture 2.2.5. READ/WRITE RFID TAGS To read an RFID tag: 1) Adjust the RFID reader settings first. For instance, specify the length of data you would like to read from the tag, the start position to collect data, where and how to output data Data Output. - Page 112 CP60 Mobile Computer (WEH) Reference Manual The decoded data will display in the test scan field. Tap Back on the softkey bar to leave the test scan page. Set the block to start reading data from Shows the decoded data...
- Page 113 Chapter 2 Data Capture To write data into an RFID tag: 1) On the HF RFIDConfig main view, tap the green arrow next to Read / Write Block. 2) Tap Write tabbed page. 3) Input the data you would like to write in the blank field. 4) Place the RFID tag to write in proximity to the upper half of the mobile computer’s back cover, where the RFID reader module is installed.
- Page 114 CP60 Mobile Computer (WEH) Reference Manual...
-
Page 115: Camera
Chapter 3 CAMERA The mobile computer is adorned with a 5.0 mega-pixel camera that can also serve as a video recorder. The OS provides a camera/video recorder application, which launches the camera, takes pictures, shoots videos and stores the works on the mobile computer’s storage where they can be viewed, edited and output. -
Page 116: Launch Camera
CP60 Mobile Computer (WEH) Reference Manual 3.1. LAUNCH CAMERA To launch the camera: 1) On Start screen, tap Pictures and Videos Pictures and Videos application opens. 2) Tap Camera icon located at the upper left of the window. Camera opens in portrait mode and readies to take pictures. -
Page 117: Take Pictures
Chapter 3 Camera 3.2. TAKE PICTURES By default, pictures are taken in JPEG format and are saved to the mobile computer’s internal storage under My Device\My Documents\My Pictures. To change the default storage path, see Camera Settings. To take a picture: 1) Open camera as described in Launch Camera. -
Page 118: Camera Settings
CP60 Mobile Computer (WEH) Reference Manual 3.2.1. CAMERA SETTINGS The camera supports changing shooting mode, brightness and resolution. Users can also enable full screen shooting mode which leaves the screen clean of option buttons and picture information. To access camera settings:... - Page 119 Chapter 3 Camera Options… Opens Pictures & Videos settings page showing four tabbed pages: Camera, Video, General, and Slide Show. Camera tabbed page: Video tabbed page: Sets the file prefix, storage destination Selects whether to include audio data and compression level of the stored when recording videos, and the time image.
-
Page 120: Launch Video Camera
CP60 Mobile Computer (WEH) Reference Manual 3.3. LAUNCH VIDEO CAMERA To launch the video camera: 1) Launch camera as described in Launch Camera. 2) Tap Menu command on the softkey bar 3) Tap Video in the option menu. Video camera is readied to begin shooting. -
Page 121: Shoot Videos
Chapter 3 Camera 3.4. SHOOT VIDEOS By default, videos are shot in WMV format and are saved to the mobile computer’s internal storage under My Device\My Documents\My Pictures. To change the default storage path, see Camera Settings. To shoot a video: 1) Open video camera as described in Launch Camera. -
Page 122: Video Camera Settings
CP60 Mobile Computer (WEH) Reference Manual 3.4.1. VIDEO CAMERA SETTINGS The video camera supports changing brightness and quality. Users can also enable full screen shooting mode which leaves the screen clean of option buttons and picture information. To access video camera settings:... -
Page 123: Pictures & Videos
Chapter 3 Camera 3.5. PICTURES & VIDEOS Pictures & Videos is an application that views and edits the pictures taken and videos shoot, or those copied or downloaded. It also sets background for Today Screen Start Screen, and sets avatars for your contacts. It can also be used to email pictures and videos. LAUNCH PICTURES &... - Page 124 CP60 Mobile Computer (WEH) Reference Manual TAKE OTHER ACTIONS TO A VIDEO OR PICTURE To edit, manage or take other actions to a video or picture: 1) Open Pictures & Video as described in Launch Pictures & Videos. Pictures & Videos opens.
-
Page 125: Operating System
Chapter 4 OPERATING SYSTEM The mobile computer is powered by Windows Embedded Handheld 6.5, a member of Windows Embedded family branded for full compatibility with Windows Mobile 6.5. Windows Embedded Handheld 6.5 features a prettier UI and a series of fresh new looks unseen in the predecessor Windows CE. -
Page 126: St Startup
CP60 Mobile Computer (WEH) Reference Manual 4.1. 1 STARTUP Finished with the setup as described in Main Battery Setup Insert SD Card, proceed to power on the mobile computer as described in Power Without a SIM card installed, the mobile computer is still able to connect to an available Wi-Fi hotspot for data. -
Page 127: Exit Cipherlab Smart Shell
Chapter 4 Operating System 4.1.1. EXIT CIPHERLAB SMART SHELL CipherLab Smart Shell is optional software which is integrated on the mobile computer as per shipping orders. If the mobile computer has Smart Shell software installed on it, the system will enter Smart Shell right after power on or system reset. - Page 128 CP60 Mobile Computer (WEH) Reference Manual Tap to open the Smart Shell Settings 4) Tap the Settings icon seated on the lower right corner of the screen to open a settings menu. Tap Exit Shell in the menu to exit the Smart Shell and show the OS’s Today screen.
-
Page 129: Today Screen
Chapter 4 Operating System 4.2. TODAY SCREEN It is Today screen that first shows oncscreen when the mobile computer powers on or is unlocked. Today screen shows a scrollable list of applications such as pictures, music, clock & time and so on, and the application in the center is always the active one. When an application is active, today sceen displays additional information, and command buttons appear on the softkey bar to take actions to the application. -
Page 130: Customize Today Screen
CP60 Mobile Computer (WEH) Reference Manual 4.2.1. CUSTOMIZE TODAY SCREEN Customize Today screen to change its appearance and items presented. To customize Today screen: 1) Tap Windows icon on the softkey bar. 2) Tap Settings | Home. Home settings open. -
Page 131: Start Screen
Chapter 4 Operating System 4.3. START SCREEN Start screen is where all features on the mobile computer are accessed from. This screen lays out the application icons, shortcuts and so on in a staggered manner so icons are more touchable and the number of icons allowed onscreen are increased. Basic operations on Start screen: If you see the icon of the application you want to open, tap it. -
Page 132: Return To Start Screen
CP60 Mobile Computer (WEH) Reference Manual 4.3.1. RETURN TO START SCREEN Tap Windows icon on the softkey bar or press the physical Windows key to return to Start screen. 4.3.2. TITLE BAR At the top of almost every screen is Title bar. It shows a title on the left and a notification area on the right. - Page 133 Chapter 4 Operating System HSDPA network available HSDPA connected EDGE network available EDGE connected GPRS network available GPRS connected Phone off SIM card locked. PIN code required to turn on phone Phone on with signal strength Connection is active Connection is inactive Wi-Fi on but not connected WiFi available WiFi connected...
-
Page 134: Manage Notofications
CP60 Mobile Computer (WEH) Reference Manual 4.3.3. MANAGE NOTOFICATIONS Status/notification icons are relatively small, however by tapping the Title bar, a drop-down bar will appear to provide larger icons for managing notifications. Tap Title bar to open a drop-down bar. - Page 135 Chapter 4 Operating System Opens the reminder for an alarm or appointment. Bluetooth A2DP profile in use. Tap it to access Bluetooth devices list. Checks a new e-mail. Opens Text application. Roaming on RESPOND TO NOTIFICATIONS 1) Tap Title bar to open Drop-down bar. Drop-down bar opens.
-
Page 136: Customize Start Screen
CP60 Mobile Computer (WEH) Reference Manual 4.3.4. CUSTOMIZE START SCREEN Customize Start screen by changing the background, application shortcuts, and so on. Rearrange the application shortcuts to make the applications that you use most often easiest to access. CHANGE BACKGROUND Craft your Start screen and Today screen with any of your own pictures or a number of designer themes bundled with the OS. - Page 137 Chapter 4 Operating System 3) Tap and hold the executable file. A context menu comes up. 4) Tap Copy. 5) Browse to My Device\Windows\Start Menu\Programs. Programs folder opens. 6) Tap and hold any vacant spot onscreen. Context menu comes up 7) Tap Paste Shortcut.
- Page 138 CP60 Mobile Computer (WEH) Reference Manual REMOVE ITEMS FROM START SCREEN The mobile computer relies on File Explorer to remove an application shortcut from Start screen: 1) On Start screen, tap File Explorer File Explorer opens. 2) Browse to My Device\Windows\StartMenu\Programs.
-
Page 139: Start Screen Icons
Chapter 4 Operating System 4.3.5. START SCREEN ICONS Start screen presents a number of icons in a staggered pattern that makes them easily touchable. Each icon opens an application, folder or a group of settings when it is tapped. This section will give an overview of these icons. Icon Name Description... - Page 140 CP60 Mobile Computer (WEH) Reference Manual Calculator Performs mathematical calculations. Internet Sharing Shares the mobile computer’s mobile data connection with another computer through a USB or serial cable. See USB Internet Sharing & Bluetooth Internet Sharing for details. Search Phone Searches contacts, files and other data on the mobile computer.
-
Page 141: Suspend & Reset Mobile Computer
Chapter 4 Operating System 4.4. SUSPEND & RESET MOBILE COMPUTER To save from repeatedly charging and replacing batteries, suspend the mobile computer when you are not actively using it. “Suspension” is a state to hold the device from running without turning off power. It is a “soft-off” state whicih enables less power consumption, and also a state from which a device can quickly awake since there is no need to restart the software (applications). -
Page 142: Wake Up Mobile Computer
CP60 Mobile Computer (WEH) Reference Manual Advanced tabbed page opens. Power Information’s Advanced tabbed page 3) Set a time to turn off LCD and suspend the mobile computer. Note the following cases also suspend the mobile computer: Battery door isn’t in place. -
Page 143: Reset Mobile Computer
Chapter 4 Operating System 4.4.3. RESET MOBILE COMPUTER The mobile computer features two reset mechanisms, warm boot and cold boot. Performing these two resetting acts helps resolve certain problems within the OS and applications. These two actions can be performed by combined use of the power button and the reset button located on the mobile computer’s keypad. -
Page 144: Set Screen Lock
CP60 Mobile Computer (WEH) Reference Manual 4.5. SET SCREEN LOCK For the sake of security, you may want to restrict the access to the mobile computer by a self-set password. The OS supports setting up a password to recover the access to the mobile computer. -
Page 145: Work With Menus
Chapter 4 Operating System 4.6. WORK WITH MENUS The OS presents two kinds of menus: option menus and context menus. By these menus, users are able to operate onscreen and use applications. 4.6.1. OPTION MENUS Normally a screen or an active application features a “Menu” command on the softkey bar to launch an “option menu”, which causes actions to be taken by the screen or the active application. -
Page 146: Context Menus
CP60 Mobile Computer (WEH) Reference Manual Note some screens/applications may not have an option menu. A screen that doesn’t feature a “Menu” command on the softkey bar. An example of Start screen. 4.6.2. CONTEXT MENUS The context menu on the other hand contains the actions to be performed on a specific item selected onscreen. -
Page 147: Manage Applications
Chapter 4 Operating System 4.7. MANAGE APPLICATIONS On Windows Embedded Handheld 6.5, Start screen is where all inherent applications of the OS are accessed from. In the OS, when you run an application, the other applications that have been running don’t shut down but keep on running whether it is music that is being played or a webpage that is being browsed. - Page 148 CP60 Mobile Computer (WEH) Reference Manual MONITOR OPENED APPLICATIONS Upon launch, Task Manager shows a list of all opened applications which are under monitor: Delivers the application’s memory usage. Tap to Task Manager screen ascend/descend the “Application” shows a entries...
- Page 149 Chapter 4 Operating System Task Manager monitors opened applications Tap and hold an entry to pop up the context menu. Context menu opens. SWITCH TO ANOTHER OPENED APPLICATION To switch to another opened application: 1) Launch Task Manager as described in Launch Task Manager.
- Page 150 CP60 Mobile Computer (WEH) Reference Manual Task Manager shifts to monitor processes. Task Manager monitors cached processes. Note: Stopping an application or process or service may interrupt one or more dependant functions on the mobile computer. You may need to restart the mobile computer to recover full functionality.
- Page 151 Chapter 4 Operating System This screenshot shows downloading an Download starts and proceeds. application program to the mobile computer. When asked to confirm the download, tap the “Yes” command on the softkey bar. If the mobile computer is equipped with Installation begins.
- Page 152 CP60 Mobile Computer (WEH) Reference Manual Installation complete. “OK” command to finish and quit installation. UNINSTALL APPLICATIONS On the mobile computer, the acquired (non-inherent) applications are subject to your manual uninstallation. To uninstall an application: 1) On Start screen, tap Settings | System |...
-
Page 153: Radios
Chapter 5 RADIOS The mobile computer is a versatile networker. It integrates Wi-Fi and Bluetooth for wireless data, and optionally a HSPA+ (3.8G) module for mobile data. It also includes a GPS receiver which can detect your locations on earth with street-level accuracy. With the help of these radios, the mobile computer keeps users online all the time. -
Page 154: Access Cellular Wan
CP60 Mobile Computer (WEH) Reference Manual 5.1. ACCESS CELLULAR WAN When you insert a SIM card in the mobile computer and power on the phone module, the mobile computer will connect to your mobile carrier’s cellular wide area networks for data. -
Page 155: Check Network In Use
Chapter 5 Radios 5.1.2. CHECK NETWORK IN USE To check what network you’re using now: 1) On Start screen, tap Settings | Connections | Wireless Manager Wireless Manager opens. 2) Tap the “Menu” command on the softkey bar. Option menu shows. 3) Tap Phone Settings. -
Page 156: Use Only 2G Networks
CP60 Mobile Computer (WEH) Reference Manual 5.1.4. USE ONLY 2G NETWORKS Limit mobile data to 2G networks (GPRS or EDGE) to extend battery life or when you are not intensively transmitting data. To limit mobile data to only 2G: 1) On Start screen, tap Settings | Connections | Wireless Manager Wireless Manager opens. - Page 157 Chapter 5 Radios Make New Connection 5) Tap Next to proceed. 6) Enter the Access Point Name (APN) of the connection. Consult your mobile carrier for such APN (for instance, “Internet”). 7) Enter the username, password, and domain if your connection needs them. And tap the Advanced…...
-
Page 158: Edit & Add Access Points
CP60 Mobile Computer (WEH) Reference Manual 5.1.6. EDIT & ADD ACCESS POINTS If it is agreed between you and your mobile carrier that the current Access Point Name (APN) should be changed or a new access point needs to be created, consult your mobile carrier for the APN and detailed settings in order to have it edited. -
Page 159: Usb Internet Sharing
Chapter 5 Radios 5.1.7. USB INTERNET SHARING “Internet Sharing” or “Internet Tethering” enables your Windows-based PC to connect to Internet using the mobile computer's mobile data (or dial-up data). The mobile computer functions as a Wi-Fi “hotspot” (a.k.a “access point”) that your PC connects to. By “Internet Sharing”... -
Page 160: Use Wi-Fi
CP60 Mobile Computer (WEH) Reference Manual 5.2. USE WI-FI The mobile computer is capable of Wi-Fi, a wireless networking technology making use of an access point, also known as “hotspot”, to connect to a wireless local area network. To use Wi-Fi, the mobile computer has to connect to a hotspot. Some hotspots are open for connection while others request a key to authenticate access. -
Page 161: Status Tabbed Page
Chapter 5 Radios 5.2.2. STATUS TABBED PAGE The Status tabbed page provides basic information on WLAN connection and Bluetooth status. Wi-Fi settings can be configured in Configuration Tabbed Page. Wi-Fi status Bluetooth status (service not available now) Note: SCU does not currently support viewing or configuring Bluetooth settings. -
Page 162: Configuration Tabbed Page
CP60 Mobile Computer (WEH) Reference Manual 5.2.3. CONFIGURATION TABBED PAGE TURN ON/OFF WI-FI POWER Select the Wi-Fi checkbox to turn on Wi-Fi power. Deselect it to shut down Wi-Fi. Turn on Wi-Fi power Note: Wi-Fi connection status will be reflected under Wireless Manager, which can be accessed by tapping the Title bar | Wireless Manager icon, or Start Screen | Settings | Connections | Wireless Manager. - Page 163 Chapter 5 Radios ACTIVE PROFILE A profile is a set of parameters that define the manner which a device associates to a wireless LAN (WLAN) infrastructure. A profile contains information including the System Set Identifier (SSID, the "name" of the WLAN infrastructure), means of data encryption, authentication type, and security credentials.
- Page 164 CP60 Mobile Computer (WEH) Reference Manual CREATE WI-FI PROFILE To create a Wi-Fi Profile: 1) Open SCU as described in Launch SCU. 2) Tap the Configuration tab to show the Configuration tabbed page. 3) Tap Scan to view a list of access points that are broadcasting their SSIDs. You may sort the list by tapping the column headers.
- Page 165 Chapter 5 Radios 5) A profile settings page opens showing detailed radio settings. Tap each item and adjust its Value to suit your needs. 6) When finished fine-tuning all settings, tap Commit to save the profile. 7) Tap OK on the softkey bar to close Profile Settings page and return to Configuration settings.
- Page 166 CP60 Mobile Computer (WEH) Reference Manual MANAGE WI-FI PROFILE To manage your profiles: 1) Open SCU’s Configuration tabbed page as described in Create Wi-Fi Profile. 2) Tap Manage Profiles to open the Profile settings page. Item Description Profile When SCU is first launched, “Default” is the active profile. Unless it is modified, this profile does not specify an SSID, EAP type or encryption method.
- Page 167 Chapter 5 Radios Tap New and enter a unique name for the profile. Configure the Radio settings, Encryption, EAP Type, and other settings for this new profile. The name for each profile must be unique You can define up to 20 profiles Delete Select a profile from the drop-down menu and tap Delete.
- Page 168 CP60 Mobile Computer (WEH) Reference Manual Radio After selecting a profile in the Profile drop-down bar, configure radio settings in Settings the scrollable menu below. Property Description Profile Name Tap to rename the selected profile. Up to 32 characters allowed.
- Page 169 Chapter 5 Radios the most power but offers the highest throughput. It is recommended when AC power is in use. Maximum In Max Power Savings (Max PSP) mode, access point buffers incoming messages for the radio, which wakes periodically connects to the access point to see if any buffered messages are waiting.
- Page 170 CP60 Mobile Computer (WEH) Reference Manual A rates 6, 9, 12, 18, 24, 36, 48, and 54 Mbps, only plus N rates if supported. ABG rates All A rates and all B and G rates, with A full rates (the 802.11a radio) preferred, plus N if supported.
- Page 171 Chapter 5 Radios Encryption This specifies the type of key used to encrypt and decrypt transmitted data, and how that key is specified or derived. Select Encryption type in the Value drop-down box. Item Description None TKIP The encryption method defined with WPA. TKIP uses RC4 encryption as does WEP.
- Page 172 CP60 Mobile Computer (WEH) Reference Manual User Name (up to 64 characters) PEAP-GTC Password (up to 32 characters) CA Cert: Filename and extension of root certificate authority (CA) EAP-TTLS digital certificate (up to 32 characters). Specify the Certs Path in Globals settings page > Certs Path.
- Page 173 Chapter 5 Radios MANAGE GLOBAL SETTINGS Global settings include radio and security settings that apply to all profiles in SCU. To open the Global settings page: 1) Open SCU’s Configuration tabbed page as described in Create Wi-Fi Profile. 2) Tap Manage Profiles to open the Profile settings page. 3) Tap the Globals tab to open the Global settings page.
- Page 174 CP60 Mobile Computer (WEH) Reference Manual 1, 7, 13 For ETSI and TELEC radios only Custom Indicates the system registry has been edited to include a value other than those available in the drop-down value Default: Full DFS Channels Indicates whether to support 5 GHz (802.11a) channels where dynamic frequency selection (DFS) is required.
- Page 175 Chapter 5 Radios Auth Server Type of authentication server being used for EAP authentication. Value: Type 1 Cisco Secure ACS or another server that uses PEAPv1 PEAP with EAP-MSCHAPV2 (PEAP-MSCHAP) Type 2 A different authentication server, such as Juniper Networks Steel Belted RADIUS, that uses PEAPv0 for PEAP-MSCHAP Default: Type 1 TTLS Inner Method...
- Page 176 CP60 Mobile Computer (WEH) Reference Manual Admin Password Auth Timeout (s) Specifies how long it will wait for an EAP authentication request to succeed or fail. If authentication credentials are specified in the active profile and the authentication times out, then association will fail. If authentication credentials are not specified in the active profile and the authentication times out, then the user will be required to enter credentials again.
-
Page 177: Diagnostics Tabbed Page
Chapter 5 Radios 5.2.4. DIAGNOSTICS TABBED PAGE Perform diagnostic tests to troubleshoot connection issues when necessary. To open the Diagnostics page: 1) Open SCU as described in Launch SCU. 2) Tap the Diagnostics tab to show the Diagnostics page. Diagnostics status for Wi-Fi and Bluetooth shows, along with on-screen buttons to open Advanced settings and view software version information. - Page 178 CP60 Mobile Computer (WEH) Reference Manual ADVANCED DIAGNOSTICS To access Advanced diagnostics settings: 1) Open Diagnostics Tabbed Page. 2) Tap the Advanced button to open advanced diagnostics settings. CHECK STATUS To check diagnostics status, select Status in the drop-down bar.
- Page 179 Chapter 5 Radios USE PING TOOLS To perform ping tests, select Ping Tools in the drop-down bar. Select Ping Tools to diagnose the connection Device IP address AP Name Item Description Destination Enter the address to ping. Ping Payload The amount of data to be transmitted on a ping. Value: 32, 64, 128, 256, 512, 1024 Default: 32 (bytes) Ping Delay...
- Page 180 CP60 Mobile Computer (WEH) Reference Manual When an active ping is initiated, the screen displays a ping indicator that blinks in green (for a successful ping) or red (for an unsuccessful ping). The ping indicator is hidden when the screen is switched to a tab other than Diags or Status.
- Page 181 Chapter 5 Radios (Re)connect Disable and enable the radio, apply or re-apply the current profile, attempt to associate and authenticate to the wireless network, and log all activity in the output area at the bottom.
- Page 182 CP60 Mobile Computer (WEH) Reference Manual USE DEBUG TOOLS To check debug settings, select Debug in the drop-down bar. Select Debug to check debug settings Item Description Driver Debug Select whether to debug the WLAN driver, and the output mode for driver debug.
- Page 183 Chapter 5 Radios SOFTWARE VERSION INFORMATION To check software version information: 1) Open Diagnostics Tabbed Page. 2) Tap the About button to view information about SCU version, device driver, and software developer.
-
Page 184: Use Bluetooth
CP60 Mobile Computer (WEH) Reference Manual 5.3. USE BLUETOOTH The mobile computer is Bluetooth-enabled to synchronize data with other devices such as PCs, car hands-free kits, headsets, printers, PDAs, and cell phones. Class II Bluetooth devices enable wireless connections over a short distance of around 10 meters. -
Page 185: Turn On/Off Bluetooth
Chapter 5 Radios Device ID tabbed page opens. 3) Enter a name following the prompted rule. 4) Tap the “OK” command on the softkey bar to apply the change. 5.3.3. TURN ON/OFF BLUETOOTH To turn on/off Bluetooth power: 1) On Start screen, tap Settings | Connections | Wireless Manager Wireless Manager opens. - Page 186 CP60 Mobile Computer (WEH) Reference Manual Select Turn on Bluetooth and Make this device visible to other devices. 4) Tap the OK command on the softkey bar. Once set, the mobile computer becomes discoverable by other Bluetooth devices. When Settings | Connections | Wireless Manager is opened, a “Visible” label appears under Bluetooth entry.
-
Page 187: Pair & Connect Bluetooth Devices
Chapter 5 Radios 5.3.5. PAIR & CONNECT BLUETOOTH DEVICES Prior to connecting to another Bluetooth device, the mobile computer needs to pair with that device. Once they are paired, the two devices will stay paired unless they are unpaired. To pair with and connect to a Bluetooth device: 1) On the mobile computer, turn on Bluetooth as described in Turn On/Off Bluetooth. - Page 188 CP60 Mobile Computer (WEH) Reference Manual If the device to pair with is not displayed, make sure it is currently set as discoverable. If the mobile computer stops scanning before that device becomes discoverable, tap Refresh to repeat the scan 4) Tap the name of the found device that you wish to connect.
-
Page 189: Disconnect Bluetooth Devices
Chapter 5 Radios Devices tabbed page re-opens listing the newly connected Bluetooth device among others. A connected device is listed under Connected label. A paired but unconnected device is listed under Disconnected label. Devices tabbed page A Bluetooth device connected. A Bluetooth device paired but disconnected. -
Page 190: Unpair Bluetooth Devices
CP60 Mobile Computer (WEH) Reference Manual 5.3.7. UNPAIR BLUETOOTH DEVICES To unpair a Bluetooth device: 1) Open Bluetooth settings by tapping Start screen | Settings | Bluetooth. Bluetooth settings open showing Devices tabbed page. 2) Tap and hold the device to unpair from. - Page 191 Chapter 5 Radios Partnership Settings opens listing the device’s available profiles. Partnership Settings 4) Select or deselect a profile to use it or not.
-
Page 192: Bluetooth File Exchange
CP60 Mobile Computer (WEH) Reference Manual 5.3.10. BLUETOOTH FILE EXCHANGE Once connected with other devices using Bluetooth, the mobile computer can offload or download files to/from them. Basically it relies on File Explorer to get it done. OFFLOAD FILES 1) On the mobile computer, turn on Bluetooth as described in... -
Page 193: Bluetooth Activesync
Chapter 5 Radios DOWNLOAD FILES For the mobile computer to download files from other devices using Bluetooth, “Beam mode” must be enabled first: To enable Beam mode: 1) On Start screen, tap Settings | Connections | Beam 2) Select Receive all incoming beams. To download files from other devices using Bluetooth: 3) Enable the mobile computer’s “Beam”... - Page 194 CP60 Mobile Computer (WEH) Reference Manual Bluetooth’s Device tabbed page open. 12) For the 1 setup, tap Add new device and complete through pairing and connection as described in Pair & Connect Bluetooth Devices. Select the name of your PC if it is connected before.
-
Page 195: Bluetooth Internet Sharing
Chapter 5 Radios 5.3.12. BLUETOOTH INTERNET SHARING As mentioned in USB Internet Sharing, “Internet Sharing” or “Internet Tethering” enables a Windows-based PC to connect to Internet using the mobile computer’s mobile data (or other dial-up). Well “Internet Sharing” is supported by Bluetooth too. To tether to Internet using Bluetooth, make the follow setting: 1) Set up Bluetooth connection between the mobile computer and your PC as described in Pair &... -
Page 196: Bluetooth Pass-Through Networking
CP60 Mobile Computer (WEH) Reference Manual Internet Sharing “Connected” prompted. Tap to stop Bluetooth Internet Sharing Tap the “Discon…” command on the softkey bar to stop. For the internet sharing using USB, see USB Internet Sharing. 5.3.13. BLUETOOTH PASS-THROUGH NETWORKING “Pass-Through Networking”... -
Page 197: Connect To Virtual Private Network
Chapter 5 Radios 5.4. CONNECT TO VIRTUAL PRIVATE NETWORK Virtual Private Networks (VPN) are a group of individual networks on a public network (such as the Internet) that connect to each other by private lines and communicate among themselves by encryption technology so their data are kept safe from unauthorized access. The mobile computer supports VPN connection to access the resources inside a secured network from the outside. - Page 198 CP60 Mobile Computer (WEH) Reference Manual “Make New Connection” page opens. “Make New Connection” page 3) Complete the VPN settings. Consult your network administrator for the protocol employed on the VPN and other requested credentials. 4) Follow onscreen instructions to proceed.
-
Page 199: Connect To Vpn
Chapter 5 Radios 5.4.2. CONNECT TO VPN After a VPN connection is set up as described in VPN Connection Setup, a link Edit my VPN servers shows up under My Work Network. Move on to connect to the prospective VPN. A link Edit my VPN servers shows up. -
Page 200: Edit Vpn
CP60 Mobile Computer (WEH) Reference Manual A dialog briefly displays noticing the attempt to connect. VPN is connected shortly. Once connected, the mobile computer makes a sound as per settings in Sounds & Notifications. 5.4.3. EDIT VPN To edit a VPN: 1) On Start screen, tap Settings | Connections | Connections (Manager) Connections (Manager) opens showing Tasks tabbed page. -
Page 201: Install Secure Certificates
Chapter 5 Radios 5.5. INSTALL SECURE CERTIFICATES To connect to a VPN or Wi-Fi network that deploys secure certificates, the mobile computer must possess these certificates. Where the mobile computer stores these secure certificates is called a “certificate store”. Windows Embedded Handheld 6.5 has three “certificate stores” – the Personal, Intermediate and Root certificate stores. - Page 202 CP60 Mobile Computer (WEH) Reference Manual Certificate installer starts to install the file. 4) Follow the onscreen instructions to proceed. Once the installation completes, it can be viewed in Certificates...
-
Page 203: Location Discovery
GPS relies on the satellites covering the sky around the world to pinpoint your whereabouts. A location-aware application is necessary, such as CipherLab’s GPS Viewer for NMEA-based location discovery. There are other applications downloadable from Internet. Download “.cab”-suffixed programs that confirm the compatibility with Windows Embedded Handheld 6.5. -
Page 204: Use Gps
To discover locations by GPS: 1) Launch GPS as described in Launch GPS. 2) Launch a GPS software or location-aware application (for instance, CipherLab provided GPS Viewer). CipherLab GPS Viewer 5.6.3. USE EXTERNAL GPS RECEIVER WITH BLUETOOTH To use an external GPS receiver via Bluetooth connection involves two-phase setup. The first phase is to set up a Bluetooth connection between your mobile computer and the external GPS receiver. - Page 205 Chapter 5 Radios The application will search for and list the discoverable Bluetooth devices within wireless coverage. Devices tabbed page under Bluetooth Tap Add new device… to search for discoverable Bluetooth devices within wireless coverage 5) Select the GPS receiver and tap Next on the softkey bar. The mobile computer then attempts to pair with the selected Bluetooth device.
- Page 206 CP60 Mobile Computer (WEH) Reference Manual Your Bluetooth device may request a passcode to create a secure connection. Check the documentation provided by the device manufacturer for more details on the passcode. Enter the passcode to complete Bluetooth pairing Once two devices are connected, you are prompted shortly with a dialog.
- Page 207 Chapter 5 Radios A paired but currently disconnected device is listed under Disconnected label 7) Tap your GPS receiver to open Partnership Settings. Services available for that device will be listed on this page. Select Serial Port and tap Save on the softkey bar. A Bluetooth SPP connection will be established between the mobile computer and the GPS receiver.
- Page 208 CP60 Mobile Computer (WEH) Reference Manual 9) Tap COM Ports tab to open COM Ports tabbed page. Tap New Outgoing Port, then tap OK on the softkey bar. Tap to add an outgoing port for the paired Bluetooth device. 10) Add a Device page opens.
- Page 209 Chapter 5 Radios 11) Bluetooth page opens showing a drop-down list for port selection and a checkbox to set secure connection. Select a port number. You can check the available ports on your mobile computer by tapping Start screen | Settings | System | COM Port Mapping. See COM Port Mapping for details.
- Page 210 CP60 Mobile Computer (WEH) Reference Manual 13) On Start screen, tap Settngs | System | External GPS GPS Settings opens to show Programs tabbed page. This page shows the default COM port through which GPS data obtained by GPS hardware is streamed to location discovery applications on the mobile computer. Do not change the settings on this page.
- Page 211 Chapter 5 Radios 15) Tap Access tab. Make sure Manage GPS automatically is selected. Tap OK to confirm settings. Manage GPS automatically should be selected 16) Run your GPS software or location aware application. GPS data is streamed to the software to assist location finding.
- Page 212 CP60 Mobile Computer (WEH) Reference Manual...
-
Page 213: Phone
Access Cellular WAN. Note: Phone calling and receiving functions are reserved on CP60. Related settings such as phone volume, phone ring tone, voice mail and so on are reserved as well. IN THIS CHAPTER 6.1 About Phone ............200 6.2 SIM Card ..............200... -
Page 214: About Phone
CP60 Mobile Computer (WEH) Reference Manual 6.1. ABOUT PHONE The mobile computer supports the following types of cellular technology: GPRS EDGE WCDMA HSDPA HSUPA HSPA+ 6.2. SIM CARD To use the mobile computer’s phone, first obtain a SIM card from your mobile carrier. -
Page 215: Status Icons
Chapter 6 Phone 6.3. STATUS ICONS Status icons for phone status: Status Icon Description No SIM card installed Phone off SIM card locked. PIN code required to turn on phone. Phone on with signal strength. The more bars lit, the stronger the signal. Connected to another mobile carrier’s network (roaming) - Page 216 CP60 Mobile Computer (WEH) Reference Manual...
-
Page 217: More Applications
Chapter 7 MORE APPLICATIONS Aside from the dedicated Reader Configuration which empowers the mobile computer’s with a specialty in data capture as mentioned in Data Capture, more manufacturer-developed applications are preinstalled to strengthen user’s system management and make the mobile computer more eligible. These applications include: Applications Description... -
Page 218: Button Assignment
CP60 Mobile Computer (WEH) Reference Manual 7.1. BUTTON ASSIGNMENT Button Assignment can re-define the functions of physical keys so that they trigger different actions. Settings made to one or more keys can be saved as a profile, allowing users to switch conveniently in between different sets of settings. -
Page 219: Redefine Keys
Chapter 7 More Applications TOOLBAR Toolbar icon Description Opens Button Assignment main menu which can be used to manage profiles, reset settings to default, obtain version information, or exit the application. Saves current settings as a new profile, or saves changes made to the profile currently opened. - Page 220 CP60 Mobile Computer (WEH) Reference Manual Item Value Default Sets the key function back to factory default. Custom Provides a drop-down list to select the preferred function for the specific key. (Options available differ with the key.) Either select a pre-defined function, or select “”User define” and enter a valid ASCII key code (0x00~0xFF) in the text box.
-
Page 221: Main Menu
Chapter 7 More Applications 7.1.3. MAIN MENU When the main menu button is tapped, an option menu opens providing the following functions: Item Description User Profile Displays the existing profiles (not including default settings), and a toolbar to manage profiles: Toolbar icon Description Applies the selected profile. - Page 222 CP60 Mobile Computer (WEH) Reference Manual MANAGE PROFILES CREATE PROFILE To create a new profile: 1) Load factory default settings, or read current settings from device first. 2) Modify the settings directly according to your needs, then tap to open a page where you can enter a name for the new profile.
- Page 223 Chapter 7 More Applications Specify the directory where the profile is stored Tap a profile to import it Select the profile you wish to export, then tap to enter export settings. Enter a name for the profile to export Specify the location and file type for the profile to export Note: The All Folders directory refers to all folders under My Device\My Documents.
- Page 224 CP60 Mobile Computer (WEH) Reference Manual READ/WRITE SETTINGS Use Read from device and Write to device to read the current settings on the device, or write the newly changed settings to the device in order for them to take effect. See...
-
Page 225: Keypad Modes
Chapter 7 More Applications 7.1.4. KEYPAD MODES Both the numeric and QWERTY keypad provide two different modes, normal mode and function mode. To enable the function mode, simply press the Function key . For behaviors of the Function key, see Function Key. - Page 226 CP60 Mobile Computer (WEH) Reference Manual F1-24 [*] Asterisk Increase Backlight User Define Brightness [-] Hyphen [.] Period key [#] Number Decrease Backlight Brightness Keys 1, 2, 3.….9, 0 F1-12...
- Page 227 Chapter 7 More Applications QWERTY KEYPAD Special options Button Normal mode Function mode General options (Normal mode only) Answer Call / Start Screen Answer Call / Send Send End (Call) Start Screen End (Call) Scan Camera Home Push to Talk Scan + User define Left Right...
- Page 228 CP60 Mobile Computer (WEH) Reference Manual [.] Comma Decrease Backlight Brightness Keys A-Z F1-24 Note: (1) Direct keys (scan key, side trigger keys, volume up/down keys, Application key) on the mobile computer are available for re-assigning only under normal mode.
-
Page 229: Gps Viewer
Chapter 7 More Applications 7.2. GPS VIEWER The mobile computer includes a GPS module (GPS hardware). This module communicates with the Global Positioning System and discovers your location on earth if it has a piece of GPS software to work with. As previously mentioned in Launch GPS, the GPS module turns on automatically once GPS software launches on the mobile computer. - Page 230 CP60 Mobile Computer (WEH) Reference Manual Item Description Date, Time Current date and time Longitude, Latitude, Altitude Together they deliver the user’s location on earth PDOP Positional (3D) Dilution of Precision, an indicator about the relationship between the error in user position and the error in satellite position.
-
Page 231: View Nmea-Based Data
Chapter 7 More Applications 7.2.2. VIEW NMEA-BASED DATA The data standard for GPS communication is NMEA. NMEA uses a simple serial protocol to define data syntax. GPS Viewer enables viewing such NMEA data streamed from GPS hardware to software (the application layer). To view NMEA data: 1) Launch GPS Viewer as described in Launch GPS Viewer. -
Page 232: Signature Utility
CP60 Mobile Computer (WEH) Reference Manual 7.3. SIGNATURE UTILITY Signature utility captures, views and edits signature files. 7.3.1. LAUNCH SIGNATURE UTILITY To launch Signature utility: 1) On Start screen, tap Signature Signature utility opens showing a toolbar along the top and a signing area within its window. -
Page 233: Capture Signature
Chapter 7 More Applications 7.3.2. CAPTURE SIGNATURE To capture a signature: 1) Launch Signature utility as described in Launch Signature Utility. Signature utility launches. 2) Use the stylus to sign a name in the signing area. 3) Tap icon to save the signature as an image in BMP, JPG or Locus format. icon to discard the signature and sign again. -
Page 234: View Or Edit Existing Signatures
CP60 Mobile Computer (WEH) Reference Manual 7.3.3. VIEW OR EDIT EXISTING SIGNATURES To view the existing signature(s) on the storage of the mobile computer: 1) Launch Signature utility as described in Launch Signature Utility. Signature utility launches. 2) Tap icon on toolbar. -
Page 235: Preferences
Chapter 7 More Applications 7.3.4. PREFERENCES The utility supports preferences settings which change the utility’s behaviors when it is used. Users are able to change the size and color of the signing pen stroke, and customize the background color of the signing area. To access the utility’s preferences settings: 1) Launch Signature utility as described in Launch Signature... -
Page 236: Push To Talk
CP60 Mobile Computer (WEH) Reference Manual 7.4. PUSH TO TALK CipherLab Push to Talk is a walkie-talkie service that allows users of an active talk group to communicate with all other members of the group instantaneously with a simple push of a button. -
Page 237: Communicate With Group Members
Chapter 7 More Applications 7.4.2. COMMUNICATE WITH GROUP MEMBERS Push to Talk functions through group communication, meaning that when an audio transmission is initiated on one device, all other devices in that group will receive the audio message. Groups are established by Wi-Fi connection under a specific subnetwork (subnet). All devices that are currently running Push to Talk and are connected within a certain wireless subnet will be automatically incorporated as a group member. - Page 238 CP60 Mobile Computer (WEH) Reference Manual “Transmitting” status indicates the device is in transmit mode When tapped and held, PUSH button turns red When finished transmitting the audio message, let go of the PUSH button. The button will return to gray and the mobile computer will switch back to voice reception mode.
- Page 239 Chapter 7 More Applications RECEIVING AUDIO CONTENT To receive audio content from group members: 1) Have all devices you would like to communicate with connect to a specific (or several specific) access point(s) as described in Wi-Fi. Make sure these access points belong to the same subnet.
- Page 240 CP60 Mobile Computer (WEH) Reference Manual MANAGING MEMBER LIST The Member List will show all other devices (not including the device under operation) that have connected to the wireless subnet and are currently running the Push to Talk application. OPEN MEMBER LIST...
- Page 241 Chapter 7 More Applications VOICE RECEPTION MODE When Push to Talk is opened, devices will be in voice reception mode and are ready to receive audio content. The status bar before the device name appears in green. Green indicates a device is in voice reception mode ACTIVE AND PASSIVE TRANSMIT MODES When one of the devices in the group is sending out audio content, the status bar before...
- Page 242 CP60 Mobile Computer (WEH) Reference Manual DEVICE DISCONNECTED When one or more of the devices in the group is disconnected, the status bar before the device name will change to gray. The Member List label will be updated to reflect the remaining number of connected devices.
-
Page 243: Manage Mobile Computer
Chapter 8 MANAGE MOBILE COMPUTER This chapter guides you to the system settings featured by the OS Access these settings to define how the mobile computer looks, sounds, stores/secures your data, manages the applications, or exchanges data with your networks or other devices. This chapter also includes a section detailing the mechanism you follow suit to update OS image. -
Page 244: Update Os Image
OS image upgrade helps optimize the mobile computer’s performance and functionality. The upgrade relies on CipherLab’s OS Update Tool, a utility to run on your PC to get the job done. This utility brings the upgrades of OS image and splash (booting logo) to the mobile computer. - Page 245 Chapter 8 Manage Mobile Computer The following notification will appear onscreen to indicate the system is updating. Update Mobile 6) When the update process is finished, a prompt will appear onscreen asking to cold boot the mobile computer. Cold boot the mobile computer by holding down the power button and pressing the reset button.
-
Page 246: System Settings
CP60 Mobile Computer (WEH) Reference Manual 8.2. SYSTEM SETTINGS This section guides to Windows Embedded Handheld 6.5 system settings. Access these settings to define how the mobile computer looks, sounds, stores/secures data, manages applications, or exchanges data with networks or other devices. - Page 247 Chapter 8 Manage Mobile Computer Personal Accesses phone settings and assigns a program to a button. Users can also record information about the owner of the mobile computer. System Leads to System Folder, where the hardware and software on the mobile computer can be configured and their info can be viewed.
-
Page 248: Connections Folder
CP60 Mobile Computer (WEH) Reference Manual 8.2.1. CONNECTIONS FOLDER This section guides to applications available in Connections Folder under System Settings. Open Start screen, tap Settings | Connections Connections folder opens: Connections folder BEAM For Windows Mobile and Windows Embedded Handheld, “beam” is typically known as data sharing between handheld devices through infrared or Bluetooth. - Page 249 Chapter 8 Manage Mobile Computer WIRELESS MANAGER Enables/disables the radios of Wi-Fi, Bluetooth, phone, and mobile data. It also limits mobile data to 2G only. See Use Only 2G Networks. Wireless Manager opens showing a few entries: All: Turns on/off all the radios on the mobile computer except Wi-Fi and GPS. (GPS is turned off by losing GPS-dependent applications).
- Page 250 CP60 Mobile Computer (WEH) Reference Manual Bluetooth devices. COM Ports tabbed page: Sets up COM ports for a paired device. Edits an existing port. Phone Settings Phone settings are only available when a SIM card is assembled and the phone is turned on.
- Page 251 Chapter 8 Manage Mobile Computer Page Description Task tabbed Sets where mobile data connects to, to Internet (My ISP), or to an page internal network (intranet) or a VPN (My Work Network). Setting Description My ISP Sets up mobile data connection to the Internet. It provides links –...
-
Page 252: Personal Folder
CP60 Mobile Computer (WEH) Reference Manual Exceptions… Enters the address of the intranet to access in case it includes a period. 8.2.2. PERSONAL FOLDER This section guides to Personal Folder Open Start screen, tap Settings | Personal. Personal folder opens:... -
Page 253: System Folder
Chapter 8 Manage Mobile Computer 8.2.3. SYSTEM FOLDER This section guides to System Folder Open Start screen, tap Settings |System. System folder opens: System folder opens ABOUT Views OS information. It features three tabs – Version, Device ID and Copyright. Tabbed Page Description Version... - Page 254 CP60 Mobile Computer (WEH) Reference Manual BACKLIGHT SETTING Sets screen and keypad timeout and brightness. Four tabs are featured – Brightness, Battery Power, External Power, and Profile. Tabbed Page Description Brightness Selects whether to allow manual adjustment of the screen and keypad backlights.
- Page 255 Chapter 8 Manage Mobile Computer COM port Default Settings COM1 Scan engine (Laser or 2D) COM2 Bluetooth hardware port COM3~8 COM9 GPS hardware port Default button restores all COM port settings back to factory default. Upon system reboot, the mobile computer checks whether there is a registry entry for Bluetooth Serial Port Profile (SPP) or Dial-up Profile (DUN).
- Page 256 CP60 Mobile Computer (WEH) Reference Manual GPS MANAGER Downloads or updates ephemeris data, which is valid for 14 days according to system date and time. The download page shows validity information and a progress bar to indicate download status. Correct time must be set before downloading the ephemeris to ensure data is accurate.
- Page 257 Chapter 8 Manage Mobile Computer Turn off screen if device is not used for 2 min (On external power) Unchecked Turn off screen if device is not used for READER CONFIGURATION Allows users to set scanner preferences, data output format and destination, and symbologies settings.
- Page 258 CP60 Mobile Computer (WEH) Reference Manual SENSOR CALIBRATION Calibrates the G-sensor, E-compass and Gyroscope. Tabbed Page Description G-Sensor Shows a round ball which fixes at the center of a set of circles when the mobile computer is on a level surface, and dislocates when the mobile computer is tilted.
- Page 259 Chapter 8 Manage Mobile Computer SYSTEM INFORMATION Displays some of the mobile computer’s info such as manufacturer, firmware version, MAC address, memory capacity and so on. Tap each node to expand the tree structure list and view data about the given items. This page also displays the mobile computer’s Device Config, a sequence of digits that deliver information about the hardware integrated on the mobile computer.
- Page 260 CP60 Mobile Computer (WEH) Reference Manual TIME SYNCHRONIZATION Provides two tabs, SNTP and GPS. SNTP tabbed page Synchronizes the mobile computer’s time with an NTP server, either automatically or manually. Users can also select the time period for auto-synchronization. Synchronized time will be written to RTC and system time will be updated.
- Page 261 Chapter 8 Manage Mobile Computer Searching for GPS signal. Once signal is detected, proceed to sync time using GPS data USB CONNECTION Sets the type of USB connection without re-plugging the USB cable. ActiveSync Advanced Network Mode: Sets up ActiveSync connection with PC through RNDIS protocol.
- Page 262 CP60 Mobile Computer (WEH) Reference Manual Summit Client Utility (SCU) allows changing Wi-Fi settings on the mobile computer, including radio type, access point, encryption and more. Settings are displayed among three tabs: Tabbed Page Description Status Displays AP information, device IP, connection status and signal strength.
-
Page 263: Specifications
SPECIFICATIONS PLATFORM, PROCESSOR & MEMORY Operating System & CPU OS Version Microsoft Windows Embedded Handheld 6.5 TI DM3730 1GHz Processor Memory 512MB DDR SDRAM Flash 4GB Flash ROM Expansion Slot One MicroSDHC card slot, supports up to 32GB COMMUNICATIONS & DATA CAPTURE Communications USB Host/Client USB 1.1 / USB 2.0... -
Page 264: Electrical Characteristics
CP60 Mobile Computer (WEH) Reference Manual ELECTRICAL CHARACTERISTICS Batteries Main Battery Pack Standard: 3.7V, 3600 mAh High Capacity: 3.7V, 4400 mAh Rechargeable Li-ion battery Charging time: approximately 4 hours for Standard battery and 6 hours for Extended battery Backup Battery 3.6V, 15 mAh... -
Page 265: Physical Characteristics
Specifications PHYSICAL CHARACTERISTICS Color Tap Screen Display Display 3.5” Transflective TFT-LCD, 65K colors, sunlight readable Resolution VGA 480 (W) x 640 (H) Keypad Layout Numeric or QWERTY keypad Backlight White LED backlight for display and keypad Notifications Status LED Three LEDs for showing scanning good read, radio connection status and battery charging status Audio Integrated with speaker... -
Page 266: Environmental Characteristics
IP65/67 per applicable IEC 60529 sealing specs Electrostatic Discharge ± 15 kV air discharge, ± 8 kV contact discharge Note: CipherLab will not be held responsible for the mobile computer’s malfunction incurred by the operation outside operating temperature range. PROGRAMMING SUPPORT Development Environment &... -
Page 267: Accessories
Snap-on Charging and Communication Cable (USB or RS-232) Charging & Communication Cradle Pistol Grip Belt Holster for CP60 with Pistol Grip Belt Holster with Shoulder Strap for CP60 without Pistol Grip 4-slot Battery Charger Snap-On Car Charging Kit 4-slot Terminal Cradle... - Page 268 CP60 Mobile Computer (WEH) Reference Manual...
-
Page 269: Scan Engine Settings
Appendix I SCAN ENGINE SETTINGS The CipherLab developed utility Reader Configuration configures the following reader types: 1D Laser (SE955) 1D Long Range Laser (SE965HP) 2D Imager (SE4500DL) HF RFID Reader For mobile computers with an HF RFID reader integrated, the reader combination allowed is either 1D plus RFID or 2D plus RFID. -
Page 270: Symbologies Supported
CP60 Mobile Computer (WEH) Reference Manual SYMBOLOGIES SUPPORTED Depending on the scan engine integrated on the mobile computer, supported symbologies will differ as listed below. For details on configuring associated settings, refer to Appendix II and III. Laser Codabar Code 11... - Page 271 Appendix I Scan Engine Settings US Planet UK Postal EAN/UPC EAN-8 EAN-8 Extend EAN-13 Bookland EAN (ISBN) UCC Coupon Extended Code ISSN EAN UPC-A UPC-E Convert UPC-E to UPC-A UPC-E1 Convert UPC-E1 to UPC-A 2D Symbologies Aztec Data Matrix Maxicode MicroPDF417 MicroQR PDF417...
-
Page 272: Rfid Tags Supported
CP60 Mobile Computer (WEH) Reference Manual RFID TAGS SUPPORTED The RFID reader supports both reading and writing RFID data. Supported labels include ISO 15693, ISO 14443A, ISO 14443B and ISO 18000-3. Supported RFID tags include: UID Only Read Page Write Page... - Page 273 Appendix I Scan Engine Settings ICode1 with EAS & AFI ICode FeliCa Sony FeliCa Note: For more information, refer to the specifications of the RFID tags to read.
- Page 274 CP60 Mobile Computer (WEH) Reference Manual...
-
Page 275: Laser (Se955 & Se965Hp)
Appendix II LASER (SE955 & SE965HP) The tables below list the symbology settings for 1D laser scan engine (SE955) and 1D long range laser scan engine (SE965HP). SYMBOLOGY SETTINGS Symbology Description Default CODABAR CodaBar Codabar Checkbox to enable Codabar decoding. Enable Length option Sets the length of the Codabar symbols to decode. - Page 276 CP60 Mobile Computer (WEH) Reference Manual Code 39 Code 39 Checkbox to enable Code 39 decoding. Enable Trioptic Code 39 Selects whether to decode Trioptic Code 39. Disable Trioptic Code 39 is a variant of Code 39 used in the marking of computer tape cartridges.
- Page 277 Appendix II Laser (SE955 & SE965HP) Length option Sets the length of the Discrete 2 of 5 symbols to decode. Max / Min Length One Fixed length (Length 1) (4-55) Two Fixed lengths (Length 1>Length 2) Max / Min Length (range: 0-55; Length 1<Length 2) Any Length Interleaved 25 Interleaved 25...
- Page 278 CP60 Mobile Computer (WEH) Reference Manual Convert to UPC/EAN This only applies to GS1 DataBar-14 and GS1 DataBar Disable Limited barcodes not decoded as part of a Composite barcode. Convert to EAN-13 Strips the leading “010” from barcodes. The barcode must be composed of a leading “01” as the application identifier (AI) and a first digit of zero.
- Page 279 Appendix II Laser (SE955 & SE965HP) UPC-A UPC-A Checkbox to enable UPC-A decoding. Enable Preamble Decide whether include UPC-A/UPC-E/UPC-E1 Transmit preamble System Character (and Country Code) in the data System being transmitted. Character No transmit: transmits none of the above Transmit System Character: transmits system number only Transmit Sys.
-
Page 280: Miscellaneous
CP60 Mobile Computer (WEH) Reference Manual EAN Addon Option Decide whether to decode EAN-8, EAN-13 with addons Ignore Addon (including Addon 2 and 5). Ignore Addon Decode only with addons Auto-discriminate EAN Addon Redundancy When “Auto-discriminate” is applied, decide the number of times of supplementary decoding the same barcode to count as a valid read. -
Page 281: Aim Code Id - Modifier Characters
Appendix II Laser (SE955 & SE965HP) Code 128, Coupon (Code 128 portion) Data Matrix UPC/EAN, Coupon (UPC portion) GS1 DataBar (RSS) Codabar Code 93 Code 11 Interleaved 25 PDF417, Macro PDF417, Micro PDF417 QR Code, MicroQR Industrial 25 (Discrete 25), IATA 2 of 5 Maxicode Code 39 Trioptic, Bookland EAN, Matrix 25, US Postnet, US Planet, UK Postal, Japan Postal, Australian Postal, Dutch Postal... - Page 282 CP60 Mobile Computer (WEH) Reference Manual UPC/EAN Standard data packet in full EAN country code format, which is 13 digits for UPC-A and UPC-E (not including addons). Standard data packet with two-digit or five-digit addons. EAN-8 data packet. A UPC-A with Addon 2 barcode, 012345678905-10, is transmitted to the host as a 18-character string, ]E3001234567890510.
- Page 283 Appendix II Laser (SE955 & SE965HP) Scan engine is set for Basic Channel operation (no escape character transmission protocol). Data characters 92 not doubled. When decoders are set to this mode, unbuffered Macro symbols and symbols requiring the decoder to convey ECI escape sequences cannot be transmitted.
- Page 284 CP60 Mobile Computer (WEH) Reference Manual...
-
Page 285: Imager (Se4500Dl)
Appendix III 2D IMAGER (SE4500DL) The tables below list the symbology settings for 2D imager (SE4500DL). SYMBOLOGY SETTINGS 1D SYMBOLOGIES Symbology Description Default CODABAR CodaBar Codabar Checkbox to enable Codabar decoding. Enable Length option Sets the length of the Codabar symbols to decode. Max / Min Length One Fixed length (Length 1) - Page 286 CP60 Mobile Computer (WEH) Reference Manual CODE 39 Code 39 Code 39 Checkbox to enable Code 39 decoding. Enable Trioptic Code 39 Selects whether to decode Trioptic Code 39. Disable Trioptic Code 39 is a variant of Code 39 used in the marking of computer tape cartridges.
- Page 287 Appendix III 2D Imager (SE4500DL) Concatenation Sets whether to enable decoding ISBT-128 by performing Disable concatenation of ISBT data Disable: Does not perform concatenation Enable: Performs concatenation ISBT-128 barcodes. Auto-discriminate: Auto-discriminates between ISBT-128 barcodes which require concatenation and those which do not need concatenation. Redundancy Sets redundancy between 2-20.
- Page 288 CP60 Mobile Computer (WEH) Reference Manual Verify Check Digit Select whether to verify the check digit, which is the last Disable character of the barcode. If the check digit is incorrect, the barcode will not be accepted. Transmit Check Digit...
- Page 289 Appendix III 2D Imager (SE4500DL) Convert to UPC/EAN This only applies to GS1 DataBar-14 and GS1 DataBar Disable Limited barcodes not decoded as part of a Composite barcode. Convert to EAN-13 Strips the leading “010” from barcodes. The barcode must be composed of a leading “01” as the application identifier (AI) and a first digit of zero.
- Page 290 CP60 Mobile Computer (WEH) Reference Manual Netherlands KIX Code Enable Netherlands KIX Checkbox to enable Netherlands KIX Code decoding. Enable Code US Postnet Enable US Postnet Checkbox to enable US Postnet decoding. Enable US Planet Enable US Planet Checkbox to enable US Planet decoding.
- Page 291 Appendix III 2D Imager (SE4500DL) Preamble Decide whether include UPC-A/UPC-E/UPC-E1 Transmit preamble System Character (and Country Code) in the data System being transmitted. Character No transmit: transmits none of the above Transmit System Character: transmits system number only Transmit Sys. Character and Country Code: transmits system number and country code Convert to UPC-A The UPC-E barcode will be expanded into UPC-A format, and...
-
Page 292: Symbologies
CP60 Mobile Computer (WEH) Reference Manual UPC Addon Redundancy When “Auto-discriminate” is applied, decide the number of times of supplementary decoding the same barcode to count as a valid read. Configurable between 2 and 30. 2D SYMBOLOGIES Symbology Description Default... -
Page 293: Miscellaneous
Appendix III 2D Imager (SE4500DL) Maxicode MicroPDF417 MicroPDF417 Selects whether to enable MicroPDF417 decoding. Disable Code 128 Emulation Transmit data from certain Micro PDF 417 barcodes as if it Disable was encoded in Code 128 barcodes. Transmit AIM code ID character in Miscellaneous options must be enabled first. - Page 294 CP60 Mobile Computer (WEH) Reference Manual...
-
Page 295: Hf Rfid Reader
Appendix IV HF RFID READER The HF RFID reader supports ISO14443A and B, 15693 and Secure Access Module (SAM). RFID TAG DEFAULT BLOCK Tag Type Standard Default Block/Page Mifare ISO 14443A SR176 ISO 14443B ICODE SLI ISO 15693 LRI512 ISO 15693 SRF55VxxP ISO 15693 EM4135... - Page 296 CP60 Mobile Computer (WEH) Reference Manual...
-
Page 297: Physical Keypad Reference Table
Appendix V PHYSICAL KEYPAD REFERENCE TABLE NUMERIC KEYPAD Numeric keypad layout: USING ALPHA, SHIFT & FN KEYS Normal Mode Alpha Mode (Lowercase) Alpha Mode (Uppercase) Fn+Key Shift+Key only press press press press press press press press Shift+1 Shift+2 Shift+3 Shift+4 Shift+5 Shift+6 Shift+7... - Page 298 CP60 Mobile Computer (WEH) Reference Manual Enter Enter Enter Enter Enter Enter Back Back Keypad Back Back Back Space Lock Space Space Space Space Back Back Back Back Back Back Light Light Light Light Light Light Send Send Start Send...
-
Page 299: Qwerty Keypad
Physical Keypad Reference Table QWERTY KEYPAD QWERTY keypad layout: USING ALPHA, SHIFT & FN KEYS Normal Shift+Key Fn (Orange)+Key Alpha (Blue)+Key < > “ Backspace Backspace Backspace Keypad Lock Backspace... - Page 300 CP60 Mobile Computer (WEH) Reference Manual & & & & Space Space Space Space Space Enter Enter Enter Enter Enter HilightUp Page Up Down Down HilightDown Page Down Down Left Left HilightLeft Home Left Right Right HilightRight Right Backlight Backlight...
Need help?
Do you have a question about the CP60 and is the answer not in the manual?
Questions and answers