
Related Manuals for Quanmax QDSP-2060


Summary of Contents for Quanmax QDSP-2060
- Page 1 QDSP-2060 Small PC with 2 Generation Intel® Core i3/i5/i7 Processors User’s Guide QDSP-2060 User’s Manual...
- Page 2 © 2011 Quanmax Inc. All rights reserved. The information in this user’s guide is provided for reference only. Quanmax does not assume any liability arising out of the application or use of the information or products described herein. This user’s guide may contain or reference information and products protected by copyrights or patents and does not convey any license under the patent rights of Quanmax, nor the rights of others.
-
Page 3: Table Of Contents
Mechanical Dimensions ..............19 Chapter 2 Getting Started ..................20 Setting up your PC ................20 Connecting VESA Mount on QDSP-2060 ........... 24 Mounting your PC to a monitor ............25 Changing Memory and mini-PCIe ............26 Chapter 3 AMI BIOS Setup ..................29 Overview ..................... -
Page 4: Figures & Tables
Figure 7 Network cable with RJ45 connector ..........22 Figure 8 Turning on the system ..............23 Figure 9 VESA Mount Assembly ..............24 Figure 10 VESA Mount on QDSP-2060 ............. 24 Figure 11 VESA mounting ................25 Figure 12 Opening the Cover on the Bottom ..........26 Figure 13 Bottom view of Main Board ............ - Page 5 Figures & Tables Table 17 Save & Exit Menu ................ 43 QDSP-2060 User’s Manual...
-
Page 6: Safety Instructions
Use extreme caution when installing or removing components. Refer to the installation instructions in this user’s guide for precautions and procedures. If you have any questions, please contact Quanmax Post-Sales Technical Support. Access can only be gained by service persons or by users who have been instructed about the reasons for the restrictions applied to the location and about any precautions that shall be taken;... -
Page 7: When Working Inside A Computer
Static electricity can harm system boards. Perform service at an ESD workstation and follow proper ESD procedure to reduce the risk of damage to components. Quanmax strongly encourages you to follow proper ESD procedure, which can include wrist straps and smocks, when servicing equipment. -
Page 8: Instructions For Lithium Battery
(e.g. to the collecting points for disposal of batteries) Voltage Ratings The external power adaptor of the QDSP-2060 has the following voltage ratings: Input: 100-240 VAC, 50-60 Hz ... -
Page 9: Preface
Remove all items from the box. If any items listed on the purchase order are missing, notify Quanmax customer service immediately. Inspect the product for damage. If there is damage, notify Quanmax customer service immediately. Refer to “Warranty Policy” for the return procedure. -
Page 10: Warranty Policy
Quanmax or its authorized agent; or if the failure is caused by accident, acts of God, or other causes beyond the control of Quanmax or the manufacturer. Neglect, misuse, and abuse shall include any installation, operation, or maintenance of the product other than in accordance with the user’s guide. -
Page 11: Maintaining Your Computer
Quanmax. Limitation of Liability In no event shall Quanmax be liable for any defect in hardware, software, loss, or inadequacy of data of any kind, or for any direct, indirect, incidental, or consequential damages in connection with or arising out of the performance or use of any product furnished hereunder. -
Page 12: Power Protection
Because of this added protection, line conditioners cost more than surge protectors. However, line conditioners cannot protect against a complete loss of power. Uninterruptible Power Supply Uninterruptible power supply (UPS) systems offer the most complete protection QDSP-2060 User’s Manual... - Page 13 Surge protectors should be used with all UPS systems, and the UPS system should be Underwriters Laboratories (UL) safety approved. QDSP-2060 User’s Manual...
-
Page 14: Chapter 1 Introduction
Chapter 1 Chapter 1 Introduction Overview QDSP-2060 is a surprisingly affordable, space-saving system that will capably serve everyday computing needs and turn your living room into home theater with ease. ® ® Featuring the 2nd Generation Intel Core i3/i5/i7 Processors with Intel... -
Page 15: Product Specifications
Input: 100-240 VAC Power Unit Output: 75 Watt, +19V DC, 3.95A Temperature / Operating: 0°C to 45°C, 0%-90%, non-condensing Humidity Storage: -20°C to 80°C, 0%-90%, non-condensing Mounting VESA-mount Certifications CE, FCC Class A Table 1 QDSP-2060 product specifications QDSP-2060 User’s Manual... -
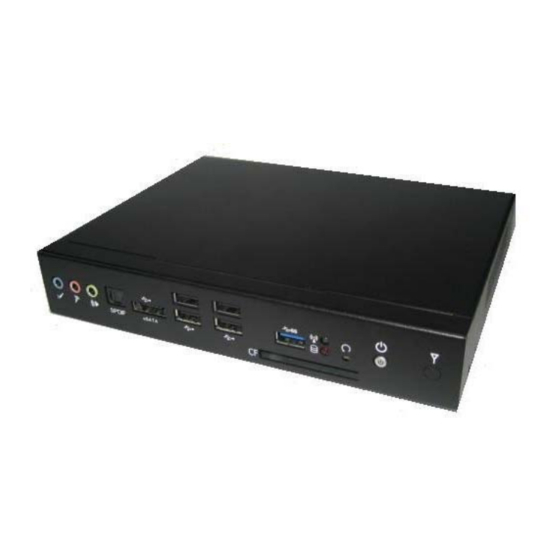
Page 16: System Tour
The hard disk/card reader LED blinks when data is being written into or read from the HDD/Card Reader. The USB (Universal Serial Bus) port is compatible with USB devices such as keyboards, mouse devices, cameras, and hard disk drives. USB allows many QDSP-2060 User’s Manual... - Page 17 The Line-in jack is designed to take input from a higher-powered sound source. CAUTION This connector do not support hot-swapping. Users should not connect or disconnect their eSATA/USB (combo) & CF devices from PC when the system is Working. QDSP-2060 User’s Manual...
-
Page 18: Figure 2 Rear I/Os
The eight-pin RJ-45 LAN port supports a standard Ethernet cable for connection to a local network. DVI-I DVI-I connector for DVI-D or VGA output D-Sub 9 pin connector for RS-232 connection WiFi External Antenna Spared hole on the casing for connecting WiFi external antenna QDSP-2060 User’s Manual... -
Page 19: Mechanical Dimensions
Chapter 1 Mechanical Dimensions 200 x 35 x 153.1 mm (W x H x D) Figure 3 Mechanical Dimensions QDSP-2060 User’s Manual... -
Page 20: Chapter 2 Getting Started
Figure 4 Connect the DVI cable NOTE When the system reboots without connecting the DVI, there might be no image on screen when you insert the DVI cable. Please pressing <Ctrl>+<Alt>+<F4> simultaneously to show the image on screen. QDSP-2060 User’s Manual... -
Page 21: Figure 5 Connect Usb Mouse & Keyboard
Chapter 2 Connecting USB mouse & keyboard Your QDSP-2060 does not come with a keyboard and mouse, but you can use any USB keyboard or mouse with your computer. USB 3.0 USB 2.0 eSATA/USB Figure 5 Connect USB mouse & keyboard NOTE Using a third-party USB mouse or keyboard may require software drivers. -
Page 22: Figure 6 Com Port
Connecting to a network device Connect one end of a network cable to the LAN port on the system rear panel and the other end to a hub or switch. RJ 45 Figure 7 Network cable with RJ45 connector QDSP-2060 User’s Manual... -
Page 23: Figure 8 Turning On The System
Connect the supplied AC power cord to the system AC power inlet on the I/O panel of the system. Connect the other end of the AC power cord to a corresponding outlet. Press the power switch to turn on the system DC Jack Power Button Figure 8 Turning on the system QDSP-2060 User’s Manual... -
Page 24: Connecting Vesa Mount On Qdsp-2060
Chapter 2 Connecting VESA Mount on QDSP-2060 Take out the VESA mounting kit form your package and facing it onto the bottom of QDSP-2060; then tightening the screws on your QDSP-2060 as figures shown below. Figure 9 VESA Mount Assembly Following figures are the complete status when you done. -
Page 25: Mounting Your Pc To A Monitor
Firstly, mount your VESA kit on the backside of the monitor with four screws in the package. Secondly, place the QDSP-2060 on the VESA mounting kit and then tightening the screws from the holes on both sides of the VESA bracket - make sure the computer is fitting well on the bracket. -
Page 26: Changing Memory And Mini-Pcie
Chapter 2 Changing Memory and mini-PCIe Firstly, Opening the cover by loosening the two screws on the bottom of QDSP-2060 as shown below; Figure 12 Opening the Cover on the Bottom Then you may able to change the DDR SO-DIMM and/or mini-PCIe modules. -
Page 27: Figure 14 So-Dimm Installation (1)
SO-DIMM. Lift it out of the socket. Make sure you store the SO-DIMM in an anti-static bag. The socket must be populated with memory modules of the same size and manufacturer. QDSP-2060 User’s Manual... -
Page 28: Figure 16 Mini-Pcie Installation
Chapter 2 Changing mini-PCIe (1) Place your mini-PCIe module toward the mini-PCIe socket. Figure 16 Mini-PCIe Installation (2) Tightening the screw on the hole of the mini-PCIe module as shown above. QDSP-2060 User’s Manual... -
Page 29: Chapter 3 Ami Bios Setup
This chapter provides a description of the AMI BIOS. The BIOS setup menus and available selections may vary from those of your product. For specific information on the BIOS for your product, please contact Quanmax. NOTE: The BIOS menus and selections for your product may vary from those in this chapter. -
Page 30: Main Menu
+- Change Opt. Frequency 1333 MHz F1: General Help System date [ Wed 06/01/2012] F2: Previous Values System time [14:13:19] F3: Optimized Defaults F4 Save & Exit ESC Exit Version 2.10.1208. Copyright (C) 2010, American Megatrends, Inc. QDSP-2060 User’s Manual... -
Page 31: Advanced Menu
Version 2.10.1208. Copyright (C) 2010, American Megatrends, Inc. Onboard LAN 1 Controller Options: Disabled, Enabled Onboard LAN 1 Boot Options: Disabled, Enabled Onboard LAN 2 Controller Options: Disabled, Enabled Onboard LAN 2 Boot Options: Disabled, Enabled Audio Controller Options: Disabled, Enabled, Auto QDSP-2060 User’s Manual... -
Page 32: Table 4 Advanced Menu – Display Configuration
Options: 0M, 32M, 64M, 96M, 128M, 160M, 192M, 224M, 256M, 288M, 320M, 352M, 384M, 416M, 448M, 480M, 512M DVMT Total Gfx Mem Options: 128M, 256M, MAX IGFX – Boot Type Options: VBIOS Default, CRT, DVI, HDMI, DP IGFX – 2 Boot Type Options: Disabled, CRT, DVI, HDMI, DP QDSP-2060 User’s Manual... -
Page 33: Table 5 Advanced Menu – Super Io Configuration
IO=2F8h; IRQ=3, 4, 5, 6, 7, 9, 10, 11, 12; IO=3E8h; IRQ=3, 4, 5, 6, 7, 9, 10, 11, 12; IO=2E8h; IRQ=3, 4, 5, 6, 7, 9, 10, 11, 12; Serial Port Type Options: RS232, RS422, RS485 COM1 Pin9 Definition Options: RI, +5V QDSP-2060 User’s Manual... -
Page 34: Table 7 Advanced Menu –Power Management Configuration
Options: Power Off, Power On, Last State Resume By PCIE Device Options: Disabled, Enabled Resume By RTC Alarm Options: Disabled, Enabled EUP Power Saving Mode Options: Disabled, Enabled Watchdog Timer Configuration WDT Function [Disabled] ■ Options: Disabled, Enabled QDSP-2060 User’s Manual... -
Page 35: Table 8 Advanced Menu –Cpu Advanced Configuration
Version 2.10.1208. Copyright (C) 2010, American Megatrends, Inc. EIST Options: Disabled, Enabled Intel ® Virtualization Tech Options: Disabled, Enabled Active Processor Cores Options: All, 1 Limit CPUID Maximum Options: Disabled, Enabled Execute Disable Bit Options: Disabled, Enabled QDSP-2060 User’s Manual... -
Page 36: Table 9 Advanced Menu –Trusted Computing
Serial ATA Port 2 Empty F2: Previous Values Software Preserve Unknown F3: Optimized Defaults F4 Save & Exit ESC Exit Version 2.10.1208. Copyright (C) 2010, American Megatrends, Inc. SATA Controller(s) Options: Disabled, Enabled SATA Mode Selection Options: IDE, AHCI QDSP-2060 User’s Manual... -
Page 37: Table 11 Advanced Menu –Intel Txt (Lt) Configuration
Intel AMT SPI Protected [Disabled] AMT CIRA Timeout Watchdog [Disabled] OS Timer BIOS Timer Version 2.10.1208. Copyright (C) 2010, American Megatrends, Inc. Intel AMT Options: Disabled, Enabled Intel AMT Setup Prompt Options: Disabled, Enabled BIOS Hotkey Pressed Options: Disabled, Enabled QDSP-2060 User’s Manual... - Page 38 AMT Wait Timer Options: 0 only Options: Disabled, Enabled Activate Remote Assistance Process Options: Disabled, Enabled USB Configure Options: Disabled, Enabled PET Progress Options: Disabled, Enabled Intel AMT SPI Protected Options: Disabled, Enabled Watchdog Options: Disabled, Enabled QDSP-2060 User’s Manual...
-
Page 39: Table 13 Advanced Menu –Usb Configuration
Options: Disabled, Enabled USB Transfer Time-Out Options: 1, 5, 10, 20 sec. Device Transfer Time-Out Options: 10, 20, 30, 40 sec. Device Power-Up Delay Options: Auto, Manual San Disk Options: Auto, Floppy, Forced FDD, Hard Disk, CD-ROM QDSP-2060 User’s Manual... -
Page 40: Table 14 Advanced Menu –H/W Monitor
Version 2.10.1208. Copyright (C) 2010, American Megatrends, Inc. CPU Warning Temperature Options: Disabled, 80 C, 85 C, 90 C, 95 C System Shutdown Temperature Options: Disabled, 55 C, 60 C, 65 C, 70 C CPU Smart FAN Options: Disabled, Enabled QDSP-2060 User’s Manual... -
Page 41: Boot Menu
Options: San Disk, UEFI: USB USB Hard Drive, Disabled Boot Option #2 Options: San Disk, UEFI: USB USB Hard Drive, Disabled Hard Drive BBS Priorities ■ Boot Option #1 【 San Disk 】 Options: San Disk, Disabled QDSP-2060 User’s Manual... -
Page 42: Security Menu
The password must be 3 to 20 characters long. +- Change Opt. F1: General Help F2: Previous Values F3: Optimized Defaults Administrator Password F4 Save & Exit User Password ESC Exit Version 2.10.1208. Copyright (C) 2010, American Megatrends, Inc. QDSP-2060 User’s Manual... -
Page 43: Save & Exit Menu
Discard Changes F3: Optimized Defaults Restore Defaults F4 Save & Exit Save as User Defaults ESC Exit Restore User Defaults Boot Override San Disk UEFI : USB, USB Hard Drive Version 2.10.1208. Copyright (C) 2010, American Megatrends, Inc. QDSP-2060 User’s Manual... - Page 44 Load Optimal Default values for all the setup values. This option allows you to load failsafe default values for each of the parameters on the Setup menus, which will provide the most stable performance settings. The F8 key can be used for this operation. QDSP-2060 User’s Manual...
-
Page 45: Chapter 4 Driver Installation
Chapter 4 Driver Installation If your QDSP-2060 does not come with an operating system pre-installed, you will need to install an operating system and the necessary drivers to operate it. After you have finished assembling your system and connected the appropriate power source, power it up using the power supply and install the desired operating system.
Need help?
Do you have a question about the QDSP-2060 and is the answer not in the manual?
Questions and answers