Table of Contents
Advertisement
Quick Links
Advertisement
Table of Contents

Related Manuals for Quanmax QDSP-300


Summary of Contents for Quanmax QDSP-300
- Page 1 QDSP-300 ® 0.6-Liter Mini PC with Intel Core™ i5-5200U Processor User’s Guide...
-
Page 2: Table Of Contents
Chapter 3 AMI BIOS Setup ....................23 Overview ......................23 Main Menu ......................24 Ad vanced Menu.....................25 Boot Menu ......................33 Security Menu ....................34 Save & Exit Menu ..................35 Chapter 4 Driver Installation ....................37 QDSP-300 User’s Manual... -
Page 3: Figures & Tables
Figure 7 Turning on the system ................20 Figure 8 VESA mounting ..................21 Figure 9 Use a Kensington lock ................22 Table 1 QDSP-300 product specifications............12 Table 2 BIOS Main Menu ..................24 Table 3 Advanced Menu ..................25 Table 4 Advanced Menu – Display Configuration..........26 Table 5 Advanced Menu –... -
Page 4: Safety Instructions
Turn off system power, turn off the power supply, and then disconnect the power cord from its source before removing the chassis cover. Turning off the system power switch does not remove power to components. QDSP-300 User’s Manual... -
Page 5: When Working Inside A Computer
ESD procedure, which can include wrist straps and smocks, when servicing equipment. You can also take the following steps to prevent damage from electrostatic discharge (ESD): When unpacking a static-sensitive component from its shipping carton, do not QDSP-300 User’s Manual... -
Page 6: Instructions For Lithium Battery
(e.g. to the collecting points for disposal of batteries) Voltage Ratings The external power adaptor of the QDSP-300 has the following voltage ratings: Input: 100~240 VAC, 50~60 Hz ... -
Page 7: Preface
Reorient or relocate the receiving antenna. Increase the separation between the equipment and receiver. Connect the equipment to an outlet on a circuit different from that to which the QDSP-300 User’s Manual... -
Page 8: Maintaining Your Computer
However, if a system is located in an unusually humid location, a dehumidifier can be used to maintain the humidity within an acceptable range. Refer to the “Specifications” section of this user’s guide for QDSP-300 User’s Manual... -
Page 9: Power Protection
UPS system. UPS systems range in price from a few hundred dollars to several thousand dollars, with the more expensive unit s allowing you to run larger systems for a QDSP-300 User’s Manual... - Page 10 Surge protectors should be used with all UPS systems, and the UPS system should be Underwriters Laboratories (UL) safety approved. QDSP-300 User’s Manual...
-
Page 11: Chapter 1 Introduction
Introduction Overview QDSP-300 is a Box PC enclosed within a palm-sized aluminum chassis. It can easily fit into any space environment. Powered by 5th Generation Intel® Broadwell ULT Core™ i5-5200U processor or above as well as 4GB memory and 120GB 2.5"... -
Page 12: Product Specifications
Operation Temp.: 0°C ~ 50°C / 32°F ~ 122°F Environmental Storage Temp.: -20°C ~ 80°C / -4°F ~ 176°F Characteristics Humidity: 0% ~ 90% Mounting VESA mount Certifications CE, FCC Class A Table 1 QDSP-300 product specifications QDSP-300 User’s Manual... -
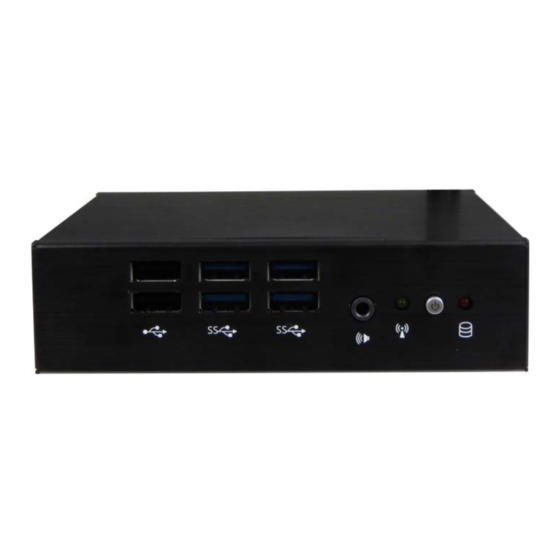
Page 13: System Tour
The Wirless LED will light when the WiFi is on. Storage LED The storage LED blinks when data is being written into or read from the SSD. Power Button The power button allows powering ON and OFF the system. (with Power LED) QDSP-300 User’s Manual... -
Page 14: Figure 2 Rear Panel
DVI-D is an acronym which means Digital Video Interface Digital. Essentially it is a cable that connects two devices producing an output image on a screen. Wi-Fi / Bluetooth reserved holes for Wi-Fi / Bluetooth combo antenna connection. QDSP-300 User’s Manual... - Page 15 Chapter 1 Clear CMOS 1x reset button for clear CMOS. External Power Button The external power button allows powering ON and OFF the system. QDSP-300 User’s Manual...
-
Page 16: Mechanical Dimensions
Chapter 1 Mechanical Dimensions 130 x 111 x 35 mm (W x D x H) Figure 3 Mechanical Dimensions QDSP-300 User’s Manual... -
Page 17: Chapter 2 Getting Started
Chapter 2 Getting Started Setting up your PC Connecting the monitor Connect the HDMI / DVI-D cable from your displa y to the HDMI / DVI-D port. DVI-D HDMI Figure 4 HDMI / DVI-D QDSP-300 User’s Manual... -
Page 18: Figure 5 Connecting Usb Mouse & Keyboard
Chapter 2 Connecting USB mouse & keyboard Your QDSP-300 does not come with a keyboard and mouse, but you can use any USB keyboard or mouse with your computer. USB2.0 USB3.0 Figure 5 Connecting USB mouse & keyboard NOTE Using a third-party USB mouse or keyboard may require software drivers. -
Page 19: Figure 6 Rj45 Connector
Chapter 2 Connecting to a network device Connect one end of a network cable to the LAN port on the system rear panel and the other end to a hub or switch. RJ45 Figure 6 RJ45 connector QDSP-300 User’s Manual... -
Page 20: Figure 7 Turning On The System
Chapter 2 Turning on the system Connect the power adapter cable to the DC jack (DC IN) of QDSP-300 Connect the power cable to the power adapter Connect the power cable to a power outlet Press the power switch on the front panel to turn on the system... -
Page 21: Mounting Your Pc To A Monitor
To fasten the metal shelf, your monitor must comply with VESA75 or VESA100 standard. The VESA mounting kit is optional. Place the QDSP-300 on the VESA mounting bracket and make sure the bracket is hooked with the fins of the system housing. -
Page 22: Anti-Theft Protection With A Kensington Lock
Anti-theft protection with a Kensington Lock QDSP-300 has a Kensington lock slot for the Kensington MicroSaver. With the Kensington MicroSaver, a sturdy steel cable, you can attach your QDSP-300 to a stationary object and protect your PC from theft. -
Page 23: Chapter 3 Ami Bios Setup
It is possible for the CMOS battery to fail, which will cause data loss in the CMOS only. If this happens you will need to reconfigure your BIOS settings. QDSP-300 User’s Manual... -
Page 24: Main Menu
4096 MB (DDR3) F3: Optimized Defaults F4 Save & Exit Frequenc y 1600 MHz ESC Exit Sys tem date [Tue 11/06/2015] Sys tem ti me [14:05:23] Access Level Admi nistrator Version 2.15.1236. Copyright (C) 2012 American Megatrends, Inc. QDSP-300 User’s Manual... -
Page 25: Advanced Menu
Version 2.15.1236. Copyright (C) 2012 American Megatrends, Inc. Onboard LAN 1 Controller Options: Disabled, Enabled Onboard LAN 1 Boot Options: Disabled, Enabled Onboard LAN 2 Controller Options: Disabled, Enabled Onboard LAN 2 Boot Options: Disabled, Enabled Audio Controller Options: Disabled, Enabled QDSP-300 User’s Manual... -
Page 26: Table 4 Advanced Menu – Display Configuration
320 M , 352 M , 384 M , 416 M , 448 M , 480 M , 512M , 1024M DVMT Total Gfx Mem Options: 128MB, 256MB, MAX IGFX-Boot Type Options: VBIOS Default, DVI, HD MI QDSP-300 User’s Manual... -
Page 27: Table 5 Advanced Menu – Cpu Chipset Configuration
Version 2.15.1236. Copyright (C) 2012 American Megatrends, Inc. EIST Options: Disabled, Enabled Hyper-Threading Options: Disabled, Enabled VT-d Options: Disabled, Enabled Active Processor Cores Options: All, 1 Limit CPUID Maximum Options: Disabled, Enabled Execute Disable Bit Options: Disabled, Enabled Intel Virtualization Technology Options: Disabled, Enabled QDSP-300 User’s Manual... -
Page 28: Table 6 Advanced Menu – Sata Configuration
Version 2.15.1236. Copyright (C) 2012, American Megatrends, Inc. SATA Controller(s) Options: Disabled, Enabled SATA Mode Selection Options: AHCI SATA Controller Speed Options: Default, Gen 1, Gen 2 , Gen 3 Port 1 (For SATA Port / mSATA Port) Options: Disabled, Enabled QDSP-300 User’s Manual... -
Page 29: Table 7 Advanced Menu – Usb Configuration
Version 2.15.1236. Copyright (C) 2012 American Megatrends, Inc. Legacy USB Support Options: Disabled, Enabled, Auto USB3.0 Support Options: Disabled, Enabled xHCI Hand-off Options: Disabled, Enabled EHCI Hand-off Options: Disabled, Enabled USB Mass Storage Driver Support Options: Disabled, Enabled QDSP-300 User’s Manual... -
Page 30: Table 8 Advanced Menu – Intel (R) Rapid Start Technology
Current Status Information +- Change Opt. F1: General H elp F2: Previous Val ues F3: Optimized Defaults F4 Save & Exit ESC Exit Version 2.15.1236. Copyright (C) 2012 American Megatrends, Inc. Security De vice Support Options: Disabled, Enabled QDSP-300 User’s Manual... -
Page 31: Table 10 Ad Vanced Menu – H/W Monitor
F3: Optimized Defaults +VCORE : +1.712V +VIN : +12.000V F4 Save & Exit : +5.089V ESC Exit +3.3V : +3.356V Version 2.15.1236. Copyright (C) 2012 American Megatrends, Inc. CPU FAN Configuration FAN Setting 【Manual Mode】(Options: Smart, Manual) Manual Duty QDSP-300 User’s Manual... -
Page 32: Table 11 Power Management Configuration
Options: Power Off, Power On, Last State Power Saving Mode Options: Disabled, EUP Enabled, DeepSX Enabled Resume By PCIE Device Options: Disabled, Enabled Resume By RTC Alarm Options: Disabled, Enabled Watchdog Timer Configuration WDT Function 【Disabled】 ■ Options: Disabled, Enabled QDSP-300 User’s Manual... -
Page 33: Boot Menu
CSM Support Options: Disabled, Enabled Boot Option Filter Options: UEFI and Legacy, Legacy only, UEFI only Boot Option # 1 Options: Disabled, IBA GE Slot 00C8 v1410 Network Device BBS Priorities Options: Disabled, IBA GE Slot 00C8 v1410 QDSP-300 User’s Manual... -
Page 34: Security Menu
The pass word l ength mus t be in the followi ng range: F2: Previous Val ues Minimum Length F3: Optimized Defaults Maxi mum length F4 Save & Exit ESC Exit Admi nistrator Pass word User Pass word Version 2.15.1236. Copyright (C) 2012, American Megatrends, Inc. QDSP-300 User’s Manual... -
Page 35: Save & Exit Menu
Enter: Sel ect Save C hanges +- Change Opt. Discard Changes F1: General H elp Restore Defaults F2: Previous Val ues F3: Optimized Defaults F4 Save & Exit ESC Exit Version 2.15.1236. Copyright (C) 2012, American Megatrends, Inc. QDSP-300 User’s Manual... - Page 36 Load Optimal Default values for all the setup values. This option allows you to load failsafe default values for each of the parameters on the Setup menus, which will provide the most stable performance settings. The F8 key can be used for this operation. QDSP-300 User’s Manual...
-
Page 37: Chapter 4 Driver Installation
You can download the drivers for the QDSP-300 from our website and install as instructed there. For other operating systems, please contact us.
Need help?
Do you have a question about the QDSP-300 and is the answer not in the manual?
Questions and answers