
Related Manuals for Quanmax QDSP-2050


Summary of Contents for Quanmax QDSP-2050
- Page 1 QDSP-2050 Small PC with Intel® Calpella Platform User’s Guide QDSP-2050 User’s Manual...
- Page 2 © 2010 Quanmax Inc. All rights reserved. The information in this user’s guide is provided for reference only. Quanmax does not assume any liability arising out of the application or use of the information or products described herein. This user’s guide may contain or reference information and products protected by copyrights or patents and does not convey any license under the patent rights of Quanmax, nor the rights of others.
-
Page 3: Table Of Contents
Mechanical Dimensions ..............19 Chapter 2 Getting Started ..................20 Setting up your PC ................20 Connecting VESA Mount on QDSP-2050 ........23 Mounting your PC to a Monitor ............24 Changing Memory and mini-PCIe ............ 25 Chapter 3 AMI BIOS Setup ..................28 Overview .................. -
Page 4: Figures
Figure 6 Network Cable with RJ45 Connector ............21 Figure 7 Turing on the System ................. 22 Figure 8 VESA Mount Assembly ................23 Figure 9 VESA Mount on QDSP-2050..............23 Figure 10 VESA Mounting ..................24 Figure 11 Opening the Cover on the Bottom ............25 Figure 12 Bottom View of Main Board .............. -
Page 5: Safety Instructions
Turn off system power, turn off the power supply, and then disconnect the power cord from its source before removing the chassis cover. Turning off the system power switch does not remove power to components. QDSP-2050 User’s Manual... -
Page 6: When Working Inside A Computer
You can also take the following steps to prevent damage from electrostatic discharge (ESD): When unpacking a static-sensitive component from its shipping carton, do not remove the component’s antistatic packing material until you are ready to install QDSP-2050 User’s Manual... -
Page 7: Instructions For Lithium Battery
(e.g. to the collecting points for disposal of batteries) Voltage Ratings The external power adaptor of the QDSP-2050 has the following voltage ratings: Input: 100-240 VAC, 50-60 Hz Output: 75W, +19Vdc, 3.95A... -
Page 8: Preface
However, there is no guarantee that interference will not occur in a particular installation. If this equipment does cause interference to radio or television equipment reception, which can be determined by QDSP-2050 User’s Manual... -
Page 9: Warranty Policy
All product(s) returned to your dealer for service or credit must be accompanied by a Return Material Authorization (RMA) Number. Freight on all returned items must be prepaid by the customer who is responsible for any loss or damage caused by QDSP-2050 User’s Manual... -
Page 10: Maintaining Your Computer
If the system has been exposed to abnormally cold temperatures, allow a two-hour warm-up period to bring it up to normal operating temperature before turning it on. Failure to do so may cause damage to internal components, particularly the hard disk drive. QDSP-2050 User’s Manual... -
Page 11: Power Protection
Line conditioners go beyond the overvoltage protection of surge protectors. Line conditioners keep a system’s AC power source voltage at a fairly constant level and, therefore, can handle brownouts. Because of this added protection, line conditioners cost more than surge protectors. However, line conditioners QDSP-2050 User’s Manual... - Page 12 Surge protectors should be used with all UPS systems, and the UPS system should be Underwriters Laboratories (UL) safety approved. QDSP-2050 User’s Manual...
-
Page 13: Chapter 1 Introduction
Chapter 1 Introduction Overview QDSP-2050 is a surprisingly affordable, space-saving Nettop that will capably serve everyday computing needs and turn your living room into home theater with ease. Featuring the latest 32 nm Intel® Capella platform with intel® HM55 chipset, it provides the powerful computing and graphic performance with the optimal energy efficiency. -
Page 14: Table 1 Qdsp-2050 Product Specifications
Cooling Input: 100-240 VAC Power Unit Output: 75W, +19VDC, 3.95A Operating: 0°C to 40°C, 0%-90%, non-condensing Temperature / Storage: -20°C to 80°C, 0%-90%, non-condensing Humidity VESA-mount Mounting CE, FCC Class A Certifications Table 1 QDSP-2050 product specifications QDSP-2050 User’s Manual... -
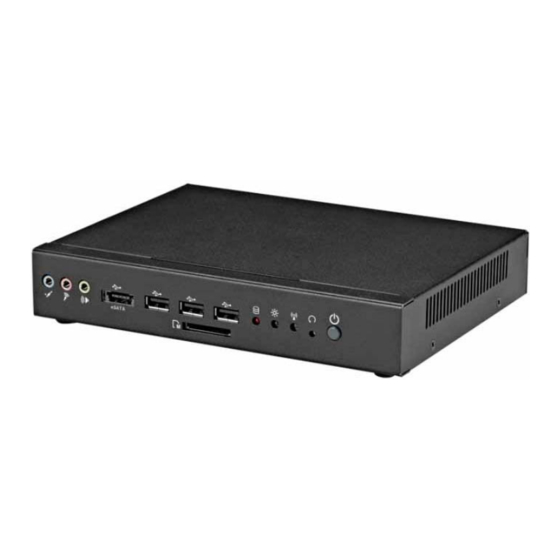
Page 15: System Tour
The USB (Universal Serial Bus) port is compatible with USB devices such as keyboards, mouse devices, cameras, and hard disk drives. USB allows many devices to run simultaneously on a single computer, with some peripheral acting as additional plug-in sites or hubs. QDSP-2050 User’s Manual... - Page 16 Line-IN The Line-in jack is designed to take input from a higher-powered sound source. CAUTION This connector do not support hot-swapping. Users should not connect or disconnect their eSATA/USB devices from PC when the system is working. QDSP-2050 User’s Manual...
-
Page 17: Figure 2 Rear Panel
Ethernet The eight-pin RJ-45 LAN port supports a standard Ethernet cable for connection to a local network. HDMI HDMI connector for display output DVI-I DVI-I connector for DVI-D or VGA output QDSP-2050 User’s Manual... - Page 18 Power supplied through this jack supplies power to the PC. To prevent damage to the PC, always use the supplied power adapter. WiFi External Antenna Spared hole on the casing for connecting WiFi external antenna 3G External Antenna Spared hole on the casing for connecting 3G external antenna QDSP-2050 User’s Manual...
-
Page 19: Mechanical Dimensions
Chapter 1 Mechanical Figures Dimension: 203 x 153.1 x 36.3 mm (W x H x D) Figure 3 Mechanical Figures QDSP-2050 User’s Manual... -
Page 20: Chapter 2 Getting Started
Figure 4 Connect the DVI cable NOTE When the system reboots without connecting the DVI, there might be no image on screen when you insert the DVI cable. Please pressing <Ctrl>+<Alt>+<F4> simultaneously to show the image on screen. QDSP-2050 User’s Manual... -
Page 21: Figure 5 Connecting Usb Mouse & Keyboard
Chapter 2 Connecting USB mouse & keyboard Your QDSP-2050 does not come with a keyboard and mouse, but you can use any USB keyboard or mouse with your computer. Figure 5 Connecting USB mouse & keyboard NOTE Using a third-party USB mouse or keyboard may require software drivers. -
Page 22: Figure 7 Turing On The System
Chapter 2 Turning on the system Connect the power adapter cable to the DC jack (DC IN) of the QDSP-2050 Connect the power cable to the power adapter Connect the power cable to a power outlet Press the power switch on the front panel to turn on the system Figure 7 Turing on the system QDSP-2050 User’s Manual... -
Page 23: Connecting Vesa Mount On Qdsp-2050
Chapter 2 Connecting VESA Mount on QDSP-2050 Take out the VESA mounting kit form your package and facing it onto the bottom of QDSP-2050; then tightening the screws on your QDSP-2050 as figures shown below. Figure 8 VESA Mount Assembly Following figures are the complete status when you done. -
Page 24: Mounting Your Pc To A Monitor
Firstly, mount your VESA kit on the backside of the monitor with four screws in the package. Secondly, place the QDSP-2050 on the VESA mounting kit and then tightening the screws from the holes on both sides of the VESA bracket - make sure the computer is fitting well on the bracket. -
Page 25: Changing Memory And Mini-Pcie
Chapter 2 Changing Memory and mini-PCIe Firstly, Opening the cover by loosening the two screws on the bottom of QDSP-2050 as shown below; Figure 11 Opening the Cover on the Bottom Then you may able to change the DDR SO-DIMM and/or mini-PCIe modules. -
Page 26: Figure 13 So-Dimm Installation (1)
SO-DIMM. Lift it out of the socket. Make sure you store the SO-DIMM in an anti-static bag. The socket must be populated with memory modules of the same size and manufacturer. QDSP-2050 User’s Manual... -
Page 27: Figure 15 Mini-Pcie Installation
Chapter 3 Changing mini-PCIe (1) Place your mini‐PCIe module toward the mini‐PCIe socket. Figure 15 mini-PCIe Installation (2) Tightening the screw on the hole of the mini‐PCIe module as shown above. QDSP-2050 User’s Manual... -
Page 28: Chapter 3 Ami Bios Setup
It is possible for the CMOS battery to fail, which will cause data loss in the CMOS only. If this happens you will need to reconfigure your BIOS settings. QDSP-2050 User’s Manual... -
Page 29: Main Menu
F1 General Help Access level Administrator F2 Previous values F3 Optimized Defaults F4 Save ESC Exit V02.00.1201. Copyright © 2009, American Megatrends, Inc. Below table is described for Primary IDE Master, Primary IDE Slave, Secondary IDE Master setting. QDSP-2050 User’s Manual... -
Page 30: Advanced Menu
F3 Optimized Defaults F4 Save ESC Exit V02.00.1201. Copyright © 2009, American Megatrends, Inc. Full Item For Debug Options: Enabled, Disabled Onboard LAN Controller Options: Enabled, Disabled Launch PXE OpROM Options: Enabled, Disabled Audio Controller Options: Enabled, Disabled QDSP-2050 User’s Manual... -
Page 31: Table 4 Advaned - Display Configuration
+- Change Opt. F1 General Help F2 Previous values F3 Optimized Defaults F4 Save ESC Exit V02.00.1201. Copyright © 2009, American Megatrends, Inc. ACPI Sleep State Options: Suspend Disabled, S1 (CPU Stop Clock), S3 (Suspend to RAM) QDSP-2050 User’s Manual... -
Page 32: Table 6 Advaned - Sata Configuration
Select Screen ↑↓ Select Item Enter: Select +- Change Opt. F1 General Help F2 Previous values F3 Optimized Defaults F4 Save ESC Exit V02.00.1201. Copyright © 2009, American Megatrends, Inc. SATA Mode Options: Disabled, IDE Mode, AHCI Mode QDSP-2050 User’s Manual... -
Page 33: Table 7 Advaned - Usb Configuration
: +1.03 V +- Change Opt. : +3.392 V F1 General Help F2 Previous values F3 Optimized Defaults F4 Save ESC Exit V02.00.1201. Copyright © 2009, American Megatrends, Inc. CPU Shutdown Temperature Options: Disabled, 80C, 85C, 90C, 95C QDSP-2050 User’s Manual... -
Page 34: Table 9 Save & Advaned - Super Io Configuration
Options: Auto, IO=3F8h; IRQ=4; IO=3F8h; IRQ=3, 4, 5, 6, 7, 10, 11, 12; IO=2F8h; IRQ=3, 4, 5, 6, 7, 10, 11, 12; IO=3E8h; IRQ=3, 4, 5, 6, 7, 10, 11, 12; IO=2E8h; IRQ=3, 4, 5, 6, 7, 10, 11, 12; QDSP-2050 User’s Manual... -
Page 35: Table 11 Save & Advaned - Hw Configuration - Serial Port 2
IRQ=3, 4, 5, 6, 7, 10, 11, 12; IO=3E8h; IRQ=3, 4, 5, 6, 7, 10, 11, 12; IO=2E8h; IRQ=3, 4, 5, 6, 7, 10, 11, 12; Serial Port 2 Type Options: Rs232, RS422, RS485 Serial Port 2 Power Options: Normal, 5V, 12V QDSP-2050 User’s Manual... -
Page 36: Boot Menu
Setup Prompt Timeout Enter the time you want. Example: 1 stands for 1 second. Bootup Numlock State Options: On, Off Boot Option #1 Options: WDC WD800BEVS-22RST0, Disabled Hard Drive BBS Priorities – Boot Option #1 Options: WDC WD800BEVS-22RST0, Disabled QDSP-2050 User’s Manual... -
Page 37: Security Menu
Save as User Defaults ↑↓ Select Item Restore User Defaults Enter: Select +- Change Opt. Boot Override F1 General Help SATA: WDC WD800BEVS-22RSTO F2 Previous values F3 Optimized Defaults F4 Save ESC Exit V02.00.1201. Copyright © 2009, American Megatrends, Inc. QDSP-2050 User’s Manual... - Page 38 Load Optimal Default values for all the setup values. This option allows you to load optimal default values for each of the parameters on the Setup menus, which will provide the best performance settings for your system. The F9 key can be used for this operation. QDSP-2050 User’s Manual...
-
Page 39: Chapter 4 Driver Installation
Chapter 4 Driver Installation If your QDSP-2050 does not come with an operating system pre-installed, you will need to install an operating system and the necessary drivers to operate it. After you have finished assembling your system and connected the appropriate power source, power it up using the power supply and install the desired operating system.
Need help?
Do you have a question about the QDSP-2050 and is the answer not in the manual?
Questions and answers