
Related Manuals for Fujitsu Siemens Computers PRIMERGY TX150


Summary of Contents for Fujitsu Siemens Computers PRIMERGY TX150
- Page 1 PRIMERGY Ute Jacob Fujitsu Siemens Computers GmbH München 81730 Munich e-mail: email: manuals@fujitsu-siemens.com Tel.: (089) 61001-161 Fax: (++49) 700 / 372 00000 A26361-K879-Z102-3-7619 Sprachen: En...
-
Page 2: Copyright And Trademarks
Gesellschaft für Technik-Dokumentation mbH www.cognitas.de Copyright and Trademarks Copyright © 2003 Fujitsu Siemens Computers GmbH. All rights reserved. Delivery subject to availability; right of technical modifications reserved. All hardware and software names used are trademarks of their respective manufacturers. -
Page 5: Table Of Contents
Contents Introduction ......1 Overview of the Documentation ....1 Features . - Page 6 Contents Property and Data Protection ....65 BIOS Setup Security Functions ....65 Problem Solutions and Tips .
-
Page 7: Introduction
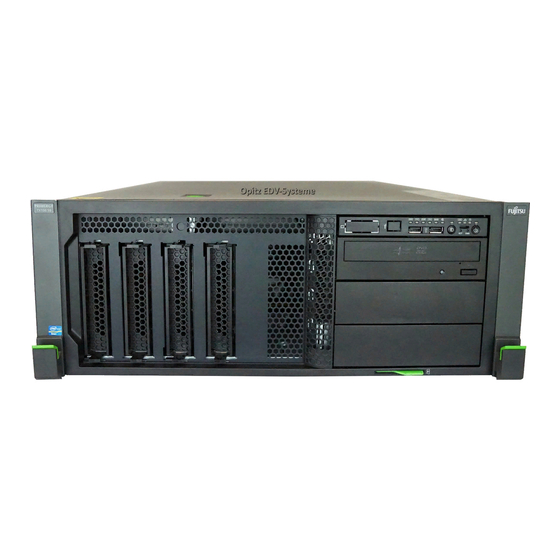
Introduction The PRIMERGY TX150 server is an Intel-based server for small and medium- sized networks and can be used as floorstand or as rack model. A floorstand model can be converted into a rack model using an optional conversion kit. - Page 8 – Technical Manual for the system board D1501 (PDF file available on the ServerBooks CD) – “D1501 Setup Utility for PRIMERGY TX150“ manual (PDF file available on the ServerBooks CD) – “ServerStart Bundle“ includes the ServerStart CD, the ServerBooks CD and the print version of the manual „ServerStart Bundle“.
-
Page 9: A26361-K879-Z102
The features of the system board (D1501) can be found in the technical manual of the system board for the hardware and in the „D1501 Setup Utility for PRIMERGY TX150“ for the firmware (see “Related Publications” on page 87). Hard disk drives The server has a drive cage which can accommodate up to four ULTRA-320- SCSI hard disk drive modules. - Page 10 ASR&R (Automatic Server Reconfiguration and Restart) restarts the system in the case of an error and automatically ”hides“ the defective system components. The PDA (Prefailure Detection and Analyzing) technology from Fujitsu Siemens Computers analyzes and monitors all components important for system reliability.
- Page 11 The flash EPROM programme supplied with the Fujitsu Siemens utilities supports fast BIOS Update. The RemoteView Remote Test and Diagnosis System allows the PRIMERGY TX150 Server to be maintained from remote locations. A Remote Service Board (RSB) can be used in conjunction with RemoteView.
-
Page 12: Notational Conventions
Notational Conventions Introduction Notational Conventions The following notational conventions are used in this manual: Italics indicate commands, menu items or software programmes. “Quotation marks” indicate names of chapters and terms that should be emphasized. Ê text which follows this symbol describes activities that must be performed in the order shown. - Page 13 Introduction Technical Data Compliance Standards Product safety and ergonomics IEC 60950 / EN 60950 / UL 60950 3rd. Ed., CAN/CSA C22.2 No. 60950 3rd. Ed. Electromagnetic Compatibility FCC class A VCCI class A AS/NZS 3548 class A CNS 13438 Emitted interference EN 55022 class A Harmonic current EN 61000-3-2 JEIDA...
- Page 14 Technical Data Introduction Environmental Conditions Environment class 3K2 DIN EN 60721(IEC 721) section 3-3 Environment class 2K2 DIN EN 60721(IEC 721) section 3-2 Temperature: Operation (3K2) 10 °C ..35 °C Transport (2K2) -25 °C ..60 °C Relative humidity 10%...85% Condensation during operation must be avoided.
-
Page 15: Installation Steps: Overview
Installation Steps: Overview In this chapter you will find an overview of the steps necessary to install your server system. Links guide you to sections where you can find more detailed information on the individual steps: Ê At first, please take notice of chapter “Important Notes” on page 11ff, especially of „Notes on Safety“. -
Page 17: Important Notes
Important Notes In this chapter you will find essential information regarding safety when working with your server. Notes on Safety You will also find the following safety instructions in the manual entitled “Safety and Ergonomics“ which also includes other notes on ergonomics. - Page 18 Notes on Safety Important Notes Before setting up CAUTION! During installation and before operating the device, observe the instructions on environmental conditions for your device (see section “Technical Data” on page 6). If the device is brought in from a cold environment, condensation may form both inside and on the outside of the machine.
- Page 19 Important Notes Notes on Safety CAUTION! Data cables must be adequately shielded to avoid interference. To the LAN wiring the requirements apply in accordance with the standards EN 50173 and EN 50174-1/2. As minimum requirement the use of a protected LAN line of category 5 for 10/100 MBps Ethernet, and/or of category 5e for Gigabit Ethernet is considered.
- Page 20 Notes on Safety Important Notes CAUTION! The components (e.g. power supply) marked with a warning label (e.g. lightning symbol) may only be opened, removed, or exchanged by authorized, qualified personnel. The hot-swap or hot-plug compo- nents are exceptions to this rule. The warranty is invalidated if the device is damaged during the instal- lation or replacement of system expansions.
- Page 21 Important Notes Notes on Safety Notes on Handling CDs and CD-/DVD-ROM Drives CAUTION! Use only CDs in proper condition in the CD-/DVD-ROM drive of your server to prevent data loss, damage to the device and injuries. Therefore, check each CD for damage, cracks, breakage etc. before inserting it in the drive.
- Page 22 Notes on Safety Important Notes Modules with Electrostatic Sensitive Devices: Electrostatic-sensitive components may be identified by the following sticker: Figure 1: ESD label When you handle components fitted with ESDs, you must observe the following points under all circumstances: You must always discharge static build up (e.g. by touching a grounded object) before working.
-
Page 23: Ce Certificate
Important Notes CE Certificate Other important notes: When cleaning the device, please observe the relevant notes in the section section “Cleaning the Server” on page 64. Keep this Operating Manual safety and all additional documentation (e.g. Technical Manual, CD) together with the device. If you pass on the device to third parties, you should also pass on the complete documentation. -
Page 24: Transporting The Server
Consult the dealer or an experienced radio/TV technician for help. Fujitsu Siemens Computers is not responsible for any radio or television inter- ference caused by unauthorized modifications of this equipment or the substi- tution or attachment of connecting cables and equipment other than those specified by Fujitsu Siemens Computers. -
Page 25: Notes On Installing Into The Rack
Important Notes Notes On Installing Into the Rack Notes On Installing Into the Rack CAUTION! For safety reasons, at least two people are required to install the rack model because of its weight and size. Never lift the server into the rack using the handles on the front panel. When connecting and disconnecting cables, observe the relevant notes in the chapter ”Important notes“... -
Page 26: Environmental Protection
Environmental Protection Important Notes Environmental Protection Environmentally friendly product design and development This product has been designed in accordance with standards for ”environmen- tally friendly product design and development“. This means that the designers have taken into account important criteria such as durability, selection of materials and coding, emissions, packaging, the ease with which the product can be dismantled and the extent to which it can be recycled. - Page 27 Important Notes Environmental Protection Take-back, recycling and disposal For details on take-back and reuse of devices and consumables within Europe, contact your Fujitsu Siemens Computers branch office/subsidiary or our recycling centre in Paderborn: Fujitsu Siemens Computers Recycling Center D-33106 Paderborn Tel.:...
-
Page 29: Hardware Installation
Hardware Installation CAUTION! Please note the safety instructions in chapter “Important Notes” on page 11. Do not expose the server to extreme environmental conditions (see section “Technical Data” on page 6). Protect it from dust, moisture, and heat. The server must be acclimatized in its operating environment for an accli- matization time. -
Page 30: Unpacking The Server
Unpacking the Server Hardware Installation Unpacking the Server CAUTION! Please note the safety instructions in chapter “Important Notes” on page 11. If you need to lift or transport the server, ask other people to help you. Do not unpack the server until all transport maneuvers are completed. It is recommended to not throw away the original packaging material! It may be required for transportation at some later date. -
Page 31: Setting Up The Floorstand Model
Hardware Installation Setting Up the Floorstand Model Setting Up the Floorstand Model CAUTION! Please note the safety instructions in chapter “Important Notes” on page 11. Ê Transport the server to the place where you want to set it up. Ê Unpack the server (see section “Unpacking the Server” on page 24) and the HDD cover. - Page 32 Setting Up the Floorstand Model Hardware Installation Ê Set up the server. When you set up the floorstand model with hot-plug power supply units the supplied anti-tilt bracket must be fitted to prevent tilting (see section “Mounting the Anti-tilt Bracket” on page 27). CAUTION! –...
-
Page 33: Mounting The Anti-Tilt Bracket
Hardware Installation Setting Up the Floorstand Model 4.3.1 Mounting the Anti-tilt Bracket For floorstand models with hot-plug power supply units the supplied anti-tilt bracket must be fitted at the rear of the server. Figure 4: Mounting the anti-tilt bracket Ê Position the server on the anti-tilt bracket so the rubber feet of the server fit into the openings of the bracket (1). -
Page 34: Installing/Removing The Rack Model
Installing/Removing the Rack Model Hardware Installation Figure 5: Fastening the anti-tilt bracket Ê Fasten the anti-tilt bracket using the two knurled screws (1). Installing/Removing the Rack Model CAUTION! Please observe the safety precautions and references to rack instal- lation in chapter “Important Notes” on page 11. At least two people are needed to position the server in the rack. - Page 35 The power is supplied via the socket strips available in the rack. The main features of the rack systems of the Fujitsu Siemens Computers GmbH are: PRIMECENTER Rack –...
- Page 36 Installing/Removing the Rack Model Hardware Installation To rack systems of different foreign manufacturers the following applies: 3rd-Party Rack Certain boundary conditions are to be fulfilled: – Installation dimensions (see the dimensions shown in figure 6 on page 31). rack front side rack rear side rack depth (comparison PRIMECENTER Rack 940/1000 mm) rack width (comparison PRIMECENTER Rack 700 mm)
- Page 37 Hardware Installation Installing/Removing the Rack Model – Power supply. For the installation in 3rd-Party Racks it is to be made certain that appro- priate socket strips are present. Figure 6: Mechanical conditions A26361-K879-Z102-3-7619...
-
Page 38: Mounting Into The Primecenter Rack
Installing/Removing the Rack Model Hardware Installation 4.4.1 Mounting into the PRIMECENTER Rack For mounting the server in the PRIMECENTER Rack the following parts are necessary: – support bracket – two telescopic rails (assembled) – four assembly brackets (VL; VR; HL; HR are panched onto the brackets) –... - Page 39 Hardware Installation Installing/Removing the Rack Model Ê Repeat the procedure also for the right telescopic rail and the corresponding assembly brackets VR and HR. For mounting the left telescopic rail in the PRIMECENTER Rack, the delivered support bracket must first be mounted on the rear left support upright. The bracket must be mounted level with the lower edge of the device.
- Page 40 Installing/Removing the Rack Model Hardware Installation Figure 9: Mounting the telescopic rails into the PRIMECENTER Rack Ê Using the supplied Allen key (No. 5) secure the end of the telescopic rails with the corresponding assembly brackets with two screws M4 each (1 and 2) in the rack at the support uprights and/or at the support bracket.
-
Page 41: Mounting Into The Datacenter Rack
Hardware Installation Installing/Removing the Rack Model 4.4.2 Mounting into the DataCenter Rack For mounting the server in the DataCenter Rack the following parts are necessary: – support bracket – two telescopic rails (assembled) – assembly bracket HL (HL is panched onto the bracket) –... - Page 42 Installing/Removing the Rack Model Hardware Installation Ê Using the mounting aid (stencil) mark the position of the attachment points for the telescopic rails and for the server (front panel) on the support uprights (five height units). Refer to the information on the mounting aid. Ê...
- Page 43 Hardware Installation Installing/Removing the Rack Model Figure 11: Mounting the telescopic rail into the DataCenter Rack Ê Using the supplied Allen key (No. 5) secure the end of the telescopic rail without assembly bracket with two screws M5 (1) in the rack at the front left support upright.
-
Page 44: Mounting Into The Classic Rack
Installing/Removing the Rack Model Hardware Installation Ê Mount the DataCenter Rack cable management (articulated cable guide) as described in the Technical Manual of the DataCenter Rack. Ê Mount the server (see section “Installing the Server” on page 44). Ê Route the cables with the inserted server as described in the Technical Manual of the DataCenter Rack. - Page 45 Hardware Installation Installing/Removing the Rack Model Figure 12: Mounting the telescopic rail into the Classic Rack Ê Using the supplied Allen key (No. 5) secure the two telescopic rails with two screws M5 each in the rack at the right and left support uprights. Please note that the guide nubs of the telescopic rails next to the spring nuts must fit into the holes in the support uprights.
- Page 46 Installing/Removing the Rack Model Hardware Installation Figure 13: Mounting the articulated cable carrier Ê Fix the articulated cable carrier with two mounting screws on the rear right support upright. Figure 14: Routing the cables on the articulated cable carrier Ê Route the cables as shown in the figure and secure them to the articulated cable carrier with cable ties (1).
- Page 47 Hardware Installation Installing/Removing the Rack Model Securing the cables to the articulated cable carrier ensures that, if the server is pulled out the articulated cable carrier extends themselves. The server can be pulled out so later without further preparations (see figure 15). Figure 15: Server with articulated cable carrier: pulled out A26361-K879-Z102-3-7619...
- Page 48 Installing/Removing the Rack Model Hardware Installation Routing the Fibre Channel Optical Waveguide Cable The protective hose (length approx. 1m) supplied with the mounting kit has a separable design. Figure 16: Mounting the protective hose Ê Separate the outside protective sheath (1) from the inside sheath. Ê...
-
Page 49: Mounting Into 3Rd-Party Racks
Hardware Installation Installing/Removing the Rack Model Figure 17: Routing the fibre channel optical waveguide cable with protective hose Ê Route the fibre channel optical waveguide cable on the articulated cable carrier as shown in the figure and secure them with cable ties (1). CAUTION! Please make sure that the so protected fibre channel optical waveguide cable is routed in such a way on the articulated cable carrier that in the... -
Page 50: Installing The Server
Installing/Removing the Rack Model Hardware Installation Ê Mount the necessary manufacturer original parts (like support bracket or cable management). Sometimes a number of parts of the delivered mounting kit cannot be used because original parts of the 3rd-Party Rack are to be used. Ê... - Page 51 Hardware Installation Installing/Removing the Rack Model Figure 19: Installing the server Ê Lift the server onto the two projecting telescope bars. Ê Position the server so that the holes of the telescopic bars are in line with those of the server. When doing this, ensure that the telescopic bars are kept in a locked position.
- Page 52 Installing/Removing the Rack Model Hardware Installation Figure 21: Mounting the spreader bar and fastening the server Ê Slide the server into the rack (1). CAUTION! Never lift the server into the rack using the handles on the front panel. Ê Place the cage nuts for fastening the front panel in the corresponding holes of the front support uprights and fasten the server using four knurled screws (2).
-
Page 53: Connecting Devices To The Server
Hardware Installation Connecting Devices to the Server Connecting Devices to the Server The ports for external devices are on the rear of the server. Which additional ports are available on your server depends on the PCI boards installed. The standard ports (figure 22) are marked with symbols, and some are color- coded. - Page 54 Connecting Devices to the Server Hardware Installation Figure 23: Rack model: ports Some of the devices that you connect require special driver software (see the documentation for the connected device). Ê Connect the data cables to the server and peripherals. You can find an additional USB port on the front of the server (see figure 27 on page 55).
-
Page 55: Connecting The Server To The Line Voltage
Hardware Installation Connecting the Server to the Line Voltage Connecting the keyboard, mouse and monitor Ê Connect the monitor, the keyboard and mouse to the standard ports of the server (see figure 22 on page 47 and figure 23 on page 48). If a separate graphics card is installed in a slot, the graphic controller on the system board is automatically deactivated. - Page 56 Connecting the Server to the Line Voltage Hardware Installation Figure 24: Connecting the server to the line voltage Ê Connect the insulated connector of the power cable to power supply unit of the server (1), and the power plug to a grounded mains outlet (2) of the in- house mains and/or into the mains socket strip of the rack (see Technical Manual of the rack).
-
Page 57: Instructions On Connecting/ Disconnecting Cables
Hardware Installation Instructions on Connecting/ Disconnecting Cables Instructions on Connecting/ Disconnecting Cables CAUTION! Be sure to read the documentation for the peripheral devices before connecting them. Do not connect or disconnect data cables during a thunderstorm. When removing a cable, always hold it by the plug. Connect and disconnect the cables in the order described below. -
Page 59: Preparation For Use And Operation
Preparation for Use and Operation CAUTION! Please note the safety instructions in chapter “Important Notes” on page 11. Locking and Unlocking the Floorstand Model Enabling access to the accessible drives Figure 25: Accessing the accessible drives Ê Unlock the server (1). Ê... - Page 60 Locking and Unlocking Preparation for use and operation To prevent access to the HDD modules, the server can be locked again (3). In this case, the drive cover cannot be pushed into the top position and the hard disk drive cover cannot be removed. Enabling access to the HDD modules Figure 26: Accessing the HDD modules Ê...
-
Page 61: Operating And Indicator Elements
Preparation for use and operation Operating and Indicator Elements Operating and Indicator Elements 5.2.1 The Front Figure 27: The front 1 ON/OFF button Identification LED (= ID LED) 2 Power-on indicator USB port 3 Hard disk drive active indicator 10 Hard disk drive control indicators (figure 28) 4 Global Error indicator 11 Floppy disk drive access indicator... - Page 62 Operating and Indicator Elements Preparation for use and operation Operating elements Key lock To prevent access to the drives, the server can be locked. ON/OFF button When the system is switched OFF, it can be switched ON by pressing the ON/OFF button. When the system is operating, pressing the ON/OFF button will switch OFF the system.
- Page 63 Preparation for use and operation Operating and Indicator Elements Global Error indicator (orange) Does not light when the system is ok. No service incident or critical event has occurred. Flashes orange when a critical event has occurred or a prefailure event has been recognized.
- Page 64 Operating and Indicator Elements Preparation for use and operation Hard disk drive control indicator Figure 28: HDD Module: indicators HDD BUSY green – lights: HDD in active phase – does not light: HDD inactive HDD FAULT (in conjunction with a RAID controller) orange –...
-
Page 65: The Rear Side
Preparation for use and operation Operating and Indicator Elements 5.2.2 The Rear Side Indicators on the Connection Panel Figure 29: Connection panel: indicators Global Error indicator (orange) Does not light when the system is ok. No service incident or critical event has occurred. - Page 66 Operating and Indicator Elements Preparation for use and operation ID LED (blue) Pressing the ID button lights up the ID LEDs (blue) on the front and on the rear of the server. The two ID LEDs are synchronized. Lights up blue, when the system has been selected by pressing the ID button.
-
Page 67: Switching The Server On/Off
Preparation for use and operation Switching the Server ON/OFF Switching the Server ON/OFF CAUTION! If after switching ON the server there is nothing but flickering stripes on the screen, switch the server OFF immediately (see chapter “Problem Solutions and Tips” on page 67). The ON/OFF button does not disconnect the server from the mains voltage. -
Page 68: Configuring The Server
Configuring the Server Preparation for use and operation Other ON/OFF possibilities In addition to the ON/OFF button, the server can be switched ON and OFF in the following ways: – Specified switch-On time/switch-OFF time The server is automatically switched ON or OFF at a time specified in the ServerView programme. -
Page 69: Configuration Without Serverstart
Preparation for use and operation Configuring the Server Note on SCSI-ID: Please note that the SCSI-IDs for the hot-swapable hard disk drives are permanently assigned (i.e. in the order 0, 1, 2, 3 from the bottom to top). Descriptions of operating systems not covered in the RAID controller manual are provided in the appropriate readme files on the driver diskettes. -
Page 70: Cleaning The Server
Cleaning the Server Preparation for use and operation Cleaning the Server CAUTION! Switch the server off, and pull the power plug out of the grounded-contact power socket. Do not clean any interior parts yourself; leave this job to a service technician. -
Page 71: Property And Data Protection
Property and Data Protection The floorstand model is protected against unauthorized opening with the lock. The server is also fitted with an intrusion detection switch which enables the ServerStart programme to detect and log any removal of the left cover or housing cover and the cover for the HDD modules. - Page 72 BIOS Setup Security Functions Property and Data Protection is indicated by the three keyboard LEDs which flash on and off alternately. Once you have entered the correct system password and pressed the key [Enter], the keyboard LEDs go off and the boot procedure continues. Preventing unauthorized access to the settings of boards with their own BIOS You can activate this protection by selecting the value Extended for the Setup Password Lock field in the System Security menu.
-
Page 73: Problem Solutions And Tips
Problem Solutions and Tips CAUTION! Observe the safety information in the manuals ”Security and Ergonomics“ and „Warranty“ and in chapter “Hardware Installation” on page 23. If a problem occurs, try to resolve it as described: – in this chapter, – in the documentation for the attached devices, –... -
Page 74: The Server Switches Itself Off
The Server Switches Itself OFF Problem Solutions and Tips The Server Switches Itself OFF Server management has detected an error Ê Check the error list or the ErrorLog file in the ServerView program, and attempt to eliminate the error. The Monitor Remains Dark Monitor is switched OFF Ê... -
Page 75: Flickering Stripes Across The Monitor
Problem Solutions and Tips Flickering Stripes Across the Monitor Flickering Stripes Across the Monitor CAUTION! Switch OFF the server immediately. Risk of damaging the server. Monitor does not support the set horizontal frequency Ê Find out which horizontal frequency your monitor supports. You will find the horizontal frequency (also known as line frequency or horizontal deflection frequency) in the documentation for your monitor. -
Page 76: Floppy Disk Cannot Be Read Or Written Onto
Floppy Disk Cannot be Read or Written onto Problem Solutions and Tips Mouse controller disabled The mouse controller on the system board must be enabled if you use the supplied mouse. Ê Check in the BIOS Setup that the mouse controller is Enabled. Floppy Disk Cannot be Read or Written onto Ê... -
Page 77: Drives "Dead" At System Boot
Problem Solutions and Tips Drives ”dead“ at System Boot 7.10 Drives ”dead“ at System Boot This error message may occur when the server has a RAID controller: RAID controller configuration incorrect Ê Check and correct the settings for the drives with the RAID controller utility. Further information is provided in the manual on the RAID controller. -
Page 79: Hot-Plug/Hot-Swap Components
Hot-plug/Hot-swap Components This chapter describes how to handle hot-plug or hot-swap components and/or how to modify your server hardware (e.g. installing/removing hot-plug power supply units, hot-swap HDD modules). Upgrading or replacing fix installed components are described in the Service Manual and may only be performed by maintenance staff. Hot-plug Power Supply Units As an option, the fixed power supply unit can be replaced with one or two hot-plug power supply units (upgrading may only be performed by... -
Page 80: Replacing The Hot-Plug Power Supply Unit
Hot-plug Power Supply Units Hot-plug/Hot-swap Components 8.1.1 Replacing the Hot-plug Power Supply Unit Figure 31: Unlocking and removing the power supply unit CAUTION! Before replacing a non defective hot-plug power supply unit in a non- redundant configuration (only one power supply unit present) the server must be switched OFF. -
Page 81: Adding A Hot-Plug Power Supply Unit
Hot-plug/Hot-swap Components Hot-plug Power Supply Units Ê Connect the power supply unit to the power supply. Please ensure that the power supply unit engages correctly in the mounting frame and is locked in position. This is the only way to avoid the power supply unit being shaken out of its mountings and damaged during transport. -
Page 82: Hot-Swap Hard Disk Drive
Hot-swap Hard Disk Drive Up to four Ultra 3-Wide U320-SCSI hard disk drives can be installed into the PRIMERGY TX150 server. The hard disk drives are built on a carrier which allows defective drives to be replaced (hot-swap) or new drives to be added during operation. The hard disk drive and the carrier constitute the hard disk drive module (HDD module). -
Page 83: Installing/Removing Hdd/Dummy Module
If this is not taken into account, existing data can be destroyed. The hard disk drives which can be ordered for the PRIMERGY TX150 are delivered as HDD modules which include the hard disk drive preinstalled in a carrier. - Page 84 Hot-swap Hard Disk Drive Hot-plug/Hot-swap Components Removing the dummy module Ê Press the upper and lower tabs on the dummy module together (see figure 32 on page 78) until the locking mechanism disengages, and remove the dummy module from the slot. Installation of the dummy module occurs in reverse order.
- Page 85 Hot-plug/Hot-swap Components Hot-swap Hard Disk Drive Figure 33: Installing the HDD module Ê Insert the HDD module with the opened handle carefully into the empty slot (1) until it stops. Ê Push the module handle completely in the original position (2) until the locking mechanism (3) engages.
-
Page 86: Hot-Swap For Hdd Modules
Hot-swap Hard Disk Drive Hot-plug/Hot-swap Components 8.2.3 Hot-swap for HDD Modules CAUTION! The hot-swap function can only be performed together with a corre- sponding RAID configuration. Only pull out a HDD module if the drive is not being accessed. Observe the control LEDs for the corresponding HDD module (see “Hard disk drive control indicator”... -
Page 87: Abbreviations
Abbreviations Alternating Current ANSI American National Standard Institute ASR&R Automatic Server Reconfiguration and Restart BIOS Basic Input-Output System Baseboard Management Controller Cache Coherency Compact Disk CD-ROM Compact Disk-Read Only Memory Cylinder Head Sector CMOS Complementary Metal Oxide Semiconductor Communication Central Processing Unit Direct Current A26361-K879-Z102-3-7619... - Page 88 Abbreviations DIMM Dual Inline Memory Module Dual Inline Package Direct Memory Access Desktop Management Interface Error Checking and Correcting Extended Capabilities Port EEPROM Electrically Erasable Programmable Read-Only Memory ElectroMagnetic Compatibility) Emergency Management Port Enhanced Parallel Port ElectroStatic Discharge Front Panel Controller Field Replaceable Unit Front Side Bus A26361-K879-Z102-3-7619...
- Page 89 Abbreviations Global Array Manager Graphical User Interface Hard Disk Drive Hot-Swap Controller I²C Inter-Integrated Circuit Input/Output Intelligent Chassis Management Identification Integrated Drive Electronics Interrupt Request Line Local Area Network Logical Block Address Liquid Crystal Display Logical Unit Number A26361-K879-Z102-3-7619...
- Page 90 Abbreviations Low-Voltage Differential SCSI Multi Mode Fibre Manually Retention Latch Non Maskable Interrupt NVRAM Non Volatile Random Access Memory Operating System Peripheral Component Interconnect Prefailure Detection and Analysing POST Power ON Self Test RAID Redundant Arrays of Independent Disks Random Access Memory Read-Only Memory Remote Service Board Real Time Clock...
- Page 91 Abbreviations RTDS Remote Test- und Diagnose-System SAF-TE SCSI Accessed Fault-Tolerance Enclosures Single Bit Error Single Connector Attachment SCSI Small Computer System Interface Sensor Data Record SDRAM Synchronous Dynamic Random Access Memory System Event Log System Management Interrupt System Setup Utility SVGA Super Video Graphics Adapter Universal Serial Bus...
-
Page 93: Related Publications
Technical Manual 19 inch rack Technical Manual ServerView Server Management User Manual RemoteView User Manual RemoteView Service Board Installation Guide System Board D1501 Technical Manual [10] D1501 Setup Utility for PRIMERGY TX150 Reference Manual [11] Adaptec HostRAID User’s Guide A26361-K879-Z102-3-7619... -
Page 95: Index
Index devices acclimatization time 23, 77 connecting to the server 47 articulated cable carrier 39 disconnecting fixing 40 cables 51 articulated cable guide 34, 38 disposal, of devices 21 ASR&R 4 drive availability 4 "dead" 71 defective 71 indicators 57 BIOS dummy module security functions 65... - Page 96 Index ESD-sensitive devices 16 handling 76 external devices hard disk drive 77 connecting 51 hot-swap 80 installing/removing 77 height units 33, 36, 38 fault HostRAID 62, 63 display drifts 69 RAID functionality 3 screen dark 69 hot-plug system does not boot 70 power supply unit 49 FCC statement 17 hot-swap...
- Page 97 Index mouse 47 mains voltage parallel port 47 connecting the server 49 serial port 47 meaning of the symbols 6 USB 47, 55 model rating plate 24 power supply monitor redundant 49 display drifts 69 power supply unit flickering 69 adding 75 no display on screen 69 dummy unit 75...
- Page 98 Index security functions 1 serial port 47 setup password 65 setting up 25, 53 system password 65 standards 7 unauthorized access 66 switches itself off (error) 68 server switching OFF 61 configuring 62 switching ON 61 connecting external devices 47 technical data 6 connecting mains voltage 49 transport 18...
- Page 99 Index take-back, of devices 21 target group 1 technical data 6 telescopic rail 34, 37, 39, 44 plugwasher 33, 36 time, wrong 70 transport damage 24 troubleshooting, server 67 unauthorized access 66 unpacking server 24 ventilation clearance 7 weight 7 Zero Channel RAID controller (ZCR) 3 A26361-K879-Z102-3-7619...
- Page 101 Comments Suggestions Corrections Fax: (++49) 700 / 372 00000 Comments on PRIMERGY TX150 Server System A26361-K879-Z102-3-7619...
- Page 103 Comments Suggestions Corrections Fax: (++49) 700 / 372 00000 Comments on PRIMERGY TX150 Server System A26361-K879-Z102-3-7619...
- Page 105 Information on this document On April 1, 2009, Fujitsu became the sole owner of Fujitsu Siemens Compu- ters. This new subsidiary of Fujitsu has been renamed Fujitsu Technology So- lutions. This document from the document archive refers to a product version which was released a considerable time ago or which is no longer marketed.
Need help?
Do you have a question about the PRIMERGY TX150 and is the answer not in the manual?
Questions and answers