Table of Contents
Advertisement
Quick Links
Page 1
READ THE
SAFETY NOTE
Page 7
CHECKING
THE CONTENTS
OF THE CARTON
OWNER'S MANUAL
Thank you for purchasing this FUJIFILM product.
This manual explains how to use your FUJIFILM Printpix Digital Photo Printer CX-400.
Before using your printer, thoroughly read the "OWNER'S MANUAL".
After reading, store the "OWNER'S MANUAL" in a safe place.
Page 10
PREPARING
THE PRINTER
FOR USE
Page 15
SELECTING THE
PHOTOGRAPHS
AND PRINTING
BL00141-200(1)
Advertisement
Table of Contents

Related Manuals for FujiFilm Printpix CX-400


Summary of Contents for FujiFilm Printpix CX-400
-
Page 1: Checking The Contents
OWNER’S MANUAL Thank you for purchasing this FUJIFILM product. This manual explains how to use your FUJIFILM Printpix Digital Photo Printer CX-400. Before using your printer, thoroughly read the “OWNER'S MANUAL”. After reading, store the “OWNER’S MANUAL” in a safe place. -
Page 2: Safety Notes
Check page 101 for the print size. Thank you for purchasing this FUJIFILM product. Before using your new product, thoroughly read the “Owner’s Manual” and use the product correctly. After reading the “Owner’s Manual” store it in a safe place. - Page 3 Media. Should Media not meet the are trademarks of Adobe Systems Incorporated of the U.S. I These specifications are subject to change without notice. FUJIFILM shall not be held liable for damages foregoing warranty, FUJIFILM shall replace such defective Media •...
-
Page 4: Table Of Contents
Contents I SAFETY NOTES ......1 I Introduction ....... . 6 Installation on a Windows PC . - Page 5 Feature/System Configuration CHECKING THE CONTENTS OF THE CARTON The CX-400 is equipped with a LCD (liquid crystal) monitor. By merely operating the printer in accordance with the If there are any missing or damaged parts, please contact your dealer. directions displayed on the monitor screen, you can enjoy the following:...
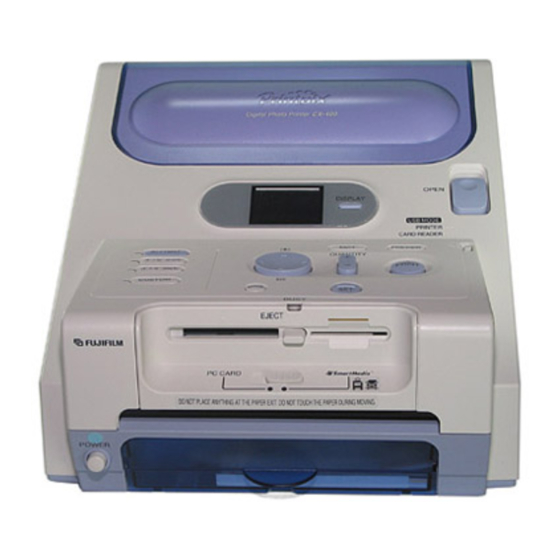
- Page 6 Introduction Introduction Name and Operation of Each Part G [ID PRINT] button G Direction buttons: ab d c G [EDIT] button G Paper holder slot Press to switch print to [ID Press to perform the photo Use to select the menu and picture The paper holder fits here.
-
Page 7: Try To Print
Try to print! Try to print! PREPARING THE PRINTER FOR USE Installing the printer Use the printer after checking the accessories (→P. 7). Install the printer. Set the printer on a flat, wide surface. Note • Place the printer far enough from a wall so that the ventilation holes are not blocked. -
Page 8: Load The Printing Paper
Place the roll type paper onto the paper holder before loading the paper into the printer. Insert the memory card after turning on the printer power. The CX-400 can print the data of The printer automatically recognizes the type of paper. -
Page 9: Loading A Pc Card
• When there is DPOF data, ALL FRAMES: • Microdrive only PC card adapter (IBM, MELCO, FUJIFILM) pictures are printed in • PC card adapter MSAC PC2 for memory stick (SONY) The pictures on the memory card are displayed on accordance with the DPOF •... - Page 10 Try to print! Try to print! AT THE END OF PRINTING Removing and storing the printing paper. Removing the memory card Press the [EJECT] button and remove the Grasp the paper holder knobs with both hands memory card. and remove the holder from the printer. Remove the paper holder after gently pushing it Note to the back.
-
Page 11: Enjoy Various Printing
Enjoy various printing! Enjoy various printing! DISPLAY OF PICTURE SWITCHING/PRINT SIZE SETTING This section introduces the Display of picture switching function. Enjoy printing of various sizes using this printer. Switching the display of picture The set print mode window is displayed. Use ab to select “SIZE”, and press the [SET] Select When the [DISPLAY] button is pressed, the... -
Page 12: All Frames Print
Enjoy various printing! Enjoy various printing! ALL FRAMES PRINT Print setting Setting print sets The picture (9 frame) is displayed. Use abd c Load the paper and memory card into the printer, and press the [CUSTOM] button at the to select the picture in the memory card. top of the printer. -
Page 13: Multiple Print
Enjoy various printing! Enjoy various printing! MULTIPLE PRINT The following steps vary depending on the picture Multiple print prints the preferred number of frames (2UP, 4UP, 9UP, 16UP, 25UP) on one sheet of arrangement type. paper. When the print size is [3” × 4” Size], only 2UP and 4UP multiple printing are possible. SAME: Prints the same picture at all frames (Page 23). -
Page 14: Multiple Print (Random Picture - Each Frame)
Enjoy various printing! Enjoy various printing! e e e e e e MULTIPLE PRINT (➔P. 22) continued MULTIPLE PRINT (➔P. 22) continued Multiple print (random picture - each frame) Multiple print (random picture - layout) T I P T I P At the “SETTINGS FOR MULTIPLE”... -
Page 15: Multiple Print (Random Picture - All Frames)
Enjoy various printing! Enjoy various printing! INDEX PRINT e e e MULTIPLE PRINT (➔P. 22) continued Index print prints the pictures of 25 frames on one sheet of paper. It is very convenient in checking the pictures on the memory card. Print size is [4” × 6” Size]. Multiple print (random picture - all frames) Setting index print At the “SETTINGS FOR MULTIPLE”... -
Page 16: Index Print (All Frames)
Enjoy various printing! Enjoy various printing! e e e e e e INDEX PRINT (➔P. 27) continued INDEX PRINT (➔P. 27) continued Index print (all frames) Index print (set range) T I P At the “SETTING FOR INDEX” window, use ab At the “SETTING FOR INDEX”... -
Page 17: Id Print
Enjoy various printing! Enjoy various printing! ID PRINT Prints up to 24 frames of the picture of the chosen size on one sheet of paper. Setting ID print T I P Load the paper and memory card into the If the preview contents are correct, press the •... -
Page 18: Id Settings
Enjoy various printing! Enjoy various printing! ID SETTINGS ID print frame size and number of frames can be freely selected and registered. The registered settings are saved even when the printer power is turned off. ID settings Set number of frame Load the paper and insert the memory card into Set the number of frames. -
Page 19: Dpof Print
Enjoy various printing! Enjoy various printing! DPOF PRINT EDIT/PRINT QUALITY DPOF print prints according to the DPOF information on the memory card. DPOF print can be Enjoy picture finishing using such functions as “ZOOM/MOVE” that magnifies the picture, performed by loading the paper and a memory card containing DPOF data. “ROTATION”... -
Page 20: Print Quality
Enjoy various printing! Enjoy various printing! Rotation Cancel edit This function returns the selected picture to its state before editing. The “ROTATION” window is displayed. Use d c to adjust the picture angle. Execute format processing at the “EDIT/PRINT QUALITY” window. d : Rotates the picture 90 degrees to the left Use ab to select “CANCEL EDIT”, and press (counterclockwise). -
Page 21: Other Print Settings
Enjoy various printing! Enjoy various printing! OTHER PRINT SETTINGS Pictures can be printed by setting [Print size], [Set border], and other items, as preferred. Print settings Set data print Use ab to select the desired setting. Load the paper and memory card into the printer and press the [CUSTOM] button at the top of the Note printer. - Page 22 Other methods of use Other methods of use OTHERS SETTINGS STARTUP MODE, LANGUAGE, VARIOUS SETTINGS and etc. can be set. Refer page 10 regarding how to set LANGUAGE. Various settings such as “AUTO QUALITY ADJUSTMENT” and “SLIDE SHOW” can be made. Make these settings before printing.
-
Page 23: Image Display Order
Other methods of use Other methods of use Image display order LCD monitor brightness adjustment Sets the order in which the picture data is displayed when a memory card was loaded into the printer. Adjusts the brightness of the LCD monitor. T I P T I P Use ab to select the desired setting. - Page 24 [POWER] button. • When printing is not clean even when head cleaning is — executed, contact your FUJIFILM dealer. while printing. After paper is ejected after the mechanism of the printer is formatted, turn off the power.
-
Page 25: When An Error Is Displayed On The Lcd Monitor
• If the printer still remains in this state, contact your FUJIFILM dealer. • Paper is not loaded. • Edge of paper is not aligned. • Load the paper correctly. -
Page 26: When Data Is Displayed On The Lcd Monitor
When trouble occurs When trouble occurs WHEN DATA IS DISPLAYED ON THE LCD MONITOR See when a window with or the “Select item” window was displayed. Symptom Cause Remedy Symptom Cause Remedy To perform the print mode change, select Since an attempt was made to change the Paper was cut because printing was Wait a while and operation will advance to “YES”... -
Page 27: Definition Of Terms
When trouble occurs When trouble occurs Definition of terms G DCF G Motion JPEG Short for Design rule for Camera file system, standard Motion JPEG is a file format AVI (Audio Video Interleave) format established by the Japan Electronics and Information Technology for handling both pictures and audio with one file. - Page 28 FinePixViewer installation USB Mass Storage Driver and Exif Launcher are also installed simultaneously Printer driver Page 59 Page 82 The CX-400 can be connected to a PC and used as a printer. USB printer driver installation Acrobat Reader ® Page 60 Page 83 Software for reading PDF format documents using a PC.
-
Page 29: Glossary Of Terms
Using with a PC Using with a PC GLOSSARY OF TERMS This section explains the minimum basic operations you must be familiar with in order to use your PC (personal computer), along with an introduction to some other operations that will help you to use your PC more efficiently. -
Page 30: Installation On A Windows Pc
• Operation is not guaranteed on home-built computers or on computers running updated operating system software. • Only one CX-400 can be connected to one PC. • Two or more FUJIFILM printers cannot be connected simultaneously. Disconnect the USB cable of the printer you do not want to use. (FUJIFILM printers: NX-700/NX-500/NX-800M) -
Page 31: Load The Cd-Rom Into Your Pc
Installation on a Windows PC Installation on a Windows PC LOAD THE CD-ROM INTO YOUR PC FROM FinePixViewer INSTALLATION TO RESTART The Setup screen appears. Click the [Installation of FinePixViewer] button. Do not connect the printer to your PC until the ✽... -
Page 32: Install The Printer Driver
Install QuickTime as directed by the on-screen instructions. Enter “Printer name”. Check that “Printer name” is “FUJIFILM CX-400” ✽ If QuickTime version 5.0 or later has already been installed, this installation is not performed. and then click the [OK] button to start installation. -
Page 33: Windows Xp
Installation on a Windows PC Installation on a Windows PC CONNECTING THE PRINTER AS A CARD READER A Mass Storage Driver is installed when “FinePixViewer” is installed. Check that the printer is connected as a card reader and the USB Mass Storage Driver was installed correctly. Windows XP Note •... - Page 34 Click the “Unplug or Eject Hardware” icon in the taskbar, click “Safely remove FujiFilm FinePix drive icon and name change Digital Camera” and then click the [Close] button of the “Safe To Remove Hardware” help to the “FinePix”...
-
Page 35: Printing From Windows
The Adobe Systems ' Acrobat Reader software must be installed to read the FinePixViewer User's Guide (PDF). If the latest version is already installed, this step is not required. Check that “Name” is “FUJIFILM CX-400” and then click the [Properties] button. The “FUJIFILM CX-400 Properties” dialog box appears. - Page 36 Printing from Windows Printing from Windows Set the printing information (Paper Size, Layout, Multiple Print, Border, Quantity). Adjust the picture quality. q Click the [Paper] tab. q Click the [Adjustment] tab. w Paper Size: Select the size of the paper. w Automatic print quality adjustment: To adjust picture quality automatically, click “Enable”.
-
Page 37: Uninstalling The Software
Click FinePixViewer Ver.3.0 Click the [Yes] button. Click the [OK] button. <To remove the USB Mass Storage Driver> FUJIFILM USB Driver Select Click When the confirmation message appears, click the [OK] button. Check your selection carefully since the process cannot be cancelled once you click the [OK] button. -
Page 38: Troubleshooting (Windows)
Troubleshooting (Windows) Troubleshooting (Windows) TROUBLESHOOTING TABLE INSTALLATION PROBLEMS If the software does not operate correctly, check that you are using the correct hardware and software (→ P. 57). If the problem persists even though you are using the correct hardware and software, refer to the table below and then see the reference page listed for your problem. -
Page 39: Printer Problems
USB cable to the printer (→P. 61, 62). of how to enable the USB functions. Manager] button. Is the printer that is to do the printing Select the printer name “FUJIFILM CX-400” selected? (→P. 67). Is the printer name “FUJIFILM CX-400”? I I want to print from an application other than FinePixViewer. -
Page 40: Memory Card Problems
I When the “Removable disk” icon is double-clicked, a “Cannot access Manuals supplied with your PC for details drive. The device is not ready.” warning appears. of how to enable the USB functions. • When “FUJIFILM USB Printer Device” is Check Solution not displayed, the USB driver (printer) was not installed correctly. -
Page 41: Application Problems
Troubleshooting (Windows) Troubleshooting (Windows) APPLICATION PROBLEMS INTERNET PROBLEMS I FinePixViewer automatic startup is slow. I I cannot log in to the “FinePix Internet Service”. Check Solution Check Solution Are there too many resident applications? Click the [Start] button and select Is Internet connection possible? Check the PC environment. -
Page 42: Installation On A Mac Os
• When an additional USB interface board is used, operation is not guaranteed. • Only one CX-400 can be connected to one PC. • Two or more FUJIFILM printers cannot be connected simultaneously. Disconnect the USB cable of the printer you do not want to use. (FUJIFILM printers: NX-700/NX-500/NX-800M) -
Page 43: From Finepixviewer Installation To Restart
Installation on a Mac OS Installation on a Mac OS FROM FinePixViewer INSTALLATION TO RESTART When the enclosed CD-ROM is loaded into the Install QuickTime as directed by the on-screen instructions and then restart your Macintosh. ✽ If you have already installed QuickTime version 5.0 or later, this installation is not performed. CD-ROM drive, the “Printpix”... - Page 44 Installation on a Mac OS Installation on a Mac OS CONNECTING THE PRINTER AS A CARD READER Connect the printer as a card reader and check that the USB Mass Storage Driver was installed correctly. The Mass Storage Driver is installed at “FinePixViewer” installation. Note When installation is completed, the message •...
- Page 45 Installation on a Mac OS Installation on a Mac OS DISCONNECTING THE CARD READER Acrobat Reader INSTALLATION To disconnect the printer from the Macintosh, follow the procedure below. Adobe Systems' Acrobat Reader software must be installed to read the FinePixViewer User's Guide (PDF).
-
Page 46: Printing From The Macintosh
This completes printer setting. Click Note Select • If the “CX-400” icon does not appear at the right-hand side of Click Select the “Chooser” screen even when the “CX-400” icon is clicked, the Macintosh and printer are not connected. Close the “Chooser”... -
Page 47: Uninstalling The Software
Printing from the Macintosh Uninstalling the software UNINSTALLING THE SOFTWARE Only perform this operation when you no longer require the installed software or when the software was installed incorrectly. Uninstalling Mass Storage Driver I Manual adjustment Click Move and set the bar of each item. The picture at the top right-hand side of the screen Check that the printer power is off. -
Page 48: Uninstalling Printer Driver
Uninstalling printer driver Type Problem This operation uninstall CX-400 printer driver which was installed through “FROM PRINTER DRIVER INSTALLATION TO RESTART” procedure (P. 83). Installation problems When the printer was connected to the Macintosh, the “Required software was not found”... -
Page 49: Memory Card Problems
USB cable? connected to the printer and the other end Is the picture to be printed selected? Select CX-400 as the printer (→P. 88). is connected to the Macintosh. Is the CX-400 selected in the Chooser? Is the [USB MODE] switch in the [CARD... -
Page 50: Application Problems
Troubleshooting (Macintosh) Troubleshooting (Macintosh) INTERNET PROBLEMS I A warning message appears when the memory card was removed or the I I cannot log in to the “FinePix Internet Service”. USB cable was disconnected from the printer. Check Solution Check Solution Can you connect to the Internet? Check the Macintosh environment. -
Page 51: Specifications
• Exif Ver 2.2 is a picture standard that substantially expands the functions of the original Exif. However, Exif compatible machines may limit the functions. • SmartMedia (64 MB) formatted by the following FUJIFILM digital cameras cannot be used. FinePix 700, FinePix 500, CLIP-IT-50, DS-250HD (For compatibility of other makes of digital cameras, please contact the camera manufacturer.) -
Page 52: Print Size
100 mm × 74 mm 3” × 4” Size Product Name: FUJIFILM Digital Photo Printer Printpix CX-400 (3.9 in. × 2.9 in.) Manufacturer’s Name: Fuji Photo Film Co., Ltd. Manufacturer’s Address: 26-30, Nishiazabu 2-chome, Minato-ku, Tokyo 106 - 8620, Japan 100 mm ×... - Page 53 26 - 30, Nishiazabu 2 - chome, Minato - ku, Tokyo 106 - 8620, Japan Printed on recycled paper. FGS - 204106 - FG Printed in Japan...
Need help?
Do you have a question about the Printpix CX-400 and is the answer not in the manual?
Questions and answers