Table of Contents
Advertisement
Quick Links
Advertisement
Table of Contents

Related Manuals for Tadiran Telecom T49G


Summary of Contents for Tadiran Telecom T49G
- Page 1 Tadiran T49G IP Phone User Guide Aeonix Version 2.5 Document Edition 1.0...
- Page 2 No parts of this publication may be subject to alteration, modification or commercial use. Tadiran Telecom (TTL), L.P . will not be liable for any damages arising from use of an illegally modified or altered publication.
- Page 3 WEEE separately. GNU GPL Information Tadiran T49G IP phone firmware contains third-party software under the GNU General Public License (GPL). Tadiran uses software under the specific terms of the GPL. Please refer to the GPL for the exact terms and...
-
Page 4: About This Guide
User Guide for T49G IP Phone About This Guide Thank you for choosing the T49G IP phone, an ultra-elegant gigabit IP phone which is exquisitely designed to provide business telephony features, such as Call Hold, Call Transfer, Busy Lamp Field, Call Recording, Multicast Paging and Conference over an IP network. -
Page 5: Table Of Contents
Table of Contents Table of Contents About This Guide ..............iv Table of Contents ..............v Overview .................. 7 Hardware Component Descriptions .................. 7 Icon Descriptions ........................ 10 LED Descriptions ......................... 15 User Interfaces ........................16 Phone User Interface ...................... 16 Web User Interface ...................... - Page 6 User Guide for T49G IP Phone Customizing Your Phone ............37 General Settings ........................ 38 Wallpaper ........................38 Audio Settings ........................40 Volume ..........................40 Ring Tones ........................41 System Customizations ...................... 44 Headset Use ........................44 External Monitor ......................44 Bluetooth Headset ......................
-
Page 7: Overview
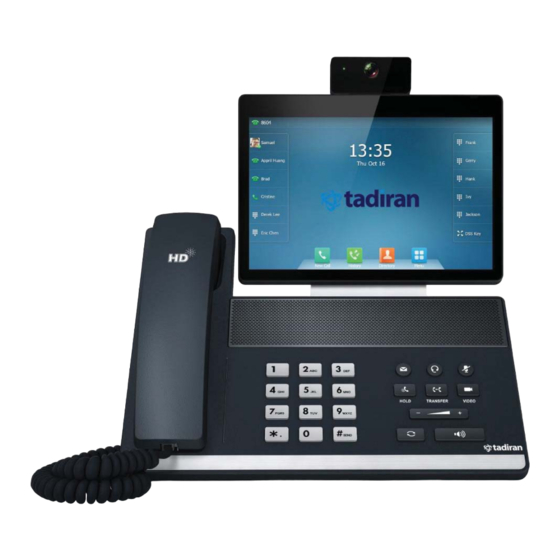
User Interfaces Documentation If you require additional information or assistance with your new phone, contact your system administrator. Hardware Component Descriptions The main hardware components of the T49G IP phone are the touch screen and the keypad. - Page 8 User Guide for T49G IP Phone Hardware component instructions of the T49G IP phone are: Item Description Provides near-site video. The better distance between ① Camera camera and images you want to capture should be in the range of 0.35 meters (1 feet) to 2 meters (6 feet).
- Page 9 Overview Item Description Mutes audio transmission locally during calls and ⑥ MUTE Key conferences. The key LED illuminates solid red when the call is muted. • Allows you to preview near-site video when the phone is idle. VIDEO Key ⑦ •...
-
Page 10: Icon Descriptions
User Guide for T49G IP Phone Icon Descriptions Icons appearing on the touch screen are described in the following table: Icons Description Wired network is unavailable The private line registers successfully Register failed Registering (Flashing) The shared line registers successfully... - Page 11 Overview Icons Description Phone Lock Received Calls Placed Calls Missed Calls Forwarded Calls Recording box is full A call cannot be recorded Recording starts successfully Recording cannot be started Recording cannot be stopped Bluetooth mode is on Bluetooth headset is both paired and connected Bluetooth-Enabled mobile phone is both paired and connected The default caller photo and contact icon...
- Page 12 User Guide for T49G IP Phone Icons Description The USB flash drive is detected DSS Key External monitor is connected The icons of DSS key appearing on the touch screen are described in the following table: Icons Description ACD (Log into the ACD system)
- Page 13 Overview Icons Description Forward Transfer Hold ReCall Record/URL Record Record/URL Record (Recording starts successfully) Multicast Paging Group Listening Paging List Hot Desking Zero Touch Phone Lock Directory Speed Dial Mobile Line (Bluetooth-Enabled mobile phone is both paired and connected) Mobile Line (Bluetooth-Enabled mobile phone fails to connect) Mobile Line (Bluetooth-Enabled mobile phone is connecting)
- Page 14 User Guide for T49G IP Phone Icon indicator (associated with BLF/BLF List) Icons Description BLF List BLF/BLF list ringing state (Flashing) BLF/BLF list calling state (Flashing) BLF/BLF list hold state BLF/BLF list call park state BLF/BLF List failed state Icon indicator (associated with a shared line) The local SCA phone indicates the phone is involved in an SCA call, while the monitoring SCA phone indicates the phone is not involved in the SCA call.
-
Page 15: Led Descriptions
Overview Icon Description (for monitoring SCA phone) The shared line conversation is barged in by the other shared line party. For a multi-party call, all the shared line parties participating in this call place the shared line conversation on hold. LED Descriptions Power Indicator LED LED Status... -
Page 16: User Interfaces
LED is configurable via web user interface. For more information, refer to Tadiran_SIP-T2_Series_T19(P) E2_T4_Series_CP860_IP_Phones_Administrator_Guide User Interfaces Two ways to customize configurations of your T49G IP phone: The user interface on the IP phone. The user interface in a web browser on your PC. -
Page 17: Web User Interface
The main options you can use to customize the IP phone via phone user interface and/or via web user interface are listed in the following table: Documentation The following table shows documentations available for the T49G IP phone. Name Contents... -
Page 18: Getting Started
User Guide for T49G IP Phone Getting Started This chapter provides the following basic installation instructions and information for obtaining the best performance with the T49G IP phone. Topics include: Packaging Contents Note Phone Installation Network Connection ... - Page 19 Getting Started Handset & Handset Cord Camera Ethernet Cable Quick Start Guide ...
-
Page 20: Optional Accessories
Note The T49G IP phone’s HDMI port does not supply power. When connecting the HDMI port to a VGA monitor via an HDMI-to-VGA converter cable, use a cable that requires an external power connection such as a USB power connection, or proprietary power supply. -
Page 21: Phone Installation
Getting Started Phone Installation If your phone is already installed, proceed to Phone Initialization on page 24. This section introduces how to install the phone: Attach the stand Insert the camera Connect the handset and optional headset Connect the AC power Connect the optional USB flash drive Connect the optional external monitor Attach the stand... - Page 22 User Guide for T49G IP Phone Connect the AC power Connect the DC plug on the power adapter to the DC12V port on the phone and connect the other end of the power adapter into an electrical power outlet. Important! Do not remove power to the phone while it is updating firmware and Note configurations.
-
Page 23: Network Connection
Contact your reseller to purchase it Tadiran Extended Display Accessories Quick separately. For more information, refer to Installation Guide for T49G Network Connection You have two options for network connection. You can select one of them according to the current office environment. -
Page 24: Connecting To The Wired Network
Connecting to the Wireless Network Tadiran T49G IP phone supports Wi-Fi feature. You can connect your phone to a wireless network. The wireless network is more convenient and cost-effective than wired network. The PC port is not supported in wireless network. For more information on how to... -
Page 25: Registration
Getting Started DHCP (Dynamic Host Configuration Protocol) The phone attempts to contact a DHCP server in your network to obtain valid IPv4 network settings (e.g., IP address, subnet mask, default gateway address and DNS address) by default. Note contact your Aeonix system administrator If your network does not use DHCP , Registration Generally, your phone will be deployed with multiple other phones. - Page 26 User Guide for T49G IP Phone Name Description bar. For more information, refer to Icon on page 10. The label of the default account is displayed on Default Account the left of the status bar. The idle screen displays line keys 1-11. The line keys 1-6 on the left and the line keys 7-11 on the right can be used to activate up to 11 lines.
-
Page 27: Configuration Screen Display
Getting Started Configuration Screen Display Name Description Title Area Displays the title of the current menu screen. Default Account Displays the label of the default account. Displays various operation options for Operation Option Area different menu screens. Displays menu items. Menu Tree Area Tap the desired menu item to enter the corresponding configuration screen. -
Page 28: Video Call Screen Display
User Guide for T49G IP Phone Video Call Screen Display Name Description The phone’s time and date are displayed on Time and Date the right of the status bar. The video call screen displays line keys 1-11. The line keys 1-6 on the left and the line keys 7-11 on the right can be used to activate up to 11 lines. -
Page 29: Video Call Full-Screen Display (Both Far- And Near-Site Videos Exist)
Getting Started Name Description Displays the active call. During a video call, the active call window can display the near site and the far site. Active Call Window By default, a small window (near site) is located on the top-right of the touch screen, and a larger window (far site) is centered in the middle of the touch screen. -
Page 30: Navigating Menus And Fields
User Guide for T49G IP Phone Name Description Shows the information (name or number) of Far-Site Information the far site by default. Exits the full-screen display. Navigating Menus and Fields To navigate menus and fields, you can: Tap corresponding keys on the touch screen. -
Page 31: Control Center/Notification Center
Getting Started Gesture Action Tap and hold, then move. To stop scrolling, stop the Drag dragging motion. Touch the screen with two or more fingers, and then move Pinch Open the fingers away from each other (stretch). Touch the screen with two or more fingers, and then move Pinch Close the fingers towards each other (pinch). -
Page 32: Entering Data And Editing Fields
Before using the onscreen keyboard to enter data, you need to know the function of the keys on the onscreen keyboard. By default, the T49G IP phone supports English and Russia onscreen keyboard. The following takes English keyboard as an example:... - Page 33 Getting Started Item Description Space Key Enter spaces. Left and Right Arrow Position the cursor. Keys Four Special Characters Enter special characters. Hide the onscreen keyboard. When you tap , the onscreen keyboard is shown as below: Item Description Special Characters Enter special characters.
- Page 34 User Guide for T49G IP Phone If you want to Action characters in uppercase/lowercase mode. (Optional.) Tap to switch between English and Russia keyboard. Tap the character(s) you want to enter. If a keyboard with numbers does not display, tap or drag Enter numbers.
-
Page 35: Using The Phone Keypad
Getting Started The original onscreen keyboard key only provide one character, you can configure a custom keyboard Ime file to make the key provide more characters. Contact your administrator for more information. cannot be entered until you release your finger from the key. character to hide the onscreen keyboard. - Page 36 User Guide for T49G IP Phone If you want to Action lowercase (abc) input mode, it will provide the space character. If it is the numeric (123) or alphanumeric (2aB) input mode, it will only provide the digit 0. key: It only provides the pound character #.
-
Page 37: Customizing Your Phone
Customizing Your Phone Customizing Your Phone You can customize your T49G IP phone by personally configuring certain settings, for example, wallpaper, time & date and ring tones. You can add contacts to the phone’s local directory manually or from call history. You can also personalize different ring tones for different callers. -
Page 38: General Settings
General Settings Wallpaper You can customize the wallpaper of the T49G IP phone, and can change the wallpaper image via phone user interface or web user interface. You can also upload custom wallpaper images via web user interface or using a USB flash drive. - Page 39 Customizing Your Phone - Tap the Wallpaper field, and then select the desired wallpaper. Tap the Save soft key to accept the change or to cancel. Setting Wallpaper by Using USB Flash Drive You can set a picture stored in your USB flash drive as the wallpaper. Before setting the picture in your USB flash drive as the wallpaper, ensure that the picture is in the USB flash drive, and the USB flash drive is connected to your phone.
-
Page 40: Audio Settings
Wallpaper. Note The T49G IP phone screen size is 1280*800 pixels. If the size of the custom wallpaper doesn’t meet the IP phone screen size, the wallpaper will be stretched or/and zoomed out according to the IP phone screen size. -
Page 41: Ring Tones
Customizing Your Phone To adjust the volume when the phone is idle: Press to adjust the ringer volume. Note If the ringer volume is adjusted to minimum, the icon will appear on the touch screen. To adjust the volume when the phone is during a call: Press to adjust the volume of currently engaged audio device (handset, speakerphone or headset). - Page 42 User Guide for T49G IP Phone To select a ring tone for the phone via phone user interface: ->Basic->Sound->Ring Tones->Common. Tap the desired ring tone. Tap the Save soft key to accept the change or to cancel. A ring tone for the phone is configurable via web user interface at the path Settings->Preference->Ring Type.
- Page 43 Customizing Your Phone Account->Basic->Ring Type.
-
Page 44: System Customizations
User Guide for T49G IP Phone System Customizations Headset Use If you want to use a wired headset, physically connect your headset and activate the headset mode for use. For more information on physically connecting a headset, refer Note Phone Installation on page 20. - Page 45 Before using the external monitor, ensure that the external monitor has been connected to your phone. For more information, refer to Note Phone Installation on page 20. T49G IP phone supports the following video resolutions on both IP phone and external monitor: Resolution Scenario Receive...
- Page 46 User Guide for T49G IP Phone Note If you connect the external monitor, but disable the EXT Display, the external monitor will not display the content on the phone but a Tadiran logo. To disable the external monitor via phone user interface, do one of the following: Disconnect the monitor.
-
Page 47: Bluetooth Headset
Customizing Your Phone Bluetooth Headset The T49G IP phone supports Bluetooth. Bluetooth enables low-bandwidth wireless connections within a range of 10 meters (32 feet). The best performance is in the 1 to 2 meter (3 to 6 feet) range. You can activate/deactivate the Bluetooth mode, and then pair and connect the Bluetooth headset with your phone. - Page 48 User Guide for T49G IP Phone The touch screen displays the Bluetooth device information (device name and MAC address). You can also swipe down from the top of the screen to enter the control center, and toggle Bluetooth on. Pairing and Connecting the Bluetooth Headset Before you pair a Bluetooth headset, check the indicator on the Bluetooth headset to make sure that the Bluetooth headset is discoverable.
- Page 49 Customizing Your Phone Tap the found Bluetooth device to connect the Bluetooth headset to your phone. Enter the PIN in the prompted PIN field. The default PIN is “0000”. Tap OK. The touch screen displays “Connect Success.”.
- Page 50 User Guide for T49G IP Phone The Bluetooth icon appears on the status bar of the touch screen. With the Bluetooth headset paired and connected, you can use the Bluetooth headset to place and answer calls. For more information, refer to the documentation from the Bluetooth headset manufacturer.
- Page 51 Customizing Your Phone Disconnecting the Bluetooth Headset To disconnect your Bluetooth headset from your phone: ->Basic->Bluetooth. Tap the connected Bluetooth headset. The Bluetooth headset is disconnected. To connect it to your phone again, tap the Bluetooth headset again. Deleting the Paired Bluetooth Headset You can delete your Bluetooth headset from your phone.
- Page 52 User Guide for T49G IP Phone The touch screen displays the paired and connected Bluetooth headset. after the desired Bluetooth headset name. Tap Delete in the pop-up dialog box. The touch screen prompts the following warning “Delete selected item?”. Tap OK to confirm the deletion or Cancel to cancel.
-
Page 53: Bluetooth-Enabled Mobile Phone
Bluetooth mode is configurable via web user interface at the path Features->Bluetooth. Bluetooth-Enabled Mobile Phone Tadiran T49G IP phone supports the use of your IP phone in conjunction with Bluetooth-enabled mobile phone. You can do the following: Pair and connect your IP phone with a Bluetooth-enabled mobile phone to make and receive mobile calls. - Page 54 User Guide for T49G IP Phone automatically find an available line key and assign the line key for Mobile Line. The Mobile Line key’s default label is “My Mobile”. If there is no available line key, you may assign it manually.
- Page 55 Customizing Your Phone Tap OK on both mobile phone and IP phone. Then the IP phone will prompt “Would you like to sync phone contacts temporarily?”. (Optional.) Tap OK to enable the mobile contacts sync feature and the IP phone will sync the mobile contacts temporarily, or tap Cancel to disable mobile contacts sync feature and the IP phone will not sync the mobile contacts.
- Page 56 User Guide for T49G IP Phone The touch screen displays “Connect Success.”. The Bluetooth icon will display on the status bar of the touch screen. And the IP phone automatically assigns a Mobile Line key. Before you configure the Mobile Line key, make sure the Bluetooth-Enabled mobile phone is connected.
- Page 57 Customizing Your Phone Making a Mobile Phone Call by Using the IP Phone When you make a mobile phone call by using your IP phone, the IP phone acts as a hands free device for your mobile phone. The call is made through your mobile phone, but the audio is present on and the call control is done by using the IP phone.
- Page 58 User Guide for T49G IP Phone To make a call through a mobile phone: Tap the My Mobile line key. Enter the desired number using the keypad or the soft keyboard on the touch screen. Tap Call from Mobile. The outgoing call information will appear on both your IP phone and mobile phone screen.
-
Page 59: Dss Keys
Tap the Reject soft key to reject the call. DSS Keys There are two types of DSS keys: Line Keys and Programmable Keys. Details will be introduced in the following. The T49G IP phone supports 29 line keys and 7 programmable keys. Line Keys You can assign predefined functionalities to line keys. - Page 60 User Guide for T49G IP Phone Select the desired key type from the Type field. (Optional.) Select the desired key event type from the Key Type field. (Optional.) Select the desired line from the Account ID field. (Optional.) Enter the string that will appear on the touch screen in the Label field.
- Page 61 Customizing Your Phone The following figure shows an example of label display when the label length feature is set to Default: Programable Key You can customize the soft keys, navigation keys and function keys. To customize programmable keys via the Aeonix Portal: Aeonix Configuration Guide for End Users Refer to for details on how to customize...
-
Page 62: Basic Phone Features
User Guide for T49G IP Phone Basic Phone Features The T49G IP phone is designed to be easily used like a regular phone on a public switched telephone network (PSTN). You can place calls, answer calls, transfer a call to someone else, or conduct a conference call. -
Page 63: Placing Calls
Basic Phone Features Placing Calls You can place a call in one of three ways using your T49G IP phone: Using the handset Using the speakerphone Using the headset You can also dial the number first, and then choose the way you want to speak to the other party. - Page 64 User Guide for T49G IP Phone Press , or tap Send. The # key is configured as a send key by default. You can also set the * key as the send key, or set neither. You can also tap History or Directory to search for an entry or contact after picking up the handset, and then tap the desired entry or contact to place a call.
- Page 65 50 calls at one time. To place multiple calls: You can have more than one call on your T49G IP phone. To place a new call during an active call, do one of the following: Tap the line key.
-
Page 66: Answering Calls
User Guide for T49G IP Phone Answering Calls When you are not in another call, you can answer a call in one of three ways: Using the handset Using the speakerphone Using the headset Note You can reject incoming calls by tapping the Reject soft key to stop the phone from playing ring tone. - Page 67 Basic Phone Features Answering When in Another Call If you have an active call, and an incoming call arrives on the phone. The incoming call information is displayed on the touch screen. Do one of the following: Tap the Answer. Tap the incoming call avatar.
-
Page 68: Ending Calls
User Guide for T49G IP Phone Ending Calls To end a call: Do one of the following: If you are using the handset, tap the EndCall soft key or hang up the handset. If you are using the headset, tap the EndCall soft key. -
Page 69: Changing The Clarity Of Near-Site Video
Scene Mode T49G IP phone provides four scene modes – standard mode, warm color mode, cool color mode and manual mode. You can select one of them to obtain a better video call experience if required. If you select manual mode, you may need to know how to set parameters of camera in advance (e.g., white balance, sharpness and brightness). - Page 70 User Guide for T49G IP Phone Tap the desired item in the pop-up dialog box. Tap the Save soft key. The touch screen will prompt “Save succeeded! Preview the video effect?”. Tap OK to accept the change and preview the video or Cancel to go back to the menu screen.
- Page 71 Basic Phone Features Tap Manual Mode in the pop-up dialog box. Tap the White Balance field. Tap Auto or Manual Mode in the pop-up dialog box. (Optional.) Enter the desired value in the Red Gain and Blue Gain field respectively. Red Gain and Blue Gain fields appear only if White Balance field is set to Manual Mode.
- Page 72 User Guide for T49G IP Phone Brightness - Sets how brightly your video displays. You can set a level between 0 (dimmest) and 100 (brightest). The default level is 50. Contrast Setting - Sets the difference in brightness between the light and dark areas of your video.
-
Page 73: Changing The Video Settings
Basic Phone Features Tap the Reset To Default soft key. The touch screen prompts “Reset to default setting?”. Tap OK to accept the change or Cancel to cancel. Reset Manual Settings is configurable via web user interface at the path Settings->Camera. - Page 74 User Guide for T49G IP Phone Bandwidth or Downlink Bandwidth field respectively. Video Enable – Enables or disables the IP phone to use camera during a call. You can set to Enabled or Disabled. The default value is Enabled. If you set to Disabled, the IP phone can only place/receive an audio-only call.
-
Page 75: Changing The Video Layout During Calls
Basic Phone Features The touch screen will prompt “Save succeeded!”. Video setting is configurable via web user interface at the path Settings->Video. Changing the Video Layout during Calls During video calls, near-site and far-site video images are displayed on the touch screen. - Page 76 User Guide for T49G IP Phone To swap video during a video call via phone user interface: Tap the near-site (small window) video during a video call. The near-site video will display in the center of the touch screen, and the far-site video will display on the top-right of the touch screen.
- Page 77 Basic Phone Features To change the video layout to the same size mode during a video call via phone user interface: From the video call full-screen, pinch close the large window. The following figure shows what the touch screen looks like in the same size mode: You can tap to go to video call screen (refer to Video Call Screen...
- Page 78 User Guide for T49G IP Phone To change the video layout to the full screen mode during a video call via phone user interface: From the video call full-screen, do one of the following: Tap the large window. Pinch open the large window.
- Page 79 Basic Phone Features The following figure shows what the touch screen looks like in full screen mode: You can tap to go to video call screen (refer to Video Call Screen Display) or tap the video area to go back to “one big, other small” layout. To change the video layout during a video conference call via phone user interface: The default screen layout during a video conference call is the same size mode.
-
Page 80: Previewing The Near-Site Video
User Guide for T49G IP Phone The following figure shows what the touch screen looks like in the “one big, other small” layout during a three-way video conference call: Previewing the Near-Site Video You can preview the video of yourself that you display during video calls, and configure the scene mode at the same time. -
Page 81: Redialing Numbers
Basic Phone Features ->Basic->Camera Setting->Scene Mode will be applied. For more information, refer to Scene Mode on page 69. Press or tap Exit Video to return to the idle screen. Note Standard Mode The soft keys ( and Exit Video) are hidden after they display 5 seconds, unless you tap the touch screen. -
Page 82: Call Hold/Resume
User Guide for T49G IP Phone The touch screen indicates that the call is muted. The mute key LED illuminates solid red when the call is muted. The following shows an audio-only call has been muted: The following shows a video call has been muted:... - Page 83 Basic Phone Features To place a call on hold: Press or tap the Hold soft key during a call. The following shows an audio-only call has been held: The following shows a video call has been hold: The phone will beep softly every 30 seconds to remind you that you still have a call on hold.
-
Page 84: Do Not Disturb (Dnd)
User Guide for T49G IP Phone Do Not Disturb (DND) You can use DND to reject incoming calls automatically on the phone. The prompt message "n New Missed Call(s)" ("n" indicates the number of missed calls) will appear on the touch screen, and callers will receive a busy message. All calls you receive while DND is enabled are logged to your missed calls list. - Page 85 Basic Phone Features Tap Transfer to complete the transfer. (The call will automatically dial out in about 5 seconds if you do not tap Transfer.)
-
Page 86: Conference
User Guide for T49G IP Phone Conference You can use the T49G IP phone to create a conference using the phone’s local conference and network conference. During a conference, you can manage each participant. You can mute, hold and remove individual participants in the video call screen. - Page 87 Basic Phone Features Repeat steps 2 to 4 until you have added all intended parties. Note The phone will enter the video call full-screen within 5 seconds during a call, you may tap or blank area at the top or bottom of the screen to see the soft keys. To join calls in a conference: Make sure you have an active call and one or more calls on hold (either on the same line key or a different line key).
- Page 88 User Guide for T49G IP Phone Tap the Hold call to join the calls in the conference. Repeat steps 3, 4 to join more calls in the conference. During the conference call, you can do the following: Press or tap the Hold soft key to place the conference call on hold.
-
Page 89: Capturing Screenshots During A Video Call
Basic Phone Features one can hear the muted party. Tap Remove to remove the party. Tap Cancel or to close the dialog box. Capturing Screenshots during a Video Call You can capture the screenshots during a video call via phone user interface. Before capturing the screenshot, ensure that the USB flash drive has been connected to your phone. - Page 90 User Guide for T49G IP Phone Press The status bar prompts “Screenshot has been saved to the USB device successfully.”. You can view the screenshots that stored in the USB flash drive. For more information, refer to Viewing the Pictures Stored in Your USB Flash Drive on page 91.
-
Page 91: Viewing The Pictures Stored In Your Usb Flash Drive
Basic Phone Features - Tap the desired screenshot to preview, and then tap Delete. The phone prompts “Delete this photo?” Tap OK to accept the change or Cancel to cancel. Viewing the Pictures Stored in Your USB Flash Drive You can view the pictures that are stored in your USB flash drive at any time. You can display your pictures as lists, or display just one picture. - Page 92 User Guide for T49G IP Phone...
- Page 93 Basic Phone Features Tap the desired photo to view. You can do one of the following: Tap Set WallPaper to set the picture as the wallpaper for your phone. For more information, refer to Setting Wallpaper on page 39. Tap Delete to delete the picture. The touch screen prompts “Delete this photo?”.
- Page 94 User Guide for T49G IP Phone...
-
Page 95: Regulatory Notices
Regulatory Notices Regulatory Notices Service Agreements Contact your Tadiran Authorized Reseller for information about service agreements applicable to your product. Limitations of Liability TO THE FULL EXTENT ALLOWED BY LAW, TADIRAN EXCLUDES FOR ITSELFAND ITS SUPPLIERS ANY LIABILITY, WHETHER BASED IN CONTRACT OR TORT (INCLUDING NEGLIGENCE), FOR INCIDENTAL, CONSEQUENTIAL, INDIRECT, SPECIAL, OR PUNITIVE DAMAGES OF ANY KIND, OR FOR LOSS OF REVENUE OR PROFITS, LOSS OF BUSINESS, LOSS OF INFORMATION OR DATA, OR OTHER FINANCIAL LOSS ARISING OUT OF OR IN... - Page 96 User Guide for T49G IP Phone Place the device on a stable and level platform. Please do not place heavy objects on the device in case of damageand deformation caused by the heavy load. Keep at least 10 cm between the device and the closest object for heat ...
-
Page 97: Index
Index Index Hardware Component Instructions Headset Use Headset Mode Activation/Deactivation About This Guide Activating the Bluetooth Mode Answering Calls Audio Settings Icon Instructions Idle Screen Display Basic Phone Features Bluetooth Headset Bluetooth-Enabled Mobile Phone LED Instructions Limitation of Liability Call Mute Line Keys Call Hold/Resume Capturing Screenshots during a Video... - Page 98 User Guide for T49G IP Phone Setting Wallpaper by Using USB Flash Drive Stopping Transmitting Video during a Call System Customizations Table of Contents Touch Screen Display User Interfaces Using the Onscreen Keyboard Using the Phone Keypad Volume Viewing the Pictures Stored in Your USB...
Need help?
Do you have a question about the T49G and is the answer not in the manual?
Questions and answers