
Related Manuals for GDC Standalone IMB SR-1000


Summary of Contents for GDC Standalone IMB SR-1000
- Page 1 INSTALLATION MANUAL FOR SR-1000 STANDALONE INTEGRATED MEDIA BLOCK™ SMS Version 17.0 December 22 , 2022...
-
Page 2: Table Of Contents
Christie Series 2 Projector ..............25 8.5. 3D settings for Series 2 Projectors ............27 9. TIME ZONE SETUP ..................28 10. CONTENT INGEST MANAGEMENT SETUP ..........29 GDC SR-1000 STANDALONE INTEGRATED MEDIA BLOCK™ December 22 , 2022 - 1 - INSTALLATION MANUAL... - Page 3 16.6.2. Audio input/output solution using AIB-2000 (suitable for connection to digital Amplifiers) ....................51 16.6.2.1. Connection Requirements ................52 16.7. Technical Specifications of AIB-2000 Audio IO Box ......54 GDC SR-1000 STANDALONE INTEGRATED MEDIA BLOCK™ December 22 , 2022 - 2 - INSTALLATION MANUAL...
- Page 4 The contents, features and specifications stated in this manual are subject to change without notice due to continuous product development and improvements. In no other event shall GDC Technology Limited be liable for any loss of profit or any other commercial damages, including but not limited to special, consequential, or other damages.
- Page 5 CONTACTS AND OFFICES CONTACTS AND OFFICES Website Contact Us Worldwide Offices 24/7 Support GDC SR-1000 STANDALONE INTEGRATED MEDIA BLOCK™ December 22 , 2022 - 4 - INSTALLATION MANUAL...
-
Page 6: Introduction
In this manual, the SR-1000 Web UI is used to configure the SR-1000. The Dashboard tab of the SR-1000 Web UI is shown below (Refer to Figure 1). Figure 1: Dashboard tab GDC SR-1000 STANDALONE INTEGRATED MEDIA BLOCK™ December 22 , 2022... -
Page 7: Equipment List
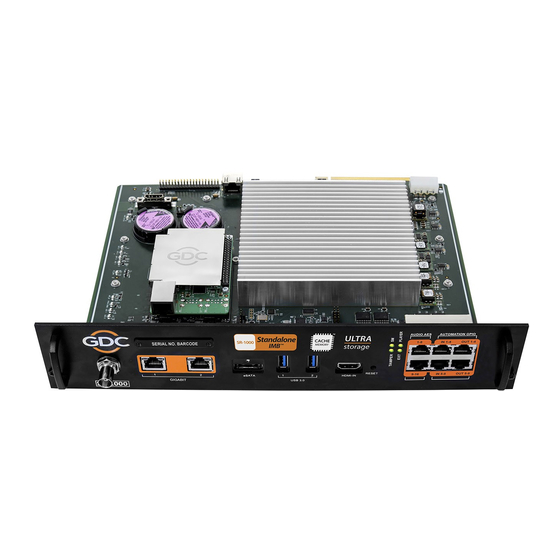
1.INTRODUCTION 1.1. Equipment List This section provides a suggested installation configuration of GDC SR-1000 for reference. Please contact our sales representative to specify the accessories needed for the installation. 1.1.1. SR-1000 IMB Equipment List The SR-1000 packaging includes the components mentioned below:... - Page 8 Table 1: SR-1000 Equipment List Subject to actual configuration. Please specify with our sales representative. Included in packaging for SR-1000 Extreme -24 configuration only. Refer to Section 16.2 for more details regarding this cable. GDC SR-1000 STANDALONE INTEGRATED MEDIA BLOCK™ December 22 , 2022...
-
Page 9: Enterprise Storage Equipment List
Cable Quick Start Guide Table 2: Enterprise Storage Equipment List The number of HDD is subject to change without notice due to ongoing product development and improvement. GDC SR-1000 STANDALONE INTEGRATED MEDIA BLOCK™ December 22 , 2022 - 8 -... -
Page 10: Installing Sr-1000 Into The Projector
This section of the manual describes the physical installation of the SR-1000 into the projector. If the projector does not have the GDC SR-1000 installed, follow the steps below to install the SR- 1000 into the projector. ™... -
Page 11: Remove Existing Interface Board/Placeholders From The Projector
This board must be removed in order to install the SR-1000, as shown in Figure 4. Figure 3: Remove interface board from Barco Projector Figure 4: SR-1000 Placement on Barco Projector GDC SR-1000 STANDALONE INTEGRATED MEDIA BLOCK™ December 22 , 2022... -
Page 12: Christie Projector Placement
IMB enclosure. Please refer to the respective projector manuals for more details on preparing the projector for SR-1000 installation. GDC SR-1000 STANDALONE INTEGRATED MEDIA BLOCK™ December 22 , 2022 - 11 -... -
Page 13: Installing The Sr-1000 Into The Projector
Connect the provided Cat 5e LAN cable from the SR-1000 Gigabit 2 network port to cinema network. Please see Section 6 for IP network instructions after the SR-1000 is installed. GDC SR-1000 STANDALONE INTEGRATED MEDIA BLOCK™ December 22 , 2022... -
Page 14: Connecting Portable Storage/Enterprise Storage With The Sr-1000
3.CONNECTING PORTABLE STORAGE/ENTERPRISE STORAGE WITH THE SR-1000 3. CONNECTING PORTABLE STORAGE/ENTERPRISE STORAGE WITH THE SR-1000 For more details on installation of the Enterprise Storage, please refer to ‘GDC Installation Manual for Portable Storage and Enterprise Storage’. 3.1. Connecting the Portable Storage 1. -
Page 15: Connecting The Enterprise Storage
Figure 11: Insert eSATA cable into SR-1000 eSATA port NOTE: To use the Enterprise Storage as the content source, it MUST be connected to the eSATA port of the SR-1000 board. GDC SR-1000 STANDALONE INTEGRATED MEDIA BLOCK™ December 22 , 2022... -
Page 16: Placement Of The Enterprise Storage
IMB & Enterprise Storage. Please ensure that the eSATA cable is not bent sharply or stressed. Figure 12: Enterprise Storage Placement GDC SR-1000 STANDALONE INTEGRATED MEDIA BLOCK™ December 22 , 2022 - 15 -... -
Page 17: Power On/Off Sequence
Web UI Dashboard. 2. Power down the Enterprise Storage/Portable Storage attached to the SR-1000. 3. Power down the Projector after the SR-1000 has powered down. GDC SR-1000 STANDALONE INTEGRATED MEDIA BLOCK™ December 22 , 2022 - 16 -... -
Page 18: Sr-1000 Web Ui Access
Web UI. 5. Select the preferred UI language by clicking on the corresponding flag icon, as shown in Figure 13. Figure 13: SR-1000 Web UI Login Page GDC SR-1000 STANDALONE INTEGRATED MEDIA BLOCK™ December 22 , 2022 - 17 -... -
Page 19: Sr-1000 Network Setup
5. Once the IP values have been entered, click on the Validate IPs button to check their correctness. Figure 14: IMB Network Configuration (1) GDC SR-1000 STANDALONE INTEGRATED MEDIA BLOCK™ December 22 , 2022 - 18 - INSTALLATION MANUAL... - Page 20 IP Address must be allocated for each SR-1000 IMB on the cinema’s content network. • Assigned IP Addresses should not conflict with other devices in the cinema’s network GDC SR-1000 STANDALONE INTEGRATED MEDIA BLOCK™ December 22 , 2022 - 19 -...
-
Page 21: Storage Configuration
& select ‘CineCache’ from the dropdown. 4. Check the Enable Secondary Storage option The CineCache™ is now set as the Secondary Storage. 5. Click Save to save these settings. GDC SR-1000 STANDALONE INTEGRATED MEDIA BLOCK™ December 22 , 2022 - 20 - INSTALLATION MANUAL... - Page 22 7. The SR-1000 will restart and use the selected option for storage. Figure 17: Dashboard tab Figure 18: Restart window NOTE: For GDC Cinema Automation 2.0 (CA 2.0) setup with Centralized Playback; please choose ‘CineCache’ as the Primary Storage in Storage Type...
-
Page 23: Series 2 Projector Setup
5. After the IMB marriage is performed and the tampers are cleared; green ‘Married’ and ‘Closed’ indicators will be shown respectively (as seen in Figure 19). Figure 19: Clear IMB tampers GDC SR-1000 STANDALONE INTEGRATED MEDIA BLOCK™ December 22 , 2022... -
Page 24: Barco Series 2 Projector Setup
For details, please refer to the projector manual. Figure 20: INPUT source settings on Barco Series 2 Projector GDC SR-1000 STANDALONE INTEGRATED MEDIA BLOCK™ December 22 , 2022 - 23 -... -
Page 25: Nec Series 2 Projector
5. Select [Start] → [Power] → [On] to power on the projector. 6. Clear the Service Door/Marriage Tamper on the SR-1000. To use the SR-1000 for content playback, the INPUT source of the projector macros must be set to IMB. GDC SR-1000 STANDALONE INTEGRATED MEDIA BLOCK™ December 22 , 2022... -
Page 26: Christie Series 2 Projector
Figure 23: Marriage account 3. Enter Username as [marriage] and its password and click [Login] button (as shown in Figure 24). Figure 24: Marriage account login GDC SR-1000 STANDALONE INTEGRATED MEDIA BLOCK™ December 22 , 2022 - 25 - INSTALLATION MANUAL... - Page 27 4. Select [Menu] → [Administrator Setup] → [Content Devices Configuration] (as shown in Figure 25). Figure 25: Content Devices Configuration 5. Select [GDC] for the [IMB Installed] (as shown in Figure 26). Figure 26: Content Devices Configuration 6. Clear the Service Door/Marriage Tamper on the SR-1000.
-
Page 28: Settings For Series 2 Projectors
The settings for 3D output control (‘3D Sync Polarity’, ‘Dark Time’, ‘Output Delay’ and ‘Phase Delay’) should be customized according to the type of 3D system used (RealD, XpanD or Dolby3D). GDC SR-1000 STANDALONE INTEGRATED MEDIA BLOCK™ December 22 , 2022... -
Page 29: Time Zone Setup
1. Go to the Configuration → System → Configure TimeZone section. 2. Select the Region/City in the TimeZone Select dropdown and click the button. 3. Click Save to save this setting. Figure 28: TimeZone setting GDC SR-1000 STANDALONE INTEGRATED MEDIA BLOCK™ December 22 , 2022 - 28 - INSTALLATION MANUAL... -
Page 30: Content Ingest Management Setup
USB storage device partition from the respective drop-downs. 4. Click to choose content to be ingested from the USB disk. Figure 29: Content source setting GDC SR-1000 STANDALONE INTEGRATED MEDIA BLOCK™ December 22 , 2022 - 29 - INSTALLATION MANUAL... -
Page 31: Content Ingest From Ftp
Figure 30: Content source settings 5. Click Open to connect to the FTP server and choose the content for ingest. Figure 31: Content source settings GDC SR-1000 STANDALONE INTEGRATED MEDIA BLOCK™ December 22 , 2022 - 30 -... -
Page 32: Audio Setup
(please refer to Figure 32). Figure 32: RJ45→DB25 Audio Connector Figure 33: RJ45→DB25 pinout (For traditional audio connector) Figure 34: RJ45→DB25 pinout (For CP750/JSD80 audio connector) GDC SR-1000 STANDALONE INTEGRATED MEDIA BLOCK™ December 22 , 2022 - 31 - INSTALLATION MANUAL... - Page 33 11. AUDIO SETUP Figure 35: AES Audio RJ45 pinout GDC SR-1000 STANDALONE INTEGRATED MEDIA BLOCK™ December 22 , 2022 - 32 - INSTALLATION MANUAL...
-
Page 34: Subtitles
Subtitle Overlay option and mention the Subtitle Delay interval (in number of frames) under the Playback sub-tab of the Configuration menu. Figure 36: Subtitle settings GDC SR-1000 STANDALONE INTEGRATED MEDIA BLOCK™ December 22 , 2022 - 33 - INSTALLATION MANUAL... -
Page 35: Automation Setup
The output pulse width must be at least 100ms. If a different output pulse width is required, the value can be entered in the Output Pulse Width setting. Click the Save button to save any changes made. GDC SR-1000 STANDALONE INTEGRATED MEDIA BLOCK™ December 22 , 2022 - 34 - INSTALLATION MANUAL... -
Page 36: Automation Setup For Projectors
If the projector is a Series 2 projector, check the ‘Series 2’ checkbox. 6. Enter Login Password for the projector, if required. 7. Click Save to save the settings. Figure 38: Projector setting GDC SR-1000 STANDALONE INTEGRATED MEDIA BLOCK™ December 22 , 2022 - 35 - INSTALLATION MANUAL... -
Page 37: Automation Setup For Ecna Devices
All cues are disabled by default. 6. Click Save to save the settings. Figure 39: eCNA device setting GDC SR-1000 STANDALONE INTEGRATED MEDIA BLOCK™ December 22 , 2022 - 36 - INSTALLATION MANUAL... -
Page 38: Automation Setup For Jnior Devices
Password are set to the default values for JUNIOR device, if left empty. 6. Click Save to save the settings. Figure 40: JNIOR device setting GDC SR-1000 STANDALONE INTEGRATED MEDIA BLOCK™ December 22 , 2022 - 37 - INSTALLATION MANUAL... -
Page 39: Automation Setup For Christie Act Devices
ChristieACT automation device. Control cues – can be added or removed by clicking the buttons. 7. Click Save to save the settings. Figure 41: Christie device setting GDC SR-1000 STANDALONE INTEGRATED MEDIA BLOCK™ December 22 , 2022 - 38 - INSTALLATION MANUAL... -
Page 40: Automation Setup For Dolby Devices
OK. 4. Enter the IP Address of the Dolby CP650 device. 5. Click Save to save the settings. Figure 42: Dolby device setting GDC SR-1000 STANDALONE INTEGRATED MEDIA BLOCK™ December 22 , 2022 - 39 - INSTALLATION MANUAL... -
Page 41: Automation Setup For Usl Dax Devices
USL DAX device and click OK. 4. Enter the IP Address of the USL DAX device. 5. Click Save to save the settings. Figure 43: USL DAX device setting GDC SR-1000 STANDALONE INTEGRATED MEDIA BLOCK™ December 22 , 2022 - 40 - INSTALLATION MANUAL... -
Page 42: Automation Setup For Usl Jsd Devices
(‘JSD-80’ or ‘JSD-100’) of the device the server is connected to. 5. Select the correct Model 6. Click Save to save the settings. Figure 44: USL JSD device setting GDC SR-1000 STANDALONE INTEGRATED MEDIA BLOCK™ December 22 , 2022 - 41 - INSTALLATION MANUAL... -
Page 43: Automation Setup For Aib-2000 Audio Io Box
5. Enter the IP Address of the AIB-2000 device connected to the server. 6. Click Save to save the settings. Figure 45: AIB-2000 device setting GDC SR-1000 STANDALONE INTEGRATED MEDIA BLOCK™ December 22 , 2022 - 42 - INSTALLATION MANUAL... -
Page 44: Component Enginnering Ta-10 Setup
The TA-10 is connected to the SR-1000 using the server’s GPIO input/output port. Configure event labels with the GPIO device to trigger the TA-10. Figure 46: Component Engineering TA-10 wiring diagram GDC SR-1000 STANDALONE INTEGRATED MEDIA BLOCK™ December 22 , 2022... -
Page 45: Testing Procedures For Qc After Installation
3. Test the server’s ability to activate automation cues using test cues for lights, curtains, sound and fire alarm. 4. Test the remote access capabilities of the server, including: Theater Management System (TMS) access and network connectivity. GDC SR-1000 STANDALONE INTEGRATED MEDIA BLOCK™ December 22 , 2022 - 44 -... -
Page 46: Sr-1000 Input And Output
23/24. See Table 3 for the button settings. Illustration Position Result CH23/24 used as AES out Down CH23/24 used as LTC out Table 3: Button Settings on AES 17-24 Extension Board GDC SR-1000 STANDALONE INTEGRATED MEDIA BLOCK™ December 22 , 2022 - 45 - INSTALLATION MANUAL... -
Page 47: Gpio Power Details
Relay ON-resistance: Min = 6 / Typ = 10 / Max = 15 ohms Relay Current limit: Min = 300 / Typ = 360 / Max = 460 mA Relay output power dissipation (continuous) = 600 mW GDC SR-1000 STANDALONE INTEGRATED MEDIA BLOCK™ December 22 , 2022... -
Page 48: Audio Output From The Sr-1000
SR-1000 allows direct input of 8 channel PCM audio via HDMI IN port on the IMB. The HDMI output of the source needs to be set to LPCM audio format. GDC SR-1000 STANDALONE INTEGRATED MEDIA BLOCK™ December 22 , 2022... -
Page 49: Examples Of A Complete Audio Input/Output Solution (For 5.1/7.1 Audio Formats)
NOTE: The SR-1000 Automation should be used to switch between the analog sources and the 8 channel AES3 output from the SR-1000 to the AIB-2000 to ensure that the correct source is routed to the sound system. GDC SR-1000 STANDALONE INTEGRATED MEDIA BLOCK™ December 22 , 2022... -
Page 50: Connections Requirements
A break out cable may be required to allow pins 7 & 8 to be connected to an external 4D system while allowing pings 1-6 which carry AES3 channels 9-14, to be connected to the audio system. GDC SR-1000 STANDALONE INTEGRATED MEDIA BLOCK™ December 22 , 2022 - 49 -... - Page 51 * Refer to the ‘AIB-2000 Manual’ for more details. IMPORTANT: Please check and set the levels of the analog input sources to the AIB- 2000 appropriately, to avoid any damage to the auditorium speakers. GDC SR-1000 STANDALONE INTEGRATED MEDIA BLOCK™ December 22 , 2022...
-
Page 52: Audio Input/Output Solution Using Aib-2000 (Suitable For Connection To Digital Amplifiers)
NOTE: The SR-1000 Automation should be used to switch between the analog sources to the AIB-2000 as well as between the analog and digital AES3 inputs on the digital Amplifiers to ensure that the correct source is routed to the sound system. GDC SR-1000 STANDALONE INTEGRATED MEDIA BLOCK™ December 22 , 2022... -
Page 53: Connection Requirements
A break out cable may be required to allow pins 7 & 8 to be connected to an external 4D system while allowing pings 1-6 which carry AES3 channels 9-14, to be connected to the audio system. GDC SR-1000 STANDALONE INTEGRATED MEDIA BLOCK™ December 22 , 2022 - 52 -... - Page 54 * Refer to the ‘AIB-2000 User Manual’ for more details. IMPORTANT: Please check and set the levels of the analog input sources to the AIB- 2000 appropriately, to avoid any damage to the auditorium speakers. GDC SR-1000 STANDALONE INTEGRATED MEDIA BLOCK™ December 22 , 2022...
-
Page 55: Technical Specifications Of Aib-2000 Audio Io Box
483 x 44 x 158 mm Shipping Dimensions (WxHxD) 550 x 70 x 255 mm Net weight 2.1 kg Shipping weight 3.2 kg Table 6: AIB-2000 Technical Specifications GDC SR-1000 STANDALONE INTEGRATED MEDIA BLOCK™ December 22 , 2022 - 54 - INSTALLATION MANUAL... - Page 56 Contact Us GDC Technology manufacturing facility is ISO 9001:2015 certified. Copyright © 2022 GDC Technology Limited. All rights reserved. All trademarks listed in this manual are properties of their respective owners. Specifications are subject to change without notice due to ongoing product development and improvement.
Need help?
Do you have a question about the Standalone IMB SR-1000 and is the answer not in the manual?
Questions and answers