
Subscribe to Our Youtube Channel
Related Manuals for GE Giraffe OmniBed Carestation CS1


Summary of Contents for GE Giraffe OmniBed Carestation CS1
- Page 1 ™ ™ Giraffe OmniBed Carestation™ Service Manual 2077955-001 Revision L Class A © 2014-2017 General Electric Company All rights reserved.
- Page 2 Buyer or to Buyer’s order, but in no event for a period of more than two years from the date of original delivery by GE Healthcare to an GE Authorized Dealer, this Product, other than its expendable parts, is warranted to be...
- Page 3 Revision History Revision Revision Date Revision Description Updated Service language disclaimer, part numbers, part June 2017 descriptions, diagrams, procedure steps, specifications, and front and back covers. June 2016 Implemented Low Noise Fan updates. November 2015 Implemented Service Process Validation changes. September 2015 Initial release.
- Page 4 RH-2 Service Manual...
-
Page 5: Table Of Contents
Table of Contents Table of Contents Service Language Disclaimer ................i Safety and Regulatory Information..............ix Warnings................................ix Cautions ................................xvi Symbols ................................xviii Regulatory ..............................xxiii User Responsibility .............................xxiii About this Manual ..................... xxv Intended Audience ............................xxv Technical Competence..........................xxvi Conventions..............................xxvi Chapter 1: Functional Description..............1-1 1.1 Control Board............................1-1 1.2 Relay Board............................1-3 1.3 Infant Care Single Board Computer (ICSBC) ................1-4... - Page 6 2.2.1.5 Options Checks......................2-3 2.2.1.6 Nurse Call Checks ......................2-4 2.2.2 Control Panel Checks......................2-4 2.2.3 Humidifier Check ........................2-5 2.2.4 Oxygen Leak Tests ........................2-5 2.2.4.1 Oxygen Leak Test ......................2-5 2.2.4.2 Vent Fitting to O2 Sensor Leak Test..............2-5 2.2.4.3 Supply Valve Leak Test ....................2-6 2.2.5 Scale Checks..........................2-7 2.2.5.1 Visual Inspection ......................2-7 2.2.5.2 Center Weight Check....................2-7...
- Page 7 Chapter 5: Troubleshooting ................5-1 5.1 Troubleshooting Symptoms......................5-1 5.2 Additional Troubleshooting Tips....................5-9 5.2.1 Raising and Lowering the Canopy or Elevating Base ..........5-9 5.2.2 Incubator Heaters and Bed Safety Thermostat ............5-9 5.2.3 Radiant Heater........................5-10 5.2.4 Power Supplies........................5-10 5.2.5 Troubleshooting Harness Cables 6600-0701-700 and 2075837-001..5-11 5.3 Switches/Thermostat ........................5-12 5.3.1 Humidifier Heater/Safety Thermostat ................5-13 5.3.2 Compartment Air Probe and Skin Temperature Probes........5-13...
- Page 8 6.1.9 Bed Heater Failure Alarm ....................6-4 6.1.10 Bed Raise/Lower Pedal Failure Alarm.................6-5 6.1.11 Canopy Pedal Failure Alarm ....................6-5 6.1.12 Fan Always in High Speed Alarm...................6-6 6.1.13 Fan Failure Alarm........................6-6 6.1.14 Heater Doors Not Closed Alarm..................6-7 6.1.15 Heater Doors Not Open Alarm ..................6-7 6.1.16 Humidity Failure Alarm ......................6-8 6.1.17 In Transition - Heat Off Alarm ..................6-9 6.1.18 Motor Drive Failure Alarm....................
- Page 9 6.2.30 System Failure 36.......................6-23 6.2.31 System Failure 37.......................6-23 6.2.32 System Failure 38.......................6-24 6.2.33 System Failure 55.......................6-24 6.2.34 System Failure 60.......................6-24 6.2.35 System Failure 61.......................6-24 6.2.36 System Failure 62.......................6-24 6.2.37 System Failure 63.......................6-25 6.2.38 System Failure 70.......................6-25 6.2.39 System Failure 71.......................6-25 6.2.40 System Failure 81.......................6-25 6.2.41 System Failure 82.......................6-25 6.2.42 System Failure 83.......................6-26...
- Page 10 7.5.5.5 Reassembly........................7-34 7.6 Radiant Heater Assembly Repair Procedures ..............7-34 7.6.1 Removing the Canopy/Heater Assembly ..............7-34 7.6.1.1 Realigning the Canopy ................... 7-36 7.6.2 Replacing the Radiant Heater ..................7-37 7.6.3 Heater Door Spool Assembly ..................7-39 7.6.4 Heater Door Cable Adjustment..................7-40 7.6.5 Spring Tube Assembly Replacement................
- Page 11 7.18.3.2 Sensor Housing Repairs: Calibration Valve..........7-62 7.18.4 Valve Housing Repairs.....................7-63 7.18.4.1 Valve Housing Repairs: Regulator Assembly ..........7-63 7.18.4.2 Valve Housing Repairs: Supply Valves ............7-63 7.18.5 End Cap Safety Valve .......................7-64 7.18.6 Servo Oxygen Board Repairs..................7-64 7.19 Display Module Repairs ......................7-65 7.19.1 Rear Cover..........................7-65 7.19.1.1 Carrier Plate Hardware ..................7-65 7.19.2 Alarm Lens..........................7-66...
- Page 12 8.19.1.2 Connector Panel...................... 8-67 8.19.2 Raise/Lower Pedal......................8-68 8.19.3 Rating Label.......................... 8-68 8.19.4 Porthole Warning....................... 8-68 8.19.5 Chassis Vent Servo O2..................... 8-69 8.19.5.1 Servo O2 Maximum Pressure Labels............. 8-69 8.19.5.2 Weight Limit Warnings ..................8-70 8.19.5.3 Port Cover ........................8-71 8.19.5.4 Branding Label......................
- Page 13 List of Figures List of Figures FIGURE 1-1. Block Diagram..........................1-2 FIGURE 1-2. Humidifier .............................1-8 FIGURE 2-1. Weight Placement Locations....................2-8 FIGURE 3-1. Control Board Test Points ......................3-2 FIGURE 3-2. Cal RH..............................3-4 FIGURE 3-3. Cal Scale ............................3-6 FIGURE 3-4. Initializing ............................3-7 FIGURE 3-5. Place Weight..........................3-7 FIGURE 3-6.
- Page 14 FIGURE 7-12. Hole Fill Assembly (2x) for Canopies with Six Holes across North End..7-9 FIGURE 7-13. South Seal Parts........................7-10 FIGURE 7-14. South Corner Parts ......................7-11 FIGURE 7-15. North Corner Parts......................7-11 FIGURE 7-16. Installing Rail Spacers ....................... 7-12 FIGURE 7-17.
- Page 15 FIGURE 7-52. Probe Panel..........................7-56 FIGURE 7-53. Electronics Enclosure ......................7-57 FIGURE 7-54. Installing Sensors.........................7-60 FIGURE 7-55. Sensor Housing........................7-61 FIGURE 7-56. Valve Housing........................7-63 FIGURE 7-57. End Cap Safety Valve ......................7-64 FIGURE 7-58. Rear Cover..........................7-65 FIGURE 7-59. Alarm Lens ..........................7-66 FIGURE 7-60. Alarm Board ...........................7-66 FIGURE 7-61.
- Page 16 FIGURE 8-17. Base and Elevating Column.................... 8-34 FIGURE 8-18. Right (East) Upright Parts, Motor Side (Complete East Rail Assembly: 6600-0290-850) Motor Not included ....................8-36 FIGURE 8-19. Belt Channel - 1 (Lift Motor Side) .................. 8-38 FIGURE 8-20. Lift Rail (Both Sides)......................8-40 FIGURE 8-21.
-
Page 17: Service Language Disclaimer
Service Language Disclaimer WARNING: This service manual is available in English only. (EN) • If a customer’s service provider requires a language other than English, it is the customer’s responsibility to provide translation services. • Do not attempt to service the equipment unless this service manual has been consulted and is understood. - Page 18 Service Language Disclaimer UPOZORENJE Ovaj servisni priručnik dostupan je na engleskom jeziku. (HR) • Ako davatelj usluge klijenta treba neki drugi jezik, klijent je dužan osigurati prijevod. • Ne pokušavajte servisirati opremu ako niste u potpunosti pročitali i razumjeli ovaj servisni priručnik. •...
- Page 19 FIGYELMEZTETÉS Ezen karbantartási kézikönyv kizárólag angol nyelven érhető el. (HU) • Ha a vevő szolgáltatója angoltól eltérő nyelvre tart igényt, akkor a vevő felelőssége a fordítás elkészíttetése. • Ne próbálja elkezdeni használni a berendezést, amíg a karbantartási kézikönyvben leírtakat nem értelmezték.
- Page 20 Service Language Disclaimer AÐVÖRUN Þessi þjónustuhandbók er aðeins fáanleg á ensku. (IS) • Ef að þjónustuveitandi viðskiptamanns þarfnast annas tungumáls en ensku, er það skylda viðskiptamanns að skaffa tungumálaþjónustu. • Reynið ekki að afgreiða tækið nema að þessi þjónustuhandbók hefur verið skoðuð og skilin. •...
- Page 21 Service Language Disclaimer ĮSPĖJIMAS Šis eksploatavimo vadovas yra tik anglų kalba. (LT) • Jei kliento paslaugų tiekėjas reikalauja vadovo kita kalba – ne anglų, suteikti vertimo paslaugas privalo klientas. • Nemėginkite atlikti įrangos techninės priežiūros, jei neperskaitėte ar nesupratote šio eksploatavimo vadovo.
- Page 22 Service Language Disclaimer ATENŢIE Acest manual de service este disponibil doar în limba engleză. (RO) • Dacă un furnizor de servicii pentru clienţi necesită o altă limbă decât cea engleză, este de datoria clientului să furnizeze o traducere. • Nu încercaţi să reparaţi echipamentul decât ulterior consultării şi înţelegerii acestui manual de service. •...
- Page 23 Service Language Disclaimer VARNING Den här servicehandboken finns bara tillgänglig på engelska. (SV) • Om en kunds servicetekniker har behov av ett annat språk än engelska, ansvarar kunden för att tillhandahålla översättningstjänster. • Försök inte utföra service på utrustningen om du inte har läst och förstår den här servicehandboken. •...
- Page 24 Service Language Disclaimer viii Service Manual...
-
Page 25: Safety And Regulatory Information
Safety and Regulatory Information Warnings Warning: Before using the device, read through this entire manual. Attempting to use this device without a thorough understanding of its operation may result in patient and user injury. Warning: This device should only be operated by clinically trained personnel familiar with the risks and benefits of this type of device. - Page 26 Safety and Regulatory Information Warnings Warning: Use the device only with the power cord supplied. Warning: The use of accessories, replacement parts, or power cords other than those specified by the manufacturer may affect the performance of the device and could result in damage to the device or unsafe operating conditions.
- Page 27 Safety and Regulatory Information Warnings Warning: Direct sunlight, phototherapy, other radiant heat sources, or heated mattresses can cause an increase in device and patient temperature. Warning: Proper temperature control depends on continuous, unobstructed air circulation. Do not cover air circulation openings around the bed, as obstruction will result in loss of air circulation, loss of heat, and carbon dioxide buildup.
- Page 28 Safety and Regulatory Information Warnings Warning: Use of electrosurgical units or other electrical field radiating equipment can affect the operation of the device. Keep the patient probe lead as far away as possible from electrosurgical cables. Do not allow excess electrical cables to be laid on the bed platform.
- Page 29 Warning: Only use GE approved skin temperature probes; other manufacturers’ probes are not calibrated to GE equipment. Using probes from other manufacturers’ may cause inaccurate temperature readings, may not comply with safety standards, and will void your GE equipment warranty.
- Page 30 Safety and Regulatory Information Warnings Warning: Medical Electrical Equipment needs special precautions regarding EMC and needs to be installed and put into service according to the EMC information provided in the User Manual. Warning: Portable RF communications equipment (including peripherals such as antenna cables and external antennas) should be used no closer than 30 cm (12 inches) to any part of the device, including cables specified by the manufacturer.
- Page 31 Safety and Regulatory Information Warnings Warning: If oxygen is administered outside of the device’s oxygen system, use an oxygen analyzer to monitor oxygen levels. Warning: The use of head boxes, oxygen hoods, and oxygen administration can increase the noise level inside the device. Warning: Remove all sources of ignition including smoking materials, and sources of electrical discharge from the area when oxygen is in use.
-
Page 32: Cautions
Safety and Regulatory Information Cautions Warning: Allow the heater to cool before servicing. Warning: Be sure the front of the chassis is supported before removing the screws from the bracket to prevent the chassis from falling. Cautions Caution: Do not allow alcohol or substances containing alcohol, such as hand- disinfectants, to come in contact with any acrylic part. - Page 33 Safety and Regulatory Information Cautions Caution: To minimize the generation of static electricity, do not polish the side panels with a dry cloth. Caution: Do not allow cleaning fluid to leak into skin temperature probe and electrical connectors. Equipment damage may occur. Caution: Use of cleaning/disinfecting solutions containing chemicals not listed in the User Manual, i.e.
-
Page 34: Symbols
Safety and Regulatory Information Symbols Symbols This section identifies the symbols that are displayed on the device. Equipment configurations can differ. Labels or symbols may not appear on every device Symbol Description Consult Manual Do Not Place Objects Under Radiant Heat Alternating Current Do Not Lean on Equipment Do Not Reuse... - Page 35 Safety and Regulatory Information Symbols Symbol Description Hot Surface Skin Temperature Probe Connector Compartment Sensor Connector Maximum Weight per Rail Maximum Water Level in Humidifier Opening the Giraffe Humidifier Reservoir Electric Shock Hazard Type B Equipment USB Port (for use by authorized service personnel only) Ethernet Port Electrostatic Discharge Sensitive Do not immerse scale...
- Page 36 Safety and Regulatory Information Symbols Symbol Description Relative Humidity Range (on package) Temperature Range (on package) Pressure Range (on package) This End Up (on package) Air Boost Humidity Oxygen Timer Scale Trends Setup Help Alarm Comfort Zone Baby Mode Warm-Up Mode / Manual Mode Air Mode Start the Timer Stop the Timer...
- Page 37 Safety and Regulatory Information Symbols Symbol Description Reset Apgar Tone Time Stamp Alarm Volume (low) Alarm Volume (low medium) Alarm Volume (high medium) Alarm Volume (high) Arrow to increase setting Arrow to decrease setting Re-weigh Baby Temperature Set Temperature Air Temperature Screen Locked Screen Unlocked Heater Power Level...
- Page 38 Safety and Regulatory Information Symbols Symbol Description Alarm Acknowledged Alarm Off Indicator Alarm Pause Indicator Alarm Acknowledge Indicator Low Priority Alarm Medium Priority Alarm High Priority Alarm Skin Temperature Probe Indicator Away Screen Button Unit Weight Beginning in September 2016, some medical devices sold in the USA must be labeled with a Unique Device Identifier (UDI).
-
Page 39: Regulatory
Should such repair or replacement become necessary, GE Healthcare recommends that a telephone or written request for service advice be made to the nearest GE Healthcare Regional Service Center. This Product or any of its parts should not be repaired other than in accordance with written instructions provided by GE Healthcare and by GE Healthcare trained personnel. - Page 40 Safety and Regulatory Information User Responsibility xxiv Service Manual...
-
Page 41: About This Manual
The information contained in this service manual pertains only to those models of products which are marketed by GE Healthcare as of the effective date of this manual or the latest revision thereof. This service manual was prepared for exclusive use by GE Healthcare service personnel in light of their training and experience as well as the availability to them of parts, proper tools and test equipment. -
Page 42: Technical Competence
No repairs should ever be undertaken or attempted by anyone not having such qualifications. Genuine replacement parts manufactured or sold by GE Healthcare must be used for all repairs. Read completely through each step in every procedure before starting the procedure;... -
Page 43: Chapter 1: Functional Description
Chapter 1: Functional Description This chapter provides a functional description for the device, including sections representing each of the four boards. Refer to “Figure 1-1 Block Diagram” and section “8.21 Wiring Diagrams” when studying this chapter. 1.1 Control Board The Intel 80C188EC microcontroller is an enhanced X86 processor with many on-board peripheral features, such as a interrupt controller, DMA controller, peripheral chip select driver, programmable timers, etc. -
Page 44: Figure 1-1. Block Diagram
Chapter 1: Functional Description Control Board FIGURE 1-1. Block Diagram Service Manual... -
Page 45: Relay Board
Chapter 1: Functional Description Relay Board The overtemperature circuit compares the air temperature to a reference level, generates an interrupt, and turns off the heat if the air temperature is higher than the reference level. The overtemperature circuit requires varying its voltage levels to accommodate various thermistor measurements. This is because the calibration is digital (no potentiometer). -
Page 46: Infant Care Single Board Computer (Icsbc)
Chapter 1: Functional Description Infant Care Single Board Computer (ICSBC) The motor driver circuit turns the DC motor coils in the incubator airflow fan motor on and off based on feedback from the hall effect position sensors. This integrated circuit can also vary the speed and brake the motor based on input signals from the Control Board. -
Page 47: Alarm Board
Chapter 1: Functional Description Alarm Board The ICSBC provides two user accessible I/O ports located at the lower rear area of the display assembly. One is a USB 2.0 Host with a Type A female connector. The USB port is used for software upgrades with a USB Flash Drive. -
Page 48: Rail And Heater Door Switches
Chapter 1: Functional Description DataLink current sense circuit. It then outputs from the relay board to the solid state relays and the incubator and radiant warmer heaters. The humidifier isolation transformer isolates the humidifier heater from the mains voltage. The primaries mains input comes from the relay board and is switched by safety relay 2. -
Page 49: Servo Controlled Oxygen Option
Chapter 1: Functional Description Servo Controlled Oxygen Option The RS-232 Board contains the electronic circuitry necessary to provide a 1500 VRMS isolated serial interface which meets the EIA/TIA-232E specification and a 1500 VRMS isolated single-pole double-throw (SPDT) relay. The relay contacts are rated for 24 VDC and 0.5 amps of current. For further details on the connector pinout and DataLink data protocol, see “RS-232 Serial Data”... -
Page 50: Humidifier
Chapter 1: Functional Description Humidifier board, control flow to the patient compartment. Both valves are opened until the measured level gets close to the desired set point then one valve is closed. One valve is then cycled on and off as needed to maintain the desired oxygen levels in the patient compartment. -
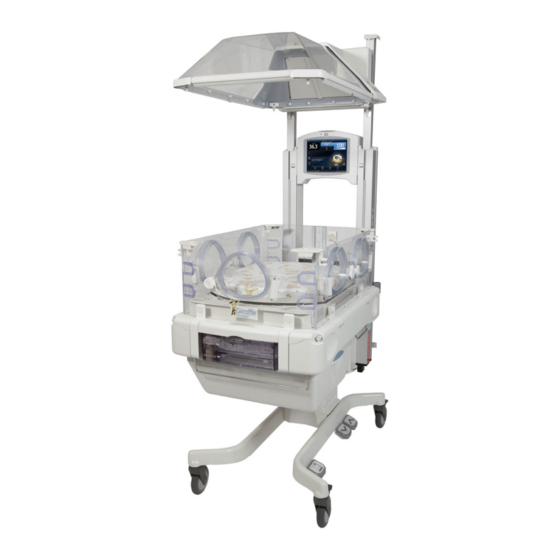
Page 51: Front View
Chapter 1: Functional Description Front View 1.11 Front View Feature Number Description Indicator Light Power Fail/HFAS Indicator Light (Red Power Fail, Green HFAS) Hands Free Alarm Sensor Control Panel Canopy Side bed panel latches Compartment air and humidity sensor (on rear bed panel on Control Panel end) Tubing management grommet Humidifier Water Reservoir (air filter located behind humidifier) -
Page 52: Probe Panel
Chapter 1: Functional Description Probe Panel 1.12 Probe Panel Feature Number Description Standby power switch (I/O) Skin temperature probe connectors Compartment air/Humidity sensor connector Scale connector 1-10 Service Manual... -
Page 53: Side View
Chapter 1: Functional Description Side View 1.13 Side View Control Panel- Humidifier-end of end of the device the device Feature Number Description Mounting rail Portholes Canopy raise/lower arrows (switches) X-ray Tray Pleural drainage hanger Storage drawer Bed Raise/Lower pedal Elevating column Wheel brake Raise canopy pedal Service Manual... -
Page 54: Rear View
Chapter 1: Functional Description Rear View 1.14 Rear View Feature Number Description Control Panel cover USB port Ethernet port Ventilator access RS-232 connector for DataLink option Rear Panel cover Circuit breakers for accessory outlets Grounding Post Accessory power outlet connectors Mains Power Switch Power cord connector Serial number... -
Page 55: Chapter 2: Installation And Service Checkout
Chapter 2: Installation and Service Checkout 2.1 Installation The OmniBed is shipped with the canopy in the locked down position. Before the canopy can be raised the rail shipping locks must be released. They are located in both sides of the OmniBed near the outside bottom of the uprights. -
Page 56: Power Cord Condition
Chapter 2: Installation and Service Checkout Service Checkout 2.2.1.1 Power Cord Condition To verify the condition of the power cord: Disconnect the power cord from the power outlet. Examine the power cord for signs of damage. If damage is evident, replace the cord. Do not put in service. Consult authorized service personnel. Verify that the plug retaining brackets for the power cord and the accessory outlets on the back of the device are placed as shown. -
Page 57: Options Checks
Chapter 2: Installation and Service Checkout Service Checkout Check that the bed panels are securely attached to the device and that the hinge pins are properly seated. Check that the inner side bed panels are securely fastened to the outer side bed panels. Close the bed panels and check that the latches hold the panels securely shut. -
Page 58: Nurse Call Checks
Chapter 2: Installation and Service Checkout Service Checkout 2.2.1.6 Nurse Call Checks See Nurse Call and remote Monitoring in the User Manual for more information. Note: This procedure is required only for customers who have or are installing a Nurse Call system. The Nurse call system must be installed and operational prior to executing this procedure. -
Page 59: Humidifier Check
Chapter 2: Installation and Service Checkout Service Checkout 2.2.3 Humidifier Check To check humidifier operation: Turn on the Giraffe unit and verify that the Servo Humidity icon appears on the screen. Set the Humidity to 65%. Wait for 4 minutes. If no alarms appear (except for a possible "Add Water" message), the humidifier is operational. -
Page 60: Supply Valve Leak Test
Chapter 2: Installation and Service Checkout Service Checkout Note: During first 90 minutes of operation, the fan defaults to high speed, and the Air Boost icon is not operational: Note: Even though the fan is in high speed, the Air Boost icon is not illuminated/animated. Touch Air Boost to illuminate/animate the Air Boost icon (that is, to turn it on). -
Page 61: Scale Checks
Chapter 2: Installation and Service Checkout Service Checkout Close V1 & V2 and place the 10 mm hose in a cup of water. Verify that no more than 10 bubbles appear over a one minute period. If device fails, replace supply valves. Raise the canopy a couple of inches and open V1 &... -
Page 62: Figure 2-1. Weight Placement Locations
Chapter 2: Installation and Service Checkout Service Checkout Place a 5 kg weight on the third corner of the scale on the bed. (See location B3 in Figure 2-1.) Record the SC value on the screen, and name it SC6. Subtract SC3 from SC6. -
Page 63: Chapter 3: Calibration And Maintenance
Chapter 3: Calibration and Maintenance SENSITIVE TO ELECTROSTATIC DISCHARGE CAUTION An Electrostatic Discharge (ESD) Susceptibility symbol is displayed to alert service personnel that the part(s) are sensitive to electrostatic discharge and that static control procedures must be used to prevent damage to the equipment. Warning: After performing any repair or calibration, always perform the Service Checkout Procedure before putting the device back into service. -
Page 64: Figure 3-1. Control Board Test Points
Chapter 3: Calibration and Maintenance Service Maintenance Schedule Calibration jumper Test Point 1 12345678 Dipswitch Test Point 2 FIGURE 3-1. Control Board Test Points Service Manual... -
Page 65: Special Tools
Chapter 3: Calibration and Maintenance Special Tools 3.2 Special Tools The following tools (or their functional equivalents) are required to complete the recommended service procedures: • Digital Multimeter, 4-1/2 digit • Leakage Current Tester • PLCC Extractor for removing socketed chips •... -
Page 66: Humidifier Calibration
Chapter 3: Calibration and Maintenance Humidifier Calibration 3.4 Humidifier Calibration Important: Be sure to re-calibrate the humidifier whenever either the sensor or the control board is replaced. Important: In order for the water in the calibration bottle (6600-0048-850) to be completely saturated, most of the salt should not be dissolved. -
Page 67: Servo Controlled Oxygen Calibration
Directive, have the device calibrated by an accredited local test authority. If you are unable to identify a test authority, please contact your GE representative or distributor for assistance. Periodic re-verification (calibration) of the scale must be performed in accordance of the National Regulations Governing Legal Metrology. -
Page 68: Figure 3-3. Cal Scale
Chapter 3: Calibration and Maintenance Scale Calibration Note: One 5 kg Certified Test Weight (part number 6600-0209-800) is required to perform the calibration procedure. Clear all objects from the bed, and ensure only the mattress and clear plate remain on the scale. Ensure the bed is level. -
Page 69: Figure 3-4. Initializing
Chapter 3: Calibration and Maintenance Scale Calibration The screen prompts Initializing for a few seconds. FIGURE 3-4. Initializing When the screen prompts Place Test Weight and Press Next, place the weight and press Next. FIGURE 3-5. Place Weight Service Manual... -
Page 70: Figure 3-6. Measuring
Chapter 3: Calibration and Maintenance Scale Calibration The screen prompts Measuring for a few seconds. FIGURE 3-6. Measuring When the screen prompts Enter Test Weight, type the test weight to the nearest gram and touch Enter. FIGURE 3-7. Enter Weight Service Manual... -
Page 71: Electrical Safety Tests
Chapter 3: Calibration and Maintenance Electrical Safety Tests For a successful calibration, the screen prompts Calculating for a few seconds. FIGURE 3-8. Calculating When the screen prompts Exit Only, Restore Defaults, Save and Exit, touch Save and Exit. FIGURE 3-9. Completion Note: If Save and Exit is grayed out, the calibration was not successful. -
Page 72: Ground
Chapter 3: Calibration and Maintenance Electrical Safety Tests Due to the nature of this medical device, leakage current testing as defined in IEC 60601-1 is recommended. Use of the direct method of leakage current test as defined in IEC 62353 is an acceptable substitution. Due to the design of this medical device use of the alternative method and differential method as defined in IEC 62353 is not recommended. -
Page 73: Line Voltage Calibration
Chapter 3: Calibration and Maintenance Line Voltage Calibration If required by local ordinances, in single fault condition in all possible operating modes the patient leakage current shall be less than 500 microamperes. For DC lead leakage current: In normal condition in all possible operating modes the patient lead leakage current shall be less than 10 microamperes. - Page 74 Chapter 3: Calibration and Maintenance Line Voltage Calibration 3-12 Service Manual...
-
Page 75: Chapter 4: Understanding The Service Interface
Chapter 4: Understanding the Service Interface 4.1 Powering the Device This section describes how to turn the device On and Off. Isolation of the device from the supply mains can only be achieved by turning off the device using the mains power switch on the rear of the device. -
Page 76: Change Password
Chapter 4: Understanding the Service Interface Accessing Service Mode If this is the first time accessing the application, enter Pass0000 and go to step 6. If not enter your password (Pass + PIN). The password is not case sensitive and may be typed in upper or lower case. Note: If this is the first time you are accessing the application, you have the option to change your password as described in “Change Password”... -
Page 77: Understanding The Service Interface Layout
Chapter 4: Understanding the Service Interface Understanding the Service Interface Layout 4.3 Understanding the Service Interface Layout The Service Interface layout provides a consistent structure for all of the service screens. Service mode provides a touch screen interface. Left-navigation area Static Features Display area FIGURE 4-2. -
Page 78: Pedals
Chapter 4: Understanding the Service Interface Setup Note: Resetting maximum preheat level to above 25% will result in noncompliance to device standard IEC 60601-2-21. 4.4.2 Pedals The Bed/Canopy can be operated from the service screen when pedals are not working by touching the On/ Off toggle for each item. -
Page 79: Calibration
Chapter 4: Understanding the Service Interface Calibration Wait for the prompt to disappear before powering off unit. Pulldown Item Description Language Selects the language to display on-screen in the user interface. English is the default language. Temp Units Select the temperature units displayed. ºC, ºF, or ºC only are available. ºC only prevents the Fahrenheit option from showing on the user Setup screen (Celsius is factory set default). -
Page 80: Upgrade
Chapter 4: Understanding the Service Interface Upgrade To set time and date formats: In service mode, touch Set Time in the left-navigation area. FIGURE 4-4. Set Time Screen Select the desired value from the pulldowns. You can select the date format and time format (12 hour (AM/PM) or 24 hour). Touch OK to accept any changes made to the time and date (not needed for the formats). - Page 81 Chapter 4: Understanding the Service Interface Upgrade The USB and Ethernet connectors are identified with the electrostatic discharge sensitive label on the back of the display assembly. The connectors should not be touched, nor should any connector be plugged in until all possible electrostatic charges have been discharged by either touching the rails or other metal surface on the device.
- Page 82 Chapter 4: Understanding the Service Interface Upgrade Service Manual...
-
Page 83: Chapter 5: Troubleshooting
Chapter 5: Troubleshooting 5.1 Troubleshooting Symptoms Note: Numbers in the ID column are for reference only. Symptom Possible Cause(s) Action(s) User Interface Touch Screen Foreign substance on Turn off power. Clean and dry does not function. Touch Screen surface Touch Screen per manual. Turn on power. - Page 84 Chapter 5: Troubleshooting Troubleshooting Symptoms Symptom Possible Cause(s) Action(s) No Power Fail Indicator (Red Display Power cable Check for fully seated LED) disconnected connection at SBC and power bus expansion cable. Defective Display Power Replace cable. cable Defective Alarm Board Replace board.
- Page 85 Chapter 5: Troubleshooting Troubleshooting Symptoms Symptom Possible Cause(s) Action(s) No audio alarm. Defective speaker or Use an ohmmeter to verify the harness speaker resistance is about 8 ohms at relay board connector J40, pins 5-6. If defective, determine whether speaker or harness is defective and take off the back cover, disconnect the lower shroud from the base...
- Page 86 Chapter 5: Troubleshooting Troubleshooting Symptoms Symptom Possible Cause(s) Action(s) Elevating base and canopy will Pedal switches are Try raising/lowering canopy not go up or down. disabled on Operator using the hand switches. Check Setup screen or Service Setup screen or Service screen screen.
- Page 87 Chapter 5: Troubleshooting Troubleshooting Symptoms Symptom Possible Cause(s) Action(s) Canopy works in one direction Defective canopy motor. Check the voltage to the but not the other. canopy motor for both up and down movement. Refer to the Tips section (5.3.4). If OK, replace the canopy motor/ gearbox.
- Page 88 Chapter 5: Troubleshooting Troubleshooting Symptoms Symptom Possible Cause(s) Action(s) The radiant heater doors do M5 nut (6600-0711-408) on Inspect the M5 nut attachment not open completely when the spring tube assembly rod of spring tube assembly to the canopy is raised. is loose or missing.
- Page 89 Chapter 5: Troubleshooting Troubleshooting Symptoms Symptom Possible Cause(s) Action(s) Device will not power up, alarm Defective scale Disconnect scale connector at sounds. probe panel. Power cycle the device. If error clears replace the scale. Defective scale harness Disconnect scale harness from J7 on the control board.
- Page 90 Chapter 5: Troubleshooting Troubleshooting Symptoms Symptom Possible Cause(s) Action(s) Air Temp >38C or Air Temp Alarm is not designed to Push the operator interface >40C alarm activated even automatically reset after alarm silence button to clear though compartment temp is < alarm condition is the alarm.
-
Page 91: Additional Troubleshooting Tips
Chapter 5: Troubleshooting Additional Troubleshooting Tips Symptom Possible Cause(s) Action(s) Bed will not lock in tilt position. Tilt ball not engaged in Tilt the control panel end of the finger pocket latch bed platform all the way down while holding the latch open, then let the latch close to capture the tilt ball. -
Page 92: Radiant Heater
Chapter 5: Troubleshooting Additional Troubleshooting Tips 5.2.3 Radiant Heater The 115 volt radiant heater is rated at 225 watts at 104 volts. It is powered by isolated 115 volts from the heater isolation transformer switched by the radiant warmer SSR. The resistance of the radiant heater is about 24 ohms. -
Page 93: Troubleshooting Harness Cables 6600-0701-700 And 2075837-001
Chapter 5: Troubleshooting Additional Troubleshooting Tips The 5V and 12V supplies are generated by the Power Supply and are sent to the Relay Board for distribution.The +5STBY is generated on the Relay Board from either the 12V (normal operation) or the 8.4V NiMH PF Battery (power fail). - Page 94 Chapter 5: Troubleshooting Switches/Thermostat Connect the negative (com) probe of multimeter to pin 1 and the positive probe to pin 4. The voltage shall be more than 4.75V. If not, harness 6600-0701-700 is defective. Order a new harness and replace it. Note: When replacing either harness, do not to pull by the cable wires, but use the connector body to disengage or engage connectors.
-
Page 95: Humidifier Heater/Safety Thermostat
Chapter 5: Troubleshooting Switches/Thermostat 5.3.1 Humidifier Heater/Safety Thermostat The humidifier has two separate heater elements rated at 225 watts at 104 volts. They are connected in parallel for 115 volt operation and in series for 230 volt operation. The humidifier safety thermostat is in series with the heater. -
Page 96: Elevating Base Motor And Canopy Motor
Chapter 5: Troubleshooting Switches/Thermostat Temperature (°C) Resistance (Ohms) 1353 1017 5.3.4 Elevating Base Motor and Canopy Motor If you must replace a footswitch when the bed is all the way down, use Pedal screen on Service screen to raise or lower the bed. To troubleshoot a broken canopy roll pin, run the elevating base all the way up. -
Page 97: Troubleshooting The Toroidal Transformer
Chapter 5: Troubleshooting Servo Controlled Oxygen pins in the cable. Because it is difficult to remove and measure the cable without possibly changing the resistance, it is suggested that you keep a spare 50 pin ribbon cable to use as a troubleshooting tool. 5.3.6 Troubleshooting the Toroidal Transformer Perform the following tests in service mode. - Page 98 Chapter 5: Troubleshooting Servo Controlled Oxygen FIGURE 5-1. Servo 02 Item Description Oxygen0 Oxygen reading in percent from first sensor cell: Oxygen1 Oxygen reading in percent from second sensor cell: Sensor0 Voltage output in millivolts from first sensor cell. Sensor1 Voltage output in millivolts from second sensor cell.
-
Page 99: Components Control
Chapter 5: Troubleshooting Servo Controlled Oxygen 5.4.2 Components Control To open and close oxygen-related items on the Servo O2 information screen: In service Mode, touch Calibration in the left-navigation area. The display area is populated with calibration options. Touch Servo O2. The Servo O2 information screen appears. - Page 100 Chapter 5: Troubleshooting Servo Controlled Oxygen Alarm Message Meaning Cause Action Oxygen Probe One of the Defective Sensor(s) In service mode sensor0 and Failure sensors is sensor1 should be 23-280. If reading out of outside this range replace the range (23-280 sensors.
- Page 101 Chapter 5: Troubleshooting Servo Controlled Oxygen Alarm Message Meaning Cause Action Oxygen System The sensor plug Device is cold: Allow device to warm up. Failure 1 thermistor <15 degrees C. temperature Cooling fan is not Test the cooling fan. Refer to the reading is out of running when the Tips section (5.4.4).
- Page 102 Chapter 5: Troubleshooting Servo Controlled Oxygen Alarm Message Meaning Cause Action Oxygen System Check O2 Supply O2 supply not Verify O2 supply, minimum 45psi Failure 5 alarm has been connected (310 kPa) and 45 L/min is silenced twice connected to the inlet. and the sensor1 Calibration valve stuck Check the calibration valve.
-
Page 103: Servo Controlled Oxygen Troubleshooting Tips
Chapter 5: Troubleshooting Servo Controlled Oxygen 5.4.4 Servo Controlled Oxygen Troubleshooting Tips 5.4.4.1 Check Supply Valves and End Cap Safety Valve Power up device in service Mode. Close the canopy. Select Servo O2. Be sure O2 is connected. Open V1. You should hear gas flow. -
Page 104: Sensor Housing Temperature Sensor Temperature To Resistance Curve
Chapter 5: Troubleshooting Status 5.4.4.4 Sensor Housing Temperature Sensor Temperature to Resistance Curve Temperature Resistance 15 °C 15.720 kOhm 25 °C 10.000 kOhm 30 °C 8.056 kOhm 35 °C 6.530 kOhm 40 °C 5.326 kOhm 45 °C 4.369 kOhm 50 °C 3.604 kOhm 60 °C 2.491 kOhm... -
Page 105: Switches
Chapter 5: Troubleshooting Switches FIGURE 5-3. Status Screen The Minutes Run area shows 2 minute parameters; one that is resettable and one that is not. To reset the resettable minute parameter, touch Reset. To see additional software status information, touch Press here for more software information. FIGURE 5-4. -
Page 106: Error
Chapter 5: Troubleshooting Error Heater Doors Open Heater Doors Closed Canopy Top Canopy Middle Humidifier Add Canopy Raise Water Arrow Canopy Lower Humidifier Reservoir Arrow Engaged Canopy Bottom Canopy Pedal Bed Lower Pedal Bed Raise Pedal FIGURE 5-5. Switch Diagnostic Diagram 5.7 Error Access the Status screen from the main service menu. -
Page 107: Alarm Test
Chapter 5: Troubleshooting Alarm Test The Error screen lists a chronological log of the last 32 system errors that occurred with error number and date. FIGURE 5-6. Error Screen 5.8 Alarm Test Push and Hold the alarm test button on the Setup screen to test the functionality of the alarm light indicators, buzzer, and green power status LED on alarm board. -
Page 108: Figure 5-7. Diagnostic Readings Screen
Chapter 5: Troubleshooting Diagnostic Readings FIGURE 5-7. Diagnostic Readings Screen FIGURE 5-8. Diagnostic Readings Screen Power supply voltage. Should be + 0.25V of 5V. Air Control Temperature. Temperature read by second thermistor in the compartment air probe. Should be + 0.3ºC of ADT temperature. Air display temperature. -
Page 109: Dac Voltage Test
Chapter 5: Troubleshooting Diagnostic Readings High fan speed. Should be 1500 +/- 100 (measured at power up only). Heat sink sensor resistance. Should be 20000 ohms @ 25ºC. Refer to the Tips section (5.3.3) for resistance versus temperature values. 60Hz or 50Hz. Low fan speed. - Page 110 Chapter 5: Troubleshooting Diagnostic Readings 5-28 Service Manual...
-
Page 111: Chapter 6: Alarms And System Failure Codes
Chapter 6: Alarms and System Failure Codes General user alarm descriptions are available in the User Manual. If an alarm requires interaction from service personnel, it is described in this chapter. System failure codes are described in this chapter. 6.1 Alarms 6.1.1 Compartment Sensor Failure Alarm Cause or Circumstances Failure... -
Page 112: Patient Hot - Check Probe 1
Chapter 6: Alarms and System Failure Codes Alarms 6.1.3 Patient Hot - Check Probe 1 Cause or Circumstances Failure Action The Patient Hot alarm activates Baby Mode set temperature is Respond per clinical protocol. when the temperature incorrect for patient. Check the attachment of the skin measured by the skin External heat such as... -
Page 113: Bed Height Pedals Disabled
Chapter 6: Alarms and System Failure Codes Alarms 6.1.6 Bed Height Pedals Disabled Cause or Circumstances Failure Action The Bed Height Pedals Disabled Bed pedal is disabled in service Release the pedal. alarm activates if the bed raise Mode. If the canopy pedal is disabled in or lower pedals have been Bed pedal is disabled in Setup the service screen and you wish to... -
Page 114: Bed Heater Failure Alarm
Chapter 6: Alarms and System Failure Codes Alarms 6.1.9 Bed Heater Failure Alarm This alarm activates only when the canopy is at the bottom position. Cause or Circumstances Failure Action The software has turned on the The bed safety thermostat is If the device was shut off when the incubator heater but it is either open (possibly because the... -
Page 115: Bed Raise/Lower Pedal Failure Alarm
Chapter 6: Alarms and System Failure Codes Alarms 6.1.10 Bed Raise/Lower Pedal Failure Alarm Cause or Circumstances Failure Action One of the bed Raise/Lower Defective bed Raise/Lower Check the switches on the service pedal switches is shorted. pedal switch or harness screen to determine which switch is shorted or open. -
Page 116: Fan Always In High Speed Alarm
Chapter 6: Alarms and System Failure Codes Alarms 6.1.12 Fan Always in High Speed Alarm Cause or Circumstances Failure Action Software cannot read Defective heat sink sensor or Check the heat sink temperature temperature of the heat sink harness sensor resistance in service Mode. sensor in incubator heat sink. -
Page 117: Heater Doors Not Closed Alarm
Chapter 6: Alarms and System Failure Codes Alarms 6.1.14 Heater Doors Not Closed Alarm Cause or Circumstances Failure Action This alarm activates as the Doors not closing Check to sure both heater doors canopy reaches about halfway are closing fully as the canopy down and the heater doors are starts to lower. -
Page 118: Humidity Failure Alarm
Chapter 6: Alarms and System Failure Codes Alarms 6.1.16 Humidity Failure Alarm Note: The Humidity Failure alarm can be caused by non-humidifier issues. Cause or Circumstances Failure Action The Motor Drive Failure alarm is If this alarm activates, it opens Refer to section 6.1.18 safety relay 2 and disables the... -
Page 119: In Transition - Heat Off Alarm
Chapter 6: Alarms and System Failure Codes Alarms 6.1.17 In Transition - Heat Off Alarm Cause or Circumstances Failure Action As the canopy reaches the top Note: This message should always position (for warmer mode) or be on when the device is in the bottom position (for transition between the incubator mode), the software... -
Page 120: Motor Drive Failure Alarm
Chapter 6: Alarms and System Failure Codes Alarms 6.1.18 Motor Drive Failure Alarm Cause or Circumstances Failure Action The software has detected that Defective relay board Replace the relay board. the elevating base motor or the Note: Humidifier will not operate canopy motor was running during this failure. -
Page 121: Radiant Heater Failure Alarm
Chapter 6: Alarms and System Failure Codes Alarms 6.1.20 Radiant Heater Failure Alarm Cause or Circumstances Failure Action The software has turned on the Defective radiant heater or Check the resistance of the radiant radiant heater but it is either wire harness heater. -
Page 122: Up Pedal Pressed Alarm
Chapter 6: Alarms and System Failure Codes System Failure Codes 6.1.22 Up Pedal Pressed Alarm Cause or Circumstances Failure Action The bed up pedal switch was None When the bed up pedal switch is pressed and held on during released, the alarm deactivates. If power up. -
Page 123: System Failure 12
Chapter 6: Alarms and System Failure Codes System Failure Codes Cause(s) Action(s) Defective Servo Oxygen Disconnect RS485 bus cable from J6 on the control board. Power cycle the cable device. If the error clears, replace the RS485 cable going to the Servo Oxygen board. -
Page 124: System Failure 14
Chapter 6: Alarms and System Failure Codes System Failure Codes 6.2.4 System Failure 3 System failure 3 indicates: During ADC calibration, the software detected a channel out of range. Cause(s) Action(s) During system calibration, Before calibrating, make sure J1, J2, and J4 on the control board are J1, J2, and J4 were not disconnected. -
Page 125: System Failure 18
Chapter 6: Alarms and System Failure Codes System Failure Codes 6.2.8 System Failure 8 System failure 8 indicates: No Line Frequency. When troubleshooting this error code, have control board, 50 pin ribbon cable, and relay board on hand. Cause(s) Action(s) Defective control board Measure the signal on the control board between J9 pin 43, and TP1-4 (Ground). -
Page 126: System Failure 22
Chapter 6: Alarms and System Failure Codes System Failure Codes 6.2.11 System Failure 13 System failure 13 indicates: Defective SRAM. Cause(s) Action(s) Defective SRAM circuit on Replace control board. control board 6.2.12 System Failure 14 System failure 14 indicates: Defective WDOG. Cause(s) Action(s) Defective watch dog circuit... - Page 127 Chapter 6: Alarms and System Failure Codes System Failure Codes Cause(s) Action(s) No output from heater In service Mode, check the output voltage of the heater isolation isolation transformer. transformer at the one pin connectors on the black and white wires on the Defective relay board.
-
Page 128: System Failure 26
Chapter 6: Alarms and System Failure Codes System Failure Codes 6.2.14 System Failure 16 System failure 16 indicates: When the device performed Power-on Self Test, either the incubator heater or the radiant heater could not be turned off. Cause(s) Action(s) If this error occurs during Reconnect J1, J2 and J4 on the control board. -
Page 129: System Failure 29
Chapter 6: Alarms and System Failure Codes System Failure Codes 6.2.17 System Failure 19 System failure 19 indicates: No Audio Frequency. Cause(s) Action(s) Defective PF Battery PF Battery is only used for power fail. Try powering up the device with the battery disconnected. -
Page 130: System Failure 34
Chapter 6: Alarms and System Failure Codes System Failure Codes 6.2.20 System Failure 23 System failure 23 indicates: During operation the system was unable to turn OFF either the radiant heater or the incubator heater. Cause(s) Action(s) Other errors Power down the device. During the system tests after power-up, the device should detect system failure 16. -
Page 131: System Failure 37
Chapter 6: Alarms and System Failure Codes System Failure Codes 6.2.23 System Failure 27 System failure 27 indicates: Defective non-volatile memory. Cause(s) Action(s) Defective circuit on control Replace the control board. board 6.2.24 System Failure 28 System failure 28 indicates: During operation, the SBC board lost communication with control board. Cause(s) Action(s) Refer to system failure 0. -
Page 132: System Failure 60
Chapter 6: Alarms and System Failure Codes System Failure Codes 6.2.26 System Failure 30 System failure 30 indicates: Mains voltage reading LV1 is outside of the expected range. Cause(s) Action(s) Mains Voltage Comp Calibrate the line voltage. Circuit is not calibrated correctly. -
Page 133: System Failure 63
Chapter 6: Alarms and System Failure Codes System Failure Codes 6.2.29 System Failure 35 System failure 35 indicates: Wrong dipswitch set up. Cause(s) Action(s) Switches set wrong Check the 8 position dipswitch on the control board. Verify that Switch 1 and Switch 2 are on. -
Page 134: System Failure 81
Chapter 6: Alarms and System Failure Codes System Failure Codes 6.2.32 System Failure 38 System failure 38 indicates: Software has detected that door switches show that heater doors are both open and closed (which is not physically possible). Cause(s) Action(s) Defective switches or Use the service screen to determine which switches are on. -
Page 135: System Failure 99
Chapter 6: Alarms and System Failure Codes System Failure Codes 6.2.37 System Failure 63 Cause(s) Action(s) Control board has Replace control board software with latest version incompatible software version. 6.2.38 System Failure 70 Cause(s) Action(s) Unexpected SBC software Power cycle the device. If issue persists replace SBC. problem 6.2.39 System Failure 71 Cause(s) - Page 136 Chapter 6: Alarms and System Failure Codes System Failure Codes 6.2.42 System Failure 83 System failure 83 indicates: Unexpected SBC Software problem. Cause(s) Action(s) Unexpected SBC Software Power cycle the device. If issue persists, replace the SBC. problem 6.2.43 System Failure 85 Cause(s) Action(s) Defective flat ribbon cable...
-
Page 137: Chapter 7: Repair Procedures
Chapter 7: Repair Procedures SENSITIVE TO ELECTROSTATIC DISCHARGE CAUTION An Electrostatic Discharge (ESD) Susceptibility symbol is displayed to alert service personnel that the part(s) are sensitive to electrostatic discharge and that static control procedures must be used to prevent damage to the equipment. Warning: After performing any repair or calibration, always perform the Service Checkout Procedure before putting the device back into service. -
Page 138: Figure 7-1. Heater Housing Cover And Soffit
Chapter 7: Repair Procedures Canopy Removal for Service Remove the canopy from the device: Using a small straight-blade screwdriver, remove the six arrow clips that secure the soffit beneath the control panel end of the canopy. Remove the soffit. (Refer to Figure 7-1.) Save the six arrow clips and soffit for later reinstallation. -
Page 139: Figure 7-2. Nuts
Chapter 7: Repair Procedures Canopy Removal for Service Using a 2.5 mm hex key, remove the four screws that secure the heater housing cover to the heater door bracket. Remove the heater housing cover. Save the four screws and heater housing cover for later reinstallation. -
Page 140: Figure 7-4. Canopy, Bracket, And Heater Housing
Chapter 7: Repair Procedures Canopy Removal for Service Canopy Bracket Housing bracket Button head screws and threaded inserts Access holes Canopy mounting nuts Heater Door Bracket Canopy FIGURE 7-4. Canopy, Bracket, and Heater Housing Support the canopy and hold the threaded inserts inside the canopy while using a 2.5 mm hex key to remove the three button head screws across the top of the canopy. -
Page 141: Figure 7-6. Canopy Seal Parts
Chapter 7: Repair Procedures Canopy Removal for Service Use the Enhanced Seal Retrofit Kit (M1208286) to replace the seal hardware. Clean the canopy before reinstallation. Refer to the following figure while performing the remaining steps in this section: Corner pin gasket SE corner cover Corner pin Corner receiver... -
Page 142: Figure 7-7. West Side Seal Parts
Chapter 7: Repair Procedures Canopy Removal for Service Smooth nut Canopy West rail Door support Door support gasket Spacer washer INSIDE OF CANOPY M4 splitlock washer M4x20 buttonhead socket cap screw M4x16 buttonhead socket cap screw Inscribed “W” OUTSIDE OF CANOPY West seal M4x30 sockethead set screw cup point... -
Page 143: Figure 7-8. Using North Seal To Help Position Washers
Chapter 7: Repair Procedures Canopy Removal for Service Note: The cutouts in the north seal may be used to help with this positioning of these washers as shown in the following figure: FIGURE 7-8. Using North Seal to Help Position Washers Thread the set screw into the threaded hole in the guide rail near the “E”... -
Page 144: Figure 7-10. North Seal Parts
Chapter 7: Repair Procedures Canopy Removal for Service Install and remove seals to check for easy installation. * You may wish to retain the hardware by sliding the seal over the rail. Then you can place the spacer washers on that rail assembly before placing the rail assembly on the canopy. -
Page 145: Figure 7-12. Hole Fill Assembly (2X) For Canopies With Six Holes Across North End
Chapter 7: Repair Procedures Canopy Removal for Service Start all set screws in the spacer, with the hex socket end of the screw pointing to the outside of the canopy. Add plastic spacer washers to the set screws. Install the north spacer and washers to the canopy with smooth nuts. If your canopy has six holes across the north end, install parts for the middle four holes as shown Figure 7-10 and install parts for the remaining two holes as shown in... -
Page 146: Figure 7-13. South Seal Parts
Chapter 7: Repair Procedures Canopy Removal for Service Remove the north seal. South seal M4x16 buttonhead socket cap screw OUTSIDE OF CANOPY M4 splitlock washer South rail Spacer washer Canopy Smooth nut INSIDE OF CANOPY FIGURE 7-13. South Seal Parts Install south parts on the upside-down canopy: Install the south guide rail with the four button head screws (2.5 mm hex key), washers, and lock washers provided with the kit. -
Page 147: Figure 7-14. South Corner Parts
Chapter 7: Repair Procedures Canopy Removal for Service Install corner parts: Using a Phillips screwdriver, install the corner pin, gasket, and corner receiver on the upside-down canopy at each south corner (the corners opposite the heater door cutout). The corner receiver rib should be closest to the canopy edge. -
Page 148: Figure 7-16. Installing Rail Spacers
Chapter 7: Repair Procedures Canopy Removal for Service Install additional hardware: Make sure that four set screws are inserted into the heater door bracket. Also make sure that the set screw on each side of the canopy at the display end is aligned with the hole in the heater door bracket. - Page 149 Chapter 7: Repair Procedures Canopy Removal for Service Make sure that all seals can be easily installed: At the north end of the canopy, insert the north notched seal in the slot in front of the red/orange warning spacer and slide it up to snap it into place. You should hear an audible snap from each end.
-
Page 150: Figure 7-17. Soffit
Chapter 7: Repair Procedures Canopy Removal for Service Warning: The OmniBed must be properly reassembled per these guidelines. Improper reassembly of the OmniBed may result in unsafe operation of the device. Screw in the rail locking screws in the oblong slot in each rail to unlock the rails. Refer to Figure 7-1. -
Page 151: Figure 7-19. Untrimmed And Trimmed Soffit
Chapter 7: Repair Procedures Canopy Removal for Service Check for and remove any sharp edges at each of the two corner cuts: Before After FIGURE 7-19. Untrimmed and Trimmed Soffit Reinstall the soffit using the six arrow clips. Reinstall north seal. Make sure that all seals can be easily removed: Lift and unsnap the corner covers. -
Page 152: Canopy Seals Replacement Parts
Chapter 7: Repair Procedures Porthole Door Replacement Slide the short south seal to the side. Unsnap the notched north seal by pulling down the ends. Repeat step 10 to reinstall the seals. Perform the checkout procedures in Chapter “Repair Procedures” on page 7-1. Warning: After performing any repair or calibration, always perform service checkout procedures before putting the device back into service. -
Page 153: Display Head Removal
Chapter 7: Repair Procedures Display Head Removal Remove the porthole door. Now the door springs can be accessed along with screws that secure the inside half of the hinge cover. To replace the porthole door, put the door back in place in the open position, install the springs, then slide the hinge pin back in place. -
Page 154: Right Rail Assembly Repair Procedures
Chapter 7: Repair Procedures Right Rail Assembly Repair Procedures Using a 3 mm hex key, loosen the 4 screws that secure the display module to the nut bars on either side of the display module 2-3 turns. (item 2) Do not remove the screws. Using a 2 mm hex key remove the two lower screws holding the nut bar (item 3). -
Page 155: Figure 7-22. Disconnecting Heater Door Cable
Chapter 7: Repair Procedures Right Rail Assembly Repair Procedures Screw Canopy bracket Conical cap Hole plug Smaller hole Lift rail Screw Door cable Front cable clip Steel tube Side cable clip Conical cap Plastic tube FIGURE 7-22. Disconnecting Heater Door Cable Lock the rails in the intermediate position by raising the canopy then slowly lowering it until the rail locking screws align with the horizontal oblong holes in the rails. -
Page 156: Figure 7-23. Rail Decorative Strips, End Caps, And Wire Cover
Chapter 7: Repair Procedures Right Rail Assembly Repair Procedures Upright Decorative strip Bottom end cap Wire covers FIGURE 7-23. Rail Decorative Strips, End Caps, and Wire Cover Remove the two flat head screws (3 mm hex key) that hold the canopy bracket to the lift rail. Use a 2.5 mm hex key to loosen the 2 screws in the keyhole slots and remove the 6 remaining screws that secure the Control panel cover, then remove the cover. -
Page 157: Removing The Left Upright
Chapter 7: Repair Procedures Right Rail Assembly Repair Procedures Lift Motor Right upright Motor bracket Lift Motor Coupler Gear box FIGURE 7-24. Removing the Lift Motor Remove the Display head assembly by following the steps in “Display Head Removal” on page 7-17. - Page 158 Chapter 7: Repair Procedures Right Rail Assembly Repair Procedures Disconnect the two electrical connectors to the heater housing and feed them out of the slot in the canopy bracket so they do not catch when the rail tension is released. Loosen the 2 screws in the keyhole slots and remove the 6 remaining screws that secure the control panel cover, then remove the cover.
-
Page 159: Right Rail Internal Repairs
Chapter 7: Repair Procedures Right Rail Assembly Repair Procedures 7.4.3 Right Rail Internal Repairs 7.4.3.1 Removing the Inner Rail Assembly Refer to “Figure 7-24 Removing the Lift Motor”, “Figure 7-25 Right Rail Disassembly”, and “Figure 7-39 Heater Door Cable Adjustment”. Lift rail Pinch guard Access hole... -
Page 160: Replacing Rollers And Tension Springs
Chapter 7: Repair Procedures Right Rail Assembly Repair Procedures 7.4.3.2 Replacing Rollers and Tension Springs Refer to “Figure 7-26 Rollers and Tensioning Spring”. STEP 3 Lift rail Bearing Roller mounting screw Center rollers Tensioning plate Roller tensioning spring FIGURE 7-26. Rollers and Tensioning Spring The rollers can be removed one at a time by removing the screw (4 mm hex key) at their hub and pulling off the roller and bearing. -
Page 161: Replacing The Rail Buoyancy Springs
Chapter 7: Repair Procedures Right Rail Assembly Repair Procedures Remove the screw that secures the lift rail and the belt channel together (this will require either a 3 or 4 mm hex key). 7.4.3.4 Replacing the Rail Buoyancy Springs Refer to “Figure 7-27 Replacing the Rail Buoyancy Springs”. - Page 162 Chapter 7: Repair Procedures Right Rail Assembly Repair Procedures Reinstall the pinch guard. Be sure to orient the pinch guard with the holes in the keyhole slots at the bottom of the rail. Drop a length of wire down the inside of the extended upright so that the wire appears at the bottom, and attach that wire to the holes in the upper hole of the tube of the door opening assembly.
-
Page 163: Left Rail Internal Repairs
Chapter 7: Repair Procedures Left Rail Internal Repairs Reinstall the connection panel at the bottom of the electrical enclosure. Fasten the control panel cover to the back of the enclosure. 7.5 Left Rail Internal Repairs 7.5.1 Removing the Inner Rail Assembly Refer to “Figure 7-28 Left Inner Rail”. -
Page 164: Replacing The Rail Buoyancy Springs
Chapter 7: Repair Procedures Left Rail Internal Repairs 7.5.2 Replacing the Rail Buoyancy Springs Refer to “Figure 7-29 Left Rail Springs and Spools”. STEP 6 Buoyancy spring Lift rail Plastic washer Spring spool Cable carrier channel Cable carrier FIGURE 7-29. Left Rail Springs and Spools Using a 4 mm hex key, remove the screw that secures the springs to the lift rail. -
Page 165: Replacing Rollers, Tension Springs, And Cable Carrier Links
Chapter 7: Repair Procedures Left Rail Internal Repairs 7.5.3 Replacing Rollers, Tension Springs, and Cable Carrier Links Refer to “Figure 7-26 Rollers and Tensioning Spring”. The rollers can be removed one at a time by removing the screw (4 mm hex key) at their hub and pulling off the roller and bearing. -
Page 166: Replacement Of The Left Upright Heater Wire Harness/Cable Carrier Assembly
Chapter 7: Repair Procedures Left Rail Internal Repairs into the upright. Using a 3 mm hex key, reinstall the side roller bracket. To make sure it is properly seated in its tracks, move the rail assembly through its full range of travel to make sure it does not hang-up or bind before reattaching the upright to the device. -
Page 167: Removing And Disassembling The Rail
Chapter 7: Repair Procedures Left Rail Internal Repairs 7.5.5.1 Removing and Disassembling the Rail Refer to “Figure 7-29 Left Rail Springs and Spools”. Remove the left upright following section 7.4.2. Remove the inner rail assembly following section 7.4.3.1. Remove the 3 buoyancy spring spools from the cable carrier channel. Save the spring spools and plastic washers for reinstallation. -
Page 168: Reinstalling The Harness On The Left Rail
Chapter 7: Repair Procedures Left Rail Internal Repairs 7.5.5.2 Reinstalling the Harness on the Left Rail On the left rail end of the replacement harness, mark the location on the harness where the cable tie was located. Cable Tie FIGURE 7-32. Cable Tie Remove the cable tie that secures the harness to the carrier. -
Page 169: Removing The Old Harness From The Cable Carrier Channel
Chapter 7: Repair Procedures Left Rail Internal Repairs 7.5.5.3 Removing the Old Harness from the Cable Carrier Channel Open the first 4 exposed cable guard latches at the cable carrier channel end. FIGURE 7-34. Opened Cable Guard Latches Unsnap the links with open covers leaving the end riveted link and 2 additional links on the cable carrier channel. -
Page 170: Reassembly
Chapter 7: Repair Procedures Radiant Heater Assembly Repair Procedures Bring Lift Rail and Cable Carrier Channel together as shown in the following figure. Lift rail Cable carrier channel Push cable down Heater wire harness/cable carrier assembly FIGURE 7-36. Lift Rail and Cable Carrier Channel Together Make sure that the cables within the cable guard are not overlapping. -
Page 171: Figure 7-37. Canopy Alignment
Chapter 7: Repair Procedures Radiant Heater Assembly Repair Procedures Raise the canopy to the intermediate lock position, then lock it in place by loosening the rail locking screws on the outside of both uprights so that their heads engage the holes in the uprights. Shut off the device and disconnect the power cord. -
Page 172: Realigning The Canopy
Chapter 7: Repair Procedures Radiant Heater Assembly Repair Procedures 7.6.1.1 Realigning the Canopy Refer to “Figure 7-37 Canopy Alignment”. There are four nuts and four nut-and-bolt sets that adjust canopy alignment. These require a 10 mm wrench and torque to approximately 81 inch-pounds. Loosen all eight black canopy alignment nuts. -
Page 173: Replacing The Radiant Heater
Chapter 7: Repair Procedures Radiant Heater Assembly Repair Procedures 7.6.2 Replacing the Radiant Heater Refer to “Figure 7-1 Heater Housing Cover and Soffit” “Figure 7-38 Radiant Heater Disassembly”. Heater housing Grommet Reflector Heating element Heater guard Warning label FIGURE 7-38. Radiant Heater Disassembly Before replacing the heating element, use an ohmmeter between the pins to determine if the heating element is the failed electrical component. - Page 174 Chapter 7: Repair Procedures Radiant Heater Assembly Repair Procedures Remove the 2 screws and lock washers (2.5 mm hex key) that secure the reflector and remove the heater assembly. Remove the 2 nuts and lock washers (5.5 mm wrench) from the back of the reflector and remove the heating element and heater guard.
-
Page 175: Heater Door Spool Assembly
Chapter 7: Repair Procedures Radiant Heater Assembly Repair Procedures 7.6.3 Heater Door Spool Assembly Refer to “Figure 7-39 Heater Door Cable Adjustment”. Right (East) Side Left (West) Side Nylon washer (gray) Inner cam (white) Radiant heater arm Outer cam (white) Apply Lubriplate here. -
Page 176: Heater Door Cable Adjustment
Chapter 7: Repair Procedures Radiant Heater Assembly Repair Procedures To replace the door cable, use a flat screwdriver blade to pry the top tang (12 o’clock position) on the spool assembly and pull the cable off the spool toward you. Use a 2.5 mm hex key to separate the cable from the spool. -
Page 177: Figure 7-41. Removal Of The Lower M5 Nut
Chapter 7: Repair Procedures Radiant Heater Assembly Repair Procedures Remove the wrench from the cross hole in the spring tube and lower the tube to the bottom of travel with the string. Remove the lower M5 nut from the spring tube assembly at the bottom of the rail. Bracket Lower nut Upper nut... -
Page 178: Figure 7-42. Dog Point Of The Set Screw
Chapter 7: Repair Procedures Radiant Heater Assembly Repair Procedures FIGURE 7-42. Dog Point of the Set Screw If it is not, re-insert the securing wrench and retighten the set screw. Re-install the hole plug. Ensure that the opposing M5 nuts on the rod are tightened to the bracket. (Refer to “Figure 7-41 Removal of the Lower M5 Nut”.) -
Page 179: Compartment Sensor Repairs
Chapter 7: Repair Procedures Compartment Sensor Repairs 7.7 Compartment Sensor Repairs Refer to “Figure 7-43 Compartment Sensor Disassembly”. Compartment sensor O-ring Break plate Shim washer Humidity sensor Cylindrical spacer Probe housing cover Back panel Probe cable clip FIGURE 7-43. Compartment Sensor Disassembly Using a 2.5 mm hex key, remove the screw that secures the probe cable clip to the back panel. -
Page 180: Removing The Upper End Cap Spring
Chapter 7: Repair Procedures Removing the Upper End Cap Spring 7.8 Removing the Upper End Cap Spring Refer to “Figure 7-44 Top Rail End Cap”. Top inner end cap Spring Top outer end cap Roll pin FIGURE 7-44. Top Rail End Cap To replace the retaining spring, use a punch to push the roll pin in the top of the lift rail out about ¼... -
Page 181: Lower Device Repairs
Chapter 7: Repair Procedures Lower Device Repairs 7.9 Lower Device Repairs 7.9.1 Removing the Chassis Cover with the Storage Drawer in Place Refer to “Figure 7-45 Chassis Bottom Cover”. Wire raceway cover Chassis cover Chassis FIGURE 7-45. Chassis Bottom Cover Note: It is not necessary to remove the storage drawer before removing the chassis cover, but you may wish to remove it to provide easier access to the chassis cover. -
Page 182: Incubator Fan, Fan Motor, And Optical Fan Sensor
Chapter 7: Repair Procedures Lower Device Repairs Motor Motor shaft Motor isolators Motor bracket Thermostat FIGURE 7-46. Fan Motor 7.9.2 Incubator Fan, Fan Motor, and Optical Fan Sensor Refer to “Figure 7-48 Bed Disassembly”, “Figure 7-47 Heat Sink and Fan”, and “Figure 7-46 Fan Motor”. -
Page 183: Incubator Heater Replacement
Chapter 7: Repair Procedures Lower Device Repairs 7.9.3 Incubator Heater Replacement Refer to “Figure 7-47 Heat Sink and Fan”, and “Figure 8-14 Upper Chassis”. Heat sink Incubator heater (not shown) Fan seal Fan hub Heat sink gasket Incubator heater Motor shaft Canopy finger switch Chassis Flexible membrane... -
Page 184: Elevating Base
Chapter 7: Repair Procedures Lower Device Repairs Remove the 14 mounting screws that secure the heat sink. Remove the heatsink. Remove the retaining clip and slide the cartridge out of the heat sink. To reassemble, seat the fan seal in the center bore of the heatsink and use it to align the fan shaft before fully securing the heat sink with its mounting screws. -
Page 185: Figure 7-49. Elevating Base With Three-Shroud Assembly
Chapter 7: Repair Procedures Lower Device Repairs Main bracket casting Back cover Lower shroud Column power cable Elevating column Outer column Upper shroud Lower mounting plate Caster (wheel) Bed raise/ lower pedals 12 mm screw Canopy pedal 6 mm screw FIGURE 7-49. -
Page 186: Chassis Replacement
Chapter 7: Repair Procedures Lower Device Repairs Use a 2.5 mm hex wrench to remove four M4 flat washers, four M4 split lock washers, and four M4x10 button head socket cap screws, that attach the back cover shroud to the lower shroud. Use a 4 mm hex wrench to remove two M6 flat washers, two M6 split lock washers, and two M6x12 button head screws, that attach the back cover shroud to the base plate. -
Page 187: Bed Raise/Lower Pedal Switch
Chapter 7: Repair Procedures Lower Device Repairs 7.9.6 Bed Raise/Lower Pedal Switch Run the bed up to the elevating base’s top travel limit. Power down the device and unplug it. Use a 2.5 mm hex wrench to remove four M4 flat washers, four M4 split lock washers, and four M4x10 button head socket cap screws, that attach the back cover shroud to the lower shroud. -
Page 188: Bed Tilt Brake Pad Replacement
Chapter 7: Repair Procedures Bed Tilt Brake Pad Replacement Connect the blue and black connectors. Secure the connection using the plastic adhesive connector locking pieces that you saved in step 6 or a new one (part number 6600-0572-600). Tuck the connector assembly down between the chassis and the electronics enclosure. Remove the adhesive backing on the new membrane switch and attach it to the chassis. -
Page 189: Wheel Replacement
Chapter 7: Repair Procedures Wheel Replacement 7.11 Wheel Replacement Refer to “Figure 7-49 Elevating Base with Three-shroud Assembly”. The wheels may be replaced with the device upright or carefully placed on its back. You may wish to lock the canopy in its shipping position. Lock all the other wheels. -
Page 190: Figure 7-51. Humidifier Parts
Chapter 7: Repair Procedures Humidifier Assembly Repairs M3 x 16 Phillips M3 x 12 Phillips head screw head screw (Attaches ground wire with two star washers) Reservoir switch Reservoir switch M3 x 10 socket head button cap screw Top bracket Star washer Spacer M3 x 10 Phillips head... -
Page 191: Reassembly
Chapter 7: Repair Procedures Humidifier Assembly Repairs 7.12.2 Reassembly Screw the steam outlet in the threaded hole on the heater mount. Slide the silicone tube on the steam outlet flush to the hex. Screw the heater cartridge assembly into the heater mount, then back it off so the harness exits between the two thermostat mounting holes. -
Page 192: Control Panel And Display Module Procedures
Chapter 7: Repair Procedures Control Panel and Display Module Procedures 7.13 Control Panel and Display Module Procedures 7.13.1 Probe Panel Refer to “Figure 7-52 Probe Panel” “Figure 8-1 Probe Panel Assembly”. Power switch Probe panel housing Probe panel housing PF Battery holder PF Battery Electrical enclosure FIGURE 7-52. -
Page 193: Power Fail Battery
Chapter 7: Repair Procedures Control Board 7.13.1.1 Power Fail Battery The PF Battery snaps into a holder on the side of the probe panel housing. It has two snap connectors at its top. When replacing the battery, its easier to first connect the terminals then push the battery into its holder. Note: Run the device for at least two hours to charge the new battery before using the device. -
Page 194: Relay Board
Chapter 7: Repair Procedures Relay Board Slide the control board out about an inch and disconnect all the electrical connectors along its outside edge, then remove the board. Dipswitch configuration on replacement control boards. (Refer to Figure 8-39.) • Switch 1 must be ON. •... -
Page 195: Toroidal Transformer
Chapter 7: Repair Procedures Power Supply To verify the power supply outputs are correct, measure the following voltages on one of the unused connectors that feed power to the option boards. The voltages are not adjustable. If they are out of specification, the power supply must be replaced. -
Page 196: Servo Controlled Oxygen Service Procedures
Chapter 7: Repair Procedures Servo Controlled Oxygen Service Procedures 7.18 Servo Controlled Oxygen Service Procedures 7.18.1 Installing Oxygen Sensors Refer to Figure 7-54. Oxygen sensor Sensor housing cover Sensor housing cover Sensor housing door Captive screw Chassis cover FIGURE 7-54. Installing Sensors Slide the drawer to one side and using a 3 mm hex key, loosen the captive screws in the chassis cover sensor housing door and swing the door down to access the sensor housing. -
Page 197: Sensor Housing Repairs
Chapter 7: Repair Procedures Servo Controlled Oxygen Service Procedures 7.18.3 Sensor Housing Repairs Sensor housing cover Calibration fan Sensor plug assembly PC board Black hoses White hoses FIGURE 7-55. Sensor Housing 7.18.3.1 Sensor Housing Repairs: Boards, Calibration Fan Assembly, and Sensor Plug Assembly Slide the drawer to one side and using a 3 mm hex key, loosen the captive screws in the chassis cover sensor housing door and swing the door down to access the sensor housing. -
Page 198: Sensor Housing Repairs: Calibration Valve
Chapter 7: Repair Procedures Servo Controlled Oxygen Service Procedures 7.18.3.2 Sensor Housing Repairs: Calibration Valve Slide drawer to one side and remove three M4 screws that secure bottom cover to chassis. Remove the humidifier reservoir by pulling forward from bottom. A sheet metal ground strap is located behind the reservoir. -
Page 199: Valve Housing Repairs
Chapter 7: Repair Procedures Servo Controlled Oxygen Service Procedures 7.18.4 Valve Housing Repairs Regulator assembly Supply valve Manifold FIGURE 7-56. Valve Housing 7.18.4.1 Valve Housing Repairs: Regulator Assembly Using a 3 mm hex key, remove the 4 screws that secure the valve housing bottom cover and remove the cover. -
Page 200: End Cap Safety Valve
Chapter 7: Repair Procedures Servo Controlled Oxygen Service Procedures Use a pair of pliers to turn the valve out of the manifold block. When installing a new valve, finger tighten it into the manifold. Perform the Pre-use Checkout Supply Valve Leak Test. 7.18.5 End Cap Safety Valve M4 flat head screw Elbow fittings... -
Page 201: Display Module Repairs
Chapter 7: Repair Procedures Display Module Repairs 7.19 Display Module Repairs 7.19.1 Rear Cover Using a 3 mm hex key, remove the 4 (M4 X 10) button head socket screws, M4 flat washer, and M4 split washers that secure the back cover to the display module and remove the cover. FIGURE 7-58. -
Page 202: Alarm Lens
Chapter 7: Repair Procedures Display Module Repairs 7.19.2 Alarm Lens Remove the display housing rear cover. See “Rear Cover” on page 7-65. Slide the alarm lens toward the back of the device and remove. FIGURE 7-59. Alarm Lens Note: When reinstalling the Alarm Lens, it may be helpful to loosen two or more of the (40 x 12) thread forming screws that hold the Display Bezel to the Carrier Plate. -
Page 203: Figure 7-61. Alarm Board Screws
Chapter 7: Repair Procedures Display Module Repairs Using a T10 torx tool, remove the two 30 x 10 thread forming mounting screws upper left and lower right and remove the Alarm Board. FIGURE 7-61. Alarm Board Screws Note: Do not remove the two middle screws. If you are installing a new Alarm PCA, you will need to complete steps 5 and 6. -
Page 204: Lcd Display Assembly
Chapter 7: Repair Procedures Display Module Repairs 7.19.4 LCD Display Assembly Caution: Failure to raise the Canopy before loosening the bezel mounting screws may result in damage to the Display Assembly. 7.19.4.1 LCD Display Disassembly Power on the unit. Using the foot or hand switch, raise the Canopy all the way to the top. Remove the display housing rear cover. -
Page 205: Figure 7-66. Remove Thread Forming Screws
Chapter 7: Repair Procedures Display Module Repairs Working from the front of the device, using a T10 torx tool, remove the two (30 x 10) thread forming screws that mount the right hand side of the LCD display assembly to the display stand offs. Caution: Be sure to support the display during disassembly to avoid damaging the display. -
Page 206: Lcd Display Assembly
Chapter 7: Repair Procedures Display Module Repairs Caution: The leads on the Display Harnesses are fragile. Care when connecting/ disconnecting the connectors is warranted. Do not disconnect the harnesses from the Display as reinstalling them may cause permanent damage to the Display. Note: If you are replacing the display, new factory installed harnesses are included in the Display Assembly. -
Page 207: Sbc (Single Board Computer) Pca
Chapter 7: Repair Procedures Display Module Repairs 7.19.5 SBC (Single Board Computer) PCA 7.19.5.1 SBC Disassembly Remove the LCD display by following the steps in “LCD Display Assembly” on page 7-68. Working from the back of the device, disconnect the power harness from the SBC PCA by pulling firmly outward on the white Molex connector. -
Page 208: Figure 7-72. Remove Emi Shield
Chapter 7: Repair Procedures Display Module Repairs Working from the back of the device using a T10 torx tool, remove the eight (M3 x 8) thread forming screws that mount the EMI shield to the carrier plate and carefully remove the EMI shield. FIGURE 7-72. -
Page 209: Sbc Assembly
Chapter 7: Repair Procedures Clock Battery Replacement 7.19.5.2 SBC Assembly Reassemble the SBC PCA following “SBC Disassembly” on page 7-71 steps 1 through 6 in reverse order. Caution: The Display Assembly requires two types of Torx-drive thread forming screws. When installing the SBC PCA and EMI Shield it is critical that only the THREAD FORMING, M3X8 screw (2066774-001) as shown in Figure 7-75 is used. -
Page 210: Display Harness Connections
Chapter 7: Repair Procedures Display Harness Connections Caution: Be sure to wrap the battery in insulating tape before disposing to prevent contact with conductive material and shorting out battery. Caution: Dispose of the battery in accordance with local toxic waste regulations. Access service mode. - Page 211 Chapter 7: Repair Procedures Display Harness Connections Service Manual 7-75...
- Page 212 Chapter 7: Repair Procedures Display Harness Connections 7-76 Service Manual...
-
Page 213: Chapter 8: Illustrated Parts
Chapter 8: Illustrated Parts 8.1 Probe Housing Screw, M4 x 8 Socket Head .......... 6600-0707-408 Washer, M4 Split Ring ............. 6600-0713-403 Washer, M4 Flat ..............6600-0712-403 Retaining Frame..............6600-1288-500 Patient Probe Connector Plate ........6600-1287-502 Patient Probe Label* ............6600-2325-102 Compartment Air Probe Kit.......... -
Page 214: Figure 8-1. Probe Panel Assembly
Chapter 8: Illustrated Parts Probe Housing Probe Panel Expanded View Probe Panel Rear View FIGURE 8-1. Probe Panel Assembly Service Manual... -
Page 215: Display Module
Description 2074302-001 SVC Kit DISPLAY FRONT ASSEMBLY 2066764-001 GASKET FOAM LCD 2066766-001 Alarm Lens 2069132-001 LABEL LIGHT PIPE(GE Meatball) 2066760-001 LIGHTPIPE IR 2074304-001 SVC Kit ALARM BOARD 2074303-001 SVC Kit LCD-TOUCH ASSY 2066775-001 SCREW, THREAD FORMING, 30X10 DELTA-PT, OVAL HEAD, S/STEEL,... -
Page 216: Figure 8-2. Display Module Disassembly
Chapter 8: Illustrated Parts Display Module 17a, 17 FIGURE 8-2. Display Module Disassembly Service Manual... -
Page 217: Electrical Enclosure
Chapter 8: Illustrated Parts Electrical Enclosure 8.3 Electrical Enclosure 1. Filter harness ................. 2086378-001 2. Cable twist lock..............6600-1197-600 3. Card cage ................6600-1347-500 4. Relay board bracket ............6600-1166-500 5. Relay board ................2080429-001 120 V 2 amp fuse.............. 6600-0877-600 230 V 1 amp fuse ............. - Page 218 Chapter 8: Illustrated Parts Electrical Enclosure 36. Board retaining bracket..........6600-1822-500 37. M3 Nut for bracket ............6600-0711-403 38. Screw, M4 x 6 ..............…6600-0706-407 39. Lock washer M4..............6600-0713-403 40. Label Ground Mains............……0205-4735-300 41. Locknut M4 ................6600-0714-402 42.
-
Page 219: Figure 8-3. Electrical Enclosure
Chapter 8: Illustrated Parts Electrical Enclosure 3, 20, 53 4, 19, 39, 53 8a, 8b, 20, 42 36, 37, 54, 55 38, 39, 19 25, 21, 20 FIGURE 8-3. Electrical Enclosure Service Manual... -
Page 220: Electronic Enclosure Ground Stackup
Chapter 8: Illustrated Parts Electronic Enclosure Ground Stackup 8.4 Electronic Enclosure Ground Stackup Stud 2 Stud 3 Stud 1 Stud 3 Stud 1 Stud 2 FIGURE 8-4. Electrical Enclosure Ground Stackup Service Manual... -
Page 221: Figure 8-5. Electrical Enclosure Ground Stackup (Cont'd)
Chapter 8: Illustrated Parts Electronic Enclosure Ground Stackup Stud 3 Stud 1 Stud 2 Stud 3 Stud 1 Stud 2 FIGURE 8-5. Electrical Enclosure Ground Stackup (cont’d) Stud 3, Hardware Stack up as follows: 33, 34, Ground from Gearbox/Motor, and 34, 33, 34, Ground from Power Supply AC Input, 34. -
Page 222: Harnesses
Chapter 8: Illustrated Parts Harnesses 8.5 Harnesses 8.5.1 Relay Board Harness Connections Name Part Number Connector ISO Transformer Mains 2078042-001 (115V/220V) 2078103-001 (100V) AC Mains Harness 6600-0731-700 WRM/INC HTR Hardness 6600-0623-700 ISO Adapter HTR Harness 6600-0622-700 Heater Door Switches Harness 6600-0710-700 Hand Hood Control Harness 6600-0744-700... -
Page 223: Control Board Harness Connections
Chapter 8: Illustrated Parts Humidifier Transformer and RS-232 8.5.2 Control Board Harness Connections Name Part Number Connector Environmental Sensor Panel Harness 6600-1513-700 PAT Probe 2 Harness 6600-0716-702 PAT Probe 1 Harness 6600-0716-701 Heat Sink Probe Harness 6600-0742-700 Scale Harness 6600-0728-700 Display Data Harness 6600-0703-700 DC Power Harness*... - Page 224 Chapter 8: Illustrated Parts Humidifier Transformer and RS-232 FIGURE 8-6. Humidifier Transformer and RS-232 8-12 Service Manual...
-
Page 225: Bed And Side Panels
Chapter 8: Illustrated Parts Bed and Side Panels 8.7 Bed and Side Panels Giraffe pressure-diffusing mattress (blue) ..................2076066-001 Clear Plate................6600-1365-500 Rotating Bed ..............6600-1353-500 Translation Deck ............... 6600-1352-500 Tape (5.4 in.)................. 6600-1758-502 Latch Cover ................. 6600-1364-500 Locking Latch ..............6600-1363-500 Spring .................. -
Page 226: Figure 8-7. Bed
Chapter 8: Illustrated Parts Bed and Side Panels This label no longer required. FIGURE 8-7. Bed 8-14 Service Manual... - Page 227 Chapter 8: Illustrated Parts Bed and Side Panels Giraffe OmniBed side wall (Acrylic) with porthole cutouts..............6600-1107-500 Giraffe OmniBed side wall (Polycarbonate) with porthole cutouts** ............6600-1685-500 Giraffe OmniBed East/West Door Kit (Acrylic) (Includes side wall, portholes, hinges, inner wall, door latches) ...............
-
Page 228: Figure 8-8. Side Panel (East/West)
Chapter 8: Illustrated Parts Bed and Side Panels 18, 19, 30 FIGURE 8-8. Side Panel (East/West) 8-16 Service Manual... - Page 229 Chapter 8: Illustrated Parts Bed and Side Panels REAR WALL Front (south) wall with ventilator cut out....6600-0247-854 Front (south) wall with porthole cut out....6600-0247-851 Flat washer ................6600-0712-404 Right front (SE) wall hinge ..........6600-1175-500 Wall hinge snap..............6600-1436-500 Left front (SW) wall hinge ..........
-
Page 230: Figure 8-9. Rear (North) And Front (South) Wall
Chapter 8: Illustrated Parts Bed and Side Panels FIGURE 8-9. Rear (North) and Front (South) Wall 8-18 Service Manual... -
Page 231: Wire Covers
Chapter 8: Illustrated Parts Wire Covers 8.8 Wire Covers Wire cover, left (west) ............6600-0824-700 Screw, M3 x 10 Button Head ........6600-0706-401 Star washer, M3 internal tooth ........6600-0713-431 Wire cover, right (East) ............ 6600-0823-700 8.9 Radiant Heater and Canopy 1. -
Page 232: Figure 8-10. Radiant Heater
Chapter 8: Illustrated Parts Radiant Heater and Canopy FIGURE 8-10. Radiant Heater 8-20 Service Manual... - Page 233 Chapter 8: Illustrated Parts Radiant Heater and Canopy Radiant heater bracket..........6600-1307-500 Bolt, M6 x 12 ............... 6600-0707-481 Nut, M6 x 12................ 6600-0711-460 Heater doors spring spool assembly (includes cable) ..............6600-0857-700 Heater door cable ............6600-0817-700 Screw, M4 x 10 button head ........6600-0706-409 Split ring lock washer............
-
Page 234: Figure 8-11. Canopy
Chapter 8: Illustrated Parts Radiant Heater and Canopy 37, 38 14, 15 FIGURE 8-11. Canopy 8-22 Service Manual... - Page 235 Chapter 8: Illustrated Parts Radiant Heater and Canopy Kits for canopy seals: Seal Replacement Kit (contains the following parts)M1208284 West Canopy Seal, quantity 1 South Canopy Seal, quantity 1 East Canopy Seal, quantity 1 North Canopy Seal, quantity 1 Corner Cover Replacement Kit (contains the following parts)M1208283 Corner Cover SE, quantity 1 Corner Cover SW, quantity 1 Corner Cover Receiver, quantity 2...
-
Page 236: Figure 8-12. Enhanced Canopy Seal Parts
Chapter 8: Illustrated Parts Radiant Heater and Canopy PART, SMOOTH NUT PART, PIN CANOPY GH, Injection molded SPACER RAIL HUMIDIFIER CP3, Machined ART, SPACER WASHER, Machined SCREW, M4 X 30 SKT SET CUP PT SST Retrofit Kit (contains all of the above parts) ...M1208286 SOUTH NORTH (heater door end) - Page 237 Chapter 8: Illustrated Parts Radiant Heater and Canopy Foil door, right (East)* ............6600-1454-500 Heater door, right (East)*..........6600-1309-500 Foil door, left (west)* ............6600-1453-500 Heater door, left (west)* ..........6600-1310-500 Lower pivot bearing............6600-1059-400 Elastic lock nut, M3 ............6600-0714-401 Spherical bearing block ..........
-
Page 238: Figure 8-13. Heater Doors
Chapter 8: Illustrated Parts Radiant Heater and Canopy 23, 24 FIGURE 8-13. Heater Doors 8-26 Service Manual... -
Page 239: Chassis
Chapter 8: Illustrated Parts Chassis 8.10 Chassis Fan seal ................. 6600-1557-500 Fan Replacement Kit............2097465-001 Fan hub ................. 6600-1440-500 Heat sink ................6600-1858-500 Heat sink gasket..............6600-0300-300 Canopy lift switch, left (east)........6600-0736-701 Canopy lift switch, right (west)........6600-0736-702 Hairpin ................... 6600-1046-400 Tie down cylinder ............. - Page 240 Chapter 8: Illustrated Parts Chassis Fan motor bracket ............6600-1162-500 ..............2086675-001 Fan motor Fan ................... 6600-1433-500 Screw, M4 shoulder............6600-1051-400 Flat washer, M5..............6600-0712-409 Motor mount ............... 6600-1000-400 M3 star washer, internal tooth ........6600-0713-431 Screw, M3 x 6 ..............6600-0707-401 Thermostat ................
- Page 241 Chapter 8: Illustrated Parts Chassis 48. Screw, shoulder..............6600-1033-400 49. Flat washer, M5..............6600-0712-404 50. Spring ..................6600-1299-500 51. Spring clip................6600-1300-500 52. Humidifier spacer............. 6600-1814-500 53. Humidifier sound damper ..........6600-1494-500 54. Screw, M3 x 6 button head........... 6600-0706-406 55.
-
Page 242: Figure 8-15. Lower Chassis
Chapter 8: Illustrated Parts Chassis 55, 56 FIGURE 8-15. Lower Chassis 8-30 Service Manual... -
Page 243: Humidifier
Chapter 8: Illustrated Parts Humidifier 8.11 Humidifier Flat washer, M3 x 3.2, ID .5 ........... 6600-0712-402 Split ring lock washer, M3 x 3.1, ID .8....... 6600-0713-402 Screw, M3 x 16 Cheese head Phillips....... 6600-1255-404 Reservoir switch (included in item 21) Button, reservoir switch.......... -
Page 244: Figure 8-16. Humidifier Assembly
Chapter 8: Illustrated Parts Humidifier NOTE: Refer to “7.12 Humidifier Assembly Repairs” Repair Procedures before ordering parts. FIGURE 8-16. Humidifier Assembly 8-32 Service Manual... -
Page 245: Elevating Base
Chapter 8: Illustrated Parts Elevating Base 8.12 Elevating Base Main Bracket............... 6600-1183-500 Flat Washer, ................ M86600-0712-406 Nut, M8 .................. 6600-0714-405 Lower Shroud ..............M1078152 Cover Shroud ..............M1078156 Leg Casting................6600-1599-500 7a. SVCE Kit Canopy Fswitch Gray ........2081691-001 (Includes one pedal and labels for both left and right pedals. Can be used on left or right side.) 7b. -
Page 246: Figure 8-17. Base And Elevating Column
Chapter 8: Illustrated Parts Elevating Base 33, 32, 31, 10 7b, 7c, 7d 7a, 7b FIGURE 8-17. Base and Elevating Column 8-34 Service Manual... -
Page 247: Uprights And Lift Rail Components
Chapter 8: Illustrated Parts Uprights and Lift Rail Components 8.13 Uprights and Lift Rail Components Lift rail ....................6600-1332-500 Lift motor isolator.................6600-1099-400 Lift motor bracket.................6600-1767-500 Flat washer, M4................6600-0712-403 Split ring lock washer M4............6600-0713-403 Screw, M4 x 6 Button Head............6600-0707-407 44, 45 Belt channel ..................6600-1312-500 Right (east) upright@..............6600-1189-500 Pinch guard ..................6600-1383-500... -
Page 248: Figure 8-18. Right (East) Upright Parts, Motor Side (Complete East Rail Assembly: 6600-0290-850) Motor Not Included
Chapter 8: Illustrated Parts Uprights and Lift Rail Components 11, 46, 47 FIGURE 8-18. Right (East) Upright Parts, Motor Side (Complete East Rail Assembly: 6600-0290-850) Motor Not included 8-36 Service Manual... - Page 249 Chapter 8: Illustrated Parts Uprights and Lift Rail Components Upper buoyancy spring* ..........6600-1464-500 Spool ..................6600-1317-500 Plastic washer ..............6600-1708-500 Lock nut, M3................ 6600-0714-401 Lower buoyancy spring* ..........6600-1465-500 Spacer ..................6600-1491-500 Belt switch assembly guide ......... 6600-1769-500 Parts Not Shown Micro-switch (part of switch harness)......
-
Page 250: Figure 8-19. Belt Channel - 1 (Lift Motor Side)
Chapter 8: Illustrated Parts Uprights and Lift Rail Components Metal Lift Belt U-Channel Assembly Parts not listed above are not orderable. Order the Metal Lift Belt U-Channel Assembly (2074711-001). This single assembly replaces the need to replace piece parts within the assembly and is expected to perform more reliably. 2074711-001 When unpackaging the U-Channel Assembly be sure to remove the two tie wraps (not shown) that hold the... - Page 251 Chapter 8: Illustrated Parts Uprights and Lift Rail Components Washer .................. 6600-1088-400 Outer roller................6600-1318-500 Short bearing..............6600-1086-400 Lock washer, internal tooth ......... 6600-0713-434 Screw, M6 x 16 button head ........6600-0706-428 Inner roller................6600-1750-500 Stepped bushing ............... 6600-1749-500 Screw, M6 x 20 button head ........6600-0706-429 Screw, M5 x 20 socket head ........
-
Page 252: Figure 8-20. Lift Rail (Both Sides)
Chapter 8: Illustrated Parts Uprights and Lift Rail Components SCALE 3/10 FIGURE 8-20. Lift Rail (Both Sides) STEP 3 8-40 Service Manual... - Page 253 Chapter 8: Illustrated Parts Uprights and Lift Rail Components 1. End cap, top inside left (west) ........6600-1339-500 2. Roll pin ..................6600-1095-400 3. Spring ..................6600-1089-400 4. End cap, top outside left (west) ........6600-1340-500 Circular loop fastener (order when ordering end cap)........6600-1177-400 5.
-
Page 254: Figure 8-21. Rail End Caps
Chapter 8: Illustrated Parts Uprights and Lift Rail Components 14, 15, 16 16, 17 11, 19 FIGURE 8-21. Rail End Caps 8-42 Service Manual... - Page 255 Chapter 8: Illustrated Parts Uprights and Lift Rail Components STEP 7 STEP 7 21, 22, 28, 22 21, 22, 28, 22 1. Spring, upper* ..................6600-1464-500 2. Spring, lower*..................6600-1465-500 3. Spring, left (west) only* ..............6600-1725-500 4. Screw, M5 x 20 socket head ............6600-1152-400 5.
-
Page 256: Figure 8-22. Left (West) Upright (Complete West Rail Assembly: 6600-0290-851)
Chapter 8: Illustrated Parts Uprights and Lift Rail Components ** The side roller pin, side roller bracket, and side roller should be ordered together. Use pliers to press the pin into the side roller bracket. *** When ordering this assembly, also order 6600-1097-603, unless you have a pin extractor. For details, refer to section 7.5.5. -
Page 257: Compartment Sensor
Chapter 8: Illustrated Parts Compartment Sensor 8.14 Compartment Sensor Compartment Sensor@ ..........2075908-001 Probe wire harness@ ............6600-1513-700 O-ring ..................6600-0540-400 2a. Shim washer** ..............2103116-001 Humidity sensor assembly*......... 6600-0784-700 Retainer ................. 6600-1475-500 Break plate................6600-1473-500 Screw, M3 x 6 button hd ..........6600-0706-406 Back plate ................ -
Page 258: Servo Control Oxygen
Chapter 8: Illustrated Parts Servo Control Oxygen 8.15 Servo Control Oxygen Screw, M4 Skt Hd............... 6600-0868-402 Sensor housing cover ............. 6600-1876-500 Oxygen sensor kit (2 pcs)..........2084419-001 Sensor gasket ..............6600-1887-500 Screw, M3x10L Skt Hd............. 6600-0707-403 Split ring washer, M3 ............6600-0713-402 Flat washer, M3.............. -
Page 259: Figure 8-24. Servo Control Oxygen Sensor Housing Assembly (Servo O2 Upgrade Kit 6600-0678-800)
Chapter 8: Illustrated Parts Servo Control Oxygen 1, 24 FIGURE 8-24. Servo Control Oxygen Sensor Housing Assembly (Servo O2 Upgrade Kit 6600-0678-800) Service Manual 8-47... - Page 260 Chapter 8: Illustrated Parts Servo Control Oxygen Screw, M4x12L Skt Hd............. 6600-0707-410 Split ring washer, M4 ............6600-0713-403 Valve housing top cover ..........6600-1838-500 Valve housing wire harness ......... 6600-1069-700 Adapter 1/8NPTFx1/8NPTM......... 6700-0616-800 Elbow fitting 10 OD x1/8NPT........6600-0873-400 Screw, M4 Skt Hd............... 6600-1051-400 Flat washer, M5..............
-
Page 261: Figure 8-25. Servo Control Oxygen Valve Housing
Chapter 8: Illustrated Parts Servo Control Oxygen FIGURE 8-25. Servo Control Oxygen Valve Housing Service Manual 8-49... -
Page 262: Figure 8-26. Expansion Chamber/Heatsink Vent
Chapter 8: Illustrated Parts Servo Control Oxygen Screw, M4 Skt Hd............... 6600-0706-409 Split ring washer, M4 ............6600-0713-403 Flat washer, M4..............6600-0712-403 Expansion chamber cover..........6600-1878-500 Cover gasket ............... 6600-1883-500 Elbow fitting ................ 6600-0873-400 Expansion chamber assembly (includes items 1-6)............6600-0256-850 Vent .................. -
Page 263: Figure 8-27. Servo Control Oxygen Cooling Fan
Chapter 8: Illustrated Parts Servo Control Oxygen Nylok nut, M4..............6600-0714-402 Cooling fan assembly* ........... 6600-1523-700 Flat washer, M4..............6600-0712-403 Screw, M4x20L Button Hd..........6600-0706-412 Screw, captive 8 mm long..........6600-0868-401 Screw, SEMS M4 x 6 Button Hd........6600-0908-402 Parts Not Shown Cable tie ................ -
Page 264: Figure 8-28. Servo Control Oxygen Pc Board
Chapter 8: Illustrated Parts Servo Control Oxygen Servo Oxygen PCB............2080447-001 Card guide, black .............. 6600-1064-400 Card guide, white.............. 6600-1183-400 Nut, M3 .................. 6600-0711-403 Lock washer, int. tooth ........... 6600-0713-431 Parts Not Shown EPROM (U6) ................6600-0255-850 In-line fuse cable*............. 2074950-001 ESU label (located on probe panel)...... -
Page 265: Figure 8-29. Manifold Endcap Safety Valve
Chapter 8: Illustrated Parts Servo Control Oxygen Screw, M4 x 10 flt.hd............6600-0715-418 Split ring washer, M4 ............6600-0713-403 Spring Cover................ 6600-2025-500 Valve retaining tube ............6600-2016-500 Spring kit ................6600-0273-850 Two-way valve*..............6600-1272-400 Manifold retaining pin............. 6600-2013-500 Screw, M4 x 25 btn. hd........... 6600-0706-413 Manifold endcap ............... -
Page 266: Storage Drawer
Chapter 8: Illustrated Parts Storage Drawer 8.16 Storage Drawer 1. Drawer slide ................6600-1717-500 2. Drawer mounting bracket front (south) ....6600-1781-500 3. Screw, M4 x 12 Button HD ..........6600-0706-410 4. Screw, M4 x 8 Button HD..........6600-0706-408 5. Storage drawer..............6600-1279-500 6. -
Page 267: Options
Chapter 8: Illustrated Parts Options 8.17 Options Weight limit label.............. 6600-1839-101 Shelf (order item 1 when replacing shelf)....6600-1733-500 Pawl Block ................M1171928 FIGURE 8-31. Instrument Shelf CN (M1082912) Service Manual 8-55... -
Page 268: Figure 8-32. Monitor Shelf Cn (M1082910)
Chapter 8: Illustrated Parts Options Shelf (order item 2 when replacing shelf)....6600-0481-501 Weight limit label .............. 6600-1941-101 Weight limit label CN ............. M1052590 Shelf support............... 6600-0811-501 Mounting block assembly..........6600-0290-800 Screw, 1/4 - 20 x 5/8............6600-0394-400 FIGURE 8-32. Monitor Shelf CN (M1082910) 8-56 Service Manual... -
Page 269: Figure 8-33. Cylinder Holders
Chapter 8: Illustrated Parts Options 1. Cylinder Holder Assembly..........M1151570 2. E-Cylinder Holder..............6600-0836-800 3. Cylinder Holder Assembly, XL ........M1151571 FIGURE 8-33. Cylinder Holders Service Manual 8-57... -
Page 270: Figure 8-34. Tubing Management Arm (6600-0837-800)
Chapter 8: Illustrated Parts Options Goose neck ................6600-1866-500 Tubing plate................. 6600-1862-500 Screw cover ................. 6600-1206-403 Screw, pan hd..............6600-1213-400 Mount ..................6600-1845-500 FIGURE 8-34. Tubing Management Arm (6600-0837-800) 8-58 Service Manual... -
Page 271: Figure 8-35. Dovetail Mount Din Rail (6600-0659-803)
Chapter 8: Illustrated Parts Options Mounting bracket housing ........... 6600-1541-500 Mounting bracket lock............ 6600-1542-500 Screw, M4 x12..............6600-0853-400 DIN rail ................... 6600-1540-503 (Order item 7 at the same time.) Spacer ................... 6600-1538-500 Screw, M8 x 35 Skt Hd............. 6600-0852-400 7. Weight limit label..............M1160984 FIGURE 8-35. -
Page 272: Figure 8-36. Silo Support Assembly (6600-0853-800)
Chapter 8: Illustrated Parts Options FIGURE 8-36. Silo Support Assembly (6600-0853-800) 8-60 Service Manual... -
Page 273: Figure 8-37. Rotating I.v. Pole Assembly (6600-0851-800)
Chapter 8: Illustrated Parts Options Screw, 10-32 Button Hd..........6600-1258-400 Knob..................M1081553 Teflon washer ..............6600-1238-400 Set Screw M4 x 6............... 6600-0715-416 Knob, block ................0217-5335-300 Washer .................. 0202-0095-300 Bushing.................. 6700-0030-400 Label ..................6600-2497-101 Note: If you need to replace the upper or lower swing arms, order the entire I.V. pole assembly. FIGURE 8-37. -
Page 274: Figure 8-38. Dovetail Extension (6600-0852-800)
Chapter 8: Illustrated Parts Options Dovetail rail................6600-1946-500 Bottom end cap..............6600-0366-500 Screw, 4-40 x 1/2, Skt. Hd..........0144-2117-208 Top end cap................. 6600-1239-400 Swing arm assembly............6600-1516-700 Knob..................6700-0020-400 Teflon washer ..............6600-1238-400 Knob, block ................0217-5335-300 Washer .................. 0202-0095-300 10. -
Page 275: Options Pns
Chapter 8: Illustrated Parts Options PNs 8.18 Options PNs The following options are available for use with the device. Other options available for use with this device may be obtained through your sales representative. Option Part Number (where applicable) Disposable patient probe (box of 10) 2074816-001 Disposable patient probe (box of 50) 2074817-001... - Page 276 Chapter 8: Illustrated Parts Options PNs Option Part Number (where applicable) E-cylinder holder 2 sliding parts M1151570 Cylinder holder XL International 2 sliding parts M1151571 Giraffe Stand-Alone Resuscitation System T-Piece Language Specific PN Giraffe Stand-Alone Resuscitation System Bag & Mask Language Specific PN Giraffe Exam light Language Specific PN...
-
Page 277: Labels
Chapter 8: Illustrated Parts Labels 8.19 Labels Part Number Description Language 2084425-001 LBL SET WARNINGS GIRAFFE ENG ENGLISH 2078487-001 LBL SET WARNINGS GIRAFFE FRE FRENCH 2078519-001 LBL SET WARNINGS GIRAFFE CANADA CANADA 2078488-001 LBL SET WARNINGS GIRAFFE BUL BULGARIAN 2078489-001 LBL SET WARNINGS GIRAFFE CHN CHINESE 2078490-001... -
Page 278: Label Illustrations
Chapter 8: Illustrated Parts Labels 8.19.1 Label Illustrations Note: Images shown are for reference only. Appearance of actual label may vary. 8.19.1.1 Warning Label Set 8-66 Service Manual... -
Page 279: Connector Panel
Chapter 8: Illustrated Parts Labels 8.19.1.2 Connector Panel 6600-2325-101 6600-2325-102 6600-2325-103 6600-2325-107 6600-2325-104 6600-2325-108 Service Manual 8-67... -
Page 280: Raise/Lower Pedal
Chapter 8: Illustrated Parts Labels 8.19.2 Raise/Lower Pedal Raise/Lower Pedal switch label........... 6600-2552-101l 8.19.3 Rating Label OHMEDA ® 154249 0086 Medical T Y P E : B C L A S S : 1 w MAX CONTINUOUS 2A @ 115 V ~ OPERATION Ohmeda Medical Laurel, MD... -
Page 281: Chassis Vent Servo O2
Chapter 8: Illustrated Parts Labels 8.19.5 Chassis Vent Servo O2 Align rectangular cut-out with the optical sensor in the chassis. Stick label to chassis. Drill a 13mm hole through the chassis, centered on this Peel backing from label. .063 hole. Remove label. Chassis vent Servo O2 template label ...... -
Page 282: Weight Limit Warnings
Chapter 8: Illustrated Parts Labels 8.19.5.2 Weight Limit Warnings REF: 6600-0852-800 Dove Tail Rail 5 kg Ohmeda Medical, a division of Datex-Ohmeda, Inc. 8880 Gorman Road Laurel MD 20723 USA OHMEDA REF: 6600-0851-800 Swiveling IV Pole Medical 79 cm Ohmeda Medical Laurel MD 20723 9 kg MAX 6600-2497-101 Rev 002... -
Page 283: Port Cover
Chapter 8: Illustrated Parts Labels 8.19.5.3 Port Cover 8.19.5.4 Branding Label 8.19.6 Other Warnings 6600-2343-101 Rev 003 6600-2328-101 Rev A 8.19.7 Canopy Canopy Pedal switch label ............ 6600-2552-102 Service Manual 8-71... -
Page 284: Pcb Layouts
Chapter 8: Illustrated Parts PCB Layouts 8.20 PCB Layouts Calibration Jumper 6600-1226-600 Main control board software (U42) 2087684-001 Orderable part KIT EPROM CTRL 2089261-001 Dip switch 123456 Audio software (U22) 6600-1031- Audio waveform (U18) 2075445-001 Control board revision FIGURE 8-39. Control Board (2080962-001) 8-72 Service Manual... - Page 285 Chapter 8: Illustrated Parts PCB Layouts 2089821-001 Clock Battery (CR2032, 3V, LITHIUM) FIGURE 8-40. SBC (2074306-001) Service Manual 8-73...
-
Page 286: Figure 8-41. Relay Board (Service Kit: 2080429-001)
Chapter 8: Illustrated Parts PCB Layouts AIR CIRCULATION MOTOR Board Assembly Revision Number AIR FLOW SE DC OUTPUT WARMER HEATER C INC HEATER CON 50 49 MOTOR TRAN EBASE MOT HOOD MOTOR Fuse 3.15 amp 2070016-001 This fuse is not orderable individually order Fuse SVC Kit FOOT SWITCHES HOOD POSITION SEN... -
Page 287: Wiring Diagrams
Chapter 8: Illustrated Parts Wiring Diagrams 8.21 Wiring Diagrams FIGURE 8-42. Wiring Diagram: Control Board Service Manual 8-75... -
Page 288: Figure 8-43. Wiring Diagram: Elevating Base, Hood, And Motors
Chapter 8: Illustrated Parts Wiring Diagrams FIGURE 8-43. Wiring Diagram: Elevating Base, Hood, and Motors 8-76 Service Manual... -
Page 289: Figure 8-44. Wiring Diagram: Electrical Enclosure
Chapter 8: Illustrated Parts Wiring Diagrams Standby Switch V charge out J43.1 To J43 on V charge in black J43.2 V battery J43.3 Relay Board black J43.4 BATTERY 6600-1024-600 Phase in J47.1 To J47 on Phase out black J47.2 Relay Board Standby Switch 2074885-001 6600-1216-600... -
Page 290: Figure 8-45. Wiring Diagram: Control Panel
Chapter 8: Illustrated Parts Wiring Diagrams FIGURE 8-45. Wiring Diagram: Control Panel 8-78 Service Manual... -
Page 291: Figure 8-46. Wiring Diagram: Incubator And Warmer Heater
Chapter 8: Illustrated Parts Wiring Diagrams FIGURE 8-46. Wiring Diagram: Incubator and Warmer Heater Service Manual 8-79... -
Page 292: Figure 8-47. Wiring Diagram: Servo Humidifier
Chapter 8: Illustrated Parts Wiring Diagrams FIGURE 8-47. Wiring Diagram: Servo Humidifier 8-80 Service Manual... -
Page 293: Figure 8-48. Wiring Diagram: Servo Control Oxygen
Chapter 8: Illustrated Parts Wiring Diagrams FIGURE 8-48. Wiring Diagram: Servo Control Oxygen Service Manual 8-81... - Page 294 Chapter 8: Illustrated Parts Wiring Diagrams 8-82 Service Manual...
-
Page 295: Appendix A: Compartment And Skin Probe Characteristics
Appendix A: Compartment and Skin Probe Characteristics Res. Res. Res. Res. Res. Res. Res. Res. Temp °C Temp °C Ohms Ohms Temp °C Temp °C Ohms Ohms Temp °C Temp °C Ohms Ohms Temp °C Temp °C Ohms Ohms 29.9 29.9 8071.2 8071.2... - Page 296 Appendix A: Compartment and Skin Probe Characteristics Service Manual...
-
Page 297: Appendix B: Specifications
Appendix B: Specifications Power Requirements 11.5 A @ 100V ~, 50/60 Hz 2 A @ 100V ~, 50/60 Hz (Accessory Outlet) 9.5 A @ 115V ~, 50/60 Hz 2 A @ 115V ~, 50/60 Hz (Accessory Outlet) 5.5 A @ 220V ~, 50/60 Hz 1 A @ 220V ~, 50/60 Hz (Accessory Outlet) 5.5 A @ 230V ~, 50/60 Hz 1 A @ 230V ~, 50/60 Hz (Accessory Outlet) - Page 298 Appendix B: Specifications Installation Non-Permanent Installation of Equipment System Performance Expected Service Life Approximately 7 years. The device is designed to last at least 7 years in normal use when operated, maintained, and serviced in accordance with the instructions provided in the provided manuals.
- Page 299 Appendix B: Specifications Irradiance During the ten minute warm up period, the radiant heater is at 100% power (~27 mW/cm ). After the radiant heater has been running in warm up mode for ten minutes, the heater power setting drops to 25% (less than 10 mW/cm Note: The 25% setting can be changed in Service Mode.
- Page 300 Appendix B: Specifications Humidity Servo Control Accuracy* ± 10% for settings up to 85%; minimum Humidity control setting vs 75% for settings > 85% average humidity at 10 cm above center of bed. Ramp-up Time ≤ 50 minutes Time to reach 75% RH with a 39°C control temp from cold start in 25°C, 50% RH room.
-
Page 301: Appendix C: Rs-232 Serial Data
Appendix C: RS-232 Serial Data Warning: The computer or RS-232 monitor’s user program must continuously check the data link. The program should constantly verify connection to the control panel and check for updated data. Note: In the event of a power failure, all serial communication will cease until power is restored. C.1 RS-232 Connector The Nurse Call and the serial data output share the same female, nine pin, d-type connector. -
Page 302: Nurse Call
Appendix C: RS-232 Serial Data Nurse Call Closed bed mode. This is either C or N. Set point for humidity. The 00 means the humidifier is not on. Relative humidity in the patient compartment as measured by the compartment probe. Air Boost Status. -
Page 303: Nurse Call Signals
Appendix C: RS-232 Serial Data Nurse Call C.3.3 Nurse Call Signals Nurse Call Signal Incubator Status Pins 1 and 6 Pins 1 and 9 Normal Closed Open Alarm Open Closed Pwr switch off or pwr fails Open Closed Nurse Call cable disconnected Open Open Service Manual... - Page 304 Appendix C: RS-232 Serial Data Nurse Call Service Manual...
-
Page 305: Index
Index Index Numerics Do Not Lean on Equipment (symbol) i-xviii Do Not Place Objects Under Radiant Heat (symbol) i-xviii Do Not Reuse (symbol) i-xviii 2002/96/EC WEEE directive i-xxiii Dovetail rail 1-11 21 CFR CH-1 Section 1020.30 (n) i-xxiii Electric shock hazard i-xix Accessory power outlets 1-12 Electrical B-1 Air Control temperature B-1... - Page 306 Power Fail Indicator Light 1-9 Power Requirements B-1 Pressure range i-xx Keep Dry i-xix Probe Panel 1-10 Protective Earth Terminal (symbol) i-xviii Lower Bed (symbol) i-xviii Lower Pedal Pressed 6-3 Radiant heat power B-1 Raise canopy pedal 1-11 Ramp-up time B-4 Rear Panel cover 1-12 Mains Power Switch 1-12 Rear view 1-12...
- Page 307 UDI (Unique Device Identifier) i-xviii i-xxii Uninterruptible Power Supply (UPS) B-4 Up Pedal Pressed 6-3 UPS B-4 USB Port i-xix 1-12 USB port output amperage capacity B-2 use environment B-1 User Control Settings B-1 User Responsibility i-xxiii Variability B-2 Ventilator access 1-12 Warm-up time B-2 Warranty 1-2 waste i-xix...
- Page 308 Shanghai, China 通用电气医疗系统贸易发展 (上海)有限公司 中国 (上海)自由贸易试验区意威路 96 号 1 幢 Brazil Only Contact Number of Post Sales Service Agent GE Healthcare do Brasil Comércio e Serviços para 中国境内售后服务机构电话 Equipamentos Medicos-Hospitalares Ltda. China 800 810 8188 Av. Magalhães de Castro, 4800, Andar 12 cj 121 e Andar 13 cj...
Need help?
Do you have a question about the Giraffe OmniBed Carestation CS1 and is the answer not in the manual?
Questions and answers