Renishaw ATOM Installation Manual
Rotary encoder system
Hide thumbs
Also See for ATOM:
- Installation manual (36 pages) ,
- Installation manual (42 pages) ,
- Installation manual (75 pages)

Related Manuals for Renishaw ATOM


Summary of Contents for Renishaw ATOM
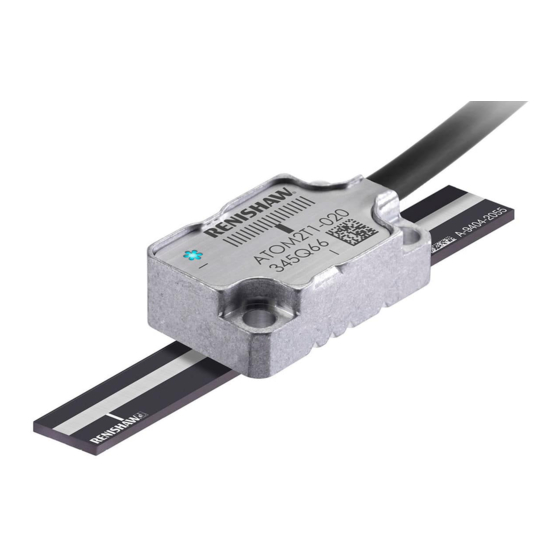
- Page 1 Installation guide M-9693-9717-04-A ATOM rotary encoder system ™ Image here if required www.renishaw.com/atomdownloads #renishaw...
- Page 2 This page is intentionally left blank. ATOM rotary encoder system...
-
Page 3: Table Of Contents
LED diagnostics ........................37 www.renishaw.com... - Page 4 Disc specifications ....................... .61 ATOM rotary encoder system...
-
Page 5: Legal Notices
The user is cautioned that any changes or modifications not expressly approved by Renishaw plc Renishaw warrants its equipment and software for a limited period (as set out in the Standard or authorised representative could void the user’s authority to operate the equipment. - Page 6 Information required by Article 33(1) of Regulation (EC) No. 1907/ 2006 (“REACH”) relating to products containing substances of very high concern (SVHCs) is available at The ATOM FPC readhead and ACi have been designed as system components and to be www.renishaw.com / REACH compliant with EMC regulations for products of their type.
-
Page 7: Storage And Handling
Storage and handling Scale and readhead N-heptane Propan-2-ol CH 3 (CH 2 ) 5 CH 3 CH 3 CHOHCH 3 www.renishaw.com... - Page 8 Readhead Temperature Storage System −20 °C to +70 °C Operating System 0 °C to +70 °C Readhead and DRIVE-CLiQ interface Humidity 95% relative humidity (non-condensing) to IEC 60068-2-78 ATOM rotary encoder system...
-
Page 9: Atom System Installation Overview
ATOM system installation overview This section gives an overview of the steps involved in installing, setting-up and calibrating an ATOM system. More detailed information is contained within the rest of the document. For information on designing the readhead and disc into the system refer to the detailed installation drawings and 3D models at www.renishaw.com/atomdownloads... -
Page 10: Rcdm Rotary Disc Installation Drawing
25.5 47.25 55.9 52.15 30.19 0.125 0.225 2.5 ±0.11 (40 µm version) 10 000 5 000 25.5 58.55 67.9 63.66 35.94 0.15 0.125 2.5 ±0.055 (20 µm version) 16 384 8 192 50.9 99.20 107.9 104.30 56.26 0.225 ATOM rotary encoder system... -
Page 11: Mounting The Disc
(mm) Contact your local Renishaw representative for more information on designing the mounting surface, suggested materials and adjustment methods. 17 mm disc can be mounted on black mask due to space constraints. All other size discs the black mask must not impede the disc contact surface. - Page 12 Cross section of typical hub and disc assembly Clearance between Customer hub Bead of disc ID and hub / shaft RCDM adhesive disc Adhesive Disc mounting contact surface surface Black mask Disc Adhesive Adhesive overspill areas contact mounting surface surface ATOM rotary encoder system...
-
Page 13: Aligning The Disc
1. Position the microscope / camera over the alignment band on the disc so that any displacement of the alignment band due to rotation of the disc / hub assembly can be observed. Microscope Alignment and camera band RCDM disc / hub assembly www.renishaw.com... -
Page 14: Electrical Alignment
5. Gently move the disc relative to the hub in a radial direction so the alignment band moves contact your local Renishaw representative. For more information on the DSi refer to the TONiC DSi half way between the limits of movement. - Page 15 3. Power the system. 4. Restore factory defaults on both ATOM systems by pressing and holding the CAL button on both interfaces whilst switching the system on. This can be done individually or whilst the interfaces are plugged into the DSi. See ‘Restoring factory defaults’...
-
Page 16: System Connection
(no interface) • Ensure that the interboard connector is inserted into the connector on the customers’ electronics The ATOM readhead is available in several variants: • Cable variant with a 15 way D-type connector NOTE: Care should be taken to ensure correct orientation •... - Page 17 • Minimum exposed conductor strip length 1.5 mm • Maximum exposed conductor strip length 2.5 mm (to ensure isolation from the body) 3.25 mm Contact your local Renishaw representative for more information regarding FPC design requirements. Shielding Shield For optimum performance: connect pad FPC connector •...
- Page 18 CAUTION: Do not push the locking lever down if no FPC cable is inserted as this will damage the locking mechanism. 3. When the system has been connected, proceed with ‘Readhead mounting and alignment’ on page ‘System calibration’ on page 34. ATOM rotary encoder system...
- Page 19 PCB. 2. Ensure locking lever is fully open before removing the FPC cable. 3. Pull the FPC cable straight back to remove it. CAUTION: Do not pull upwards or sideways as this may damage the readhead. www.renishaw.com...
-
Page 20: Aci Interface
• Minimum exposed conductor strip length 1.5 mm • Maximum exposed conductor strip length 2.5 mm (to ensure isolation from the body). Contact your local Renishaw representative for more information regarding FPC design requirements. ATOM rotary encoder system... - Page 21 The output connector is a 10-way JST, GH crimp connector with 1.25 mm pitch. It is suitable for cable size 26 to 30 AWG. See page for pin-out information. Cable Approved ESD precautions must be followed at all times during readhead interboard and interface electrical connection. connector Ensure suitable clamping to retain interboard connector on ACi. www.renishaw.com...
- Page 22 • Minimum exposed conductor strip length 1.5 mm • Maximum exposed conductor strip length 2.5 mm (to ensure isolation from the body) Contact your local Renishaw representative for more information regarding FPC design requirements. ATOM rotary encoder system...
- Page 23 PCB mounting: connecting a cable variant ATOM readhead ACi interface Customer PCB 2 mounting holes M3 through Ferrule Input Output Cable interboard connector Shielding For optimum performance: • Ensure 100% shielding • Ground the mounting brackets • Use a metal clamp around the cable ferrule to ground the readhead cable •...
-
Page 24: Ri Interface
The readhead is connected to the Ri interface via a small, rugged connector to allow for easy feed-through during installation. NOTE: An optional Ri cable guide (A-9693-2577) is available to simplify assembly. For instructions on how to install the Ri cable guide, download the Ri interface cable guide (Renishaw part no. M-9770-9478) from the website at www.renishaw.com/atomdownloads Connecting the readhead 1. - Page 25 1. Disconnect power. 2. Open the interface housing as detailed earlier in this section. 3. Gently lever the connector PCB (on the end of the cable) out of the socket. 4. Place the connector in an anti-static bag. 5. Re-assemble the interface. www.renishaw.com...
-
Page 26: Ti Interface
3. Refit the cover plate, ensuring the cable ferrule is located in the recess on the inside, and no wires are trapped under the cover plate. 4. Proceed with ‘Readhead mounting and alignment’ on page ‘System calibration’ on page 34. ATOM rotary encoder system... - Page 27 2. Remove the cover plate on the interface (two M2.5 hex head screws). 3. Gently lever the connector PCB (on the end of the cable) out of the socket. CAUTION: Do not pull the cable to remove the connector. 4. Place the connector in an anti-static bag. 5. Refit the cover plate. www.renishaw.com...
-
Page 28: Readhead Mounting And Alignment
For more details on designing the mounting bracket and Location pins selecting the appropriate mounting tools, contact your local Renishaw representative. Mounting bracket Ensure that the disc, readhead optical window and mounting face are clean and free from obstruction. - Page 29 10. Adjust longitudinal and radial offset of the readhead to obtain a green readhead set-up LED around the full axis of rotation. An oscilloscope or Renishaw USB set-up tool kit and software can be used to help maximise the signal size. For more information on the Renishaw USB set-up tool kit contact your local Renishaw representative.
-
Page 30: Dummy Kit
The reusable dummy head is mounted directly onto the bracket in place of the readhead. It has the same dimensions as the ATOM readhead with a longer ‘nose’ that is machined to the optimum rideheight (2.5 mm ±0.02 mm). The bracket should have location pins or a shoulder to control readhead yaw. - Page 31 11. Adjust longitudinal and radial offset of the readhead to obtain a Green readhead set-up LED around the full axis of rotation. An oscilloscope or Renishaw USB set-up tool kit and software can be used to help maximise the signal size. For more information on the Renishaw USB set-up tool kit contact your local Renishaw representative.
-
Page 32: Signal Amplitude Adjustment
• Applications where the readhead mounting bracket allows full adjustment of the readhead and the Pitch Renishaw USB set-up tool kit and software or an oscilloscope can be used to monitor the output signals. Required parts: • Customer designed bracket •... -
Page 33: Calibration Overview
Calibration is an essential operation that completes readhead set-up, with the optimum incremental and reference mark signal settings stored in the readhead’s non-volatile memory. This section is an overview of the calibration procedure for an ATOM system. For more detailed information on calibrating the system see ‘System calibration’... -
Page 34: System Calibration
LED) the calibration of the incremental signals has failed. After ensuring failure is not due to overspeed (> 100 mm/s), exit the calibration routine, restore factory defaults and check the readhead installation and system cleanliness before repeating the calibration routine. ATOM rotary encoder system... - Page 35 CAL button on the the end of the interface remote CAL line (pin 8) side of the interface for < 2 seconds. for < 2 seconds. for < 2 seconds. • On successful exit, the readhead set-up LED will stop flashing blue and remain green. www.renishaw.com...
-
Page 36: Restoring Factory Defaults
> 3 seconds then disconnect. > 3 seconds then release. > 3 seconds then release. • The readhead set-up LED will be green with the addition of blue when AGC is enabled. NOTE: The system must be calibrated before switching AGC on. ATOM rotary encoder system... -
Page 37: Led Diagnostics
Flash will effectively be invisible when incremental signal level is > 70% when passing reference mark. Alarm output will take the form of 3-state or line driven E− signal depending on interface configuration. Also, some configurations do not output overspeed alarm. See the ATOM ™... -
Page 38: Troubleshooting
• Offset • Check the disc and readhead orientation. • Check that the readhead variant is the correct type for the chosen scale (see the ATOM ™ miniature encoder system data sheet (Renishaw part no. L-9517-9563) for details of readhead configuration). - Page 39 • Check the readhead optical window and disc are clean and free from contamination. • Check that the readhead variant is the correct type for the chosen disc (see the ATOM miniature encoder system ™ data sheet (Renishaw part no. L-9517-9563) for details of readhead configuration).
-
Page 40: Atom Readhead
For detailed installation drawings, refer to R > 20 Dynamic bend radius www.renishaw.com/atomdownloads R > 10 Static bend radius 5 min Identification marks for readhead manufacture only. Notches will vary depending on readhead type. Not optical centreline ATOM rotary encoder system... -
Page 41: Fpc Readhead Dimensions
NOTE: Readhead is supplied with lid separate. 20.5 FPC cable must be inserted before fitting the lid. For detailed installation drawings, refer to www.renishaw.com/atomdownloads Identification marks for readhead manufacture only. Notches will vary depending on readhead type. Not optical centreline... -
Page 42: Output Signals
FPC connection Interboard JST connector connector for connection to Ri, Ti and cabled ACi interfaces All power connections should be used either to minimise voltage drop down the cable or incorporate voltage sensing. Only available on interboard connector. ATOM rotary encoder system... -
Page 43: Aci Interface
FPC cable Care must be taken not to damage the FPC connector when fitting / removing the cable. 10-way JST, GH crimp connector. 1.25 mm pitch. Suitable for cable size 26 to 30 AWG. 3 m JST to 15-way D-type cable A-9412-1001. www.renishaw.com... - Page 44 Reference mark − − Reference mark Set-up − Remote CAL Set-up Do not connect 9, 10 Remote CAL All power connections should be used either to minimise voltage drop down the cable or incorporate voltage sensing. ATOM rotary encoder system...
-
Page 45: Cable Variant Installation Drawing
Component area 2 mounting pillars CAL pad 4.5 × 45° 2 mounting holes M3 through Component area 6.25 10-way JST, GH crimp connector. 1.25 mm pitch. Suitable for cable size 26 to 30 AWG. 3 m JST to 15-way D-type cable A-9412-1001. www.renishaw.com... - Page 46 Cable ferrule Cable ferrule Do not connect 1, 2 1, 3, 7, 11 All power connections should be used either to minimise voltage drop down the cable or incorporate voltage sensing. Only available on interboard connector. ATOM rotary encoder system...
-
Page 47: Pcb Mounting Variant Installation Drawing
Dimensions and tolerances in mm Recommended mating connector Samtec CLP-105-02-F-D-P-TR PCB footprint 16.1 Clearance holes ∅0.74 10.1 CAL pad 1.27 12.5 1.27 (typ) 0.74 (typ) Component area 14.5 CAL pad 4.5 × 45° 2 mounting holes M3 through Component area www.renishaw.com... - Page 48 − − − Reference mark − − Set-up Remote CAL Samtec FTS-105-01-L-DV-P-TR Pin 1 ACi PCB Pin 2 input connector Pin 9 Pin 1 ACi PCB output connector Pin 10 Pin 2 Pin 10 Pin 9 ATOM rotary encoder system...
- Page 49 Angular speed Angular speed depends on disc optical diameter. Use the following equation to convert to rev/min. V × 1000 × 60 Where V = maximum linear speed (m/s) and D = Optical diameter (mm). Angular speed (rev/min) = www.renishaw.com...
-
Page 50: Ri Interface Drawing
CAL button operation Push and release (< 2 seconds) – Calibration (CAL) routine initiation / exit. Push and release (> 3 seconds) – Automatic Gain Control (AGC) initiation / exit. Push and hold during power ‘Off / On’ cycle – Restore factory defaults. ATOM rotary encoder system... - Page 51 All power connections should be used either to minimise voltage drop down the cable or incorporate voltage sensing. The alarm signal can be output as a line driven signal or 3-state. Select the preferred option at time of ordering. www.renishaw.com...
- Page 52 Angular speed depends on disc optical diameter. Use the following equation to convert to rev/min. 40 µm system - 20 m/s (−3dB) V × 1000 × 60 20 µm system - 10 m/s (−3dB) Angular speed (rev/min) = Where V = maximum linear speed (m/s) and D = Optical diameter (mm). ATOM rotary encoder system...
-
Page 53: Ti Interface Drawing
Push and hold during power ‘Off / On’ cycle - Restore factory defaults. Refer to ‘Readhead LED diagnostics’ and ‘Ti LED diagnostics’ for LED indications. Cover plate 6 min R > 20 Dynamic bend radius R > 10 Static bend radius Interface set-up LED CAL button access hole Ø2.4 (digital interface only) www.renishaw.com... - Page 54 All power connections should be used either to minimise voltage drop down the cable or incorporate voltage sensing. The alarm signal can be output as a line driven E signal or 3-state depending on the interface configuration. Select the preferred option at time of ordering. ATOM rotary encoder system...
- Page 55 0.082 0.032 0.0162 12.96 6.48 2.58 1.296 0.648 0.26 0.13 0.064 0.026 0.013 0.45 0.18 0.09 0.046 0.018 0.009 6.74 3.36 1.34 0.676 0.338 0.136 0.068 0.034 0.0136 0.0068 1.68 0.84 0.32 0.168 0.084 0.034 0.016 0.008 0.0034 0.0016 www.renishaw.com...
- Page 56 Angular speed depends on disc optical diameter. Use the following equation to convert to rev/min. V × 1000 × 60 Angular speed (rev/min) = Where V = maximum linear speed (m/s) and D = Optical diameter (mm). ATOM rotary encoder system...
-
Page 57: Electrical Connections
120R Cable Z = 120R Shield (recommended) A B Z E− 220 pF For more information on FPC contact your local Renishaw representative. 0 V Customer Standard RS422A line receiver circuitry. electronics Cable readhead Capacitors recommended for improved noise immunity. Connector / interface... -
Page 58: Output Specifications
Output specifications Analogue output signals Set-up (Readhead, ACi, Ri and Ti analogue) During normal operation All ATOM readheads and Ri and Ti analogue interfaces. Incremental 3.3 V (nom) 2 channels V and V differential sinusoids in quadrature, centred ~ 1.65 V (90 ° phase shifted) Voltage at V 40 / 20 µm... - Page 59 Between 50% and 70% signal level, X is a duty cycle. Time spent at 3.3 V increases with incremental signal level. Inverse signals not shown for clarity. At > 70% signal level X is nominal 3.3 V. Set-up signals as shown are not present during calibration routine. www.renishaw.com...
- Page 60 Differentially transmitted signals forced open circuit for > 15 ms when alarm conditions valid. (Ri and Ti alarm conditions same as differential line driven output. ACi alarm conditions: < 40% signal or overspeed). Inverse signals not shown for clarity. ATOM rotary encoder system...
-
Page 61: General Specifications
Outside diameter 3.5 mm maximum Flex life > 20 × 10 cycles at 20 mm bend radius Maximum length 5 m (Extension cable up to 25 m when using Renishaw approved extension cable) UL recognised component FPC cable 16 core, 0.5 mm pitch Minimum exposed conductor length 1.5 mm Maximum exposed conductor length 2.5 mm... -
Page 62: Disc Specifications
7.91 6.49 3.95 3.24 2.78 (arc seconds) Coefficient of thermal expansion ~8 µm/m/°C Nominal outer diameter (mm) 40 µm 17, 20, 25, 27, 30, 36, 50, 56, 68 and 108 20 µm 30, 36, 50, 56, 68 and 108 ATOM rotary encoder system... - Page 63 WHILE CONSIDERABLE EFFORT WAS MADE TO VERIFY THE ACCURACY OF THIS © 2013–2022 Renishaw plc. All rights reserved. This document may not be copied or reproduced in whole or in part, or transferred to any other DOCUMENT AT PUBLICATION, ALL WARRANTIES, CONDITIONS, REPRESENTATIONS media or language by any means, without the prior written permission of Renishaw.
Need help?
Do you have a question about the ATOM and is the answer not in the manual?
Questions and answers