JLG 10MSP Service And Maintenance Manual
Hide thumbs
Also See for 10MSP:
- Service maintenance manual (196 pages) ,
- Service and maintenance manual (178 pages) ,
- Operation and safety manual (108 pages)

Related Manuals for JLG 10MSP


Summary of Contents for JLG 10MSP
- Page 1 Service and Maintenance Ma vice and Maintenance Manual nual Model Model 10MSP 10MSP V Vertical Lift ertical Lift P/N - 3121228 P/N - 3121228 April 29, 2 April 29, 2013 ANSI ANSI ® ®...
- Page 2 NOTES: NOTES:...
-
Page 3: Maintenance Safety Precautions
INTRODUCTION - MAINTENANCE SAFETY PRECAUTIONS INTRODUCTION - MAINTENANCE SAFETY PRECAUTIONS MAINTENANCE SAFETY PRECAUTIONS MAINTENANCE SAFETY PRECAUTIONS A A . . G G E E N N E E R R A A L L C. MA MAIN INTE TENA NANC NCE E This section contains the general safety precautions This section contains the general safety precautions... - Page 4 Manual Revised....February 4, 2011 Manual Revised....April 29, 2013 – JLG Lift – 3121228...
-
Page 5: Table Of Contents
Cleanliness..............2-5 3121228 – JLG Lift –... - Page 6 Brush Assembly - Remove/Install ..........3-24 – JLG Lift –...
- Page 7 Joystick Assembly - Install/Remove ......... . . 4-18 3121228 – JLG Lift –...
-
Page 8: Section 1 - Machine Specifications
SECTION 1 - MACHINE SPECIFICATIONS 1.1 CAPACITIES IES IN YOUR JLG EQUIPMENT MAY RESULT IN PERFORMANCE ISSUES OR BATTERY CHARGER FAULT CODES. JLG ASSUMES System Voltage NO RESPONSIBILITY FOR SERVICE OR PERFORMANCE ISSUES ARISING FROM THE USE OF NON APPROVED BATTERIES. -
Page 9: Machine Height
+20°F (–7°C) JLG recom- mends using Mobil DTE 13 hydraulic oil. Platform Entry Height (Floor to Platform Floor) Aside from JLG r ecommendations, it is not advisable to 13.75 in. (34.9cm) mix oils of different brands or types, as they may not con-... - Page 10 (c) Prior to checking hydraulic oil level, operate machine through one complete cycle of lift function (full up and down). Failure to do so will result in incorrect oil level reading on the hydraulic reservoir. – JLG Lift – 3121228...
-
Page 11: Torque Spscifications
1. THESE TORQUE VALUES DO NOT APPLY TO CADMIUM PLATED FASTENERS 2. ALL TORQUE VALUES ARE STATIC TORQUE MEASURED PER STANDARD AUDIT METHODS TOLERANCE = ±10% 3. * ASSEMBLY USES HARDENED WASHER REFERENCE JLG ANEROBIC THREAD LOCKING COMPOUND JLG P/N Loctite® P/N... - Page 12 Service and Maintenance Man- Inspection Inspection rental deliver rental deliver y y . . Mechanic Mechanic ual and applicable JLG inspec- ual and applicable JLG inspec- tion tion form. form. Frequent Frequent In service for 3 months; or Out of service In service for 3 months;...
-
Page 13: Section 2 - General Service Information
SECTION 2 - SECTION 2 - GENERAL SERVICE INFORMA GENERAL SERVICE INFORMATION TION T T able 2-2. 10MSP able 2-2. 10MSP - Preventive Maintenance & - Preventive Maintenance & Inspection Schedule. Inspection Schedule. INTERVAL INTERVAL 3 MONTH 3 MONTH 6 MONTH... -
Page 14: Maintenance And Inspection Table Codes
SECTION 2 - SECTION 2 - GENERAL SERVICE INFORMATION GENERAL SERVICE INFORMATION T T able 2-2. 10MSP - Preventive Maintenance & Inspection Schedule. able 2-2. 10MSP - Preventive Maintenance & Inspection Schedule. (Continued) (Continued) INTERVAL INTERVAL 3 MONTH 3 MONTH... -
Page 15: Servicing And Maintenance Guidelines
MACHINE IS SHUT DOWN BEFORE PRESSURE-WASHING. SHOULD PRESSURE WASHING BE UTILIZED TO WASH AREAS Discard bearings if the races and balls (or rollers) are pit- CONTAINING ELECTRICAL/ELECTRONIC COMPONENTS, JLG ted, scored, or burned. INDUSTRIES, INC. RECOMMENDS A MAXIMUM PRESSURE OF If bearing is found to be serviceable, apply a light coat of ... - Page 16 (90 degrees) from the pin in-line position. Inspect chains carefully after long time use and heavy loading for this type of crack. If any cracks are dis- covered, replace all chains, as seemingly sound plates – JLG Lift – 3121228...
- Page 17 Fatigue and ultimate ture) but tend to extend in an arc-like path, often parallel to strength failures on JLG Lifts are incurred as a result of the rolling grain of the material. severe abuse as design specs are well within the rated lift- ing capacity of these chains.
- Page 18 (repositioning the brush warn- ing sensors), and the Ground Control Station is pro- grammed to reset the Brush Wear - Warning Timer - see Ground Control Module Programming in Section 4 of this manual. – JLG Lift – 3121228...
- Page 19 2. Frame Mounting Surface 5. Wheel Mounting Lugs (b) 3. Mounting Bolts/Washers (a) NOTE: Installation same for left and right drive motor - (a) Apply Loctite #242 to threads before tightening. (b) Tighten to 120 ft. lbs. (534 N-m) 3121228 – JLG Lift –...
- Page 20 8. Remove the Brake Friction Plate (B3) from the motor flange. 4. Cut the black wire tie (not shown) from the frame of the motor. 5. Remove the 3 Brake Bolts (7). – JLG Lift – 3121228...
- Page 21 NOTE: (a) Once cover screws are removed, you may need to tap lightly around the edge of the top cover to separate it from the motor housing. Read the note above before attempting to remove the cover. (b) These steel screws are threaded into the aluminum valve body, do not overtighten. 3121228 – JLG Lift – 3-23...
-
Page 22: Tank Remove/Install
NOTE: (a) Slide brush assembly into socket until tab is in slot at 1. Tank Assembly 3. O-Ring Seal (a) rear of socket. 2. Tank Screws (Qty. 4) 4. Reference Mark Note: (a) Lubricate o-ring with clean hydraulic fluid before sliding tank over during installation. 3-24 – JLG Lift – 3121228... -
Page 23: Filter Screen Remove/Install
• Requires removal of tank assembly and pump pick-up tube. Pressure Check Valve Remove/Install 1. Pump Assembly 3. Motor to Pump Coupler 1. Check Valve Assembly 2. Check Valve Port 2. Pump Assembly Screws 4. Pump Shaft Bearing 3121228 – JLG Lift – 3-25... -
Page 24: Batteries And Battery Charger -Service Procedures
SECTION 3 - BASE COMPONENTS 3.7 BATTERIES AND BATTERY CHARGER - MACHINE CYCLE TIMES. THE USE OF NON APPROVED BATTER- IES IN YOUR JLG EQUIPMENT MAY RESULT IN PERFORMANCE SERVICE PROCEDURES ISSUES OR BATTERY CHARGER FAULT CODES. JLG ASSUMES NO RESPONSIBILITY FOR SERVICE OR PERFORMANCE ISSUES Battery Condition Testing ARISING FROM THE USE OF NON APPROVED BATTERIES. -
Page 25: Section 4 - Control Components
Reattach wires to same terminals on new switch. Power Selector Switch Installation 1. Selector Knob 3. Power Selector Switch 2. Nut 4. Align and insert tab into cover Note: Reattach wires to the same terminals on new switch. 3121228 – JLG Lift –... -
Page 26: Ground Control Module
Manual for additional machine power-up steps. Level-3 Password: 33271 Entering Password THE LEVEL 1: JLG ENGINEERING SETTINGS ARE NOT DIS- PLAYED IN THE PROGRAMMABLE SETTINGS UNDER PASS- WORD LEVEL-2 OR LEVEL-3. LEVEL-1 SETTINGS MUST NOT BE MODIFIED UNLESS DIRECTED BY JLG ENGINEERING DEPART- MENT PERSONNEL. -
Page 27: Programming Mode Selection
1. Use the Platform UP/DOWN buttons (1) to scroll through the list of programmable items available to your programming level. 2. Once a programmable item to be adjusted is selected, press the Brake Release button (2) to enter that settings’ adjustment mode. 3121228 – JLG Lift – 4-11... - Page 28 SECTION 4 - CONTROL COMPONENTS SECTION 4 - CONTROL COMPONENTS T T able 4-1. Ground Control Module - able 4-1. Ground Control Module - Field Programmable Settings and Factory Preset. (10MSP) Field Programmable Settings and Factory Preset. (10MSP) ↑ ↑...
-
Page 29: General
SECTION 4 - CONTROL COMPONENTS SECTION 4 - CONTROL COMPONENTS 4. 4.5 5 PL PLAT ATFOR FORM CO M CONT NTRO ROL CO L CONS NSOLE OLE - - SERVICE PROCEDURES SERVICE PROCEDURES General General DO NOT ATTEMPT TO DISASSEMBLE THE PLATFORM CONTROL DO NOT ATTEMPT TO DISASSEMBLE THE PLATFORM CONTROL BOX IF MACHINE IS BOX IF MACHINE IS STILL UNDER WARRANTY. -
Page 30: Display/Controller Module Electrical Connections
2. 2. Cover Mounting Screws Cover Mounting Screws sent sent the the corresponding identification corresponding identification of of the the plug plug on on the module’s circui module’s circuit board. t board. 4-16 4-16 – JLG Lift – – JLG Lift – 3121228 3121228... -
Page 31: Display/Controller Module - Install/Remove
3. Attach Nut 2. Notch 4. Key Note: (a) Remove rear cover, unplug switch wire, press tabs to remove. Note: (a) Remove mounting bracket on bottom of console to gain access to the key switch assembly. 3121228 – JLG Lift – 4-17... -
Page 32: E-Stop/Shutdown Switch - Install/Remove
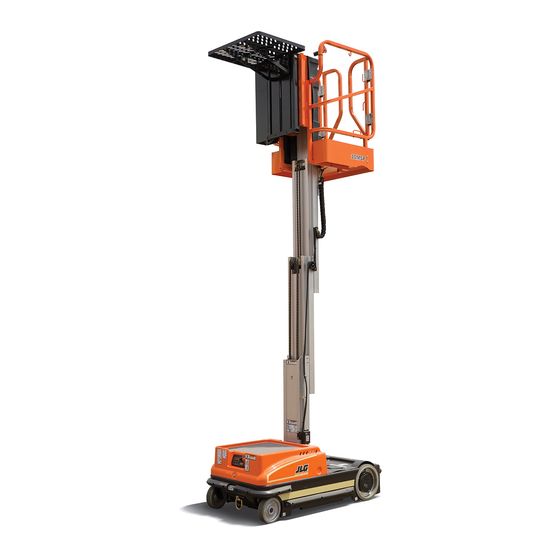
Note: (a) Use a small straight blade screwdriver to extend the (b) Remove the key switch and e-stop switch to remove spring-loaded retainer hooks (6) out and release the joystick assembly through access hole in bottom of con- switch from the body. sole. 4-18 – JLG Lift – 3121228... - Page 33 SECTION 5 - MAST COMPONENTS SECTION 5. MAST COMPONENTS 5.1 MAST COMPONENTS OVERVIEW Figure 5-1. Mast Components. 1. Material Handling Tray 3. Mast Assembly 2. Platform Assembly 4. Platform Mast Cover 3121228 – JLG Lift –...
- Page 34 While under the platform, unplug the wiring harness to the foot enable switch and the entry gate interlock switches from the platform junction box. Using suitable lifting equipment carefully lift the plat- form/material tray assembly off the mast assembly. – JLG Lift – 3121228...
- Page 35 6. 6. Section-4 - Lift Chain Anchor Bracket Section-4 - Lift Chain Anchor Bracket tion-1. Remove slide pads and shims, tion-1. Remove slide pads and shims, if necessary. if necessary. – JLG Lift – – JLG Lift – 3121228 3121228...
- Page 36 SECTION 5 - SECTION 5 - MAST COMPONENTS MAST COMPONENTS Mast Section-1 - Disassembly Mast Section-1 - Disassembly 1. 1. Rem Remove t ove the fo he four (4 ur (4) larg ) large scr e screws (2 e ews (2 each s ach side ide) ) attaching the lift cylinder mounting block to mast...
- Page 37 5-10 5-10 – JLG Lift – – JLG Lift – 3121228 3121228...
- Page 38 5. Valve O-Ring (a) 3. Manual Release Assembly 6. Solenoid O-Ring (a) Notes: (a) Coat all o-rings with clean hydraulic fluid before assembling. (b) Mount with electrical terminals pointing to right side of machine. 3121228 – JLG Lift – 5-11...
- Page 39 (ends of mast sections even). Apply- same, carefully slide the mast sections together until mast ing Krytox spray (JLG P/N-3020041) onto the slide pads ends are even. (When sliding the mast sections together, and slide pad channels before assembly will help mast be careful not to scratch the anodized surface in the wear ...
- Page 40 NOTE: 5-4. ) on a clean, flat surface (preferably a table or pad channels with Krytox lubricant spray, (JLG P/N- work bench capable of supporting the weight of the 3020041). Be careful not to scratch or score the ...
- Page 41 Coat threads 1. Slide Pads 3. Slide Pad Attach Screws (a) with Loctite #171 and tighten. 2. Shim Stock 4. Upper Sequence Cable Bracket Note: (a) Apply Loctite #242 to attach screws on final assembly. 3121228 – JLG Lift – 5-17...
- Page 42 Block on Mast Section-2. NOTE: Before sliding mast sections together, spray the slide pad channels with Krytox lubricant spray, (JLG P/N- 3020041). Be careful not to scratch or score the anodized finish in the slide pad channels. 2. Carefully slide mast section-4 into section-3 until ends are even.
- Page 43 Platform - 7 FT. HEIGHT Limit Switch - OPTION ). 3. Lower Bracket Wheel 14. The mast assembly is now complete and ready to 4. Sheave Wheel Attach Bolt 7. Spacers (Qty. 4) install onto the base frame. 3121228 – JLG Lift – 5-19...
- Page 44 Code 35 - P2-Auxiliary #1 - Tie Down ............6-31 6-14 – JLG Lift – 3121228...
- Page 45 Noise From Drive Assembly ..............6-44 3121228 – JLG Lift – 6-15...
- Page 46 For removal of electrical con- nector pins from the Drive Motor main power connec- tors. 7002842 Drive Motor Brake For removal of electrical con- nector pins from the Drive Motor Brake power connec- tors. 6-16 – JLG Lift – 3121228...
- Page 47 SECTION 6 - TROUBLESHO SECTION 6 - TROUBLESHOOTING OTING 6.11 6.11 FA FAUL ULT CODE TROUBLESHOOTING T T CODE TROUBLESHOOTING TABLES ABLES Machine in Drive Speed Cut-Back (Turtle) Mode All The Time Machine in Drive Speed Cut-Back (Turtle) Mode All The Time Overview of Procedure Overview of Procedure Under normal machine operation once the platform is elevated the machine’s maximum drive speed is reduced to 1/4 the...
- Page 48 Manual. Do the batteries pass condition tests? Manual. Do the batteries pass condition tests? as Necessary as Necessary Code 02 - RESERVED Code 02 - RESERVED Code 03 - RESERVED Code 03 - RESERVED 6-18 6-18 – JLG Lift – – JLG Lift – 3121228 3121228...
- Page 49 SECTION 6 - TROUBLESHO SECTION 6 - TROUBLESHOOTING OTING Code 04 - Tilt Condition Code 04 - Tilt Condition Check For These Obvious Conditions First: Check For These Obvious Conditions First: • • If machine is on a tilt of more than 1.5° in either or both the X If machine is on a tilt of more than 1.5°...
- Page 50 Replace Traction Go to Step 2 tor wiring harness going to the right drive motor brake assembly. Is reading Module within spec? Repair or replace right brake wiring or right brake assembly. — — — 6-20 – JLG Lift – 3121228...
- Page 51 Replace Traction machine operate OK after cooling. Module NOTE: If this is a recurring problem compare current draw of your machine with Traction Control Module specifications in Table 6-3, Amperage Draw for Various Components . 3121228 – JLG Lift – 6-21...
- Page 52 With the terminals still removed from the lift down valve coil, check continu- .00 Ohms — Repair or Replace ity of the wires from pins 10 and 3 on the P1 connector to the lif t down valve. Wiring 6-22 – JLG Lift – 3121228...
- Page 53 P4, pin-9 to Junction Box pin-4. Is there continuity on these wires? Perform the Joystick Calibration Procedure in Section 4.5 of this Service — Done Replace Manual. Does this clear the fault code? Platform Control Module 3121228 – JLG Lift – 6-33...
- Page 54 Check for short in harness wires from Ground Control Station connector P5 — Repair or Replace — to Traction Module (round din plug) . Wiring Note: This harness contains 6 wires only 3 are used, (See Figure 6-7.) Elec- trical Diagram. 6-34 – JLG Lift – 3121228...
- Page 55 Check continuity of the wires running from the P4 connector on Ground — Replace Platform Repair or Replace Control Module to the Platform Junction Box; Control Console Wiring P4 connector, Pin-1 to Junction Box Pin-2 and P4 connector, Pin-10 to Junction Box Pin-1 3121228 – JLG Lift – 6-35...
- Page 56 SECTION 6 - TROUBLESHOOTING Figure 6-6. 10MSP - Overview of Electrical System Components. 3121228 – JLG Lift – 6-45...
- Page 57 SECTION 6 - TROUBLESHOOTING Keyed Switch Removed for Australia Spec 1870201_G Figure 6-7. Electrical Diagram 6-46 – JLG Lift – 3121228...
- Page 58 SECTION 6 - TROUBLESHOOTING 1870201 G Figure 6-3. Electrical Diagram 3121228 – JLG Lift – 6-47...
- Page 59 9. Check Valve 2. Filter Screen 6. Extend Line 10. Pressure Compensator - Flow Control Valve 3. Pump 7. Hydraulic Filter 11. Manual Decent Valve 4. Pump Motor 8. Return Line 12. Lif t Cylinder 6-48 – JLG Lift – 3121228...
- Page 61 JLG Industries, Inc. 1 JLG Drive McConnellsburg PA. 17233-9533 (717) 485-5161 (717) 485-6417 JLG Worldwide Locations JLG Industries (Australia) JLG Latino Americana Ltda. JLG Industries (UK) Ltd JLG France SAS P.O. Box 5119 Rua Eng. Carlos Stevenson, Bentley House Z.I. de Baulieu...
Need help?
Do you have a question about the 10MSP and is the answer not in the manual?
Questions and answers