Current E-WAND Installation Manual And User's Manual
Hide thumbs
Also See for E-WAND:
- Installation manual and user's manual (21 pages) ,
- Setup manual (16 pages) ,
- Integration manual (11 pages)
Table of Contents
Advertisement
Advertisement
Table of Contents

Related Manuals for Current E-WAND


Summary of Contents for Current E-WAND
- Page 1 Installation Manual and User Guide...
- Page 2 Manual and User Guide. Without proper installation and programming, your E-Wand will not perform as designed. Please save these instructions. Please be aware that the E-Wand may behave differently based on blind manufacturer, slat size, and tilt mechanism location. For assistance:...
-
Page 3: Table Of Contents
5. Installing E-Wand on Vertical Blinds........22-25 6. Programming E-Wand Vertical Slat Positions....Connect the E-Wand to a Zigbee Network 7. Set Up the Current Products Corp. Bridge with the 27-29 MyCurtains App................... 8. Set Up the Current Products Corp. Bridge without the 30-31 MyCurtains App.................. - Page 4 Quick User Guide 24. Operation of a Single E-Wand............25. Controlling a Group of Blinds............26. Operation of a Single E-Wand Within a Group of Blinds. 27. Light Sensor Automation............... 28. Temperature Sensor Automation..........29. LED Modes on CPC Bridge............
-
Page 5: Package Contents And Parts Identifier
PACKAGE CONTENTS AND PARTS IDENTIFIER Optional HORIZONTAL TILT Converter HORIZONTAL BLIND MOUNT VERTICAL BLIND Installation Manual MOUNT & User Guide INSTALLATION MANUAL AND USER GUIDE (6) AA 1.5V ALKALINE BATTERIES Optional EXTENSION HANDLE VERTICAL BLIND REINFORCEMENT TAPE OPTIONAL REMOTE Wand Hook with wall plate EXTRA ADHESIVE STRIPS SleevE... -
Page 6: Meet Your E-Wand
Programming Button Battery Cap The E-Wand allows the user to motorize the slat movement for both horizontal and vertical window blinds. Users can fully control the position of an individual blind’s slats or a defined group of blind’s slats with manually with a slight twist of the handle, with the remote, through the MyCurtains app, and using voice control. -
Page 7: Horizontal Blinds Diagram
9. Vertical BLINDS DIAGRAM SLAT ATTACHMENT HEADER TILT GEAR STEM MANUAL TWIST WAND SLATS NOTE: The E-Wand is not compatible with vertical blinds that use a rope or chain to open and close the slats. -
Page 8: Mounting & Programming The E-Wand
1.2 Insert Batteries WARNING: Batteries MUST be installed with the positive end first for the E-Wand to be operable. Installing batteries incorrectly may result in the batteries and tube becoming hot to the touch. When batteries are properly installed, the E-Wand will play a... -
Page 9: Horizontal Blinds Installation & Programming Guide
Some venetian blinds use a cord to tilt the slats instead of a wand. To install the E-Wand to these types of blinds, you must first replace the corded tilt gear installed on your blind with the HORIZONTAL TILT GEAR (sold separately). - Page 10 [Fig. 2.5]. If a rod pin or the end brackets were removed while removing the corded tilt gear, replace back into their original position. Figure 2.5; Slide Stem through Header You have now converted your tilt mechanism. You may now proceed to Installing the E-Wand.
-
Page 11: Installing E-Wand On Horizontal Blinds
Make sure the blind slats are in the horizontal or fully opened position and the header is free of dirt, grime, and grease. If not, use a household Before installing the E-Wand, make sure you are able to freely tilt your cleaner to clean the header before installation. - Page 12 ATTACHMENT HOOK to your blind’s tilt gear stem or hook. Carefully push up the plastic RETAINING SLEEVE, [Fig. 3.3]. Rotate the E-Wand until the two SENSOR SWITCHES are in front and facing into the room. Figure 3.2; Hook Figure 3.3; Push up...
- Page 13 3. Test Fit the Blind Mount Perform a test fit of the HORIZONTAL BLIND MOUNT by snapping the mount onto the E-Wand [Fig. 3.4]. Slide the mount up or down along the CONTROL HOUSING until your blind’s tilt gear stem...
- Page 14 [Fig. 3.12] and firmly press to attach it to the blind’s header. Figure 3.12; Remove Backing from Adhesive Strip to Attach it to Header You have now completed installing your E-Wand onto Horizontal Blinds.
-
Page 15: Programming E-Wand Horizontal Slat Positions
4. programming e-wand horizontal slat positions You must program in the open and close limits on the E-Wand prior to the E-Wand being able to move. Limits are set to prevent any over-torquing of your blinds. When programming the E-Wand, you will be listening for audible beeps to assist you through the programming steps. - Page 16 2. Set the First Position- Full Closed Down Twist the E-Wand TWIST HANDLE [Fig. 4.2] to move the slats of the blind to the FULL DOWN position, then release the TWIST HANDLE. Be careful not to over tighten slats, as over tightening can cause damage to the blind.
- Page 17 SAME direction [Fig. 4.6] so the slats reach the FULL UP OR RIGHT position. Be careful not to over tighten the slats. The E-Wand should beep if it detects over-tightening. Press and hold the PROGRAMMING BUTTON. You will hear a TRIPLE BEEP (3) [Fig.
- Page 18 You have successfully power cycled when you hear a tune. You have now completed setting the open and close limits on the E-Wand. You are now ready to add the E-Wand onto a Zigbee Network, if desired [Pg. 26].
-
Page 19: Vertical Blinds Installation & Programming Guide
INstallation & Programming 5. Installing the E-Wand on Vertical Blinds Before installing the E-Wand, make sure you are able to freely tilt your blinds in both directions by turning the twist wand that originally came with your blinds. If there is significant resistance you may need to contact your blind manufacturer. - Page 20 [Fig. 5.2]. Figure 5.2; Reinforce vertical slat with slat reinforcement tape 2. Install the Vertical Blind Mount onto the E-Wand Install the VERTICAL BLIND MOUNT on the E-Wand by sliding the clear plastic bellows over the ATTACHMENT HOOK until it fits snuggly on the E-Wand frame [Fig.
- Page 21 [Fig. 5.6]. Be sure the slat is oriented the same as the other slats within the assembly. Figure 5.6; Reattach Vertical Slat You have now completed installing your E-Wand onto your vertical blinds.
-
Page 22: Programming E-Wand Vertical Slat Positions
6. PROGRAMMING E-WAND VERTICAL SLAT POSITIONS You must program in the open and close limits on the E-Wand prior to the E-Wand being able to move. Limits are set to prevent any over-torquing of your blinds. When programming the E-Wand, you will be listening for audible beeps to assist you through the programming steps. - Page 23 2. Set the First Position- Full Closed Left Twist the E-Wand TWIST HANDLE [Fig. 6.2] to move the slats of the blind to the FULL CLOSED LEFT position, then release the TWIST HANDLE. Be careful not to over tighten slats, as over tightening can cause damage to the blind.
- Page 24 3. Set the Second Position- Full Open Twist the E-Wand TWIST HANDLE [Fig. 6.4] in the OPPOSITE direction than the first phase of programming to move the slats to the FULL OPEN position, then release the TWIST HANDLE. Press and hold the PROGRAMMING BUTTON.
- Page 25 You have successfully power cycled when you hear a tune. You have now completed setting the open and close limits on the E-Wand. You are now ready to add the E-Wand onto a Zigbee Network, if desired [Pg. 26].
-
Page 26: Connect The E-Wand To A Zigbee Network
Connecting the E-Wand to a zigbee network The E-Wand can be paired to the Current Products Corp. bridge or to a third party Zigbee hub. If you are using a third party bridge, use the manufacturers instructions for setup, then follow their instructions for adding devices. -
Page 27: Set Up The Current Products Corp. Bridge With The Mycurtains App
7. Set up the Current Products Corp . bridge with the MyCurtains App If you would like to set up the E-Wand onto a mesh network WITHOUT WiFi, please proceed to the next section. 1. Download the App Download the Current Products Corp. app (MyCurtains) from the Google Play Store or the Apple App Store. - Page 28 3. Connect Bridge to Account After setting up your account on the app, it will prompt you to enable the Bluetooth on the bridge. The app will ask you to press and release the recessed button on the bottom of the bridge [Fig. 7.3].
- Page 29 [Fig. 7.5]. Beach House Figure 7.5; Hit the + to add a device On any E-Wand you wish to pair to the bridge (you can add more than one device at a time), press and release the programming button 3 times (without hearing a beep) [Fig.
-
Page 30: Set Up The Current Products Corp. Bridge Without The Mycurtains App
8. Set up the Current Products Corp. bridge without the mycurtains app In some rare instances you may want to establish a mesh network without using the app or WiFi. 1. Power the Bridge Find an outlet in a location central to the drapery that you are installing in the home. - Page 31 If you have additional devices you would like to add, repeat Steps 2 & 3. Figure X -Green LED will flash to indicate If the E-Wand does not jog, try putting the successful pairing. unit into pairing mode again. You have 5 minutes until the bridge times out of pairing mode.
-
Page 32: Making Sense Of The Sensors
MAKING SENSE OF THE SENSORS Light Sensor Switch Temperature Sensor Switch 9. SENSOR SWITCH POSITIONS Fully Automatic Semi-Automatic Light Sensor closes Light sensor only Light or Temperature the slats at sunset closes the slats at Sensors is off. and opens the slats at sunset. -
Page 33: Sensor Features
The LIGHT SENSOR will prevent the TEMPERATURE SENSOR from opening your blinds at night to maintain your privacy. A manual movement of an E-Wand via the TWIST HANDLE or REMOTE will deactivate the automatic features for three (3) hours. When blinds are grouped, one sensor triggered movement will move all blinds within that group. -
Page 34: Optional Programming Of The E-Wand
During programming, be conscious that there are several series of beeps that 11. E-Wand Programming Beeps correspond with the different programming stages. Be careful to not sum up the number of beeps you have heard, for example, a SINGLE BEEP (1) and then a DOUBLE BEEP (2) is not a TRIPLE BEEP (3). -
Page 35: What Is A Twist Group
A Twist Group allows you to group multiple E-Wands together so each will respond to the manual twist movement given to any other E-Wand you have placed in the group. Older, FM only E-Wands CAN be grouped to these new, Zigbee Hybrid E-Wands as long as the Zigbee E-Wand is the twist group Master. - Page 36 Figure 13.3; Jog The ability to create a twist group will time out after FIVE (5) minutes of inactivity. If you have mistakenly initiated grouping on an E-Wand, simply twist the TWIST HANDLE to remove from programming mode.
-
Page 37: Remove An E-Wand From A Twist Group
SINGLE BEEP (1), then release. Repeat this process to remove any additional desired E-Wands from the group. In some instances, you may want to add an E-Wand to an existing Twist 15. ADDING An E-Wand TO A TWIST GROUP Group. To add an E-Wand:... -
Page 38: Setting The Preferred Close Position
Press and hold the PROGRAMMING BUTTON on the E-Wand until you hear a QUADRUPLE BEEP (4). The E-Wand will now close to this set position when closed by sensor triggered events. Based on the construction of your blinds, you may notice the full open position 17. -
Page 39: Master Reset Your E-Wand
Master reset is performed to return an E-Wand to its factory default settings. 18. MASTER RESET YOUR E-Wand All twist groups, paired remotes, and positional settings will be removed from the memory of the E-Wand. Press and hold the PROGRAMMING BUTTON until you hear a QUINTUPLE BEEP (5), then release. -
Page 40: Batteries
Insert batteries with the positive (+) end first [Fig. 19.2]. Figure 19.2; Insert New Batteries 3. Replace Battery Cap Screw the BATTERY CAP back onto the end of the E-Wand. The E-Wand will play a short tune to confirm the batteries have been installed correctly. -
Page 41: Extension Handle
20. ATTACHING An E-Wand Extension Handle For blinds that are taller than average, it may be necessary to attach an E-Wand EXTENSION HANDLE (sold separately) to the end of your E-Wand. These will double the length of the TWIST HANDLE. -
Page 42: Setting Up An Optional Remote Control
Setting up the optional remote control 21. Pairing a remote control to the E-Wand For further assistance pairing a remote to the E-Wand, please view our online Instructional Videos at www.myewand.com/support. Pairing an E-Wand to the remote can be performed before or after 1. - Page 43 3. Pair the Remote Use a tack or pen to press and release the PAIRING button on the back of the remote [Fig. 21.3] When this button has been pressed, the LED’s on the front of the remote will scroll to confirm. Figure 21.3;...
-
Page 44: Setting The E-Wand Favorite Position
TRIPLE BEEP (3), then release. [Fig. 22.2]. Figure 22.2; Press and Hold Programming Button Your FAVORITE Button on the remote control will now move that blind to the programmed favorite position. Each E-Wand can be set to have different favorite positions. -
Page 45: Remote Diagram
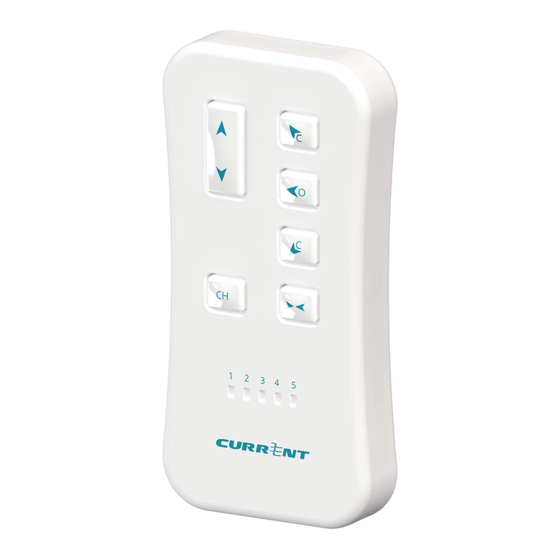
23. Remote Control Diagram Tilt Up/ Left Full Up/ Left Full Open Tilt Down/ Right Full Down/ Right Channel Selector Favorite Channel LEDs... - Page 46 CHANNEL SELECTOR selected channel is indicated by the Channel LEDs. Pressing the CHANNEL Button once will display the current channel. Pressing it again will switch to the next channel. When all LEDs are lit, the remote is selected to broadcast on all channels.
-
Page 47: Quick User Guide
E-Wand to move your blind to the desired slat position and release. Once a group is created, you can twist any E-Wand in the group and release 25. Controlling a Group of Blinds at the desired position. All other blinds in the group will automatically move to the selected position. -
Page 48: Light Sensor Automation
The E-Wand has an internal light sensor providing the capability to 27. Light Sensor Automation automatically close your slats at night to provide full privacy in the room, and open your slats in the morning to allow in natural light. -
Page 49: Led Modes On Cpc Bridge
Not Registered/Error During programming, be conscious that there are several series of beeps that 30. E-Wand Programming Beeps correspond with the different programming stages. Be careful to not sum up the number of beeps you have heard, for example, a SINGLE BEEP (1) and then a DOUBLE BEEP (2) is not a TRIPLE BEEP (3). -
Page 50: Safety Information And Statements
CAUTION Do not use the E-Wand for anything other than its intended use. Any usage of the parts of this kit outside of its intended purposes in not covered under the warranty. - Page 51 This device must accept any interference received, including interference that may cause undesired operation. Warning: Changes or modifications not expressly approved by Current Products Corp. could void the user’s authority to operate the equipment. NOTE: This equipment has been tested and found to comply with the limits for a Class B digital device, pursuant to Part 15 of the FCC Rules.
- Page 52 This device complies with Industry Canada license-exempt RSS standard(s). Operation is IC STATEMENT subject to the following two conditions: (1) this device may not cause interference, and (2) this device must accept any interference, including interference that may cause undesired operation of the device.
-
Page 53: Warranty Information
Current Products Corp. (the “Manufacturer”) hereby warrants to Customer that the E-Wand™ (the “Product”) is and will remain for a period of one (1) year from the date of delivery to Customer, as evidenced by Customer’s proof of purchase (the “Warranty Period”), free of material defects in materials and workmanship, provided that the Product... - Page 54 LIMITATION OF LIABILITY MANUFACTURER’S RESPONSIBILITY FOR DEFECTIVE PRODUCT IS LIMITED TO REPAIR OR REPLACEMENT AS DESCRIBED ABOVE IN THIS LIMITED WARRANTY STATEMENT. TO THE MAXIMUM EXTENT PERMITTED BY APPLICABLE LAW, MANUFACTURER DISCLAIMS ALL OTHER WARRANTIES WITH RESPECT TO THE PRODUCT, EXPRESS OR IMPLIED, INCLUDING THE WARRANTIES OF MERCHANTABILITY AND FITNESS FOR A PARTICULAR PURPOSE.
- Page 55 SERIAL NUMBERS Product Location Serial Number Serial Number Location...
- Page 56 Current Products Corp. 1995 Hollywood Ave. Pensacola, FL 32505 www.currentproductscorp.com 844-307-7435...
Need help?
Do you have a question about the E-WAND and is the answer not in the manual?
Questions and answers