
Related Manuals for Henny Penny FlexFusion ELECTRIC SPACESAVER PLUS TEAM


Summary of Contents for Henny Penny FlexFusion ELECTRIC SPACESAVER PLUS TEAM
- Page 1 Maintenance Read the operating instructions prior to maintenenace manual FlexFusion® ELECTRIC SPACE$AVER PLUS TEAM Model FSDE 610 FM06-140 en-US...
- Page 2 Maintenance instructions...
-
Page 3: Table Of Contents
Directory of contents 1 Introduction ................. 5 1.1 About this manual ................ 5 1.2 Personnel qualification .............. 5 2 Maintenance intervals ............ 6 2.1 Required maintenance .............. 6 2.2 Recommended maintenance ............ 6 3 Safety instructions ............. 7 4 Description of unit .............. 8 4.1 Overview of unit ................ 8 4.1.1 FlexFusion-SpaceSaver Plus Team ............ 8 4.1.2 FlexFusion-SpaceSaver Team ... - Page 4 Directory of contents 8.5 Check cooking chamber door upper and lower cooking chamber . 8.5.1 Door latch upper and lower cooking chamber ......... 21 8.6 Check water connection .............. 21 8.7 Check flexible conduits .............. 22 8.8 Check waste water connection ............. 22 8.9 Checking the condition of the electrical components .... 22 8.10 Check components upper device ...
-
Page 5: 1 Introduction
Introduction 1 Introduction 1.1 About this manual The maintenance instructions contain information: • About the safe maintenance of the unit. Observe the following notes and adhere to them: • Read the maintenance instructions completely before starting maintenance. • Read the Operating instructions before operating the unit. Target group The target group for the maintenance instructions is trained specialist personnel who are entrusted with the service, maintenance and operation of the unit. -
Page 6: 2 Maintenance Intervals
Maintenance intervals 2 Maintenance intervals 2.1 Required maintenance The manufacturer does not prescribe any mandatory maintenance of the unit. 2.2 Recommended maintenance The manufacturer recommends maintenance of the unit in accordance with the following table. After 12 months, after 6 months under heavy workload (more than 12 hours per day) •... -
Page 7: 3 Safety Instructions
Safety instructions 3 Safety instructions The maintenance personnel must be familiar with regional regulations and observe them. The maintenance personnel must observe the safety information in these maintenance instructions. The maintenance personnel must also observe the "Safety information" chapter in the installation instructions and operating instructions of the unit. -
Page 8: 4 Description Of Unit
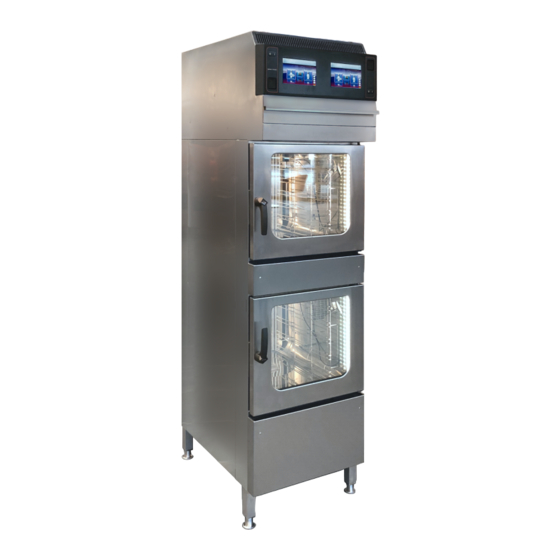
Description of unit 4 Description of unit 4.1 Overview of unit 4.1.1 FlexFusion-SpaceSaver Plus Team Image: Floor-standing unit a Air outlet j Unit leg b Operating unit k Nameplate c Filter drawer l Discharge channel for bottom unit d Condensate baffle m Cooking chamber in bottom unit e Hang-in frame n Hand shower (optional) -
Page 9: Flexfusion-Spacesaver Team
Description of unit 4.1.2 FlexFusion-SpaceSaver Team Image: FlexFusion-SpaceSaver Team a Air outlet i Nameplate b Operating unit j Discharge channel for bottom unit c Hang-in frame k Cooking chamber in bottom unit d Cooking chamber door l Hand shower (optional) e Door handle m Discharge channel for top unit f Discharge channel for top door... -
Page 10: Detailed Views
Description of unit 4.2 Detailed views 4.2.1 Recirculation hood filter Image: Recirculation hood filter a Condensation baffle e Vapor inlet b Filter drawer f Filter mat (yellow) c Air outlet g Air filter d Recirculation hood h Activated charcoal filter Maintenance instructions... -
Page 11: 5 Special Tools, Testing And Measuring Equipment
Special tools, testing and measuring equipment 5 Special tools, testing and measuring equipment The following tools and measuring instruments are needed for maintenance: • Voltmeter • Clamp-on ammeter • Spirit level • Personal protective equipment • Measuring cup with scale, capacity approx. 1 litre Maintenance instructions... -
Page 12: 6 Entering The Order Data And Nameplate Information
Entering the order data and nameplate information 6 Entering the order data and nameplate information Order data Date: Name and location of customer: Company performing the work: Order number: The nameplate contains all important data and information about the present unit. It is attached to the outside of the unit's housing. -
Page 13: 7 Opening And Closing The Housing
Opening and closing the housing 7 Opening and closing the housing Risk of personal injury and property damage from electric shock DANGER • Before working on the unit, ensure that the unit is dead. • Do not operate the unit with the housing open. Risk of injury from sharp edges CAUTION •... -
Page 14: Removing And Attaching The Rear Panel
Opening and closing the housing 7.2 Removing and attaching the rear panel 7.2.1 Remove the rear panel. 1. Unscrew the screws on the rear panel. 2. Remove the rear panel. Image: Remove back panels 7.2.2 Attaching the rear panel Risk of property damage from leaky housing NOTICE •... -
Page 15: 8 Performing Maintenance
Performing maintenance 8 Performing maintenance Risk of personal injury and property damage from electric shock DANGER • Inspection and adjustment work that can be carried out only with the hous- ing open and the unit under power must be performed only by electrically trained qualified personnel. -
Page 16: Complaints From The Operator
Performing maintenance 8.1 Complaints from the operator Has the operator noticed unacceptable situations during operation? Were they traced on the unit? Complaint Remarks / values 8.2 Checking the overall state of the unit 8.2.1 Entirety of the unit Inspect the housing for external damage Test criteria Remarks / values •... -
Page 17: Check Upper And Lower Cooking Chamber
Performing maintenance 8.4 Check upper and lower cooking chamber 8.4.1 Cooking chambers Check the cooking chamber for contamination Test criteria Remarks / values • Cooking chamber is clean. If No Inform the operator, because the proper function of the unit cannot be reliably checked and guaranteed due to the contamination. -
Page 18: Cartridge Holder Upper And Lower Cooking Chamber
Performing maintenance 8.4.4 Cartridge holder upper and lower cooking chamber Image: Check cartridge holder orientation, A incorrect, B correct Check the alignment of the cartridge holder Test criteria Remarks / values • Cartridge holder is correctly aligned. If No Align cartridge holder horizontally. If No Replace air baffle with cartridge holder. -
Page 19: Internal Core Temperature Sensor Lower Cooking Chamber
Performing maintenance 8.4.6 Internal core temperature sensor lower cooking chamber Check internal core temperature sensor for damage Test criteria Remarks / values • Core temperature sensor is not bent or damaged. If No Change core temperature sensor. Check tight fit of internal core temperature sensor Test criteria Remarks / values •... -
Page 20: Fan Wheel, Heating Element And Water Inlet Upper And Lower Cooking Chamber
Performing maintenance 8.4.8 Fan wheel, heating element and water inlet upper and lower cooking chamber Check heating element and fan wheel for limescale residues Test criteria Remarks / values • Heating element is free of limescale residues. • Fan wheel is free of limescale residues. If No Decalcify the unit. -
Page 21: Door Latch Upper And Lower Cooking Chamber
Performing maintenance 8.5.1 Door latch upper and lower cooking chamber Check the function of the interlock Test criteria Remarks / values • Lock must be actuated (locking and unlocking). If No Change door latch. Check the function of the interlock Test criteria Remarks / values •... -
Page 22: Check Flexible Conduits
Performing maintenance 8.7 Check flexible conduits Check the flexible conduit in the unit Test criteria Remarks / values • Clamps are screwed on tightly. If No Tighten bolts or replace clamp. Check tightness Test criteria Remarks / values • Hoses or flexible conduits are dry. •... -
Page 23: Check Components Upper Device
Performing maintenance Check control board cable Test criteria Remarks / values If no Repair. Check contactor and solid state relay of control board Test criteria Remarks / values • Contactor and solid state relay are externally OK (not brittle, damaged or charred). •... - Page 24 Performing maintenance Check the steaming unit (see service level) Test criteria Remarks / values • Humidification unit works perfectly. • Water volume measured in the DynaSteam test indi- cated. – Unit in "ml" or "fl oz". If No Troubleshooting according to service manual. Check solenoid valve vapour release (service level / relay test) Test criteria Remarks / values...
-
Page 25: Check Components Lower Device
Performing maintenance 8.11 Check components lower device Check fan (service level / relay test) Test criteria Remarks / values • Fan works properly when cooking process is active. – The number of fans depends on the device. If No Troubleshooting according to service manual. Check lift magnet air inlet flap Test criteria Remarks / values... -
Page 26: Check Optional Features
Performing maintenance Check siphon pump (service level / relay test) Test criteria Remarks / values If No Troubleshooting according to service manual. Inform operator. Check pump circulation (service level / relay test) Test criteria Remarks / values • Pump circulation works properly. If No Troubleshooting according to service manual. - Page 27 Performing maintenance Check hand shower Test criteria Remarks / values If No Change hand shower. Check hose reel and hose Test criteria Remarks / values • Hose rolls in without problems and is easy to unroll. • Hose is free of cracks. •...
-
Page 28: Check And Clean Recirculation Hood, Replace Filter
Performing maintenance 8.12.2 Check and clean recirculation hood, replace filter Image: Cleaning the recirculation hood and filter a Condensate baffle e Vapor inlet b Filter drawer f Filter mat (yellow) c Air outlet g Air filter d Recirculation hood h Activated charcoal filter Risk of injury from sharp edges CAUTION •... - Page 29 Performing maintenance Inspecting the recirculation hood Test criteria Remarks / values • Recirculation hood works perfectly (hood runs). If No Do not continue to operate combisteamer until hood is repaired. Replace filter mat yellow and clean filter frame Image: Removing the filter drawer and condensate baffle Image: Checking the yellow filter mat Image: Removing upper part of the filter holder and yellow filter pad Image: Removing lower part of the filter holder and condensation baffles from the...
- Page 30 Performing maintenance Prerequisite Disconnect the recirculation and associated unit from power Unit has cooled down 1. Remove the filter drawer with the filter. 2. Remove yellow filter mat, incl. holder. 3. Remove upper part of the holder. 4. Remove the yellow filter mat from the lower part of the holder and dispose it properly.
- Page 31 Performing maintenance Image: Pay attention to the installation position of the air filter Prerequisite Unit switched off Unit has cooled down 1. Remove the filter drawer with the filter. 2. Unclip condensate baffle. 3. Lift the air filter out of the holder at the rear. The air filter drops out of the front holder.
-
Page 32: Check Software
Performing maintenance 8.13 Check software New software version may fix bugs and include feature enhancements. INFORMATION The manufacturer recommends testing and updating the software. Check software version Test criteria Remarks / values • Is the installed software version up to date? If No Perform update. -
Page 33: Check Regulation Upper And Lower Unit
Performing maintenance Action • Close the unit (see "Opening and closing the unit"). 8.15 Check regulation upper and lower unit, Check date and time Test criteria Remarks / values • Date and time are current. If No Replace the battery of the control panel. Action •... -
Page 34: Check Cooking Chamber Sensors Upper And Lower Cooking Chamber
Performing maintenance 8.15.3 Check cooking chamber sensors upper and lower cooking chamber Check cooking chamber sensor Test criteria Remarks / values • Regulation works. • Unit heats up and maintains set temperature. If No Change cooking chamber sensor. Action • Check function of cooking chamber sensor. 8.15.4 Check function of cooking chamber sensor Prerequisite Unit switched on 1. - Page 35 Performing maintenance Notes and remarks Maintenance instructions...
-
Page 36: 9 Explanations Regarding Maintenance
Explanations regarding maintenance 9 Explanations regarding maintenance 9.1 Water connection 9.1.1 Clean fine sieve Fine sieve are installed at the drinking water and softened drinking water connections. Water supply line disconnected from the supply network 1. Loosen the screw connection of the line Drinking water and pull it off. -
Page 37: Swinging The Air Diverter Open And Closed
Explanations regarding maintenance 9.2.3 Swinging the air diverter open and closed Pinch hazard from rotating fan CAUTION • Before working on the unit, ensure that the unit has been disconnected from the power supply. • Do not operate the unit without the air diverter. Image: Air diverter fastener a Air diverter b Upper fastener... -
Page 38: 10 Completing The Maintenance
Completing the maintenance 10 Completing the maintenance The following work was carried out as part of the maintenance Component Reason for the exchange Maintenance instructions... - Page 39 Completing the maintenance The following components were replaced during maintenance Component Reason for the exchange Maintenance instructions...
- Page 40 Completing the maintenance The following components should be replaced promptly for proper operation. Component Reason for the exchange Maintenance instructions...
-
Page 41: 11 Acceptance Of Maintenance
Acceptance of maintenance 11 Acceptance of maintenance The maintenance was performed by: Company Installation fitter Place, date Signature / Stamp Confirmation of customer: Customer Function Place, date Signature / Stamp Maintenance instructions... - Page 42 Acceptance of maintenance Maintenance instructions...
- Page 44 *FM06-140* Henny Penny Corp., Eaton, Ohio 45320, Revised 2/7/2022...
Need help?
Do you have a question about the FlexFusion ELECTRIC SPACESAVER PLUS TEAM and is the answer not in the manual?
Questions and answers