
Related Manuals for Vitrifrigo DRW Sereis


Summary of Contents for Vitrifrigo DRW Sereis
- Page 1 SERIE DRW – TOTAL NO FROST ALL IN ONE MANUALE DI INSTALLAZIONE USO ED ASSISTENZA Rev.01 – 06/2019 LEGGERE LE ISTRUZIONI PRIMA DELL’USO...
-
Page 3: Table Of Contents
Indice INTRODUZIONE ............................... 4 AVVERTENZE GENERALI ..........................5 Destinazione del prodotto ........................5 Ricevimento ............................5 Installazione ............................5 Manutenzione e sicurezza ........................6 Smaltimento ............................6 SCOPO DEL MANUALE ........................... 7 Identificazione del costruttore ......................7 DESCRIZIONE DELL’APPARECCHIO ......................8 INSTALLAZIONE ............................. -
Page 4: Introduzione
1 INTRODUZIONE Gentile cliente: Grazie per aver scelto un nostro prodotto. La VITRIFRIGO si augura che Lei possa rimanere completamente soddisfatto dell'acquisto effettuato. Il presente manuale è considerato parte integrante del frigorifero e deve seguire il percorso di vendita fino all'utilizzatore. -
Page 5: Avvertenze Generali
2 AVVERTENZE GENERALI • Il manuale fa riferimento ai modelli della serie DRW. • Leggere attentamente questo manuale prima di utilizzare il frigorifero. ATTENZIONE pericolo d'incendio. L’apparecchio contiene gas infiammabile (propano R290). • ATTENZIONE: Non danneggiare il circuito refrigerante. • ATTENZIONE: Non usare apparecchi elettrici all’interno degli scomparti per la conservazione dei cibi, se questi apparecchi non sono del tipo raccomandato dal produttore. -
Page 6: Manutenzione E Sicurezza
• Non tentare di aprire o riparare il frigorifero. • Per eventuali problemi di funzionamento rivolgersi presso il centro assistenza Vitrifrigo più vicino; in ogni caso avvalersi di personale qualificato. • Non conservare sostanze esplosive in questo apparecchio, come bombolette per aerosol con propellente infiammabile. -
Page 7: Scopo Del Manuale
Eventuali modifiche appariranno, secondo le necessità, nelle successive versioni del manuale. Identificazione del costruttore Il frigorifero è progettato e prodotto esclusivamente presso la : Vitrifrigo s.r.l. Via Mazzini 75 - fraz. Montecchio 61022 VALLEFOGLIA(PU) – Italia Tel. +39 0721 491080 Fax. -
Page 8: Descrizione Dell'apparecchio
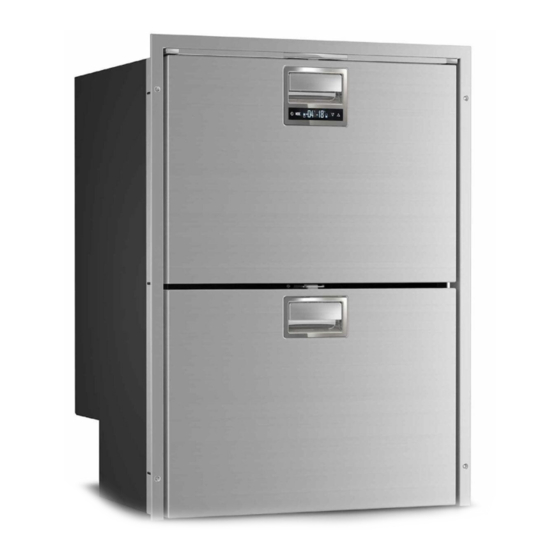
4 DESCRIZIONE DELL’APPARECCHIO L’etichetta riportante matricola e dati tecnici è posizionata all’interno del frigo. Le prime quattro cifre della matricola identificano l’anno e la settimana di costruzione. I frigoriferi della serie DRW – No frost All in one, cui il presente manuale fa riferimento, sono stati progettati, soddisfacendo gli elevati requisiti richiesti, allo scopo di garantire la corretta conservazione del cibo. - Page 9 • DRW180A Fig. 4.3 Fig. 4.4 Cassetto inferiore Griglia copri-scheda Maniglia Scheda elettronica Display comandi Condensatore Cassetto superiore Ventola Divisorio interno Vaschetta raccolta condensa Profilo di fissaggio Compressore Profilo base Centralina...
-
Page 10: Installazione
5 INSTALLAZIONE Assicurarsi che l’apparecchio non sia danneggiato, all’apertura dell’imballo dopo il ricevimento. Eventuali danni di trasporto devono essere segnalati tempestivamente al rivenditore e comunque non oltre le 24 ore successive alla consegna. Manipolare il prodotto con la massima attenzione. Nel posizionare il gruppo refrigerante (nei modelli di frigoriferi con impianto refrigerante remoto) agire con precauzione onde evitare ostruzioni o rotture sui tubi di collegamento. - Page 11 • DRW180A Fig. 5.2 Le dimensioni del vano da prevedere per l’incasso dell’apparecchio, per garantirne la stabilità, devono permettere il corretto montaggio del profilo di fissaggio installato. ATTENZIONE Mantenere libere da ostruzioni le aperture di ventilazione nella struttura ad incasso e nel vano dove è...
- Page 12 Non accostare niente alle griglie di ventilazione ne coprirle o ostruirle con oggetti o altri materiali. L’incasso deve rispettare le distanze minime tra l’apparecchio e la struttura circostante ed avere adeguate aperture di ventilazione comunicanti direttamente nell’ambiente libero del locale, per ottenere la corretta circolazione dell’aria tramite effetto camino, come indicato in fig.
-
Page 13: Tipologie Di Incasso
Per l’installazione di frigo o impianti frigo a bordo di caravan, camper, motor home etc. realizzare il vano d’incasso sul mezzo con prese di aerazione direttamente sull’esterno, dotate di opportune griglie con aperture non superiori a 5mm di lato, in posizione e di dimensioni come in fig. 5.5 Fig. -
Page 14: Fissaggio Del Cabinet
Fissaggio del cabinet 5.3.1 Scarico acqua di condensa Nei modelli sprovvisti di smaltimento automatico dell’acqua di defrost (modelli con gruppo compressore remoto), prima di fissare il cabinet nel vano d’incasso, collegare il tubo (con diam. int. 12mm) in uscita dall’unità (fig. 5.7 )alla rete idrica di scarico dell’acqua. Fig. -
Page 15: Fissaggio Sulla Cella
• DRW180A Fig. 5.9 5.3.3 Fissaggio sulla cella Dopo aver inserito il frigorifero nel suo vano nella posizione definitiva, procedere realizzando dei fori nella cella nelle posizioni indicate nelle immagini. Per accedere a tutti i punti descritti è necessario rimuovere entrambi i cassetti (par 8.2), e rimuovere i tappi dalle loro sedi. -
Page 16: Regolazione Dei Cassetti
• DRW180A Fig. 5.11 Regolazione dei cassetti Il frigorifero viene venduto con i cassetti regolati in modo tale da avere un funzionamento corretto e un buon aspetto esteriore, con uno schema delle fughe proporzionato. Nel caso in cui si renda necessario una regolazione per riposizionare i cassetti, procedere come segue. Aprire il cassetto e rimuovere le clip metalliche sul lato interno. -
Page 17: Collegamento Elettrico
6 COLLEGAMENTO ELETTRICO Connessione alla rete elettrica vca (opzionale) Il frigorifero si connette inserendo la spina nella presa elettrica. In caso non fosse presente la spina sostituire la presa con altra di tipo adatto. Tale operazione deve essere eseguita da personale qualificato il quale dovrà... -
Page 18: Collegamento A Batteria
In caso di incompatibilità fra la presa e la spina dell’apparecchio sostituire la presa con altra di tipo adatto. Tale operazione deve essere eseguita da personale qualificato il quale dovrà accertare che la sezione dei cavi della presa sia idonea alla potenza assorbita dall’apparecchio. -
Page 19: Avviamento
7 AVVIAMENTO Al termine dell’installazione verificare la continuità del circuito di terra ed eseguire tutte le prove di sicurezza elettrica previste dalle normative vigenti. Proteggere e bloccare adeguatamente i cavi al fine di evitare che trazioni accidentali del cavo che possano disconnetterlo dalle connessioni o che possano venire a contatto con parti calde con temperatura superiore a 50°C o con parti taglienti. -
Page 20: Pannello Di Controllo
Indicazione set point cassetto Accensione / spegnimento Al collegamento dell’alimentazione il display si accende in modalità stand by con visualizzata la scritta “VITRIFRIGO”. Per accendere il frigorifero, tener premuto il tasto A, per 2 secondi. In questo momento tutte le funzioni sono attive. -
Page 21: Impostazione Modalità Di Funzionamento / All In One
Impostazione modalità di funzionamento / All in one • DRW180A L’unità è in grado di funzionare in 3 modalità distinte semplicemente selezionandole dal display. Per impostare una delle tre possibili modalità tenere premuto il tasto B per 3 secondi e fare riferimento alla tabella seguente: Questa modalità... -
Page 22: Bloccaggio Tastiera
Per modificare i set point premere il tasto C o D per almeno 2 secondi. Verranno visualizzate a schermo in successione prima il setpoint del cassetto inferiore e poi quello del cassetto superiore. Premere il tasto C e D (freccia SU e freccia GIU’) per modificare tali setpoint e confermare con il tasto B. Alla conferma del cassetto INF la visualizzazione passa al cassetto SUP, confermare dopo la modifica e premere il tasto B per confermare. -
Page 23: Funzione Anti-Muffa
Funzione anti-muffa Durante le fasi di non utilizzo l’unità è predisposta per evitare la formazione di cattivi odori e muffe all’interno del vano. Dopo aver spento e svuotato il frigorifero è necessario aprire il cassetto superiore e estrarre il meccanismo al centro del tettuccio, vedi immagine. Fig. -
Page 24: Manutenzione
8 MANUTENZIONE Pulizia del frigorifero ESTERNO Pulire l’esterno del frigorifero con spugna o panno morbido evitando l’uso di solventi e prodotti abrasivi. INTERNO Procedere alla pulizia utilizzando acqua tiepida con l’aggiunta di bicarbonato di sodio o aceto. Sciacquare ed asciugare accuratamente con un panno morbido. Evitare tassativamente l’uso di prodotti abrasivi. In caso di prolungato inutilizzo dell’apparecchio, onde evitare la formazione di muffe o cattivi odori, disinserire la spina, svuotarlo e procedere alla pulizia dell’interno e lasciare la porta semiaperta. -
Page 25: Sostituzione Della Scheda Luce Led Del Cassetto Superiore
Sostituzione della scheda luce led del cassetto superiore ATTENZIONE: Prima di procedere alla sostituzione della lampada assicurarsi che il frigorifero non sia collegato all’impianto elettrico. In caso contrario disinserire la spina dalla presa di corrente. La sostituzione della lampada led deve essere effettuata da personale qualificato in grado di adottare tutte le precauzioni di sicurezza adeguate. -
Page 26: Allarmi
9 ALLARMI Gli allarmi sono mostrati alternati alla visualizzazione del setpoint ogni 2 secondi e appaiono a rotazione. In contemporanea viene emesso un suono di allarme. Di seguito l’elenco allarmi: • DRW70A Allarme Descrizione Possibili cause Conseguenze Soluzione Errore sonda cassetto Sonda guasta Il frigorifero continua a Si consiglia di togliere gli... -
Page 27: Tacitazione Allarme
• DRW180A Allarme Descrizione Possibili cause Conseguenze Soluzione Errore sonda cassetto inferiore Sonda guasta Il frigorifero continua a Si consiglia di togliere gli funzionare temporaneamente alimenti, spegnere il in modalità recovery frigorifero e chiamare subito l’assistenza Errore sonda cassetto Sonda guasta Il frigorifero continua a Si consiglia di togliere gli superiore... -
Page 28: Cosa Fare Se Il Frigo Non Funziona
10 COSA FARE SE IL FRIGO NON FUNZIONA Problema Possibili cause Soluzione La spina del cavo di alimentazione non è inserita Ricollegare correttamente la spina di alimentazione. Il frigorifero/freezer non funziona. correttamente in una presa elettrica. La temperatura del Il controllo della temperatura non è impostato Impostare una temperatura inferiore. - Page 29 NOTE __________________________________________________________________________________ __________________________________________________________________________________ __________________________________________________________________________________ __________________________________________________________________________________ __________________________________________________________________________________ __________________________________________________________________________________ __________________________________________________________________________________ __________________________________________________________________________________ __________________________________________________________________________________ __________________________________________________________________________________ __________________________________________________________________________________ __________________________________________________________________________________ __________________________________________________________________________________ __________________________________________________________________________________ __________________________________________________________________________________ __________________________________________________________________________________ __________________________________________________________________________________ __________________________________________________________________________________ __________________________________________________________________________________ __________________________________________________________________________________ __________________________________________________________________________________ __________________________________________________________________________________ __________________________________________________________________________________ __________________________________________________________________________________ __________________________________________________________________________________ __________________________________________________________________________________ __________________________________________________________________________________ __________________________________________________________________________________ __________________________________________________________________________________ __________________________________________________________________________________ __________________________________________________________________________________ __________________________________________________________________________________ __________________________________________________________________________________ __________________________________________________________________________________ __________________________________________________________________________________ __________________________________________________________________________________ __________________________________________________________________________________ __________________________________________________________________________________ __________________________________________________________________________________ __________________________________________________________________________________ __________________________________________________________________________________ __________________________________________________________________________________...
- Page 31 DRW SERIES – TOTAL NO FROST ALL IN ONE INSTALLATION, USE AND SERVICE MANUAL Rev.01 – 06/2019 READ THESE INSTRUCTIONS BEFORE USING THE PRODUCT...
- Page 33 Table of contents INTRODUCTION ............................. 34 GENERAL WARNINGS ........................... 35 Product uses ............................35 Upon receiving the product ........................ 35 Installation ............................35 Maintenance and safety ........................36 Disposal ............................. 36 PURPOSE OF THE MANUAL ......................... 37 The manufacturer ..........................37 DESCRIPTION OF THE APPLIANCE ......................
-
Page 34: Introduction
Dear client: Thank you for choosing one of our products. VITRIFRIGO hopes that you will be completely satisfied by your purchase. This manual is an integral part of the refrigerator and must accompany the refrigerator should it be sold or passed on. -
Page 35: General Warnings
2 GENERAL WARNINGS • This manual refers to models from the DRW series. • Read this manual carefully before using the refrigerator. IMPORTANT: risk of fire. The appliance contains flammable gas (propane R290). • IMPORTANT: Do not damage the refrigerant circuit. •... -
Page 36: Maintenance And Safety
• Never try to open or repair the refrigerator. • For any operational problems contact the Vitrifrigo Service Centre closest to you; in any case, request the assistance of a suitably qualified person. • Do not store explosive substances in this appliance such as aerosol cans with flammable propellant. -
Page 37: Purpose Of The Manual
Any modifications will appear, depending on the need, in future versions of the manual. The manufacturer The refrigerator has been design and manufactured exclusively by: Vitrifrigo s.r.l. Via Mazzini 75 - fraz. Montecchio 61022 VALLEFOGLIA(PU) – Italy Tel. +39 0721 491080 Fax. -
Page 38: Description Of The Appliance
4 DESCRIPTION OF THE APPLIANCE The label showing the serial number and the technical data is placed inside the refrigerator. The first four digits of the serial number identify the year and the week of manufacture. The DRW series refrigerators – No frost All in one, to which this manual refers, has been designed to meet the superior requirements demanded, in order to guarantee that food is properly conserved. - Page 39 • DRW180A Fig. 4.3 Fig. 4.4 Lower drawer Grille cover-tag Handle Electronic board Command display Condenser Upper drawer Internal partition Condensation collection tank Fixing profile Compressor Base profile Control unit...
-
Page 40: Installation
5 INSTALLATION When opening the packaging, after having received the appliance, check that it is not damaged. Any transportation damage must be reported promptly to the reseller and, in any case, within 24 hours of taking delivery of the appliance. Handle the product with the utmost care and attention. - Page 41 • DRW180A Fig. 5.2 The dimensions of the compartment to be provided for building the appliance in, in order to guarantee its stability, must allow the correct assembly of the installed fixing profile. IMPORTANT: Keep ventilation openings free from obstructions in the recess and in the compartment housing the remote refrigerant unit (in the versions with such a solution).
- Page 42 Do not place anything over the ventilation grilles, nor cover them. The recess must respect the minimum distances between the appliance and the surrounding structure, and must have adequate ventilation opening onto the room’s free environment in order to achieve correct air circulation through the chimney effect, as indicated in fig.
-
Page 43: Types Of Recess
When installing the refrigerator or the refrigerator system on board a caravan, camper, motor home, etc., you must create the recess compartment on the vehicle with air ducts directly to the outside, equipped with suitable grilles* with openings no greater than 5mm on each side, in the position and with the dimensions shown in fig. -
Page 44: Fixing The Cabinet
Fixing the cabinet 5.3.1 Defrost water drain In the model without automatic disposal of the defrost water (model with remote refrigerant unit) connect the drainpipe fig. 5.7 (with inner diameter of 12 mm) to the water disposal network before fixing the cabinet. -
Page 45: Fixing The Cell
• DRW180A Fig. 5.9 5.3.3 Fixing the cell After having introduced the refrigerator into its compartment in the definitive position, make the holes in the cell in the positions shown in the diagrams. To access all the points described, you will need to remove both drawers (paragraph 8.2) and remove the plugs from their seats. -
Page 46: Adjusting The Drawers
• DRW180A Fig. 5.11 Adjusting the drawers The refrigerator comes with two drawers that have been adjustable to provide proper operation and a good exterior appearance with a proportioned tile layout. In the event that the drawers need to be adjusted, proceed as follows. Open the drawer and remove the metal clip on the inner side. -
Page 47: Electrical Connection
6 ELECTRICAL CONNECTION Connection to the electrical network (VAC) - optional The refrigerator connects to the electrical network by plugging it into an electrical socket. If the plug is not present replace the socket with a suitable one. This operation must be done by a suitably qualified person who must ensure that the cable section of the plug is appropriate to the power absorbed by the appliance. -
Page 48: Battery Connection
In the event that the appliance’s plug and the socket are not compatible, replace the plug with a suitable one. This operation must be done by a suitably qualified person who must ensure that the cable section of the plug is appropriate to the power absorbed by the appliance. -
Page 49: Powering On
7 POWERING ON Once installation has been completed, check the continuity of the earth circuit and carry out all the electrical safety tests provided for by current regulations. Protect and adequately block the cables to avoid any risk of accidentally pulling the cable which could disconnect it or which could cause it to come into contact with a hot part of this appliance (or another one) at a temperature over 50°C or with a sharp part. -
Page 50: Control Panel
Switching on / Turning off When the power supply is connected, the display switches on in Stand By mode and displays the writing “VITRIFRIGO”. To switch the refrigerator on, press and hold button A for 2 seconds. Once on, all the functions are enabled. -
Page 51: Setting The Operation Mode / All In One
Setting the operation mode / All in one • DRW180A The unit can operate in one of 3 distinct modes by simply selecting it from the display. To set one of the three modes, press and hold button B for 3 seconds and then refer to the following table: This mode allows both drawers to be used in fridge mode. -
Page 52: Locking The Keypad
To change the setpoints, press and hold button C or D for at least 2 seconds. In order, the setpoint for the lower drawer and then the setpoint for the upper drawer will be displayed. Press button C or D (up arrow or down arrow) to change these setpoints and confirm with button B. Having confirmed the “INF”... -
Page 53: Anti-Mould Function
Anti-mould function When the unit is not in use, it is set up to prevent unpleasant smells and mould from forming inside the compartment. Once the refrigerator is turned off and emptied, you must open the upper drawer and remove the mechanism in the middle of the lid (see drawing). Push the two buttons and extract the mechanism until it “clicks”, which means the mechanism has been locked. -
Page 54: Maintenance
8 MAINTENANCE Cleaning the refrigerator OUTSIDE Clean the outside of the refrigerator with a sponge or soft cloth. Do not use solvents or abrasive products. INSIDE Clean the inside with warm water and some bicarbonate of soda or vinegar. Rinse and dry carefully with a soft cloth. -
Page 55: Replacing The Led Light Profile From The Upper Drawer
Replacing the LED light profile from the upper drawer IMPORTANT: Before replacing the light, make sure that the refrigerator is not connected to any electrical supply. If connected, unplug the appliance from the electrical supply. Replacing the LED light must be done by a suitably qualified person who is able to adopt all the appropriate safety measures. -
Page 56: Alarms
9 ALARMS Alarms are displayed, alternating with the setpoint, every 2 seconds and they appear in rotation. At the same time, an alarm sound is generated. The alarms are: • DRW70A Alarm Description Possible cause(s) Effect Solution Drawer sensor error Faulty sensor The refrigerator continues to We recommend... -
Page 57: Silencing Alarms
• DRW180A Alarm Description Possible cause(s) Effect Solution Lower drawer sensor error Faulty sensor The refrigerator continues to We recommend operate temporarily in removing any food, recovery mode turning the refrigerator off and immediately contacting the service centre Upper drawer sensor error Faulty sensor The refrigerator continues to We recommend... -
Page 58: What To Do If The Refrigerator Does Not Work
10 WHAT TO DO IF THE REFRIGERATOR DOES NOT WORK Problem Possible cause(s) Solution The power cable plug has not been properly plugged Plug the power cable in properly. The refrigerator/freezer does not into an electrical socket. work. The temperature in the The temperature control has not been set correctly. - Page 59 NOTES __________________________________________________________________________________ __________________________________________________________________________________ __________________________________________________________________________________ __________________________________________________________________________________ __________________________________________________________________________________ __________________________________________________________________________________ __________________________________________________________________________________ __________________________________________________________________________________ __________________________________________________________________________________ __________________________________________________________________________________ __________________________________________________________________________________ __________________________________________________________________________________ __________________________________________________________________________________ __________________________________________________________________________________ __________________________________________________________________________________ __________________________________________________________________________________ __________________________________________________________________________________ __________________________________________________________________________________ __________________________________________________________________________________ __________________________________________________________________________________ __________________________________________________________________________________ __________________________________________________________________________________ __________________________________________________________________________________ __________________________________________________________________________________ __________________________________________________________________________________ __________________________________________________________________________________ __________________________________________________________________________________ __________________________________________________________________________________ __________________________________________________________________________________ __________________________________________________________________________________ __________________________________________________________________________________ __________________________________________________________________________________ __________________________________________________________________________________ __________________________________________________________________________________ __________________________________________________________________________________ __________________________________________________________________________________ __________________________________________________________________________________ __________________________________________________________________________________ __________________________________________________________________________________ __________________________________________________________________________________ __________________________________________________________________________________ __________________________________________________________________________________...
Need help?
Do you have a question about the DRW Sereis and is the answer not in the manual?
Questions and answers
Is it possible to enable alarm on a dwr180 Got A3 code I know is the evaporator temp But in the night it is not fun