Vitrifrigo DW Series Instruction Manual
Fridges and freezers
Hide thumbs
Also See for DW Series:
- Instruction manual (100 pages) ,
- Installation manual (84 pages) ,
- Installation use and assistance manual (43 pages)

Related Manuals for Vitrifrigo DW Series


Summary of Contents for Vitrifrigo DW Series
- Page 1 INSTRUCTION MANUAL FRIDGES AND FREEZERS DW SERIES THANK YOU FOR PURCHASING A VITRIFRIGO PRODUCT...
- Page 2 Index 1. INTRODUCTION 2. GENERAL WARNINGS Destination of the product Receipt Installation Maintenance and safety (all models) Disposal 3. PURPOSE OF THE MANUAL Identification of the manufacturer 4. TYPES AND DESCRIPTION OF THE APPLIANCE 5. INSTALLATION Appliance recessing with ventilated condenser Appliance recess, with ventilated remote motor Appliance recess for campers, caravans and motor-homes Fixing the appliance...
-
Page 3: General Warnings
1. INTRODUCTION Dear client: Thank you for choosing one of our products. Vitrifrigo hopes that you will be completely satisfied with your purchase. This manual is considered an integral part of the refrigerator and must follow the sales path to the user. - Page 4 Destination of the product: • This appliance is designed for use in applications such as: o kitchen areas for personnel in shops, offices and other work environments; o By customers of farms, hotels, motels and in other residential environments; o Bed and Breakfast establishments; o In catering services and similar applications but not for retail purposes.
- Page 5 • Do not attempt to remove, modify or repair the refrigerator. • For any operational problems contact the Vitrifrigo Service Centre closest to you; in any case, request the assistance of a suitably qualified person. • Do not store explosive substances in this appliance such as aerosol cans with flammable propellant.
-
Page 6: Purpose Of The Manual
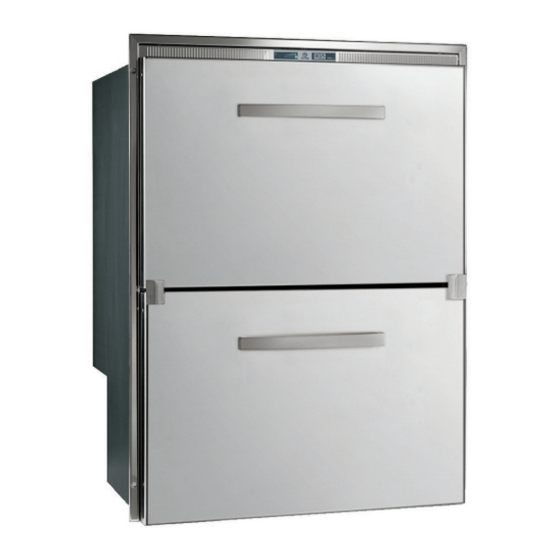
Any modifications will appear, depending on the need, in future versions of the manual. Identification of the manufacturer: The refrigerator has been designed and manufactured exclusively by: Vitrifrigo s.r.l. Via Mazzini 75 - fraz. Montecchio - 61022 VALLEFOGLIA(PU) – Italia tel. +39 0721 154500 - fax. +39 0721 497739 e-mail info@vitrifrigo.com - www.vitrifrigo.com... - Page 7 The label showing the serial number and the technical data is placed inside the refrigerator. The first four digits of the serial number identify the year and the week of manufacture. Description of the appliance – DW series (Double drawer) B2 B1...
- Page 8 Description of the appliance – DW series (Single drawer) A) Evaporator B) Drip tray (RF version) C) Wire basket D) Drawer dividers E) Bottle holder Description of the appliance – DW series (Combined) The lower part consists of a single...
-
Page 9: Installation
Description of the appliance – CDW series (Single drawer) A) Evaporator B) Drip tray C) Thermostat box D) Removable grilles D) Drawer divider 5. INSTALLATION Installation key: the presence of the letters I and L in the model code indicate the version relative to the type of installation envisioned I = version with internal motor for recessing L= version with remote motor for recessing... - Page 10 Appliance recessing with ventilated condenser The size of the front opening to be prepared for recessing the appliance must respect the dimensions of the refrigerator (see Annex 1). The recess must respect the minimum distances between the appliance and the surrounding structure and it must have suitable ventilation openings communicating directly with the open space in the room, in order to obtain correct air circulation by means of the chimney effect, as indicated in Annex 2 - Fig.1.
-
Page 11: Electrical Connection
Appliance recess for campers, caravans and motor-homes. To install the refrigerator or fridge units in a caravan, camper van, motor home etc. make the recess space in the vehicle with ventilation vents directly on the outside, fitted with suitable grilles to ensure that all possible live parts of the appliance are not directly accessible (thermostat, control unit and fan). - Page 12 battery by following the corresponding instructions of the supplied control unit (see annex 4). Prepare the alternating current power supply line using three-pole cable with minimum section per wire of 1 mm2 and suitable isolation for the methods and environment of use and compliant with the regulations in force.
- Page 13 7. START-UP (ELECTRONIC THERMOSTAT) The electronic thermostat features two button controls (Fig. 7.1): • The stand-by command “ ” • The temperature adjustment command “ ” A er connecting the refrigerator to the power supply, press the key “ ” son the membrane thermostat (Fig.
- Page 14 8. FUNCTIONALITY AND ADJUSTMENT OF THE TEMPERATURE ELECTRONIC THERMOSTAT To set the desired temperature, press the key “ ” on the thermostat (Fig. 7.1). Each time it is pressed, the light indicator goes from le to right. When the indicator is on the le , the appliance is on minimum (warmest temperature). To select a colder temperature, press the control repeatedly until the rightmost light indicator turns on (coldest temperature);...
- Page 15 If the refrigerator will not be used for a long time, disconnect it from the electrical power supply, empty it out completely, clean it and leave the door in the “Vent Position”. To put the door in the “Vent Position”, press the two buttons with both fingers and remove the mechanism from the upper bracket in DW models (Fig.
- Page 16 Removing the drawers (Lateral guides) To remove the drawers from the sliding guides, press on the two levers, right and le , in the guides (Annex 5 - Fig.1). Removing the drawers (Lower guides) To remove the drawers from the sliding guides, press on the two orange mechanisms at the bottom of the drawer and then li it (Annex 5 - Fig.2).
- Page 17 Replacing the door panel (CDW models) Remove the drawer from the guides to remove the stainless steel front panel (Annex 5 - Fig.2). Then follow the instructions in Annex 6 to remove the door panel. Removing the drip tray (“DT” versions only) Proceed as follows to extract the drip tray: Disconnect the water drain pipe Remove the fixing screws from the inside (Fig.
-
Page 18: Troubleshooting Guide
10. TROUBLESHOOTING GUIDE What to do if the fridge doesn’t work: Problem Cause Solution Check that the power supply cable is intact and properly connected. Mod. in direct current. No electrical current Check that the battery is charged check that the voltage on the terminal board The refrigerator of the appliance electronic device does not start...
Need help?
Do you have a question about the DW Series and is the answer not in the manual?
Questions and answers