
Related Manuals for Vitrifrigo TL43


Summary of Contents for Vitrifrigo TL43
- Page 1 MANUALE ISTRUZIONI FRIGORIFERO CC-CA GRAZIE PER AVER ACQUISTATO UN PRODOTTO VITRIFRIGO...
-
Page 3: Table Of Contents
Sommario 1. INTRODUZIONE 2. AVVERTENZE GENERALI Destinazione del prodotto Ricevimento Installazione Manutenzione e sicurezza (tutti i modelli) Smaltimento 3. SCOPO DEL MANUALE Identificazione del costruttore 4. DESCRIZIONE DELL’APPARECCHIO 5. INSTALLAZIONE Incasso dell’apparecchio con condensatore statico Incasso dell’apparecchio, con condensatore ventilato Incasso dell’apparecchio, con motore remoto ventilato Incasso dell’apparecchio per camper, caravan e motorhome Fissaggio dell’apparecchio... -
Page 4: Introduzione
1. INTRODUZIONE Gentile cliente, grazie per aver scelto un nostro prodotto. La Vitrifrigo si augura che Lei possa rimanere completamente soddisfatto dell’acquisto effettuato. Il presente manuale è considerato parte integrante del frigorifero e deve seguire il percorso di vendita fino all’utilizzatore. -
Page 5: Destinazione Del Prodotto
Destinazione del prodotto: • Il presente apparecchio è concepito per essere utilizzato in applicazioni quali: o zona cucina destinata al personale di negozi, uffici e altri ambienti lavorativi; o dai clienti di aziende agricole, alberghi, motel e in altri ambienti di tipo residenziale; o bed and breakfast;... -
Page 6: Manutenzione E Sicurezza (Tutti I Modelli)
• Non tentare di smontare, modificare o riparare il frigorifero. • Per eventuali problemi di funzionamento rivolgersi presso il centro assistenza Vitrifrigo più vicino; in ogni caso avvalersi di personale qualificato. • Non conservare sostanze esplosive in questo apparecchio, come bombolette per aerosol con propellente infiammabile. -
Page 7: Smaltimento
Identificazione del costruttore Il frigorifero è progettato e prodotto esclusivamente presso la : Vitrifrigo s.r.l. Via Mazzini 75 - fraz. Montecchio - 61022 VALLEFOGLIA(PU) – Italia tel. +39 0721 154500 - fax. +39 0721 497739 e-mail info@vitrifrigo.com - www.vitrifrigo.com... -
Page 8: Descrizione Dell'apparecchio
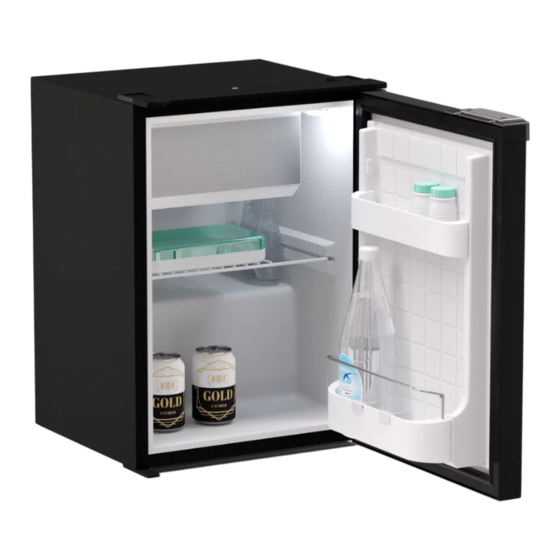
4. DESCRIZIONE DELL’APPARECCHIO A B D A) evaporatore orizzontale C) scatola termostato F) cassetto portafrutta (*) A1) evaporatore verticale D) griglie estraibili G) balconcini estraibili B) gocciolatoio E) ripiano in vetro (*) (*) solo su alcuni modelli L’etichetta riportante matricola e dati tecnici è posizionata all’interno del frigo. Le prime quattro cifre della matricola identificano l’anno e la settimana di costruzione. -
Page 9: Incasso Dell'apparecchio Con Condensatore Statico
Se il cavo di alimentazione risulta danneggiato deve essere sostituito dal servizio assistenza tecnica o comunque da una persona con qualifica similare, in modo da prevenire ogni rischio. Posizionare il frigorifero lontano da fonti di calore assicurando al medesimo sufficiente aerazione come negli esempi di installazione i seguenti. Dopo aver posizionato il frigorifero, attendere almeno un’ora prima di metterlo in funzione. -
Page 10: Incasso Dell'apparecchio, Con Motore Remoto Ventilato
L’incasso deve rispettare le distanze minime tra l’apparecchio e la struttura circostante ed avere adeguate aperture di ventilazione comunicanti direttamente nell’ambiente libero del locale, per ottenere la corretta circolazione dell’aria tramite ventilazione forzata, come indicato nell’allegato 2 - figura 2 L’incasso deve assicurare che tutte le eventuali parti in tensione dell’apparecchio non siano direttamente accessibili così... -
Page 11: Incasso Dell'apparecchio Per Camper, Caravan E Motorhome
Incasso dell’apparecchio per camper, caravan e motorhome. Per l’installazione di frigo o impianti frigo a bordo di caravan, camper, motorhome etc. realizzare il vano d’incasso sul mezzo con prese di aerazione direttamente sull’esterno, dotate di opportune griglie per assicurare che tutte le eventuali parti in tensione dell’apparecchio non siano direttamente accessibili (termostato, centralina e ventola). -
Page 12: Avviamento
batteria attenendosi alle corrispondenti istruzioni della centralina in dotazione (vedi allegato 4). Predisporre la linea di alimentazione in corrente alternata utilizzando cavo tripolare di sezione minima per conduttore di 1 mm2 ed isolamento adeguati alle modalità ed all’ambiente di utilizzo e conforme alle normative vigenti. Realizzare la connessione alla linea di alimentazione in corrente alternata mediante una connessione spina presa di portata adeguata conforme alle normative vigenti o predisporre un interruttore magnetotermico differenziale onnipolare con portata... -
Page 13: Funzionalitá E Regolazione Della Temperatura
Tempo di Modalità di Disposizione Cibo conservazione conservazione nel frigo Sulla griglia/ripiano sotto la Carne e pesce pulito 2 o 3 giorni zona freezer Utilizzare gli scomparti della Uova 1 mese controporta Utilizzare gli scomparti della Esclusivamente Burro e margarine 1 settimana controporta avvolti o chiusi in... -
Page 14: Manutenzione Non Ordinaria Ed Assistenza Pulizia Del Frigorifero
Settaggio livello di raffreddamento È possibile selezionare 4 livelli di raffreddamento. Da sinistra a destra per raggiungere la temperatura più fredda. Modalità Turbo Per avviare la modalità Turbo, tenere premuto il tasto C per un secondo. I 4 led blu si attiveranno contemporaneamente.Durante questa modalità non è possibile cambiare il set di temperatura. -
Page 15: Sbrinamento Dell'apparecchio
INTERNO Togliere i ripiani interni, le griglie (o il cestello), i contenitori e le vaschette per il ghiaccio e procedere alla pulizia utilizzando acqua tiepida con l’aggiunta di bicarbonato di sodio o aceto. Sciacquare ed asciugare accuratamente con un panno morbido. Evitare tassativamente l’uso di prodotti abrasivi, detergenti o saponi. -
Page 16: Sostituzione Del Pannello Porta
Sostituzione del pannello porta Smontare la porta seguendo le indicazioni riportate nell’allegato 5. quindi seguire le indicazioni nell’allegato 7. Sostituzione della scheda luce LED ATTENZIONE: La sostituzione della lampada led deve essere effettuata da personale qualificato in grado di adottare tutte le precauzioni di sicurezza adeguate. Prima di procedere alla sostituzione della lampada assicurarsi che il frigorifero non sia collegato all’impianto elettrico. - Page 17 Non si accende la luce di La luce è guasta Chiamare l’assistenza cortesia Frigorifero Controllare che il frigorifero sia posizionato in piano e non sia a contatto rumoroso diretto con oggetti che possano causare vibrazioni Se al termine di tali verifiche non si riuscisse ad ottenere un funzionamento regolare, rivolgersi al servizio assistenza.
- Page 18 INSTRUCTION MANUAL DC-AC FRIDGES THANK YOU FOR PURCHASING A VITRIFRIGO PRODUCT...
- Page 19 Index 1. INTRODUCTION 2. GENERAL WARNINGS Destination of the product Receipt Installation Maintenance and safety (all models) Disposal 3. PURPOSE OF THE MANUAL Identification of the manufacturer 4. DESCRIPTION OF THE APPLIANCE 5. INSTALLATION Recessing of the appliance with static condenser Appliance recessing with ventilated condenser Appliance recess, with ventilated remote motor Appliance recess for campers, caravans and motor-homes...
-
Page 20: General Warnings
This manual is considered an integral part of the refrigerator and must follow the sales path to the user. The same can be consulted on the Vitrifrigo website www.vitrifrigo.com. Each refrigerator, before being shipped, is thoroughly checked and tested to ensure it operates correctly. - Page 21 Destination of the product: • This appliance is designed for use in applications such as: o kitchen areas for personnel in shops, offices and other work environments. o By customers of farms, hotels, motels and in other residential environments. o Bed and Breakfast establishments. o In catering services and similar applications but not for retail purposes.
- Page 22 • Do not attempt to remove, modify or repair the refrigerator. • For any operational problems contact the Vitrifrigo Service Centre closest to you; in any case, request the assistance of a suitably qualified person. • Do not store explosive substances in this appliance such as aerosol cans with flammable propellant.
-
Page 23: Purpose Of The Manual
Any modifications will appear, depending on the need, in future versions of the manual. Identification of the manufacturer The refrigerator has been design and manufactured exclusively by: Vitrifrigo s.r.l. Via Mazzini 75 - fraz. Montecchio - 61022 VALLEFOGLIA(PU) – Italy tel. +39 0721 154500 - fax. +39 0721 497739... -
Page 24: Description Of The Appliance (Fig.1)
- www.vitrifrigo.com 4. DESCRIPTION OF THE APPLIANCE (fig.1) A B D A) horizontal evaporator C) thermostat box F) fruit drawer (*) A1) vertical evaporator D) removable grilles G) door shelves (removable) B) drip tray E) glass shelf (*) (*) only in some models The label showing the serial number and the technical data is placed inside the refrigerator. - Page 25 a solution) on a horizontal surface that can support the weight of the appliance and its eventual contents. Once installation has been completed, check that the refrigerator is not resting on a power cable. If the power cable is damaged, it must be replaced immediately by someone from the technical service centre or by someone suitably qualified, in order to avoid any risk.
- Page 26 dimensions of the refrigerator (see annex 1). The recess must respect the minimum distances between the appliance and the surrounding structure and it must have suitable ventilation openings communicating directly with the open space in the room, in order to obtain correct air circulation by means of the chimney effect, as indicated in annex 2 - figure 2 The recess must ensure that all possible live parts of the appliance are not directly accessible as well as the ventilation openings, by fitting them with suitable grilles.
-
Page 27: Fixing The Appliance
positioned on both sides, as per figure 3. Appliance recess for campers, caravans and motor-homes. To install the refrigerator or fridge units in a caravan, camper van, motor home etc. make the recess space in the vehicle with ventilation vents directly on the outside, fitted with suitable grilles to ensure that all possible live parts of the appliance are not directly accessible (thermostat, electronic module and fan). - Page 28 annex 4). Prepare the alternating current power supply line using three-pole cable with minimum section per wire of 1 mm2 and suitable isolation for the methods and environment of use and compliant with the regulations in force. Make the connection to the AC power line by means of a plug connection with an adequate flow rate compliant with current regulations or prepare an omnipolar magnetothermal differential switch with a capacity of 6 amps and with contact opening of at least 3 mm or nevertheless in compliance with current regulations.
- Page 29 For a reasonable arrangement and storage of food follow the table below: Preservation Method of Food Position in fridge time preservation On the grille/shelf under the Clean meat and fish 2 or 3 days freezer area Eggs 1 month Use the door compartments Exclusively wrapped Butter or margarine 1 week...
-
Page 30: Night Mode
Cooler level setting You can choose 4 levels of cooling, to change set push the button F. From left to right to reach the lowest temperature. Turbo Mode To turn on the Turbo mode, hold down the button C for one second. The 4 blue LEDs will light up and stay on at the same time. -
Page 31: Defrosting The Appliance
INSIDE Remove the internal shelves, grilles (or the rack), the containers and the ice trays and proceed with cleaning using lukewarm water with bicarbonate of sodium or vinegar. Rinse and dry carefully with a soft cloth. Completely avoid the use of abrasive products, detergents or soaps. in order to avoid the formation of mould or unpleasant smells, unplug the appliance, empty it and clean the inside and leave the door half open. -
Page 32: Troubleshooting Guide
Replacing the door panel Remove the door following the instructions given in Annex 5, then follow the instructions in Annex 7. Replacing the LED light profile ATTENTION: Replacing the LED light must be done by a suitably qualified person who is able to adopt all the appropriate safety measures. - Page 33 The courtesy light does not switch The light is faulty Call the service centre The refrigerator Check that the refrigerator sits flat and is not in direct contact is noisy with any object that might cause vibrations. If you do not manage to achieve regular operation after these checks, contact the customer assistance service.
-
Page 34: Manuel D'instructions
MANUEL D’INSTRUCTIONS RÉFRIGÉRATEURS CC-AC MERCI D’AVOIR ACHETÉ UN PRODUIT VITRIFRIGO... - Page 35 Index 1. INTRODUCTION 2. REMARQUES GÉNÉRALES Destination du produit Réception: Installation: Maintenance et sécurité (tous les modèles) Élimination de l’appareil 3. BUT DU MANUEL Identification du constructeur 4. DESCRIPTION DE L’APPAREIL 5. INSTALLATION Encastrement de l’appareil avec condenseur statique Encastrement de l’appareil, avec condenseur ventilé Encastrement de l’appareil, avec moteur à...
-
Page 36: Remarques Générales
1. INTRODUCTION Cher Client, Merci d’avoir choisi notre produit. VITRIFRIGO espère que vous serez entièrement satisfaits de votre achat. Ce manuel est considéré comme faisant partie intégrante du réfrigérateur et il doit suivre le parcours de vente jusqu’à l’utilisateur. Ce manuel peut être consulté... - Page 37 Destination du produit: • Cet appareil est conçu pour être utilisé dans des applications telles que: - Coin cuisine pour le personnel dans les magasins, bureaux et autres environnements de travail - Pour les clients des fermes, hôtels, motels et autres lieux - Chambres d’hôtes - Services de restauration et applications similaires, non destinés à...
- Page 38 Ne pas essayer de démonter, de modifier ou de réparer le réfrigérateur. • En cas d’anomalies de fonctionnement de l’appareil, contacter le centre d’assistance Vitrifrigo le plus proche ; dans tous les cas, faire appel à du personnel qualifié. •...
-
Page 39: But Du Manuel
Tout changement apparaîtra dans les versions ultérieures du manuel au besoin. Identification du constructeur Le réfrigérateur est conçu et fabriqué exclusivement auprès de: Vitrifrigo s.r.l. Via Mazzini 75 - fraz. Montecchio - 61022 VALLEFOGLIA(PU) – Italia tel. +39 0721 154500 - fax. +39 0721 497739 e-mail info@vitrifrigo.com - www.vitrifrigo.com... - Page 40 4. DESCRIPTION DE L’APPAREIL (fig.1) A B D A) évaporateur horizontal C) boîtier thermostat F) bac à lègumes (*) A1) évaporateur vertical D) clayettes extractibles G) balconnets extractibles B) bac d’égouttement E) tablette en verre (*) (*) seulement sur certains modèles L’étiquette avec le numéro de série et les données techniques se trouve à...
- Page 41 Si le câble d’alimentation est endommagé, il doit être remplacé par le service d’assistance technique ou par une personne ayant des qualifications similaires, afin de prévenir tout risque. Positionner le réfrigérateur à l’écart des sources de chaleur en vous’ assurant qu’il soit suffisamment ventilé, comme dans les exemples suivants d’installation.
- Page 42 L’encaissement doit respecter les distances minimales entre l’appareil et la structure autour, et avoir des ouvertures adéquates de ventilation communiquant directement dans l’espace libre du local, pour obtenir la circulation correcte de l’air à travers une ventilation forcée, comme indiqué dans l’annexe 2 - figure 2. L’encaissement doit garantir que toutes les parties sous tension de l’appareil ne soient pas directement accessibles, ainsi que les ouvertures de ventilation, en les dotant de grilles adéquates.
-
Page 43: Fixation De L'appareil
Encastrement de l’appareil pour camping-cars, caravanes et motorhomes. Pour l’installation de réfrigérateurs ou de systèmes de réfrigération dans les caravanes, camping-cars, motorhomes, etc., réaliser l’encastrement dans le véhicule avec des prises d’aération qui donnent directement sur l’extérieur, dotées de grilles pour garantir que toutes les parties sous tension de l’appareil ne sont pas directement accessibles (thermostat, unité... - Page 44 la batterie, en suivant les instructions correspondantes de l’unité de commande fournie (voir Annexe 4). Préparer la ligne d’alimentation en courant alternatif en utilisant un câble tripolaire d’une section minimale pour conducteur d’1 mm2 et isolement adaptés aux modalités et à l’environnement d’utilisation et conforme aux normes en vigueur. Realizer le raccordement à...
- Page 45 Temps de Modalité de Aliments Disposition dans le réfrigérateur conservation conservation Sur la clayette/étagère Viande et poisson nettoyé 2 ou 3 jours sous le congélateur. Utiliser les compartiments Œufs 1 mois de la contre-porte. Exclusivement Utiliser les compartiments Beurre et margarine 1 semaine enveloppés ou de la contre-porte.
-
Page 46: Mode Turbo
Réglage du niveau de refroidissement Vous pouvez choisir 4 niveaux de refroidissement, pour changer de réglage, appuyez sur le bouton F. De gauche à droite pour atteindre la température la plus basse. Mode Turbo Pour activer le mode Turbo, maintenez le bouton C enfoncé pendant une seconde. Les 4 LED bleues s’allumeront et resteront allumées en même temps. - Page 47 INTÉRIEUR Retirer les clayettes internes, les grilles (ou le panier), les rècipients et les bacs à glace et les nettoyer à l’eau tiède en ajoutant du bicarbonate de sodium ou de vinaigre. Rincer et essuyer soigneusement avec un chiffon souple. Èviter rigoureusement d’utiliser des produits abrasifs, des détergents ou des savons.
- Page 48 Montage cadre encastrable Total/Partiel Pour monter le cadre encastrable, dévisser partiellement les vis du cadre et le faire glisser au niveau de la porte ou au niveau du caisson et serrer de nouveau les vis. Remplacement du panneau porte Démonter la porte en suivant les indications de l’annexe 5. puis suivre les indications de l’annexe 7.
- Page 49 Le réfrigérateur Température interne trop Vérifier que la porte est parfaitement fermée ne s’arrête pas élevée La lumière de La lumière est courtoisie ne Appeler le service d’assistance en panne s’allume pas Réfrigérateur Vérifier que le réfrigérateur soit placé sur une surface plane et n’ est pas en bruyant contact direct avec des objets susceptibles de provoquer des vibrations Si à...
- Page 50 HANDBUCH DA-AC KÜHLSCHRÄNKE WIR DANKEN IHNEN SICH FÜR EIN VITRIFRIGO PRODUKT ENTSCHIEDEN ZU HABEN...
- Page 51 Inhaltsverzeichnis 1. EINLEITUNG 2. ALLGEMEINE HINWEISE Bestimmungszweck des Produktes Annahme Installation Wartung und Sicherheit (alle Modelle) Entsorgung 3. ZIEL DES HANDBUCHES Angabe des Herstellers 4. BESCHREIBUNG DES GERÄTES 5. INSTALLATION Einbau des Gerätes mit statischem Kondensator Einbau des Gerätes mit belüftetem Kondensator Einbau des Gerätes mit belüftetem Außenmotor Einbau des Kühlschranks in Wohnmobilen Wohnwagen und Reisemobilen...
-
Page 52: Einleitung
1. EINLEITUNG Lieber Kunde,vielen Dank, dass Sie sich für ein Produkt von uns entschieden haben. Vitrifrigo hofft, dass Sie mit Ihrem Kauf vollkommen zufrieden sind. Das vorliegende Handbuch ist integraler Bestandteil des Kühlschrankes und muss diesem vom Kauf bis zum Endnutzer begleiten. -
Page 53: Bestimmungszweck Des Produktes
Bestimmungszweck des Produktes: • Dieses Gerät wurde entwickelt, um in folgenden Strukturen verwendet zu werden: o Küchenbereich für das Personal in Geschäften, Büros oder anderen Arbeitsumgebungen; o Von Kunden in landwirtschaftlichen Betrieben, Beherbergungsbetrieben, Motels und anderen Einrichtungen zu Wohnzwecken; o Frühstückspensionen; o Cateringservice und ähnliche Anwendungen;... -
Page 54: Wartung Und Sicherheit (Alle Modelle)
Netzspannung mit den am Typenschild des Geräts oder Kompressors angegebenen Werten übereinstimmt. • Nach erfolgter Installation müssen Sie sicherstellen, dass der Kühlschrank nicht auf dem Versorgungskabel steht. • Sollte das Versorgungskabel beschädigt sein, muss es umgehend durch den Kundendienst oder einen Fachmann ersetzt werden. •... -
Page 55: Entsorgung
Änderungen werden bei Bedarf in den nachfolgenden Versionen des Handbuchs angezeigt. Angabe des Herstellers Der Kühlschrank wird ausschließlich von folgendem Unternehmen geplant und gebaut: Vitrifrigo s.r.l. Via Mazzini 75 - fraz. Montecchio - 61022 VALLEFOGLIA(PU) – Italia tel. +39 0721 154500 - fax. +39 0721 497739 e-mail info@vitrifrigo.com - www.vitrifrigo.com... -
Page 56: Beschreibung Des Gerätes
4. BESCHREIBUNG DES GERÄTES A B D A) horizontaler Verdampfer C) Thermostatgehäuse F) Obstfach (*) A1) vertikaler Verdampfer D) Herausziehbare Gitter G) Abstellfach B) Tropfwanne E) Glaseinlegeboden (*) (*) nur bei einigen Modellen as Typenschild mit der Seriennummer und den technischen Daten befindet sich im Inneren des Kühlschranks. -
Page 57: Einbau Des Gerätes Mit Statischem Kondensator
der Kühlschrank nicht auf dem Versorgungskabel steht. Wenn das Versorgungskabel beschädigt ist, muss es vom Technischen Kundendienst oder in jedem Fall von einer Person mit ähnlichen Qualifikationen ersetzt werden, um Risiken zu vermeiden. Der Kühlschrank muss von Wärmequellen entfernt positioniert werden. Sorgen Sie für eine ausreichende Belüftung des Gerätes, wie in den nachfolgenden Installationsbeispielen angezeigt ist. -
Page 58: Einbau Des Gerätes Mit Belüftetem Außenmotor
die direkt mit dem Freiraum des Raumes in Verbindung stehen, um eine korrekte Luftzirkulation durch die erzwungene Ventilation zu erhalten, wie in Anhang 2 - Abbildung 2 angegeben. Der Einbau muss sicherstellen, dass alle spannungsführenden Teile des Geräts sowie die Lüftungsöffnungen nicht direkt zugänglich sind und über geeignete Gitter verfügen. -
Page 59: Befestigung Des Gerätes
werden, dass die Belüftungsöffnungen direkt nach Außen gerichtet sind. Diese müssen mit entsprechenden Gittern verschlossen werden, um sicherzustellen, dass die spannungsführenden Teile des Gerätes nicht direkt erreichbar sind (Thermostat, Steueraggregat und Lüfter). Die Gitter müssen Öffnungen von max. 5 mm haben und mindestens auf einer Seite vorhanden sein (siehe Anhang 2 Abb. -
Page 60: Inbetriebnahme
an die Batterie anzuschließen. Befolgen Sie dazu die entsprechenden Anweisungen des mitgelieferten Steueraggregates (siehe Anhang 4). Bereiten Sie die Versorgungsleitung mit einem dreipoligen Kabel mit einem Mindestquerschnitt von 1 mm2 pro Leitung und einer Isolierung vor, die für die Verwendungsmethoden und die Einsatzumgebung geeignet ist und den geltenden Vorschriften entspricht. -
Page 61: Funktionsweise Und Temperaturregelung
Nahrungsmittel Konservierungsdauer Konservierungsart Anordnung im Kühlschrank Fleisch und Auf dem Gitter/Einlegeboden 2 oder 3 Tage geputzter Fisch unterhalb des Gefrierfachs. Verwenden Sie die Fächer der Eier 1 Monat Innentüre Verwenden Sie die Fächer der Butter und Margarine 1 Woche Nur umhüllt oder Innentüre in luftdichten Gekochte Speisen, Kuchen... -
Page 62: Nicht Planmässige Wartung Und Kundendienst
Kühlerstufeneinstellung Sie können 4 Kühlstufen wählen, um die Einstellung zu ändern, drücken Sie die Taste F. Von links nach rechts, um die niedrigste Temperatur zu erreichen. Turbo Modus Um den Turbo-Modus einzuschalten, halten Sie die Taste C eine Sekunde lang gedrückt. Die 4 blauen LEDs leuchten auf und bleiben gleichzeitig eingeschaltet. -
Page 63: Abtauen Des Gerätes
aggressiven Produkte verwenden. Die Reinigung und Wartung des Kondensators dürfen ausschließlich vom Personal des autorisierten Kundendienstes durchgeführt werden. INNEN Entfernen Sie die inneren Einlegeböden, die Gitter (oder den Korb), die Boxen und die Eiswürfelformen und reinigen Sie sie mit warmem Wasser unter Zugabe von Backpulver oder Essig. Abspülen und mit einem weichen Tuch gründlich trocknen. -
Page 64: Montage Des Gesamten Einbauprofils Oder Telle Davon
Montage des gesamten Einbauprofilsoder Teile davon Zum Einbau des Bündigprofils lösen Sie die Schrauben des Profils teilweise, so dass es bündig mit der Tür oder bündig mit dem Gehäuse abschließt, und ziehen die Schrauben wieder fest. Austausch des Türpaneels Entfernen Sie die Tür gemäß den Anweisungen in Anhang 5. Folgen Sie dann den Anweisungen in Anhang 7. - Page 65 Der Kühlschrank Innentemperatur zu Prüfen, ob die Tür perfekt geschlossen ist stoppt nicht hoch Innenbeleuchtung Die Lampe Rufen Sie den Kundendienst schaltet sich nicht ist kaputt Kühlschrank Prüfen, ob der Kühlschrank auf einer ebenen Fläche steht und nicht in macht Geräusche direktem Kontakt mit Gegenständen steht, die Vibrationen verursachen Sollte das Problem am Ende dieser Kontrollen nicht behoben worden sein, wenden Sie sich bitte an den Kundendienst.
- Page 66 MANUAL DE INSTRUCCIONES FRIGORÍFICOS CC-AC GRACIAS POR HABER COMPRADO UN PRODUCTO VITRIFRIGO...
- Page 67 Índice 1. INTRODUCCIÒN 2. ADVERTENCIAS GENERALES Destinación del producto Recepción Instalación Mantenimiento y seguridad (todos los modelos) Eliminación 3. FINALIDAD DEL MANUAL Identificación del fabricante 4. DESCRIPCIÓN DEL APARATO 5. INSTALACIÓN Empotrado del aparato con condensador estático Empotrado del aparato, con condensador ventilado Empotrado del aparato, con motor remoto ventilado Empotrado del aparato para camper, caravana y casas rodantes Fijación del aparato...
-
Page 68: Introducciòn
El mismo se puede consultar en el sitio web de Vitrifrigo www.vitrifrigo. com. Cada frigorífico, antes de su envío, se somete a controles y pruebas para asegurar su correcto funcionamiento. -
Page 69: Destinación Del Producto
Destinación del producto • Este aparato está diseñado para su uso en aplicaciones tales como: o Zona cocina destinada al personal de negocios, oficinas y otros ambientes laborales; o Por los clientes de empresas agrícolas, hoteles, motel y otros ambientes de tipo residencial; o Bed and Breakfast;... -
Page 70: Mantenimiento Y Seguridad (Todos Los Modelos)
No intentar desmontar, modificar o reparar el frigorífico. • Para posibles problemas de funcionamiento, comunicarse con el centro de asistencia Vitrifrigo más cercano; en cualquier caso, recurrir a personal cualificado. • No conservar sustancias explosivas en este aparato, como latas de aerosol con propulsor inflamable. -
Page 71: Eliminación
Identificación del fabricante El frigorífico está diseñado y fabricado exclusivamente por: Vitrifrigo s.r.l. Via Mazzini 75 - fraz. Montecchio - 61022 VALLEFOGLIA(PU) – Italia tel. +39 0721 154500 - fax. +39 0721 497739 e-mail info@vitrifrigo.com - www.vitrifrigo.com... -
Page 72: Descripción Del Aparato
4. DESCRIPCIÓN DEL APARATO A B D A)Evaporador horizontal C) caja termostato F) cajón portafruta (*) A1) evaporador vertical D) rejillas extraíbles G) balconcillos extraíbles B) recipiente de goteo E) estantes de vidrio (*) (*) sòlo en algunos modelos La etiqueta con el número de serie y los datos técnicos se sitùa en el interior del frigorífico. Las primeras cuatro cifras de la matrícula identifican el año y la semana de fabricación. -
Page 73: Empotrado Del Aparato Con Condensador Estático
alimentación. Si el cable de alimentación se daña debe ser sustituido por el servicio de asistencia técnica o de cualquier modo por una persona con calificación similar, a fin de prevenir cualquier riesgo. Colocar el frigorífico lejos de fuentes de calor, asegurando una aireación adecuada como en los siguientes ejemplos de instalación. -
Page 74: Empotrado Del Aparato, Con Condensador Ventilado
El empotrado debe respetar las distancias mínimas entre el aparato y la estructura circundante y tener adecuadas aperturas de ventilación que comuniquen directamente en el ambiente libre del local, para obtener la circulación correcta del aire a través de la ventilación forzada, como se indica en el anexo 2 - figura 2. El empotrado debe garantizar que no se pueda acceder directamente a todas las partes en tensión del aparato, así... -
Page 75: Empotrado Del Aparato Para Camper, Caravana Y Casas Rodantes
Empotrado del aparato para camper, caravana y casas rodantes. Para la instalación de frigoríficos o instalaciones frigoríficas a bordo de caravanas, camper, casas rodantes, etc., realizar un compartimento empotrado en el vehículo con salidas de ventilación directamente en el exterior, equipado con rejillas adecuadas para garantizar que todas las eventuales partes en tensión del aparato no sean directamente accesibles (termostato, centralita y ventilador). -
Page 76: Puesta En Marcha
batería, siguiendo las instrucciones correspondientes de la centralita suministrada (véase el anexo 4). Establecer la línea de alimentación en corriente alternada utilizando un cable tripolar de sección mínima para conductor de 1 mm2 y aislamiento adecuado de las modalidades y al ambiente de uso y conforme a las normativas vigentes. Realizar la conexión a la línea de alimentación de corriente alterna mediante una conexión con enchufe de capacidad suficiente conforme a la normativa vigente o instalar un interruptor magnetotérmico diferencial omnipolar de 6 amperios de... -
Page 77: Funcionalidad Y Regulación De La Temperatura
Preservation Method of Alimento Position in fridge time preservation En rejilla/estante bajo Carne y pescado limpio 2 o 3 días la zona congelador. Usar los compartimentos Huevos 1 mes de la puerta trasera. Exclusivamente envueltos o Usar los compartimentos Mantequilla y margarina 1 semana cerrados en de la puerta trasera. -
Page 78: Mantenimiento No Ordinario Y Asistencia
Ajuste del nivel del enfriador Puede elegir 4 niveles de enfriamiento, para cambiar el ajuste presione el botón F. De izquierda a derecha para alcanzar la temperatura más baja. Modo Turbo Para activar el modo Turbo, mantenga presionado el botón C durante un segundo. Los 4 LED azules se encenderán y permanecerán encendidos al mismo tiempo. -
Page 79: Sustitución Y Reversibilidad De La Puerta
INTERIOR Quitar los estantes internos, las rejillas (o el botellero), los envases y los recipientes para hielo y limpiar con agua tibia y bicarbonato de sodio o vinagre. Enjuagar y secar cuidadosamente con un paño suave. Evitar estrictamente el uso de productos abrasivos, detergentes o jabones para impedir la formación de moho u olores desagradables, desconectar el enchufe, vaciarlo y limpiar el interior, dejando la puerta medio abierta. -
Page 80: Sustitución Del Panel De La Puerta
Sustitución del panel de la puerta Desmontar la puerta siguiendo las indicaciones que figuran en el anexo 5. luego seguir las indicaciones en el anexo 7. Sustitución de la tarjeta luz LED ATENCIÓN: La sustitución de la lámpara led debe ser realizada por personal cualificado capaz de tomar todas las precauciones de seguridad adecuadas. - Page 81 No se enciende La luz está averiada Llamar a la asistencia la luz de cortesía Comprobar que el frigorífico esté colocado sobre una superficie plana Frigorífico ruidoso y que no esté en contacto directo con objetos que puedan provocar vibraciones Si, después de estos controles, no se puede obtener un funcionamiento regular, comunicarse con nuestro servicio de asistencia.
- Page 82 INSTRUCTIEHANDLEIDING DC-AC-KOELKASTEN BEDANKT VOOR DE AANKOOP VAN EEN VITRIFRIGO-PRODUCT...
- Page 83 ZInhoudsopgave 1. INLEIDING 2. ALGEMENE WAARSCHUWINGEN Bestemming van het product Ontvangst Installatie Onderhoud en veiligheid (alle modellen) Verwijdering 3. DOEL VAN DE HANDLEIDING Identificatie van de fabrikant 4. BESCHRIJVING VAN HET APPARAAT 5. INSTALLATIE Inbouw van het apparaat met statische condensator Inbouw van het apparaat, met geventileerde condensor Inbouw van het apparaat, met geventileerde motor op afstand Inbouw van het apparatuur voor campers, caravans en kampeerauto’s...
-
Page 84: Inleiding
1. INLEIDING Beste klant, bedankt voor het kiezen van een van onze producten. Vitrifrigo hoopt dat u volledig tevreden zult zijn met uw aankoop. Deze handleiding wordt beschouwd als een integraal onderdeel van de koelkast en moet de verkooproute volgen tot aan de gebruiker. -
Page 85: Bestemming Van Het Product
Bestemming van het product: • Dit apparaat is ontworpen voor gebruik in toepassingen zoals: o keukenruimte bestemd voor personeel in winkels, kantoren en andere werkplekken; o voor klanten in landbouwbedrijven, hotels, motels en andere residentiële omgevingen; o Bed and breakfast; o Catering en soortgelijke toepassingen, niet voor de detailhandel. -
Page 86: Installatie
• Probeer de koelkast niet te demonteren, te wijzigen of te repareren. • Per eventuali problemi di funzionamento rivolgersi presso il centro assistenza Vitrifrigo più vicino; in ogni caso avvalersi di personale qualificato. • Neem in geval van problemen met de werking contact op met het dichtstbijzijnde Vitrifrigo servicecentrum;... -
Page 87: Verwijdering
Identificatie van de fabrikant De koelkast is exclusief ontworpen en geproduceerd bij: Vitrifrigo s.r.l. Via Mazzini 75 - fraz. Montecchio - 61022 VALLEFOGLIA(PU) – Italia tel. +39 0721 154500 - fax. +39 0721 497739 e-mail info@vitrifrigo.com - www.vitrifrigo.com... -
Page 88: Beschrijving Van Het Apparaat
4. BESCHRIJVING VAN HET APPARAAT A B D A) horizontale verdamper C) thermostaatkastje F) fruitlade (*) A1) verticale verdamper D) verwijderbare roosters G) uittrekbare balkons B) druppelen E) glasplaat (*) (*) alleen op sommige modellen Het etiket met het serienummer en de technische gegevens bevindt zich aan de binnenkant van de koelkast. -
Page 89: Inbouw Van Het Apparaat Met Statische Condensator
dienst of een vergelijkbaar gekwalificeerd persoon om risico’s te voorkomen. Plaats de koelkast uit de buurt van warmtebronnen en zorg voor voldoende ventilatie, zoals in de volgende installatievoorbeelden. Wacht na het plaatsen van de koelkast minstens een uur voordat u hem in werking stelt. Inbouw van het apparaat met statische condensator De afmetingen van de frontale opening, die voor de inbouw van het apparaat gemaakt moet worden, moeten overeenkomen met de afmetingen van de koelkast en... -
Page 90: Inbouw Van Het Apparaat, Met Geventileerde Motor Op Afstand
De inbouw moet voldoen aan de minimumafstanden tussen het apparaat en de omringende structuur en moet voldoende ventilatieopeningen hebben die rechtstreeks in de open ruimte van het vertrek uitkomen, zodat een goede luchtcirculatie via geforceerde ventilatie wordt verkregen, zoals weergegeven in bijlage 2 - figuur. 2 De inbouw moet ervoor zorgen dat delen van het apparaat die onder spanning staan niet rechtstreeks toegankelijk zijn, dit geldt ook voor de ventilatieopeningen door die te voorzien van geschikte roosters. -
Page 91: Inbouw Van Het Apparatuur Voor Campers, Caravans En Kampeerauto's
De ventilatieopeningen moeten minimaal 120x120 mm groot zijn en aan beide zijden worden geplaatst, zoals weergegeven in figuur 3. Inbouw van het apparaat voor campers, caravans en kampeerauto’s Voor de installatie van koelkasten of koelsystemen aan boord van caravans, campers,kampeerauto’s, enz., moet het inbouwcompartiment in het voertuig met ventilatieopeningen rechtstreeks aan de buitenkant worden gemaakt, voorzien van geschikte roosters om ervoor te zorgen dat alle onder spanning staande delen van het apparaat niet direct toegankelijk zijn (thermostaat, besturingseenheid en ventilator). -
Page 92: Start
ELEKTRISCHE AANSLUITING VOOR MODELLEN VAN 12-24 Vdc en 12-24 Vdc / 100-240 Vac 50/60Hz Het wordt aanbevolen om de 12Vdc of 24Vdc voedingskabel rechtstreeks op de accu aan te sluiten volgens de bijbehorende instructies van de meegeleverde besturingseenheid (zie bijlage 4). Zorg voor een wisselstroom-voedingssnoer met een drie-aderige kabel met een minimale doorsnede van de geleider van 1 mm2 en isolatie die geschikt is voor de gebruikswijze en -omgeving en die voldoet aan de huidige voorschriften. -
Page 93: Functionaliteit En Temperatuurregeling
Dispositie Voedsel Bewaartijd Conserveringsmethoden in de koelkast Op de grill/plank onder het Maak vlees en vis schoon 2 of 3 dagen vriesgedeelte Gebruik de vakken op de 1 maand binnendeur Gebruik de vakken op de Boter en margarines 1 week binnendeur Uitsluitend Gekookt voedsel, gebak en... -
Page 94: Niet-Routinematig Onderhoud En Service Reiniging Van De Koelkast
Instelling koelniveau Er kunnen vier koelniveaus worden geselecteerd. Van links naar rechts om de koudste temperatuur te bereiken. Turbomodus Houd de C-toets gedurende één seconde ingedrukt om de Turbomodus te starten. De 4 blauwe LEDS worden gelijktijdig geactiveerd. In deze modus is het niet mogelijk om de temperatuur-set te wijzigen. -
Page 95: Ontdooiing Van Het Apparaat
BINNENKANT Verwijder de interne schappen, de roosters (of het mandje), de houders en de ijsbakjes en maak ze schoon met lauw water waaraan zuiveringszout of azijn is toegevoegd. Spoel af en droog grondig met een zachte doek. Vermijd absoluut het gebruik van schurende producten, reinigingsmiddelen of zeep. -
Page 96: Vervanging Van Het Deurpaneel
Vervanging van het deurpaneel Demonteer de deur volgens de instructies in bijlage 5. Volg daarna de instructies in bijlage 7. Vervanging van de LED-lichtkaart LET OP: : Het vervangen van de LED-lamp moet worden uitgevoerd door gekwalificeerd personeel dat in staat is alle passende veiligheidsmaatregelen te treffen. Controleer voordat u de lamp vervangt of de koelkast niet is aangesloten op het elektriciteitsnet. - Page 97 gebruikerslicht Het licht is niet in orde Hulp bellen gaat niet branden Lawaaierige Controleer of de koelkast plat staat en niet in direct contact staat met koelkast voorwerpen die trillingen kunnen veroorzaken Als het na deze controles niet mogelijk is om normaal te functioneren, neem dan contact op met de assistentiedienst.
-
Page 98: Allegati
ALLEGATI - ANNEXES Allegato MODELLI E MISURE DI INCASSO Annex MODELS AND RECESS MEASUREMENTS MODEL DC/AC (mm) (mm) (mm) C25L C39I C42L C50I C51I C60I C62I C75L C85I C90I C95L C115I C130L DP150I 1095 DP2600I 1344 C30BTL C35BTL C55BTL C110BTL LT45I LT75I TL20L... - Page 99 Hmin 75 mm CONDENSATORE STATICO 75 mm STATIC CONDENSER 75 mm IN APPOGGIO SU 75 mm Hmin PIANO CON GRIGLIA DI VENTILAZIONE SUPERIORE Hmin RESTING ON A SURFACE WITH TOP VENTILATION GRID Hmin 75 mm 75 mm H min = 120 mm Hmin CONDENSATORE STATICO 75 mm...
- Page 100 CONDENSATORE VENTILATO VENTILATED CONDENSER VERSIONE TOP LOADING POSIZIONE GRIGLIE CON AERAZIONE LATERALE TOP LOADING VERSION, Hmin GRIDS POSITION WITH SIDE Hmin VENTILATION H min = 120 mm CONDENSATORE VENTILATO UNITA’ REMOTA REMOTE UNIT VENTILATED CONDENSER POSIZIONE GRIGLIE GRIDS POSITION H min = 120 mm SIDE BACK Allegato...
- Page 101 Allegato SCHEMA ELETTRICO Annex ELECTRIC SCHEME Fuse Main switch Fuse Main switch Power Fuse Main switch supply Fuse Main switch Power supply Main Fuse Power switch supply Main Fuse Power switch Mechanical supply Thermostat Mechanical Thermostat Thermostat Thermostat R1= speed selection - R2 = battery protection R1= speed selection - R2 = battery protection non interface option (resistors) non interface option (resistors)
- Page 102 Allegato SOSTITUZIONE PORTA Annex DOOR REPLACEMENT Allegato REVERSIBILITÀ PORTA Annex DOOR REVERSIBILITY AIRLOCK CHROMELOCK STEELOCK ALLEGATI ANNEXES...
- Page 103 Allegato SOSTITUZIONE PANNELLO PORTA RIMOZIONE PORTA - VEDI ALLEGATO 5 Annex DOOR PANEL REPLACEMENT DOOR REMOVAL - SEE ANNEX 5 AIRLOCK CHROMELOCK Rimuovere la base in plastica utilizzando un cacciavite Rimuovere le viti e la base in plastica dal fondo Remove the plastic base using a screwdriver della porta Remove the screws and the plastic base from...
-
Page 104: Dichiarazione Di Conformità Ue
- è conforme alla Direttiva Bassa Tensione (LVD) 2014/35 CE - è conforme alla Direttiva Compatibilità Elettromagnetica (EMC) 2014/30 CE UE DECLARATION OF CONFORMITY Vitrifrigo srl, with Registered Office in via Mazzini 75, 61022 locality Montecchio, VALLEFOGLIA, Italy declares under its own responsibility that the product:... - Page 105 IDENTIFICAZIONE PRODOTTO / PRODUCT IDENTIFICATION SERIE C / C SERIES ALLEGATI ANNEXES...
- Page 106 VITRIFRIGO S.r.l. Via Mazzini, 75 Fraz. Montecchio 61022 Vallefoglia (PU) tel. +39 0721.154.500 fax +39 0721.497.739 www.vitrifrigo.com REV 02 - 2025 Made in Italy...
Need help?
Do you have a question about the TL43 and is the answer not in the manual?
Questions and answers