Vitrifrigo DW Series Installation Manual
Hide thumbs
Also See for DW Series:
- Instruction manual (100 pages) ,
- Installation use and assistance manual (43 pages) ,
- Instruction manual (18 pages)

Related Manuals for Vitrifrigo DW Series


Summary of Contents for Vitrifrigo DW Series
- Page 1 EN 42 SERIE DW ISTRUZIONI DI INSTALLAZIONE USO E MANUTENZIONE LEGGERE ATTENTEMENTE PRIMA DELL’USO...
-
Page 2: Table Of Contents
MANUALE DI INSTALLAZIONE USO ED ASSISTENZA Serie DW Leggere attentamente prima dell’uso Sommario 1 - INTRODUZIONE 1.1 - LETTERA ALLA CONSEGNA 1.2 - GARANZIA 1.3 - DENOMINAZIONE PRODOTTO 1.4 - COME SI LEGGE IL MANUALE 1.5 - NOTE PER L’UTILIZZATORE 1.6 - DESTINAZIONE D’USO 1.7 - SIMbOLOGIA UTILIZZATA 1.8 - DISPOSITIvI DI PROTEZIONE INDIvIDUALE (DPI) -
Page 3: Introduzione
1.1 - LETTERA ALLA cONSEGNA GENTILE CLIENTE Nel ringraziarLa di aver scelto un nostro prodotto la vITRIFRIGO si augura che Lei possa rimanere completamente soddisfatto dell’acquisto effettuato. Il presente manuale è considerato parte integrante del frigorifero e deve seguire il percorso di vendita fino all’utilizzatore e che la vitrifrigo ne vieta la riproduzione di qualsiasi parte. -
Page 4: Garanzia
1.2 - GARANZIA L’apparecchiatura ed i particolari meccanici della macchina che dovessero risultare difettosi all’origi- ne sono coperti da garanzia (vedi Norme Contrattuali). Le apparecchiature elettriche, superata la fase di collaudo, non sono coperte da garanzia. Durante il periodo di garanzia ogni operazione di smontaggio o sostituzione di particolari deve essere effettuata alla presenza di personale tecnico specializzato, pena la decadenza della garanzia stessa. -
Page 5: Destinazione D'uso
L’uso della macchina deve essere affidato esclusivamente ad operatori abilitati. Per operatore abilitato è inteso quel personale che ha: - letto completamente le “istruzioni per l’uso”; - compreso i concetti espressi nella pubblicazione stessa; costruttore Il costruttore non è responsabile delle conseguenze derivanti da un uso scorretto o improprio dell’apparecchiatura come ad esempio: - impiego di materie prime inadatte;... -
Page 6: Simbologia Utilizzata
1.7 - SIMbOLOGIA UTILIZZATA Di seguito si riportano le simbologie utilizzate nel manuale per richiamare l’attenzione del letto- re sui diversi livelli di pericolo nelle operazioni di uso e manutenzione della macchina. ATTENZIONE I testi contrassegnati da questo simbolo contengono informazioni rilevanti sul piano della sicurezza e indicano situazioni o aspetti potenzialmente pericolosi. -
Page 7: Trasporto
2 - TRASPORTO 2.1 - TRASPORTO L’apparecchiatura viene spedita normalmente su mezzi di trasporto via terra. Possono essere eseguiti imballaggi e/o contenitori speciali per esigenze particolari. ATTENZIONE Le parti imballate con scatole in cartone non possono essere impilate. 2.2 - MOVIMENTAZIONE E/O STOccAGGIO Le operazioni di trasporto, sollevamento e montaggio devono essere eseguite da aziende spe- cializzate operanti nel settore di trasporto;... -
Page 8: Modelli
3 - MODELLI 3.1 - VERSIONE A cASSETTO La seguente tabella indica le varie tipologie di versioni per i modelli a doppio scompartimento (fig. 3.1.1) e a singolo scompartimento (fig. 3.1.2). L’indicazione “*IM” indica la possibilità di inse- rire l’ICE MAKER nello scompartimento. 1 cASSETTO 2 cASSETTI frigo... -
Page 9: Versione Combinata
3.2 - VERSIONE cOMbINATA La seguente tabella mostra le varie versioni combinate (fig. 3.2.1). Ventilato Ventilato con modulo 1 cassetto Ventilato con modulo 2 cassetti Fig. 3.2.1... -
Page 10: Informazioni Introduttive
4 - INFORMAZIONI INTRODUTTIVE 4.1 - ETIchETTA IDENTIFIcATIVA Per qualsiasi comunicazione con il produttore o con i centri assistenza citare sempre il NUMERO SERIALE della macchina posto sull’etichetta di identificazione (fig. 4.1.1). L’etichetta indica inoltre tutte le specifiche tecniche del vostro frigorifero. Fig. -
Page 11: Descrizione Modello Dw
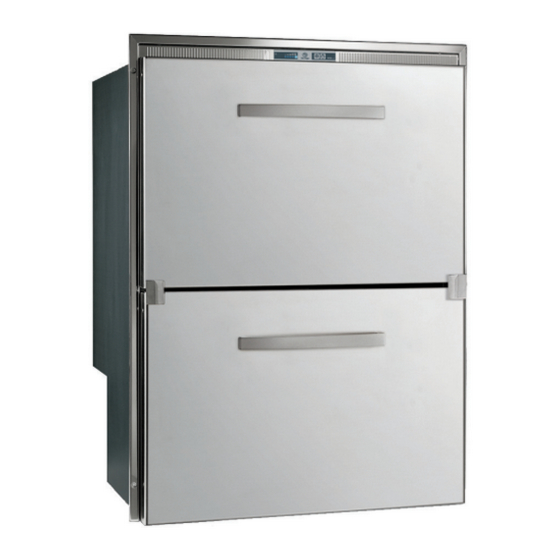
4.2 - DEScRIZIONE MODELLO DW FIG. 4.2.1 FIG. 4.2.2 FIG. 4.2.3 Cassetto superiore Centralina Gocciolatoio versione “DT” Cassetto inferiore Compressore Gocciolatoio versione “RF” Termostato Ventola Cestello / Divisori Condensatore Divisori Profilo di fissaggio Maniglie Fig. 4.2.1... - Page 12 Fig. 4.2.2 Fig. 4.2.3 ...
-
Page 13: Descrizione Modello Dw-Im
4.3 - DEScRIZIONE MODELLO DW-IM FIG. 4.3.1 FIG. 4.3.2 FIG. 4.3.3 FIG. 4.3.4 A Cassetto superiore A Tubo carico acqua A Cubetteria A Gocciolatoio versione “DT” B Cassetto inferiore B Scheda elettronica B ON “I” / OFF “0” cubetteria C Termostato C Protezione D Divisori D Elettrovalvola... - Page 14 Fig. 4.3.2 Fig. 4.3.3 Fig. 4.3.4 ...
-
Page 15: Descrizione Modello Ventilato
4.4 - DEScRIZIONE MODELLO VENTILATO FIG. 4.4.1 FIG. 4.4.2 Ripiani Centralina Ripiano in vetro Compressore Verduriere Ventola Ventola evaporatore Condensatore Luce Balconcini Termostato Fig. 4.4.1... - Page 16 Fig. 4.4.2 ...
-
Page 17: Installazione
5 - INSTALLAZIONE 5.1 - INSTALLAZIONE ObbLIGO DPI Manipolare il prodotto con la massima attenzione utilizzando dispositivi di protezio- ne individuale adeguati ed a norma di legge. ATTENZIONE Prima di collegare l’apparecchio verificare che la tensione di rete corrisponda a quanto riportato sulla targhetta di identificazione dell’... -
Page 18: Tipologia Di Incasso
ATTENZIONE Mantenere libere da ostruzioni le aperture di ventilazione nell’involucro dell’ap- parecchio o nella struttura ad incasso. Effettuare, con le apposite viti, il montaggio ad incasso del prodotto utilizzando i fori presenti lungo il profilo di fissaggio (Fig. 5.1.3). Installare l’apparecchio lontano da fonti di calore in luogo asciutto e ben aerato. Fig. -
Page 19: Collegamento Elettrico
5.3 - cOLLEGAMENTO ELETTRIcO ATTENZIONE Prima di effettuare l’allaccio verificare l’esistenza di un idoneo impianto di mes- sa a terra secondo Norme Europee (EN). ATTENZIONE Prima di effettuare qualsiasi collegamento elettrico verificare che l’interruttore generale sia spento (OFF) (Fig. 5.1.4). NOTA Per il corretto collegamento consultare lo schema elettrico allegato al presente manuale. -
Page 20: Istruzioni Per Collegamento A Batteria (Solo Per Modelli Che Prevedono L'alimentazione In Corrente Continua)
NOTA E’ obbligatoria a termini di legge la messa a terra dell’apparecchio. Assicurarsi che il sistema di messa a terra dell’impianto elettrico sia perfettamente efficiente. Si declina ogni responsabilità per eventuali danni subiti da persone o cose deri- vanti dalla mancata osservanza di tale norme. E’... - Page 21 Installazione (fig. 5.4.1) Collegare il connettore terminale dell’unità elettronica di controllo al terminale del compresso- re. Montare l’unità sul compressore incastrando il coperchio sulla testa della vite (1). Alimentazione (fig. 5.4.1) L’unità elettronica di controllo deve essere sempre collegata direttamente ai poli della batteria (2).
-
Page 23: Istruzioni Danfoss Bd35/Bd50F 12-24 Vcc / 110-240 Vca
5.5 - ISTRUZIONI DANFOSS bD35/bD50F 12-24 Vcc / 110-240 Vca L’unità elettronica è un dispositivo multitensione. Può essere utilizzato sia con sistemi di alimen- tazione da 12v/24v DC che da 100-240v AC 50/ 60Hz. In caso di sistema di alimentazione a 12v DC la tensione massima è... - Page 24 Lampada (opzionale, fig. 5.5.1) Una lampada da 5 Watt 12v DC (10) può essere collegata fra i morsetti A e C. La tensione d’uscita fra i morsetti A e C è sempre regolata su 12v DC. Sia con il sistema di alimentazione a 12v che con quello a 24v deve essere utilizzata una lampada 12v DC.
-
Page 26: Collegamento Idrico (Solo Per Versioni Dw-Im)
5.6 - cOLLEGAMENTO IDRIcO (solo per versioni DW-IM) Collegare la rete idrica al bocchettone filettato presente sull’elettrovalvola (A) mediante l’appo- sito tubo flessibile in dotazione (fig.5.6.1). Fig. 5.6.1 NOTA L’apparecchio è previsto per il funzionamento con pressione idrica compresa fra 1 ÷... - Page 27 Quando l’indicatore si trova a sinistra, l’apparecchio è al minimo (temperatura più calda) . Per selezionare una temperatura più fredda premere ripetutamente il comando fino all’accen- sione dell’indicatore luminoso più a destra (massimo freddo), la successiva pressione realizza l’accensione dell’indicatore luminoso più a sinistra. Quando l’indicatore si trova al centro l’appa- recchio è...
-
Page 28: Regolazione "Fine" Ingresso Acqua (Versioni Con Fabbricatore Di Ghiaccio)
6.1.2 - REGOLAZIONE “FINE” INGRESSO AcQUA (Versioni con fabbricatore di ghiaccio) Per accedere alla vite di regolazione del livello d’acqua in ingresso, rimuovere il carter in plastica del fabbricatore di ghiaccio (Fig. 6.1.2.1, A). Agendo con un cacciavite sulla vite di regolazione del livello acqua (Fig. 6.1.2.1, b) si sposta il contatto direttamente sulla cubettiera. -
Page 29: Modalita' Mantenimento
6.3 - MODALITA’ MANTENIMENTO Durante il mantenimento, la produzione di ghiaccio è interrotta. Il mantenimento entra in funzione quando: • L’interruttore di accensione del produttore di ghiaccio (Fig. 6.3.1) è disattivato. • Vasca (Fig. 6.3.1) piena di ghiaccio. Per ripristinare la fabbricazione del ghiaccio sarà sufficien- te svuotare la vasca, (anche parzialmente). NOTA La cubettiera presente sul cassetto superiore ha un interruttore di ON/OFF per attivare la produzione di ghiaccio. -
Page 30: Sbrinamento Dell'apparecchio
7.2 - SbRINAMENTO DELL’APPAREcchIO NOTA Lo sbrinamento dell’apparecchio si effettua ogni qualvolta si riscontri uno spes- sore di brina superiore a tre millimetri. Tale operazione è necessaria per garanti- re un buon rendimento dell’apparecchio ed evitare maggior consumo di energia elettrica. -
Page 31: Rimozione Frontale Inox
• estrarre, perpendicolarmente alla base, il coperchio di protezione facendo attenzione a non danneggiare i perni di fissaggio. • scollegare il cavo di alimentazione della luce • sostituire la scheda luce led • collegare il cavo di alimentazione • riposizionare il coperchio ATTENZIONE Al momento della sostituzione bisogna fare attenzione a non danneggiare il reed magnetico di comando... -
Page 32: Anomalie Di Funzionamento
8 - ANOMALIE DI FUNZIONAMENTO PRObLEMA CAUSA RISOLUZIONE Termostato nella verificare che il termostato sia nella posizione acceso. posizione spento. L ’ i n t e r r u t t o r e a u t o m a t i c o verificare che l’interruttore automatico dell’impianto elettrico dell’impianto elettrico sia inserito. -
Page 33: Fine Servizio
PRObLEMA CAUSA RISOLUZIONE verificare che non manchi la corrente elettrica. verificare che l’interruttore automatico dell’impianto elettrico non sia disinserito. verificare che la spina sia efficiente e correttamente inserita nella presa di corrente. verificare che la presa di corrente sia efficiente. Per tale verifica L’apparecchio collegare alla presa un apparecchio la cui funzionalità... -
Page 34: Schemi Elettrici
10 - SchEMI ELETTRIcI WHITE WHITE... - Page 36 WHITE WHITE...
- Page 38 WHITE WHITE...
- Page 40 OLD MODEL WITH SWITCH IN THE DRAWER...
- Page 41 NEW MODEL...
- Page 42 INSTALLATION USE AND ASSISTANCE MANUAL DW Series Read carefully before use Contents 1 – INTRODUcTION 1.1 – DELIvERY LET TER 1.2 – WARRANTY 1.3 – PRODUCT NAME 1.4 – HOW TO READ THIS MANUAL 1.5 – NOTES FOR THE USER 1.6 –...
-
Page 43: Introduction
This manual is considered an integral part of the refrigerator and must accompany it from the time of sale to the end user. vitrifrigo prohibits the reproduction of any part of this manual. before it leaves our factory, every refrigerator undergoes strict tests and inspections to guarantee that it is in perfect working order. -
Page 44: Warranty
1.2 – WARRANTY The appliance and mechanical parts of the machine that are found to be faulty are covered by warranty (see Contractual Provisions). After passing inspection, electrical equipment is not covered by warranty. During the warranty period, all operations concerning the disassembly or replacement of parts must be carried out under the supervision of specialist technical staff under penalty of rendering the warranty null and void. -
Page 45: Intended Use
Only qualified operators are allowed to use the machine. Qualified operators are those persons who have: - read the “instructions for use” in full; - fully understood the concepts expressed in the publication; Manufacturer The manufacturer is not responsible for the consequences of incorrect or improper use of the equipment, such as, for example: - use of unsuitable raw materials;... -
Page 46: Symbols Used
1.7 – SYMbOLS USED The following section contains the symbols used in the manual to draw the reader’s attention to the different hazard levels involved in the use and maintenance operations for the machine. WARNING Any text marked with this symbol contains important information concerning safety and indicates potentially dangerous situations or aspects. -
Page 47: Transport
2 - TRANSPORT 2.1 – TRANSPORT The appliance is shipped as standard on transport means over land. Special packaging and/or containers are available for specific requirements. WARNING Parts packaged in cardboard boxes cannot be stacked. 2.2 – hANDLING AND/OR STORAGE Transport, hoisting and assembly must be performed by specialist companies in the transport industry;... -
Page 48: Models
3 - MODELS 3.1 – DRAWER VERSION The following table shows the different types of version for the models with two compartments (fig.3.1.1) or single compartments (fig. 3.1.2). The letters “*IM” shows the possibility to insert an ICE MAKER into the compartment. 1 DRAWER 2 DRAWERS fridge... -
Page 49: Combined Version
3.2 – cOMbINED VERSION The following table shows the different combined versions (fig. 3.2.1). Ventilated Ventialted with 1 drawer module Ventialted with 2 drawer module Fig. 3.2.1... -
Page 50: Introductory Information
4 – INTRODUcTORY INFORMATION 4.1 – IDENTIFIcATION LAbEL Whenever communicating with the manufacturer or assistance centres, always quote the SERIAL NUMbER of the machine on the identification label (fig. 4.1.1). The label also states all of the technical specifications of your refrigerator. Fig. -
Page 51: Dw Model Description
4.2 – DW MODEL DEScRIPTION FIG. 4.2.1 FIG. 4.2.2 FIG. 4.2.3 Top drawer Control unit Drip tray version “DT” Bottom drawer Compressor Drip tray version “RF” Thermostat Basket/Racks Condenser Racks Fixing bracket Handles Fig. 4.2.1... - Page 52 Fig. 4.2.2 Fig. 4.2.3 ...
-
Page 53: Dw-Im Model Description
4.3 – DW-IM MODEL DEScRIPTION FIG. 4.3.1 FIG. 4.3.2 FIG. 4.3.3 FIG. 4.3.4 Top drawer Water filler pipe Ice cube maker Drip tray version “DT” Bottom drawer Electronic board ice cube maker ON “I” / OFF “0” C Thermostat Protection Basket/Racks Solenoid valve Racks... - Page 54 Fig. 4.3.2 Fig. 4.3.3 Fig. 4.3.4 ...
-
Page 55: Ventilated Model Description
4.4 – VENTILATED MODEL DEScRIPTION FIG. 4.4.1 FIG. 4.4.2 Shelf Control unit Glass shelf Compressor Salad compartment Evaporator fan Condenser Light Door shelves Thermostat Fig. 4.4.1... - Page 56 Fig. 4.4.2 ...
-
Page 57: Installation
5 - INSTALLATION 5.1 - INSTALLATION PPE MUST bE WORN Handle the product with the utmost care and wear suitable personal protective equipment compliant with legal standards. WARNING before connecting the appliance, make sure that the mains voltage is the same stated on the appliance rating plate or on the rating plate of the compressor. - Page 58 WARNING Keep the air vents in the appliance casing and/or cabinet for built-in installation free from obstruction. Using the special screws, continue to fit the refrigerator in the cabinet, inserting the screws into the holes along the fastening profile (Fig. 5.1.3). Install the refrigerator away from heat sources in dry and well-ventilated surroundings.
-
Page 59: Electrical Connections
5.3 – ELEcTRIcAL cONNEcTION WARNING before connecting the refrigerator, make sure that there is an efficient earthing system, compliant with European Standards (EN). WARNING before making any wiring connection, make sure that the main breaker is off (OFF) (Fig. 5.1.4). PLEASE NOTE: For correct connection see the attached wiring diagram accompanying this manual. -
Page 60: Instructions For Battery Connection (Models Equipped For Dc Power Only)
PLEASE NOTE: You are legally obliged to earth the system. Make sure that the electrical system earthing installation is in perfect working order. The manufacturer hereby refuses to accept any liability for damages to people or property arising from the failure to respect this regulation. The use of adapters, multiple sockets, or extension leads is not recommended. - Page 61 the compressor by snapping the cover over the screw head (1). Power supply (fig. 5.4.1) The electronic unit must always be connected directly to the battery poles (2). Connect the plus to + and the minus to -, otherwise the electronic unit will not work. The electronic unit is protected against reverse battery connection.
-
Page 63: Danfoss Bd35/Bd50F 12-24 V Dc Instructions
5.5 - DANFOSS bD35/bD50F 12-24 V Dc INSTRUcTIONS The electronic unit is a multi voltage device. It can be used with 12v/24 v DC and 100-240 v AC 50/ 60Hz systems. The maximum voltage for 12v DC systems is 17 v DC, while for 24 v DC systems it is 31.5 v DC. - Page 64 Lamp (optional, fig. 5.5.1) A 12 v DC 5 Watt lamp (10) can be connected between the terminals A and C. The output voltage between the terminals A and C is always regulated to 12 v DC. A 12 v DC lamp can be used with both the 12 v and 24 v power supply.
-
Page 66: Water Supply Connection (Dw-Im Version Only)
5.6 - WATER SUPPLY cONNEcTION (DW-IM version only) Connect the water mains to the threaded filler on the solenoid valve (A) using the special hose (11) supplied (Fig. 5.6.1). Fig. 5.6.1 PLEASE NOTE: This appliance is suitable to work with a water pressure between 1 - 3 bar (0.1 - 0.3 MPa). - Page 67 To select a cooler temperature, press the control repeatedly until the LED furthest on the right (maximum cold) lights up; pressing it again will cause the LED furthest on the left to light up. When the LED is in the middle, the appliance is at a medium temperature setting. 6.1.1.1 Fig.
-
Page 68: Fine" Adjustment For Water Supply (Version With Ice Maker)
6.1.2 - “FINE” ADJUSTMENT FOR WATER SUPPLY (version with ice maker) To access the screw to adjust the incoming water level, remove the plastic casing from the ice maker (Fig. 13, A). Use a screwdriver on the water level adjustment screw (Fig. 13, b) to move the contact directly on the grid assembly. -
Page 69: Maintenance Mode
6.3 – MAINTENANcE MODE During maintenance operations, the ice-making operations are interrupted. The machine enters maintenance mode when: • The ice maker on switch (Fig. 6.3.1) is off. • Hopper (Fig. 6.3.1) full of ice. To restart the ice maker simply empty the hopper, even partially). -
Page 70: Defrosting The Appliance
Fig. 7.4 - LIGhT LED bOARD REPLAcEMENT The refrigerators in the DW series have LED lights, magnetically controlled by the drawers opening or closing. Modules with two drawers have two LED bars: one under the top of the unit for the top drawer and one under the central crosspiece for the bottom one. Modules with just one drawer and the ventilate fridge have a LED light bar over the top of the unit. -
Page 71: Stainless Steel Front Panel Removal
• connect the power cord • refit the cover. WARNING When replacing the board, take great care not to damage the magnetic control reed. 7.5 - STAINLESS STEEL FRONT PANEL REMOVAL before removing the panel, we recommend that you take the drawer out of the fridge, as described in the previous section. -
Page 72: Troubleshooting
8 - TROUbLEShOOTING PRObLEM CAUSE SOLUTION Thermostat make sure it is set to on. set to off. The a u t o m a t i make sure the electrical system automatic circuit breaker is breaker of the engaged. electric system is off. the power supply cable is not faulty any junction points in the power line are efficient and terminals are properly tightened. -
Page 73: Disposal
PRObLEM CAUSE SOLUTION The appliance is not working. Make sure there is electrical power. Make sure that the electrical system circuit breaker on the appliance has not tripped. Make sure that the plug is in perfect working order and is correctly inserted into the socket The appliance is not working... -
Page 74: Wiring Diagrams
10 - WIRING DIAGRAMS WHITE WHITE... - Page 76 WHITE WHITE...
- Page 78 WHITE WHITE...
- Page 80 OLD MODEL WITH SWITCH IN THE DRAWER...
- Page 81 NEW MODEL...
- Page 83 DICHIARAZIONE DI CONFORMITA’ La VITRIFRIGOsrl con sede in via della Produzione 9, 61022 fraz. Montecchio VALLEFOGLIA(PU), Italia, DICHIARA sotto la propria responsabilità che il frigorifero o unità refrigerante per la refrigerazione ed il mantenimento di cibi e bevande i cui dati sono riportati nell’etichetta sottostante ed alla quale questa dichiarazione si riferisce E’...
- Page 84 VITRIFRIGO s.r.l. Via Della Produzione 9 61022 fraz. Montecchio VALLEFOGLIA (PU) Tel. +39 0721 491080 - Fax +39 0721 497739 www.vitrifrigo.com E-mail: vitrifrigo@vitrifrigo.com...
Need help?
Do you have a question about the DW Series and is the answer not in the manual?
Questions and answers