Table of Contents
Advertisement
Quick Links
Advertisement
Table of Contents

Related Manuals for Thermo Scientific Surveyor MSQ Plus


Summary of Contents for Thermo Scientific Surveyor MSQ Plus
- Page 1 Surveyor MSQ Plus Hardware Manual 60111-97043 Revision B November 2007...
- Page 2 © 2007 Thermo Fisher Scientific Inc. All rights reserved. Surveyor™, Xcalibur™, and MSQ™ are trademarks of Thermo Fisher Scientific. Dell® is a registered trademark of Dell Inc. Hewlett-Packard® is a registered trademark of Hewlett-Packard Company. Agilent® is a registered trademark of Agilent Technologies, Inc. Intel® and Pentium® are registered trademarks of Intel Corporation. KEL-F®...
- Page 3 Regulatory Compliance Thermo Fisher Scientific performs complete testing and evaluation of its products to ensure full compliance with applicable domestic and international regulations. When the system is delivered to you, it meets all pertinent electromagnetic compatibility (EMC) and safety standards as described below. EMC Directive 89/336/EEC as amended by 92/31/EEC and 93/68/EEC EMC compliance has been evaluated by UNDERWRITERS LABORATORY, INC (UL).
- Page 4 CAUTION Read and understand the various precautionary notes, signs, and symbols contained inside this manual pertaining to the safe use and operation of this product before using the device. Notice on Lifting and Handling of Thermo Fisher Scientific Instruments For your safety, and in compliance with international regulations, the physical handling of this Thermo Fisher Scientific instrument requires a team effort to lift and/or move the instrument.
- Page 5 WEEE Compliance This product is required to comply with the European Union’s Waste Electrical & Electronic Equipment (WEEE) Directive 2002/96/EC. It is marked with the following symbol: Thermo Fisher Scientific has contracted with one or more recycling or disposal companies in each European Union (EU) Member State, and these companies should dispose of or recycle this product.
- Page 6 Conformité DEEE Ce produit doit être conforme à la directive européenne (2002/96/EC) des Déchets d'Equipements Electriques et Electroniques (DEEE). Il est marqué par le symbole suivant: Thermo Fisher Scientific s'est associé avec une ou plusieurs compagnies de recyclage dans chaque état membre de l’union européenne et ce produit devrait être collecté...
- Page 7 CAUTION Symbol CAUTION VORSICHT ATTENTION PRECAUCION AVVERTENZA Electric Shock: This instrument uses Elektroschock: In diesem Gerät werden Choc électrique: L’instrument utilise des Descarga eléctrica: Este instrumento Shock da folgorazione. L’apparecchio è high voltages that can cause personal Hochspannungen verwendet, die tensions capables d’infliger des blessures utiliza altas tensiones, capaces de alimentato da corrente ad alta tensione...
- Page 8 CAUTION Symbol CAUTION Electric Shock: This instrument uses high voltages that can cause personal injury. Before servicing, shut down the instrument and disconnect the instrument from line power. Keep the top cover on while operating the instrument. Do not remove protective covers from PCBs. Chemical: This instrument might contain hazardous chemicals.
-
Page 9: Table Of Contents
Cone Wash System ..........36 Thermo Scientific Surveyor MSQ Plus Hardware Manual... - Page 10 Surveyor MSQ Plus Server ........
- Page 11 Checking the System Connections ....... 102 Restarting the Surveyor MSQ Plus System ......103 Resetting the MS Detector .
- Page 12 Index ............. . .127 Surveyor MSQ Plus Hardware Manual...
-
Page 13: Preface
Preface About This Guide This Surveyor MSQ Plus Hardware Manual contains a description of the modes of operation and principal hardware components of your Surveyor MSQ Plus MS detector. In addition, this manual provides step-by-step instructions for cleaning and maintaining your Surveyor MSQ Plus MS detector. -
Page 14: Safety Precautions
Do not perform any servicing other than that contained in the Surveyor MSQ Plus Hardware Manual. To avoid personal injury or damage to the instrument, do not perform any servicing other than that contained in the Surveyor MSQ Plus Hardware Manual or related manuals unless you are qualified to do so. -
Page 15: Solvent And Gas Purity Requirements
Solvent and Gas Purity Requirements Because the Surveyor MSQ Plus MS detector is extremely sensitive to solvent impurities, use the highest purity solvents available. Use liquid chromatography grade or higher solvents and buffers. Because deionized water contains chemicals that the Surveyor MSQ Plus MS detector can detect, use distilled water. -
Page 16: Contacting Us
561-688-8731 Web site www.thermo.com/finnigan To suggest changes to documentation or to Help • Fill out a reader survey online at www.thermo.com/lcms-techpubs. • Send an e-mail message to the Technical Publications Editor at techpubs.finnigan-lcms@thermofisher.com. Surveyor MSQ Plus Hardware Manual Thermo Scientific... -
Page 17: Introduction
Introduction Welcome to the Surveyor MSQ™ Plus MS detector. The Surveyor MSQ Plus MS detector is a member of the Thermo Scientific family of MS detectors. The Surveyor MSQ Plus system is an advanced analytical instrument that includes an MS detector, forepump, data system, and an optional cone wash pump. Integrated with an LC system, the Surveyor MSQ Plus MS detector provides you with the separation capability of an HPLC and the detection capability of a single-quadrupole MS detector. -
Page 18: Overview
As the separated chemical components exit the LC column they pass through a transfer line and enter the Surveyor MSQ Plus MS detector. The Surveyor MSQ Plus MS detector consists of an atmospheric pressure ionization (API) source, a transfer lens, a mass analyzer, and an ion detection system. -
Page 19: Ionization Techniques
If you do not know the identity of your analyte, screen in both modes. Ionization Techniques You can operate the Surveyor MSQ Plus MS detector in the following ionization modes: • Electrospray Ionization (ESI) •... - Page 20 M + 1, where M equals the mass of the original molecule. Acidic compounds (for example sulphonic acids) can form a deprotonated molecule [M – H] , which can be analyzed in the negative ion polarity Surveyor MSQ Plus Hardware Manual Thermo Scientific...
- Page 21 The rules for a good electrospray are as follows: • Keep salts out of the solvent system. • Use organic/aqueous solvent systems and volatile acids and bases. • Optimize the pH of the solvent system. Thermo Scientific Surveyor MSQ Plus Hardware Manual...
-
Page 22: Atmospheric Pressure Chemical Ionization (Apci)
4. The solvent ions react with sample molecules to form sample ions. Figure 3. Positive ion APCI mechanism Step 1 Step 2 Step 3 Step 4 Liquid Ionized Solvent molecules sample Heated nebulizer Sample molecules Corona pin produces molecules a corona discharge Surveyor MSQ Plus Hardware Manual Thermo Scientific... - Page 23 Because APCI uses a heated probe to aid the desolvation process, it is not suitable for thermally labile (unstable) compounds, which can fragment in the ion source. Thermo Scientific Surveyor MSQ Plus Hardware Manual...
-
Page 24: Scan Types
Introduction Scan Types Scan Types The Surveyor MSQ Plus MS detector provides two scan types: • Full Scan • Selected Ion Monitoring (SIM) (SIM) Full Scan A full scan provides a mass spectrum over a defined mass range. Because the MS detector has to monitor multiple m/z values during a chromatographic run, a full scan does not provide the sensitivity that SIM provides. -
Page 25: Profile Data Type
In general, the profile data type is used when you tune and calibrate the MS detector so that you can easily see and measure mass resolution. Figure 4. Full scan, profile peak format, spectrum of D-raffinose Thermo Scientific Surveyor MSQ Plus Hardware Manual... -
Page 26: Centroid Data Type
You can view the real-time spectrum and stop the data acquisition when you obtain the required results. MCA is particularly useful for the acquisition of raw data from the infusion of proteins and peptides. Surveyor MSQ Plus Hardware Manual Thermo Scientific... - Page 27 Introduction Data Types Figure 6. Full scan MCA spectrum of horse heart myoglobin 1060 1131 1212 1305 1000 1100 1200 1300 Thermo Scientific Surveyor MSQ Plus Hardware Manual...
-
Page 29: Chapter 2 Functional Description
Reference Inlet System • MS Detector • Cone Wash System • Data System Figure 7. Surveyor LC, Surveyor MSQ Plus MS detector, cone wash pump, forepump, and data system Surveyor LC system Surveyor MSQ Plus Data system MS detector Reference inlet computer... - Page 30 8. A sample transfer line connects the Surveyor LC to the Surveyor MSQ Plus MS detector. The Surveyor LC system is usually installed to the left of the Surveyor MSQ Plus MS detector to minimize the length of tubing required to connect the outlet from the LC to the inlet of the mass spectrometer.
-
Page 31: Liquid Chromatograph
For more information on configuring the software for your LC devices, refer to the chapter in your Surveyor MSQ Plus Getting Connected Guide that pertains to your LC devices or the online Help available from the Xcalibur Instrument Configuration window. -
Page 32: Reference Inlet System
Full System Autotune or a Mass Scale Calibration, which is a subset procedure of the Full System Autotune procedure. During an automated Full System Autotune procedure, the Surveyor MSQ Plus MS detector and instrument control software perform these steps: •... - Page 33 The software applies these adjustments to all subsequent acquisitions until you perform a new Full System Autotune or Mass Scale Calibration. After installing the Surveyor MSQ Plus MS detector, a Thermo Fisher Scientific service engineer performs a Full System Autotune. You must repeat the procedure if you move the MS detector to a new location, install or update the Xcalibur data system, or the environment of your laboratory changes.
- Page 34 Reference inlet reservoir Figure 11. Microinjection (switching) valve in the Inject position 500 uL sample loop Grounding union To API probe To waste Connection to LC Nitrogen line Clip Waste reservoir Reference inlet reservoir Surveyor MSQ Plus Hardware Manual Thermo Scientific...
-
Page 35: Ms Detector
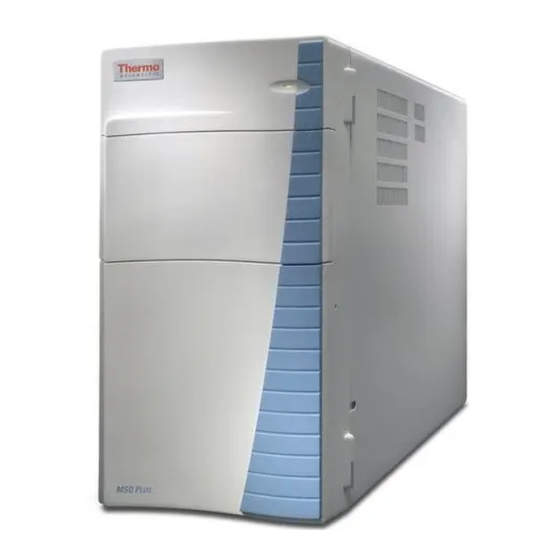
The MS detector provides sample ionization and mass analysis of samples injected with an autosampler or samples infused with the reference inlet system. The Surveyor MSQ Plus MS detector uses a quadrupole mass analyzer with an API source external to the mass analyzer. - Page 36 Functional Description MS Detector Figure 12. Front view of the Surveyor MSQ Plus MS detector Status LED Table 2. States of Surveyor MSQ Plus MS Status LED Instrument Status Light Vented Venting Pumping down Flashing yellow Under vacuum (above vacuum trip)
-
Page 37: Rear Panel Controls And Connections
On (I) position. The power supply requirements for the Surveyor MSQ Plus MS detector are 230 Vac, regulated to ± 5% at 50 or 60 Hz. The Surveyor MSQ Plus MS detector ships with power cords appropriate to its shipping destination. - Page 38 MS Detector The connection to the user-supplied nitrogen source (labeled GAS IN) is located in the bottom-middle of the rear panel. The Surveyor MSQ Plus MS detector is connected to the user-supplied nitrogen source with 6 mm OD PTFE tubing.
-
Page 39: Connection Between Lc And Ms Detector
MS Detector Connection Between LC and MS Detector The connection between the liquid chromatograph and the Surveyor MSQ Plus MS detector is a PEEK union. This union is located behind the front door of the MS detector to the left of the source block cover. - Page 40 Figure 15. View of the ESI probe, showing the principal components and the pressure regions LC eluent Nebulizing gas, N Sheath gas, N Probe heater RF/dc prefilter Insert capillary Entrance cone Exit cone Atmospheric M-Path RF/df prefilter pressure region vacuum region vacuum region 1 Torr Torr Forepump Surveyor MSQ Plus Hardware Manual Thermo Scientific...
- Page 41 LC eluent Nebulizing gas, N Sheath gas, N Probe heater Corona pin RF/dc prefilter Insert capillary Entrance cone Extraction cone Atmospheric M-Path RF/df prefilter pressure region vacuum region vacuum region 1 Torr Torr Forepump Thermo Scientific Surveyor MSQ Plus Hardware Manual...
-
Page 42: Rf/Dc Prefilter
Mass Analyzer The mass analyzer separates ions according to their mass-to-charge ratio and then passes them to the ion detection system. In the Surveyor MSQ Plus MS detector, the mass analyzer is a single quadrupole rod assembly. The mass analyzer is described in detail in the following topics: •... - Page 43 – dc voltage Mass Analysis The mass analyzer in the Surveyor MSQ Plus MS detector is a square array of round rods. The rods are charged with a variable ratio of RF voltage and dc voltage. These potentials give rise to an electrostatic field that gives stable oscillations to ions with a specific mass-to-charge ratio and unstable oscillations to all others.
-
Page 44: Ion Detection System
Ion Detection System The Surveyor MSQ Plus MS detector is equipped with a high sensitivity, off-axis ion detection system that produces a high signal-to-noise ratio and allows for voltage polarity switching between positive ion and negative ion modes of operation. The ion detection system includes a 10 kV conversion dynode and a channel electron multiplier. - Page 45 Thus, a cascade of electrons is created that finally results in a measurable current at the end of the cathode where the electrons are collected by the anode. The current collected by the anode is proportional to the number of secondary particles striking the cathode. Thermo Scientific Surveyor MSQ Plus Hardware Manual...
- Page 46 The ion detection system of the Surveyor MSQ Plus MS detector increases signal while maintaining a low level of noise. The high voltage applied to the conversion dynode results in a high conversion efficiency and increased signal.
-
Page 47: Vacuum System
Atmospheric M-Path RF/dc Analyzer pressure region prefilter region Pirani gauge (or other region region Sample tube sample input device) (10 -6 Torr) (1 Torr) Torr) Split flow turbomolecular pump Exhaust Forepump Foreline Thermo Scientific Surveyor MSQ Plus Hardware Manual... - Page 48 PVC tubing. The power cord of the forepump is plugged into the outlet labeled PUMP OUT on the rear panel of the Surveyor MSQ Plus MS detector. This outlet supplies power to the forepump and is controlled by the main power circuit breaker switch. The Edwards forepump has an On/Off switch that must be turned to the On position to operate the forepump.
-
Page 49: Inlet Gas Hardware
CAUTION Always plug the forepump power cord into the outlet labeled PUMP OUT on the rear panel of the Surveyor MSQ Plus MS detector. Never plug it into a wall outlet. Failure to follow these instructions could lead to instrument damage and personal injury. - Page 50 Per Method Parameters table of the Tune window (see Figure 24). After you turn on the nitrogen gas, you can hear the jet of nitrogen gas flowing into the API probe. Surveyor MSQ Plus Hardware Manual Thermo Scientific...
- Page 51 • The ESI mode consumes approximately 720L/hr. • The APCI mode consumes approximately 480 L/hr. • The Standby mode consumes approximately 20 to 50 L/hr. Thermo Scientific Surveyor MSQ Plus Hardware Manual...
-
Page 52: Cone Wash System
The cone wash system consists of a cone wash pump, PEEK tubing, and a cone wash nozzle. Red, 0.005-in. ID, PEEK tubing connects the cone wash pump to the Surveyor MSQ Plus MS detector. Inside the Surveyor MSQ Plus MS detector, the red, PEEK tubing is connected to one end of a union. -
Page 53: Data System
PC. The Xcalibur data system also processes data that is acquired by the Surveyor MSQ Plus MS detector. Information about the status of the Surveyor MSQ Plus MS detector is available from the Xcalibur HomePage - Information view and from the Server “LED”... -
Page 54: Computer Hardware
Table 3. Xcalibur Home Page version 2.0 is required for the MSQ 2.0 Plus version of the Surveyor MSQ Plus detector software. The firmware versions of the LC devices controlled by Xcalibur 2.0 with Quan Devices are listed in your Surveyor MSQ Plus Getting Connected Guide. -
Page 55: Surveyor Msq Plus Server
Figure 27. View of taskbar, showing the Server icon The Server icon provides you with information about the status of the Surveyor MSQ Plus MS detector and mimics a tri-state LED display (red, green, yellow) showing: •... -
Page 56: Tune Window
Tune Window The Surveyor MSQ Plus Tune window allows you to optimize the MS detector parameters (manually tune) for your analytes and acquire data to a raw file (.raw). When you finish tuning your MS detector for a compound of interest, you save the current values of the tuning parameters in a tune file (.tune). - Page 57 The Tune window shown in Figure 30 includes the following: • Title Bar • Menu Bar • Comms Indicator • Scan Events Table • Per Method Parameters Table • Peak Display • Status Bar Thermo Scientific Surveyor MSQ Plus Hardware Manual...
- Page 58 Title Bar The title bar is the horizontal band at the very top of the window. It contains the file name of the currently active tune file. For example: default.tune is the name of the Surveyor MSQ Plus default tuning file.
- Page 59 The table also provides individual tuning parameter readbacks. You can adjust the tuning of the Surveyor MSQ Plus MS detector by altering the values of these tuning parameters. In ESI, you optimize the probe temperature and the needle voltage for your application.
-
Page 60: Printer
Data System Printer Thermo Fisher Scientific does not ship a printer with the Surveyor MSQ Plus MS detector. If you choose to connect a printer that communicates through a USB cable, connect the cable to one of the USB ports on the front of the data system computer. -
Page 61: Chapter 3 Daily Operation
Daily Operation To optimize the performance of your Surveyor MSQ Plus MS detector, you need to perform various routine operations both before and after you operate the system. Contents • Things to Do Before Operating the MS Detector • Things to Do After Operating the MS Detector... -
Page 62: Checking The Disk Space
Therefore, it is important that you check the oil level in the oil mist filter on a daily basis. Refer to “Draining the Oil Mist Filter and Purging the Pump Oil” page 48 instructions on draining the oil mist filter. Surveyor MSQ Plus Hardware Manual Thermo Scientific... -
Page 63: Things To Do After Operating The Ms Detector
• Flushing the API Probes • Placing the System in the Off Mode • Draining the Oil Mist Filter and Purging the Pump Oil • Emptying the Solvent Waste Bottles Thermo Scientific Surveyor MSQ Plus Hardware Manual... -
Page 64: Flushing The Api Probes
Placing the System in the Off Mode Place the Surveyor MSQ Plus MS detector in the Off mode if you are not going to use it for a short period of time, such as overnight or over weekends. In the Off mode, the system is left... -
Page 65: Emptying The Solvent Waste Bottles
Waste solvents are produced by both the Surveyor MSQ Plus MS detector and the LC system. In the Surveyor MSQ Plus MS detector, waste solvent flows from the drain port at the bottom of the source enclosure, out the back of the detector through the Exhaust manifold, and into a solvent trap. -
Page 67: Switching Probes
5. Turn the locking plate on the ESI probe clockwise to the open position. Then, pull the ESI probe out of the probe heater. 6. Remove the APCI probe from the holder located in the door of the Surveyor MSQ Plus MS detector and replace it with the ESI probe. - Page 68 32. Then, turn the locking plate counterclockwise to the closed position. Figure 32 shows the Surveyor MSQ Plus MS detector setup for the APCI mode. Figure 33 shows the corona pin in the operational position for the APCI mode. 8. Turn the corona pin knob 90 degrees to its horizontal position.
-
Page 69: Switching From Apci To Esi
6. Turn the locking plate of the APCI probe clockwise to the open position and remove the APCI probe from the MS detector. 7. Remove the ESI probe from the holder located in the door of the Surveyor MSQ Plus MS detector and replace it with the APCI probe. - Page 70 9. Insert the PEEK fingertight fitting into the ESI probe and screw in. Figure 34, which shows the Surveyor MSQ Plus MS detector setup for the ESI mode. 10. Adjust the nitrogen gas pressure to 520 kPa (75 psi). Figure 34. Surveyor MSQ Plus MS detector setup for the ESI mode...
-
Page 71: Routine And Preventive Maintenance
Routine and Preventive Maintenance The Surveyor MSQ Plus MS detector is a low maintenance instrument. Apart from fairly light periodic preventive maintenance, it requires only simple source cleaning and inspection on a “loss of performance” basis. This chapter contains a maintenance schedule and instructions for the maintenance tasks that you must perform to keep your Surveyor MSQ Plus MS detector in optimal working condition. -
Page 72: Maintaining The Esi Probe
Instability in the MS signal can be symptomatic of a partially blocked capillary. Replace the capillary if it becomes blocked or partially blocked. CAUTION Wait for the source block and the probe heater assembly to cool before you remove the ESI probe. Surveyor MSQ Plus Hardware Manual Thermo Scientific... -
Page 73: Removing The Esi Probe
4. Unscrew and remove the PEEK fingertight fitting from the ESI probe. See Figure Figure 35. ESI probe installed in the probe heater PEEK fingertight fitting Locking plate (in locked position) Probe heater Thermo Scientific Surveyor MSQ Plus Hardware Manual... -
Page 74: Removing The Esi Capillary
ESI probe components. To remove the capillary from the ESI probe 1. Remove the ESI probe from the MS detector as described in “Removing the ESI Probe” page Surveyor MSQ Plus Hardware Manual Thermo Scientific... - Page 75 4. Place a lint-free cloth on the workbench, and then gently shake the ESI capillary (P/N FM102598), graphite ferrule (P/N 6070119), and PEEK tube insert (P/N FM102591) assembly out of the ESI probe onto the cloth. See Figure Thermo Scientific Surveyor MSQ Plus Hardware Manual...
-
Page 76: Cleaning Or Replacing The Esi Capillary
“Removing the ESI Capillary” page 3. If the capillary is reusable, clean its surface with [50:50] methanol / water. 4. Reinstall the clean capillary or a new capillary as described in “Installing the ESI Capillary” page Surveyor MSQ Plus Hardware Manual Thermo Scientific... -
Page 77: Replacing The Ceramic Sleeve Of The Esi Probe
Figure 41 shows, the ESI ceramic sleeve is slightly flared at one end. This flare holds the ESI ceramic sleeve in place when you insert it into the ESI ceramic mount. Thermo Scientific Surveyor MSQ Plus Hardware Manual... - Page 78 8. Insert the two M3 × 8 cap head stainless steel screws into the ESI probe mount and tighten with the 2.5 mm Allen key. 9. Reinstall the ESI capillary and reassemble the probe as described in “Installing the ESI Capillary” page Surveyor MSQ Plus Hardware Manual Thermo Scientific...
-
Page 79: Installing The Esi Capillary
PEEK insert (9 mm) 2. While holding the ESI probe in the vertical position, use tweezers to insert the capillary, PEEK tube insert, and graphite ferrule assembly into the ESI probe. See Figure Thermo Scientific Surveyor MSQ Plus Hardware Manual... - Page 80 Figure 45 shows, the capillary should protrude from the tip of the probe. Figure 45. View of capillary inserted into the ESI probe mount ESI probe mount Internal bottom of ESI probe mount Capillary Surveyor MSQ Plus Hardware Manual Thermo Scientific...
- Page 81 8. (Optional) Using the ESI spacer plate, confirm that the capillary protrudes from the tip of the probe. Figure 47 shows the ESI spacer being used to check the protrusion depth of the capillary. Thermo Scientific Surveyor MSQ Plus Hardware Manual...
-
Page 82: Installing The Esi Probe
ESI probe into the probe heater. 3. Turn the locking plate counterclockwise to the closed position to lock the probe in place. Figure 35 page 4. Connect the PEEK fingertight fitting to the ESI probe. See Figure Surveyor MSQ Plus Hardware Manual Thermo Scientific... -
Page 83: Maintaining The Apci Probe
3. Wait for the source block and the probe heater to cool. 4. Unscrew and remove the PEEK fingertight fitting from the APCI probe. See Figure CAUTION Because it is fragile and can be damaged easily, exercise care when handling the APCI capillary. Thermo Scientific Surveyor MSQ Plus Hardware Manual... -
Page 84: Removing The Apci Capillary
5. Turn the locking plate clockwise to the open position and remove the APCI probe from the probe heater. See Figure Figure 48. Surveyor MSQ Plus MS detector set up for the APCI mode PEEK fingertight fitting Locking plate (in locked position) Probe heater Figure 49. - Page 85 5. Pull the APCI capillary out of the PEEK tube insert, and then do one of the following: • If the capillary is partially blocked or blocked, dispose of it. • If the capillary is reusable, clean its surface with [50:50] methanol / water. Thermo Scientific Surveyor MSQ Plus Hardware Manual...
-
Page 86: Installing The Apci Capillary
Figure 51. Inserting the capillary, PEEK sleeve, and graphite ferrule into the APCI probe PEEK sleeve insert Graphite Vespel ferrule Bottom of the probe mount Figure 52. APCI capillary, PEEK sleeve, and graphite ferrule inserted into probe PEEK sleeve Graphite Vespel ferrule Capillary Surveyor MSQ Plus Hardware Manual Thermo Scientific... - Page 87 2.5 mm Allen key. Typically, a visual confirmation that the capillary protrudes from the probe tip is sufficient, but you can also use the APCI spacer plate provided in the Surveyor MSQ Plus tool kit to check the capillary protrusion depth.
-
Page 88: Installing The Apci Probe
Figure 49 page 2. Turn the locking plate counterclockwise to the closed position to lock the probe in place. Figure 48 page 3. Connect the PEEK fingertight fitting to the APCI probe. See Figure Surveyor MSQ Plus Hardware Manual Thermo Scientific... -
Page 89: Maintaining The Probe Heater
The black knobs are connected to locking cams. When the black knobs are facing away from each other, the cams are in the unlocked position and you can pull the probe heater out of the probe mount. Thermo Scientific Surveyor MSQ Plus Hardware Manual... - Page 90 Grounding cable Thermocouple connector Thermocouple connector Power connector Probe heater knobs in locked position Probe mount Figure 56. View of the probe heater knobs in the removal position Probe heater knobs in removal position Surveyor MSQ Plus Hardware Manual Thermo Scientific...
- Page 91 See Figure Figure 57. View of power connector and thermocouple connector Green, Thermocouple connector White, Power connector Figure 58. View of probe heater with the operator detaching the grounding strap Thermo Scientific Surveyor MSQ Plus Hardware Manual...
-
Page 92: Cleaning The Probe Heater
Because the spring is reusable, it is not provided in the repair kit. c. Pull the probe screw sleeve off the detent screw insulator. d. Pull the detent screw insulator out the underside of the probe heater body. See Figure Surveyor MSQ Plus Hardware Manual Thermo Scientific... - Page 93 Insert the spring that you removed from the broken assembly into the spring cup. d. Align the bottom of the spring cup with the probe screw sleeve. e. Insert the spring screw into the spring cup and tighten the assembly with a flat-blade screwdriver. Thermo Scientific Surveyor MSQ Plus Hardware Manual...
-
Page 94: Installing The Probe Heater
5. Rotate the black knobs of the probe heater forward to their locking position. See Figure 55 page 6. Plug the green connector and the white connector into their respective receptacles located above the probe mount. See Figure Surveyor MSQ Plus Hardware Manual Thermo Scientific... -
Page 95: Maintaining The Source Block Assembly
Cleaning the Extraction Cone and the Source Block Assembling the Source Block Assembly Installing the Source Block Assembly CAUTION Wait for the source block and probe heater assembly to cool before carrying out any maintenance. Thermo Scientific Surveyor MSQ Plus Hardware Manual... -
Page 96: Preparing The Lc/Ms System For Maintenance
MSQ listing to open a shortcut menu and choose Turn Device Off from the shortcut menu. 4. If the Surveyor MSQ Plus MS detector is under vacuum, vent it. Right-click the Server icon and choose Vent from the shortcut menu. -
Page 97: Clearing Access To The Source Block Assembly
4. Store the probe heater in the holder to the left of the source compartment. 5. If your Surveyor MSQ Plus MS detector is set up in the APCI mode, rotate the corona pin knob downward to its vertical position. - Page 98 • For instructions on cleaning the entrance cone, go to the next procedure. • For instructions on cleaning the internal components of the source block assembly, go to “Removing the Source Block Assembly” page Figure 63. Entrance cone with cone facing upwards Cone facing upwards Surveyor MSQ Plus Hardware Manual Thermo Scientific...
-
Page 99: Cleaning The Entrance Cone And The Cone Wash Nozzle
Orifice in the center of the entrance cone CAUTION Because solvent and acid can damage them, do not sonicate O-rings. CAUTION Take care when handling the cone wash nozzle. Its tip is extremely fragile. Thermo Scientific Surveyor MSQ Plus Hardware Manual... - Page 100 10. Take the probe heater out of its holder. Ensure that the knobs of the probe heater are facing away from each other, and then insert the probe heater into the probe mount. See Figure 56 page Surveyor MSQ Plus Hardware Manual Thermo Scientific...
-
Page 101: Removing The Source Block Assembly
2. Loosen the thumbscrews on the source block and pull the source block assembly out of the MS detector. See Figure Figure 67. View of the source block assembly being removed from the MS detector Thumbscrews Thermo Scientific Surveyor MSQ Plus Hardware Manual... -
Page 102: Cleaning The Rf/Dc Prefilter
Figure 68. Source block assembly with the three screws connecting the RF/dc prefilter to the source block Three hexapole screws Surveyor MSQ Plus Hardware Manual Thermo Scientific... - Page 103 3. Decant the methanol and fill the graduated cylinder with 100% acetone. Sonicate for 15 min. 4. Carefully remove the RF/dc prefilter from the cylinder. Rinse the RF/dc prefilter with methanol. 5. Dry the prefilter with a gentle stream of nitrogen gas. Thermo Scientific Surveyor MSQ Plus Hardware Manual...
-
Page 104: Cleaning The Extraction Cone And The Source Block
If you use buffered mobile phases or inject samples with complex matrices or both, you might need to clean the source block and the extraction cone on a weekly basis. CAUTION Wait for the source block and probe heater assembly to cool before carrying out any maintenance. Surveyor MSQ Plus Hardware Manual Thermo Scientific... - Page 105 • Top-left O-ring, 9.12 mm ID × 3.53 mm THK, viton black (P/N 00107-01-00047) • Bottom-left O-ring, BS207, viton black (P/N FM101417) • Right O-ring, BS225, viton black (P/N FM103048) CAUTION Because solvent and acid can damage the O-rings, do not sonicate them. Thermo Scientific Surveyor MSQ Plus Hardware Manual...
-
Page 106: Assembling The Source Block Assembly
4. Align the three spring screws at the base of the RF/dc prefilter to the three holes on the backside of the source block. Support the quadrupole as you alternately screw the three spring screws at the base of the RF/dc prefilter into the source block. See Figure 68 page Surveyor MSQ Plus Hardware Manual Thermo Scientific... -
Page 107: Installing The Source Block Assembly
2. Handling the cone wash nozzle by its base because the tip is fragile, insert the cone wash nozzle (P/N FM102521) into the source block, and then carefully rotate the nozzle tip to the right. See Figure Thermo Scientific Surveyor MSQ Plus Hardware Manual... - Page 108 APCI probe assembly (P/N FM102587). 7. Pump down the MS detector: a. Right-click the Surveyor MSQ Plus Server icon in the System Tray portion of the Windows Taskbar to open the shortcut menu. The Server icon is red because the system is vented.
-
Page 109: Maintaining The Forepump
The forepump (also referred to as a backing pump, a rotary pump, or a roughing pump) is external to the Surveyor MSQ Plus MS detector and requires routine maintenance for optimal performance. -
Page 111: Chapter 6 System Shutdown, Startup, And Reset
When you are not performing analyses, you can temporarily turn off the nitrogen gas or set the Surveyor MSQ Plus MS detector to the Off mode. Turning off the nitrogen gas between intermittent analyses conserves the nitrogen supply. Placing the system in the Off mode conserves the laboratory nitrogen supply and increases the life of the ion detection system. -
Page 112: Turning Off The Nitrogen Gas
After you double-click the Tune icon, the Server icon appears in the System tray (to the left of the clock) of the Windows taskbar. b. Double-click the Server icon to open the Tune window. Surveyor MSQ Plus Hardware Manual Thermo Scientific... -
Page 113: Placing The System In The Off Mode
Placing the System in the Off Mode Place the Surveyor MSQ Plus MS detector in the Off mode if you are not going to use it for a short period of time, such as overnight or over weekends. In the Off mode, the system is left... -
Page 114: Turning The Ms Detector Off From Xcalibur
5. Right-click the Surveyor MSQ listing on the Status page. Then, choose Turn Device Off from the shortcut menu to place the MS detector in the Off mode. See Figure The status LED on the front of the Surveyor MSQ Plus MS detector turns yellow. Surveyor MSQ Plus Hardware Manual Thermo Scientific... -
Page 115: Turning The Ms Detector Off From The Tune Window
System Shutdown, Startup, and Reset Placing the System in the Off Mode Figure 77. Info view - Status page, showing the shortcut menu for the Surveyor MSQ Plus MS detector Turning off the MS detector Turning the MS Detector Off from the Tune Window To turn off the Surveyor MSQ Plus MS detector from the Tune window 1. -
Page 116: Shutting The System Down For Non-Routine Maintenance
7. When you plan to leave the Surveyor MSQ Plus MS detector in the Off mode for a significant period of time, turn off the nitrogen supply to the system at the main regulator. -
Page 117: Restarting The System Following A Complete Shutdown
MAINS IN switch to the Off position. Turning off the power to the Surveyor MSQ Plus MS detector also turns off the power to the Edwards forepump, which gets its line power from the Pump Out receptacle on the rear panel of the MS detector. -
Page 118: Checking The System Connections
Gas Connections • The GAS IN port on the rear panel of the Surveyor MSQ Plus MS detector is connected to a nitrogen supply and the auxiliary regulator is set to 75 psi (5.2 bar). • Any required gas connections required for the LC system have been made. -
Page 119: Restarting The Surveyor Msq Plus System
Xcalibur icon. 3. Pump down the instrument: a. Right-click the Surveyor MSQ Plus Server icon in the System Tray portion of the Windows Taskbar and choose Pump from the shortcut menu. b. Wait for the Surveyor MSQ Plus MS detector to reach high vacuum. -
Page 120: Resetting The Ms Detector
(Figure 79). The Surveyor MSQ Plus MS detector is ready to use as soon as the Probe Temperature readback value approaches that in the setpoint box, although for most stable operation Thermo Fisher Scientific recommends that you wait approximately 10 min for the source to equilibrate. - Page 121 Resetting the MS Detector Figure 80. View of the upper right-hand corner of the MS detector’s rear panel START IN + START IN - USER I/O READY OUT + READY OUT - RESET Thermo Scientific Surveyor MSQ Plus Hardware Manual...
-
Page 123: Chapter 7 Replaceable Parts
MS detector. You do not need an interface kit to connect a Surveyor LC to your Surveyor MSQ Plus MS detector. The manuals for the Surveyor MSQ Plus MS detector are provided on the software CD. Thermo Scientific Surveyor MSQ Plus Hardware Manual... -
Page 124: Consumables
Consumables The MSQ Plus Annual Maintenance kit (P/N 60111-62014) contains all the consumables required for the upkeep of your Surveyor MSQ Plus MS detector. The parts contained in this kit are listed below. MSQ Plus Annual Maintenance kit ....... 60111-62014 Adaptor (capillary retainer nut). - Page 125 API probe FM101522 12.42 1.78 BS014 Source block assembly, large sealing plug FM101417 13.87 3.53 BS207 Source block assembly 5711035 18.77 18.77 BS018 Probe heater assembly FM103048 47.22 3.53 BS225 Source block assembly Thermo Scientific Surveyor MSQ Plus Hardware Manual...
- Page 126 9.25 mm ID P/N FM100231 12.42 mm ID 47.22 mm ID P/N FM101522 P/N FM103048 9.12 mm ID P/N 00107-01-00026 13.87 mm ID P/N FM101417 Probe mount assembly 3.3 mm ID P/N FM103016 Surveyor MSQ Plus Hardware Manual Thermo Scientific...
-
Page 127: Spares
Kit, tool, Surveyor MSQ ........60111-62100 Kit, Surveyor MSQ Plus installation ....... . 60111-62006 Kit, sensitivity test, Surveyor MSQ system . - Page 128 Spring..........00111-01-00013 Surveyor MSQ Plus Hardware Manual...
- Page 129 Plug source block sealing O-ring, BS207,13.87 mm ID × 3.53 mm THK (P/N FM101460) (P/N FM101417) Circlip, provided in MSQ Plus Hardware and O-ring Kit Spring (P/N 00111-01-00013) Hexapole screw (P/N 60111-20055) RF/dc prefilter Thermo Scientific Surveyor MSQ Plus Hardware Manual...
-
Page 130: Esi Probe Assembly
(P/N 5711020) ESI mount sub-assembly Locking plate M3 × 10 cap head screw (P/N FM103046) O-ring, BS012 (P/N FM100231) M3 × 8 cap head screws Graphite Vespel ferrule (P/N 6070119) Capillary retaining nut (FM102590 Surveyor MSQ Plus Hardware Manual Thermo Scientific... -
Page 131: Apci Probe Assembly
PEEK sleeve insert O-ring, BS012 M3 × 10 (P/N FM100231) cap head screw (P/N FM103046) M3 × 8 cap head screws Probe clamp Graphite Vespel ferrule Capillary (P/N 6070119) retaining nut (P/N FM102590) Thermo Scientific Surveyor MSQ Plus Hardware Manual... -
Page 132: Probe Heater Assembly
Figure 85. Probe heater assembly with a view of the O-rings O-ring, BS018, 18.77 mm ID × 1.78 mm THK (P/N 5711035) Detent screw insulator (P/N FM102585) O-ring, BS006, 2.9 mm ID × 1.78 THK (P/N TORN003) Surveyor MSQ Plus Hardware Manual Thermo Scientific... -
Page 133: Vacuum Spares
PEAK nitrogen generator ........OPTON-97104 Thermo Scientific Surveyor MSQ Plus Hardware Manual... -
Page 134: Solvent Path And Calibrant Spares
Nut, PEEK, 1-piece..........FM100513 Kit, sensitivity test, Surveyor MSQ Plus system......FM104284 Electronic Spares Assembly, power supply, low-voltage, MSQ. -
Page 135: Appendix A Optimizing The Lc Conditions
<10 μL/min Capillary The different ionization modes require different flow rates and column IDs. The following guidelines apply when using the Surveyor MSQ Plus MS detector: • Electrospray can operate at all the flow rates described in Table • APCI cannot operate at flow rates below 0.2 mL/min. Therefore, suitable column IDs are 2.1 mm, 3.9 mm and 4.6 mm. -
Page 136: Lc Solvents And Mobile Phase Additives
Additives can be divided into three categories: • Commonly Used Compatible Additives • Less Commonly Used Additives • Unsuitable Additives Table 9 contains a summary of suitable additives. Table 10 contains a summary of additives to avoid. Surveyor MSQ Plus Hardware Manual Thermo Scientific... - Page 137 Volatile salts such as ammonium acetate or ammonium formate are often used to buffer mobile phases. Use as little ammonium acetate or ammonium formate as possible, keeping the concentration below 100 mM. Ensure that the cone wash is running when using high concentrations. Thermo Scientific Surveyor MSQ Plus Hardware Manual...
- Page 138 Inorganic acids (for example, sulfuric acid or phosphoric acid) can be used. Check the suitability of the LC column to low pHs. CAUTION After using phosphoric acid, thoroughly clean the source, source enclosure and hexapole RF lens to minimize the physical damage. Surveyor MSQ Plus Hardware Manual Thermo Scientific...
-
Page 139: Cone Wash System
Refer to your Surveyor MSQ Plus Getting Connected manual for instructions on connecting the cone wash pump to the Surveyor MSQ Plus MS detector. The recommended flow rate for the cone wash solvent is 200 μl/min and the recommended cone wash solvent is [50:50] methanol / water (v/v). -
Page 140: Flow Splitting
Flow Splitting Flow Splitting Because the Surveyor MSQ Plus MS detector can handle flow rates up to 2 mL/min, flow splitting of the LC eluent is not usually required. However, if hyphenated detection (using both a UV detector and an MS detector) is required, flow splitting can be achieved by using a zero dead volume Tee fitting. - Page 141 2. Never over-tighten PEEK fittings as this can cause leaks. Figure 87. Poor connections result if tubing is not bottomed in the port (A) or is not cut square (B) Courtesy of Rheodyne website Thermo Scientific Surveyor MSQ Plus Hardware Manual...
-
Page 143: Index
Xcalibur 2.0 cleaning the entrance cone dimethyl sulphoxide disassembling the source block assembly disassembling the RF/dc prefilter ESI probe removal disk space, checking forepump power cord dynode removing the heater Thermo Scientific Surveyor MSQ Plus Hardware Manual... - Page 144 User I/O ionization techniques vacuum system atmospheric pressure chemical ionization (APCI) Xcalibur - HomePage - Roadmap view electrospray ionization (ESI) firmware downloading the Surveyor MSQ firmware versions for LC devices controlled by Xcalibur Surveyor MSQ Plus Hardware Manual Thermo Scientific...
- Page 145 LC pumps nitrogen supply turbomolecular pump checking pressure purity requirements of solvents rate of consumption uses non-volatile salts quadrupoles normal phase solvents RF and dc fields Notes RF/dc prefilter cone wash solvent Thermo Scientific Surveyor MSQ Plus Hardware Manual...
- Page 146 Xcalibur turbomolecular pump solvent waste vacuum status from autosampler vacuum system from MS detector description solvents forepump compatibility with PEEK tubing turbomolecular pump for liquid chromatography vent valve solvents, purity requirements Surveyor MSQ Plus Hardware Manual Thermo Scientific...
- Page 147 Xcalibur devices controlled by Home Page Instrument Configuration dialog box introduction launching Server turning off the MS detector from Thermo Scientific Surveyor MSQ Plus Hardware Manual...
Need help?
Do you have a question about the Surveyor MSQ Plus and is the answer not in the manual?
Questions and answers