Barco CX-20 Installation Manual
Hide thumbs
Also See for CX-20:
- Installation manual (102 pages) ,
- User manual (70 pages) ,
- Quick setup manual (4 pages)
Table of Contents
Advertisement
Quick Links
Advertisement
Table of Contents
Troubleshooting

Related Manuals for Barco CX-20


Summary of Contents for Barco CX-20
- Page 1 CX-20 Installation manual ENABLING BRIGHT OUTCOMES...
- Page 2 Barco NV Beneluxpark 21, 8500 Kortrijk, Belgium www.barco.com/en/support www.barco.com Registered office: Barco NV President Kennedypark 35, 8500 Kortrijk, Belgium www.barco.com/en/support www.barco.com...
- Page 3 Barco. If the purchaser or a third party carries out modifications or repairs on goods delivered by Barco, or if the goods are handled incorrectly, in particular if the systems are operated incorrectly or if, after the transfer of risks, the goods are subject to influences not agreed upon in the contract, all guarantee claims of the purchaser will be rendered invalid.
- Page 4 ClickShare applications (each a “Barco ClickShare Product”). • Term The Software can be used under the terms of this EULA from the date of first use of the Barco ClickShare Product, for as long as you operate such Barco ClickShare Product. •...
- Page 5 ( http://www.barco.com/en/about-barco/legal/privacy-policy/clickshare-app). Via the Software, Barco may gather technical information about (i) the functioning and the functionality of the products which are connected through the Software, and/or (ii) as provided by you or generated by your use of the Software (“Functional Information”).
- Page 6 PACKAGE VERSION SOURCE SITE bluez5_utils- https://cdn.kernel.org/pub/linux/bluetooth headers 5.50 https://github.com/libffi/libffi/archive/v3.3-rc0 libffi v3.3-rc0 http://www.zlib.net libzlib 1.2.11 http://0pointer.de/lennart/projects/libdaemon libdaemon 0.14 libglib2 http://ftp.gnome.org/pub/gnome/sources/glib/2.56 2.56.4 https://sourceware.org/elfutils/ftp/0.176 elfutils 0.176 bzip2 https://sourceware.org/pub/bzip2 1.0.8 https://cdn.kernel.org/pub/linux/utils/util-linux/v2.33 util-linux 2.33 https://github.com/linux-pam/linux-pam/releases/download/ linux-pam 1.3.1 v1.3.1 https://github.com/westes/flex/files/981163 flex 2.6.4 http://ftpmirror.gnu.org/readline readline http://alpha.gnu.org/gnu/bc 1.06.95 http://downloads.sourceforge.net/project/omxil/omxil/Bellagio% bellagio 0.9.3...
- Page 7 PACKAGE VERSION SOURCE SITE libopenssl https://www.openssl.org/source 1.1.1c pciutils https://cdn.kernel.org/pub/software/utils/pciutils 3.5.5 unzip ftp://ftp.info-zip.org/pub/infozip/src https://cdn.kernel.org/pub/linux/utils/usb/usbutils usbutils https://github.com/libusb/libusb/releases/download/v1.0.22 libusb 1.0.22 http://c-ares.haxx.se/download c-ares 1.15.0 http://snapshot.debian.org/archive/debian/20190513T145054Z/ pool/main/c/ca-certificates ca-certificates 20190110 http://cairographics.org/snapshots cairo 1.15.12 fontconfig http://fontconfig.org/release 2.13.1 freetype http://download.savannah.gnu.org/releases/freetype 2.9.1 libpng http://downloads.sourceforge.net/project/libpng/libpng16/1.6.37 1.6.37 https://dri.freedesktop.org/libdrm libdrm 2.4.97 libpthread-stubs http://xcb.freedesktop.org/dist http://xorg.freedesktop.org/releases/individual/lib pixman...
- Page 8 PACKAGE VERSION SOURCE SITE http://downloads.sourceforge.net/project/faac/faad2-src/faad2- faad2 2.8.8 2.8.0 http://s-tech.elsat.net.pl/fbv 1.0b giflib http://downloads.sourceforge.net/project/giflib 5.1.4 jpeg-turbo https://downloads.sourceforge.net/project/libjpeg-turbo/2.0.1 2.0.1 ffmpeg http://ffmpeg.org/releases 4.1.3 https://github.com/intel/libva/releases/download/2.4.0 libva 2.4.0 http://downloads.xiph.org/releases/vorbis libvorbis 1.3.6 libogg http://downloads.xiph.org/releases/ogg 1.3.3 libvpx https://github.com/webmproject/libvpx/archive/v1.7.0 v1.7.0 opus https://downloads.xiph.org/releases/opus 1.3.1 https://downloads.xiph.org/releases/speex speex 1.2.0 20ed3452074664a- d07e380e51321- speexdsp https://git.xiph.org/speexdsp.git b148acebdf20 ftp://ftp.astron.com/pub/file...
- Page 9 PACKAGE VERSION SOURCE SITE http://bitmath.org/code/mtdev mtdev 1.1.4 pcre2 https://ftp.pcre.org/pub/pcre 10.32 gst1-vaapi https://gstreamer.freedesktop.org/src/gstreamer-vaapi 1.14.4 htop http://hisham.hm/htop/releases/2.2.0 2.2.0 https://github.com/vcrhonek/hwdata/archive/v0.308 hwdata v0.308 input-event- https://github.com/gandro/input-event-daemon/archive/v0.1.3 daemon v0.1.3 iperf3 https://downloads.es.net/pub/iperf https://cdn.kernel.org/pub/software/network/iw 4.14 jansson http://www.digip.org/jansson/releases 2.12 jose https://github.com/latchset/jose/releases/download/v10 json-for-modern- https://github.com/nlohmann/json/archive/v3.5.0 v3.5.0 jsoncpp https://github.com/open-source-parsers/jsoncpp/archive/1.8.4 1.8.4 http://www.libarchive.org/downloads libarchive 3.3.3 libconfig https://github.com/hyperrealm/libconfig/archive/v1.7.2...
- Page 10 PACKAGE VERSION SOURCE SITE http://pyropus.ca/software/memtester/old-versions memtester 4.3.0 http://mmonit.com/monit/dist monit 5.25.3 https://downloads.sourceforge.net/project/net-snmp/net-snmp/ netsnmp nodejs http://nodejs.org/dist/v8.15.1 8.15.1 opkg http://downloads.yoctoproject.org/releases/opkg 0.3.6 opus-tools https://downloads.xiph.org/releases/opus opusfile https://downloads.xiph.org/releases/opus 0.11 http://www.php.net/distributions 7.3.9 portaudio v190600_20161030 http://www.portaudio.com/archives powertop https://01.org/sites/default/files/downloads/powertop protobuf https://github.com/google/protobuf/archive/v2.6.1 v2.6.1 https://files.pythonhosted.org/packages/a8/c6/ a8d1555e795dbd0375c3c93b576ca13bbf139db51ea604a- python-pyyaml 4.2b4 fa19a2c35fc03 https://files.pythonhosted.org/packages/cc/74/ 11b04703ec416717b247d789103277269d567db575d2fd88f25- python-serial d9767fe3d qt5declarative...
- Page 11 PACKAGE VERSION SOURCE SITE https://strace.io/files/4.26 strace 4.26 tcpdump http://www.tcpdump.org/release 4.9.2 http://downloads.sourceforge.net/project/trousers/tpm-tools/ tpm-tools 1.3.9.1 1.3.9.1 http://downloads.sourceforge.net/project/trousers/trousers/ trousers 0.3.14 0.3.14 http://www.iana.org/time-zones/repository/releases tzdata 2018e http://wayland.freedesktop.org/releases weston 5.0.0 wireless-regdb https://cdn.kernel.org/pub/software/network/wireless-regdb 2019.06.03 wireless_tools 30.pre9 https://hewlettpackard.github.io/wireless-tools xkeyboard-config http://www.x.org/releases/individual/data/xkeyboard-config 2.23.1 ftp://ftp.info-zip.org/pub/infozip/src http://dev.gentoo.org/~spock/projects/gensplash/archive splashutils 1.5.4.4 libresample ftp://ftp.ubuntu.com/ubuntu/pool/universe/libr/libresample 0.1.3 https://launchpad.net/gcc-arm-embedded/5.0/5-2016-q3- 5_4-2016q3- update/+download...
- Page 12 PACKAGE VERSION SOURCE SITE a5ffe45908- cae43925bb5cb13- wpa_cli http://w1.fi/hostap.git d98251c802b4717 a5ffe45908- cae43925bb5cb13- hostapd http://w1.fi/hostap.git d98251c802b4717 a5ffe45908- cae43925bb5cb13- hostapd_cli http://w1.fi/hostap.git d98251c802b4717 https://sourceforge.net/projects/rscode/files/rscode rscode https://tukaani.org/xz 5.1.1 https://github.com/secure-remote-password/stanford-srp/tree/ libsrp master/libsrp 2.1.2 https://github.com/mstorsjo/fdk-aac libfdk-aac 0.1.4 https://github.com/macosforge/alac libalac mDNSRespond- https://opensource.apple.com/source/mDNSResponder 878.30.4 nlohmann::json https://github.com/nlohmann/json 3.7.3 https://github.com/Azure/azure-iot-sdk-c azure-iot-c-sdk 2020-07-01 bcrypt https://github.com/kelektiv/node.bcrypt.js...
- Page 13 PACKAGE VERSION SOURCE SITE passport http://github.com/jaredhanson/passport 0.4.0 promise https://github.com/then/promise 8.1.0 request https://github.com/request/request 2.88.2 swagger-parser https://github.com/APIDevTools/swagger-parser 6.0.5 swagger-ui- express https://github.com/scottie1984/swagger-ui-express 4.0.1 f44ca27357563e9e- d43f1ff76d3bd8dd14- https://github.com/rockchip-linux/u-boot uboot f4747e 805e544f539b96d- e96388960173b- https://github.com/rockchip-linux/kernel linux b673dab5a9dd 21e95266704e572c- ed1c633bbc4aea9- https://android.googlesource.com/platform/external/avb/ avb-vbmeta f42afa0a5 +/21e95266704e572ced1c633bbc4aea9f42afa0a5/avbtool b18c9afdb7- d02e1249cee5cb430- https://github.com/rockchip-linux/avb/tree/master/boot_control bootcontrol dc9f15a3ccc27 7617e69a524ac- c1a50a8a98b257-...
- Page 14 PACKAGE VERSION SOURCE SITE https://www.nxp.com/support/developer-resources/software- development-tools/mcuxpresso-software-and-tools/ mcuxpresso-software-development-kit-sdk:MCUXpresso-SDK? tab=Design_Tools_Tab NXP-SDK 2.5.0 https://github.com/lz4/lz4/blob/dev/lib/lz4.h unlz4 ring-buff https://code.google.com/archive/p/ring-buff wpa_supplicant http://w1.fi/wpa_supplicant f5a28c74f- ba7a99736fe49- d3a5243e- https://github.com/quiet/libcorrect quiet-libcorrect ca29517ae9 4951bbbf67a9857d- baab0bc6- quiet-dsp https://github.com/quiet/quiet-dsp fa69801717308109 b64a058e- d40a49a8ff777bf- quiet https://github.com/quiet/quiet b526f2989480eb1ec EN55032-CISPR32 Class B ITE (Information Technology Equipment) This is a class B product. In a domestic environment this product may cause radio interference in which case the user may be required to take adequate measures.
- Page 15 The radiated output power of the Barco Wireless Device is below the Industry Canada (IC) radio frequency exposure limits. The Barco Wireless Device should be used in such a manner such that the potential for human contact during normal operation is minimized.
- Page 16 Informations concernant l'exposition aux fréquences radio (RF) La puissance de sortie émise par l'appareil de sans fil Barco est inférieure à la limite d'exposition aux fréquences radio d'Industry Canada (IC). Utilisez l'appareil de sans fil Barco de façon à minimiser les contacts humains lors du fonctionnement normal.
-
Page 17: Table Of Contents
Table of contents 1 Introduction to the Installation Guide..........................19 Documentation ....................................20 Symbols and fonts..................................20 2 CX-20 Specifications..................................21 About the CX-20 .....................................22 CX-20 Specifications..................................23 About the Base Unit..................................24 3 Getting started......................................27 Environmental Condition Check .............................28 Basic Workflow....................................28 4 CX-20 Installation....................................29 Installation methods for the Base Unit ..........................30 Guidelines for ClickShare Conference system installation..................30... - Page 18 Support & Updates, Troubleshoot, log settings ......................105 6.39 Troubleshooting, Erase all settings............................ 105 6.40 Reset to factory defaults ................................106 6.41 Troubleshoot, diagnostics ............................... 107 7 Firmware updates ..................................... 109 Updating the CX-20 firmware..............................110 8 Troubleshooting ....................................111 Troubleshooting list..................................112 R5900102 /04 CX-20...
-
Page 19: Introduction To The Installation Guide
Introduction to the Installation Guide Documentation ..........................20 Symbols and fonts ........................20 R5900102 /04 CX-20... -
Page 20: Documentation
1.1 Documentation About the documentation This installation guide explains how to install your CX-20 in a meeting room, It explains also how to make everything operational. It provides detailed information on how to configure your CX-20 . Available System documentation Next to the installation manual, a user guide and a safety guide are available on Barco’s website,... -
Page 21: Specifications
CX-20 Specifications R5900102 /04 CX-20... -
Page 22: About The Cx-20
AV peripherals in the room for a better, more immersive meeting experience. Everything becomes part of your laptop. This CX-20 not only helps the presenter get the presentation on-screen in a second, but it also allows the other people in the conference to participate more actively. The result is enhanced meeting efficiency and better decision-making. -
Page 23: Specifications
CX-20 Specifications 2.2 CX-20 Specifications Base unit Dimensions (HxWxD) 34 mm x 135 mm x 135 mm Power supply Standard 110/220 V AC plug Power consumption Operational: 5-10W, 24W Max Weight 900 gr Operating system Windows 8/8.1/10. macOS 10.15 and higher. -
Page 24: About The Base Unit
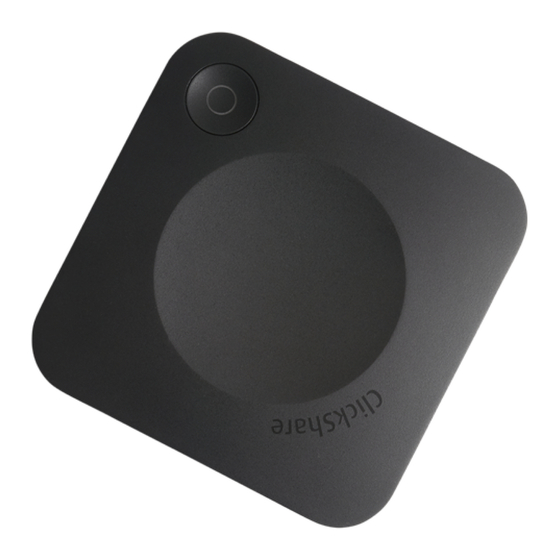
CX-20 Specifications 1x USB Type-C 2.0 (front); 1x USB Type A 2.0 (front) Temperature range Operating: 0°C to +40°C (+32°F to +104°F) Max: 35°C (95°F) at 3000m Storage: -20°C to +60°C (-4°F to +140°F) Humidity Storage: 0 to 90% relative humidity, non-condensing... - Page 25 CX-20 Specifications Image 2–2 USB Type-A port (USB 2.0) USB Type-C port (USB 2.0) Status LED ring Standby Button USB ports Both USB ports, one USB Type-C and one USB Type-A, are used to connect a USB camera or USB echo- cancelling speakerphone to the Base Unit.
- Page 26 The antenna is built-in in the CX-20 . Bottom layout of the Base Unit The serial number label containing the Barco part number, the revision number, production date (week-year) and the serial number. The product label with the applicable certification logos.
-
Page 27: Getting Started
Getting started Environmental Condition Check.....................28 Basic Workflow..........................28 R5900102 /04 CX-20... -
Page 28: Environmental Condition Check
Register you device online to obtain your SmartCare package. Pair your Buttons, see “Preparing the Buttons”, page 51 For more information on using CX-20 , refer to the CX-20 User Guide. This manual can be found on Barco's website www.barco.com/clickshare. R5900102 /04... -
Page 29: Installation
CX-20 Installation Installation methods for the Base Unit ....................30 Guidelines for ClickShare Conference system installation ..............30 Table mounting..........................31 Wall or ceiling mounting ........................31 Standalone setup .........................32 Network connected setup ......................33 Dedicated network setup.......................34 Fully equipped, Audio only or Camera only conference room ............35 Video signal connections to the Base Unit ..................36... -
Page 30: Installation Methods For The Base Unit
CX-20 Installation 4.1 Installation methods for the Base Unit For optimal performance, install the Base Unit close to the display and avoid obstacles between the Base Unit and the Buttons. Make sure not to install the Base Unit in a metal enclosure. -
Page 31: Wall Or Ceiling Mounting
About wall or ceiling mounting A mounting base is used to mount the CX-20 t o the wall or ceiling. This base has key-shaped screw holes to allow you to fasten the base to a wall or ceiling or you can use the self-adhesive layer to mount the base. Once you determine the location for your device follow the next procedure to mount the device. -
Page 32: Standalone Setup
CX-20 Installation Image 4–2 Mounting with the self-adhesive layer Peel off the removable protection foil. Image 4–3 Stick the base on the chosen location. Place your device on the mounting base and turn it clockwise until it is locked (Image 4–2). -
Page 33: Network Connected Setup
(3G/4G) at the same time. Image 4–5 Miracast on CX-20/CX-30 When the Base Unit is connected to the network via the LAN cable, than Miracast can be used via Wi-Fi Direct and Over Infrastructure (MS-MICE), but only available when the Base Unit’s access point is turned OFF. -
Page 34: Dedicated Network Setup
CX-20 Installation this configuration, the access point of the Base Unit is disabled and Buttons must connect to the Base Unit via corporate access points. Note that Wireless Conferencing capabilities of the ClickShare Button might be limited and its performance will depend on the internal network. -
Page 35: Fully Equipped, Audio Only Or Camera Only Conference Room
CX-20 Installation Setup via XMS Log in to XMS and go to the Base Units tab. In the device list select the Unit(s) for deploying network integration mode. Open the Configure dropdown list and choose Network integration. Select one of the authentication modes for network integration mode and fill out the details. -
Page 36: Video Signal Connections To The Base Unit
About USB cameras Any USB camera with at least a resolution of 720p can be connected to the Base Unit. A list of supported cameras can be found on Barco’s website. To connect Connect the camera via USB to the Base Unit. -
Page 37: Content Audio Connection
It is a bidirectional audio transmission between the Button and the speakerphone. USB speakerphone support A list of supported speakerphones can be found on Barco’s website. How to connect an echo-canceling speakerphone Connect your speakerphone device via USB to the Base Unit. -
Page 38: Lan Connection
CX-20 Installation When USB speakerphone is attached to the Base Unit, this will output all audio. Even if separate audio system is attached for the content audio.. Sound is not sent out In some Windows environments sound is not sent out. This can be solved as follow: E.g. -
Page 39: First Startup Of The Base Unit
CX-20 Installation Slide a power input adaptor piece (US, AU, IN, CH, EU or UK) on the power adapter of the ClickShare until it clicks. Use the one which is applicable in your country. Image 4–9 Power adapter Connect the power cable to the wall outlet. -
Page 40: Preferred Way To Start Up
CX-20 Installation 4.16 Preferred way to start up What will be done? After an optional firmware update check, the configuration wizard should be started to configure the Base Unit. To finalize the complete startup, the Base Unit can be registered to XMS Cloud to get your SmartCare package. - Page 41 CX-20 Installation Image 4–12 When connected to the internet you can select Automatic for firmware update (recommended). If you set it on No, you still have the choice to manually update by downloading the software on an USB stick. When connected to the internet and the setting is set to Automatic, the software check will be done and the latest version will be downloaded but the update of the firmware will be executed only when finishing the configuration wizard.
- Page 42 CX-20 Installation Image 4–14 Enter a time zone and make a selection between manual time setup and the use of NTP. For more info about manual time setup, see “Date & Time setup, manually”, page For more info about the use of an NTP server, see “Date &...
- Page 43 CX-20 Installation Image 4–16 We advise to change the default password to enter the Configurator. For more info, see “Security, passwords”, page Network settings Image 4–17 Select the frequency band, channel and enter a Wi-Fi passphrase when desired. For more info, see “”,...
- Page 44 CX-20 Installation Image 4–18 To benefit from the SmartCare program, your device should be registered to XMS Cloud. Copy your device token by clicking on the copy icon next to the token. Click on the link to start the registration procedure.
-
Page 45: Start Up Without Configuration
CX-20 Installation Image 4–20 4.17 Start up without configuration How to start Plug in a Button and start sharing your screen. As soon as a user connects to the Base Unit, the default wallpaper will be shown on the meeting room display and the unit can be used with it's default configuration. - Page 46 CX-20 Installation Image 4–21 When your E-mail address is known by XMS Cloud you arrive on the tenant selection page. To continue, go to step 5. When your E-mail address is not known by XMS Cloud, a verification code will be sent to the entered E- mail address.
-
Page 47: Activating Calendar Integration With Xms Cloud
Account. This ‘connection’ makes it possible to discover your rooms and share their credentials with the devices. Approval from your organization's O365 admins are required. How to setup Go to XMS Cloud (https://xms.cloud.barco.com) and login with your credentials. Click on the tab Calendar. R5900102 /04 CX-20... - Page 48 CX-20 Installation Image 4–26 The calendar connection page opens. Image 4–27 Click Connect. You will be redirected to your Microsoft Azure account to begin the integration. Image 4–28 Read the message on the screen and click Accept. When accepted, you are redirected back to XMS Cloud. This process should finish in 10 to 30 minutes but it can take in occasional cases a longer time.
- Page 49 CX-20 Installation Image 4–29 Once the process has finished, the screen is refreshed and shows the Continue integration button. Image 4–30 Click Continue integration to request the O365 admin’s final permission to discover rooms. Image 4–31 Click Accept. You are redirected to XMS Cloud with the your rooms discovered.
- Page 50 CX-20 Installation Assign a meeting room to a calendar (no devices are mapped yet) Click the Settings icon next to the E-mail address of the meeting room. Image 4–33 A popup opens. Image 4–34 Click on Associated devices if not yet selected.
-
Page 51: Preparing The Buttons
Preparing the Buttons Pairing ............................52 ClickShare Extension Pack ......................53 ClickShare Extension Pack installer ....................53 ClickShare Windows Certified driver ....................54 ClickShare Desktop App .......................54 MSI installer of the ClickShare Desktop App ...................55 R5900102 /04 CX-20... -
Page 52: Pairing
When the LEDs on the Button become green and on static white on the Base Unit, the Button is paired to the Base Unit. You can unplug the Button from the Base Unit. Unplug the Button from the Base Unit. The Button is now ready for use. Image 5–2 R5900102 /04 CX-20... -
Page 53: Clickshare Extension Pack
In this setup, a user or an IT admin can install the ClickShare Extension pack using the Windows command prompt. Following is an example of a silent installation (version numbers are only given as example, always check Barco’s web for the latest version): Launcher only install:... -
Page 54: Clickshare Windows Certified Driver
Just click on your meeting room name. This means you will never have to enter IP addresses or scroll long lists of meeting rooms before being connected to your R5900102 /04 CX-20... -
Page 55: Msi Installer Of The Clickshare Desktop App
Read the License Agreement and check the 'I accept the terms in the license agreement' checkbox to continue. Click Next. Enable the necessary components and click Install. The ClickShare Desktop App and the selected features are now available for all users of your computer. R5900102 /04 CX-20... - Page 56 Preparing the Buttons R5900102 /04 CX-20...
-
Page 57: Configurator
CX-20 Configurator Accessing the Configurator ......................59 ClickShare Configuration Wizard ....................62 On-Screen ID information......................64 Personalisation, Wallpaper ......................65 Personalisation, Personalized wallpaper ..................67 Manage configuration files......................68 Display & Audio setup ........................69 Peripherals ..........................70 Wi-Fi settings ..........................71 6.10 Wi-Fi settings, Access Point settings ....................72 6.11 Wi-Fi settings, Wireless Client .......................74... - Page 58 CX-20 Configurator About configuration The configuration of your device can be done in • XMS cloud • the local configurator The configurator in XMS cloud will (in time) more elaborated than the local configurator. Therefore it preferred to configure your devices via XMS cloud. For more info see XMS documentation.
-
Page 59: Accessing The Configurator
CX-20 Configurator 6.1 Accessing the Configurator Getting access to the Configurator There are three ways to access the Configurator: • Via the LAN • Direct Ethernet connection between PC and Base Unit. • Via the Base Unit's wireless network When accessing the configurator for the first time, the ClickShare Configuration Wizard starts automatically. - Page 60 CX-20 Configurator Image 6–2 Configurator lanuguages The following languages are possible: • Arabic • Simplified Chinese • Traditional Chinese • Danish • Dutch • English • Finnish • French • German • Italian • Japanese • Korean • Norwegian •...
- Page 61 CX-20 Configurator Image 6–3 Start screen The language of the configurator can be changed on any page in the interface. The screen is split up in 2 panes. Left pane with the selection buttons and a right pane to configure the selected function.
-
Page 62: Clickshare Configuration Wizard
CX-20 Configurator To access the Configurator via the Base Unit wireless network On your laptop, connect to the Base Unit wireless network. The default SSID and password to connect to the Base Unit are respectively 'ClickShare-<serial base number>' and 'clickshare'. - Page 63 CX-20 Configurator Or, you can start up the configuration wizard by clicking at the bottom left on Configuration wizard or on Lauch configuration wizard on the dashboard page. Image 6–4 Configuration Wizard start All basic settings necessary to configure the Base Unit are covered by this configuration wizard. Once the configuration wizard is finished, the Base Unit is ready for use.
-
Page 64: On-Screen Id Information
CX-20 Configurator For more information about a specific topic, see one of the following topics. The ClickShare Configuration Wizard can be started at any time to change the configuration just by clicking on ClickShare Configuration Wizard at the left bottom of each screen or on Lauch configuration wizard on the start page. -
Page 65: Personalisation, Wallpaper
Click in the input field next to Welcome message and enter the desired message. 6.4 Personalisation, Wallpaper About wallpaper When CX-20 starts up, a background (wallpaper) is displayed. The display of this background wallpaper can be disabled. By default two general ClickShare wallpapers are available. The possibility exists to upload personal backgrounds (wallpapers). - Page 66 The Wallpaper selection pane is shown. The current selected wallpaper is shown with a red border. Select one of the available wallpapers and click on Save Changes. Note: By default two general Barco wallpapers are available. They are automatically resized to fit the aspect ratio of the screen.
-
Page 67: Personalisation, Personalized Wallpaper
CX-20 Configurator integrated in a room system such as a Cisco video conferencing system, Microsoft Teams room system or a Zoom room system. 6.5 Personalisation, Personalized wallpaper How to upload Log in to the Configurator Click Personalisation → Wallpaper. The Wallpaper selection pane is shown. The current selected wallpaper is shown with a red border. -
Page 68: Manage Configuration Files
CX-20 Configurator Image 6–10 Change image Browse for the desired image, click Open to load the image. The content of the file is checked and when valid (format and size), the file is uploaded. The new wallpaper gets a red border. -
Page 69: Display & Audio Setup
6.7 Display & Audio setup Resolution The output resolution to the display is set on Auto. That means that the CX-20 output resolution is automatically adapted to the resolution of the display. For HDMI displays, a hot plug detection is available. -
Page 70: Peripherals
Update of firmware of the peripheral devices via the configurator is supported for Logitech Meetup and Rally and only when the camera is not in use. When the installed firmware version is lower than the Barco certified peripheral firmware version, then the install button becomes active. Click on Install the install the latest version. -
Page 71: Wi-Fi Settings
CX-20 Configurator An overview of the status of the Speakerphone Device, microphone and speaker, and Camera device is given. Image 6–14 Peripherals Quality score camera When the camera is in use, a quality score is given between 0 and 100. It gives an indication what’s going on with the camera stream quality and format change. -
Page 72: Wi-Fi Settings, Access Point Settings
CX-20 Configurator About The operational mode of the Wi-Fi setting can be set in 3 different modes: • Access point • Wireless client • Change operational mode Log in to the Configurator. Click Wi-Fi & Network → Wi-Fi Settings. Image 6–16 Wi-Fi settings Select the operational mode by clicking on the drop down and selecting the desired option. - Page 73 CX-20 Configurator Image 6–17 Wi-Fi settings, access point settings Enter a public name (SSID) for the wireless network. The default SSID is ClickShare-<serial number Base Unit>. If you want to broadcast this SSID, check the checkbox before Enable SSID broadcast.
-
Page 74: Wi-Fi Settings, Wireless Client
CX-20 Configurator The 5 GHz channels do not overlap with each other and are less used by non-Wi-Fi devices than the 2.4 GHz channels. Moreover, 5 GHz signals are more rapidly damped than 2.4 GHz signals. Therefore, the use of a 5 GHz channel is recommended. -
Page 75: Wi-Fi Settings, Wireless Client, Eap-Tls
CX-20 Configurator For Wireless Conferencing, a direct connection between the Button and the Base Unit is advised. How to activate Wireless Client Log in to the Configurator. Click Wi-Fi & Network → Wi-Fi Settings. Click Edit settings. Click on the drop down box next to Operational Mode and select Wireless Client. - Page 76 CX-20 Configurator Image 6–20 Wi-Fi Settings, Wireless Client, EAP-TLS Fill out a Corporate SSID. The SSID of your corporate wireless infrastructure to which the ClickShare Buttons will connect. Fill out the Domain and Identity. Select the certification method. Click on the drop down box and select the desired method.
-
Page 77: Wi-Fi Settings, Wireless Client, Eap-Ttls
CX-20 Configurator File should at least contain the root CA certificate for your domain. Save Changes Using SCEP The Simple Certificate Enrolment Protocol (SCEP) is a protocol which enables issuing and revoking of certificates in a scalable way. SCEP support is included to allow a quicker and smoother integration of the ClickShare Base Unit and Buttons into the corporate network. -
Page 78: Wi-Fi Settings, Wireless Client, Peap
CX-20 Configurator Image 6–22 Wi-Fi Settings, Wireless Client, EAP-TTLS 6.14 Wi-Fi settings, Wireless Client, PEAP About PEAP PEAP (Protected Extensible Authentication Protocol) is an EAP implementation co-developed by Cisco Systems, Microsoft and RSA Security. It sets up a secure TLS tunnel using the servers CA certificate after which actual user authentication takes place within the tunnel. -
Page 79: Wi-Fi Settings, Wireless Client, Wpa2-Psk
CX-20 Configurator Image 6–23 Wi-Fi Settings, Wireless Client, PEAP Fill out a Corporate SSID. The SSID of your corporate wireless infrastructure to which the ClickShare Buttons will connect. Fill out the Domain and Identity. Enter a Password. Upload CA certificate. Click on Choose file and browse to the desired file. -
Page 80: Lan Settings
CX-20 Configurator Image 6–24 Wi-Fi Settings, Wireless Client, WPA-PSK Fill out a Corporate SSID. The SSID of your corporate wireless infrastructure to which the ClickShare Buttons will connect. Fill out Passphrase. The key used in WPA2-PSK to authenticate onto the wireless infrastructure. This can be a string of 64 hexadecimal digits or a passphrase of 8 to 63 printable ASCII characters. - Page 81 CX-20 Configurator Image 6–25 LAN settings Click in the input field next to Hostname and enter a host name for the Base Unit. The default host name is ClickShare-<serial number Base Unit>. To select the method, click on the drop down box next to Method and select the Automatic (DHCP) or Manual.
-
Page 82: Lan Settings, Wired Authentication
CX-20 Configurator Click in the DNS Servers input field and fill out the preferred DNS servers (maximum 5) in a comma separated list. Click Save changes to apply the settings. Do not use IP address 192.168.2.x for a Subnet mask 255.255.255.0 and IP address 192.168.x.x for a Subnet mask 255.255.0.0... -
Page 83: Lan Settings, Eap-Tls Security Mode
CX-20 Configurator Image 6–27 Wired authentication The setup wizard starts. Select the authentication method. Click on the drop down and select the desired method. The following methods are available: • No authentication: no authentication mechanism will be applied to the wired interface. - Page 84 CX-20 Configurator Image 6–28 EAP-TLS Fill out the Domain and Identity. Select the certification method. Click on the drop down box and select the desired method. • Manually provide Client & CA certificates • Auto enrollment via SCEP Manually providing certificates Upload client certificate.
-
Page 85: Lan Settings, Eap-Ttls Security Mode
CX-20 Configurator Image 6–29 EAP-TLS — SCEP SCEP ServerIP/ This is the IP or hostname of the Windows Server in your network running the NDES hostname service. By default HTTP is used. E.g.: http://myserver or http://10.192.5.1 SCEP User name This is a user in your Active Directory which has the required permission to access the NDES service and request the challenge password. -
Page 86: Services, Mobile Devices
CX-20 Configurator Image 6–30 EAP-TTLS Fill out the Domain and Identity. Domain The company domain for which you are enrolling, should match with the one defined in your Active Directory. Identity Identity of the user account in the Active Directory which will be used by the ClickShare Buttons to connect to the corporate network. - Page 87 CX-20 Configurator The supported versions of AirPlay can be found on Barco’s website, www.barco.com\clickshare. The support of non-released version of these protocols cannot be guaranteed by Barco. About streaming via Google Cast Before you can mirror information and display it via ClickShare your device must be connected with the wireless network of the Base Unit.
-
Page 88: Service, Presentsense
CX-20 Configurator To allow streaming via Miracast, check the check box in front of Streaming via Miracast. Click on the drop down box and select the desired passcode type. • No passcode • Numeric passcode Passcode applies to all BYOD screen sharing except Google Cast. -
Page 89: Service, Clickshare Api, Remote Control Via Api
CX-20 Configurator 6.22 Service, ClickShare API, remote control via About API settings The API can be enabled or disabled, that means that the access to the unit from an external device can be allowed or can be blocked. This functions in enabled by default. -
Page 90: Security, Security Level
When using the default Engine ID, make sure the check box before Use default Engine ID is checked. The default engine ID is a combination of the Barco Enterprise Number with the MAC-address (eth0). Fill out the SNMP Manager address. - Page 91 CX-20 Configurator • no wireless ClickShare Configurator (WebUI) access, • SSID of Wi-Fi network is hidden. Level 2 : this level offers a higher degree of security, fit for organizations that are more sensitive to security matters. Level 2 contains the level 1 security and a mandatory PIN code for mobile devices. Alphanumeric PIN codes for mobile apps and Buttons and the Buttons require a certificate for pairing.
-
Page 92: Security, Passwords
CX-20 Configurator 6.25 Security, passwords About passwords To access the ClickShare Configurator a user name and password is needed. That password can be changed at any time to protect the ClickShare Configuration settings. Changing the ClickShare Configurator password Log in to the Configurator. -
Page 93: Date & Time Setup, Manually
CX-20 Configurator Click Support → Base Unit Status. Image 6–37 To restart the Base Unit, click on Restart Base Unit. A ClickShare system reboot message with progress bar is displayed while rebooting takes place. When the reboot is finished, a re-login is necessary. - Page 94 CX-20 Configurator Image 6–38 Manual time & date update The current time is indicated next to Current time. Select your time zone. Click on the drop down box next to Time zone and select the corresponding time zone. Check the radio button in front of Set time and date manually.
-
Page 95: Date & Time Setup, Time Server
CX-20 Configurator Not checked: use of 12 hour time format Click Save changes to apply. 6.28 Date & Time setup, time server About using NTP server The clock is continuously synchronized with an external time server and the deviation is in the order of milliseconds. -
Page 96: Buttons
CX-20 Configurator Eco mode When the Base Unit enters ECO standby mode, it will disable the HDMI output signal. The Base Unit's LEDs will be breathing white to indicate the ECO standby mode. Power consumption in Eco standby: 2.6W The Base Unit will wake up with one of the following actions: •... -
Page 97: Buttons, External Access Point, Mode Eap-Tls
CX-20 Configurator All Buttons used with the Base Unit are indicated in the Buttons List. The list contains the serial number, MAC address, article code and the firmware version, the number of connections and last connection date and time. It is possible to update the software of the Buttons over Wi-Fi. - Page 98 CX-20 Configurator Image 6–44 Buttons, External access point, mode EAP-TLS The SSID of your corporate wireless infrastructure to which the ClickShare Buttons will connect. Fill out the Domain and Identity. Select the certification method. Click on the drop down box and select the desired method.
-
Page 99: Buttons, External Access Point, Mode Eap-Ttls
CX-20 Configurator ClickShare Base Unit and Buttons into the corporate network. Since most companies are using Microsoft Windows Server and its active directory (AD) to manage users and devices our SCEP implementation is specifically targeted at the Network Device Enrolment Service (NDES) which is part of Windows Server 2008 R2 and Windows Server 2012. -
Page 100: Buttons, External Access Point, Mode Peap
CX-20 Configurator Fill out the Domain and Identity. Enter a Password. Upload CA certificate. Click on Choose file and browse to the desired file. The following formats are allowed: • .pem • .cer • .crt • .pb7 (Base64 encoded DER) File should at least contain the root CA certificate for your domain. -
Page 101: Buttons, External Access Point, Mode Wpa2-Psk
CX-20 Configurator 6.34 Buttons, External access point, mode WPA2- How to fill out the settings Fill out a Corporate SSID. Image 6–48 Buttons, External access point, mode WPA2-PSK The SSID of your corporate wireless infrastructure to which the ClickShare Buttons will connect. -
Page 102: Xms Cloud Integration
CX-20 Configurator Image 6–49 Save annotations Check or uncheck the check box in front of Allow saving annotations to connected clients and USB sticks. Checked: annotations on the blackboard can be saved. Unchecked: no annotations on the blackboard can be saved. -
Page 103: Firmware Update
Barco and our partners for up to 5 years. When SmartCare is activated, in the SmartCare pane the message SmartCare active, valid until... is displayed. - Page 104 A browser window opens. Browse to the file with the new firmware and click Open to start the upload. Note: This should be an .enc file. You might have to unzip the file downloaded from Barco's website. Note: Updating the software to the Base Unit takes several minutes. Progress can be followed on the meeting room display.
-
Page 105: Support & Updates, Troubleshoot, Log Settings
CX-20 Configurator way, consult Barco’s web pages on XMS ( https://www.barco.com/en/page/xms-cloud-management-platform). • Download the firmware on a USB stick and plug in this USB in your device. For more information, see “Updating the CX-20 firmware”, page 110 6.38 Support & Updates, Troubleshoot, log settings About logging Both Button and Base Unit log data is saved in log files on the Base Unit. -
Page 106: Reset To Factory Defaults
CX-20 Configurator How to erase Log in to the Configurator. Click Support & Updates → Troubleshoot. To erase all settings and revert to default, click Erase all settings. Image 6–54 Troubleshoot, logging 6.40 Reset to factory defaults About the reset When applying a reset to factory defaults, the device settings are reverted to the factory defaults. -
Page 107: Troubleshoot, Diagnostics
CX-20 Configurator Image 6–55 Factory reset Click Reset to factory defaults. The following message is displayed: “This action will remove all settings of the Base Unit and replace them with the default settings. Are you sure you want to continue?”... - Page 108 CX-20 Configurator Image 6–56 Troubleshoot, diagnositcs A separate file is written to the log archive. Only the TCP header info will be collected as part of this test. R5900102 /04 CX-20...
-
Page 109: Firmware Updates
Firmware updates R5900102 /04 CX-20... -
Page 110: Updating The Cx-20 Firmware
USB stick To update the Base Unit software by copying the software on a USB stick Download the latest version of the firmware from Barco's website, www.barco.com/clickshare. Click on Support and select the update firmware button of your device type. -
Page 111: Troubleshooting
Troubleshooting R5900102 /04 CX-20... -
Page 112: Troubleshooting List
• Some types of USB devices policy on the laptop. might be blocked as a company policy. • USB port settings on the laptop might limit the usage of high power USB devices when on battery power. R5900102 /04 CX-20... - Page 113 Base Unit via the web interface. output resolution. The Base Unit is in standby mode Briefly push the standby button on the Base Unit or insert a Button and run the ClickShare software. R5900102 /04 CX-20...
- Page 114 Locate the problem you are experiencing in the table below and apply the solution. Barco knowledge base and YouTube videos Go to the product page on Barco’s website and select in the right column Support. You will get access to Barco’s...
- Page 116 R5900102 /04 | 2021-09-28 www.barco.com...
Need help?
Do you have a question about the CX-20 and is the answer not in the manual?
Questions and answers