Barco CX-50, C 5010S, R9861600D01C Manual
- Installation manual (98 pages) ,
- User manual (70 pages) ,
- Tips & tricks (2 pages)
Advertisement
- 1 Introduction to CX-50
- 2 Getting started
- 3 Troubleshooting
- 4 Symbol overview
- 5 Documents / Resources
Introduction to CX-50
About the CX-50
CX-50 sets
With the Conferencing Button, in seconds, you are automatically connected to cameras, mics, soundbars and any other AV peripherals in the room for a better, more immersive meeting experience. Everything becomes part of your laptop.
This CX-50 not only helps the presenter get the presentation on-screen in a second, but it also allows the other people in the conference to participate more actively. The result is enhanced meeting efficiency and better decision-making.
The set is compatible with any laptop, desktop tablet or smartphone OS. It works with most conferencing platforms and connects instantly with most brands of peripherals (speakers, microphones, webcams, soundbars) when using the Conferencing Button.
At the moment 6 different sets are available on the market. Each set is sold in its specific region and it can only be used in that specific region because of WiFi regulations.
Components CX-50 set
A standard CX-50 set consists of a Base Unit and 2 Conference Buttons. Depending on the location where you buy the product, the software of the Base Unit is different. If needed, you can buy additional Conferencing Buttons and a tray to store the Buttons.

- Base unit
- Conferencing Button 2
--
2: Futher called Button
Accessories included
Products
R9861522xx 3
Contains
- R9861522
- 2x R9861600D01C
4 1x R9861600D01C 4
Accessories included
- DC adapter with regional depending power cord
- Printed safety manual
Contact your local sales representative for the correct regional variant to be used in your country.
--
3: xx=EU, CN, NA, US, ZH, RW,
4: For US, R9861600D01CUS
About the Base Unit
Base Unit functionality
The Base Unit receives the wireless input from the Buttons and controls the content of the meeting room display and the peripherals connected to the Base Unit (speakers, microphones, webcam and soundbar). Furthermore, it will send out the content from the camera and/or the speakerphone towards the Button.
The Base Unit can be inside a cabinet in the meeting room, or put on the meeting room table or mounted on a wall. Check the Installation Guide for instructions on how to install the Base Unit.

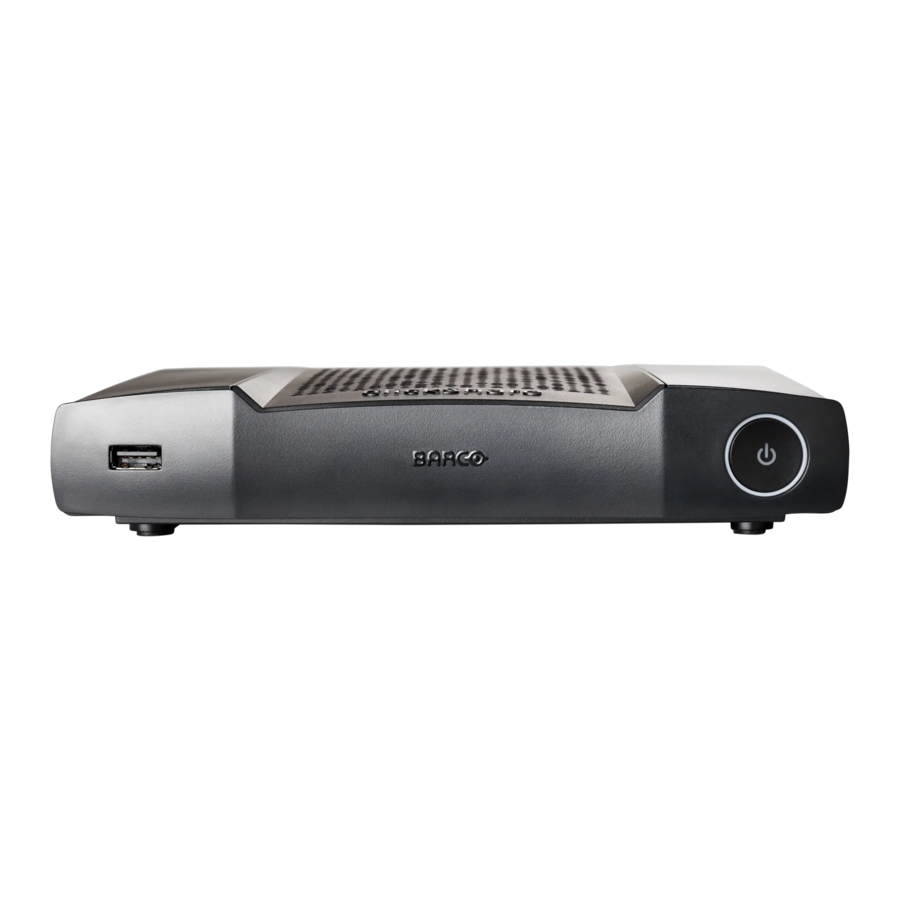
- USB Type-A port
- Status LED ring
- Standby Button
USB Port
The USB port is used to pair the Button to the Base Unit and to update the software of both the Base Unit and the Buttons and to connect a touch screen, USB camera or USB echo-cancelling speakerphone to the Base Unit.
When plugging in the Button into the Base Unit, the Button is paired to the Base Unit. The Base Unit checks whether the software and firmware of the Button is up to date. If not, the Base Unit updates the software and/ or firmware.
Use a convertor to connect a Button with an USB Type-CTM connector to front USB port of the Base Unit. USB Type-CTM port available at the backside.
Status LED ring
The color of the LED ring around the power button of the Base Unit give information on the status of the system.
| LEDs behavior | Explanation |
| static red |
|
| blinking white |
|
| breathing white |
|
| static white |
|
| red blinking |
|
| dark |
|
Power button
The button at the front of the Base Unit has a standby function once the Base unit is powered.
- When the system is in normal operational mode, a push makes the system goes into a pre-defined standby mode.
- When the system is in standby, a push triggers the system to start up and it goes into normal operational mode.
About the Button
Button layout
A Button consists of five main components

- USB Type-C TM connector
- Quick access button
- Button
- LED ring
- Strap hole
USB connector
Using the USB connector the Button can be plugged into a laptop (for sharing your screen) or the Base Unit (for pairing the Button to the Base Unit or updating its software). Button R9861600D1C has a USB Type-CTM connector. Depending on the type of USB port on your laptop or on the Base Unit a convertor must be used.
Button
By inserting the Button, the peripherals attached to the Base Unit can be used in the tool of your preference. Click the Button to display the content of the laptop's screen on the meeting room display. Clicking the Button during the meeting will toggle the sharing of the screen. Click the small button to get additional functionality and controls.
LED ring
The LED ring indicates the current status of your ClickShare.
| LEDs behavior | Explanation |
| white ring filling up |
|
| green ring |
|
| spinning white circle |
|
| white blinking |
|
| static white |
|
| static red |
|
| red blinking |
|
| off (no light) |
|
5: While sharing content, the laptop will not go to standby. Once sharing is stopped, the laptop will again be capable of going to standly.
Getting started
Activating the base unit
About power mode
The Base Unit is powered via an external power adapter. Once connected, the Base Unit is automatically switched in standby mode. For more information about power connection, see CX-50's installation manual.
Standby button
- Push the button shortly.

Image 3-1: Standby button

When the Base Unit was on, it goes to standby.
When the Base Unit was in standby, it starts up.
Basic Use, with Button
Basic functionality
When entering a meeting room equipped with ClickShare and if the display is not in screensaver mode, the ClickShare wallpaper is shown on the display. The content of the wallpaper depends on the setup.
Starting to use ClickShare is now very simple.
To start using CX-50 with a Button
- Take a Button and Insert the Button into a USB port of your laptop. Depending on the USB port on your laptop a convertor must be used. This convertor is not delivered by Barco.

Image 3-2
The white ring on the Button is filling up. When totally filled up it goes to static white and is ready to share or it starts blinking to indicate that you have to start clickshare.exe on your computer.
On your laptop a new drive appears.
Different situations are possible now:- Nothing installed, LED ring fills up and starts flashing, indicating that the executable needs to be started by the user. Double-click the ClickShare application.
- For Windows environment: when connected to internet, driver will be installed and the executable will be started by the driver.
- For Mac environment: CD-ROM drive will appear, open it and launch the application to get started.
- A launcher or the ClickShare desktop app is preinstalled on your laptop ( the Base Unit or Barco website, or deployed company-wide by your IT department). ClickShare is immediately available. You can continue with go to step 3.
- The application is started
![]()
The icon appears in the system tray.
When the system is ready for use, a message appears close to the systray icon. Message is as follow: Ready to share to <ClickShare name>
![]()
Image 3-3
The LEDs of the Button are static white.
The peripherals such as USB camera, echo cancelling audio device, etc. can now be used in the tool of your preference on your device.
Your screen or a typical application can be shared. - To share your screen on the display, click the Button.
The LEDs of the Button become static red and your screen appears on the display. When audio is enabled on the ClickShare Base Unit, the audio of your laptop is also available on the audio output of the Base Unit, and it will be played via the meeting room audio system. The icon returns to the same state as in step 3.
When a USB echo cancelling audio device is connected to the Base Unit, all audio, content audio and speaker audio is played via the speakerphone system.
The Ready to share message is reduced to the ClickShare icon![]() .
.
ClickShare automatically scales the content of your screen to the resolution of the meeting room display. The aspect ratio of your screen is maintained to make sure the proportions are correct. - To freeze the content on the screen while you look up something on your PC, just click on freeze icon (1) next to the ClickShare icon. The icon will change to a release icon (2) To resume the content sharing, click on the the release icon (2).
![]()
Image 3-4 - To remove your content from the display, click the Button again.
The LEDs of the Button become static white. - When leaving the meeting room, unplug the Button from your laptop.
No trace of the ClickShare application is left on your laptop.


 .
.
 As second user can replace the current presenter with a long press on his Button
Quick access button
This quick access button opens a selection window to make the choice what will be displayed on the screen.

Image 3-5
The choices are:
- Share an application
- View the room display
Basic Use, with ClickShare desktop app
About the ClickShare desktop app
With the ClickShare desktop app installed on your computer you can enter a meeting room and get on the screen in a few seconds.
The ClickShare desktop app connects to the meeting room screen in order to share your content. Presence detection technology is used to do so. The ClickShare desktop app uses WiFi beacons and an inaudible audio signal to detect the most nearby meeting rooms and show a list of maximum 5 most nearby meeting rooms, sorted based on signal strength on your computer. Just click on your meeting room name. This means you will never have to enter IP addresses or scroll long lists of meeting rooms before being connected to your meeting room.
The ClickShare desktop app can be used with or without a Button.
ClickShare desktop app installation
When the ClickShare desktop app is not pre-deployed in your IT environment, you can download and install the software without administrator rights from www.clickshare.app .
How to use
- Enter a meeting room.
The ClickShare desktop app will list up to 5 most nearby meeting rooms and sort them based on the signal strength.

Image 3-6: Meeting room list - If the use of a passcode is enabled on the base unit, the ClickShare desktop app will prompt you to enter the passcode that is shown on the meeting room screen.

Image 3-7: Enter passcode
After having entered the passcode, the ClickShare desktop app will connect to the meeting room.

Image 3-8: Prepare connection

Image 3-9: Ready to share - Click the white circle to start sharing your content.
When the sharing is started, the ClickShare desktop app will become partially invisible through an animation. A subtle red half circle remains visible on your screen.
Hover over the half circle to either pause your sharing session and freeze the content on the screen while you work on your computer (invisible for people in the meeting room), or click on the red circle to stop sharing. - Stop sharing by hovering over circle and clicking on the full red circle.
![]()
Image 3-10 - Disconnect from the me ting room by clicking the "leave room" icon

Image 3-11: Leave meeting room
or
when you walk away from the meeting room the app will show a message indicating you probably left the meeting room and you are still connected to the screen.


User Interface
User Interface functionality
When a Button is plugged in and ready for sharing, a context menu can be started.
Context menu
- Click on the menu icon on the Ready to share message.

Image 3-12
The context menu appears - From the list, click the action you want to perform.

Extended desktop
About extended desktop
Depending on your selection, your primary screen or your extended screen will be captured and displayed via ClickShare. That extended screen can be a physical screen or a virtual screen. To use extended desktop, the extension pack is required. It can be https://www.barco.com/en/product/clickshare-extension-pack.
With extended desktop you can take advantage of both your laptop screen and the central meeting room display. Presentation notes or other material on primary screen will not be displayed to everyone.
PC with virtual extended screen:

Primary screen displayed on the PC, extended screen displayed on the meeting room display.

Image 3-14
PC with one extended screen connected. That extended screen will be captured and displayed on the meeting room display.

Image 3-15
PC with two extended screens connected. The first extended screen, screen 2 will always be captured and displayed on the meeting room display.
How to select
- Click on the menu icon of the Ready to share message.

Image 3-16 - Check the check box before Extended desktop.

Share an application
About sharing an application
When Share an application is selected, you will be presented with an overview of open applications on your computer. Once you select an application to share, only this application will be shared on the big screen
How to select via the content menu
- Click on the the share application icon of the Ready to share message.
![]()
Image 3-17
The last 6 open applications on your computer are displayed.
![]()
Image 3-18 - Hoover your mouse over the application to share. That window becomes blue.
- Click on that application to select.
Only the selected application is shared on the meeting room display.


Via the Quick access button
- Push the quick access button.

Image 3-19
The selection menu is displayed. - To display an application, select Share an Application.
The last 6 open applications on your computer are displayed.
![]()
Image 3-20 - Hoover your mouse over the application to share. That window becomes blue.
- Click on that application to select.
Only the selected application is shared on the meeting room display.


Audio configuration
The connected user must control his own audio signal using the audio configuration of his computer. If he does not want to broadcast his audio signal, he has to mute audio on his computer.
For some operating system, it is necessary to set ClickShare as your default output device. Once you unplug the Button, the default setting is switched back to the previous setting. The speakerphone selection is also selected.
The following configuration is the expected configuration for the playback devices when plugging the Button. ClickShare speaker as default device and room speakerphone as default communications device.
The speakerphone is available and can be used even when not on screen. The sound coming out of the speaker is only heard when sharing content. With this defaults, the content audio will be played by the speakers and communication clients (UC&C and conferencing tools) will use the room speakerphone. For best experience, the room speakerphone should be selected in the communications client at all times. Difference is that the audio from the Speakers will be lip-synced with the content, but will have higher latency. The communications device is optimized for the lowest latency possible, but no lip-sync is guaranteed with the video. For an optimal conference, the audio should always be transferred with lowest latency possible and will get priority over video.

Pairing
Pairing of the Buttons with the Base Unit
To be able to use a Button it should be assigned to the Base Unit you are using. This process is called pairing. All Buttons will need to be updated and paired before use.
In case you buy additional Buttons or when a Button should be assigned to another Base Unit, the Button needs to be paired (again). The Button software update runs in the background and will not impact users while using the system. When downgrading or updating to an older version of the Base Unit software the Buttons need to paired manually to update their software.
 A Button can only be paired to one Base Unit at a time.
The Button will always make connection to the Base Unit it was last paired to.
Pairing a Button can be done in two ways:
- by plugging the Button to the Base Unit.
- by using the Button Manager application running on your laptop.
To pair a Button to the Base unit by plugging in
- Insert the Button in one of the USB port available on the Base Unit you are using (image is only given as example, all USB connectors can be used).
![warning]() Note: For some ports or Buttons, it can be necessary to use a convertor.
Note: For some ports or Buttons, it can be necessary to use a convertor.

Image 3-22: Pair button
The Base Unit LED is blinking while the Button LED fills up a circle. This means pairing is in progress.
The Base Unit automatically checks whether the software of the Button is up to date. If not, the Base Unit updates the Button software. This may take more time. The result of the pairing process can be as follows:- When the LEDs on the Button become green and on static white on the Base Unit, the Button is paired to the Base Unit. You can unplug the Button from the Base Unit.
- Unplug the Button from the Base Unit.
The Button is now ready for use. Plug in a button to conference.

Image 3-23


Touch Back
About Touch Back
Touch Back support on your wireless collaboration solution allows you to control any application on your laptop via the touch screen in the room, instead of using a computer mouse or clickers. You can control data with your finger or with a specified stylus. Stay in control of your presentation, and don't let technical limitations interrupt the flow of your meeting anymore.
No need to go back to your laptop or use unreliable clickers to move to the next slide. Simply tap the screen to switch slides. And with a few touches on the screen, you can also open other presentations, share mails or start a video. With one tap on a touch screen, you can also select the blackboarding or annotation functionality. The combination of a touch display and a wireless collaboration tool drives the productivity and engagement in your meeting room.
- It gives you the opportunity to present more freely within the meeting space
- You can start to ideate on content real-time.
- Collaborate more interactive and creatively.
- Get higher engagement from the participants.
- Technical limitations of the room are not hindering the flow of the presentation or meeting.
- It boosts spontaneous collaboration, giving people the opportunity to use the specific extras like easy access to online content, cloud drives or photos, zoom, annotate, blackboarding...
Room Dock
About
Room Dock allows to create a wireless bridge for echo-cancelling speakphone and USB camera attached to the Base Unit. This allows the user to take advantage of the installed meeting room peripherals to have better audio and video conferencing using their typical videoconferencing tools like Skype or Zoom.
The echo-cancelling speakerphone and USB camera is accessible to any user that has a Button plugged in.
Airplay
About Airplay
Airplay is a protocol that allows wireless streaming between devices of audio, video, device screens and photos. The ClickShare Base Unit can be configured to receive the airplay streaming
Why Airplay
You want to show multiple people your photos and videos or your PowerPoint and Keynote presentation on a big screen? Connect your device to the ClickShare Base Unit which can be configured to receive the Airplay streaming.
How to use Airplay
- Make sure your device is connected with the ClickShare WiFi in the meeting room.
- Open the control panel of your device and swipe up from the bottom left of the screen or swipe down from the top right of the screen, depending of your device.
- Click on
![]() Synchronise display and select the ClickShare device in the meeting room.
Synchronise display and select the ClickShare device in the meeting room.
 Synchronise display and select the ClickShare device in the meeting room.
For more information about using Airplay with a typical device, consult the user manual of that device.
Chromecast
About Chromecast
Chromecast is a protocol that allows wireless streaming between devices of audio, video, device screens and photos. The ClickShare Base Unit can be configured to receive the Chromecast streaming.
Why Chromecast
You want to show multiple people your photos and videos or your PowerPoint and Keynote presentation on a big screen? Connect your device to the ClickShare Base Unit which can be configured to receive the Chromecast streaming.
How to use Chromecast
- Make sure your device is connected with the ClickShare WiFi in the meeting room.
- Click on the cast-icon to display the content of you device on the meeting room screen.
For more information about using Chromecast with a typical device, consult the user manual of that device.
Miracast
About Miracast
Miracast enables seamless display of multimedia content between Miracast devices. Miracast allows users to wirelessly share multimedia, including high-resolution pictures and high-definition (HD) video content between Wi-Fi devices, even if a Wi-Fi network is not available. Miracast creates its own direct wireless signal between your mobile device and the wireless display receiver (ClickShare Base Unit).
How to use Miracast
- Miracast should be enable on the ClickShare Base Unit.
- Your mobile device needs to be Miracast enabled. Devices like Samsung smartphones or other Android phones, as well as devices that use Windows 8 or 10, typically have the technology built-in.
- In the settings of your mobile device, open 'wireless display' (name can be different depending on the device type and model). See the device's user guide.
- Select the ClickShare Base Unit in the meeting room.
Troubleshooting
Basic troubleshooting
Problem solving
In this chapter some problems that might occur while using CX-50 are listed. For each problem possible causes are given and a solution is proposed. If you cannot solve the problem yourself, please contact your local IT administrator.
Generic issues
| Problem | Cause | Solution |
| Your screen is not shown on the display when pressing the Button. | Wrong input is selected on the display. | Select the correct input on the display or on the room control system |
| Base Unit in standby | Briefly push the standby button on the Base Unit or plug in a Button and run the ClickShare client software. | |
| You are the third person that wants to share the content to the display. | The first or second user has to push his button to remove his content so that a third user can share his content. or As third user, click and hold the Button to use the Show me function of ClickShare. | |
| The ClickShare client software is not running. | Go to the ClickShare drive and run the software. | |
| Your screen is shown, but your audio is not playing on the meeting room audio system | Your audio signal on your PC is muted | Right click on the speaker icon and switch off the mute. |
| Audio system of the meeting room is not switched on | Switch on the audio system of the meeting room. | |
| When using separate audio, audio cable is not connected | Check audio connection between the Base Unit (audio out, green connector) and the audio system of the meeting room. | |
| Default speaker is not correctly set. | With a Button inserted, set ClickShare speaker as your default speaker. | |
| Buttons are not re-paired after changing the audio setting on the web interface | Re-pair the buttons. | |
| Audio setting on the web interface is not correctly set. | Consult your administrator to select the correct audio setting. | |
| Your content is removed from the display and the LEDs of your Button are blinking white. | Connection to the Base Unit has been lost. | ClickShare tries to restore the connection automatically. If this fails, the LEDs of the Button start blinking red. You should unplug the Button from your laptop and start a new. |
| Nothing is shown on the display at all. | The display is switched off. | Switch on the display. |
| Wrong input is selected. | Select the correct input. | |
| The display cable is not connected (correctly). | (Re)insert the display cable to the display and the Base Unit. | |
| The display does not recognize or is not able to display the Base Unit output resolution. | You or an administrator should change the corresponding setting via the web interface. | |
| The Base Unit is in standby mode. | Briefly push the standby button on the Base Unit or plug in a Button and run the ClickShare client software. | |
| The Base Unit is powered off. | Check if power adapter is connected to the Base unit and to the wall outlet. | |
| Wallpaper is disabled | If you connect a Button and start sharing, the content should be shown. | |
| After inserting the Button into your laptop, you cannot find the ClickShare drive. | No automatic refresh of drives. | Refresh the view on your laptop. |
| Bad connection at USB port on laptop. |
| |
| Windows tries to assign the ClickShare drive to an already reserved drive letter | Use Microsoft Windows Disk Management to assign it to a free drive letter. | |
| IT policy not mount USB drives | Contact your IT responsible. | |
| Some programs of Windows are not shown on the display. | Use of overlays, 3D or hardware acceleration in the GPU. |
|
Issues related to first time use and updating
| Problem | Cause | Solution |
| Ethernet cable is inserted, but the Base Unit does not receive an IP address | Fixed IP address not configured. 802.X authentication required | Contact your IT responsible |
| Update server not reachable | Proxy server to be configured. Firewall is blocking the connection | Contact your IT responsible |
| Buttons do not connect after first time installation | Buttons not paired | Please pair the Buttons by plugging them into the USB ports of the Base Unit. Manual pairing only needs to be done once, after this, the Buttons will be automatically updated when updating the Base Unit |
| Unable to connect to internet | No internet available at the customer's site | Contact your IT responsible |
Issues related to screen sharing (video/screen sharing)
| Problem | Cause | Solution |
| After inserting the Button into your laptop, you cannot find the ClickShare drive. | Bad connection at USB port on laptop | Reconnect to the USB port, try another USB port, or reboot your laptop. |
| Windows tries to assign the ClickShare drive to an already reserved drive letter | Use Microsoft Windows Disk Management to assign it to a free drive letter. | |
| Bad block on the mass storage | Please re-pair the Button with the Base Unit to restore the flash | |
| I cannot start the ClickShare App | Running 3rd party applications is blocked by IT | Contact your IT responsible. In the meantime, you can share your screen using your device's native protocols |
| You are using a Linux PC or ChromeBook | Use the device's native protocols to share on screen | |
| Button LEDs are blinking | Clickshare Application has not been started | Start the application on the ClickShare Button's mass storage or download and run the ClickShare Desktop App. |
| Screen is not shown when pressing the Button although Button LED is static white. | Already two people on screen | Long press the Button to kick off all other sources from screen. Or ask for somebody to remove its source from screen |
| Somebody is moderating the session | Request the moderator to put you on screen or claim the moderation role from the ClickShare application | |
| Your shared content becomes grayed out. | Connection between the ClickShare application (or Button) and the Base Unit is lost | ClickShare tries to restore the connection automatically. If this fails, the LEDs of the Button start blinking red. You should unplug the Button from your laptop and start a new |
| Button cannot connect to the Base Unit. Button LEDs keep spinning. | Button is not paired to correct Base Unit. | Pair the Buttons with the Base Unit. |
| Base Unit settings have changed and Button has not been paired again. | Pair the Buttons with the Base Unit. | |
| When network integrated, the Button cannot find the Base Unit. | IP address of the Base Unit has changed. | Pair the Buttons with the Base Unit. |
| The Button cannot connect to the Base Unit due to firewall settings. | Contact your IT responsible. | |
| Quality of the image displayed is not satisfactory. | Button is using a channel with high utilization. | Contact your IT responsible. |
| Base Unit antennas are obstructed. | Make sure no insulation or metal plating or a cage is placed around the Base Unit. If too far, place the Base Unit closer to the location of the Buttons. Preferably, have line of sight between Base Unit and Button. | |
| Low signal strength | Place the Base Unit closer to the location of the Buttons. Check the settings of the Base Unit to see if the power of the wireless signal has not been set too low. | |
| Laptop performance | If the video performance is acceptable with a higher performing laptop, laptop performance might be the cause of bad video playback. To reduce the load on the laptop, you can:
| |
| Some programs of Windows are not shown on the display. | Use of overlays, 3D or hardware acceleration in the GPU. | Disable overlays or hardware acceleration in the GPU. In Windows 7, disable AeroGlass. |
| Unable to share from extended desktop. | Mac OS | The Clickshare Extension pack only works with Windows. This feature is available to Mac users through Airplay. An alternative is to use the Window sharing functionality in the ClickShare Desktop App |
| Extension pack not installed | In order to have a second screen on your computer when using ClickShare, you will need to download and install the ClickShare extension pack. barco.com/clickshare/extensionpack | |
| Old Extension pack installed | ClickShare will only work with the latest version of the Extension Pack. Please uninstall the extension pack and install the latest version. barco.com/clickshare/extensionpack |
Issues related to screen sharing (audio of shared content)
| Problem | Cause | Solution |
| Your screen is shown, but your audio is not playing on the meeting room audio system. | Your audio signal on your PC is muted. | Right click on the speaker icon and switch off the mute. |
| Audio system of the meeting room is not switched on or not connected. | Switch on the audio system of the meeting room. Check audio connection between the Base Unit and the audio system of the meeting room. | |
| There is no ClickShare audio device for me to select on my computer. | Audio output of the Base Unit is not correctly configured. | Ask your administrator to configure audio of the Base Unit. |
| Audio device is not available in my OS when I plug in the Button after changing audio settings on my Base Unit. | Re-pair the Buttons with the Base Unit. | |
| ClickShare audio device is visible, but sound is coming out of my own device or other audio device connected to my computer. | Audio output of the Button is not selected. ClickShare speaker is not selected | In Windows, left click on the speaker icon and select the ClickShare Speaker. In Windows, right click on the |
| ClickShare speaker is not selected as default device. | In Windows, right click on the speaker icon and select "Playback devices". In the Playback tab, right click on the ClickShare Speaker and select as "Default device", on the ClickShare Speakerphone if available, right click and select as "Default communications device". | |
| Audio is heard in the room while not sharing on the big screen. | ClickShare speakerphone is selected as default device. | In Windows, right click on the speaker icon and select "Playback devices". In the Playback tab, right click on the ClickShare Speaker and select as "Default device", on the ClickShare Speakerphone if available, right click and select as "Default communications device". |
| Audio and video are not in sync. | ClickShare speakerphone is selected as audio device. | In Windows, left click on the speaker icon and select the ClickShare Speaker See also above for to select the ClickShare Speaker as default audio device. |
Symbol overview
The following icons are used in the manual:
 | Caution |
 | Warning |
| | Info, term definition. General info about the term |
| | Note: gives extra information about the described subject |
| | Tip: gives extra advice about the described subject |
Documents / ResourcesDownload manual
Here you can download full pdf version of manual, it may contain additional safety instructions, warranty information, FCC rules, etc.
Advertisement


Need help?
Do you have a question about the CX-50 and is the answer not in the manual?
Questions and answers