EMS AIR-FLOW MASTER Operating Instructions Manual
Hide thumbs
Also See for AIR-FLOW MASTER:
- Quick manual (128 pages) ,
- Operation instructions manual (118 pages) ,
- Instructions for use manual (43 pages)

Related Manuals for EMS AIR-FLOW MASTER


Summary of Contents for EMS AIR-FLOW MASTER
- Page 1 OPERATION INSTRUCTIONS MODE D'EMPLOI AIR-FLOW MASTER ® BEDIENUNGSANLEITUNG INSTRUCCIONES DE EMPLEO ISTRUZIONI PER L'USO BRUKSANVISNING...
- Page 2 3 4 5...
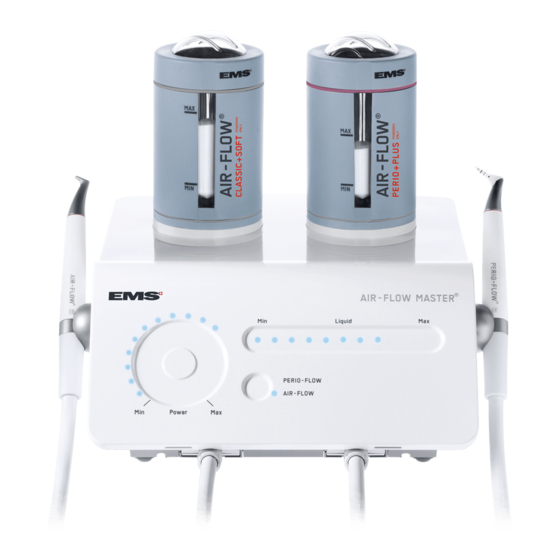
- Page 3 COMPONENTS COMPOSANTS BESTANDTEILE Control panel Panneau de contrôle Bedienfeld Power setting (air/powder) Réglage de puissance (air/poudre) Leistungseinstellung (Luft/Pulver) Sélecteur de mode de travail Einstellung Betriebsmodus Working mode selection Réglage de débit d'eau Regulierung Fliessgeschwindigkeit Wasser Connector for the handpiece cord Connecteur pour le cordon de la pièce à...
- Page 4 22 23 24 26 27...
- Page 5 "Packing list" shows exactly what your unit includes. votre appareil. EMS behält sich vor, im Zusammenhang mit techni- EMS reserves the right to modify the technique, acces- EMS se réserve le droit d’apporter à la technique, schen oder wissenschaftlichen Weiterentwicklungen, sories, operating instructions or contents of the set due aux accessoires, au mode d’emploi et au contenu de...
- Page 6 Les felicitamos por la adquisición de su nuevo Ci congratuliamo con voi per l’acquisto di questo Tack för att ni valde denna nya EMS produkt. producto EMS, el cual satisface las exigencias nuovo prodotto EMS. Esso soddisfa gli standard Den uppfyller högsta kvalitets- och säkerhetskrav.
- Page 7 Thank you for buying a new EMS product. It meets Nous vous félicitons de l'acquisition de ce nouveau Wir gratulieren Ihnen zum Kauf Ihres neuen the highest quality and safety standards. produit EMS. Il répond aux plus hautes exigences EMS-Produkts. Es erfüllt höchste Ansprüche an en matière de qualité...
- Page 8 El producto solamente se debe utilizar con los Questo prodotto dovrà essere utilizzato esclusi- Produkten får endast användas med pulver polvos suministrados por EMS para aplicación vamente con le polveri fornite da EMS per appli- levererade av EMS for subgingivala tillämpningar. subgingival. cazione subgengivale.
- Page 9 AIR-FLOW or PERIO-FLOW systems. Pour plus de détails concernant les traitements, Weitere Informationen über die Behandlung Please do not hesitate to contact your local EMS veuillez vous référer au mode d’emploi fourni entnehmen Sie sich bitte der Bedienungsanleitung dealer for further information.
- Page 10 Do not hesitate to des composant avant d’utiliser le ce produit. lesen Sie die ursprünglich mitgelieferte Bedie- contact your local EMS dealer for further infor- N’hésitez pas à contacter votre distributeur EMS nungsanleitungen jedes einzelnen Bauteils bevor mation.
- Page 11 No componente prima di utilizzare il prodotto. Non ningar. dude en ponerse en contacto con su distribuidor esitate a contattare il vostro distributore EMS per EMS para recabar mayores informaciones. Ha gärna denna bruksanvisning nära till hands. maggiori informazioni.
- Page 12 Var god och kontakta vår llame directamente a nuestro centro de reparación Chiamate direttamente il vostro centro assistenza EMS godkänt serviceställe eller med din fördelare. autorizado EMS o a su distribuidor. autorizzato EMS o il vostro distributore. Vi önskar Er lycka till! ¡Le deseamos mucho éxito!
- Page 13 Veuillez téléphoner direc- verständlich technische Unterstützung an. Bitte Please call directly your approved EMS repair center or your dealer. tement à votre centre de réparation agrée EMS kontaktieren Sie unsere EMS- Niederlassung oder ou à votre distributeur. Ihren EMS-Fachhändler.
-
Page 14: Table Of Contents
Connexion de la pédale Anschluss des „multifunction“-Fusspedals .. 4 foot pedal ............4 "multifunction" ..........4 Anschluss an ein zweites EMS-Gerät Connecting to a second EMS unit Connexion à un second appareil EMS (optional) ............6 (optional) ............6 (option) ............6 Anschluss des Gerätes an die... - Page 15 Conexión del pedal "multifunction" ....5 Collegamento del pedale Ansluta en "multifunction" pedal ....5 "multifunction" ..........5 Conexión de una segunda unidad EMS Ansluta till en annan EMS-enhet (opcional) ............7 Collegamento a una seconda unità EMS (tillval) ............7 (opzionale) ............
- Page 16 Garantie ............80 Accessories............ 80 Entsorgen des Produktes ......80 Accessoires ............ 80 EMS-Service ..........82 Garantie ............80 Service EMS ..........82 Symbols ............84 Zubehör ............80 Symboles ............84 Technical data ..........87 EMS-Service ..........82 Caractéristiques techniques ......87 Electromagnetic compatibility ......
- Page 17 Garanti ............81 Osservazioni sulla sicurezza ......75 Accesorios ............. 81 Tillbehör ............81 Conservazione del prodotto ......79 Servicio técnico EMS ........83 EMS Service ..........83 Smaltimento del prodotto ....... 81 Símbolos ............85 Symboler ............85 Garanzia ............81 ......
-
Page 18: Installation And Set Up
INSTALLATION AND INSTALLATION ET INSTALLIEREN UND SET UP BRANCHEMENT ANSCHLIESSEN „ “... - Page 19 INSTALACIÓN Y CONEXIÓN INSTALLAZIONE E INSTALLATION OCH COLLEGAMENTI ANSLUTNING...
-
Page 20: Connecting The "Multifunction" Foot Pedal
„ “-... -
Page 22: Connecting To A Second Ems Unit (Optional)
The AIR-FLOW MASTER can be connected to L'AIR-FLOW MASTER peut être connecté à un Der AIR-FLOW MASTER kann mit einem another compatible EMS device, so both devices autre appareil EMS compatible, ce qui permet anderen kompatiblen EMS-Gerät verbunden can be operated using a single foot pedal. A d’utiliser une unique pédale de commande. -
Page 23: "Multi-Function
El AIR-FLOW MASTER se puede conectar a AIR-FLOW MASTER può essere collegato a un AIR-FLOW MASTER kan anslutas till en annan otro dispositivo EMS compatible, por lo tanto altro dispositivo EMS compatibile, in modo che kompatibel EMS apparat, så att båda appara-... -
Page 24: Connecting The Unit To The Water Supply
Connect the unit to a water supply with the original Brancher l'appareil à l'alimentation d'eau avec le Schliessen Sie das Gerät ausschliesslich mit dem EMS water hose supplied with your product. tuyau d'eau EMS fourni avec votre produit. original EMS-Wasserschlauch an die Festwas- serversorgung an. - Page 25 Collegate l'apparecchio all’alimentazione d’acqua Anslut enheten till vattenförsörjning med den con la manguera de alimentación de agua original original EMS vattenslang som levererades med EMS. din produkt.
-
Page 26: Connecting The Unit To The Compressed Air Supply
5.5 - 7.5 80 - 109 550 - 750 Check that the supply pressure of Prüfen Sie, dass der Versorgungsdruck der comprimé ne dépasse pas la valeur spécifiée Druckluft den auf dem Gerät angegebenen Wert value (mentioned on the unit). (mentionnée sur l'appareil). - Page 27 Utilizzate esclusivamente aria compressa secca Compruebe que la presión de suministro Kontrollera att tryckluftens tryck inte de aire comprimido no excede del valor descrito Controllate che la pressione d’alimenta- en el equipo. zione dell’aria compressa non superi il valore indicato sull'apparecchio.
-
Page 28: Connecting The Unit To The Mains Power
100-240 VAC 50-60Hz To prevent damage to the unit, check that its Pour éviter d'endommager l'appareil, Die Nennspannung des Geräts muss mit rated voltage corresponds to the local line voltage. der örtlichen Versorgungsspannung überein- à la tension secteur de votre cabinet. stimmen. - Page 29 Compruebe que la tensión nominal del Per evitare danni all’apparecchio, controllare Undvik att skada enheten genom att aparato coincide con la tensión de la red de su che la tensione nominale dell’apparecchio corri- kontrollera att dess märkspänning stämmer consulta, puesto que de lo contrario el aparato sponda alla tensione di alimentazione disponibile.
-
Page 30: Electrical Safety Precautions
To avoid the risk of electric shock, this Pour éviter le risque de choc électrique, Dieses Gerät darf nur an eine Netzsteckdose equipment must only be connected to a supply cet équipement doit seulement être connecté au mit Schutzerde angeschlossen werden, um das mains with protective earth. - Page 31 Para evitar el riesgo de electrocución, Per evitare il rischio di scosse elettriche, För att undvika elektrisk stöt får denna conecte este equipo únicamente a una red eléctrica l'apparecchio deve essere collegato esclusiva- utrustning endast anslutas till en jordad nätkontakt. con enlace a tierra.
-
Page 32: Connecting The Cords And Placing The Handpiece Supports
Check that the cords are fully dry before connecting Vergewissern Sie sich, dass die Schläuche to the unit. connexion à l'appareil. vollkommen trocken sind, bevor Sie sie an das Gerät anschliessen. Place the magnetic handpiece holder only on the Placer le support magnétique de la pièce à main metallic part of the unit or the furniture. - Page 33 Compruebe que las mangueras están totalmente Kontrollera att slangarna är helt torra innan de secas antes de conectarlas a la unidad. cavi siano completamente asciutti. ansluts till enheten. Collocate il supporto magnetico del manipolo solo Placera den magnetiska handstyckshållaren Coloque el soporte magnético del mango sólo sulle parti metalliche dell’unità...
-
Page 34: Powder Chambers
AIR-FLOW CLASSIC+SOFT ® Es gibt zwei verschiedene Pulverkammern mit je There are two powder chambers having each a Il existe deux versions de chambre à poudre avec The AIR-FLOW CLASSIC+SOFT powder D i e A I R - F L O W C L A S S I C + S O F T- L a c h a m b r e à... - Page 35 AIR-FLOW PERIO+PLUS ® Esistono due vani della polvere, ciascuno dotato Hay dos cámaras de polvo y cada una tiene tiene en särskild spridare. I l v a n o d e l l a p o l v e r e A I R - F L O W L a c á...
-
Page 36: Supragingival Treatment Using The Air-Flow Classic+Soft Powder Chamber
SUPRAGINGIVAL TREATMENT TRAITEMENT SUPRAGINGIVAL SUPRAGINGIVALE BEHANDLUNG USING THE AIR-FLOW AVEC LA CHAMBRE À POUDRE UNTER VERWENDUNG DER CLASSIC+SOFT POWDER AIR-FLOW CLASSIC+SOFT- AIR-FLOW CLASSIC+SOFT CHAMBER PULVERKAMMER AIR-FLOW CLASSIC+SOFT ® D i e A I R - F L O W C L A S S I C + S O F T- The AIR-FLOW CLASSIC+SOFT powder L a c h a m b r e à... - Page 37 TRATAMIENTO SUPRAGINGIVAL TRATTAMENTO SUPRAGINGIVAL BEHANDLING CON LA CÁMARA DE POLVO SOPRAGENGIVALE UTILIZZANDO MED AIR-FLOW CLASSIC+SOFT- IL VANO DELLA POLVERE AIR-FLOW CLASSIC+SOFT PULVERKAMMAREN AIR-FLOW CLASSIC+SOFT CLASSIC PERIO CLASSIC COMFORT SOFT PLUS AIR-FLOW HANDPIECE ® AIR-FLOW POWDERS ® L a c á m a r a d e p o l v o A I R - F L O W Il vano della polvere AIR-FLOW deve AIR-FLOW-pulverkammaren får endast CLASSIC+SOFT solo debe utilizarse en trata-...
-
Page 38: Supragingival Treatment Using The Air-Flow Perio+Plus Powder Chamber
SUPRAGINGIVAL TREATMENT TRAITEMENT SUPRAGINGIVAL SUPRAGINGIVALE BEHANDLUNG USING THE AIR-FLOW AVEC LA CHAMBRE À POUDRE UNTER VERWENDUNG DER PERIO+PLUS POWDER CHAMBER AIR-FLOW PERIO+PLUS- AIR-FLOW PERIO+PLUS PULVERKAMMER AIR-FLOW PERIO+PLUS ® The AIR-FLOW PERIO+PLUS powder L a c h a m b r e à p o u d r e A I R - F L O W D i e A I R - F L O W P E R I O + P L U S - chamber can be used for supragingival treatments PERIO+PLUS peut être utilisée pour les trait-... - Page 39 TRATAMIENTO SUPRAGINGIVAL TRATTAMENTO SUPRAGINGIVAL BEHANDLING CON LA CÁMARA DE POLVO SOPRAGENGIVALE UTILIZZANDO MED AIR-FLOW PERIO+PLUS- IL VANO DELLA POLVERE AIR-FLOW PERIO+PLUS PULVERKAMMAREN AIR-FLOW PERIO+PLUS CLASSIC PLUS CLASSIC COMFORT SOFT AIR-FLOW HANDPIECE ® La cámara de polvo AIR-FLOW PERIO+ Il vano della polvere AIR-FLOW PERIO+ AIR-FLOW PERIO+PLUS-pulverkammaren PLUS se puede utilizar en tratamientos suprag- PLUS è...
-
Page 40: Subgingival Treatment Using The Air-Flow Perio+Plus Powder Chamber
SUBGINGIVAL TREATMENT USING TRAITEMENT SOUS-GINGIVAL SUBGINGIVALE BEHANDLUNG THE AIR-FLOW PERIO+PLUS AVEC LA CHAMBRE À POUDRE UNTER VERWENDUNG DER AIR-FLOW PERIO+PLUS- POWDER CHAMBER AIR-FLOW PERIO+PLUS PULVERKAMMER AIR-FLOW PERIO+PLUS ® For a subgingival treatment with the Für eine subgingivale Behandlung mit Pour un traitement sous-gingival avec la AIR-FLOW PERIO+PLUS powder chamber use der AIR-FLOW PERIO+PLUS-Pulverkammer chambre à... - Page 41 TRATAMIENTO SUBGINGIVAL CON TRATTAMENTO SOPRAGENGIVALE SUBGINGIVAL BEHANDLING LA CÁMARA DE POLVO AIR-FLOW UTILIZZANDO IL VANO DELLA MED AIR-FLOW PERIO+PLUSPULVERKAMMAREN PERIO+PLUS POLVERE AIR-FLOW PERIO+PLUS PERIO CLASSIC 4 mm MAXI CLASSIC CLASS AIR-FLOW HANDPIECE ® OMFORT PLUS SOFT PERIO & PLUS POWDERS PERIO-FLOW HANDPIECE ®...
-
Page 42: Powder Choice
CLASSIC CLASSIC COMFORT PLUS SOFT AIR-FLOW ® CLASSIC+SOFT POWDER CHAMBER AIR-FLOW ® PERIO+PLUS POWDER CHAMBER SUPRAGINGIVAL Die Pulver, die für die AIR-FLOW T h e p o w d e r s c o m p a t i b l e w i t h t h e Les poudres compatibles avec la chambre CLASSIC+SOFT-Pulverkammer bestimmt sind, AIR-FLOW CLASSIC+SOFT powder chamber... - Page 43 PERIO PLUS AIR-FLOW PERIO+PLUS POWDER CHAMBER ® SUBGINGIVAL Los polvos compatibles con la cámara de Le polveri compatibili con la camera De pulver som är kompatibla med polvo AIR-FLOW CLASSIC+SOFT solo puede della polvere AIR-FLOW CLASSIC+SOFT sono AIR-FLOW CLASSIC+SOFT-pulverkammaren utilizarse en tratamientos supragingivales. utilizzabili esclusivamente per itrattamenti sopra- får endast användas för supragingival behandling.
-
Page 44: Filling The Powder Chambers
Um ein Verstopfen des Gerätes zu remplir les chambres à poudre au-dessus de la vermeiden, füllen Sie das Pulver in der Pulver- Use only powder provided by EMS and ligne "Max". kammer bitte nur bis zur roten Linie „Max“. corresponding to the application. - Page 45 än till ”Max”-linjen. non riempire il vano per la polvere al di sopra della la cámara de polvo por encima de la línea roja Använd endast pulver från EMS och som linea "Max". "Max". motsvarar tillämpningen.
- Page 46 A set of interchangeable colored rings is provided Un set d'anneaux interchangeables de couleur Ein Satz austauschbarer farbiger Ringe wird mitge- to help recognize the chosen powder flavors. est fourni pour aider à reconnaître les arômes de liefert, der Ihnen die Erkennung der gewählten Please refer to the information provided in the poudre choisis.
- Page 47 Se suministra un juego de anillos coloreados inter- Un kit di anelli colorati intercambiabili è fornito En uppsättning inbördes utbytbara, färgade ringar cambiables para ayudarle a reconocer los sabores quale aiuto per riconoscere il gusto delle polveri tillhandahålls för att göra det lättare att känna de los polvos que ha seleccionado.
-
Page 48: Preparing For Treatment
PREPARING FOR TREATMENT PRÉPARATION POUR LE VORBEREITEN FÜR DIE TRAITEMENT BEHANDLUNG For further details concerning the use of the Pour plus de détails concernant l’utilisation de Weitere Informationen über die verschie- handpiece, please refer to the operating instruc- la pièce à main, veuillez vous référer au mode denen Anwendungen und die Behandlung des tions of the AIR-FLOW systems. - Page 49 PREPARACIÓN PARA EL PREPARATIVI PER IL FÖRBEREDELSE FÖR TRATAMIENTO TRATTAMENTO BEHANDLING CLICK Hallará información más detallada referente a Per ulteriori informazioni sull’uso del manipolo, Ytterligare information om handhavande av la utilización del mango en las instrucciones de consultare le istruzioni d’uso dei sistemi handstycke finns i den bruksanvisning som empleo de los sistemas AIR-FLOW.
-
Page 50: Installing The Nozzle And Connecting The Perio-Flow Handpiece
Pour plus de détails concernant l’utilisation de Weitere Informationen über die verschie- For further details concerning the use of the la pièce à main, veuillez vous référer au mode denen Anwendungen und die Behandlung des handpiece please refer to the operating instruc- d’emploi du système PERIO-FLOW. - Page 51 PERIO-FLOW CLICK Hallará información más detallada referente a Per ulteriori informazioni sull’uso del manipolo, Ytterligare information om handhavande av la utilización del mango en las instrucciones de consultare le istruzioni d’uso dei sistemi PERIO- handstycke finns i den bruksanvisning som empleo de los sistemas PERIO-FLOW.
-
Page 52: Operating The Unit
OPERATING THE UNIT When the unit is switched on, the control lamps Lors de la mise sous tension de l’appareil, les Beim Einschalten des Geräts leuchten die lights up and the powder chambers are under voyants lumineux s’allument et les chambres à Kontrolllampen auf und die Pulverkammer steht pressure. - Page 53 MANEJO DEL APARATO Cuando se conecta la unidad, el indicador Quando apparecchio è acceso, le spie di funzio- När enheten är påslagen tänds kontrollamporna luminoso se enciende y la cámara de polvo se namento si accendono e i vani per la polvere sono och pulverkamrarna trycksätts.
-
Page 54: Fonctions Des Pédales
Air/water spray Jet d'air/eau Luft-/Wasser-Strahl Pulverización de aire/agua Spruzzo aria/acqua Luft-/vattensprej Air/water/powder spray Jet d'air/eau/poudre Luft-/Wasser-/Pulver-Strahl Pulverización de aire/agua/polvo Spruzzo aria/acqua/polvere Luft-/vatten-/pulversprej... - Page 55 AIR-FLOW mode Pulverización de Luft-/vattensprej Air/Water spray Jet d'Air/Eau Luft-/Wasser-Strahl Spruzzo aria/acqua aire/agua Jet d' Spruzzo aria Air/Water/Powder Luft-/Wasser-/ Pulverización de Luft-/vatten-/ Air/Eau/Poudre Pulver-Strahl /acqua/polvere pulversprej spray aire/agua/polvo Air seul Nur Luft Sólo aire Solo aria Air only Endast luft „Boost“- Función Funzione "Boost"*...
-
Page 56: Working Mode Selection
In PERIO-FLOW mode, the available air pressure En mode PERIO-FLOW, la pression d'air dispo- Im PERIO-FLOW-Modus ist der verfügbare is reduced compared to AIR-FLOW mode. nible est réduite par rapport au mode AIR-FLOW. Luftdruck im Vergleich zum AIR-FLOW-Modus reduziert. In PERIO-FLOW mode, one beep is generated En mode PERIO-FLOW, un bip est émis toute les every 5 seconds (recommended duration per 5 secondes (durée recommandées par poche à... - Page 57 En el modo PERIO-FLOW, la presión neumática In modalità PERIO-FLOW, la pressione dell’aria I läget med PERIO-FLOW är det potentiella disponible está reducida en comparación con el disponibile è inferiore rispetto a quella della lufttrycket lägre än i läget med AIR-FLOW. modo AIR-FLOW.
-
Page 58: Perio-Flow Mode Detection
The PERIO-FLOW mode is automatically selected Le mode PERIO-FLOW est sélectionné automati- Der PERIO-FLOW-Modus wird automatisch when the handpiece used with the AIR-FLOW quement dès que la pièce à main utilisée avec la ausgewählt, wenn das Handstück, das mit PERIO+PLUS powder chamber is lifted from its chambre à... - Page 59 PERIO-FLOW E l m o d o P E R I O - F L O W s e s e l e c c i o n a La modalità PERIO-FLOW viene automaticamente PERIO-FLOW-läge känns av automatiskt när automáticamente cuando el mango usado con selezionata quando il manipolo utilizzato con il den handstycke som används med AIR-FLOW la cámara de polvo AIR-FLOW PERIO+PLUS se...
-
Page 60: Setting The Air/Powder Flow Rate
The adjustments can be obtained either by sliding Les réglages peuvent être obtenus soit en glissant, Die Einstellung kann durch Verschieben oder Platzieren des Fingers auf dem sensiblen soit en plaçant le doigt sur la zone sensible. Placer Bereich erreicht werden. Den Finger direkt an le doigt directement à... - Page 61 Se puede ajustar deslizando o colocando el dedo Le regolazioni si possono ottenere facendo Inställning kan göras med hjälp av skjutreglaget en la zona sensible. Una alternativa de ajuste scorrere o collocando le dita sulla zona sensibile. rápido es colocar el dedo directamente en la Un’alternativa per l’impostazione rapida è...
-
Page 62: Setting The Water Flow Rate
Information regarding how to use and adjust the Vous trouverez les informations précises sur le Informationen zur Verwendung und Einstellung water/air setting can be found in the operation maniement et réglage eau/air dans les modes instructions of the AIR-FLOW systems. d'emploi des systèmes AIR-FLOW. -
Page 63: Ajuste Del Caudal De Agua
Información referente al uso y ajuste de la Le informazioni inerenti alla modalità d’uso e di Information om hur inställningen för vatten/luft regulación del agua/aire, se puede encontrar regolazione delle impostazioni acqua/aria sono en las instrucciones de utilización del sistema reperibili nel manuale d’uso dei sistemi AIR-FLOW. -
Page 64: Before Using The Unit
Air/water/powder spray Jet d'air/eau/poudre Luft-/Wasser/Pulver-Strahl Pulverización de aire/agua/polvo Spruzzo aria/acqua/polvere Luft-/vattensprej/pulversprej After refilling the powder chamber it is Après le remplissage de la chambre à Nach dem Auffüllen der Pulverkammer recommanded to ensure that the equipment is poudre, il est recommandé de faire marcher empfiehlt es sich, den einwandfreien Betrieb functioning. -
Page 65: Innan Du Använder Enheten
Vi rekommenderar att du kontrollerar Dopo il riempimento del vano della polvere, Después de rellenar la cámara de polvo att utrustningen fungerar efter påfyllning av se recomienda comprobar el funcionamiento si raccomanda di accertarsi del funzionamento pulverkammaren. Gör ett test över ett handfat. del equipo. -
Page 66: Purge Switch And Mode
The purge switch allows to depressurize the Le bouton de purge permet de dépressuriser les Mit dem Reinigungsschalter kann der Druck in powder chambers for safe removal. It also controls den Pulverkammern herabgesetzt werden, so the "purge" function (see following pages). sécurité. -
Page 67: Interruptor De Purga Y Modo
L’interruttore di scarico consente di depres- Med tömningsbrytaren kan trycket minskas i El interruptor de purga permite despresurizar las surizzare i vani per la polvere consentendone pulverkamrarna så att det är säkert att ta bort cámaras de polvo para permitir desmontarlas con la rimozione in sicurezza. -
Page 68: Powder Exchange Or Refill
Do not remove or open the powder Ne pas enlever ou ouvrir les chambres à Entfernen oder öffnen Sie die Pulver- chambers when they are under pressure. poudre lorsque elles sont sous pression. kammern nicht, wenn sie unter Druck stehen. Press once on the purge switch to release the air Appuyer une fois sur le bouton de purge pour vider Drücken Sie ein Mal auf den Reinigungsschalter,... -
Page 69: Cambio O Recarga De Polvo
CLICK No retire ni abra las cámaras de polvo Non rimuovere né aprire i vani per la polvere Avlägsna inte eller öppna pulverkammare mientras están a presión. sotto pressione. då de är trycksatta. Pulse una vez el interruptor de purga para evacuar Premere una volta l’interruttore di scarico per Tryck en gång på... -
Page 70: End Of The Treatment
END OF THE TREATMENT FIN DU TRAITEMENT BEENDEN DER BEHANDLUNG Entfernen Sie die Pulverkammern und bewahren Enlever les chambres à poudre avant d'éteindre Remove the powder chambers before switching Sie sie an einem trockenen Ort auf, bevor Sie das l'appareil et les ranger dans un endroit sec. the unit off and store them in a dry place. -
Page 71: Fin Del Tratamiento
FIN DEL TRATAMIENTO FINE DEL TRATTAMENTO AVSLUTA BEHANDLINGEN Antes de apagar el aparato retire las cámaras de Prima di spegnere l’unità, rimuovere i vani per la Avlägsna pulverkamrarna innan enheten stängs polvo y guárdelas en un lugar seco. polvere e deporli in un luogo asciutto. av och förvara dessa på... -
Page 72: Cleaning, Disinfecting And Sterilizing
STERILIZING ET STÉRILISATION STERILISIEREN Please conform to the recommendations of Veuillez vous conformer aux recommanda- Halten Sie sich bitte in Bezug auf die the Reprocessing Instructions manual delivered tions contenues dans le manuel "Reprocessing Reinigung, die Desinfektion, die Sterilisation und with your product regarding procedure of cleaning, Instructions"... -
Page 73: Limpieza, Desinfección Y Esterilización
ESTERILIZACIÓN STERILIZZAZIONE OCH STERILISERING Se debe realizar según las recomenda- Attenetevi alle raccomandazioni contenute Följ rekommendationerna i den "Repro- ciones que se indican en el manual "Reprocessing nel manuale "Reprocessing Instructions", fornito cessing Instructions" som medföljer produkten Instructions", que se adjunta al equipo, en el insieme al prodotto, per quanto riguarda la que se abordan los procedimientos de limpieza, procedura di pulizia, disinfezione, sterilizzazione... -
Page 74: Cleaning The Dome
Disassemble the dome to facilitate cleaning. Démonter la coupole pour faciliter le nettoyage. Lösen Sie die Kuppel des Schraubverschlusses für die Reinigung aus dem Ring heraus. Regularly clean and disinfect the cap. Nettoyer et désinfecter régulièrement le bouchon. Reinigen und desinfizieren Sie den Schraub- The ribs of the dome must be aligned Les nervures de la coupole doivent être verschluss regelmäßig. -
Page 75: Limpieza De La Cúpula
CLICK Desmontar la tapa para facilitar la limpieza. Smontare il cupolino per facilitare la pulitura. Demontera kåpan för att lättare kunna göra rent. Limpie y desinfecte regularmente la tapa. Pulire e disinfettare regolarmente il tappo. Le nervature del cupolino devono essere Kåpans flänsar måste passas in med alinearse con los de la corona roscada. -
Page 76: Cleaning The Powder Chamber
Dévisser la coupole et extraire le diffuseur à Schrauben Sie die Kuppel ab und nehmen Sie Unscrew the dome and pull out the powder poudre. den Pulververteiler heraus. diffuseur. Die Pulverkammer muss regelmäßig gereinigt Nettoyer régulièrement cette pièce. Regularly clean this part. werden. -
Page 77: Limpieza De La Cámara De Polvo
Desatornille la cúpula y extraiga el difusor del Skruva loss kåpan och dra ut pulverspridaren. Svitare il cupolino ed estrarre il diffusore della polvo. polvere. Rengör den här komponenten regelbundet. Limpie regularmente esta pieza. Pulire regolarmente questo elemento. Kåpan och pulverspridaren måste vara La tapa y el difusor del polvo deben estar absolut torra innan de monteras igen. -
Page 78: Maintenance
MAINTENANCE MAINTENANCE WARTUNGSARBEITEN Check the condition of the threads on the Contrôler l’état des pas-de-vis de la Überprüfen Sie den Zustand des Gewindes powder chamber and cap. The powder chamber chambre à poudre et du bouchon. Tout au long der Pulverkammer und des Schraubverschlusses. is pressurized during use. -
Page 79: Mantenimiento
MANTENIMIENTO MANUTENZIONE UNDERHÅLL Compruebe el estado de la rosca de la Kontrollera i vilket skick gängorna på cámara de polvo y de la tapa. Durante el trata- per la polvere e del tappo. Il vano per la polvere è pulverkammaren och locket är. Pulverkammaren miento, la cámara de polvo está... -
Page 80: O- Ring
If an O-ring is damaged or worn out, it must Si un joint torique est endommagé ou usé, Sollte ein O-Ring beschädigt oder be replaced immediately. il doit être remplacé immédiatement. verschlissen sein, muss er sofort ersetzt werden. -
Page 81: Juntas Tóricas
Se un anello di tenuta è danneggiato o Skadad eller sliten O-ring måste omedelbart ser substituida inmediatamente. consumato, deve essere sostituito immediata- bytas. mente. -
Page 82: Valve Assembly
VERSION 1 Valve assembly Assemblage Clapet Ventilbaugruppe Válvula Valvola Ventilen VERSION 2 Wenn das Ventil beschädigt oder abgenutzt Si la clapet est endommagé ou usé, il doit If the valve is damaged or worn out, it must ist, muss es sofort ersetzt werden. être remplacé... -
Page 83: Válvula
Valve + O-ring Clapet + joint torique Ventil + O-Ring Válvula + junta tórica Valvola + anelli di tenuta Ventilen + O-ring CLICK Se la valvola è danneggiata o usurata, deve Om ventilen är skadad eller utsliten måste debe sustituirse inmediatamente. essere immediatamente sostituita. -
Page 84: Replacing The O-Rings Of The Connectors
Use only plastic tweezers to remove the Utiliser uniquement des brucelles en Verwenden Sie zum Entfernen des O-ring of the powder chamber holders. plastique pour enlever le O-ring des supports de O-Rings an den Halterungen der Pulverkammer chambres à poudre. ausschliesslich eine Kunststoffpinzette. -
Page 85: Cambio De Las Juntas Tóricas En Los Conectores
Utilice exclusivamente unas pinzas de Använd endast plastpincett för att ta bort Rimuovere gli anelli di tenuta della base plástico para retirar la junta tórica de los soportes dei vani per la polvere utilizzando solamente delle pulverkamrarnas o-ringar. de las cámaras de polvo. pinzette di plastica. -
Page 86: Replacing The Water Filter And The Fuses
Contrôler régulièrement le filtre. Nettoyer ou Der Filter muss regelmäßig kontrolliert, gereinigt und erforderlichenfalls ausgewechselt werden. Replace exclusively with the type of fuse Remplacer uniquement par le type de Ersetzen Sie die Sicherung ausschliesslich indicated on the back of the unit. fusible mentionné... -
Page 87: Sostituzione Del Filtro Dell'acqua E Dei Fusibili
Compruebe el filtro con regularidad, si fuera se necessario. Reemplazar únicamente por el mismo Sostituite i fusibili esclusivamente con il tipo Byt endast till säkring av den typ som anges tipo de fusible indicado en el panel posterior del indicato sul retro dell’unità. på... -
Page 88: Air Filter
Der Filter muss regelmäßig kontrolliert und gereinigt werden. Die Luftfilter können nicht wiederverwendet werden. Montieren Sie immer einen neuen EMS-Filter. -
Page 89: Cambio Del Filtro De Agua Y De Los Fusibles 71 Filtro De Aire
Controllare e spurgare regolarmente il filtro dell’aria. -
Page 90: Safety Precautions
SAFETY PRECAUTIONS REMARQUES CONCERNANT LA SICHERHEITSHINWEISE SÉCURITÉ EMS and the dealer of this product accept no EMS et le distributeur de ce produit ne peuvent EMS und der Vertreiber dieses Produktes haften liability for direct or consequential injury or damage être tenus responsables d’éventuels préjudices... -
Page 91: Consejos De Seguridad
CONSEJOS DE SEGURIDAD OSSERVAZIONI SULLA SICUREZZA EMS y los distribuidores de este producto no EMS e il distributore di questo prodotto declinano EMS och distributören av denna produkten tar ogni responsabilità per lesioni o danni diretti o inte på sig ansvaret för varken direkt eller indirekt e indirectos derivados del uso o manipulación... - Page 92 Vérifier avant chaque traitement que le Überprüfen Sie Ihr Produkt vor jeder be replaced. Use original EMS spare parts and produit ne présente pas de défauts. Un accessoire Behandlung auf Schäden. Beschädigtes Zubehör accessories only.
- Page 93 CSA (Canadian Standard Association) non Standard Association) har inte undersökt andra fysiologiska effekter. Le polveri fornite da EMS sono progettate De pulver som tillhandahålls av EMS är para utilizarse con el aparato. No utilizar un polvo appositamente per essere utilizzate con questa särskilt utvecklade för att användas med enheten.
-
Page 94: Storing The Product
STORING THE PRODUCT ENTREPOSAGE DU PRODUIT AUFBEWAHREN DES PRODUKTES Keep the original packaging until the Conserver l’emballage d’origine jusqu’à la Bewahren Sie die Originalverpackung bis product is to be disposed of permanently. It can mise au rebut du produit. Il peut ainsi être utilisé zur endgültigen Entsorgung Ihres Produktes auf. -
Page 95: Almacenaje Del Producto
ALMACENAJE DEL PRODUCTO CONSERVAZIONE DEL FÖRVARING AV PRODUKTEN PRODOTTO Le aconsejamos conserve el embalaje Si consiglia di conservare l’imballaggio Behåll originalförpackningen tills produkten original hasta el momento de deshacerse de originale fino allo smaltimento definitivo del skall kasseras permanent. Förpackningen kan su producto. -
Page 96: Product Disposal
Abfall aus elektrischen und elektronischen belonging to customers located in the European Geräten im Besitz von Kunden in der Europäi- Union may be shipped to EMS for recycling in l'Union Européenne peuvent être envoyés à EMS schen Union können gemäß der WEEE-Richtlinie pour être recyclés en accord avec la directive... -
Page 97: Eliminación Del Producto
Uso (WEEE) appartenente a clienti residenti nella elektroniska produkter (WEEE – Waste Electrical nicos (RAEE) que pertenezcan a clientes que se UE potrà essere spedita a EMS per il riciclaggio and Electronic Equipment) som tillhör kunder inom encuentren en la Unión Europea pueden enviarse in conformità... -
Page 98: Ems-Service
When sending your product directly to the En cas d’expédition directe du produit vers votre Bei Direktversand des Produkts an das von EMS approved EMS repair center, please include the centre de réparation agréé EMS, indiquez le nom autorisierte Reparaturzentrum geben Sie bitte den Namen Ihres Händlers an. -
Page 99: Servicio Técnico Ems
Antes de enviar su producto junto con todos accessori Inclusi, puliteli, disinfettateli e steriliz- Om Ni skickar produkt direkt till ett av EMS godkänt sus accesorios, limpie, desinfecte y esterilice todo zateli come descritto nelle istruzioni d’uso. -
Page 100: Symbols
SYMBOLS SYMBOLES SYMBOLE Read the operation instructions Ver instrucciones de empleo Manufacturer’s logo Logotipo del fabricante Veuillez lire le mode d’emploi Logo du fabriquant Leggere le istruzioni per l’uso Logo del produttore Hersteller-Logo Tillverkarens logotype Siehe Bedienungsanleitung Läs bruksanvisningen ¡Precaución! Power switch "ON"... -
Page 101: Símbolos
SÍMBOLOS SIMBOLI SYMBOLER Fusible Without irrigation Sin irrigación Fuse Fusibile Sans irrigation Fusible Senza irrigazione Ohne Spülung Sicherung Säkring Utan spolning Irrigación Irrigation Irrigazione Irrigation Spolning Spülung Ajuste mínimo Minimum setting Réglage minimum Regolazione minima Minimum Einstellung Lägsta inställning "Power" adjustment function Función de ajuste "Potencia"... - Page 102 GOST R marking for products in conformance with Russian standards GOST R marquage pour les produits conformes aux exigences russes Marca GOST R para productos conformes con las normas rusas Marchio GOST R per prodotti in conformità con le normative russe GOST R-märkning produkter i enlighet med ryska standarder conformance with US standards US-Normen...
-
Page 103: Technical Data
TECHNICAL DATA CARACTÉRISTIQUES TECHNIQUES Manufacturer EMS SA, CH-1260 Nyon, Switzerland Fabriquant EMS SA, CH-1260 Nyon, Suisse Model AIR-FLOW MASTER ® Modèle AIR-FLOW MASTER ® - Classe I - Class I - Partie appliquée du Type BF - Applied part, Type BF... -
Page 104: Technische Daten
TECHNISCHE DATEN ESPECIFICACIONES TÉCNICAS Hersteller EMS SA, CH-1260 Nyon, Schweiz Fabricante EMS SA, CH-1260 Nyon, Suiza Modell AIR-FLOW MASTER ® Modelo AIR-FLOW MASTER ® - Klasse I - Clase I - Anwendungsteil Typ BF - Parte de aplicación tipo BF - IP 20 Gerät... -
Page 105: Dati Tecnici
DATI TECNICI TEKNISKA DATA Costruttore EMS SA, CH-1260 Nyon, Svizzera Tillverkare EMS SA, CH-1260 Nyon, Schweiz Modello AIR-FLOW MASTER ® Modell AIR-FLOW MASTER ® - Classe I - Klass I - Parte applicata del tipo BF - Tillämpad del, Typ BF... -
Page 106: Electromagnetic Compatibility
The use of accessories and cables L’utilisation d’accessoires ou de câbles Nähe bzw. auf oder unter einem anderen Gerät other than those specified or sold by EMS as unvermeidbar ist, muss die Funktionsweise des replacement parts may result in increased comme pièces de remplacement peut avoir... -
Page 107: Compatibilidad Electromagnética
COMPATIBILIDAD COMPATIBILITÀ ELEKTROMAGNETISK ELECTROMAGNÉTICA ELETTROMAGNETICA KOMPATIBILITETS Este producto necesita precauciones Questo prodotto richiede particolari precau- Denna produkt kräver särskild försiktighet especiales referentes a la compatibilidad electro- zioni riguardo alla compatibilità elettromagnetica avseende elektromagnetisk kompatibilitet och magnética y necesita ser instalado y puesto en e deve essere installato e messo in funzione måste installeras och sättas igång enligt anvis- servicio según la guía "Compatibilidad electro-... -
Page 108: Troubleshooting
• Replace the handpiece • Replace the handpiece cord • Send the handpiece and the handpiece cord to an authorized EMS Repair Center No water jet coming from the handpiece • • Check the water adjustment of your unit •... - Page 109 Check the condition of the handpiece connecting O-rings cord and the handpiece • Send the system and the handpiece cord to an authorized EMS Repair Center Water leakage between the handpiece • Verify the position of the nozzle and its position on the handpiece and the nozzle •...
-
Page 110: Mesures À Prendre En Cas D'incident
Remplacer la pièce à main • Remplacer le cordon • Envoyer la pièce à main avec le cordon à un centre de réparation agrée EMS Aucun jet d’eau ne sort de la pièce à main • • Contrôler le réglage d'eau de votre appareil •... - Page 111 Contrôler l’état des joints du raccord de la pièce à main main et la pièce à main • Envoyer le système et le cordon de pièce à main à un centre de réparation agréé EMS Fuite d’eau entre la busette et la pièce à •...
-
Page 112: Fehlerbehebung
• Ersetzen Sie das Handstück • Ersetzen Sie den Handstückschlauch • Senden Sie das Handstück und den Handstückschlauch an ein von EMS autorisiertes Reparaturzentrum Es kommt kein Wasserstrahl aus dem • Handstück • Überprüfen Sie die Wassereinstellung Ihres Geräts •... - Page 113 Überprüfen Sie den Zustand der Anschluss-O-Ringe des Handstücks und dem Handstück tritt Wasser aus • Schicken Sie das System und den Schlauch des Handstücks zu Ihrem EMS-Fachhändler oder direkt an unsere EMS Niederlassung Zwischen dem Handstück und der Düse •...
-
Page 114: Medidas A Adoptar En Caso De Incidentes
• Cambie el mango • Cambie la manguera • Envíe el mango y la manguera a un Centro de reparación autorizado EMS No sale chorro de agua del mango • • Compruebe la regulación del agua de la unidad •... - Page 115 Fuga de agua entre la manguera y el • Compruebe el estado de las juntas tóricas de conexión del mango mango • Envíe el sistema y la manguera a un Centro de reparación autorizado EMS Fuga de agua entre el mango y la cánula • • •...
-
Page 116: Individuazione E Soluzione Dei Problemi
• • Sostituire il manipolo • Sostituire il cavo del manipolo • Inviare il manipolo e il relativo cavo a un Centro Assistenza EMS autorizzato Il getto d’acqua non fuoriesce dal • manipolo • • Controllare i collegamenti tra l’unità, il cavo e il manipolo •... - Page 117 Fuoriuscita d’acqua tra il cavo del • manipolo e il manipolo • Inviare il sistema e il cavo del manipolo a un Centro Assistenza EMS autorizzato Fuoriuscita d’acqua tra il manipolo e • Controllare la posizione dell’ugello e la sua posizione relativa sul manipolo l’ugello...
-
Page 118: Felsökning
• handstycken • Byt handstycke • Byt handstyckens slang • Skicka handstycke och handstyckens slang till av EMS auktoriserat serviceställe Ingen vattenstråle kommer ut ur • handstycken • Kontrollera enhetens inställning för vatten • Kontrollera anslutningarna mellan enhet, slang och handstycke •... - Page 119 Vattenläckage mellan handstyckens slang • Kontrollera skicket för O-ringarna i handstyckens anslutning och handstycke • Skicka systemet och handstyckens slang till av EMS auktoriserat serviceställe Vattenläckage mellan handstycke och • Kontrollera hur munstycket sitter och dess placering på handstycken munstycke •...
- Page 120 Fax +1 514 736 5065 Tél. +33 1 34 58 03 80 Fax +33 1 34 58 03 90 GERMANY ITALY EMS Electro Medical Systems Vertriebs GmbH EMS Italia S.r.l. Schatzbogen 86 Via Faravelli 5 Ch. de la Vuarpillière 31 D-81829 München...
Need help?
Do you have a question about the AIR-FLOW MASTER and is the answer not in the manual?
Questions and answers