
Related Manuals for Polycom VVX OBi Series


Summary of Contents for Polycom VVX OBi Series
- Page 1 USER GUIDE 6.4.0 | July 2019 | 3725-85476-003A ® ® Polycom Business IP Phones, OBi Edition...
- Page 2 Open Source Software Used in this Product This product may contain open source software. You may receive the open source software from Polycom up to three (3) years after the distribution date of the applicable product or software at a charge not greater than the cost to Polycom of shipping or distributing the software to you.
-
Page 3: Table Of Contents
Contents Before You Begin....................6 Audience, Purpose, and Required Skills................6 Related Documentation.......................6 Getting Started with Polycom VVX Business IP Phones, OBi Edition..7 Product Overview........................7 Overview of Phone Hardware and Keys................7 VVX 150 Hardware....................7 VVX 250 Hardware....................9 VVX 350 Hardware....................11 VVX 450 Hardware....................13... - Page 4 View Contact Information..................41 Edit a Contact......................41 Delete a Contact.....................41 Delete All Contacts....................41 Add Picture to a Contact..................42 Customize the Phone Book Display..................42 Contact Groups......................... 42 Add a Group......................42 Delete a Group....................... 42 Add Contact to a Group..................43 Polycom, Inc.
- Page 5 Connect to a Wireless Network..................53 Disconnect from a Wireless Network................53 Remove a Wireless Network.....................53 VVX Business IP Phone Settings..............54 Choose a Theme for Your Phone..................54 Set the Language......................55 Disable Call Waiting......................55 Time and Date Display...................... 56 Polycom, Inc.
- Page 6 Enable Pack Calls On Display................63 Disable Pack Calls On Display................64 Silencing the Phone Ringer....................64 Silence the Phone Ringer..................64 Phone Accessories..................65 Using a Headset with Your Phone..................65 Connecting a Headset....................65 Change the Preferred Audio Device................. 65 Change the Preferred Headset Device................66 Polycom, Inc.
- Page 7 Contents Electronic Hookswitch....................... 66 Enable Electronic Hookswitch................66 Disable Electronic Hookswitch................66 Polycom VVX EM50 Expansion Modules............67 VVX EM50 Expansion Module Hardware Features............67 Connect a VVX EM50 Expansion Module.................69 Connect an Additional VVX EM50 Expansion Module............70 Set a Speed Dial on Expansion Modules................70 Changing the Backlight Intensity on the Expansion Module..........
-
Page 8: Before You Begin
Before You Begin Topics: • Audience, Purpose, and Required Skills • Related Documentation The Polycom VVX Business IP Phones, OBi Edition User Guide contains overview information for ® ® navigating and performing tasks on Polycom Business IP Phones, OBi Edition. ®... -
Page 9: Getting Started With Polycom Vvx Business Ip Phones, Obi Edition
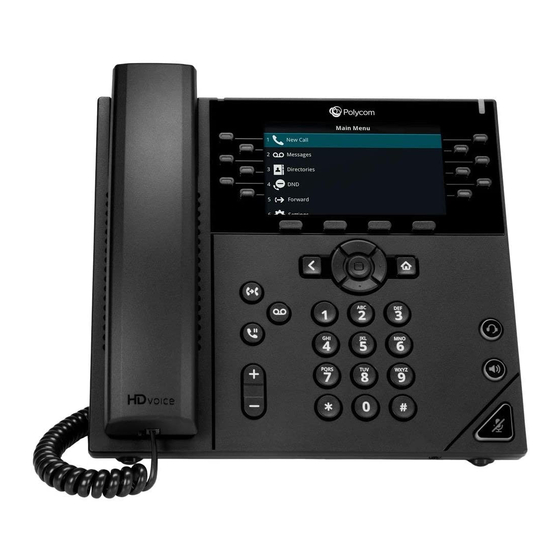
Additionally, the examples and graphics in this guide may not directly reflect available options or what your device screen displays. Product Overview Polycom VVX business IP phones, OBi Edition provides the following features and capabilities: • Placing and answering audio calls •... - Page 10 Getting Started with Polycom VVX Business IP Phones, OBi Edition Figure 1: VVX 150 hardware features VVX 150 Hardware Feature Descriptions Reference Feature Feature Description Number Line keys Enable you to select a phone line, view calls on a line, or quickly call a favorite contact.
-
Page 11: Vvx 250 Hardware
Getting Started with Polycom VVX Business IP Phones, OBi Edition Reference Feature Feature Description Number Speakerphone key Enables you to place and receive calls using the speakerphone. Headset key Enables you to place and receive calls through a headset. Home key... - Page 12 Getting Started with Polycom VVX Business IP Phones, OBi Edition Figure 2: VVX 250 hardware features VVX 250 Hardware Features Reference Feature Feature Description Number Line keys Enable you to select a phone line, view calls on a line, or quickly call a favorite contact.
-
Page 13: Vvx 350 Hardware
Getting Started with Polycom VVX Business IP Phones, OBi Edition Reference Feature Feature Description Number Speakerphone key Enables you to place and receive calls using the speakerphone. Headset key Enables you to place and receive calls through a headset. USB Port Enables you to attach a USB flash drive or USB headset. - Page 14 Getting Started with Polycom VVX Business IP Phones, OBi Edition Figure 3: VVX 350 hardware features VVX 350 Hardware Feature Descriptions Reference Feature Feature Description Number Line keys Enable you to select a phone line, view calls on a line, or quickly call a favorite contact.
-
Page 15: Vvx 450 Hardware
Getting Started with Polycom VVX Business IP Phones, OBi Edition Reference Feature Feature Description Number Dial pad Enables you to enter numbers, letters, and special characters. You can also use the dial pad keys to select menu items that have index numbers. - Page 16 Getting Started with Polycom VVX Business IP Phones, OBi Edition Figure 4: VVX 450 hardware features VVX 450 Hardware Feature Descriptions Reference Feature Feature Description Number Line keys Enable you to select a phone line, view calls on a line, or quickly call a favorite contact.
-
Page 17: Securing Your Phone With The Security Slot
Getting Started with Polycom VVX Business IP Phones, OBi Edition Reference Feature Feature Description Number Dial pad Enables you to enter numbers, letters, and special characters. You can also use the dial pad keys to select menu items that have index numbers. -
Page 18: Soft Keys
Getting Started with Polycom VVX Business IP Phones, OBi Edition • Line keys • Feature keys Soft Keys Soft keys display along the bottom of the screen. Each screen uses up to four soft keys. If a function requires more than four soft keys, you can view the remaining soft keys. - Page 19 Getting Started with Polycom VVX Business IP Phones, OBi Edition List of Feature Keys and Their Functions Feature Key Stages Feature Description Call Lets you make or receive a single call. There must be an available and Appearance idle call key to make or receive a new call.
- Page 20 Getting Started with Polycom VVX Business IP Phones, OBi Edition Feature Key Stages Feature Description BLF (Busy Monitor the call state of another extension. A BLF key must be bound to Lamp Field) a service. Monitored call events include: Ringing: at least one •...
- Page 21 Getting Started with Polycom VVX Business IP Phones, OBi Edition Feature Key Stages Feature Description Call Forward If the function is bound to a specific service, it's applied to incoming calls on that service only. Otherwise, it's applied system-wide to all incoming Off On calls.
-
Page 22: Navigating Vvx Business Ip Phones, Obi Edition
Getting Started with Polycom VVX Business IP Phones, OBi Edition Feature Key Stages Feature Description Hoteling This feature is also known as Hot Desking. The phone may be set up for temporary use by a guest, such as a visiting employee or temporary Logged Off worker. -
Page 23: Calls Screen
Getting Started with Polycom VVX Business IP Phones, OBi Edition » Press Home to access the home screen. Calls Screen The Calls screen displays one or more active calls on your phone. It displays automatically when you place or receive a call. Use it to manage calls currently in progress. -
Page 24: Icons And Status Indicators
Getting Started with Polycom VVX Business IP Phones, OBi Edition Icon Call State Description Available Operations LED Pattern Holding User has placed the call on hold. End, Resume, Add to Slow blinking red Conf., Transfer, Blind Transfer Ended Call failed due to various reasons, such... -
Page 25: Entering Characters
Getting Started with Polycom VVX Business IP Phones, OBi Edition Entering Characters The phone uses this dialog for user input with a short title that indicates the requested information. An example is Enter Admin Password. A text icon at the lower right bottom indicates the current input mode. The phone supports four input modes: •... -
Page 26: Logging In To Your Phone
Your administrator can set up the phone for a guest to temporarily use by assigning a feature key with the Hoteling function. Use the guest phone as your own extension until you log out manually or via a server- triggered logout. Procedure 1. Press the Hoteling feature key. Polycom, Inc. - Page 27 Logging In to Your Phone 2. Enter user credentials. Polycom, Inc.
-
Page 28: Audio Calls
• Lift the handset from the cradle, enter the number, and press the Dial soft key. • Enter a number using the dialpad, press the speakerphone button. • Enter a number using the dialpad, press the headset button. Polycom, Inc. - Page 29 You can edit a contact's number before dialing. This enables you to input star codes or other digit maps before placing the call. Procedure 1. Go to Contacts > Phone Book. 2. Select a contact. 3. Press the Edit Dial soft key. Polycom, Inc.
-
Page 30: Answering Calls
Press the line key of the assigned favorite you want to call. The call is placed and is displayed on your phone's screen. Related Links Polycom VVX EM50 Expansion Modules on page 67 Answering Calls When you receive an incoming call, you can choose to answer the call in various ways, including answering calls automatically and during a call. -
Page 31: Holding And Resuming Calls
Procedure » Press the expansion module line key that has the flashing green LED indicator. Related Links Polycom VVX EM50 Expansion Modules on page 67 Holding and Resuming Calls When you are in a call, you can place an active audio call on hold and resume the call. -
Page 32: End A Call
Audio Calls Related Links Polycom VVX EM50 Expansion Modules on page 67 End a Call You can end active calls at any time, however, you must resume held calls before you can end a call. Procedure 1. On the Current Calls screen, highlight the call. -
Page 33: Reject Anonymous Calls
If a contact does not answer the transfer or you want to remain speaking with the contact on your line, you can cancel the transfer before it is complete. Procedure » Do one of the following: • Press Home • Press Back Polycom, Inc. -
Page 34: Call Park And Call Pickup
Enabled and Disabled. • Enter the call forward number in the Destination Number field. • Use Enter to cycle through the list of voice services. 5. Press Home to exit Preferences and confirm your selection. Polycom, Inc. -
Page 35: Set Up Call Forward Busy
Forward an Incoming Call You can forward an incoming call directly to a contact without answering the call. Procedure 1. Press the Call Forward soft key. The Call Fwd Unconditional screen displays. 2. Press the Enable soft key. Polycom, Inc. -
Page 36: Conference Calls
1. While connected to the conference bridge, call a contact or take an incoming call. The conference bridge is placed on hold. 2. When you or the contact answer the call, highlight the held conference bridge call, and select the Add to Conf option. Polycom, Inc. -
Page 37: Shared Lines
Resume and take over the Slow blinking in with that SCA and has call. placed the call on hold. Private Held A sharing phone is on a call Slow blinking in with that SCA and has placed the call on private hold. Polycom, Inc. -
Page 38: Busy Lamp Field (Blf)
Call A call is parked Pick up the call from the parking slot. Periodic short Parked against the monitored blink in red extension. Idle Monitored extension is Make or transfer a call to the extension. Steady green idle. Polycom, Inc. - Page 39 Shared Lines Icon Event Description Available Operation LED Pattern Offline Monitored extension is Steady amber offline. Polycom, Inc.
-
Page 40: Recording Audio Calls
After you pause and then resume recording, recording continues in the same file. Procedure » Select Rec. Resume. Stop Recording You can stop recording a call before the call ends. The recording also stops when the active call ends, no matter who ended the call. Polycom, Inc. - Page 41 Recording Audio Calls Procedure » Do one of the following: • Select Rec.Stop. • Press the End soft key. Polycom, Inc.
-
Page 42: Call Lists And Directories
Search for Contacts You can search for contacts in the phone book. Procedure 1. Go to Contacts > Phone Book. 2. In the search field, enter your search criteria. Results display below the search field as you enter characters. Polycom, Inc. -
Page 43: Add A Contact
2. Highlight the contact and press Enter 3. Press the More soft key, then select Remove. 4. Press the OK soft key to delete the contact. Delete All Contacts You can delete all contacts from the phone book. Polycom, Inc. -
Page 44: Add Picture To A Contact
You can add custom groups to the Groups tab. Procedure 1. Go to Contacts > Group. 2. Press the New Group soft key. 3. Enter the group's name. 4. Press the Save soft key. Delete a Group You can delete groups from the Groups tab. Polycom, Inc. -
Page 45: Add Contact To A Group
Call an Entry from Call History List You can call people that are in your call history list even if they aren't a saved contact. The number has to be available in the call history to connect a call. Procedure Polycom, Inc. -
Page 46: View Call Listing Detail
A network directory refers to a directory service offered by a service provider or your company. All the contacts in a network directory are stored on the server and are downloaded when the Network Directory App is running. Optionally, a network directory can be grouped into a number of sub-directories. Polycom, Inc. -
Page 47: Refresh Network Directories
Set a Speed Dial Feature Key Number from Contacts If enabled by your administrator, you can define one or more feature keys as speed dials. You can identify a speed dial key by the speed dial icon displayed beside a line key. Procedure Polycom, Inc. -
Page 48: Add A Speed Dial Entry
Each entry in the buddy list consists of the following information: • Display Name (optional): The display name of the user. • Phone Number (optional): The number of the user. • Status (optional): A short message indicating your status. For example: On a break, back at 1PM. Polycom, Inc. -
Page 49: Set Your Buddy List Presence
Remove a contact • Add a group • Remove a group • Add contact to a group • Remove contact from a group • Tag or untag a contact as a favorite • Accept presence subscriptions (invitations) from other users Polycom, Inc. -
Page 50: Buddy Groups
An Expanded Buddy List can include additional contacts that don't have presence information. For those contacts, you don't see a presence icon in the respective entry in the Buddy List display. This feature lets you consolidate all your contacts into one list, with or without presence information. Polycom, Inc. -
Page 51: Broadcasting Messages
After you have joined a group page, you'll continue receiving and sending broadcasts until you leave the group page. You must be in an active group page to leave a group page. Procedure » Press the Group Page feature key. The LED goes off. Polycom, Inc. -
Page 52: Enable Auto Answer Page
3. Press Home to exit Preferences and confirm your selection. Leave a Page Group You can leave a page group you previously joined. Procedure 1. Go to Preferences > Join Page Group 1. 2. Do one of the following: Polycom, Inc. - Page 53 Broadcasting Messages • Press Enter • Press the Disable soft key. 3. Press Home to exit Preferences and confirm your selection. Polycom, Inc.
-
Page 54: Connecting To A Wireless Network
If the phone is unable to connect the network, a dialog box displays the reason for the inability to connect. Press the OK soft key to close the dialog. Enable a Wireless Network ® You can enable wireless connectivity for your USB-enabled phone using the Polycom Wi-Fi wireless network adapter. Procedure ®... -
Page 55: Connect To A Wireless Network
You can remove a saved wireless network connection. Procedure 1. Go to Settings > WiFi. 2. Press the Scan soft key. 3. Locate the previously connected network at the top of the WiFi Networks list. 4. Press the Forget soft key. Polycom, Inc. -
Page 56: Vvx Business Ip Phone Settings
Procedure 1. Press Home 2. Go to Preferences > Skin. 3. Press Enter repeatedly to cycle through the available skins. 4. After you select a skin, press the Reboot soft key and confirm. The phone reboots. Polycom, Inc. -
Page 57: Set The Language
If you disable Call Waiting, any incoming calls received on your phone while you are in a call are automatically sent to voicemail. Procedure 1. Press Home 2. Go to Preferences > Call Waiting. 3. Press the Disable soft key. 4. Press Home to exit Preferences and confirm your selection. Polycom, Inc. -
Page 58: Time And Date Display
You can enable the dim screen so your screen automatically dims after the phone is idle. Procedure 1. Press Home 2. Go to Preferences > Dim Screen. 3. Press the Enable soft key. 4. Press Home to exit Preferences and confirm your selection. Polycom, Inc. -
Page 59: Set Dim Screen Delay
Note: The maximum resolution for images is 1024 X 768 and the maximum file size for ringtones is 1MB. Procedure 1. Attach a USB flash drive to the USB port on your phone. 2. Go to Settings > Storage. Polycom, Inc. -
Page 60: Change The Background Picture
Your screen saver automatically starts each time your phone is idle for a certain amount of time. You can stop the screen saver at any time by pressing any key or lifting the headset. Procedure 1. Press Home Polycom, Inc. -
Page 61: Set The Screen Saver Wait Time
You can require a passcode to reactivate your phone from the screen saver. Procedure 1. Press Home 2. Go to Preferences > Require Passcode on Wake Up. 3. Press the Enable soft key. 4. Select Wake Up Passcode. Polycom, Inc. -
Page 62: Display The Time And Date On The Screen Saver
Press the Play soft key to sample the highlighted ringtone. 5. Highlight a ringtone and press the Select soft key. Set a Ringtone for Individual Contacts To help you quickly identify callers, you can select unique ringtones for contacts in your directory. Polycom, Inc. -
Page 63: Change The Volume
Enable Acoustic Fence Acoustic Fence suppresses background noise while you are on a call, which enhances audio quality for call participants. Note that if AEC is disabled for the RJ9 headset, enabling Polycom Acoustic Fence automatically enables AEC as well. -
Page 64: Disable Acoustic Fence
Procedure 1. Press Home 2. Do one of the following: • Go to Preferences > Polycom Acoustic Fence for RJ9 Headset. • Go to Preferences > Polycom Acoustic Fence for handset. 3. Press the Disable soft key. 4. Press Home to exit Preferences and confirm your selection. -
Page 65: Enable Automatic Home Page
Pack Calls On display displays multiple call windows, making full use of the screen. Procedure 1. Press Home 2. Go to Preferences > Pack Calls on Display. 3. Press the Enable soft key. 4. Press Home to exit Preferences and confirm your selection. Polycom, Inc. -
Page 66: Disable Pack Calls On Display
Per-service DNR is also configurable under Voice Services. Do Not Ring is disabled by default. Procedure 1. Press Home 2. Go to Preferences > Do Not Ring. 3. Press the Enable soft key. 4. Press Home to exit Preferences and confirm your selection. Polycom, Inc. -
Page 67: Phone Accessories
You can specify the device (speakerphone or an attached headset) to use when you make or receive a call without lifting the handset or pressing the speaker/headset button. The default setting is speakerphone. Procedure 1. Press Home 2. Go to Preferences > Preferred Audio Device. Polycom, Inc. -
Page 68: Change The Preferred Headset Device
Disable electronic hook switch (EHS) support for Plantronics Jabra, or generic DHSG wireless headsets. It's disabled by default. Procedure 1. Press Home 2. Go to Preferences > Electronic Hook Switch. 3. Press the Disable soft key. 4. Press Home to exit Preferences and confirm your selection. Polycom, Inc. -
Page 69: Polycom Vvx Em50 Expansion Modules
• Navigate Expansion Module Paging The Polycom VVX EM50 expansion module is a console supported on VVX 450 business IP phones and enables you to add additional lines to your phone. Note: VVX 150, 250, and 350 business IP phones don’t support expansion modules. The VVX EM50 expansion module is only supported on VVX 450 business IP phones, running OBi software 6.4.0. - Page 70 Polycom VVX EM50 Expansion Modules Figure 5: VVX EM50 Hardware Features VVX EM50 Hardware Description Reference Feature Feature Description Number Line keys Selects available line key contacts, functions, and assignments. Bracket Secures the expansion module to the phone. USB plug Connects the expansion module to the phone.
-
Page 71: Connect A Vvx Em50 Expansion Module
Polycom VVX EM50 Expansion Modules Reference Feature Feature Description Number Line key LED indicators Indicates a line or busy lamp field contact's status. The following lists the LED Indicator behaviors shown on the expansion modules: • Solid Green—Indicates an active call in progress. -
Page 72: Connect An Additional Vvx Em50 Expansion Module
Polycom VVX EM50 Expansion Modules Connect an Additional VVX EM50 Expansion Module You can connect up to two VVX EM50 expansion modules to a VVX 450 business IP phone. Note: When you connect expansion modules to a VVX 450 phone, you can connect additional USB devices to the rear port of the phone and the side port on the second connected expansion module. -
Page 73: Changing The Backlight Intensity On The Expansion Module
56 Navigate Expansion Module Paging The Polycom expansion modules with color displays support three pages of line information on the LCD screen for each module connected to a supported VVX phone. Each page of the expansion module contains line registrations, monitored contacts, contacts' presence, or favorites assigned to line keys. -
Page 74: Accessibility Features
Polycom products include a number of features to accommodate hearing-, vision-, mobility-, or cognitively-impaired users. Features for Hearing-Impaired Users Polycom phones include many features that enable users with hearing impairments to use various features of the phone. The following table lists the accessibility features for hearing-impaired phones:... -
Page 75: Features For Mobility-Impaired Users
Accessibility Features Features for Mobility-Impaired Users Polycom phones include features that enable users with mobility impairments to perform various functions on the phone. The following table lists the accessibility features for mobility-impaired users. Accessibility Features for Mobility-Impaired Users Accessibility Feature... - Page 76 An audible alert plays when you mute or unmute the microphones using any of the Mute keys on the device or far-end system. The system plays an alert periodically if the device is muted for a set period of time. Polycom, Inc.
-
Page 77: Maintaining Vvx Business Ip Phones, Obi Edition
1. Go to Settings. 2. Press the Reboot soft key. 3. Press OK to confirm. Product Information The Product Information screen displays relevant data about your phone. This includes information like model number, phone number, and software version. Polycom, Inc. -
Page 78: Reset The Phone To Factory Defaults
The firmware update process is designed to be simple. There are multiple options to update your phone's firmware. Related Links Icons and Status Indicators on page 22 Update Firmware from the Interactive Voice Response Menu Call into the Interactive Voice Response menu to update your phone's firmware. Procedure Polycom, Inc. -
Page 79: Update Firmware Directly In The Phone
2. Open the phone's native web portal in a web browser on the same computer. 3. Select the Firmware Update link. 4. Do one of the following: • On the firmware update page, enter the path to the firmware file. • Click Browse to locate the firmware file on the computer. Polycom, Inc.
Need help?
Do you have a question about the VVX OBi Series and is the answer not in the manual?
Questions and answers