Table of Contents
Advertisement
Quick Links
Advertisement
Table of Contents

Subscribe to Our Youtube Channel
Related Manuals for Delta 100kW PCS


Summary of Contents for Delta 100kW PCS
- Page 1 100kW Power Conditioning System (PCS) Installation Manual Version: 1.0.0...
- Page 2 ABLE OF ONTENTS About this Manual ......... . 1 Version Control.
- Page 3 Warranty ..........60 Appendix .
- Page 4 Delta may modify or update the Manual from time to time without any notice. Delta will do its best efforts to keep the Manual updated and maintain the accuracy of the Manual. Delta disclaims any kinds or forms of warranty, guarantee or undertaking, either expressly or implicitly, including but not limited to the completeness, accuracy, non-infringement, merchantability or fitness for particular purpose or usage.
- Page 5 About this Manual About this Manual Version Control Table 1: Version Control Rev. Change Description Date 1.0.0 Installation Manual...
- Page 6 PCS, and information about configuration of the unit. It does not provide details of batteries. Audience The manual is intended for anyone who needs to install Delta 100kW PCS. Installers should be certificated technicians or electricians. Organization This manual is organized into the following chapters: Chapter 1: “About the Manual”...
- Page 7 About this Manual Important Safety Instructions Save these Instructions General Safety Instructions (EN) This manual contains important instructions for PCS that should be followed during installation and maintenance. PCS is designed and tested to meet all applicable International safety standards. However, like all electrical and electronic equipment, safety precautions must be observed and followed during installation and operation of PCS to reduce the risk of personal injury and to ensure a safe installation.
- Page 8 The PCS section does not contain user-serviceable parts. For all service and maintenance, a Delta repair technician or authorized service partner is required for onsite maintenance services. Read all of these instructions, cautions, and warnings for the PCS and associated PCS ...
- Page 9 It supports demand charge management by peak shaving, enables load shifting for time-of-use savings, and provides real power and reactive power compensation to improve power quality. With Delta’s PCS solution you can realize the fullest value of an energy storage system. Figure 1. Typical PCS Application System Architecture...
- Page 10 Introduction Features High conversion efficiency with latest technologies High efficiency: peak 97.2% High power density in outdoor application: 146 W/l, 322 W/kg Low standby power loss: < 25W Integrated AC and DC switches for easy installation ...
- Page 11 The function of lightning and surge protection systems is to protect the devices, functional isolations and over voltage-sensitive consumer equipment of the 100kW PCS. The 100kW PCS is equipped with a Type 2 Surge Arrester to cover the system when not placed directly in a lightning strike area.
- Page 12 Installation Foundation The PCS cabinet is recommended to be mounted on concrete floor. Follow the illustration below to prepare the groundwork. Before installing a PCS cabinet, it is recommended to have a solid foundation established. The following information is provided to serve as a guide for the setup of a recommended foundation. The footprint boundary area of the PCS is 600 x 800 mm (23.62 x 31.49 in.), and there are two ways for mounting: 1.
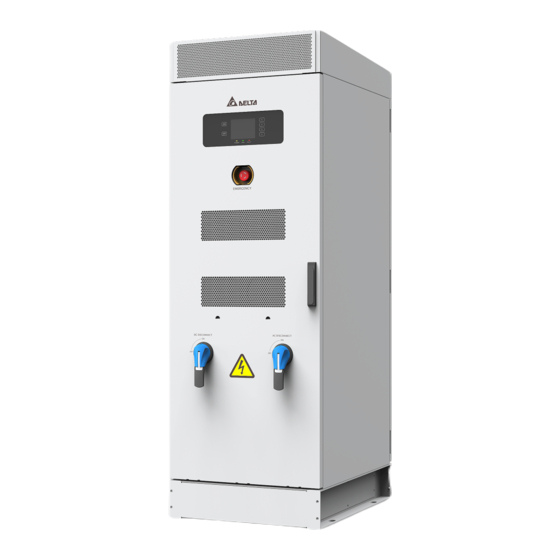
- Page 13 800 mm (31.5 in) (1.73 in) 855 mm (33.66 in) Figure 5. Front and Side Views of a Delta 100kW PCS Location Considerations To fully experience the benefits and reliability of the PCS design, follow the provided guidelines: The PCS unit is rated IP55 and configured for outdoor installations.
- Page 14 Installation Under certain operating conditions, the PCS emits an audible noise. It is advisable to install away from living accommodations to protect against noise levels. The PCS should not be installed in an area that is excessively dusty, as this may decrease the ...
- Page 15 Installation Opening Requirements A minimum distance of 3 feet (914.4 mm) behind the PCS is required for maintenance from rear side as shown in Figure 7. 800 mm+ 914.4 mm+ (31.5 in+) (3 feet+) Figure 7. Front and Rear Maintenance Clearance Distance When installing the PCS, take into consideration the necessary ventilation space as well as the space requirements to allow access when opening the doors.
- Page 16 Installation Unpacking the Unit Use a forklift to move and place the crate containing the 100kW PCS and the wooden pallet on a designated location. Make sure the location is clean and prepared prior to moving the crate. WARNING! The 100kW PCS and crate have a combined weight of approximately 418 kg/921 lbs. DO NOT attempt to lift and/or move the package/unit by hand.
- Page 17 Installation 4. Remove the screws securing the left and right sidewalls from the shipping package. 5. Remove the right and left sidewalls. STAN FAUL CO NN EC T CO NN EC T Figure 10. Removing Left and Right Sidewalls Installation Manual...
- Page 18 EC T Figure 11. Removing Front and Rear Walls Upon unpacking the page, inspect the unit for signs of damages that may have been caused during shipping. If damage is found, immediately contact Delta and the shipping company.. Installation Manual...
- Page 19 Installation Installing the PCS Onsite The PCS Series must be located in weather-proof enclosure or enclosed-area. The PCS is not intended or designed for exposure to water or excessive dust. The PCS system is designed to support the requirements of various environments. The PCS must be in an upright position at all times.
- Page 20 The dimensions and weights specified must be taken into consideration when mounting the 100kW PCS. All lifting equipment and lifting components (hooks, bolts, lifts, slings, chains, etc.) must be properly sized and rated to safely lift and hold the weight of the 100kW PCS during the mounting process.
- Page 21 TO THE HOOD AND BE SURE TO USE A MINIMUM OF FOUR STRAPS OF SUFFICIENT LENGTH 1. Unpack the 100kW PCS, see “Unpacking the Unit” on page 12. 2. Remove the hexagonal nuts and washers securing the 100kW PCS to the shipping pallet. OF F...
- Page 22 Installation 3. Use the provided key to unlock the front panel. 4. Rotate the door handle to open the front panel and pull the door open. OF F STAN DI SC ON NE OF F DI SC ON NE OF F Figure 13.
- Page 23 Installation 5. Repeat for the rear panel. Figure 15. Opening a Rear Panel Make sure the door limiter at the bottom of the panel engages in the track to keep the rear panel from closing accidentally. Figure 16. Locking a Rear Panel in a Cabinet The rear panel locks in place when it is fully extended.
- Page 24 Installation 6. Locate the top cover, see the following figure and remove the screws from the front and rear sides. 7. At least two individuals are required to safely lift the top cover. Lift both ends simultaneously and remove the top cover from the PCS. Place the cover in a clean work surface as it is needed for the final phase of the installation.
- Page 25 Installation To close the front panel, the interlocking mechanism holding the door and cabinet in place must be first released. 8. Locate the interlocking mechanism at the base of the door. See the following image. 9. Push the mechanism upwards to unlock it from the rail. Figure 18.
- Page 26 Installation 12. Repeat for the rear panel. Figure 20. Closing a Rear Panel Installation Manual...
- Page 27 ANY LIFTING DEVICE MUST BE RATED TO WITHSTAND THE MAXIMUM REQUIRED WEIGHT CAUTION! HE UNIT SHOULD NOT BE INSTALLED WITH THE CABINET DOORS OPEN 13. Locate the eye bolts on each corner of the 100kW PCS. 14. Check the eye bolts are properly tightened to frame. Eye Bolts for...
- Page 28 Installation 15. Connect the hoist to the eye bolts on the cabinet. Make sure the load is secured before making any attempt to move it. The recommended diagonal length of the sling is 2 to 2.5 m (6.56 to 8.2 ft.).
- Page 29 ENCLOSURE FRONT TO BACK AND SIDE TO SIDE DURING LIFTING BECAUSE THE CENTER OF GRAVITY OF THE ENCLOSURE IS NOT THE CENTER OF THE ENCLOSURE 1. Unpack the 100kW PCS, see “Unpacking the Unit” on page 12. 2. Using the forklift to move the 100kW PCS.
- Page 30 Installation b. Remove the screws securing the side base covers. c. Remove the base covers. Place them in a clean work surface for later use. The covers must be replaced after cabinet installation and cable routing is completed. OF F STAN DI SC ON NE...
- Page 31 Installation d. Align the forklift with the bottom channels on the cabinet, see the following image. e. Once aligned, insert the forks into the channels until they are completely through the opposite side of the insertion channels. WARNING! Take care the unit is balanced and no risk to prevent it fell. Carefully lift the cabinet.
- Page 32 Installation Front/Rear Handling a. Remove the hexagonal nuts and washers. OF F STAN DI SC ON NE OF F DI SC ON NE OF F Figure 26. Releasing a PCS from a Pallet b. Remove the screws securing the front/rear base covers. c.
- Page 33 Installation d. Align the forklift with the bottom channels on the cabinet, see the following image. e. Once aligned, insert the forks into the channels until they are completely through the opposite side of the insertion channels. WARNING! Take care the unit is balanced and no risk to prevent it fell. Carefully lift the cabinet.
- Page 34 Installation Securing a Cabinet in a Final Location 1. Make sure the installation sites has been prepared, see “Before You Begin” on page 7. CAUTION! AKE SURE THE SWITCH IS OFF POWERED OFF BEFORE OPENING THE FRONT PANEL 2. Use the following guidelines to secure the cabinet if installed using a chain hoist: a.
- Page 35 Installation The front panel locks in place when it is fully extended. c. Repeat for the rear panel. Figure 31. Opening a Rear Panel Make sure the door limiter at the bottom of the panel engages in the track to keep the rear panel from closing accidentally.
- Page 36 Installation d. Install the top cover and secure the top cover to the 100kW PCS with screws. Figure 33. Installing the Top Cover Installation Manual...
- Page 37 Installation e. Push the mechanism upwards to unlock it from the rail. Push the front panel in completely. Make sure the door limiter on the top and bottom of the cabinet are engaged with the front panel. g. Rotate the door handle to lock. OF F STAN DI SC...
- Page 38 Installation 3. Repeat for the rear panel. Figure 35. Closing a Rear Panel Installation Manual...
- Page 39 Installation Note: The hole diameter on the cement base of the expansion tube is 20 mm (0.79"). 4. First insert a washer in the anchoring bolt followed by a nut. 5. Turn the nut until it is lowered in the bolt. Do not tighten at this time. All nuts must be inserted in their respective anchoring bolts.
- Page 40 The function of lightning and surge protection systems is to protect the devices, functional isolations and over voltage-sensitive consumer equipment of the 100kW PCS. The 100kW PCS is equipped with a Type 2 Surge Arrester to cover the system when not placed directly in a lightning strike area.
- Page 41 Wiring Instructions Causes of Battery Ground Faults There are several causes for introducing a ground fault into a battery system. The following presents the most common causes for ground faults. Debris on the surface of the container- Dirt and debris on the surface of the battery can develop ...
- Page 42 Wiring Instructions AC, DC Disconnect Position The following figures show the status of AC and DC disconnects. ON: Vertical, turn counterclockwise to horizontal position to OFF state. OFF: Horizontal, turn clockwise to vertical position to ON state. Switch on for PCS Switch off for PCS STANDBY FAULT...
- Page 43 Wiring Instructions Opening a Front Panel The AC and DC disconnects have an interlock mechanism to prevent the front door from being opened when not in the OFF position. After turning the disconnects to the OFF (horizontal) position, wait at least five minutes before opening the front door.
- Page 44 Wiring Instructions 3. Rotate the door handle to unlock the front panel. 4. Open the front panel open and swing it open until it locks in place. Figure 40. Opening a Front Panel Make sure the door limiter at the bottom of the panel engages in the track to keep the front panel from closing accidentally.
- Page 45 Wiring Instructions Wire Sizing and Ratings AC Wire Sizing and Ratings Prepare all the AC power cables meeting the following wiring specifications: Table 2: AC Wire Sizing and Ratings Cable Type Solid Copper Conductor Voltage Rating 600 Volts or greater Temperature 70°C or greater Gauge...
- Page 46 Wiring Instructions Communication and I/O Wire Sizing and Ratings Here are the requirements for the communication and I/O wires: Table 5: Communication and I/O Wire Sizing and Ratings Cable Type Solid Copper Conductor Voltage Rating 600 Volts or greater Temperature 70°C or greater Gauge 1.32 mm...
- Page 47 Wiring Instructions Preparing AC/DC Cables The following guidelines describe how to prepare the AC/DC cables for a grid connection. When crimping cable, a hexagonal crimping method is recommended. 1. Strip the head of the insulator of the AC and DC power cables. Insert the exposed part of the power cable into the junction hole of the corresponding cable lug, which is available from the accessory kit.
- Page 48 Wiring Instructions Communication and I/O Wiring Lead the wires with 15-pin, 6-pin and 3-pin connectors prepared for communication and I/O connection through the front square hole of the unit base and through the wire glands in front of the DC cable glands.
- Page 49 Wiring Instructions I/O Connector (CNJ3) The CNJ3 connector is for digital I/O connection. Take out the green 15-pin connector (CNJ3) from the accessory kit, and connect eight prepared 1.32 mm wires to pin 1~4 and pin 7~10 of this connector as shown in the following figure.
- Page 50 Wiring Instructions BMS Communication Connector (CNJ13) The CNJ13 connector is for communication between PCS and BMS. Communication with BMS is handled in two ways, RS485/Modbus or CANbus. RS485 requires three prepared 1.32 mm wires connected to pins 1 to 3 on the 6-pin connector from the accessory kit. For CANbus, connect two prepared 1.32 mm wires to pins 5 and 6.
- Page 51 Wiring Instructions Analog I/O Connector (CNJ1) The CNJ1 connector is CT ports for external current detecting from customer. It requires six prepared 1.32 mm (AWG16) wires connected to pins 1 to 6 on the 6-pin connector from the accessory kit, as shown in Figure 47 and Table 8.
- Page 52 Wiring Instructions Communication Connector (CNJ11, CNJ12) The CNJ11 and CNJ12 connectors are for communication with ESS controller or with other PCS in parallel operation. Prepare two RJ45 connectors and six 1.32 mm wires for each, and connect the wires to the pin 1~2 and pin 4~7 of the RJ45 connector as the graphic and pin assignment below: CNJ12 CNJ11 PIN 1...
- Page 53 Wiring Instructions Auxiliary Power Interface Connector (CNJ5) CNJ5 is located on J board called Interface board, shown in the following figure. It is used for alternative auxiliary power input with 24Vdc 0.5A. Connect two 1.32 ~ 0.326 mm wires to the 2-pins connector as the pin assignment table below.
- Page 54 Wiring Instructions Table 12: Demand Response Modes (DRMs) (Continued) Mode Description DRM7 The export power to the grid is no more than 75% of the rated power. The export power to the grid is 100% of the rated power, but subject to the constraints DRM8 from other active DRMs.
- Page 55 Wiring Instructions Wiring General Introduction For wiring convenience, you can lead the cables and wires from the left, right, front or rear bottom side of the unit into the cabinet. The following sections will be described in the case of wiring from the front bottom side of the unit as an example.
- Page 56 Wiring Instructions Inside the PCS cabinet, you will see several cable glands for DC, AC and communication wiring on the bottom of the cabinet as shown below: DC Cable Glands (+/-, x3 sets) AC Cable Glands (L1, L2, L3, 2 cables for each) Communication and I/O Glands Grounding...
- Page 57 Wiring Instructions DC Wiring 1. Prepare DC cables: Prepare several 1/0 size, 1000V cables for DC wiring. The PCS supports up to 3 sets of battery connection, and each set of battery connection requires two cables (one for positive, the other for negative). Connect the DC cables to the two-hole lugs which are available in the accessory kit, and use heat shrinkable tubing on the junction between the cables and lugs to prevent the exposure of the conductive part.
- Page 58 Wiring Instructions 3. Connect DC cables to DC terminals: Loose the hex socket screws of the DC terminals, then lead the DC cables with two-hole lugs through the DC cable glands into the PCS. Connect and secure these cables to the relevant “DC+” and “DC-” terminals. Figure 55.
- Page 59 Wiring Instructions AC Wiring 1. Prepare AC cables: Prepare six 53.49 ~ 33.62 mm 600V cables for AC wiring. The PCS supports 3-phase/3-wire connection type AC wiring with L1, L2 and L3 phase terminals, and each phase terminal requires two cables to connect. Attach the AC cables to the two-hole lugs in the accessory kit, and use thermal casing to prevent the exposure of the naked part.
- Page 60 Wiring Instructions 3. Connect AC cables to AC terminals: Loose the hex socket screws of the AC terminals by Allen wrench, then lead the AC cables with two-hole lugs through the AC cable glands into the PCS, connect and secure these cables to the relevant “L1”, “L2” and “L3” terminals. Figure 59.
- Page 61 Wiring Instructions Grounding First attach the two 600 V, 1/0 size cables prepared for grounding to the 2-hole lugs in the accessory kit. Then lead these grounding cables through the front square hole of the unit base and through the grounding cable glands into the PCS cabinet.
- Page 62 Wiring Instructions Wiring N Cable According to the demand to decide wiring the N cable or not. 1. Prepare the 1/0 600V wire. 2. Remove the nuts securing the plexiglass cover then remove the plexiglass cover. Figure 62. Removing the Plexiglass Cover 3.
- Page 63 Wiring Instructions 5. Install the plexiglass cover and secure the nuts. Figure 64. Installing the Plexiglass Cover After finishing all the wiring works, reinstall the protective cover, close and lock the front door. Note: The specification of PCS100 is designed for 3P3W & PE. The reserved N terminal is floating connected that used only for N from 3P4W &...
- Page 64 3. event of Force Majeure, any circumstance not within the reasonable control of the operation design; 4. repaired, modified, moved or installed by any party without Delta's prior written authorization; 5. damage due to accidents such as fire, inundation, unusual electric shock, power failure or shipping.
- Page 65 Appendix Appendix Specifications Table 14: Technical Specifications of Delta 100kW PCS Item Description Grid-tied Operation Rated Grid Voltage 400 Vac, 3 phase 3 wire 320 to 440 Vac (VDE-AR-N4105) Grid Voltage Range 312 to 450 Vac (AS/NZS 4777.2) Rated Grid Frequency 50 Hz 47.5 to 51.5 Hz (VDE-AR-N4105)
- Page 66 Appendix Table 14: Technical Specifications of Delta 100kW PCS (Continued) Item Description Output Voltage Regulation < 10%, at dynamic; Recovering within tolerance in 100 ms Crest Factor 2.0 @ rated power 3,000 m (9,843 ft) Max Altitude Thermal derating above 2,000 m (6,561.68 ft.) Environment ≤...
- Page 67 Appendix Glossary Abbreviation for “Alternating Current”. Abbreviation for “Authority Having Jurisdiction” (electrical inspector). American Wire Gauge. Basic Insulation Insulation to provide basic protection against electric shock. Battery management system. Abbreviation for “Direct Current”. The Electro-Magnetic Compatibility (EMC) concerns the technical of the mutual influencing of electrical devices through electromagnetic fields caused by them.
- Page 68 Appendix Power Conditioning System, an electrical device which converts DC direct voltage into AC voltage and/or direct current into alternating current. Power dissipation Power dissipation is designated as the difference between absorbed power and power of a device or process yielded. Power dissipation is released mainly as heat. ...
- Page 69 Appendix Screw Torque Table 1. The torque level for M3~M5 screws is 4.8, refer to the following torque standard table to make sure the washers are in close contact with the screws. Table 15: Screw Torque Table for M3~M5 Screws Screw Assembly Torque Standard Unit: N·m Screw Type...
Need help?
Do you have a question about the 100kW PCS and is the answer not in the manual?
Questions and answers