
Related Manuals for gefran ADP200


Summary of Contents for gefran ADP200
- Page 1 Vector inverter for Hybrid injection molding machines ADP200 ..Quick start up guide Specification and installation...
-
Page 2: Information About This Manual
Gefran S.p.A has the right to modify products, data and dimensions without notice. The data can only be used for the product description and they can not be understood as legally stated properties. -
Page 3: Table Of Contents
7.2 Regulation section ................................35 7.2.1 Cable cross-sections ..................................35 7.2.2 Connection of I/O card ..................................35 7.2.2.1 Terminal strip and connection standard ADP200 models ............................35 7.2.2.2 Terminal strip and connection ADP200-...-24 models ..............................36 7.2.2.3 Terminal strip and connection ADP200-...-I01 models ...............................36 7.2.2.4 Terminal strip and connection ADP200-...-24-I01 models ............................36... - Page 4 A.1 - Inserting expansion cards ............................... 84 A.2 - I/O Card ..................................85 A.2.1 Input/Output features ..................................86 A.3 Encoders and encoder expansion cards ........................... 89 A.3.1 Encoders ......................................89 A.3.2 Phasing ......................................90 A.3.3 Encoder cards ....................................91 ADP200 • Quick installation guide - Specifications and connection...
-
Page 5: Safety Precautions
Use for intended purpose only The power drive system (electrical drive + application plant) may be used only for the application stated in the manual and only together with devices and components recommended and authorized by Gefran. Utiliser uniquement dans les conditions prévues Le système d’actionnement électrique (drive électrique + installation) ne peut être utilisé... -
Page 6: General Warnings
L’utilisation des drives dans des zônes à risques (présence de vapeurs ou de poussières inflammables), peut provoquer des incendies ou des explosions. Les drives doivent être installés loin des zônes dangeureuses, et équipés de moteurs appropriés. ADP200 • Quick installation guide - Specifications and connection... -
Page 7: Introduction To The Product
2 - Introduction to the product The new ADP200 inverter series represents an innovative concept in drive technology, the result of constant technological research and the know-how in plastics applications that the Gefran Group has acquired by working side by side with major sector players. -
Page 8: Application Features
Pressure sensor status control • Adaptive Feedforward • Automatic switchover between closed-loop speed and pressure control • Speed and pressure control loops tuning • Pump Rotation direction identification • Multipump convergent and divergent control. ADP200 • Quick installation guide - Specifications and connection... -
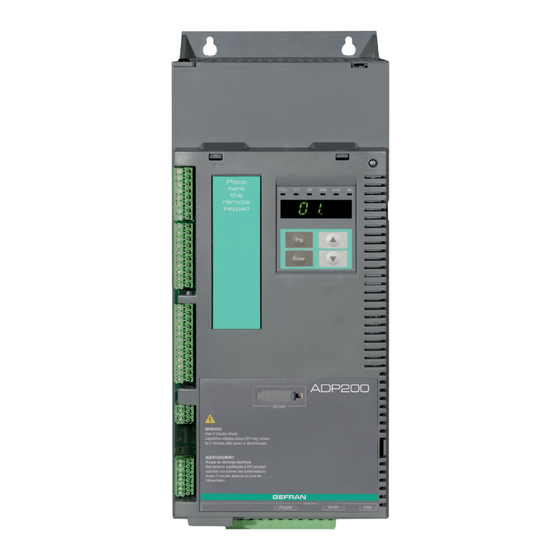
Page 9: Identification Of Components
Cards for controlling and regulating the closed and open-loop power section. Commands, references and reactions are connected to these. 7. Output voltage Three-phase AC voltage. 8. Speed feedback encoder (see section A.3 of the Appendix). ADP200 • Quick installation guide - Specifications and connection... -
Page 10: Product Identification
The rated output current of the drive must be higher than or equal to the rated current of the motor used. Name of model (code) ADP200 2 075 -K B P -F-4-C-RS-ER -24 -I01 I/O card version: [Empty] = standard I/O card EXP-IO-... -
Page 11: Transport And Storage
3.1 General A high degree of care is taken in packing the ADP200 Drives and preparing them for delivery. They should only be transported with suitable transport equipment (see weight data). Observe the instructions printed on the packaging. -
Page 12: Specification
(*) referred to rated torque 4.3.4 Current rating Overload ����������������������������� slow overload = 170% * 60 sec; fast overload = 200% * 3 sec. Switching frequency �������������������� 8 kHz max (4 kHz default) ADP200 • Quick installation guide - Specifications and connection... -
Page 13: Input Electrical Data
(1) @ rated Iout without AC input chokes. (2) with LR3 AC input chokes. (3) with integrated DC input choke, in accordance with EN 61800-3. (4) ADP200-5S550 and 5S750 models: AC input external choke is mandatory. 4.5 Output electrical data Motor type ��������������������������� Synchronous Maximum output voltage U2 ��������������... -
Page 14: Derating Values In Overload Condition
4.5.2 Derating values for switching frequency ADP200 is factory set to 4kHz constant switching frequency (PAR 568 Switching freq mode = [0] Constant). The figure 4.5.2 is valid only when PAR 568 Switching freq mode = [1] Variable, refer to ADV200 FP manual for more details. -
Page 15: Kalt: Ambient Temperature Reduction Factor
4.6 Voltage level of the inverter for safe operations The minimum time between the moment in which an ADP200 inverter is disabled from the mains and that in which an operator can operate on internal parts of the inverter, without the danger of electric shock, is 5 minutes. -
Page 16: Weights And Dimensions
155.8 23.6 11.5 218.3 Dimensions: Width x Height x Depth Weight Sizes (mm) (inches) (kg) (lbs) ADP200-3150-... ADP200-3185-... 235 x 401 x 179.4 9.25 x 15.79 x 7.06 10.5 23.15 ADP200-3220-... ADP200 • Quick installation guide - Specifications and connection... - Page 17 Figure 4.9.4: Size 5 dimensions (55kW) 331.4 304.8 31.2 Dimensions: Width x Height x Depth Weight Sizes (mm) (inches) (kg) (lbs) ADP200-5550-... 311 x 767 x 331.4 12.2 x 30.2 x 13.05 132.3 ADP200 • Quick installation guide - Specifications and connection...
- Page 18 (3:5) DETTAGLIO DETTAGLIO (3:5) 17.5 157.5 Dimensions: Width x Height x Depth Weight Sizes (mm) (inches) (kg) (lbs) ADP200-5S550-... 300 x 630 x 332 11,8 x 24,8 x 13,07 92,6 ADP200-5S750-... ADP200 • Quick installation guide - Specifications and connection...
-
Page 19: 5- Options
Technical data for fuses, including dimensions, weights, power leakage, fuse carriers etc. are reported in the corresponding manufacturers' data sheets: GRD... (E27), S00... Jean Müller, Eltville A70... Ferraz (*) Pcc max ADP200 • Quick installation guide - Specifications and connection... -
Page 20: Input Chokes
<55 Note: For the standard application of the ADP200 (injection molding machine with servopump), LR3 input choke for sizes 7.5kW to 22kW can be omitted only if the Pcc line is below the values shown in the table. For other applications, the input choke may be mandatory. Please contact Gefran’s sales department for further information and details. -
Page 21: Dc Input Chokes
5750 Note! The DC input choke is not integrated and can not be connected on ADP200-5S550 / ADP200-5S750 sizes. 5.3 AC output chokes The ADP200 inverter can be used with standard motors or motors designed specifically for use with inverters. -
Page 22: External Braking Resistors (Optional)
Si la résistance prévoit un contact de protection, ce dernier doit être utilisé conjointement à celui du dispositif de protection thermique. ADP200 • Quick installation guide - Specifications and connection... -
Page 23: Emc Filter
Category / Motor cable length EN 61800-3 ADP200-2075-...-F ... ADP200-5750-...-F Models with an internal EMI filter C2 / 10 m For ADP200 models without integrated EMI filters the optional external filters are reported in the table: Dimensions: WxHxd Weight Conducted emissions according to Sizes... -
Page 24: Mechanical Installation
����������������������� 25 mm 25 mm ( 0.98” ) 150 mm ( 6" ) 25 mm ( 0.98” ) 150 mm ( 6" ) 25 mm ( 0.98” ) 25 mm ( 0.98” ) ADP200 • Quick installation guide - Specifications and connection... -
Page 25: Fastening Positions
4 x M6 x 16 mm screws + Grover (spring-lock) washer + flat washer Size 5 - 5S 5 x M6 x 16 mm screws + Grover (spring-lock) washer + flat washer Note! Other dimensions see chapter 4.9 Weights and dimensions. ADP200 • Quick installation guide - Specifications and connection... -
Page 26: Wiring Procedure
Il est recommandé de protéger séparément l’onduleur au moyen de fusibles. Respecter la réglementation des pays concernés (par exemple, les normes VDR en Allemagne) et des fournisseurs locaux d’énergie électrique. ADP200 • Quick installation guide - Specifications and connection... - Page 27 CC avant d’en effectuer le branchement. Avant la mise en service des appareils, ayant été stockés pendant long temps, il faut alimenter variateurs à vide pendant deux heures, pour régénérer les condensateurs : appliquer une tension d’alimentation sans actionner le variateur. ADP200 • Quick installation guide - Specifications and connection...
-
Page 28: Power Section
The power terminal strip is extractable on sizes 2055 ... 3110. Note! The minimum cross-section for both ground connections must comply with EN61800-5-1 prescriptions. Always ground both points on structural steel. ADP200 • Quick installation guide - Specifications and connection... -
Page 29: Connection Of Shielding (Recommended)
Fasten the power cable shield to the omega sections (C) as illustrated in the figure. • Sizes 5S550 and 5S750 : for these sizes the metal support (A) is not provided. Cable shielding must be provided by the installer. ADP200 • Quick installation guide - Specifications and connection... -
Page 30: Emc Guide Line
Use power shield kit to connect shield of motor cable to drive. Note! For further information regarding electro-magnetic compatibility standards, according to Directive 2014/30/EC, conformity checks carried out on Gefran appliances, connection of filters and mains inductors, shielding of cables, ground connections, etc., consult the “Electro-magnetic compatibility guide” on the CD attached to this drive. -
Page 31: Block Diagram Of Power Section
7.1.4 Block diagram of power section This type is equipped with an EMI input filter (models ADP200.-...-F-...), an AC/DC converter, a system for pre-loading DC capacitors, a DC/AC converter, a power supply unit and an integrated braking unit (except ADP200-5750 size, see below). -
Page 32: Power Line Connection
400- 480 V 50/60 Hz) ADP200-5750 ADP200-5S550 - ADP200-5S750 L1 L2 L3 C (3ph, 230-400-480 V 50/60 Hz) (3ph, 230-400-480 V 50/60 Hz) Note! Recommended combination F1 fuses: see paragraph 5.1.1. ADP200 • Quick installation guide - Specifications and connection... -
Page 33: Connection Of Ac And Dc Chokes
50/60 Hz) 3ph, 230- 400- 480 V 50/60 Hz) 7.1.7.2 Connection of DC choke ADP200-2075...3220 L1 L2 L3 BR C1 C DC choke (optional) 3ph, 230- 400- 480 V 50/60 Hz) ADP200 • Quick installation guide - Specifications and connection... -
Page 34: Motor Connection
Recommended combination braking resistors: see paragraph 5.4. For size 5750 an optional external BUy braking unit can be used and connected to terminals C and D. Refer to the BUy handbook for further information. ADP200 • Quick installation guide - Specifications and connection... -
Page 35: Regulation Section
(AI) + 1 analog outputs (AO) + 2 relay outputs (RO). EXP-IO-D8A4R2-ADP 2– 1– 54 55 56 57 26 27 29 99 80 81 40 41 42 43 70 71 72 99 45 46 10 11 12 ADP200 • Quick installation guide - Specifications and connection... -
Page 36: Terminal Strip And Connection Adp200
If the control is powered with a +24V external, you have to insert a protective diode as described in "Figure 7.3.1.6: External diode on +24V external". 7.2.3 Feedback Connection This section describes the feedback connections for the standard ADP200-...-RS series. For optional cards see section A3 of the Appendix. - Page 37 For technical specification see "EXP-RES-I1-ADP" on section "A.3.3 Encoder cards". EXP-RES-I1-ADP 10 11 12 13 14 15 RESOLVER ENCODER (RES) EXC- EXC+ COS- COS+ SIN- SIN+ (*) Connection of shielding, see figure 7.2.4 ADP200 • Quick installation guide - Specifications and connection...
-
Page 38: Connection Diagrams
7.3 Connection diagrams Note! This chapter describes the typical wiring diagrams with reference to ADP200 drives with standard configuration. 7.3.1 Regulation potentials, digital I/O Figure 7.3.1.1: Regulation potentials (ADP200) Shielded cable Analog input 1X Shielded cable Analog output 1 Analog input 2X... - Page 39 71 72 Power Supply +24V external Figure 7.3.1.5: +24V external - IO source mode (NPN) 71 72 Power Supply +24V external Figure 7.3.1.6: External diode on +24V external Power Supply +24V external ADP200 • Quick installation guide - Specifications and connection...
-
Page 40: Typical Connection Diagram
Connect resolver shield directly to chassis as shown on fig. 7.2.4. Connect the shields of Motor protection, Analog Input 1/2X and Analog Output signals directly to chassis (or to terminal 99 of T3 strip) as shown on figure 7.2.4. ADP200 • Quick installation guide - Specifications and connection... -
Page 41: Serial Interface (Pc Connector)
O = Output, I/O = Input/ Output The ADP200 drive is provided with a port as standard (9-pin D-SUB receptacle connector) for connection of the RS485 serial line used for drive-PC point-to-point or multipoint communication (with the GF-eXpress configuration software). -
Page 42: Drive / Rs485 Port Point-To-Point Connection (Isolated)
The card is equipped with a 9-pin D-SUB male receptacle connector which must be inserted in the RS485 connector of the ADP200 drive. Connect P1 side to RS485 connector of ADP200, and J1 side to the PC serial line, the adapters indicated in paragraph 7.4.1 must be used. -
Page 43: Can Interface
Version: 4.2.0 21 February2011"). The ADP200 can be requested with the interface for connection to CAN networks at the time of ordering (ADP200-...-C models). The CAN protocol (ISO 11898) used is CAN2.0A with 11-bit identifier. The integrated CANopen interface has been developed as a Minimum Capability Device. -
Page 44: Optional Keypad Interface (Keypad Connector)
7.7 Saving data on the Memory Card With the ADP200 drive, data can be saved on a normal Secure Digital-type memory card. In order to use the memory card, the specific adapter (SD-ADL) must be connected by inserting it into the dedicated slot on the front of the drive. -
Page 45: Braking
(R ), thus providing very short deceleration times and restricted four-quadrant operation. In the standard configuration, ADP200 drives (≤ 55kW) comprise an internal braking unit. Figure 7.8.1: Operation with braking unit (circuit diagram) Note! When the internal braking unit is present the protection must consist of fast-acting fuses! Follow the relative assembly instructions. -
Page 46: Use Of The Keypad
Moves the selection down in a menu or list of parameters. Down During modification of a parameter, decreases the value of the blinking digit. 8.1.1.2 Meaning of LEDs There are 7 drive status indicator LEDs on the front of the ADP200 drive. LEDs Colour Meaning of LEDs Yellow... -
Page 47: Kb-Adv100 Optional Programming Keypad
When this LED is lit the drive has reached a current limit condition. During normal functioning, this LED is off. Yellow The LED is lit when motor speed is 0. The LED is lit when the drive signals that an alarm has been triggered ADP200 • Quick installation guide - Specifications and connection... -
Page 48: Navigating With The Integrated Keypad
> Middle window: indicated by the flashing point of the second digit from the left: Middle Bottom Window >>> Complete number >>> > Top window: indicated by the flashing point of the first digit from the left: Middle Bottom Window >>> Complete number >>> ADP200 • Quick installation guide - Specifications and connection... - Page 49 Synchronous list, Menu 2 - DRIVE INFO, PAR 510 Time drive power on = 6:13 h.min .88. 1.3. Enter (x10) Enter the flashing point of the second digit from the right displays the bottom window ADP200 • Quick installation guide - Specifications and connection...
-
Page 50: Changing Values
Synchronous list, Menu 6 – RAMPS, PAR 700 Acceleration time 0 (default = 10.00 s) 6.8 8 . 1 0. 0 9. Enter Enter Enter Enter ( > 2 sec) Enter 1. 0.0 Enter ( > 2 sec) ADP200 • Quick installation guide - Specifications and connection... -
Page 51: Error Messages When Modifying A Parameter
The alarms are shown on the display of the integrated keypad with the abbreviated text shown in brackets "[XXX]" in chapter "10.1 Alarms" on page 88 . Active alarms are displayed by a flashing indicator. ADP200 • Quick installation guide - Specifications and connection... -
Page 52: Alarm Log
The STARTUP WIZARD cannot run simultaneously on the two keypads (integrated and optional). When running on one, it cannot be accessed from the other. Note ! For further information see chapter "9.2 Startup wizard for brushless motors (with the optional keypad)". ADP200 • Quick installation guide - Specifications and connection... -
Page 53: Motor Self-Tuning
If an error occurs, the word Er is displayed with the error code. Press Prg to exit the error. Note ! For further information see chapter "9.2 Startup wizard for brushless motors (with the optional keypad) ADP200 • Quick installation guide - Specifications and connection... -
Page 54: Navigating With The Optional Keypad
Input value too high the value entered too high Input value too low the value entered too low Out of range attempt to insert a value outside the min. and max. limits ADP200 • Quick installation guide - Specifications and connection... -
Page 55: Scanning Of The Parameters
Press E to activate modification mode. The entire line is displayed in reverse. Use the ▲ and ▼ keys to move from one state to another. Press E to confirm the modification or ESC to cancel. ADP200 • Quick installation guide - Specifications and connection... -
Page 56: How To Save Parameters
PAR: 03 STARTUP WIZARD Save parameters Save parameters Save parameters Press E to exe c ute In progress Done 04 DRIVE CONFIG 05 REFERENCES To exit, press the ◄ key. ADP200 • Quick installation guide - Specifications and connection... -
Page 57: Configuration Of The Display
• If the alarm page is not displayed: Press the RST key to reset the alarms. If active alarms are still present following reset, the alarm page is opened. ADP200 • Quick installation guide - Specifications and connection... -
Page 58: Messages
Instead of the letter X, the number of the currently selected keypad memory is displayed. At the end of transfer, if this has been completed successfully, the “Done” caption is displayed for a few seconds with subsequent return to the initial page. ADP200 • Quick installation guide - Specifications and connection... -
Page 59: Load Parameters From Keypad
04.21 Load from SD card, PAR 598: ADP_0000.DAT ADP_0000.DAT 01 MONITOR 04 DRIVE CONFIG 02 DRIVE INFO 04.21 PAR: 03 STARTUP WIZARD Load from SD card Press E to execute 04 DRIVE CONFIG 05 REFERENCES ADP200 • Quick installation guide - Specifications and connection... -
Page 60: Commissioning Via Keypad
According to the EEC standards the ADP200 and accessories must be used only after checking that the machine has been produced using those safety devices required by the 89/392/EEC set of rules, as far as the machine industry is concerned. These standards do not apply in the Americas, but may need to be considered in equipment being shipped to Europe. - Page 61 Il ne faut pas éxécuter de tests de rigidité diélectrique sur des parties du convertisseurs. Pour mesurer les tensions des signaux, il faut utiliser des instruments de mesure appropriés (résistance interne minimale 10kΩ/V). ADP200 • Quick installation guide - Specifications and connection...
-
Page 62: Startup Wizard For Brushless Motors (With The Integrated Keypad)
9.1 Startup wizard for brushless motors (with the integrated keypad) The ADP200 can operate with regulation modes: field-oriented vector control of permanent magnet synchronous mo- tors (brushless). Note! Before starting, check the factory setting: Menu 02 DRIVE INFO, parameter 02.01 Control type, PAR: 480, default = [25] Synchronous. - Page 63 Step 2 - Setting motor parameters Note! Def: The factory (default) setting depends on the size of the drive that is connected. These values refer to the ADP200-2110-... ▲ 176 v .88. 20.00. Πo ▼ Enter Enter Enter (x2) Enter (x3s) Prg 174 v ▲...
- Page 64 Enter (x3s) Prg ▲ 5001 Hz ▼ Enter (x2) Enter (x3s) 4999 Hz At the end of the procedure proceed to step 6. Press the Prg x2 and keys. ADP200 • Quick installation guide - Specifications and connection...
- Page 65 Note! The factory (default) setting depends on the size of the drive that is connected. These values refer to the ADP200-2110-... Step 7 - Setting the ramps Set the acceleration and deceleration times for the profile of ramp 0 : ▲...
- Page 66 (4) When the parameters have been saved correctly the drive displays this screen to show that the startup wizard is complete. Press the Prg (x3s) key. Proceed to the next step. Application set-up Refer to PID-IMM Application manual for detailed Set-up procedure. ADP200 • Quick installation guide - Specifications and connection...
-
Page 67: Startup Wizard For Brushless Motors (With The Optional Keypad)
9.2 Startup wizard for brushless motors (with the optional keypad) The ADP200 can operate with regulation modes: field-oriented vector control of permanent magnet synchronous mo- tors (brushless). Note! Before starting, check the factory setting: Menu 02 DRIVE INFO, parameter 02.01 Control type, PAR: 480, default=Synchronous. - Page 68 After completing all the checks described above, power the drive and proceed to step 2. Step 2 - Setting motor parameters Note! Def: The factory (default) setting depends on the size of the drive that is connected. These values refer to the ADP200-2110-... 03 STARTUP WIZARD ▲...
- Page 69 The calculated parameters are saved in a RAM memory to enable the drive to perform the necessary calculations. These data are lost if the device is switched off. To save the motor data follow the procedure described in step 9. ADP200 • Quick installation guide - Specifications and connection...
- Page 70 Proceed to the next step. Step 5 - Encoder phasing (Standard card EXP-RES-I1-ADP) ADP200 drives have a command to start automatic phasing of the resolver. Phasing must be repeated whenever: the drive is replaced (alternatively, download parameters taken from previous drive)
- Page 71 After setting the speed, proceed to step 7. Note! The factory (default) setting depends on the size of the drive that is connected. These values refer to the ADP200-2110-... Step 7 - Setting the ramps Set the acceleration and deceleration times for the profile of ramp 0 : 03 STARTUP WIZARD ▲...
- Page 72 (4) When the parameters have been saved correctly the drive displays this screen to show that the startup wizard is complete. Proceed to the next step. Application set-up Refer to PID-IMM Application manual for detailed Set-up procedure. ADP200 • Quick installation guide - Specifications and connection...
-
Page 73: Troubleshooting
- Use a cooling fan to cool the motor. Condition: Drive overload alarm. Drive overload [DOL] - The inverter output current has exceeded the allowed overload value. - The overload cycle has exceeded the allowed values. ADP200 • Quick installation guide - Specifications and connection... - Page 74 The overload threshold of the accumulator of the I²t braking resistor thermal image has been exceeded. For standard external braking resistor the Max overload (factory set) is 1” service 10% (see Table 5.4.1 on ADP200 QS manual). Bres overload [BOL] Solution: - Check the size of the braking resistor.
- Page 75 0001H-1 Incorrect PLC key. PLC application not available. Solution: Contact Gefran to request the key to enable the desired firmware function. Encoder error [ENC] Condition: this condition may occur when the drive is powered during encoder setup each time parameter 552 Regulation mode is set.
-
Page 76: Speed Fbk Loss Alarm According To The Type Of Feedback
Solution: Contact Gefran in order to update the firmware on the optional encoder card. Condition: an optional card has been removed with respect to the configuration present when the last Save parameters command was executed or there Opt cfg change [OCFG] is a fault on the optional card or on the regulation card. - Page 77 Solution: See the encoder manufacturer's technical guide. 16.31 Light source Failure (1) Signal amplitude Erroneous (1) Position value Erroneous (1) Over voltage Yes (1) Under voltage Under voltage supply (1) Over current Yes (1) ADP200 • Quick installation guide - Specifications and connection...
-
Page 78: Reset Speed Fbk Loss Alarm
SpdFbkLoss code. Several causes may be present at the same time. If no card is recognised, the system runs a routine that always returns Speed fbk loss [22] active without specifying a cause. ADP200 • Quick installation guide - Specifications and connection... -
Page 79: Encoder Error Alarm
Cause: Firmware on option card incompatible with firmware on regulation card. 0x200 error When this has been signalled the information obtained from the encoder is not reliable. Solution: Contact Gefran in order to update the firmware on the optional card. ADP200 • Quick installation guide - Specifications and connection... -
Page 80: Messages
Solution: Close the enable contact before sending the Autotune command Internal calculation error concerning IGBT control Solution: Perform autotuning once more, if the problem persists, contact the Gefran technical support centre. The drive has measured a stator resistance value exceeding the set limit. - Page 81 If correct, the drive is faulty, contact the Gefran technical support centre. LS leakage inductance value outside accepted range. 15 - 16 -17 Solution: Perform autotuning once more, if the problem persists, contact the Gefran technical support centre. Measurement of Im magnetising current outside accepted range. 18-19 Solution: Perform autotuning once more, if the problem persists, contact the Gefran technical support centre.
- Page 82 Incorrect PLC key. PLC application not available. Solution: Ask Gefran to supply the correct key to enable the desired firmware function. Condition: this may occur at drive power-on if the incorrect enabling key was inserted for a given firmware function. At this stage the firmware function...
- Page 83 Solution: try again with a correct file. Note! For any messages that are displayed but not included in this list, reference should be made to the manual for the application used by the drive. ADP200 • Quick installation guide - Specifications and connection...
-
Page 84: Appendix
Insert the Encoder card in the guide bars (C) of Slot 2 until the male terminal (E) is fully inserted in the female terminal (E) of the regulation card. Tighten the screws (C) provided with the card. ADP200 • Quick installation guide - Specifications and connection... -
Page 85: I/O Card
(MO). EXP-IO-D10A3R2-ADP 2– 1– 54 55 56 57 26 27 29 99 80 81 40 41 42 43 70 71 72 99 10 11 12 ADP200 • Quick installation guide - Specifications and connection... -
Page 86: Input/Output Features
Isolation 1 KV External supply (*) 1A / 24V ±10% Note! (*) Only for ADP200-...-24 models (24 Vdc external power supply included), see chapter "2.4 Product identification" . ● Digital inputs (DI) and enable hardware input (EN-HW) Description Features Type... - Page 87 1% of full scale Isolation Description Features Type Single-ended in current (only output 2) Output current 0 (4) mA to 20 mA R load 500 Ω Resolution 12 Bits Precision 1% of full scale ADP200 • Quick installation guide - Specifications and connection...
- Page 88 0 (4) mA to 20 mA Input R 500 Ω Resolution 12 Bits Precision 1% of full scale Isolation AI-S AI-S AI-S (*) Select input V/I (V=OFF, I=ON) ● Motor temperature sensor (MOT) MOT+ MOT- ..ADP200 • Quick installation guide - Specifications and connection...
-
Page 89: Encoders And Encoder Expansion Cards
PAR 2132 Encoder 1 mode (menu 15 - ENCODER CONFIG). Attention Selecting the transformation ratio via jumper. The drive ADP200 supports different types of encoders, each managed by a specific expansion card. The card is automatically recognised at startup. Possible configurations are summarised in the table:... -
Page 90: Phasing
A.3.2 Phasing In order for the ADP200 Brushless regulation algorithm to function correctly, it is necessary to know the position of the rotor with respect to the stator power phases. Therefore the 0° position provided by the absolute encoder must be known with respect to the position of a motor pole and the encoder count direction must match the motor power phases. -
Page 91: Encoder Cards
J1=Open open open close Resolver T ratio = 0.5 J2=Close (Default) J3=Open Voltage levels measured on the terminals. The indicated levels are typical with a tolerance of ±10%. ADP200 • Quick installation guide - Specifications and connection... - Page 92 Cable length ���������������������������� max 50m, shielded coupled plus a total external shield. RESOLVER ENCODER (RES) EXC- EXC+ COS- COS+ SIN- SIN+ (*) Connection of shielding, see figure 7.2.4 Note! Repeat Encoder see end of this chapter. ADP200 • Quick installation guide - Specifications and connection...
- Page 93 TTL = 7V max Programmable internal power supply ���������� min +6.0 V, max +20.0 V (default + 6.0 V) − Imax 150 mA. See table(1) Cable length ���������������������������� max 50m (*) with external supply. ADP200 • Quick installation guide - Specifications and connection...
- Page 94 INCREMENTAL DIGITAL ENCODER (DE) SINGLE ENDED NPN O.C. 0VE out +VE out INCREMENTAL DIGITAL ENCODER (DE) SINGLE ENDED PNP O.C. 0VE out +VE out (*) Connection of shielding, see figure 7.2.4 ADP200 • Quick installation guide - Specifications and connection...
- Page 95 Programmable internal power supply ���������� min +5.2 V, max +6.0 V (default + 5.2 V) − Imax 150 mA. See table (1) Cable length ���������������������������� max 50m INCREMENTAL SINUSOIDAL ENCODER (SE) 0VE out +VE out (*) Connection of shielding, see figure 7.2.4 ADP200 • Quick installation guide - Specifications and connection...
- Page 96 Cable length ���������������������������� max 50m INCREMENTAL SINUSOIDAL ENCODER + ABSOLUTE SINCOS (SESC) Fast input 2 Fast input 1 COS- COS+ SIN- SIN+ 0VE out +VE out (*) Connection of shielding, see figure 7.2.4 ADP200 • Quick installation guide - Specifications and connection...
- Page 97 Incremental sinusoidal + Absolute EnDat/SSI (EN/SSI) Fast input 2 Fast input 1 (**) (**) 0VE out +VE out (*) Connection of shielding, see figure 7.2.4 (**) VS+ / VS- : optional (encoder supply feedback) ADP200 • Quick installation guide - Specifications and connection...
- Page 98 Number of bits ��������������������������� max 32 bit/turn* max 32bit/turn (automatic recognition at initialisation) INCREMENTAL SINUSOIDAL ENCODER + ABSOLUT HIPERFACE (HIP) 0VE out +VE out (*) Connection of shielding, see figure 7.2.4 ADP200 • Quick installation guide - Specifications and connection...
- Page 99 5.2 V 6.0 V Enc 4 5.2 V 5.2 V 10.0 V Enc 5 8.0 V 7.0 V 12.0 V Enc 6 The encoder repetition of Resolver expansion card is always TTL. ADP200 • Quick installation guide - Specifications and connection...
- Page 100 Fax +91 20 6614 6501 Fax +55 (0) 1132974012 gefran.india@gefran.in comercial@gefran.com.br GEFRAN FRANCE SA GEFRAN MIDDLE EAST ELEKTRIK VE GEFRAN TAIWAN 4, rue Jean Desparmet - BP 8237 ELEKTRONIK SAN. VE TIC. LTD. STI No.141, Wenzhi Rd., Zhongli City, Taoyuan County 32054, 69355 LYON Cedex 08 Yesilkoy Mah.
Need help?
Do you have a question about the ADP200 and is the answer not in the manual?
Questions and answers
Milicron machine me master drive ki setting karna he uski process kya he
@Nilesh Uike master drive install karna hai
Master drive install karna hai