
Related Manuals for Xylem EXO Series


Summary of Contents for Xylem EXO Series
- Page 1 user Manual AdvAnced WAter QuAlity Monitoring PlAtforM item# 603789REF revision A...
- Page 2 The information contained in this manual is subject to change without notice. Effort has been made to make the information in this manual complete, accurate, and current. The manufacturer shall not be held responsible for errors or omissions in this manual. Consult EXOwater.com for the most up-to-date version of this manual.
-
Page 3: Table Of Contents
Table of Contents 1. Introduction 1.1 EXO1 Sonde Overview 1.2 EXO2 Sonde Overview 1.3 EXO Handheld Overview 1.4 EXO Sensors Overview and Specifications 1.5 Conductivity/Temperature 1.6 Depth and Level 1.7 Dissolved Oxygen 1.8 fDOM 1.9 pH and ORP 1.10 Total Algae (Chlorophyll and Blue-green Algae) 1.11 Turbidity 2. -
Page 4: Introduction
5. Calibration 5.1 Introduction to Basic Procedure 5.2 Calibrating Conductivity/Temperature 5.3 Calibrating Dissolved Oxygen 5.4 Calibrating Depth 5.5 Calibrating pH 5.6 Calibrating ORP 5.7 Calibrating Turbidity 5.8 Calibrating Total Algae (Chlorophyll and Blue-green Algae) 5.9 Calibrating fDOM 5.10 Calibration Standards 5.11 Calibration Record Sheet 6. -
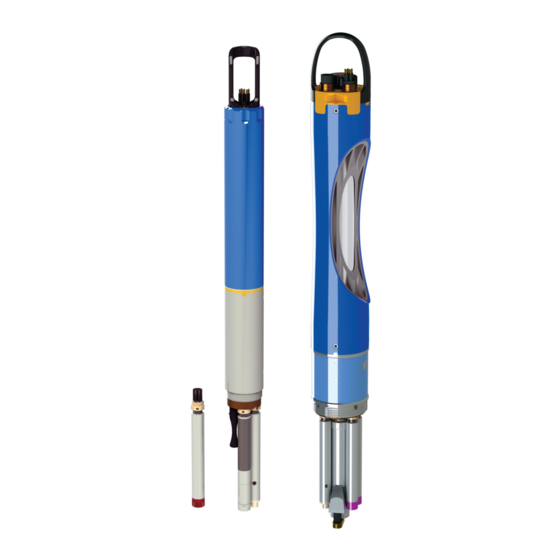
Page 5: Exo1 Sonde Overview
EXO 1 Sonde Overview The EXO1 sonde is a multiparameter instrument that collects water quality data. The sonde collects the data with up to four user-replaceable sensors and an integral pressure transducer. Each sensor measures its parameter via a variety of electrochemical, optical, or physical detection methods. Each port accepts any EXO sensor and automatically recognizes its type. - Page 6 EXO1 Sonde 599501 Removable Bail 599473 6-Pin Cable Connector Upper Battery Compartment Seal O-rings 599680 Battery Compartment Battery Cover Lower Battery Compartment Seal Pressure Transducer Opening Red LED Indicator – Sonde Status Blue LED Indicator – Bluetooth On/Off Magnetic Switch for Power and Bluetooth Bulkhead Sensor...
-
Page 7: Exo2 Sonde Overview
EXO2 Sonde Overview The EXO2 sonde is a multiparameter instrument that collects water quality data. The sonde collects the data with up to six user-replaceable sensors and an integral pressure transducer. Each sensor measures its parameter via a variety of electrochemical, optical, or physical detection methods. Each port accepts any EXO sensor and automatically recognizes the type of sensor. - Page 8 EXO2 Sonde 599502 Removable Bail 599474 Auxiliary Port 6-Pin Cable Connector Battery Cap/Pressure Relief Valve O-rings 599681 Battery Compartment Opening Battery Compartment On/Off Magnetic Switch for Power and Bluetooth Red LED Indicator – Sonde Status Blue LED Indicator – Bluetooth Bulkhead Sensor Port Plug...
-
Page 9: Exo Handheld Overview
EXO Handheld Overview The EXO Handheld (HH) is a rugged, microcomputer-based instrument that allows the user to display sonde readings, configure sondes, store and retrieve data, and transfer data from sondes to a computer. Equipped with GPS, barometer, and custom operating system, the Handheld communicates via Bluetooth wireless technology, field cable, or USB connector. - Page 10 EXO Handheld 599150 Bluetooth Indicator Wi-Fi Indicator is for future functionality; not active yet Daylight-viewable Soft Keys (2) Menu Escape Navigation Arrows (4) & Return Backspace Power Brightness Alphanumeric Keypad Shift Cable Connector...
- Page 11 EXO Sensors Overview The EXO product line includes nine sensors that detect a variety of physical, chemical, and biological properties of natural water. EXO sensors are designed to collect highly accurate data under ever-changing environmental conditions. Data Filtering All EXO sensors share some common embedded software, including the filtering of real-time data. Sensors acquire environmental data at a constant rate, and use this stream of data as the input to the filtering algorithm that produces results seen by the user.
- Page 12 Sensor Response Times Response times for EXO sensors are based on laboratory testing. Actual response times in the field may vary depending on application. Sensor Accuracy Specifications To maintain accuracy specifications for EXO sensor, we recommend that users calibrate sensors in the lab in standards with temperatures as close to the ambient temperature of the field water as possible.
-
Page 13: Conductivity/Temperature
Conductivity/Temperature Sensor Overview The EXO combination conductivity and temperature sensor should be installed in a sonde in nearly all sonde applications. Not only will this sensor provide the most accurate and fastest response temperature data, but it will also provide the best data for the use in temperature compensation for the other EXO probes. The conductivity data is used to calculate salinity, specific conductance, and total dissolved solids, and compensate for changes in density of water (as a function of temperature and salinity) in depth calculations if a depth sensor is installed. - Page 14 thermistor’s resistance changes with temperature. The measured resistance is then converted to temperature using an algorithm. The temperature sensor receives a multi-point NIST traceable wet calibration and the accuracy specification of 0.01˚C is valid for expected life of the probe. No calibration or maintenance of the temperature sensor is required, but accuracy checks can be conducted and logged through the KOR interface software.
- Page 15 Depth Sensor Overview EXO measures depth of water with a non-vented strain gauge. A differential strain gauge transducer measures pressure with one side of the transducer exposed to the water and the other side exposed to a vacuum. We calculate depth from the pressure exerted by the water column minus atmospheric pressure. Factors influencing depth measurement include barometric pressure, water ...
- Page 16 Location of Depth Sensor (continued) To assist with consistent horizontal orientation, the EXO2 sonde has an indentation at the top of the sonde for a marker or positioning pin. The sonde should be installed with at least 1 cm of water above the intake ports.
-
Page 17: Dissolved Oxygen
Dissolved Oxygen Sensor Overview The principle of operation of the EXO optical Dissolved Oxygen sensor is based on the well-documented concept that dissolved oxygen quenches both the intensity and the lifetime of the luminescence associated with a carefully chosen chemical dye. The EXO DO sensor operates by shining a blue light of the proper wavelength on this luminescent dye which is immobilized in a matrix and formed into a disk. - Page 18 polynomial non-linear regression. Fortunately, the non-linearity does not change significantly with time so that, as long as each sensor is characterized with regard to its response to changing oxygen pressure, the curvature in the relationship does not affect the ability of the sensor to accurately measure oxygen for an extended period of time.
-
Page 19: Fdom
fDOM Sensor Overview The EXO fDOM (Fluorescent Dissolved Organic Matter) sensor is a fluorescence sensor which detects the fluorescent component of DOM (Dissolved Organic Matter) when exposed to near-ultraviolet (UV) light. Colored Dissolved Organic Matter Users might wish to quantify colored dissolved oxygen matter (CDOM) in order to determine the amount of light which is absorbed by stained water and thus is not available for the photosynthesis process carried out by subsurface aquatic plants and algae. - Page 20 affected by the UV absorbance of the DOM in the water. Testing shows that underlinearity can occur at fDOM concentrations as low as 50 QSU. This factor means that a field sample with an fDOM reading of 140 QSU will contain significantly more than double the fDOM of a sample that reads 70 QSU.
-
Page 21: Ph And Orp
pH and ORP Sensor Overview Users can choose between a pH sensor or a combination pH/ORP sensor to measure these parameters. pH describes the acid and base characteristics of water. A pH of 7.0 is neutral; values below 7 are acidic; values above 7 are alkaline. - Page 22 Replaceable Sensor Module The EXO pH and pH/ORP sensors have a unique design that incorporates a user-replaceable sensor tip (module) and a reusable sensor base that houses the processing electronics, memory, and wet-mate connector. This allows users to reduce the costs associated with pH and pH/ORP sensors by only replacing the relatively inexpensive module periodically and not the more costly base.
- Page 23 Total Algae (Chl & BGA-PC) 1.10 Sensor Overview The EXO total algae sensor is a dual-channel fluorescence sensor that generates two independent data sets; one resulting from a blue excitation beam that directly excites the chlorophyll a molecule, present in all photosynthetic cells, and a second from an orange excitation beam that excites the phycocyanin accessory pigment found in blue-green algae (cyanobacteria).
- Page 24 The sensor generates data in three formats: RAW, RFU, and an estimate of the pigment concentration in μg/L. The RAW value is a value unaffected by user calibrations and provides a range from 0-100, representing the per cent of full scale that the sensor detects in a sample. RFU stands for Relative Fluorescence Units and is used to set sensor output relative to a stable secondary standard, such as Rhodamine WT dye.
-
Page 25: Turbidity
Turbidity 1.11 Sensor Overview Turbidity is the indirect measurement of the suspended solid concentration in water and is typically determined by shining a light beam into the sample solution and then measuring the light that is scattered off of the particles which are present. The suspended solid concentration is an important water quality factor and is a fundamental measure of environmental change. - Page 26 While all turbidity sensors will read consistently in formazin, other calibration solutions and field readings will vary between different models of turbidity sensors. These differences are thought to be a result of differing optical components and geometries and the resulting detection of varying suspended sediment characteristics. This effect is inherent in the nature of every turbidity sensor, and as a result readings between different model turbidity sensors are likely to show different field values even after calibration in the same standards.
-
Page 27: Install Batteries
Install Batteries The EXO1 Sonde uses two (2) D-cell alkaline batteries and the EXO2 Sonde uses four (4) D-cell alkaline batteries as the recommended power source. Alternatively, the sonde may use rechargeable NiMH D-cell batteries that you purchase. See detailed installation instructions Section 6.2 1. -
Page 28: Install/Remove Sensors
Install/Remove Sensors EXO sensors have identical connectors and identify themselves via onboard firmware; therefore, users can install any probe into any universal sonde port. The exception is the wiper for the EXO2 sonde, which must be installed in the central Port 7. Individual ports are physically identified by an engraved number on the sonde bulkhead. - Page 29 Install/Remove Guard or Calibration Cup Sonde guards protect EXO sensors from impact throughout deployment. Users should always install the guard prior to data collection. The calibration cup (cal cup) is used for storage and calibration. We recommend using two guards: one for field deployments and a second used exclusively for calibrations. Using a second guard will minimize calibration solution contamination (especially for turbidity) and calibration errors.
-
Page 30: Sonde States And Led Descriptions
Sonde States and LED Descriptions States An EXO sonde is always in one of three operational states: Off, Awake, and Asleep. These states determine the sonde’s current power usage and logging potential. When Off , the sonde is not powered and cannot collect data (no batteries installed, no topside power). -
Page 31: Awake Sonde, Activate Bluetooth
Awaken Sonde, Activate Bluetooth Once power is applied to the sonde, internally or externally, users can awaken their sondes from Sleep state using any of several methods. Primarily, users activate EXO sondes and the Bluetooth connections via a magnetic switch installed in sonde’s electronics compartment. The sonde will automatically disable the connection and go to sleep once it has not received a Bluetooth signal for 5 minutes or a signal from the topside connector for 30 seconds. -
Page 32: Attach Sonde To Handheld
Attach Sonde to Handheld Field Cable All EXO cables have 6-pin and wet-mateable connectors. Each cable also incorporates a strain relief mechanism to alleviate stress on the connector. Read the Cable Maintenance section before first-time use. Because Bluetooth wireless will not pass through water, users must use the cable to connect to the sonde when it is submerged and taking real-time field readings that are being viewed by the user or logged by a data collection platform. -
Page 33: Bluetooth Wireless Communication
Attach Sonde to Handheld Bluetooth Wireless Users can wirelessly connect EXO sondes (above water) to the EXO Handheld using Bluetooth wireless. With Bluetooth, users can reduce the amount of cables needed to operate their sonde. This wireless connection has a typical range of 10 meters, but this range will fluctuate depending on the operating environment. Users cannot wirelessly connect through water. -
Page 34: Install Kor Software
Install KOR Software The desktop KOR software is supplied will all EXO sondes on a USB flash drive. Installing the software will require Administrative privileges on the local PC. It is important to install KOR software prior to using the USB Signal Adapter, as the required drivers for the adapter are installed along with KOR software. -
Page 35: Connect Sonde
Connect Sonde The USB signal output adapter (USB-SOA #599810) allows users to connect to an EXO sonde over a standard USB connection. Although the USB-SOA is rugged and water resistant, users should protect its connectors with the included cap when not in use. The SOA should never be submerged. Prior to use, users must install KOR software and its drivers on the associated PC. - Page 36 Connect Sonde 2.10 Bluetooth Before users can communicate wirelessly with their EXO sondes, they must establish a Bluetooth link. All EXO sondes are equipped with Bluetooth wireless. This technology provides a secure, two-way, reliable communication channel with which users can communicate with their sondes above water without cables. Many new computers are equipped with Bluetooth wireless installed internally;...
- Page 37 Establish Bluetooth link. (Win 7) 1. Open Control Panel>Devices and Printers. 2. Select “Add a Device” from the top of the screen. 3. Locate the sonde name (starts with YSI) from the options. 4. Select “Enter the device’s pairing code, ” then enter the pairing code 9876.
-
Page 38: Data Collection Platform
Connect Sonde 2.11 Data Collection Platform (DCP) This signal output adapter (SOA) allows users to connect an EXO sonde to a Data Collection Platform (DCP) as well as power it via an external 12 V DC source (not included). Users wire a sonde cable with flying leads into one side of the SOA and an SDI-12 /RS-232 output and power source into the other. - Page 39 4 C onnect flying lead cable to sonde. Press in the male 6-pin connector, then screw down the retaining collar. Attach the cable’s strain relief to the sonde’s bail with a carabiner. The cable’s strain relief should be positioned to remove any weight-bearing from the actual connector and retaining collar.
- Page 40 Voltage The sonde is designed to run with 12-volt batteries, with supply voltages between 9 and 16 V DC. These systems should be directly powered by a sealed battery or installed as part of a remote solar system. Power the SOA through a 1-amp slow-blow fuse for protection. Remove the fuse until all wiring is completed. When used with a solar system always ensure use of 12-volt solar regulator. Never connect the sonde directly to solar panel;...
- Page 41 Connect Sonde 2.12 Flow Cell There are two versions of the EXO flow cell: EXO1 flow cell (#599080) and EXO2 flow cell (#599201). Flow rate of the flow cell is typically between 100 mL and 1 L per minute. Maximum flow rate depends on tubing type, size, and length.
- Page 42 This page intentionally left blank...
- Page 43 Handheld Install or Replace Batteries The EXO Handheld (HHs) uses four (4) C-cell alkaline batteries as a power source. Users can extend battery life by putting the HH in “Sleep” mode, when convenient, by pressing and holding the power button for less than three seconds.
- Page 44 Power On/Off Handheld Users can power on/off and awaken/put to sleep the EXO Handheld (HH) depending on use. In order to use the HH, users must first power it on. When finished with the HH, users should power it off to increase its battery life.
- Page 45 Attach Handheld to Sonde Field Cable All EXO cables have 6-pin and wet-mateable connectors. Each cable also incorporates a strain relief mechanism to alleviate stress on the connector throughout deployment. Read the Cable Maintenance section before first- time use. Although the cables are wet-mateable, users should dry the connectors prior to installation when possible.
- Page 46 Attach Handheld to Sonde Bluetooth Wireless Users can wirelessly connect their EXO sondes (above water) to the EXO Handheld using Bluetooth wireless communication. With Bluetooth, users can reduce the amount of cables needed to operate their sonde. The wireless connection has a typical range of 10 meters, but this range will fluctuate depending on the operating environment.
- Page 47 Spot Sampling View Live Data When connecting through the Handheld, KOR software attempts to automatically connect to an available sonde and start displaying current data in a live view. To manually access the live view from either the Handheld or Desktop, go to the Run menu and choose “Dashboard. ” Users can set view preference in the live view menu to display numeric live data (default) or a graph view, where a maximum of two parameters can simultaneously be plotted on the screen.
- Page 48 Spot Sampling Record Spot Sampling Data The sonde can be used for both continuous and spot-sampling applications. Spot-sampling readings are refreshed in real-time on the Dashboard screens. The soft keys on the Handheld allow logging of this information. There are two options when logging data: log a single point or continuous logging. Users may select one of these options from the live view settings window.
- Page 49 Upload Data from Handheld to PC The EXO Handheld stores two different sets of sensor data files: Files uploaded from the sonde and files manually logged into the Handheld from the live data mode. Both types of files can be sent to a PC via the USB cable.
-
Page 50: Handheld
Upon startup of the Handheld, the GPS function automatically initiates a fix of the location. This may take some time. During this process, the Handheld should remain stationary and have a clear view of the sky. The first time a user powers on the Handheld, the GPS fix can take up to a maximum of 20 minutes to obtain. Enable GPS. -
Page 51: Kor Software
KOR Software Users interface with the EXO sondes and handheld via KOR software. Once the software is installed and a device is connected to a computer or an EXO handheld, launch the KOR software. (KOR Installation instructions, see section 2.8.) Navigation Both versions of KOR—Desktop KOR for computers and KOR for the EXO handheld—have the same basic menu... -
Page 52: Run Menu
KOR Software Run Menu The Run menu displays real-time water quality data in numeric or graph formats, and has three main submenus. Dashboard This real-time display shows data from connected devices. The data appears in a default order of parameters in the list. - Page 53 Clear Buffer: As in the Dashboard, the data buffer can Capture Clear Advanced Data Buffer Plot Tools manually be saved to a file using the Capture Data button. Alternatively the buffer data can be cleared using the Clear Buffer button. Once the buffer is cleared, it cannot be recovered.
-
Page 54: Calibrate Menu
KOR Software Calibrate Menu This menu is the main interface for calibrating EXO sensors. Calibration and verification settings will vary by sensor. A device must be connected to access the Calibrate menu. For detailed calibration procedures for individual sensors, reference Section 5 Calibration. Calibration menu overview In the Calibrate menu, the list of installed sensors is shown on the left side of the window. - Page 55 Type: Optional field for type of standard being used. Pre- populated for some calibrations; user-input field for other calibrations. Manufacturer: Optional field to record manufacturer of calibration standard used. This data is logged in the calibration worksheet. Lot number: Optional field for calibration standard lot number, used for traceability purposes.
-
Page 56: Deploy Menu
KOR Software Deploy Menu The Deploy menu is used mainly to configure an EXO sonde to collect unattended data and to manage deployment templates. This menu is dynamic based on the mode of the attached device. Two or three submenu options are available: Read Current Settings, Open a Template, and, if a connected sonde is logging, a Stop Deployment button. - Page 57 Stop deployment This Stop Deployment button appears when an attached EXO device is actively logging. After stopping a deployment, the button disappears and the icon in the upper right changes state to indicate the sonde is not actively logging data. Advanced sampling and logging Access the following functions in the in the Deploy | Open Template | Edit Template menu and click on the Advanced...
- Page 58 per second) will have battery power for only one day. An estimate of this life is provided in the deployment summary screen, and should be considered when setting sampling intervals. Burst Sampling Burst sampling allows the user to collect a set of data at each logging interval. Activate Burst Sampling by clicking on Burst in the Logging Mode area of the Template Edit menu.
-
Page 59: Sites Menu
KOR Software Sites Menu Used to manage sites, this optional menu helps users create site detail that may be associated with files logged in the sonde. Not yet implemented in the first version(s) of KOR. KOR is a dynamic software platform subject to additional development and future improvements. Software menus and features are subject to change. -
Page 60: Data Menu
KOR Software Data Menu The Data menu is used to transfer files from the sonde or handheld and manage data files on a local computer. The Transfer function will only work when connected to a sonde. Transfer Clicking the Transfer submenu button initiates a scan of the attached EXO and lists all files on the sonde. -
Page 61: Options Menu
KOR Software Options Menu Many preferences, settings, and updates for KOR can be accessed through the Options menu. Smart QC: KOR performs quality checks on each connected sonde and sensor and provides an overall Network QC Score. Check mark: OK. X: Warning that part or all of the system is out of specification ranges. -
Page 62: Connections Menu
KOR Software Connections Menu This menu allows the user to connect to other sondes and devices, identify which probes are installed in which ports, and update Bluetooth settings. Rescan This submenu allows the user to refresh and initiate connections to hard-wired devices, search for Bluetooth connections, or disconnect. -
Page 63: Help Menu
KOR Software Help Menu This menu connects the user to documentation resources for using KOR software and the EXO products. -
Page 64: Data Files & File Locations
KOR Software 4.10 Data Files & File Locations KOR software is installed onto your computer’s default hard drive, which is typically C:\ on most Windows- based PCs. The KOR program is then placed into the program file directory. On XP and Windows 7 32-bit systems, this folder is simply called Program Files. -
Page 65: Sdi-12
KOR Software 4.11 SDI-12 The sonde can be connected to an SDI-12 bus using a Signal Output Adapter (SOA). The SOA provides the necessary SDI-12 electrical interface and communicates to the sonde via the topside RS-485 interface. The SOA will automatically recognize when a sonde is connected and retrieve the SDI-12 address and ID from the sonde. - Page 66 Calibration Basic EXO sensors (except temperature) require periodic calibration to assure high performance. Calibration procedures follow the same basic steps with slight variations for particular parameters. Conduct calibrations in a temperature-controlled lab. Calibration set-up For accurate results, thoroughly rinse the EXO calibration cup with water, and then rinse with a small amount of the calibration standard for the sensor you are going to calibrate.
-
Page 67: Calibration
Calibration Conductivity Clean the conductivity cell with the supplied soft brush before calibrating. Also, review the basic calibration description on pg 65. This procedure calibrates conductivity, specific conductance, salinity, and total dissolved solids. Place the correct amount of conductivity standard into a clean and dry or pre-rinsed calibration cup. A variety of standards are available based on the salinity of your environment. -
Page 68: Calibrating Dissolved Oxygen
Calibration Dissolved Oxygen First review the basic calibration description on pg 65. ODO % sat – 1-point Place the sonde with sensor either (a) into a calibration cup containing about 1/8 inch of water which is vented by loosening the threads or (b) into a container of water which is being continuously sparged with an aquarium pump and air stone. - Page 69 ODO % sat or mg/L – 2-point (or zero point) Normally it is not necessary to perform a 2-point calibration for the DO sensor, and the procedure is not recommended unless (a) you are certain that the sensor does not meet your accuracy requirements at low DO levels and (b) you are operating under conditions where you are certain to be able to generate a medium which is truly oxygen-free.
-
Page 70: Calibrating Depth
Calibration Depth Note: This calibration option is available only if your sonde is equipped with an integral depth sensor. For the depth calibration, make certain that the depth sensor module is in air and not immersed in any solution. Also, review the basic calibration description on pg 65. In the Calibrate menu, select Port D-Depth, then select Depth from the second menu. -
Page 71: Calibrating Ph
Calibration 2-point Most environmental water has a pH between 7 and 10. Therefore, unless you anticipate a pH of less than 7 for your deployment application, we recommend a 2-point calibration using pH 7 and pH 10 buffers. Review the basic calibration description on pg 65. Pour the correct amount of pH 7 buffer/standard in a clean and dry or pre-rinsed calibration cup. -
Page 72: Calibrating Orp
Calibration Review the basic calibration description on pg 65. Pour the correct amount of standard with a known oxidation reduction potential value (we recommend Zobell solution) in a clean and dry or pre-rinsed calibration cup. Carefully immerse the probe end of the sonde into the solution. -
Page 73: Calibrating Turbidity
Calibration Turbidity Before calibrating, be certain that the probe is clean and free of debris. Solid particles, particularly those carried over from past deployments, will contaminate the standards during your calibration protocol and cause either calibration errors and/or inaccurate field data. Use a clean, spare sonde guard. Also, review the basic calibration description on pg 65. - Page 74 Calibration (Chl + BGA-PC) Total Algae Chlorophyll This procedure calibrates Chlorophyll RFU or Chlorophyll μg/L. If the user has both units selected, then this procedure must be performed twice, once for each unit, to completely calibrate the parameter. For 2-point calibrations, one standard must be clear water (0 μg/L), and this standard must be calibrated first.
- Page 75 chlorophyll content of grab-samples taken during a deployment has been analyzed in a laboratory. This determination can involve conducting the extractive analysis procedure described for chlorophyll in Methods for the Examination of Water and Wastewater or by carrying out an in situ measurement of chlorophyll using a commercial benchtop fluorometer.
- Page 76 In the Calibrate menu, select BGA-PC/Chlor, then select BGA μg/L. Select either a 1- or 2-point calibration. Enter 0 for first standard value and 10.4 for second standard value. Click Start Calibration. Observe the readings under Current and Pending data points. While stabilizing, click the Wipe Sensors button to activate the wiper to remove any bubbles.
-
Page 77: Calibrating Fdom
Calibration fDOM This procedure calibrates fDOM RFU or fDOM QSU/ppb. If the user has both units selected, then this procedure must be performed twice, once for each unit, to completely calibrate the parameter. For 2-point calibrations, the first standard must be clear water (0 μg/L). The second standard should be a 300 μg/L quinine sulfate solution. -
Page 78: Calibration Standards
Calibration 5.10 Calibration Standards Quinine Sulfate Solution for fDOM Sensor Before using a quinine sulfate reagent (solid or solution) or sulfuric acid reagent, read the safety instructions provided by the supplier. Take extra precautions when making dilutions of concentrated sulfuric acid, as this reagent is particularly dangerous. - Page 79 Rhodamine WT Dye Solution for Total Algae Sensor Read and follow all the safety instructions and MSDS documentation supplied with the dye before proceeding. Remember that only trained personnel should handle chemicals. Preparation Use the following procedure to prepare a Rhodamine WT solution for use as a sensor stability check reagent for the EXO Total Algae (Chlorophyll and Blue-green Algae) sensor: 1.
- Page 80 Calibration 5.11 Calibration Worksheet The Calibration Worksheet is a record of the calibration for an EXO sensor. The worksheet contains quality assurance information including date and time of calibration, date of previous calibration, sensor firmware version, type of calibration performed, standard used, and QC score. Calibration Worksheets are saved in the Calibration Files folder on the computer (not on the sonde).
- Page 81 Sonde Storage Proper sonde storage helps to ensure proper sonde operation. To keep sondes in their best working order, users must follow these instructions. This section will identify storage as “long-term” or “short-term. ” Long- term denotes storage during times of long inactivity (over winter, end of monitoring season, etc.). Short-term denotes storage during times the sonde will be used at a regular interval (daily, weekly, biweekly, etc.).
-
Page 82: Maintenance
Sonde Maintenance Like all precision equipment, EXO sondes work most reliably when users maintain them properly. A proper inspection and cleaning can prevent several issues, including leaks. When performing general maintenance on the sonde, also check this manual’s depth and connector sections. Use only the recommended materials to service instruments. - Page 83 Sonde Install or Replace EXO 1 Batteries EXO1 water quality sondes use two (2) D-cell batteries as a power source. Using alkaline batteries, users can expect approximately 90 days of deployment from a fully loaded sonde that samples once every 15 minutes. However, deployment times may vary greatly depending on water temperature, sampling rate, sensor payload, and brand of battery.
- Page 84 4 Check and service o-rings. Before replacing the battery cover, check and service the four o-rings. Ensure that the o-rings are not nicked or torn and that they have no contaminants or particles on them or the sealing surfaces inside the battery cover. Clean the o-rings with a lint-free cloth.
- Page 85 Sonde Install or Replace EXO 2 Batteries EXO2 water quality sondes use four (4) D-cell batteries as a power source. Using alkaline batteries, users can expect approximately 90 days of deployment from a fully loaded sonde that samples once every 15 minutes. However, deployment times may vary greatly depending on water temperature, sampling rate, sensor payload, wiper frequency, and brand of battery.
- Page 86 4 Check and service o-rings. Before replacing the battery cover, inspect and service the four o-rings. Ensure that the o-rings are not nicked or torn and that they have no contaminants or particles on them or the sealing surfaces inside the battery cover. Then apply a thin coat of Krytox®...
- Page 87 Sonde Replace EXO1 Bail Sonde bails provide users with a handle for convenient transport and an attachment point for cable strain reliefs. If an EXO1 bail breaks due to impact or standard wear and tear throughout the life of the sonde, a user can easily replace it.
- Page 88 Sonde Replace EXO2 Bail Sonde bails provide users with a handle for convenient transport and an attachment point for cable strain reliefs. If an EXO2 bail breaks due to impact or standard wear and tear throughout the life of the sonde, a user can easily replace it.
-
Page 89: Update Sonde Firmware
Sonde Update Firmware Users can check and update sensor or sonde firmware through the KOR interface software. Each device must be connected to the computer that is running the Desktop version of KOR, and the computer must have internet access. 1 Open firmware submenu in Kor. - Page 90 Handheld Maintenance and Storage EXO Handhelds (HH) are rugged field instruments that are tested to a rating of IP-67 in the factory. Follow the instructions below for the most reliable performance from the HH. This section will identify storage as “long-term”...
- Page 91 Handheld Install or Replace Batteries The EXO Handheld (HHs) uses four (4) C-cell alkaline batteries as a power source. Users can extend battery life by putting the HH in “Sleep” mode, when convenient, by pressing and holding the power button for less than three seconds.
- Page 92 Handheld Update Firmware & KOR Software To update the instrument firmware and KOR software on the EXO Handheld, use the Desktop version of KOR on a computer with internet access. KOR Desktop will go online and pull updated files for the Handheld, which are then transferred to the Handheld.
- Page 93 Depth Sensor Maintenance EXO depth sensors access the water through small holes (ports) located in the sonde body or bulkhead. Although users cannot access them directly, proper storage maintenance will help to ensure reliable operation. Depth sensors can be stored dry, in water-saturated air, or submerged in clean water. However, be sure that the water does not contain solutions that are corrosive.
-
Page 94: Standard Optical Sensors Maintenance And Storage
Standard Optical Sensor Maintenance and Storage Standard optical sensors include Turbidity, Total Algae, and fDOM sensors; these optical sensors are very low maintenance. This section identifies storage as “long-term” or “short-term. ” Long-term denotes storage during times of long inactivity (over winter, end of monitoring season, etc.). Short-term denotes storage during times the sonde will be used at a regular interval (daily, weekly, biweekly, etc.). - Page 95 Conductivity/Temp Sensor 6.10 Maintenance and Storage EXO conductivity and temperature (CT) sensors require little maintenance or special attention for storage. As much as possible, prevent impact to the sensor’s exposed thermistor. This section will identify storage as “long-term” or “short-term. ” Long-term denotes storage during times of long inactivity (over-wintering, end of monitoring season, etc.).
- Page 96 Dissolved Oxygen Sensor 6.11 Storage EXO DO sensors require separate storage instructions from other optical sensors due to their sensing membranes. This section will identify storage as “long-term” or “short-term. ” Long-term denotes storage during times of long inactivity (over winter, end of monitoring season, etc.). Short-term denotes storage during times the sonde will be used at a regular interval (daily, weekly, biweekly, etc.).
- Page 97 Dissolved Oxygen Sensor 6.11 Maintenance and Rehydration EXO Dissolved Oxygen (DO) sensors require unique maintenance instructions due to their sensing membranes. Users should routinely perform these instructions in order to achieve the highest levels of sensor accuracy. DO sensor caps have a typical life of 12 months. After this point, users should replace the DO membrane cap.
-
Page 98: Sensor Cap Replacement
Dissolved Oxygen Sensor 6.12 Sensor Cap Replacement Follow these instructions to replace the sensor cap on an EXO optical dissolved oxygen sensor once the previous cap has exhausted its usable life (typically about one year). This cap is shipped in a humidified container, and should be stored in a 100% humid environment. - Page 99 4 Configure probe for new cap. In KOR software, configure the probe for the new sensor cap. Click the Calibrate button and then click the ODO button. Next click the ODO % sat button, and in the DO calibration window click the Advanced button. In the Advanced menu, click the Edit button and enter the unique membrane cap coefficients found on the instruction sheet shipped with the DO sensor cap.
- Page 100 pH and pH/ORP Sensors 6.13 Storage and Rehydration pH and pH/ORP sensors have two specific storage requirements: they should not be stored in distilled or deionized water and their reference electrode junction should never dry out. This section will identify storage as “long-term”...
- Page 101 pH and pH/ORP Sensors 6.13 Maintenance pH and pH/ORP sensors will require occasional maintenance to clear contamination from the sensing elements. These contaminants can slow the sensor’s response time. Clean the sensors whenever deposits, biofouling, or other contamination appear on the glass, or when the sensor’s response time slows perceptibly. Remove the sensor from the sonde before performing the following cleaning steps.
-
Page 102: Sensor Module Replacement
pH and pH/ORP Sensors 6.14 Sensor Module Replacement EXO pH and pH/ORP feature replaceable sensor modules due to the electrolyte depleting characteristics necessary to make such measurements. We recommend that users replace these modules as necessary, typically one to two years if stored properly in the provided storage solution when not in use. Working life will depend on the conditions of the deployment environment. - Page 103 4 Inspect and service new sensor module’s o-rings. Ensure that the two o-rings are not nicked or torn and have no contaminants or particles on them. If the user detects damage, carefully replace them with the extras included in the sensor module kit. Then apply a thin coat of Krytox® lubricant to each o-ring.
- Page 104 Wiper 6.15 Maintenance and Storage Follow these instructions to replace the wiper brush assembly or brush guard component on the central wiper module on the EXO2 sonde. We recommend changing the wiper between deployments to avoid sediment carryover, which can compromise calibration and data collection. For long- and short-term storage, the wiper requires minimal precautions.
-
Page 105: Field Cable Maintenance And Storage
Field Cable 6.16 Maintenance and Storage EXO field cables are rugged and provide years of reliable service when properly maintained. As with all field cables, they are most vulnerable at their connectors. Take extra caution to protect the connectors from debris and physical harm. -
Page 106: Antifouling Equipment Maintenance
Antifouling Equipment 6.17 Maintenance Many components on EXO sondes are made of an anti-fouling copper-alloy material that discourages the growth of aquatic organisms. However, longer deployment intervals and highly productive waters can result in biofouling attachment to the equipment, which should be cleaned periodically. See also instructions for cleaning individual sensors. -
Page 107: Connectors Maintenance And Storage
Connectors 6.18 Maintenance and Storage EXO sondes utilize wet-mate connectors that greatly reduce problems associated with traditional underwater connectors. However these connectors must be properly maintained to reap the full benefit of this design. Following these instructions will minimize most potential issues. Never stick any foreign object into a female connector. - Page 108 4 Replace locking nut. If the locking nut near the sensor connector wears out, Retaining Locking Nut users can replace it with #599478 (sensor) or #599479 Ring (EXO2 central wiper). First remove the retaining ring by inserting the tip of a small, flat-blade screwdriver under the lip of the ring and pry upward.
-
Page 109: Flow Cell Maintenance
Flow Cell 6.19 Maintenance There are two versions of the EXO flow cell: EXO1 flow cell (#599080) and EXO2 flow cell (#599201). Flow rate of the flow cell is typically between 100 mL and 1 L per minute. Maximum flow rate depends on tubing type, size, and length. - Page 110 This page intentionally left blank...
-
Page 111: Chemicals
Health & Safety Chemicals NOTE: For additional health, safety, and disposal information about reagents, download the MSDS documents for the chemical in question from the EXO manufacturers’ websites: www.ysi.com or www.wtw.de. Conductivity Solutions First Aid for all solutions 3161, 3163, 3165, 3167, 3168, and 3169 Move to fresh air. -
Page 112: Zobell Solution
Skin: Exposure may cause irritation with repeated exposure. Wear rubber or neoprene gloves. Eyes: Can cause irritation and potential eye damage with repeated exposure. Wear safety glasses with side- shields or face shield. Contact lenses should not be worn when working with these solutions. Ingestion: May cause nausea, vomiting, or diarrhea. -
Page 113: Radio Frequency
• New Zealand: CISPR 11 compliant Bluetooth wireless technology and similar approvals and regulations can be country-specific. Check local laws and regulations to insure that the use of wireless products purchased from Xylem or its subsidiaries are in full compliance. -
Page 114: Declarations Of Conformity
The undersigned hereby declares that the products listed below conform with all applicable requirements of FCC Part 15 for the U.S. and Industry Canada (IC) ICES-003 for Canada, for intentional radiators. Manufacturer: YSI Incorporated, a Xylem brand 1725 Brannum Lane Yellow Springs, OH 45387 USA... - Page 115 The undersigned hereby declares that the products listed below conform with all applicable Essential Re- quirements of the listed Directives and Standards and carry the CE mark accordingly. Manufacturer: YSI Incorporated, a Xylem brand 1725 Brannum Lane Yellow Springs, OH 45387 USA...
- Page 116 Electromagnetic Compatibility (EMC) requirements for generic products to be used in residential, commercial, and light industrial environments, and carry the C-Tick mark accordingly. Manufacturer: YSI Incorporated, a Xylem brand 1725 Brannum Lane Yellow Springs, OH 45387 USA Equipment name:...
-
Page 117: Instrument Warranty
Instrument Warranty EXO sondes and sensors are warranted for two years and the Warranty Card EXO handheld for three years against defects in workmanship and materials when used for their intended purposes and maintained according to instructions and exclusive of Register your product with the batteries and any damage caused by defective batteries. - Page 118 Instrument Service Cleaning & Packing EXO Authorized Service Centers are located in the United States and around the world. Please refer to the EXO website (EXOwater.com) for your nearest Authorized Service Center. Cleaning Instructions Product Return Form Before they can be serviced, equipment exposed to biological, radioactive, or toxic materials must be cleaned and disinfected.
-
Page 119: Recycling
Instrument Service Recycling Batteries The user must remove and dispose of alkaline batteries when they no longer power the EXO1 sonde, EXO2 sonde, or EXO Handheld. Disposal requirements vary by country and region, and users are expected to understand and follow the battery disposal requirements for their specific locale. The circuit board in these instruments may contain a manganese dioxide lithium “coin cell”... - Page 120 Wissenschaftlich-technische Werkstatten gmbH d-82362 Weilheim dr.-Karl-Slevogt-Strasse 1 germany tel. 0881/183-0 info@wtw.de www.eXowater.com eXo is a trademark of Xylem inc. or one of its subsidiaries. item# 603789REF Bluetooth is a trademark of Bluetooth Sig inc. drawing # A603789 Xenoy is a trademark of SABic Plastics revision ©...
Need help?
Do you have a question about the EXO Series and is the answer not in the manual?
Questions and answers