Table of Contents
Advertisement
Quick Links
Advertisement
Table of Contents

Related Manuals for Xylem SI Analytics HandyLab 100


Summary of Contents for Xylem SI Analytics HandyLab 100
- Page 1 OPERATING MANUAL ba77062d02 12/2017 HandyLab 100 pH METER...
- Page 2 HandyLab 100 For the most recent version of the manual, please visit www.si-analytics.com. © Copyright 2017 Xylem Analytics Germany GmbH Printed in Germany. ba77062d02 12/2017...
-
Page 3: Table Of Contents
HandyLab 100 Contents HandyLab 100 - Contents Overview ........5 Keypad . - Page 4 Contents HandyLab 100 Data memory ........43 4.5.1 Manual storage .
-
Page 5: Overview
HandyLab 100 Overview Overview The compact HandyLab 100 precision pH meter enables you to per- form pH measurements rapidly and reliably. The HandyLab 100 pro- vides the maximum degree of operating comfort, reliability and measuring certainty for all applications. The proven calibration procedures and automatic stability control func- tion (AR) support your work with the pH meter. -
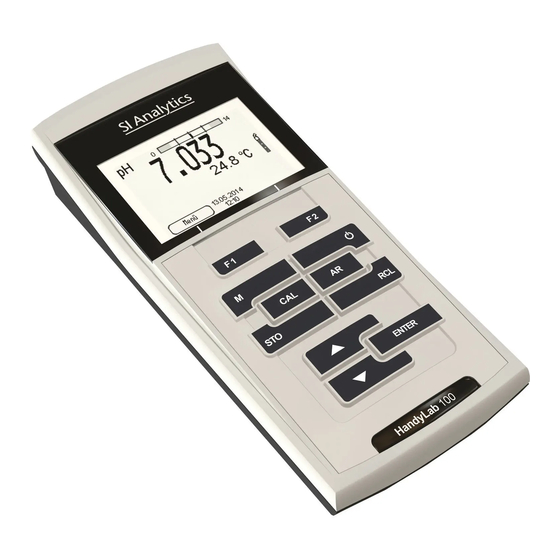
Page 6: Keypad
Overview HandyLab 100 Keypad In this operating manual, keys are indicated by brackets <..> . The key symbol (e.g. <ENTER>) generally indicates a short keystroke (under 2 sec) in this operating manual. A long keystroke (approx. 2 sec) is indicated by the underscore behind the key symbol (e.g. <ENTER >). -
Page 7: Display
HandyLab 100 Overview Display 6.093 25.0 °C HOLD AR 15.03.2014 Menu 10:00 1 Status information 2 Measured value (with unit) 3 Measured parameter 4 Continuous measurement control (CMC function) 5 Sensor symbol (calibration evaluation, calibration interval) 6 Measured temperature (with unit) 7 Status line 8 Softkeys and date + time Function display... -
Page 8: Connectors
Overview HandyLab 100 Connectors 1 pH electrode 2 Reference electrode / temperature sensor 3 Reference electrode / temperature sensor 4 Service interface Caution Only connect sensors to the meter that cannot return any voltages or currents that are not allowed (> SELV and > current circuit with current limiting). -
Page 9: Safety
HandyLab 100 Safety Safety This operating manual contains basic instructions that you must follow during the commissioning, operation and maintenance of the meter. Consequently, all responsible personnel must read this operating man- ual before working with the meter. The operating manual must always be available within the vicinity of the meter. -
Page 10: Authorized Use
Safety HandyLab 100 Authorized use This meter is authorized exclusively for pH and ORP measurements in a laboratory or field environment. The technical specifications as given in chapter 7 T must ECHNICAL DATA be observed. Only the operation and running of the meter according to the instructions given in this operating manual is authorized. - Page 11 HandyLab 100 Safety Safe operation If safe operation is no longer possible, the meter must be taken out of service and secured against inadvertent operation! Safe operation is no longer possible if the meter: has been damaged in transport ...
-
Page 12: Commissioning
Commissioning HandyLab 100 Commissioning Scope of delivery pH meter HandyLab 100 4 batteries 1.5 V Mignon type AA Short instructions CD-ROM with – detailed operating manual Initial commissioning Perform the following activities: Insert the supplied batteries ... -
Page 13: Switching On The Meter
HandyLab 100 Commissioning Caution Make sure that the poles of the batteries are positioned correctly. ± The ± signs on the batteries must correspond to the signs in the battery compartment. Note Alternatively, you can also use Ni-MH rechargeable batteries (type Mignon AA). -
Page 14: Operation
Operation HandyLab 100 Operation Switching on the meter Switching on Press the <On/Off> key. The meter performs a self-test. The display shows the manufacturer's logo while the self-test is being performed. The measured value display appears. 6.949 25.0 °C 15.03.2014 Menu 08:00 Switching off... -
Page 15: General Operating Principles
HandyLab 100 Operation General operating principles This section contains basic information on the operation of the HandyLab 100. Operating elements, An overview of the operating elements and the display is given in sec- display tion 1.1 and section 1.2. Operating modes, An overview of the operating modes and navigation of the navigation HandyLab 100 is given in section 4.2.1 and section 4.2.2. -
Page 16: Navigation
Operation HandyLab 100 4.2.2 Navigation Measured value display In the measured value display, you can open the menu for calibration and measurement settings with <F1> (short keystroke) open the system menu with the sensor-independent settings by pressing <F1>Storage & config for a <F1 >long keystroke, approx. - Page 17 HandyLab 100 Operation Functions Functions are designated by the name of the function. They are immediately carried out by confirming with <ENTER>. Example: Display the Calibration record function. Calibration record Calibration data storage Buffer One point calibration Calibration interval Unit for slope mV/pH 2.00 4.01 7.00 10.01 (25 °C)
-
Page 18: Navigation Example 1:Setting The Language
Operation HandyLab 100 4.2.3 Navigation example 1:Setting the language Press the <On/Off> key. The measured value display appears. The instrument is in the measuring mode. 6.949 25.0 °C 15.03.2014 Menu 08:00 Using <F1 >/[Menu], open the Storage & config menu. The instrument is in the setting mode. - Page 19 HandyLab 100 Operation System General Clock Service information Reset 15.03.2014 Back 08:00 Select the General submenu with <><>. The current selection is displayed with a frame. Open the General submenu with <ENTER>. General Language: Deutsch Illumination Contrast 50 % Switchoff time 15.03.2014 Back 08:00...
-
Page 20: Example 2 On Navigation: Setting The Date And Time
Operation HandyLab 100 Confirm the setting with <ENTER>. The meter switches to the measuring mode. The selected language is active. 4.2.4 Example 2 on navigation: Setting the date and time The meter has a clock with a date function. The date and time are indi- cated in the status line of the measured value display. - Page 21 HandyLab 100 Operation Clock Date format dd.mm.yyyy Date 15.03.2014 Time 14:53:40 15.03.2014 Back 08:00 Change and confirm the setting with <><> and <ENTER>. The minutes are highlighted. Change and confirm the setting with <><> and <ENTER>. The seconds are highlighted. Change and confirm the setting with <><>...
-
Page 22: Sensor-Independent Settings
Operation HandyLab 100 Sensor-independent settings The Storage & config menu comprises the following settings: System (see section 4.3.1). Data storage (see section 4.3.2) 4.3.1 System Overview The following sensor-independent meter characteristics can be adjusted in the Storage & config/System menu: ... -
Page 23: Data Storage
HandyLab 100 Operation Menu item Setting Explanation System / Reset Resets the system settings to the default values. For details, see section 4.6.2 4.3.2 Data storage This menu contains all functions to display, edit and erase stored mea- sured values. Note Detailed information on the memory functions of the HandyLab 100 is given in section 4.5. -
Page 24: Measuring The Ph Value
Operation HandyLab 100 sor (NTC30 or Pt1000) integrated in electrode. Measurement by an external temperature sensor. Manual determination and input of the temperature. The measuring instrument recognizes whether a suitable sensor is connected and automatically switches on the temperature measure- ment. - Page 25 HandyLab 100 Operation 6.949 25.0 °C 15.03.2014 Menu 08:00 Select the pH or mV display with <M>. Stability control The stability control function (AutoRead) continually checks the stability (AutoRead ) of the measurement signal. The stability has a considerable impact on the reproducibility of measured values.
-
Page 26: Measuring The Orp
Operation HandyLab 100 Using <ENTER>, start a further measurement with stability control. Release the frozen measured value again with <AR> or <M>. The [AR] status display disappears. The display switches back to the previous indication. Criteria for a stable The Stability control function checks whether the measured values are measured value stable within the monitored time interval. - Page 27 HandyLab 100 Operation Stability control The stability control function (AutoRead) continually checks the stability (AutoRead ) of the measurement signal. The stability has a considerable impact on the reproducibility of measured values. The measured parameter flashes on the display as soon as the measured value is outside the stability range ...
-
Page 28: Settings For Ph And Orp Measurements
Operation HandyLab 100 stable within the monitored time interval. Measured Time interval Stability during the time parameter interval Δ : better than 0.3 mV 15 seconds Δ : better than 0.5 °C Temperature 15 seconds The minimum duration until a measured value is assessed as stable is the monitored time interval. -
Page 29: Ph Calibration
HandyLab 100 Operation Menu item Possible Explanation setting Calibration / One Quick calibration with 1 point calibration buffer Calibration / Calibra- 1 ... 999 d Calibration interval for the tion interval pH electrode (in days). The meter reminds you to calibrate regularly by the flashing sensor symbol in the measuring screen. - Page 30 Operation HandyLab 100 played. Calibration determines and stores the current values of the zero point and slope of the electrode. Thus, you should calibrate at regular intervals. After connecting another combination electrode When do you have to calibrate? When the calibration interval has expired Buffer sets for You can use the buffer sets quoted in the table for an automatic calibra- calibration...
- Page 31 HandyLab 100 Operation Buffer set * pH values DIN 19267 1.090 25 °C 4.650 6.790 9.230 Mettler Toledo USA * 1.679 25 °C 4.003 7.002 10.013 Mettler Toledo EU * 1.995 25 °C 4.005 7.002 9.208 Fisher * 2.007 25 °C 4.002 7.004 10.002...
- Page 32 Operation HandyLab 100 Buffer set * pH values Reagecon TEC * 2.000 25 °C 4.010 7.000 10.000 Reagecon 20 * 2.000 20 °C 4.000 7.000 10.000 13.000 Reagecon 25 * 2.000 25 °C 4.000 7.000 10.000 13.000 Chemsolute * 4.000 20 °C 7.000 10.000...
- Page 33 HandyLab 100 Operation Determined values Displayed calibration data Zero point = Asy 3-point to 5-point Slp. Slope = Slp. The calibration line is calcu- lated by linear regression. Note You can display the slope in the units, mV/pH or % (see page 28). Stability control The calibration procedure automatically activates the stability control function.
-
Page 34: Calibration Interval
Operation HandyLab 100 Preparatory activities Perform the following preparatory activities when you want to calibrate: Connect the pH electrode to the meter. The pH measuring window is displayed. Keep the buffer solutions ready. Adjust the temperature of the buffer solutions, or measure the current temperature, if you measure without a temperature sensor. - Page 35 HandyLab 100 Operation is automatically finished with the measurement of buffer solution 1 and the calibration record is displayed. In the measured value display, select the measured parameter pH or mV with <M>. Start the calibration with <CAL>. The calibration display for the first buffer appears (voltage dis- play).
- Page 36 Operation HandyLab 100 If necessary, finish the calibration procedure as a single-point calibration with <M>. The calibration record is displayed. Note For single-point calibration, the instrument uses the Nernst slope (-59.2 mV/pH at 25 °C) and determines the zero point of the electrode. Continuing with two- Thoroughly rinse the electrode with deionized water.
-
Page 37: Carrying Out A Manual Calibration (Varical)
HandyLab 100 Operation When measuring without temperature sensor: Measure the temperature of the buffer manually and enter it with <><>. Start the measurement with <ENTER>. The measured value is checked for stability (stability control). The [AR] status indicator is displayed. The measured parame- ter flashes. - Page 38 Operation HandyLab 100 In the measured value display, select the measured parameter pH or mV with <M>. Start the calibration with <CAL>. The calibration display appears. Buffer 24.8 °C VariCal 15.03.2014 08:00 Thoroughly rinse the electrode with deionized water. Immerse the electrode in buffer solution 1. When measuring without temperature sensor: Measure the temperature of the buffer manually and enter it with <><>.
- Page 39 HandyLab 100 Operation Buffer 7.000 24.8 °C VariCal 15.03.2014 08:00 Set the nominal buffer value for the measured temperature with <><>. Accept the calibration value with <ENTER>. The calibration display for the next buffer appears (voltage dis- play). If necessary, finish the calibration procedure as a single-point calibration with <M>.
- Page 40 Operation HandyLab 100 Buffer 4.035 24.8 °C VariCal 15.03.2014 08:00 Set the nominal buffer value for the measured temperature with <><>. Accept the calibration value with <ENTER>. The calibration display for the next buffer appears (voltage dis- play). Finish the calibration procedure as a two-point calibration with <M>.
-
Page 41: Displaying Calibration Records
HandyLab 100 Operation Buffer 9.958 24.8 °C VariCal 15.03.2014 08:00 Set the nominal buffer value for the measured temperature with <><>. Accept the calibration value with <ENTER>. The calibration display for the next buffer appears (voltage dis- play). Use <M>... -
Page 42: Continuous Measurement Control (Cmc Function)
Operation HandyLab 100 4.4.10 Continuous measurement control (CMC function) The Continuous Measurement Control (CMC function) facilitates to evaluate the current measured value instantly and definitely. After each successful calibration the scale of the pH measuring range is displayed in the measured value display. Here you can very clearly see whether or not the current measured value is in the calibrated part of the measuring range. -
Page 43: Data Memory
HandyLab 100 Operation Data memory You can transmit measured values (datasets) to the data memory: Manual storage (see section 4.5.1) Measurement dataset A complete dataset consists of: ID number Date/time Measured value of the connected sensor ... -
Page 44: Editing The Measurement Data Memory
Operation HandyLab 100 If the memory is full The following window appears if all 500 storage locations are occupied: Warning Data storage full. Erase? 15.03.2014 Back 08:00 You have the following options: To erase the entire storage, confirm Yes. ... -
Page 45: Erasing The Measurement Data Memory
HandyLab 100 Operation Menu item Setting/ Explanation function Data storage / Erases the entire manual Manual data storage / measurement data memory. Erase Note: All calibration data remain stored when this action is performed. Display presentation of Manual data storage 3 of 64 a dataset 15.03.2014 11:24:16 ID number: 1... -
Page 46: Reset
Operation HandyLab 100 Reset You can reset (initialize) all sensor settings and sensor-independent settings separately from each other. 4.6.1 Resetting the measurement settings Note The calibration data are reset to the default settings together with the measuring parameters. Recalibrate after performing a reset. The following settings for pH measurements are reset to the default settings with the Reset function: Setting... -
Page 47: Resetting The System Settings
HandyLab 100 Operation 4.6.2 Resetting the system settings The following system settings can be reset to the default status: Setting Default settings Language English Contrast 50 % Illumination Auto Switchoff time The system settings are reset in the menu, Storage & config / System / Reset. -
Page 48: Maintenance, Cleaning, Disposal
Maintenance, cleaning, disposal HandyLab 100 Maintenance, cleaning, disposal Maintenance The only maintenance activity required is replacing the batteries. Note See the relevant operating manuals of the electrodes for instructions on maintenance. 5.1.1 Replacing the batteries Unscrew the screws (1) on the underside of the meter. Open the battery compartment (2) on the underside of the meter. -
Page 49: Cleaning
HandyLab 100 Maintenance, cleaning, disposal Place four batteries (type Mignon AA) in the battery compart- ment. Close the battery compartment. Cleaning Occasionally wipe the outside of the measuring instrument with a damp, lint-free cloth. Disinfect the housing with isopropanol as required. -
Page 50: What To Do If
What to do if... HandyLab 100 What to do if... Error message Cause Remedy OFL, UFL pH electrode: – Measured value outside the – Use suitable electrode measuring range – Air bubble in front of the junc- – Remove air bubble tion –... - Page 51 HandyLab 100 What to do if... No stable measured Cause Remedy value pH electrode: – Junction contaminated – Clean the junction – Membrane contaminated – Clean membrane Test sample: – pH value not stable – Measure with air excluded if necessary –...
- Page 52 What to do if... HandyLab 100 Obviously incorrect Cause Remedy measured values pH electrode: – pH electrode unsuitable – Use suitable electrode – Temperature difference – Adjust temperature of buf- between buffer and test sam- fer or sample solutions ple too great –...
-
Page 53: Technical Data
HandyLab 100 Technical data Technical data General data Dimensions ca. 180 x 80 x 55 mm Weight Approx. 0.4 kg Mechanical structure Type of protection IP 67 Electrical safety Protective class Test certificates Ambient Storage - 25 °C ... + 65 °C conditions Operation -10 °C ... -
Page 54: Measuring Ranges, Resolution, Accuracy
Technical data HandyLab 100 Measuring ranges, resolution, accuracy Measuring ranges, Variable Measuring range Resolution resolution - 2.0 ... + 20.0 - 2.00 ... + 20.00 0.01 - 2.000 ... + 19.999 0.001 U [mV] - 2500 ... + 2500 - 1200.0 ... + 1200.0 T [°C] - 5.0 ... -
Page 55: Lists
HandyLab 100 Lists Lists This chapter provides additional information and orientation aids. Specialist terms The glossary briefly explains the meaning of the specialist terms. How- ever, terms that should already be familiar to the target group are not described here. Index The index will help you to find the topics that you are looking for. - Page 56 Lists HandyLab 100 The ORP is caused by oxidizing or reducing substances dissolved in water if these substances become effective on an electrode surface (e.g. a gold or platinum surface). pH value The pH value is a measure of the acidic or basic effect of an aqueous solution.
- Page 57 HandyLab 100 Lists Index Erase ......44 Storage locations ....43 Authorized use .
- Page 58 Lists HandyLab 100 ba77062d02 12/2017...
- Page 60 Xylem also provides a leading portfolio of smart metering, network technologies and advanced analytics solutions for water, electric and gas utilities. In more than 150 countries, we have strong, long-standing relationships with customers who know us for our powerful combination of leading product brands and applications expertise with a strong focus on developing comprehensive, sustainable solutions.
Need help?
Do you have a question about the SI Analytics HandyLab 100 and is the answer not in the manual?
Questions and answers