Table of Contents
Advertisement
Certification Exhibit
FCC ID: U4A-SCYPROX3
IC: 6982A-SCYPROX3
FCC Rule Part: 15.209
IC Radio Standards Specification: RSS-210
ACS Report Number: 10-0443.W06.11.A
Manufacturer: Assa Abloy
Model: S1-PA/PK, S2-PA/PK,
TCIP1-M802/M803, TCWI1-M802/M803
Manual(s)
5015 B.U. Bowman Drive Buford, GA 30518 USA Voice: 770-831-8048 Fax: 770-831-8598
Advertisement
Table of Contents

Subscribe to Our Youtube Channel
Related Manuals for Sargent Profile Series v.S2


Summary of Contents for Sargent Profile Series v.S2
- Page 1 Certification Exhibit FCC ID: U4A-SCYPROX3 IC: 6982A-SCYPROX3 FCC Rule Part: 15.209 IC Radio Standards Specification: RSS-210 ACS Report Number: 10-0443.W06.11.A Manufacturer: Assa Abloy Model: S1-PA/PK, S2-PA/PK, TCIP1-M802/M803, TCWI1-M802/M803 Manual(s) 5015 B.U. Bowman Drive Buford, GA 30518 USA Voice: 770-831-8048 Fax: 770-831-8598...
- Page 2 Profile WiFi Mortise Lock Installation Instructions A7786E 01/11 Copyright 2010, Sargent Manufacturing Company, an ASSA ABLOY Group company. All rights reserved. Reproduction in whole or in part without the express written permission of Sargent Manufacturing Company is prohibited.
-
Page 3: Table Of Contents
To comply with “Fire Listed” doors, the batteries must be replaced with alkaline batteries only. SARGENT Mfg. Co. v.S Series locksets utilizing a door position switch (DPS) are not rated for, or intended for use in life safety applications. -
Page 4: General Description
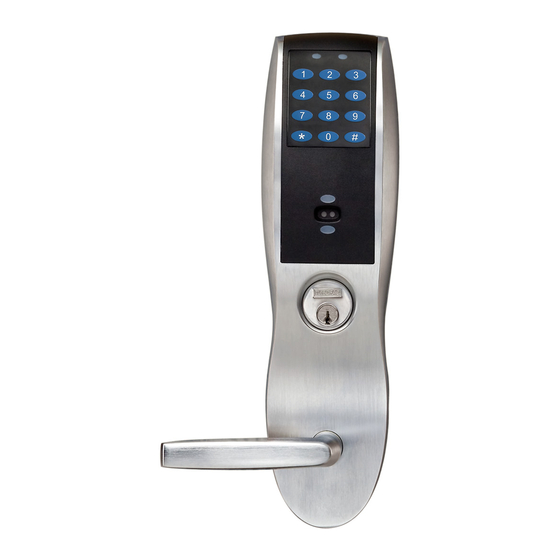
Profile Series v.S2 WiFi Mortise Lock General Description The SARGENT Profile Series v.S2 mortise lock is available with either an HID® 125 kHz prox or 13.56 MHz iCLASS® technology reader. It is designed for applications requiring wireless access control. The v.S2 is a self-contained microprocessor-controlled access control product with non-volatile memory. -
Page 5: Lock Wiring
Profile Series v.S2 WiFi Mortise Lock Lock Wiring Controller Board Connectors (Inside Escutcheon) Ring Terminal Power From Trim From Lock Body 1-800-810-WIRE • www.sargentlock.com • A7786E... -
Page 6: Parts Breakdown
Profile Series v.S2 WiFi Mortise Lock Parts Breakdown 125 kHz Prox and 13.56 MHz iCLASS 1-800-810-WIRE • www.sargentlock.com • A7786E... - Page 7 Profile Series v.S2 WiFi Mortise Lock Parts Breakdown 125 kHz Prox and 13.56 MHz iCLASS, continued ITEM PART NO. DESCRIPTION QTY. Outside Lever Reference 8200 Catalog for available levers Inside Lever Reference 8200 Catalog for available levers 82-0493 O/S Escutcheon only with Cylinder...
-
Page 8: Installation Instructions
Profile Series v.S2 WiFi Mortise Lock Installation Instructions Step #1 – Door Preparation A. Verify Hand and Bevel of Door Stand on outside/locked side of door when determining the door hand. LHRB RHRB Left Hand Left Hand Right Hand Right Hand... - Page 9 Profile Series v.S2 WiFi Mortise Lock Step #2 – How to Change Hand of Lockbody A. Reverse Lock Hand Red surface of locking piece must face the outside/locked side of door. To rotate locking piece (Fig. 2A): 1. Position lock body with red surface of locking piece visible.
- Page 10 Profile Series v.S2 WiFi Mortise Lock Step #3 – Install Lockbody To install lockbody: 1. Feed the wires first through the mortise pocket and out the inside prep, followed by the lock- body (Fig. 3A). Note: Connectors and wires must be fed through non-cylinder side.
- Page 11 Profile Series v.S2 WiFi Mortise Lock Step #5 – Install Gasket (for Exterior Doors) For exterior applications, use weather seal gasket between escutcheon Gasket and outside door surface. To apply weatherseal gasket: 1. Carefully remove the backing from the gasket. (Fig. 5A).
- Page 12 Profile Series v.S2 WiFi Mortise Lock Step #7 – Inside Escutcheon Wire Connections Images are shown without gasket. If gasket is necessary, refer to Step #5. Before the controller is attached to the door: Reader 1. Attach the reader assembly...
- Page 13 Profile Series v.S2 WiFi Mortise Lock Step #9 – Install Inside Escutcheon 1. Gently fold the excess ribbon connector and ground Inside of Door wire into the top hole, JST connectors and ground wire into offset middle hole, and mortise and AX/DPS wires into bottom hole, being careful not to pinch wires (Fig.
- Page 14 Profile Series v.S2 WiFi Mortise Lock Step #11 – Install and Secure Cylinder 1. Slide cylinder through the spring and rosette/collar and screw into lockbody, rotating the cylinder clockwise (Fig. 11A). Cylinder should be flush with escutcheon. Outside of Door Note: The 43 cylinder may be used when installing this product with or without a gasket.
- Page 15 Profile Series v.S2 WiFi Mortise Lock Step #13 – Install (or Replace) Batteries IMPORTANT: Batteries are optional if controller is powered by external power supply. 1. To install or replace batteries, first remove the battery cover (if necessary) using the provided security tool (Fig.13A).
-
Page 16: Operational Check
Profile Series v.S2 WiFi Mortise Lock Operational Check For 8276 and 8278 Function mortise locks with cylinders: 1. Insert key into cylinder and rotate (There should be no friction against lock case, wire harness or any other obstructions. Refer to Section 7, Step 8 if harness friction exists). - Page 17 New Haven, CT 06511 USA 800-810-WIRE (9473) • www.sargentlock.com Founded in the early 1800s, SARGENT® is a market leader in locksets, cylinders, door closers, exit devices, electro-mechanical products and access control systems for new construction, renovation, and replacement applications. The company’s customer base includes commercial construction, institutional, and industrial markets.
Need help?
Do you have a question about the Profile Series v.S2 and is the answer not in the manual?
Questions and answers