Table of Contents
Advertisement
Advertisement
Table of Contents

Related Manuals for IDEAL Networks LanTEK III


Summary of Contents for IDEAL Networks LanTEK III
- Page 1 LanTEK III...
- Page 2 COPYRIGHT NOTICE The information contained in this document is the property of IDEAL INDUSTRIES Ltd. and is supplied without liability for errors and omissions. No part of this document may be reproduced or used except as authorized by contract or other written permission from IDEAL INDUSTRIES Ltd.
- Page 3 • Do not open the battery pack case. There are no user-serviceable parts inside the case, and the batteries in the case are not replaceable. LanTEK III 161809 Iss 2 User Manual Page2...
- Page 4 Typographical Conventions Boldface Refers to a button on LanTEK®III Cable Certifier. • • Italics Refers to a menu option in this Operating Manual. • Quotation marks " " Identifies a "Screen Message". LanTEK III 161809 Iss 2 User Manual Page3...
-
Page 5: Table Of Contents
CONTENTS Chapter 1. Your LanTEK III Cable Certifier ................6 Technical Information..........................6 Product Specifications ..........................7 Dimensions, Weights, Operating Conditions .................. 7 Performance Specifications ........................8 Chapter 2. Product Description ....................9 The Display Handset (DH) ........................9 2.1.1 Controls and Ports/Connectors .................... - Page 6 Chapter 9. LanTEK Firmware Upgrade ................. 74 Perform Firmware Upgrade......................... 74 9.1.1 Using the Computer ........................74 9.1.2 Firmware Upgrade with USB Removable Storage ............75 Chapter 10. Customer Service ....................76 LanTEK III 161809 Iss 2 User Manual Page5...
-
Page 7: Chapter 1. Your Lantek Iii Cable Certifier
Chapter 1. Your LanTEK III Cable Certifier The LanTEK®III Cable Certifier is designed to measure twisted pair cables (TP), coaxial cables and fiber-optic cables used for high-speed data transmission in communications networks. Technical Information Features LanTEK®III-500 LanTEK®III-1000 Frequency range 500 MHz... -
Page 8: Product Specifications
External 4 hours Operating Temperature (min/max): C to +50 C (Operate only if handset temperature is close to ambient temperature!) Storage Temperature (min/max): C to +70 Relative Humidity: 5% to 90%, noncondensing LanTEK III 161809 Iss 2 User Manual Page7... -
Page 9: Performance Specifications
1 MHz - 1 GHz 0.1 dB Level III/IIIe/IV ELFEXT / ACR-F 1 MHz – 1 GHz 0.1 dB Level III/IIIe/IV ACR / ACR-N 1 MHz – 1 GHz 0.1 dB Level III/IIIe/IV LanTEK III 161809 Iss 2 User Manual Page8... -
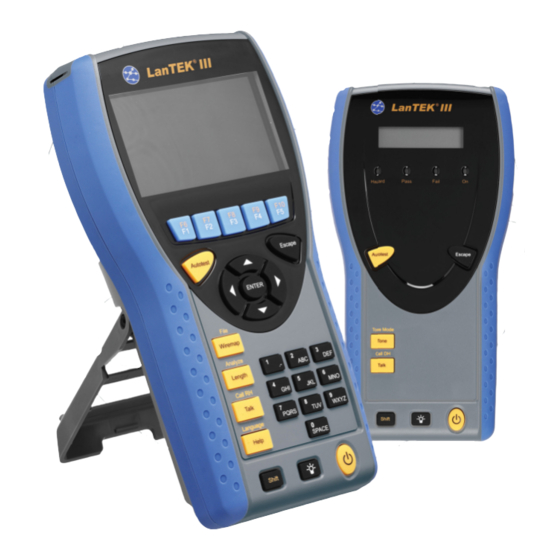
Page 10: Chapter 2. Product Description
Activate Talkset function / call Remote Handset Talk / Call RH (RH). Open Length Measurement / Open Diagnostics Length / Analyze Menu. Open analyze function "Wiremap" / Open Job Wiremap / File List. LanTEK III 161809 Iss 2 User Manual Page9... - Page 11 Connect USB removable devices to transmit USB Port data and to load Firmware-Updates. USB Device Connect to a computer Talkset Jack Connect a Talkset. Connect an external power supply and charge DC Input Jack battery pack. LanTEK III 161809 Iss 2 User Manual Page10...
-
Page 12: Tft Display
Select cable naming function. Stored Tests Select file manager for the stored tests. Job Name Display the current job name. Test Standard Display the cable type selected for tests. Records Number of records stored. LanTEK III 161809 Iss 2 User Manual Page11... -
Page 13: Function Keys F1 To F10
The example below shows the setting of Timeout options by using the soft keys at the bottom of the screen. The Value is set by Function Keys F1 (Increase) and F2 (Decrease). Softkeys Function keys Fig. 4 Soft keys and function keys LanTEK III 161809 Iss 2 User Manual Page12... -
Page 14: The Remote Handset (Rh)
Talk / Call DH (RH). Tone / Tone Mode Power the tone generator on/off. Abort and exit the current action without making Escape changes. Autotest Start the Autotest. Pass LED Test result: Passed. LanTEK III 161809 Iss 2 User Manual Page13... - Page 15 Connection for service and maintenance work. USB Device Connect to a computer for firmware updates. Talkset Jack Connect a Talkset. Connect an external power supply and charge DC Input Jack battery pack. LanTEK III 161809 Iss 2 User Manual Page14...
-
Page 16: Power Management
The Display (DH) and Remote (RH) handset can also be operated from an external DC source (AC/DC adapter). The adapters are universally applicable. Fig. 7 Adapter for LanTEK III DH and RH When using the AC/DC adapter to power the handsets, please note that: •... -
Page 17: Battery Charging
Display (DH) and Remote (RH) handset through an externally attached microphone/headset. For this purpose, the Display (DH) and Remote (RH) handset must be connected to the test adapters through a cable. LanTEK III 161809 Iss 2 User Manual... -
Page 18: Chapter 3. Basics Of The Cable Test
PL Adapter Replacement Tips • All non-45 cabling systems: R161056 LanTEK® GG45-Adapter R161054 LanTEK® TERA-Adapter R161055 LanTEK® EC7-Adapter NOTE: Please visit www.idealnetworks.net for an up to date full list of test Adapters. LanTEK III 161809 Iss 2 User Manual Page17... -
Page 19: Setup For Channel Link Test
Testing of End-to-End (E2E) , Device- or Direct Attach Links: R160050 LanTEK® Industrial Ethernet Kit & R161053 & LanTEK® Cat. 6A-Adapter for RJ-45 (both Adapters are required) NOTE: Please visit www.idealnetworks.net for an up to date full list of test Adapters. LanTEK III 161809 Iss 2 User Manual Page18... -
Page 20: Chapter 4. Preferences
Fig. 10 Preference Selection User Information This menu can be used to provide information on assigned Technician, Company and Contractor. Use Arrow Keys to navigate to "User Information" menu and press Enter. LanTEK III 161809 Iss 2 User Manual Page19... -
Page 21: Autotest Options
An activated option is indicated by the green box. 4. Press Enter to save the information entered. Press Escape to exit the menu without making changes. LanTEK III 161809 Iss 2 User Manual Page20... -
Page 22: Contrast
Use Arrow Keys to navigate to "Timeout Options" menu and press Enter. Fig. 14 Timeout Options 2. Use Arrow keys to select the desired option. 3. Use soft keys to set the desired value. LanTEK III 161809 Iss 2 User Manual Page21... -
Page 23: Measurement Units
Also use this menu to change the talkset mode. Use Arrow Keys to navigate to "Talkset" menu and press Enter. Fig. 16 Talkset 2. Use Arrow Keys to select the desired option. LanTEK III 161809 Iss 2 User Manual Page22... -
Page 24: Date And Time
9. Use Arrow Keys to navigate to option Date/Time Display. 10. Use soft key to select the desired setting. 11. Press Enter to save the information entered. Press Escape to exit the menu without making changes. LanTEK III 161809 Iss 2 User Manual Page23... -
Page 25: Restore Default
Use Arrow Keys to navigate to Clear Memory menu and press Enter. Fig. 19 Clear Memory 2. Use the soft key to clear the memory of the Cable Certifier. 3. Use the soft key to exit the screen without making changes. LanTEK III 161809 Iss 2 User Manual Page24... -
Page 26: Temperature
Use Arrow Keys to navigate to "Temperature" menu and press Enter. Fig. 20 Temperature 2. Use the soft keys to select the desired temperature. 3. Press Enter to save the information entered. Escape allows you to exit the menu without making changes. LanTEK III 161809 Iss 2 User Manual Page25... -
Page 27: Chapter 5. Autotest
• The test results of the last Autotest remain in the non-volatile memory until they are overwritten by new test results, the memory is deleted or an analysis test is conducted. LanTEK III 161809 Iss 2 User Manual Page26... -
Page 28: Set Autotest Pref
Auto Increment The test meter for the cable ID is automatically advanced after each Autotest. This will permanently delete the Tests / Jobs Enables confirmation prompt prior to deleting data. from the tester LanTEK III 161809 Iss 2 User Manual Page27... -
Page 29: Select Job Folder
Use Arrow keys to navigate to "File" and press Enter to open the job list. Fig. 22 File 2. Use Arrow Keys to navigate to the desired job folder. The display is highlighted blue. LanTEK III 161809 Iss 2 User Manual... -
Page 30: Create New Job Folder
6. When confirming with Enter, the name of the selected job folder will appear on the ready screen. 5.2.2 Create New Job Folder Use soft key to open job options in job list. Fig. 25 Job List LanTEK III 161809 Iss 2 User Manual Page29... -
Page 31: Set Cable Name (Cable Id)
Current Value (4-digit test meter) that automatically increments. Depending on selected Autotest Pref it is also possible to specify structure and way of counting. Use Arrow keys to navigate to "Cable ID" and press Enter. LanTEK III 161809 Iss 2 User Manual... -
Page 32: Simple Cable Id
4. Make corrections to entries by using the soft keys (delete at cursor position), (delete characters to the left of cursor), (insert alphanumeric characters at cursor position / overwrite highlighted entry). LanTEK III 161809 Iss 2 User Manual Page31... - Page 33 10. Use Alphanumeric Keys to enter a Cable Name for the Cable From/Cable To of test portion. 11. Use Alphanumeric Keys to reset the Current Value of the test meter, or enter an arbitrary value. LanTEK III 161809 Iss 2 User Manual Page32...
-
Page 34: Default Cable Id
Use symbol to enable Auto Increment of a character. Fig. 32 Single Cable ID 7. Press Enter to save the information entered. Escape allows you to exit the menu without making changes. LanTEK III 161809 Iss 2 User Manual Page33... - Page 35 Use symbol to enable Auto Increment of a character. 12. Press Enter to save the information entered. Escape allows you to exit the menu without making changes. LanTEK III 161809 Iss 2 User Manual Page34...
-
Page 36: Labeling Standard Tia/Eia 606-A
Specifying information elements on which the infrastructure is based. • Specifying the relation between these records to ensure the contents. • Specifying reports that contain information on record groups and • Specifying the requirements on graphs and symbols. LanTEK III 161809 Iss 2 User Manual Page35... -
Page 37: Cable Name In Format Tia/Eia 606A
4. Use soft key to hide individual positions. Assembling the cable line automatically generates the 606A-Name. 5. Press Enter to save the cable name. Use Escape to exit menu without making changes. LanTEK III 161809 Iss 2 User Manual Page36... -
Page 38: Cable Parameter 606A Backbone
Name of a horizontal and vertical cable line with a pair/fiber connection (e.g. building, several floors, several distributions, sockets). Use soft key to select cable parameter 606A Backbone Pair/Fiber. Fig. 37 Cable Parameter 606A Backbone Pair/Fiber LanTEK III 161809 Iss 2 User Manual Page37... -
Page 39: Select Twisted Pair Cabling
3. Use Arrow Keys to navigate to desired cable type. Fig. 39 Example Twisted Pair Perm 4. Press Enter to save the information entered. Escape allows you to exit the menu without making changes. LanTEK III 161809 Iss 2 User Manual Page38... -
Page 40: Specify Cable Type
Enter. Fig. 41 Select Menu 3. Use Arrow Keys to navigate to the individual boxes and use Alphanumeric Keys to assign start and stop frequencies for Certification and Performance Range. LanTEK III 161809 Iss 2 User Manual Page39... - Page 41 8. Use Arrow keys in Select Menu to navigate to option Test Limits and confirm with Enter. 9. Use Arrow keys to navigate to the individual boxes and assign desired limit with the Alphanumeric Keys. Fig. 44 Test Limits LanTEK III 161809 Iss 2 User Manual Page40...
- Page 42 19. Use Alphanumeric Keys to assign a name for the created cable type. 20. Make corrections to entries by using the soft keys (delete at cursor position), (delete characters to the left of cursor), (insert alphanumeric characters at cursor position / overwrite highlighted entry). LanTEK III 161809 Iss 2 User Manual Page41...
-
Page 43: Edit And Calculate Nvp
3. Use soft key to open menu for entering cable length. 4. Use Arrow Keys to navigate to box and use Alphanumeric Keys to assign Cable Length (m). 5. Connect cable to be tested. LanTEK III 161809 Iss 2 User Manual Page42... -
Page 44: Enter Reference Temperature
Select Menu for changing ambient temperature. 2. Use Alphanumeric Keys to assign reference temperature. Fig. 50 Reference Temperature 3. Press Enter to save the reference temperature. Use Escape to exit menu without making changes. LanTEK III 161809 Iss 2 User Manual Page43... -
Page 45: Dualmode™ Function For Twisted Pair Cabling
Deselect All to disable your selection. An enabled pairing is indicated by the green box. 4. If you would like another link model, or edit and calculate NVP for the DualMODE™ pairing, press Shift. LanTEK III 161809 Iss 2 User Manual Page44... - Page 46 NEXT, RL, ACR und Loss are indicated. Fig. 52 Overall DualMODE™ Result 6. Use Enter to load the corresponding graphical result displays of the highlighted test. LanTEK III 161809 Iss 2 User Manual Page45...
-
Page 47: Edit Nvp Default Value Of A Cable
NVP. Fig. 54 Enter NVP 4. Use Alphanumeric keys to enter one or several NVP. 5. For automatic calculation of a new NVP, press Fig. 55 Calculation of NVP LanTEK III 161809 Iss 2 User Manual Page46... -
Page 48: Coaxial Cable Standards
Ethernet and confirm with 2. Use Arrow Keys to navigate to option Enter. Fig. 56 Ethernet 3. Use Arrow Keys to navigate to desired cable type and confirm with Enter. Fig. 57 Cable Type LanTEK III 161809 Iss 2 User Manual Page47... -
Page 49: Autotest Test Series For Coaxial Cables
NOTE: It is imperative not to mix up the corresponding patch cords for Display handset (DH) and Remote handset (RH), and they must also be used for the cable test. We recommend to LanTEK III 161809 Iss 2 User Manual... - Page 50 The Remote handset (RH) indicates calibration, and a progress bar shows the status. 6. Perform the same patch cord connections to Display handset (DH) and Remote handset (RH) as during the previous test steps. LanTEK III 161809 Iss 2 User Manual Page49...
-
Page 51: Coaxial Cable
5. Connect the short coaxial calibration cable to the adapters of Display handset (DH) and Remote handset (RH). 6. Use Arrow Keys to navigate on ready screen to "Calibration" and press Enter. LanTEK III 161809 Iss 2 User Manual Page50... - Page 52 Fig. 63 Ready Screen 7. Use soft key to initiate calibration. Fig. 64 Coaxial Cable Calibration 8. After completion of calibration and display of according message, press Escape to return to main screen. LanTEK III 161809 Iss 2 User Manual Page51...
-
Page 53: Perform Autotest
The test results are automatically saved if Autosave option is enabled. • Completed tests are automatically assigned a name. If another name is desired, the test can be renamed via option Rename. LanTEK III 161809 Iss 2 User Manual Page52... -
Page 54: Job Options
The selected job folder is deleted. Jobs Rename Job Renaming highlighted job folder. New Job Adding a new job folder to job list. Enables highlighted job folder. Autotests are now stored under this Make Job Current job. LanTEK III 161809 Iss 2 User Manual Page53... -
Page 55: Test Options
4. Navigate with Arrow Keys to Copy Selected Jobs to USB Flash Drive and press Enter. 5.11.4 Alien Crosstalk Measurements (AXT) Use soft key in display of job list to open the saved Alien Crosstalk Measurements and to copy them to a USB removable storage. LanTEK III 161809 Iss 2 User Manual Page54... -
Page 56: Autotest Results And Graphs
5. Press Enter again to open test series of single test. Fig. 66 Test series 6. Use Arrow Keys to navigate to desired test series and press Enter to display result table. Fig. 67 Result Table LanTEK III 161809 Iss 2 User Manual Page55... -
Page 57: Graph Formats, Layouts And Controls
The margins indicated at lower right in table view provide information on worst case distance between the actual measuring values and the specified limits, as shown by the cursor position in the graph on the right. LanTEK III 161809 Iss 2 User Manual... - Page 58 Horizontal axis with frequency values. Specified limit curve for worst case NEXT value. During initial display of wire pair graph, the cursor is automatically at worst case limit and frequency location. LanTEK III 161809 Iss 2 User Manual Page57...
-
Page 59: Chapter 6. Structured Cabling Testing
Connect Display (DH) and Remote (RH) handset to cable line that is to be tested. 2. Open "Analyze" on start screen. 3. The tests available for the selected cable type are displayed. 4. Use Arrow Keys to navigate to desired test. LanTEK III 161809 Iss 2 User Manual Page58... -
Page 60: Evaluation Of Analysis Test Results
Graphs for Analysis Tests After completion of test series, certain analysis results can be displayed in table or graph format. The graph display in analysis mode is comparable to the one of Autotest. LanTEK III 161809 Iss 2 User Manual... -
Page 61: Overview Of Single Test Analysis
All combinations of up to three interrupts, short circuits or reversed connections are correctly detected. • In case of interrupts and short circuits, the cable end at which the error occurred is indicated (on Autotest screen for length measurement). LanTEK III 161809 Iss 2 User Manual Page60... -
Page 62: Length Test
For each wire pair, the results are displayed as resistance value in ohm, together with the reference limit for the cable type. Fig. 74 Resistance Test LanTEK III 161809 Iss 2 User Manual Page61... -
Page 63: Resistance Test Error
(pair 1-2 to 3-6 etc.). Thus, a total of 12 measurements is performed. • ACR-F (ELFEXT) measurements take place with the Display handset (DH) and the Remote handset (RH) on both cable ends and for all possible wire pair LanTEK III 161809 Iss 2 User Manual Page62... -
Page 64: Power Sum Next, Power Sum Acr-F (Elfext)
When using Power Sum ACR-F (Power Sum ELFEXT), four (4) calculations on the side of the Display handset (DH) and on each wire pair combination (pairs 1-2, 3-6 and 4-5 to 7-8 etc.) are performed. A total of eight (8) values is obtained. LanTEK III 161809 Iss 2 User Manual... -
Page 65: Next Test And Acr-F (Power Sum Elfext) Test Error
This test determines the relation between reflected and transmitted signal amplitude. High- grade cable lines exhibit only minor reflection, thus demonstrating a good impedance adjustment of the individual components connected to the cable. LanTEK III 161809 Iss 2 User Manual... -
Page 66: Return Loss Test Error
Fig. 82 Impedance Test 6.13.1 Impedance Error Impedance errors cause signal reflections and signal reduction. Average impedance of wire pairs should comply with LAN system impedance of 100, 120 or 150 Ω. LanTEK III 161809 Iss 2 User Manual Page65... -
Page 67: Delay And Skew Test
The capacitance test of the analysis mode indicates the overall capacitance in Nanofarad (nF). • The Autotest measures the overall capacitance in Picofarad (pF) per meter or foot. Fig. 84 Capacitance Test LanTEK III 161809 Iss 2 User Manual Page66... -
Page 68: Capacitance Test Error
The sum of Power Sum ACR-N (Power Sum ACR) test (i.e. corresponding value of worst case wire pair after normalization of wire pair loss over 100 meters) and the additional margin between the worst case Power Sum NEXT-value and the limit for Power Sum NEXT. LanTEK III 161809 Iss 2 User Manual Page67... -
Page 69: Headroom Test Error
Creating a New Custom Cable Type Open "Cable Type" on start screen. 2. Use Arrow Keys to navigate to desired cable type. Fig. 87 Cable Type 3. Use the soft key to open menu selection. LanTEK III 161809 Iss 2 User Manual Page68... -
Page 70: Select Custom Cable Type
Open "Cable Type" on start screen. 2. Use Arrow Keys to navigate to Custom Cable and confirm with Enter. 3. Use Arrow Keys to navigate to desired custom cable type and confirm with Enter. LanTEK III 161809 Iss 2 User Manual Page69... -
Page 71: Custom Cable Parameters
Autotests to be performed. Use Alphanumeric Keys to enter a custom name or edit the NVP value. Custom Name/NVP LanTEK II Cable Tester can save up to 10 custom cable types. ® LanTEK III 161809 Iss 2 User Manual Page70... -
Page 72: Chapter 7. Coaxial Cable Test
~ 20 ohm points to the far end. • Cable Interruption: Occurs frequently. In this case, check out the length measurement result. A value of 0 (zero) for cable length points to a fault located at the near end. LanTEK III 161809 Iss 2 User Manual Page71... -
Page 73: Chapter 8. Tone Generator
3. Use soft keys to select the wire pair (Pair 78, Pair 36, Pair 54 or Pair 12) into which the tone signal is to be fed. 4. Press SHIFT to select tone signal and enable it with soft keys LOW, HIGH or WARBLE. LanTEK III 161809 Iss 2 User Manual Page72... -
Page 74: Enable Tone Generator With Remote Handset (Rh)
3. Select the wire pair into which the tone signal is to be fed by switching between the options with the TONE key. 4. Select the tone signal for the selected wire pair by switching between the options with <SHIFT>+TONE. LanTEK III 161809 Iss 2 User Manual Page73... -
Page 75: Chapter 9. Lantek Firmware Upgrade
5. Select Upgrade and follow the instructions until the upgrade is finished. NOTE: Upgrade only newer firmware with higher end numbers. During the upgrade, the connection to the adapter must not be interrupted. 6. Repeat with the remote handset (RH). LanTEK III 161809 Iss 2 User Manual Page74... -
Page 76: Firmware Upgrade With Usb Removable Storage
8. Press Autotest. The Display Handset (DH) reports the version difference. 9. Open Calibration menu. 10. Enable firmware upgrade with 11. Confirm update with 12. Wait until upgrade is finished and normal operating status is displayed on Remote handset (RH). LanTEK III 161809 Iss 2 User Manual Page75... -
Page 77: Chapter 10. Customer Service
To comply with precision requirements, you should have your LanTEK III Cable Tester ® calibrated on an annual basis. Before sending the tester for calibration or maintenance, please contact the local Technical Customer Service of IDEAL INDUSTRIES at www.idealnetworks.net LanTEK III 161809 Iss 2 User Manual Page76...
Need help?
Do you have a question about the LanTEK III and is the answer not in the manual?
Questions and answers