EMS PIEZON MASTER 700 Operation Instructions Manual
Hide thumbs
Also See for PIEZON MASTER 700:
- Operation instructions manual (112 pages) ,
- Operating instructions manual (104 pages) ,
- Operating instructions manual (102 pages)

Related Manuals for EMS PIEZON MASTER 700


Summary of Contents for EMS PIEZON MASTER 700
- Page 1 OPERATION INSTRUCTIONS MODE D'EMPLOI PIEZON MASTER 700 ® BEDIENUNGSANLEITUNG INSTRUCCIONES DE EMPLEO ISTRUZIONI PER L'USO BRUKSANVISNING...
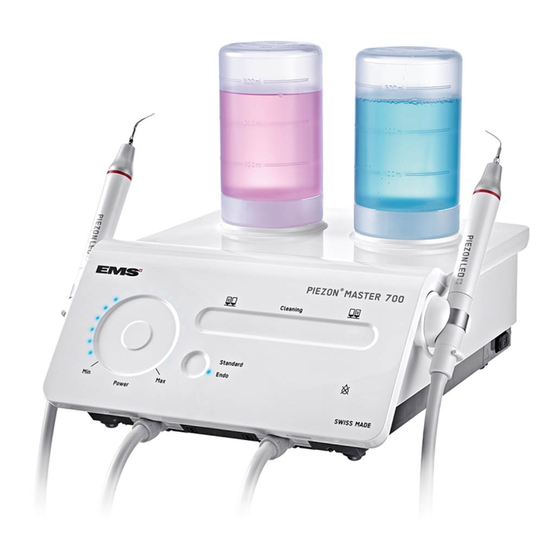
- Page 3 COMPONENTS COMPOSANTS BESTANDTEILE Unit Appareil Gerät Power setting Réglage de la puissance Einstellen der Ultraschallleistung Working mode selection Sélection du mode de travail Auswählen des Arbeitsmodus Left bottle selection Sélection de la bouteille gauche Auswählen der linken Flasche "Cleaning" mode selection Sélection du Mode "Cleaning"...
- Page 5 Connettore per il cavo del manipolo di sinistra Anslutning för vänstra handstyckets slang EMS suministra este aparato con diversos accesorios. La EMS fornisce questa unità dotata di vari accessori. Nella EMS utrustar enheten med olika tillbehör. Packlistan visar "Lista de contenido" indica exactamente lo que incluye "distinta di spedizione"...
- Page 6 CHERS CLIENTS, SEHR GEEHRTER KUNDEN, Wir gratulieren Ihnen zum Kauf Ihres neuen Thank you for buying a new EMS product. It meets Nous vous félicitons de l'acquisition de ce nouveau the highest quality and safety standards. produit EMS. Il répond aux plus hautes exigences EMS-Produkts.
- Page 7 Le agradecemos que haya adquirido un nuevo Grazie di aver acquistato un nuovo prodotto EMS Tack för att du har köpt en EMS-produkt. Den producto de EMS. Éste satisface las exigencias che soddisfa gli standard di qualità e di sicurezza uppfyller högt ställda kvalitets- och säkerhetskrav.
- Page 8 Systembestandteile sind in den jeweiligen Bedie- of the components before using this product. Do Veuillez lire les manuels d’instructions livrés avec not hesitate to contact your local EMS dealer for chacun des composant avant d’utiliser ce produit. des Geräts sind die Bedienungsanleitungen, die further information.
- Page 9 No dude en ponerse en zioni rivolgersi al rivenditore locale EMS. För att förhindra patientskador eller skador på contacto con su distribuidor local de EMS si desea Per impedire possibili lesioni al paziente o all'uti- Piezon Master 700 ska följande varningar obser- información adicional.
- Page 10 MODIFICATIONS TECHNIQUES TECHNISCHE ÄNDERUNGEN EMS reserves the right to modify the technique, EMS se réserve le droit d’apporter à la technique, EMS behält sich vor, im Zusammenhang mit accessories, operating instructions or contents of aux accessoires, au mode d’emploi et au contenu technischen oder wissenschaftlichen Weiterent- wicklungen Änderungen an der Technik, dem...
- Page 11 Rivolgersi diretta- Vi ger självklart support vid tekniska problem. supuesto, proporcionamos asistencia en caso mente al centro di assistenza EMS autorizzato o Kontakta ditt godkända EMS-reparationscenter de problemas técnicos. Póngase en contacto al proprio rivenditore.
-
Page 12: Table Of Contents
Sicherheitshinweise ........8 électrique ............8 Connecting to another EMS unit Anschließen an ein anderes EMS-Gerät (option) ............10 Connexion à un autre appareil EMS (optional) ............. 10 (option) ............10 Preparing for treatment ........12 Vorbereiten für die Behandlung ..... 12 Préparation pour le traitement ....... - Page 13 Ansluta nätströmmen ........7 Observaciones sobre seguridad eléctrica ... 9 Precauzioni per la sicurezza in materia ..9 Försiktighetsåtgärder för elsäkerhet .... 9 Conexión a otro aparato de EMS di elettricità ........... 9 Ansluta ytterligare en EMS-enhet (opción) ............11 (tillval) ............
- Page 14 Entsorgen des Produkts ........ 64 Warranty ............64 Garantie ............64 Garantie ............64 Accessories............ 64 Accessoires ............ 64 Zubehör ............64 EMS Service ..........66 Service EMS ..........66 EMS-Service ..........66 Symbols ............68 Symboles ............68 Symbole ............68 Technical data ..........76 Caractéristiques techniques ......
- Page 15 Garantía ............65 Garanzia ............65 Garanti ............65 Accesorios ............. 65 Accessori ............65 Tillbehör ............65 Servicio técnico de EMS ........ 67 Servizio assistenza EMS ....... 67 EMS-service ..........67 Símbolos ............69 Simboli ............69 Symboler ............69 Datos técnicos ..........
-
Page 16: Installation
INSTALLATION INSTALLATION INSTALLATION Foot pedal Pédale de commande Fußschalter... -
Page 17: Instalación
INSTALACIÓN INSTALLAZIONE INSTALLATION Pedal Pedaliera Fotpedal... -
Page 18: Handpiece Cords And Supports
Handpiece cords and supports Cordons et supports de pièces à main Handstückschläuche und Halterungen Check that the cords are fully dry before connecting Stellen Sie sicher, dass die Schläuche vollständig to the unit. connexion à l'appareil. trocken sind, bevor Sie sie an das Gerät an- schließen. -
Page 19: Cables Y Soportes De Los Mangos
Cables y soportes de los mangos Cavi e supporti del manipolo Slangar och hållare till handstycke Compruebe que los cables estén totalmente secos Controllare che i cavi siano asciutti prima di Kontrollera att slangarna är helt torra innan du antes de conectarlos al aparato. connetterli all'unità. -
Page 20: Connecting To The Mains Power
Connecting to the mains power Connexion au réseau électrique Anschließen an das Stromnetz 100-240 VAC 50-60Hz Always check that the unit is installed in Toujours s'assurer que l'appareil est installé Das Gerät muss sicher und stabil aufgestellt a safe and stable position. An eventual fall may en position stable et sûre. -
Page 21: Conexión A La Red Eléctrica
Conexión a la red eléctrica Connessione all'alimentazione di rete Ansluta nätströmmen Compruebe siempre que el aparato esté Controllare sempre che l'unità sia installata Se till att enheten installeras på en säker instalado en un lugar seguro y estable. Si se in una posizione sicura e stabile. -
Page 22: Electrical Safety Precautions
Electrical Safety precautions Remarques concernant la sécurité Sicherheitshinweise électrique Pour éviter le risque de choc électrique, Dieses Gerät darf nur an eine Netzsteckdose To avoid the risk of electric shock, this cet équipement doit seulement être connecté au mit Schutzerde angeschlossen werden, um das equipment must only be connected to a supply réseau électrique muni d’une liaison terre. -
Page 23: Observaciones Sobre Seguridad Eléctrica
Observaciones sobre seguridad Precauzioni per la sicurezza in materia Försiktighetsåtgärder för elsäkerhet eléctrica di elettricità Para evitar el riesgo de electrocución, Per evitare il rischio di scosse elettriche, För att undvika elektrisk stöt får denna conecte este equipo únicamente a una red l'apparecchio deve essere collegato esclusiva- utrustning endast anslutas till en jordad nätkontakt. -
Page 24: Connecting To Another Ems Unit (Option)
(option) (optional) The Piezon Master 700 can be connected to Le Piezon Master 700 peut être connecté à un Der Piezon Master 700 kann an ein anderes another compatible EMS device, so both devices autre appareil EMS compatible, ce qui permet d’uti- kompatibles EMS-Gerät angeschlossen werden,... -
Page 25: Conexión A Otro Aparato De Ems (Opción)
Ansluta ytterligare en EMS-enhet (opción) (opzionale) (tillval) El Piezon Master 700 se puede conectar a otro Il Piezon Master 700 può essere collegato ad un Piezon Master 700 kan anslutas till en annan dispositivo EMS compatible, de modo que puedan altro dispositivo EMS compatibile di modo che kompatibel EMS-enhet, så... -
Page 26: Preparing For Treatment
PREPARING FOR TREATMENT PRÉPARATION POUR VORBEREITEN FÜR LE TRAITEMENT DIE BEHANDLUNG Installing the bottles Mise en place des bouteilles Aufsetzen der Flaschen Always check the condition of the bottle cap Toujours contrôler l'état du joint O-ring du Kontrollieren Sie vor jedem Aufsetzen der Flasche den O-Ring im Flaschendeckel. -
Page 27: Preparación Para El Tratamiento
PREPARACIÓN PARA PREPARAZIONE PER FÖRBEREDELSER INFÖR EL TRATAMIENTO IL TRATTAMENTO BEHANDLING Instalación de los botes Compruebe siempre el estado de la junta Prima dell'installazione del flacone, Kontrollera alltid att flasklockets O-ring tórica de la tapa del bote antes de instalarlo. controllare sempre la condizione dell'anello di är hel innan flaskan installeras. -
Page 28: Solutions Compatible With The Circuit
/ Cepacol ® /... Disinfecting solutions for washing the circuit Solutions désinfectants pour laver le circuit Desinfektionslösungen zum Reinigen des Geräts • EMS Ultra Clean (H • EMS Ultra Clean (H • Hydrogen peroxide (H • Peroxide d'hydrogène (H •... -
Page 29: Soluciones Compatibles Con El Circuito
/ Cepacol ® /... Soluzioni disinfettanti per il lavaggio del Desinfektionslösningar för tvätt av slingan Soluciones desinfectantes para lavar circuito • EMS Ultra Clean (H el circuito • EMS Ultra Clean (H • Väteperoxid (H • Perossido di idrogeno (H •... -
Page 30: Connecting The Handpieces
Connecting the handpieces Connexion des pièces à main Aufstecken der Handstücke Blow dry the connections to remove Trocknen Sie die einzelnen Komponenten eventual presence of liquid to ensure a proper mit Druckluft, um eine einwandfreie elektronische electrical contact. Never blow compressed air in bon contact électrique. -
Page 31: Conexión De Los Mangos
Conexión de los mangos Connessione dei manipoli Ansluta handstyckena Seque con aire las conexiones para Asciugare con aria le connessioni per Torka anslutningarna med en blåstork för eliminar la posible existencia de líquido y garan- eliminare eventuali liquidi presenti e garantire un att avlägsna eventuell vätska och säkerställa tizar un contacto eléctrico adecuado. -
Page 32: Attaching The Instruments
Utiliser uniquement la CombiTorque pour Für die Befestigung des EMS-Instruments EMS instrument on the handpiece to the correct fixer l'instrument EMS sur la pièce à main au am Handstück mit dem korrekten Drehmoment torque. Once the instrument is screwed all the couple approprié. -
Page 33: Acoplamiento De Los Instrumentos
Use solamente el CombiTorque para ajustar con il valore corretto di coppia utilizzare esclusiva- fast EMS-instrumentet på handstycket till rätt el instrumento de EMS en el mango al par de mente il CombiTorque. Una volta che lo strumento vridmoment. När instrumentet har skruvats in torsión correcto. -
Page 34: Operating The Unit
OPERATING THE UNIT UTILISATION DE L’APPAREIL BEDIENEN DES GERÄTS Switching On Mise sous tension Einschalten When the unit is turned on, the control lamps Lors de la mise sous tension de l’appareil, les Beim Einschalten des Geräts leuchten die light up and then the unit returns to its previous voyants lumineux s’allument et ensuite l'appareil Kontrolllampen auf und das Gerät wird auf die After 15 min. -
Page 35: Utilización Del Aparato
UTILIZACIÓN DEL APARATO USO DELL'UNITÀ ANVÄNDA ENHETEN Encendido Accensione Slå på enheten Al encender el aparato, los pilotos indicadores Quando l'unità si accende, le spie di controllo si När enheten slås på tänds kontrollampan och guración previa. cui si trovava prima dello spegnimento. Efter 15 minuters inaktivitet går enheten Tras 15 min. -
Page 36: Working Mode Selection
Working mode selection Sélection du mode de travail Auswählen des Betriebsmodus The unit includes two modes to optimize the ultra- Das Gerät verfügt über zwei Modi zur Optimierung sound power range depending on the application. la plage de puissance des ultrasons en fonction der Ultraschallleistung je nach Anwendung. -
Page 37: Selección Del Modo De Funcionamiento
Selección del modo de funcionamiento Selezione della modalità di funzionamento Välja driftsläge El aparato incluye dos modos para optimizar el L'unità comprende due modalità per ottimizzare Enheten har två driftslägen för att optimera ultra- intervalo de la potencia de los ultrasonidos depen- la gamma di potenza ad ultrasuoni in base all'ap- ljudseffekten efter användningsområdet. - Page 39 Power settings according to the instuments Available power Working mode Réglages de puissance selon les instruments Puissance disponible Mode de travail Leistungseinstellung je nach Instrument Verfügbare Leistung Arbeitsmodus Ajustes de potencia según los instrumentos Potencia disponible Modo de trabajo Modalità di Impostazioni della potenza secondo gli strumenti Potenza disponibile l avorazione...
-
Page 40: Dry Work" Mode Selection
"Dry Work" mode selection Sélection du mode de travail à sec Auswahl des Modus "Dry Work" "Dry Work" Press the foot pedal on the corresponding symbol Presser la pédale sur le symbole correspondant Betätigen Sie den Fußschalter (Symbol für "Dry to activate the "Dry work"... -
Page 41: Selección Del Modo "Dry Work
Selección del modo "Dry Work" Selezione della modalità "Dry Work" Välja "Dry Work"-läget Pise el pedal sobre el símbolo correspondiente Premere la pedaliera sul simbolo corrispondente Tryck på "Dry Work"-symbolen på fotpedalen för para activar el modo de "Dry work". per attivare la modalità... -
Page 42: Multifunction Foot Pedal
Multifunction foot pedal Pédale multifonction Multifunktionsfußschalter... -
Page 43: Multifonction Pedal
Multifonction pedal Pedale multifunzione Multifonction pedal Standard mode Irrigazione + Irrigation + lumière Flüssigkeit + Licht Irrigación + luz Spolning + belysning Irrigation + light illuminazione Ultraljud + spolning Ultrasuoni + irriga- Ultrasound + Ultrasons + irrigation Ultraschall + Ultrasonidos + + belysning irrigation + light + lumière... -
Page 44: Piezon Handpiece Led
Piezon handpiece LED Pièce à main Piezon LED Piezon-Handstück-LED The Piezon handpiece LED lights up when La pièce à main Piezon LED s'éclaire Das Piezon-LED-Handstück leuchtet auf, the foot pedal is activated. The light stays on for lorsque la pédale de commande est activée. sobald der Fußschalter aktiviert wird. -
Page 45: El Mango Piezon Led
El mango Piezon LED El manipolo Piezon LED Piezon-handstyckets LED 20 seconds El mango Piezon LED se ilumina cuando Il manipolo Piezon LED si illumina quando si Piezon-handstyckets LED tänds när fotpe- se activa el pedal. Esta luz permanece encendida attiva la pedaliera. -
Page 46: Selecting The Irrigation Supply
Selecting the irrigation supply Sélection de la source d'irrigation Auswahl der Flüssigkeitszufuhr Constantly check the presence of liquid in Vérifiez constamment la présence de Überprüfen Sie während der Behandlung the bottles during treatment. liquide dans les bouteilles pendant le traitement. laufend, ob sich noch ausreichend Flüssigkeit in... -
Page 47: Selección De La Fuente De Irrigación
Selección de la fuente de irrigación Selezione della fonte di irrigazione Välja spolningskälla Compruebe constantemente que haya Controllare costantemente la presenza di líquido en los botes durante el tratamiento. -
Page 48: Setting The Ultrasound Power
Setting the ultrasound power Réglage de la puissance des ultrasons Einstellen der Ultraschallleistung The settings can be obtained either by sliding or Les réglages peuvent être obtenus soit en glissant, Die gewünschte Einstellung kann entweder stufenlos oder direkt durch Antippen des Drehre- soit en plaçant le doigt sur la zone sensible. -
Page 49: Ajuste De La Potencia De Los Ultrasonidos
Ajuste de la potencia Impostazione della potenza Ställa in ultraljudseffekten de los ultrasonidos degli ultrasuoni El ajuste se puede realizar deslizando el dedo o È possibile effettuare le impostazioni facendo Du kommer till inställningarna genom att dra poniéndolo sobre la zona sensible. La colocación scorrere o mettendo il dito sulla zona sensibile. -
Page 50: Setting The Irrigation Flow Rate
Réglage du débit d'irrigation Beachten Sie für die optimale Einstellung Les informations sur le réglage optimal der Flüssigkeitsmenge die Bedienungsanlei- du débit de liquide pour chaque instrument each instrument are indicated in the operating tungen der einzelnen Piezon-Systeme. sont disponibles dans les modes d’emploi des instructions of the Piezon systems systèmes Piezon. -
Page 51: Ajuste Del Flujo De Irrigación
di irrigazione Le impostazioni ottimali per la portata del Information om optimala inställningar av instrumento se indica en las instrucciones de empleo de los sistemas Piezon. nelle istruzioni operative dei sistemi Piezon. systemens bruksanvisningar. -
Page 52: End Of The Treatment
END OF THE TREATMENT FIN DU TRAITEMENT ENDE DER BEHANDLUNG Instruments disassembly and cleaning Démontage et nettoyage des instruments Auseinandernehmen und reinigen der Instrumente Clean the instrument with running water Nettoyer les instruments avec de l’eau Spülen Sie das Instrument vor der Desin- before disinfection. -
Page 53: Fin Del Tratamiento
FIN DEL TRATAMIENTO FINE DEL TRATTAMENTO AVSLUTA BEHANDLINGEN Desmontaje y limpieza Smontaggio e pulizia degli strumenti Demontera och rengöra instrument de los instrumentos Limpie los instrumentos con agua corriente Pulire lo strumento con acqua corrente Rengör instrumentet under rinnande antes de desinfectarlos. prima della disinfezione. -
Page 54: Cleaning And Disinfecting The Circuit
Cleaning and disinfecting the circuit Nettoyage et désinfection du circuit des Kreislaufs "Cleaning" mode Mode "Cleaning" "Cleaning"-Modus Il est recommandé de procéder quotidien- Eine tägliche Spülung und Desinfektion des It is recommended to proceed daily to the nement au lavage et à la désinfection du circuit Flüssigkeitskreislaufs des Geräts wird empfohlen. -
Page 55: Limpieza Y Desinfección Del Circuito
Limpieza y desinfección del circuito Pulizia e disinfezione del circuito Modo "Cleaning" Modalità "Cleaning" Rengöringsläge Se recomienda lavar y desinfectar a diario Si consiglia di procedere giornalmente al Vi rekommenderar att du tvättar och desin- el circuito de líquido del aparato. lavaggio e alla disinfezione del circuito dei liquidi dell'unità. - Page 56 Disinfecting cycle: Cycle de désinfection: Desinfektionszyklus: • Bereiten Sie die Flaschen mit einer kompatiblen • Prepare the bottle(s) with a compatible • Préparer la (ou les) bouteilles avec une Desinfektionslösung vor. (Eine Liste solcher Lö- disinfecting solution (refer to the list of com- solution désinfectante compatible (voir liste patible disinfectants at the beginning of this des désinfectants compatibles au début de...
- Page 57 Ciclo de desinfección: Ciclo di disinfezione: Desinfektionscykel: • Prepare el o los botes con una solución • Prepa • infektionslösning (se listan över kompatibla desinfectante compatible (consulte la lista disinfettante compatibile (fare riferimento desinfektionslösningar i början av handbo- de desinfectantes compatibles al principio all'elenco delle soluzioni disinfettanti riporta- ken).
- Page 58 Illustration of a "Cleaning" mode cycle Illustration d'un cycle du mode "Cleaning" Abbildungen zum Reinigungszyklus...
- Page 59 Ilustración de un ciclo del modo "Cleaning" Illustrazione di un ciclo in modalità Illustration av en cykel i "Cleaning"-läget "Cleaning"...
-
Page 60: Removing The Bottle
Removing the bottle Retrait de la bouteille Abnehmen der Flasche At the end of each treatment a purge is Nach jeder Behandlung muss der Kreislauf necessary to remove the liquid inside the cords. nécessaire pour enlever le liquide à l’intérieur des gespült werden, um die Flüssigkeit aus den Before a prolonged stop of the unit, it is important cordons. -
Page 61: Retirada Del Bote
Retirada del bote I slutet av varje behandling måste slangarna uno spurgo per eliminare i liquidi all'interno dei el líquido del interior de los cables. Antes de una tömmas på all vätska. Innan enheten står oanvänd cavi. Prima di un arresto prolungato dell'unità è parada prolongada del aparato, es importante en längre tid är det viktigt att man utför en total importante condurre una completa pulizia e disin-... -
Page 62: Cleaning, Disinfecting And Sterilizing
CLEANING, DISINFECTING NETTOYAGE, DÉSINFECTION REINIGEN, DESINFIZIEREN AND STERILIZING ET STÉRILISATION UND STERILISIEREN Please conform to the recommendations of Veuillez vous conformer aux recommanda- Beachten Sie die Empfehlungen des Handbuchs "Reprocessing Instructions", das im the Reprocessing Instructions manual delivered tions contenues dans le manuel "Reprocessing Lieferumfang Ihres Produkts enthalten ist, zur with your product regarding procedure of cleaning, Instructions"... -
Page 63: Limpieza, Desinfeccióny Esterilización
LIMPIEZA, DESINFECCIÓN PULIZIA, DISINFEZIONE RENGÖRING, DESINFEKTION Y ESTERILIZACIÓN E STERILIZZAZIONE OCH STERILISERING Siga las recomendaciones del manual Attenersi alle raccomandazioni del manuale Följ rekommendationerna i handboken "Reprocessing Instructions" suministrado con "Reprocessing Instructions" in dotazione al ”Reprocessing Instructions” som medföljer su producto con respecto al procedimiento de prodotto sulle procedure di pulizia, disinfezione, produkten vad gäller procedurer för rengöring, limpieza, desinfección, esterilización y envasado... -
Page 64: Cleaning The Accessories
Cleaning the accessories Nettoyage des accessoires Reinigen des Zubehörs 135°C 135°C The bottles can be washed in a dishwasher Les bouteilles peuvent être nettoyées dans Die Flaschen können in einer Spülmaschine and disinfected at up to 95 °C in a washer disin- le lave-vaisselle et désinfectées jusqu’à... -
Page 65: Limpieza De Los Accesorios
Limpieza de los accesorios Pulizia degli accessori Rengöra tillbehör 135°C 135°C Los botes se pueden lavar en un lavavajillas Flaskorna kan tvättas i diskmaskin och y desinfectarse a un máximo de 95 °C en una lavadora desinfectante. disinfettatrice. Los botes no se pueden esterilizar. Flaskorna kan inte steriliseras. -
Page 66: Maintenance
Wartungssatz geliefert werden. Always use EMS original parts. Using non Utiliser exclusivement des pièces originales Verwenden Sie nur Originalteile von EMS. original instruments may damage the unit, and EMS. -
Page 67: Mantenimiento
Se anvisningarna som medföljer under- el equipo de mantenimiento. manutenzione. hållssatsen. Use siempre piezas originales de EMS. Si Usare sempre parti di ricambio originali Använd alltid originaldelar från EMS. Om se utilizan instrumentos que no sean originales EMS. L'utilizzo di strumentazione non originale instrument som inte är originalinstrument används... -
Page 68: Replacing The Fuses
Replacing the fuses Remplacement des fusibles Austauschen der Sicherungen Replace exclusively with the type of fuse Remplacer uniquement par le type de Die Sicherungen dürfen nur gegen Siche- indicated on the back of the unit. fusible indiqué au dos de l'appareil. rungen des auf der Geräterückseite angegebenen Typs ausgetauscht werden. -
Page 69: Sustitución De Los Fusibles
Sustitución de los fusibles Sostituzione dei fusibili Byta säkringar Sustitúyalos exclusivamente por el tipo de Sostituire esclusivamente con il tipo di Använd endast den typ av säkringar som fusible que se indica en la trasera del aparato. fusibili indicato sul retro dell'unità. anges på... -
Page 70: Replacing The Pump Of The Unit
Replacing the pump of the unit Remplacement de la pompe de l'appareil Austauschen der Pumpe des Geräts The pump of the unit is a wear part. It is recom- La pompe de l'appareil est un élément d'usure. Il Die Pumpe des Geräts ist ein Verschleißteil. Es mended to replace it every 18 months. -
Page 71: Sustitución De La Bomba Del Aparato
Sustitución de la bomba del aparato Sostituzione della pompa dell'unità Byta ut enhetens pump La bomba del aparato es una pieza de desgaste. La pompa dell'unità è una parte sottoposta a Enhetens pump är en förbrukningsartikel. Den bör Se recomienda sustituirla cada 18 meses. usura. - Page 72 SAFETY PRECAUTIONS REMARQUES CONCERNANT SICHERHEITSHINWEISE LA SÉCURITÉ EMS and the distributor of this product accept no EMS et le distributeur de ce produit ne peuvent EMS und der Vertreiber des Produkts haften liability for direct or consequential injury or damage être tenus responsables d’éventuels préjudices...
-
Page 73: Precauciones Sobre Seguridad
PRECAUCIONES SOBRE PRECAUZIONI DI SICUREZZA SÄKERHETSFÖRESKRIFTER SEGURIDAD EMS y el distribuidor de este producto no aceptan L'EMS e il distributore di questo prodotto non EMS och produktens distributör påtar sig inget ninguna responsabilidad por daños o lesiones si assumono alcuna responsabilità per danni o ansvar för direkta skador eller följdskador som... - Page 74 être utilisé oder ein beschädigtes Gerät dürfen nicht must be replaced. Use original EMS spare parts et doit être remplacé. N’utiliser que des pièces et mehr verwendet und müssen ersetzt werden.
- Page 75 Fare riparare questo prodotto esclusi va- centra reparera produkten. Repare este producto exclusivamente en mente in un centro di assistenza EMS approvato. Denna produkt har testats med avseende un centro de reparación autorizado de EMS. Questo prodotto è stato analizzato in på...
- Page 76 STORING THE PRODUCT ENTREPOSAGE DU PRODUIT AUFBEWAHREN DES GERÄTS Keep the original packaging until the Conserver l’emballage d’origine jusqu’à la Bewahren Sie die Originalverpackung bis product is to be disposed of permanently. It can mise au rebut du produit. Il peut être ainsi réutiliser zur endgültigen Entsorgung Ihres Produkts auf.
-
Page 77: Almacenamiento Del Producto
ALMACENAMIENTO STOCCAGGIO DEL PRODOTTO FÖRVARA PRODUKTEN DEL PRODUCTO Guarde el embalaje original hasta que vaya Conservare l'imballo originale fino allo Behåll originalförpackningen tills produkten a desechar el producto de forma permanente. kasseras permanent. Den kan återanvändas för Puede servir para su transporte o almacenamiento utilizzato per la spedizione o per lo stoccaggio. - Page 78 Abfall aus elektrischen und elektronischen belonging to customers located in the European Geräten im Besitz von Kunden in der Europäi- Union may be shipped to EMS for recycling in l'Union Européenne peuvent être envoyés à EMS schen Union können gemäß der WEEE-Richtlinie accordance to the WEEE regulations.
-
Page 79: Eliminación Del Producto
Electronic Equipment) som tillhör kunder inom Los Residuos de Aparatos Eléctricos y Electró- uso appartenente a clienti residenti nella UE EU kan skickas till EMS för återvinning i enlighet nicos (RAEE) que pertenezcan a clientes que se potrà essere spedita a EMS per il riciclaggio med WEEE-direktivet. - Page 80 When sending the product directly to the approved En cas d’expédition directe du produit vers un Bei Direktversand des Produkts an das von EMS EMS repair center, please include the name of centre de réparation agréé EMS, indiquer le nom autorisierte Reparaturzentrum geben Sie bitte den Namen Ihres Händlers an.
-
Page 81: Servicio Técnico De Ems
En el caso de reparaciones no autorizadas o daños In caso di riparazioni non autorizzate o di danni EMS påtar sig inget som helst ansvar vid oaukto- debidos a la no adherencia a las instrucciones de derivanti dalla mancata osservanza delle istruzioni riserade reparationer eller skador som beror att empleo, EMS no aceptará... - Page 82 SYMBOLS SYMBOLES SYMBOLE Manufacturer’s logo Logo du fabricant Herstellerlogo Caution! Attention! Achtung! Year of manufacture Année de fabrication Herstellungsjahr Applied part, type BF Partie appliquée du type BF Anwendungsteil Typ BF Degree of protection against water permeability Degré de protection contre la pénétration de l’eau Schutzgrad gegen Wasserdurchlässigkeit CE marking: refers to directive 93/42 EEC, including EN 60601-1 and EN 60601-1-2 Marquage de conformité...
-
Page 83: Símbolos
SÍMBOLOS SIMBOLI SYMBOLER Logo del fabricante Logo del produttore. Tillverkarens logotyp ¡Precaución! Attenzione! Varning! Año de fabricación Anno di fabbricazione Tillverkningsår Componente aplicado de tipo BF Parte applicata, tipo BF Patientansluten del, typ BF Grado de protección frente a la penetración de agua Grado di protezione contro penetrazione di acqua Skydd mot vattengenomtränglighet Marcatura CE: si riferisce alla direttiva 93/42 CEE, incluse EN 60601-1 e EN 60601-1-2... - Page 84 Power switch "ON" Interrupteur général "ON" Hauptschalter „EIN“ Power switch "OFF" Interrupteur général "OFF" Hauptschalter „AUS“ Input Entrée Eingang Output Sortie Ausgang Fuse Fusible Sicherung conformance with US standards conforme US konform mit US-Normen Foot pedal connection Connexion de la pédale de commande Anschluss Fußschalter "Irrigation"...
- Page 85 Interruptor de alimentación encendido (ON) Interruttore di accensione På-knapp Interruptor de alimentación apagado (OFF) Interruttore di spegnimento Av-knapp Entrada Ingresso Ingång Salida Uscita Utgång Fusible Fusibile Säkring conformes con las estadounidenses standard statunitensi. CSA-märkning med koden "C" för produkter som överensstämmer med kanadensisk standard och "US" för produkter som överensstämmer med USA-standard Conexión pedal Connessione pedaliera...
- Page 86 "Dry Work" mode – ultrasound without irrigation Mode "Dry Work" – Ultrasons sans irrigation "Dry Work"-Modus – Ultraschall ohne Spülung "Standard" mode Standard Mode "Standard" "Standard"-Modus "Endo" mode Endo Mode "Endo" "Endo"-Modus Power setting Power Réglage de puissance Einstellen der Ultraschallleistung "Cleaning"...
- Page 87 Modo de "Dry Work" – ultrasonidos sin irrigación Modalità "Dry Work" – ultrasuoni senza irrigazione "Dry Work"-läge – ultraljud utan spolning Modo "Standard" Standard Modalità "Standard" "Standard"-läge Modo "Endo" Endo Modalità "Endo" "Endo"-läge Ajuste de la potencia Power Impostazione della potenza Effektinställning Modo "Cleaning"...
- Page 88 Liquide fourni par la bouteille de gauche Flüssigkeitszufuhr aus linker Flasche Liquid supplied from right bottle Liquide fourni par la bouteille de droite Flüssigkeitszufuhr aus rechter Flasche Connection for a second EMS unit Connexion pour un second appareil EMS Anschluss für zweites EMS-Gerät Pump Pompe...
- Page 89 Líquido suministrado por el bote izquierdo Líquido suministrado por el bote derecho Conexión para un segundo aparato de EMS Connessione ad una seconda unità EMS Anslutning för ytterligare en EMS-enhet Bomba Pompa Pump Número de serie Numero di serie Serienummer Marcación GOST R para productos conformes con las normas de Rusia...
- Page 90 TECHNICAL DATA CARACTÉRISTIQUES TECHNIQUES DESCRIPTION DESCRIPTION Manufacturer EMS ELECTRO MEDICAL SYSTEMS SA, Fabricant EMS ELECTRO MEDICAL SYSTEMS SA, CH-1260 Nyon, Switzerland CH-1260 Nyon, Suisse Model Piezon ® Master 700 Modèle Piezon ® Master 700 - Class I - Classe I - Applied part, Type BF - Partie appliquée du type BF...
-
Page 91: Datos Técnicos
TECHNISCHE DATEN DATOS TÉCNICOS BESCHREIBUNG DESCRIPCIÓN Hersteller EMS ELECTRO MEDICAL SYSTEMS SA, Fabricante EMS ELECTRO MEDICAL SYSTEMS SA, CH-1260 Nyon, Schweiz CH-1260 Nyon, Suiza ® ® Modell Piezon Master 700 Modelo Piezon Master 700 - Klasse I - Clase I... -
Page 92: Dati Tecnici
DATI TECNICI TEKNISKA DATA DESCRIZIONE BESKRIVNING Produttore EMS ELECTRO MEDICAL SYSTEMS SA, Tillverkare EMS ELECTRO MEDICAL SYSTEMS SA, CH-1260 Nyon, Svizzera CH-1260 Nyon, Schweiz Modello Piezon ® Master 700 Modell Piezon ® Master 700 - Classe I - Klass I... - Page 94 The use of accessories and cables L’utilisation d’accessoires ou de câbles Nähe bzw. auf oder unter einem anderen Gerät other than those specified or sold by EMS as unvermeidbar ist, muss die Funktionsweise des replacement parts may result in increased comme pièces de remplacement peut avoir...
-
Page 95: Compatibilidad Electromagnética
El uso de accesorios y cables distintos a los L'utilizzo di accessori e cavi diversi da Om andra tillbehör eller kablar än sådana som specificeras eller säljs av EMS används piezas de repuesto podría aumentar las emisiones ricambio può causare un aumento di emissioni o som ersättningsdelar kan detta resultera i... - Page 96 Activate the "Cleaning" mode, disconnect the handpiece from the handpiece cord and check that liquid exits the cord; if it is the case, the handpiece is plugged, send the handpiece to an approved EMS repair center Unscrew the pump cover and check that the pump functions...
- Page 97 Enlever l'instrument et activer la pédale pendant quelques minutes jusqu'à ce que le liquide s'écoule de la pièce à main le cas, la pièce à main est bouchée, envoyer la pièce à main à un centre de réparation agréé EMS Envoyer l'appareil à...
- Page 98 Stellen Sie den Drehregler für die Flüssigkeitsmenge auf das Maximum ein Aktivieren Sie den Reinigungsmodus, trennen Sie das Handstück vom Handstückschlauch und prüfen Sie, ob Flüssigkeit aus dem Schlauch austritt. Wenn dies der Fall ist, ist das Handstück blockiert und muss an ein von EMS autorisiertes Reparaturzentrum gesendet werden Entfernen Sie den Deckel der Pumpe und prüfen Sie die Funktion der Pumpe...
-
Page 99: Solución De Problemas
Compruebe la junta tórica del cable del mango y sustitúyala si es necesario el mango Envíe el cable del mango a un centro de reparación autorizado de EMS Envíe el aparato a un centro de reparación autorizado de EMS Fuga de agua en el bote Compruebe la junta tórica de la tapa del bote y sustitúyala si es necesario... -
Page 100: Individuazione E Risoluzione Dei Problemi
Attivare la modalità "Cleaning", disconnettere il manipolo dal cavo e controllare che il liquido fuoriesca dal cavo; in tal caso il mani- polo è intasato. Inviare il manipolo ad un centro assistenza EMS approvato Svitare il coperchio della pompa e controllare che la pompa funzioni Inviare l'unità... -
Page 101: Felsökning
Utan instrument monterade, aktivera pedalen i några minuter tills vätskan rinner från handstycket Aktivera rengöringsläget, ta bort handstycket från slangen och kontrollera att det kommer ut vätska ur slangen. Om det gör det är handstycket igensatt. Skicka handstycket till ett godkänt EMS-reparationscenter. Skruva bort pumpskyddet och kontrollera att pumpen fungerar. - Page 104 Tel. +39 02 3453 8111 Fax +49 89 42 71 61 60 Fax +39 02 3453 2778 e-mail: info@ems-ch.de e-mail: dental@ems-italia.it SPAIN EMS Electro Medical Systems España SL EMS Corporation Bernardino Obregón 14 bis 11886 Greenville Avenue #120 E-28012 Madrid Dallas, TX 75243, USA Tlf.
Need help?
Do you have a question about the PIEZON MASTER 700 and is the answer not in the manual?
Questions and answers