Elcometer 224 Operating Instructions Manual
Digital profile gauge
Hide thumbs
Also See for 224:
- User manual (84 pages) ,
- Operating instructions manual (64 pages) ,
- User manual (16 pages)
Table of Contents
Advertisement
Quick Links
Advertisement
Table of Contents

Related Manuals for Elcometer 224


Summary of Contents for Elcometer 224
- Page 1 Elcometer 224 Digital Profile Gauge Operating Instructions...
- Page 2 224 Patent Applied for. Bluetooth SIG QDID = B014393. is a registered trademark of Elcometer Limited. ElcoShip ® and ElcoMaster ® are registered trademarks of Elcometer Limited. ® and Bluetooth ® are trademarks owned by Bluetooth SIG Inc and licensed to Elcometer Limited.
- Page 3 -- Connect the equipment into an outlet on a circuit different from that to which the receiver is connected. -- Consult the dealer or an experienced radio/TV technician for help. Modifications not expressly approved by Elcometer Limited could void the user's authority to operate the equipment under FCC rules.
-
Page 4: Table Of Contents
CONTENTS Section Page About your gauge ............. . . 2 Getting started . -
Page 5: About Your Gauge
The Elcometer 224 Digital Profile Gauge is a world beating product. With the purchase of this gauge you now have access to the worldwide service and support network of Elcometer. For more information visit our website at www.elcometer.com. - Page 6 • [TOP] Display backlight 1.2 STANDARDS Your Elcometer 224 Digital Profile Gauge can be used in accordance with the following National and International Standards, ASTM D 4417-B, SANS 5772, US Navy NSI 009-32, US Navy PPI 63101-000. For IMO PSPC , the surface profile of metal surfaces should be measured and recorded.
-
Page 7: Getting Started
Consult your Local Environmental Authority for further guidance. 1.5 CONVENTIONS IN THESE INSTRUCTIONS The Elcometer 224 is controlled using a simple menu structure which helps you get the most from your gauge - see page 9. - Page 8 (see page 28). 2.5 LANGUAGE The Elcometer 224 has over 20 languages built-in. Note: When the gauge is switched on for the first time after batteries have been fitted, the display will show the language selection screen.
- Page 9 CHOOSING LANGUAGE Either: 1. Switch gauge off. 2. Press and hold left hand softkey. 3. Press to switch on gauge. 4. Release left hand softkey. 5. Press to locate your language, then press SEL. The gauge operates in the new language until changed.
-
Page 10: Taking A Reading
3 TAKING A READING 3.1 BEFORE YOU START • Have you zeroed the gauge? ...See “Zeroing your gauge” on page 6. • Do you require statistics? ....See “Statistics” on page 17. •... -
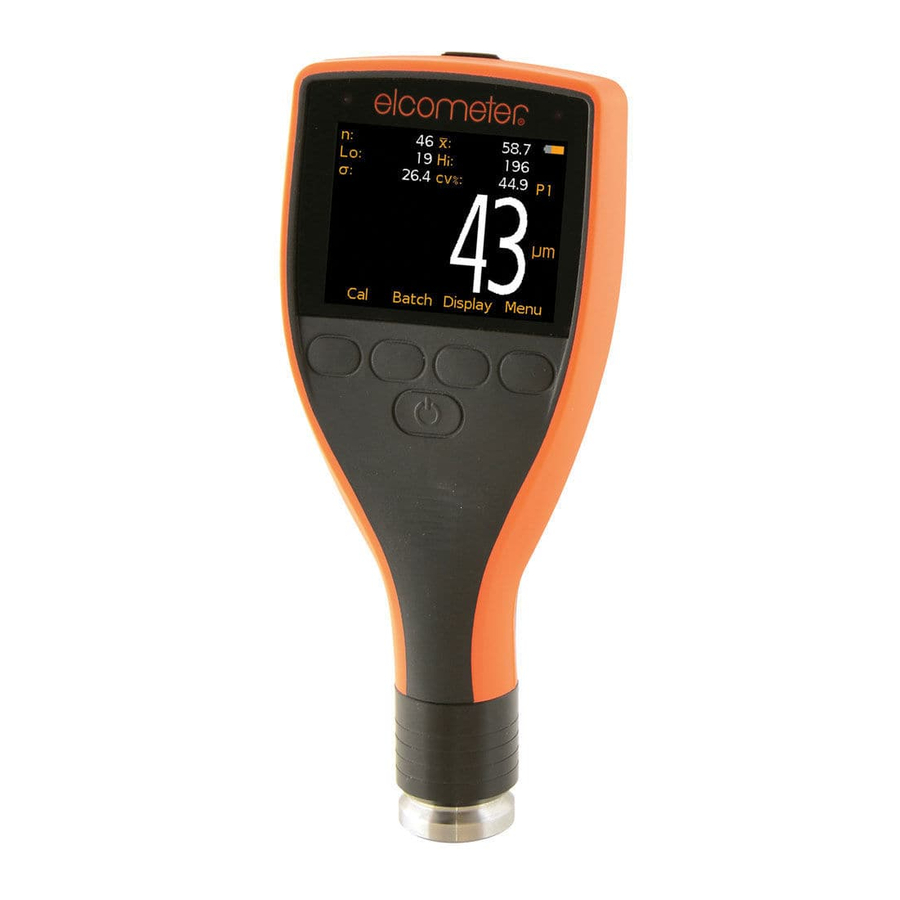
Page 11: The Display
4 THE DISPLAY The display shows measurement data, menus Battery and gauge settings. The display shown here is status a typical TOP reading screen. Peak to Units valley The reading screen changes depending upon height units, [TOP] memory, softkeys locking and whether extended menus are selected. -
Page 12: The Menus
Your gauge has two menu structures; Extended menu off and Extended menu on: 5.1 EXTENDED MENU OFF The gauge is shipped from the Elcometer factory with extended menu switched off. In this simple menu mode the gauge can be zeroed and used to take measurements. - Page 13 5.2 EXTENDED MENU ON When the extended menu is switched on, additional items are added to the menu which give access to more advanced functions, and the STATS softkey is activated. [TOP] When the extended menu is switched on the DATA softkey is also activated.
- Page 14 5.3 [STANDARD] MENU PRINT/OUTPUT Current statistics MENU DELETE Backlight Last reading Zero locked STATISTICS SELECT STATS Extended menu Select stats No. of readings Print/Output Softkey enabled Mean Delete SETUP Std deviation Setup Statistics Highest reading About Units Lowest reading Reset Auto switch off Output UNITS...
- Page 15 5.4 [TOP] MENU SELECT STATS PRINT/OUTPUT No. of readings Single batch Mean All batches Std deviation Current statistics Highest reading MENU Lowest reading STATISTICS Backlight Zero locked Extended menu DELETE Select stats Print/Output Last reading Softkey enabled Delete Single batch Setup All batches About...
-
Page 16: Gauge Configuration And Functions - Extended Menu Off
GAUGE INFORMATION - Elcometer 224 model, software versions, [TOP] Bluetooth PIN code, etc. • CONTACT - Details of Elcometer offices worldwide and, if programmed, the contact details for the Supplier or Local Distributor. • HELP - Explains symbols used on the display. -
Page 17: Gauge Configuration And Functions - Extended Menu On
7.2 PRINT/OUTPUT Outputs statistics ([TOP] and batch data) to the optional Elcometer miniprinter via the RS232 interface. Note: To use this function, first setup using MENU>SETUP>OUTPUT - see page 16. If no printers have been setup (Bit image or Plain text), PRINT/OUTPUT will display a NOT AVAILABLE message. - Page 18 7.3 DELETE Deletes readings. If there is no reading to delete, the gauge displays LAST READING NOT AVAILABLE. • LAST READING - Deletes last reading only. Gauge displays ARE YOU SURE? Select YES to confirm or NO to cancel. • [TOP] SINGLE BATCH - Deletes the batch data.
- Page 19 RS232 interface as they are taken. The gauge sends standard ASCII characters from the Courier New font set . This allows printing on devices such as RS 232 printers or PC via Elcometer software (page 28) or via HyperTerminal (or similar programs).
-
Page 20: Statistics
8 STATISTICS The Elcometer 224 has a Statistics feature (STATS) which calculates and displays a statistical analysis of readings as they are taken. [TOP] The statistical calculations are also applied to the readings stored within a single batch in memory. - Page 21 When EXTENDED MENU is active, press STATS softkey to access STATS MENU. The statistical values available are: Number of Readings Mean Standard Deviation Statistics Menu Highest Reading Lowest Reading For more information see: • “Select stats” on page 20 • “Statistics terminology”...
- Page 22 8.1 ENLARGE STATS Displays the chosen statistical values as double-height characters. The example screens (below) appear when all the statistical values are selected. The Up/Down softkeys can be used to move through the list. The OK softkey returns the gauge to the Reading Screen. Enlarged Statistics 8.2 STATS ON LCD Activates the presentation of the chosen statistical values on the reading screen.
- Page 23 8.3 CLEAR STATS Resets to zero all statistical values. 8.4 SELECT STATS Allows the user to chose which statistical values are displayed. The default condition is all values. Use Up/Down softkeys to move cursor and SEL softkey to select or deselect the statistical values.
-
Page 24: Top] Batching
(Batching is the term used to describe saving readings in gauge memory.) This section (9) applies to Elcometer 224 Top gauges only. The Elcometer 224 Top operates in one of two modes; immediate or batch. 9.1 IMMEDIATE MODE The gauge takes readings and calculates statistics, but does not store any readings in memory (this is known as ‘rolling statistics’). - Page 25 9.3 USING YOUR GAUGE MEMORY The memory in your gauge is accessed using the DATA MENU. To access the DATA MENU press the DATA, softkey (these softkeys are only displayed with EXTENDED MENU on). The functions in the DATA MENU are described below: EXIT BATCHING Returns the gauge to immediate mode and no further readings are stored in memory.
- Page 26 The OPEN NEW BATCH screen is then displayed. Batch type (normal or Batch number Limits on/off counted average) Cancel without Press to creating batch create batch Toggle batch type Set counted (normal/counted average) average group size OPEN NEW BATCH - Immediate mode 2.
- Page 27 • COUNTED AVE: ( ) - Readings are taken in preset groups, the default being 5 readings per group (n=5). At the end of each group the gauge beeps and calculates the average for the group and stores this average value, which is used for the statistical calculation. The individual readings in the group are not stored.
- Page 28 The OPEN NEW BATCH screen is then displayed (note the ‘clone’ symbol at top right). ‘Cloned’ batch Batch number symbol Cancel without Press to creating batch create batch OPEN NEW BATCH - Batch mode (cloning) 2. Press OK to create the batch Batch numbering The gauge automatically allocates the next batch number when a new batch is created.
- Page 29 REVIEW BATCHES Displays contents of any batch. Press the left/right arrows to select the batch you want to review, then press OK. The status area in the bottom half of the screen displays the batch number, batch type and number of readings in the batch. Press to switch the status area on/off.
-
Page 30: Standard] Transferring Readings To A Computer Or Printer
This section (10) applies to Elcometer 224 Standard gauges only. Measurement data can be transferred from your gauge to a PC or to the optional Elcometer miniprinter the readings are taken. It is also possible to transfer the current statistics to the miniprinter. -
Page 31: Top] Transferring Readings To A Computer Or Printer
11 [TOP] TRANSFERRING READINGS TO A COMPUTER OR PRINTER This section (11) applies to Elcometer 224 Top gauges only. 11.1 SOFTWARE Your gauge is supplied with ElcoMaster and ElcoMaster Mobile software. ElcoMaster allows you to: • Monitor measurements remotely via Bluetooth •... - Page 32 • Click Start > Run • Type D:AutoCIS (where ‘D’ is the letter of your CD drive) • Click OK. The software installation wizard will run. 2. Follow the on-screen installation instructions. Follow the instructions included with ElcoMaster to interface your gauge with your PC. If at any time ElcoMaster requests a PIN number for your gauge, press Menu>Bluetooth.
- Page 33 ® BLUETOOTH If at any time ElcoMaster requests a PIN number for your gauge, select MENU>ABOUT>GAUGE INFORMATION. The display will show the ® Bluetooth PIN in the bottom right corner (in the example shown, ‘01358’): Each gauge has a different PIN - use the PIN shown on your Gauge Information screen.
-
Page 34: Personalised Welcome Screen
This is the first screen displayed when the gauge is switched on. 12.1 [STANDARD] GAUGES Download the Elcometer ‘Welcome Screen Wizard’ software from www.elcometer.com/downloads CREATING THE SCREEN 1. Connect your gauge to your PC using the optional gauge-to-PC connection cable. -
Page 35: Storage And Transit
- see “Accessories” on page 33. In the unlikely event of a fault, the gauge should be returned to your local Elcometer supplier or directly to Elcometer. The warranty will be invalidated if the instrument has been opened. Contact details are stored in the gauge - MENU>ABOUT>CONTACT. -
Page 36: Statistics Terminology
Standard Deviation. A statistical measure of the spread of values in a group of readings. 16 ACCESSORIES The following accessories are available from Elcometer, or your local Elcometer supplier: Pack of 2 Spare Probe Tips, Dust Seals and Fixing Tool T22420053... - Page 37 Soft Pouch T22420050 LCD Window Protection Film, Pack of 50 T99916651 Gauge-to-PC Connection Cable (9-pin): T99916217 RS232 to USB converter cable: T99916716 Miniprinter , 230 V (UK Plug): X4569964B Miniprinter, 230 V (European Plug): X4569964C Miniprinter, 110 V (US Plug): X4569964D Miniprinter, gauge-to-printer connection cable (25-pin): T99916267...
-
Page 38: Technical Data
Whichever is the greater. m. Operation outside these limits depends upon climatic conditions. If required, contact Elcometer for further information. Alkaline batteries must be disposed of carefully to avoid environmental contamination. Please consult your local envi- ronmental authority for information on disposal in your region. -
Page 39: Related Equipment
18 RELATED EQUIPMENT Elcometer produces a wide range of surface testing equipment and other associated paint inspection equipment. Users of the Elcometer 224 may also benefit from the following Elcometer products: • Elcometer Mechanical surface profile gauges • Elcometer Surface replica tape (Testex) •... -
Page 40: Index
Limits Exiting Changing size of fonts Setting Opening existing batch Locking softkeys Lowest reading Batteries Precautions Rechargeable ElcoMaster Maintenance Charging Elcometer 224 Mean Specification Features Memory Baud rate Overview Amount available Beep Menu items Changing volume ABOUT Switching off AUTO SWITCH OFF... - Page 41 DATA MENU Software DELETE Standard deviation Number of readings DELETED READING Statistics EXIT BATCHING Activating FREE MEMORY Overview On/off GAUGE INFORMATION Terminology Opening screen HELP Switching on/off Creating LANGUAGES Automatically Disabling LARGE FONTS OPEN EXISTING BATCH OPEN NEW BATCH Units OPENING SCREEN Manual setting of Power supply...
Need help?
Do you have a question about the 224 and is the answer not in the manual?
Questions and answers