
Related Manuals for Elcometer 204


Summary of Contents for Elcometer 204
- Page 1 Elcometer 204 Steel Ultrasonic Thickness Gauge Operating Instructions...
- Page 2 The Elcometer 204 Steel Ultrasonic Thickness Gauge has been tested in accordance with EU regulations governing Electro-magnetic compliance and it meets the required directives. is a registered trademark of Elcometer Limited. All other trademarks acknowledged. © Copyright Elcometer Limited. 2009.
-
Page 3: Table Of Contents
CONTENTS Section Page About your gauge ..............2 Getting started. -
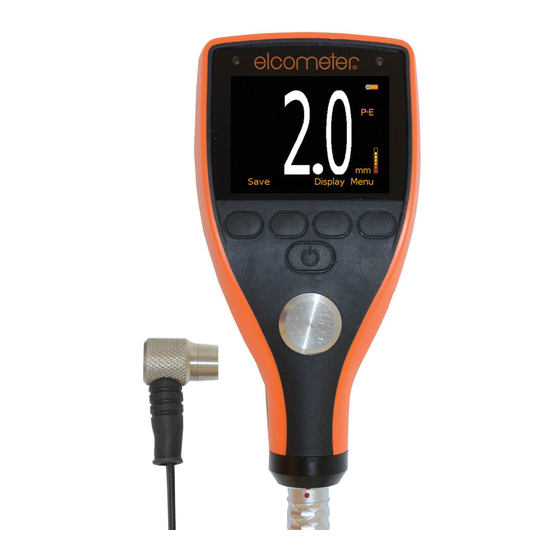
Page 4: About Your Gauge
The Elcometer 204 Steel Ultrasonic Thickness Gauge is a world beating product. With the purchase of this gauge you now have access to the worldwide service and support network of Elcometer. For more information visit our website at www.elcometer.com. - Page 5 Operating Instructions. Do not hesitate to contact Elcometer or your Elcometer supplier if you have any questions. 1.2 STANDARDS The Elcometer 204 Steel Ultrasonic Thickness Gauge can be used in accordance with the following National and International Standards ASTM E 797, EN 15317.
-
Page 6: Getting Started
To fit or replace batteries: 1. Locate battery compartment cover at top of gauge. Elcometer 204 2. Unscrew battery compartment cover. 3. Referring to battery polarity instructions on rear of gauge, insert batteries into gauge ensuring correct polarity. - Page 7 2.2 THE TRANSDUCER The transducer transmits and receives the ultrasonic energy or sound waves that the gauge uses to determine the thickness of the material being measured. The transducer connects to the gauge via the attached cable, and two coaxial connectors. The orientation of the dual coaxial connectors is not critical;...
- Page 8 2.3 THE KEYPAD Functions Press to switch the gauge on or off. When switching off, the gauge retains all of its settings. If the gauge is idle for 5 minutes, it will switch itself off. Press to change units (metric/imperial) Switches the display backlight between three settings;...
- Page 9 2.4 THE DISPLAY Stability indicator Units (IN, MM, IN/µs, MM/s) • One bar - no readings are being taken INMM/ s µ • Less than 5 bars - reading is unstable and may be inaccurate • More than 5 bars - reading is stable (Refer to “Read display”...
-
Page 10: Taking A Reading
3 TAKING A READING Disclaimer: Inherent in ultrasonic thickness measurement is the possibility that the instrument will use the second echo rather than the first echo from the back surface of the material being measured. This may result in a thickness reading which is TWICE what it should be. The responsibility for proper use of the instrument and recognition of these types of phenomenon rests solely with the user of the instrument. - Page 11 3. Read display If six or seven bars of the stability indicator are showing, the display will be reading the correct thickness of the material directly beneath the transducer. If the stability indicator has fewer than five bars showing, or the numbers on the display seem erratic, check to make sure that there is an adequate film of couplant beneath the transducer, and that the transducer is seated flat against the material.
-
Page 12: Probe Zero
At this point, your gauge has successfully calculated it's internal error factor, and will compensate for this value in any subsequent measurements. Though the Elcometer 204 will remember the last probe-zero performed, it is generally a good idea to perform a probe-zero whenever the gauge is turned on. This will... -
Page 13: Calibration
±0.5 mm (±0.02"). The accuracy will be dependent on the grade, granularity, and surface condition of the steel. However, it is not recommended that the Elcometer 204 be used to measure any materials other than steel. If greater accuracy and calibration are needed, please consider some of the other models in our product line that will be suitable for your requirements. -
Page 14: Maintenance
The gauge does not contain any user-serviceable components. In the unlikely event of a fault, the gauge should be returned to your local Elcometer supplier or directly to Elcometer. The warranty will be invalidated if the instrument has been opened. -
Page 15: Technical Specification
9 TECHNICAL SPECIFICATION Range: 1.0 mm to 152 mm (0.04" to 6.0") Resolution: 0.01 mm (0.001") Accuracy: ±2% of reading or ±0.5 mm (±0.02"), whichever is the greater and depends on material and conditions Weight: 295 g (10 oz) including batteries Size: 63.5 mm x 120.6 mm x 31.5 mm (2.5"... -
Page 16: Spares
Additionally, Elcometer Limited warrants transducers and accessories against such defects for a period of 90 days from receipt by the end user. If Elcometer Limited receives notice of such defects during the warranty period, Elcometer Limited will either, at its option, repair or replace products that prove to be defective. - Page 17 11.2 OBTAINING SERVICE DURING WARRANTY PERIOD If your hardware should fail during the warranty period, contact Elcometer Limited and arrange for servicing of the product. Retain proof of purchase in order to obtain warranty service.
-
Page 18: Transducers
11.3 AFTER THE WARRANTY PERIOD If your hardware should fail after the warranty period, contact Elcometer Limited for details of the services available, and to arrange for non-warranty service. 12 TRANSDUCERS The following paragraphs highlight the important properties of your transducer which should be considered when assessing a particular measurement task. -
Page 19: Condition And Preparation Of Surfaces
13 CONDITION AND PREPARATION OF SURFACES The shape and roughness of the test surface are of paramount importance when carrying out ultrasonic thickness testing. Rough, uneven surfaces may limit the penetration of ultrasound through the material, and result in unstable, and therefore unreliable, measurements. The surface being measured should be clean, and free of any small particles, rust, or scale. -
Page 20: Application Notes
14 APPLICATION NOTES 14.1 MEASURING TUBING When measuring a piece of pipe to determine the thickness of the pipe wall, orientation of the transducer is important. If the diameter of the pipe is larger than approximately 100 mm (4”), measurements should be made with the transducer oriented so that the gap in the wearface is perpendicular (at right angles) to the long axis of the pipe. - Page 21 14.3 MEASURING LAMINATED MATERIALS Your Elcometer 204 is not suitable for measuring the thickness of laminated materials. If you need to measure this type of material, please consider using one of the other ultrasonic thickness gauges available from Elcometer - please refer to the full details at www.elcometer.com 14.4 MEASURING THROUGH PAINT AND COATINGS...
Need help?
Do you have a question about the 204 and is the answer not in the manual?
Questions and answers