Elcometer 224 Operating Instructions Manual
Digital profile gauge, standard
Hide thumbs
Also See for 224:
- User manual (84 pages) ,
- Operating instructions manual (64 pages) ,
- Operating instructions manual (11 pages)
Table of Contents
Advertisement
Quick Links
Advertisement
Table of Contents

Related Manuals for Elcometer 224


Summary of Contents for Elcometer 224
- Page 1 Elcometer 224 Digital Profile Gauge Standard Model Operating Instructions...
- Page 2 (electronic, mechanical, magnetic, optical, manual or otherwise) without the prior written permission of Elcometer Instruments Ltd. A copy of this Instruction Manual is available for download on our Website via www.elcometer.com/ downloads.
-
Page 3: Table Of Contents
CONTENTS Section Page About your gauge ............. . . 3 1.1 Features . - Page 4 Personalised welcome screen ........... . 16 Storage and transit .
-
Page 5: About Your Gauge
The Elcometer 224 Digital Profile Gauge is a world beating product. With the purchase of this gauge you now have access to the worldwide service and support network of Elcometer. For more information visit our website at www.elcometer.com. -
Page 6: What This Box Contains
Consult your Local Environmental Authority for further guidance. 1.3 CONVENTIONS IN THESE INSTRUCTIONS The Elcometer 224 is controlled using a simple menu structure which helps you get the most from your gauge - see page 9. -
Page 7: Getting Started
2 GETTING STARTED Before you use your gauge for the first time, remove the paper strip from the battery compartment. 2.1 FITTING BATTERIES Batteries are located under the cover at the rear of the gauge. Use two LR03 (AAA), alkaline dry batteries, or rechargeable equivalent; take care to ensure correct battery polarity. -
Page 8: Selecting A Language
2.5 SELECTING A LANGUAGE The Elcometer 224 has over 20 languages built-in. When the gauge is switched on for the first time after batteries have been fitted, the display will show the language selection screen. Press to locate your language, then press SEL. The gauge operates in the new language until changed. -
Page 9: Taking A Reading
3 TAKING A READING 3.1 BEFORE YOU START • Have you zeroed the gauge? ....See “Zeroing your gauge” on page 8. • Do you require statistics? ....See “Statistics” on page 15. •... -
Page 10: Zeroing Your Gauge
4 ZEROING YOUR GAUGE Before taking measurements, always zero your gauge on a hard flat surface; use the glass plate supplied with your gauge or a similar flat surface such as window glass. 1. Press ZERO 2. When indicated by the display, place the probe on the glass plate. The display will show 0 (zero) and is immediately ready to use. -
Page 11: The Display And Menus
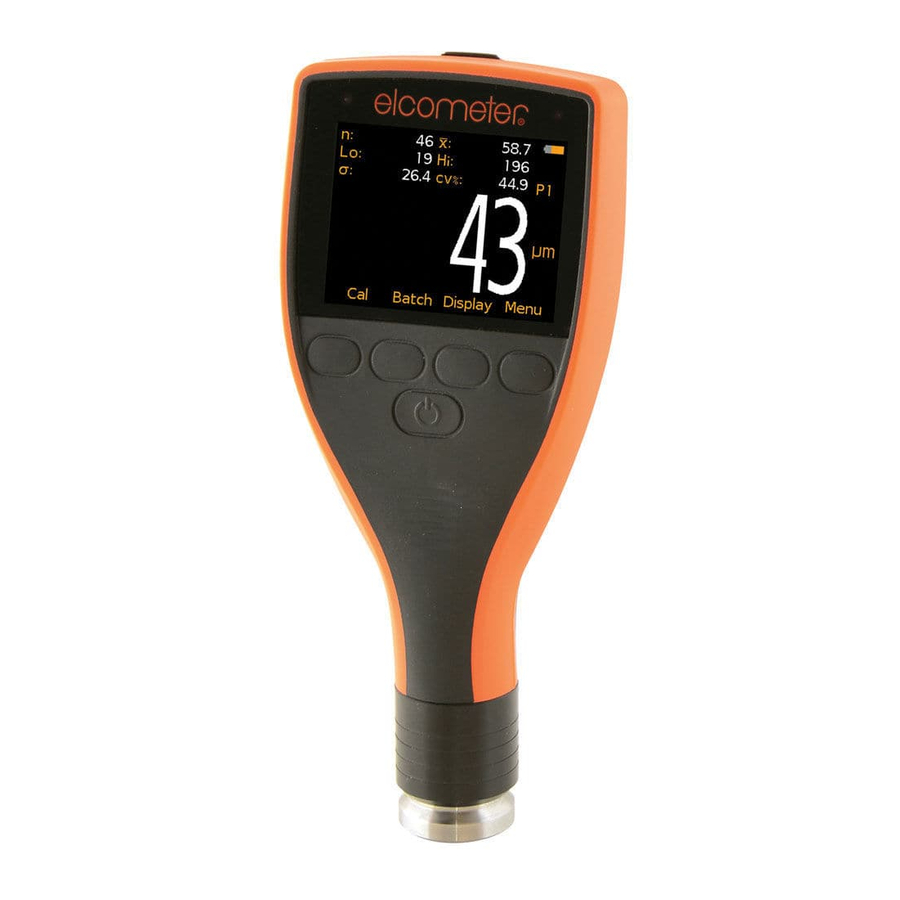
5 THE DISPLAY AND MENUS 5.1 THE DISPLAY Figure 1 shows a typical display while readings are being taken. The content Battery of the display depends upon the units status Depth selected and whether extended menus reading Units are selected. ZERO: Press to zero the gauge (using a glass zero plate). - Page 12 BACK softkey returns the gauge to a previous screen. Holding this softkey down will rapidly exit from any menu and return to the reading screen. The Elcometer 224 Standard Gauge has two menu structures (Figure 2 and Figure 3): •...
- Page 13 Beep volume Languages Auto switch off Opening screen SELECT STATS No. of readings Mean Std deviation Highest reading STATS Lowest reading Reading statistics ABOUT Gauge information Contact Help UNITS thou ZERO Zero gauge RESET Factory zero Figure 3. Elcometer 224 menu...
-
Page 14: Menu Function List
Provides information on Gauge, Probe, Contact information and Help: • GAUGE INFORMATION Elcometer 224 model, software versions, etc. • CONTACT Details of Elcometer offices worldwide and, if programmed, the contact details for the Supplier or Local Distributor. • HELP Explains symbols used on Elcometer 224 display screens. - Page 15 RESET • FACTORY ZERO Returns gauge to zero setting created at time of manufacture of the probe. Factory zero will not necessarily restore a precise zero. The gauge should always be zeroed before use using the glass plate supplied. DELETE •...
- Page 16 • UNITS Select from µm, mil or thou. • BEEP VOLUME Changes volume. 0 = off 5 = loudest Default = 3 • LANGUAGES Allows selection of language. • AUTO SWITCH OFF Changes delay before gauge switches off. Minimum = 1 minute (default) Maximum = 10 minutes ‘Off’...
-
Page 17: Statistics
6 STATISTICS The Elcometer 224 Standard has a Statistics feature (STATS) which calculates and displays a statistical analysis of readings as they are taken. To view the statistics, ensure EXTENDED MENU is active (MENU/ EXTENDED MENU/SEL) and then press the STATS softkey. If... -
Page 18: Personalised Welcome Screen
7.1 Creating the screen 1. Download the Elcometer ‘Welcome Screen Wizard’ software. This software is available free of charge from the downloads section of the Elcometer website, www.elcometer.com. 2. Connect gauge to PC using optional PC connection cable - see “Accessories” on page 19. -
Page 19: Storage And Transit
- see “Accessories” on page 19. In the unlikely event of a fault, the gauge should be returned to your local Elcometer supplier or directly to Elcometer. Contact details are stored in the gauge - MENU/ABOUT/CONTACT. -
Page 20: Statistics Terminology
10 STATISTICS TERMINOLOGY Symbol Term Meaning HIGHEST READING The value of the maximum thickness in a group of readings. LOWEST READING The value of the minimum thickness in a group of readings. MEAN The average of a group of readings; the sum of the individual readings divided by the number of readings. -
Page 21: Accessories
11 ACCESSORIES The following accessories are available from Elcometer, or your local Elcometer supplier: Pack of 2 Spare Probe Tips, Dust Seals and Fixing Tool T22420053 Pack of 2 Spare Probe Tips and Dust Seals T22420054 Pack of 5 Spare Probe Tips and Dust Seals... -
Page 22: Technical Data
Whichever is the greater. Operation outside these limits depends upon climatic conditions. If required, contact Elcometer for further information. Alkaline batteries must be disposed of carefully to avoid environmental contamination. Please consult your local envi- ronmental authority for information on disposal in your region. -
Page 23: Related Equipment
13 RELATED EQUIPMENT Elcometer produces a wide range of surface testing equipment and other associated paint inspection equipment. Users of the Elcometer 224 may also benefit from the following Elcometer products: • Elcometer Mechanical surface profile gauges • Elcometer Surface replica tape (Testex) •... -
Page 24: Index
Mean Menu items Reading, taking Delete last reading ABOUT Resetting the gauge Dimensions AUTO SWITCH OFF BACKLIGHT BEEP VOLUME Screen symbols, explanation of Elcometer 224 CONTACT Setting up the gauge Features DELETE Softkey Overview ENLARGE STATS BACK GAUGE INFORMATION MENU... - Page 25 Switching on/off Automatically Tick box Units Manual setting of Up/Down Weight Welcome screen Creating Disabling...
Need help?
Do you have a question about the 224 and is the answer not in the manual?
Questions and answers