Broaster 1600 Operation Manual
Pressure fryer w/smart touch control
Hide thumbs
Also See for 1600:
- Service manual (131 pages) ,
- Operation manual (56 pages) ,
- Installation manual (56 pages)
Table of Contents
Advertisement
PRESSURE FRYER w/SMART TOUCH CONTROL
Be sure ALL installers read, understand, and have access to this manual at all times.
Genuine Broaster Chicken®, Broasted®, Broaster Chicken®, Broaster Foods®. and Broasterie® are registered
trademarks. Usage is available only to licensed operators with written authorization from The Broaster Company.
Design Certified By:
1600: CSA, NSF and UL
1800: CSA (AGA & CGA), NSF and UL
OPERATION MANUAL
BROASTER
1600
Broaster Company
2855 Cranston Road, Beloit, WI 53511-3991
608/365-0193 broaster.com
Manual #17269 8/13 Rev 11/14
®
1600 AND 1800
1800
© 2014 The Broaster Company
Printed in U.S.A.
Advertisement
Table of Contents

Subscribe to Our Youtube Channel
Related Manuals for Broaster 1600


Summary of Contents for Broaster 1600
- Page 1 Be sure ALL installers read, understand, and have access to this manual at all times. 1600 1800 Genuine Broaster Chicken®, Broasted®, Broaster Chicken®, Broaster Foods®. and Broasterie® are registered trademarks. Usage is available only to licensed operators with written authorization from The Broaster Company. Broaster Company 2855 Cranston Road, Beloit, WI 53511-3991 608/365-0193 broaster.com Design Certified By: ©...
- Page 3 All adjustments and repairs shall be made If at any time the controller by an authorized Broaster Company repre- stays on when the power sentative. switch is moved to the OFF position, dis-...
-
Page 5: Table Of Contents
1 - IMITED WARRANTY ......................1 - 1 2 - OWNER’S RESPONSIBILITY ..................2 - 1 3 - INSTALLATION INSPECTION ..................3 - 1 4 - GETTING TO KNOW YOUR BROASTER PRESSURE FRYER ........4 - 1 5 - PRE-COOKING PREPARATIONS ...................5 - 1 O-RING LUBRICATION....................5 - 1 COVER CHECK ......................5 - 1... - Page 6 7 - COOKING WEIGHT, TEMPERATURE AND TIME ............7 - 1 FRESH PRODUCTS ....................7 - 1 FROZEN IQF CHICKEN....................7 - 2 1600 Broaster Recipe Product Cooking Chart ............7 - 3 1800 Broaster Recipe Product Cooking Chart ............7 - 4 8 - COOKING OIL CARE AND FILTERING ................8 - 1 OIL CARE........................8 - 1...
- Page 7 The extended warranty does not cover any cooking well that fails due to any misuse or abuse. Any warranty claim on the cooking well must be presented to The Broaster Company or authorized Broaster Distributor from whom the pressure fryer was purchased. Repairs will be made by The Broaster Company only.
- Page 8 The Company reserves the right to change or improve its products in any way without obligation to alter products previously manufactured. Used Company equipment or Company equipment not purchased from an authorized distribu- tor carries no warranty expressed or implied. broaster.com Manual #17269 8/13 Rev 5/14...
-
Page 10: Owners Responsibility
Broaster Company should be contacted at signs are in their original location and ® are legible. the time of sale or disposal of the Broaster Pressure Fryer so records may be updated. • Allow only properly trained personnel to ®... -
Page 12: Installation Inspection
This can be done by installing the unit in a battery of appliances, in an alcove or Contact your local Broaster Company rep- with adequate ties. resentative for converting from one type of gas to another. -
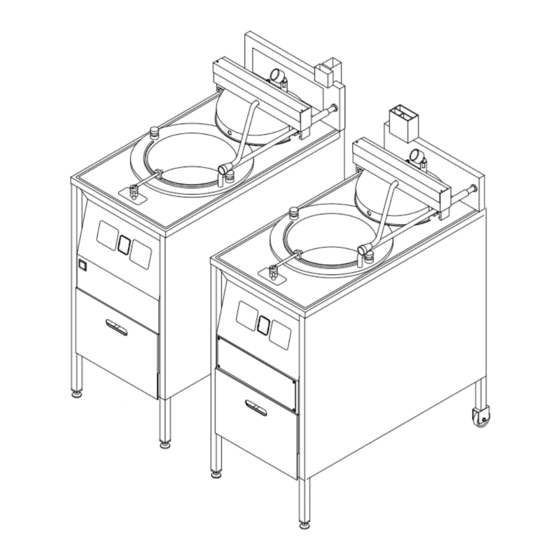
Page 14: Getting To Know Your Broaster Pressure Fryer
4 - GETTING TO KNOW YOUR ® BROASTER PRESSURE FRYER Model 1600: broaster.com Manual #17269 8/13... - Page 15 Model 1800: broaster.com Manual #17269 8/13...
- Page 16 When handle is densate pan. horizontal, valve is closed. When verti- cal, valve is open. 7. Model 1800GH Pilot Burner: A small flame used to ignite the main burner. broaster.com Manual #17269 8/13...
- Page 17 If valve leaks during normal operation, Model 1600: DO NOT operate your unit until valve is replaced by an authorized Broaster Company representative. Keep away from safety relief valve opening with- out heat and steam protective apparel.
- Page 18 Check oil level before turning cook/filter switch to COOK. 20. 1600/1800E Hot Oil Level: Indicates proper level when oil is at operating temperature. 1800GH: HOT OIL LEVEL is stamped on capillary guard. Model 1600: 21.
-
Page 20: Pre-Cooking Preparations
OPEN. If around and completely cover heating cover will still not OPEN, turn cook/filter elements on the 1600/1800E and sides switch OFF. DO NOT operate unit until it and bottom of cooking well on the has been serviced by an authorized 1800GH. -
Page 21: Oil Level
They have all ing power switch to ON. been tested for the best possible results in ® your unit. By using Genuine Broaster con- diments, you can obtain a Trademark Authorization allowing the use of The Broaster Company trademarks in your advertising. -
Page 22: 1800Gh Lighting Instructions
This type of pilot lights when the controller calls for heat and goes out when the controller isn’t calling for heat. 5. To light pilot and main burners, turn cook/filter switch to COOK. broaster.com Manual #17269 8/13 Rev 5/14... -
Page 24: Smart Touch Control Panel
If the date and time entry screen appears (Cook, Filter, Setup and Help) to help you press the box after “Month” and a keypad setup and use your fryer. will appear. Enter the number of the month broaster.com Manual #17269 8/13 Rev 5/14... -
Page 25: Cook Tab
2. After a filtering cycle. tabs across the top of the display. “CUS- 3. When a preset is selected and the oil TOM” indicates you are in manual cooking temperature is not at the preset tempera- mode. ture. broaster.com Manual #17269 8/13 Rev 5/14... -
Page 26: Select Preset Display
It is recommended the oil should be filtered There are 2 “Select Preset” boxes. every 5 loads. All of the Broaster Company Products are This box indicates how many cook cycles preloaded into the memory of the control have been completed since the last time and can be selected when you want to the oil was filtered. -
Page 27: Filter Tab
When it reaches 5:00 minutes an alert sounds and a reminder flashes (see below) to close the drain valve. To silence the alert press the button with the speaker on it. DO NOT press the Stop Pump button. broaster.com Manual #17269 8/13 Rev 5/14... -
Page 28: Setup Tab
Cook Filter Setup Help Temperature Units: Degrees F Time & Date Adjustment Language Selection Temperature Alert Settings Energy Save Setting Pin Maintenance Presets Pressing the Degrees box switches the Shortening Management Exit Setup units. broaster.com Manual #17269 8/13 Rev 5/14... -
Page 29: Energy Save Setting
When the OK button is pressed the display returns to the normal Cook Tab display and the temperature will be yellow and Low and the set temp will be alternating. DO NOT start cooking until the temp display is green. broaster.com Manual #17269 8/13 Rev 5/14... -
Page 30: Presets
Creating a new product or deleting a prod- You can quickly tell when a product is not uct on the list will be described later. active because the name and number of the item will be greyed out. broaster.com Manual #17269 8/13 Rev 5/14... -
Page 31: Add New
Smart Touch the flash drive from the USB port. control. This is done from the Preset tab using the Load Menu and Export Menu but- tons along the top of the display. broaster.com Manual #17269 8/13 Rev 5/14... -
Page 32: Load Menu
Pressing the “Shortening Changed Today” bar enters today’s date and time as a reminder when the oil was last changed. this also resets the “Cycles Since Last Fil- terd” counter to 00 on the Cook Tab. broaster.com Manual #17269 8/13 Rev 5/14... -
Page 33: Help Tab
After making the adjustments on this dis- play press the green OK button to save the entries. To go back to the Cook display either press the “Exit Setup” button or the Cook Tab. 6-10 broaster.com Manual #17269 8/13 Rev 5/14... -
Page 34: Cooking Weight, Temperature And Time
MAXIMUM LOAD: Chicken, Dark - 180°F; Fresh bone-in chicken Corn Dogs/Pork - 160 to170°F; 1600: 3.2 Kg (7 lbs.) Fish - 155°F 1800: 6.4 Kg (14 lbs) The charts below give suggested tempera- ture and time settings. Actual cook times... -
Page 35: Frozen Iqf Chicken
ALWAYS COOK ALL BROASTER RECIPE PRODUCTS UNTIL THE aximum Load Size: INTERNAL TEMPERATURE REACHES 1600: 2 chickens (16 pieces) THE FOLLOWING MINIMUMS: 1800: 4 chickens (32 pieces) Chicken, White - 170°F; Chicken, Dark - 180°F; Corn Dogs/Pork - 160 to170°F;... -
Page 36: 1600 Broaster Recipe Product Cooking Chart
1.8 Kgs (4 lbs) Min. ALWAYS COOK ALL BROASTER RECIPE PRODUCTS UNTIL THE INTERNAL TEMPERATURE REACHES THE FOLLOWING MINIMUMS: Chicken, White - 170°F; Chicken, Dark - 180°F; Corn Dogs/Pork - 160°F to 170°F; Fish - 155°F broaster.com Manual #17269 8/13 Rev 5/14... -
Page 37: 1800 Broaster Recipe Product Cooking Chart
3.63 Kgs (8 lbs) Min. ALWAYS COOK ALL BROASTER RECIPE PRODUCTS UNTIL THE INTERNAL TEMPERATURE REACHES THE FOLLOWING MINIMUMS: Chicken, White - 170°F; Chicken, Dark - 180°F; Corn Dogs/Pork - 160°F to 170°F; Fish - 155°F broaster.com Manual #17269 8/13 Rev 5/14... -
Page 38: Cooking Oil Care And Filtering
Receives: DO NOT leave any crumb build up in oil, on cooking well or on food basket. See FILTERING. Oil will need replacing more often if improperly maintained. Strain- ing methods only remove crumbs. Using a broaster.com Manual #17269 8/13 Rev 5/14... -
Page 39: Filtering
Filter Hold Down, one cup (1600) or two cups (1800) of Bro-Clean filtering media on Temperature Sensor Location: top of filter paper and/or 5 oz. (1600) or 10 oz. (1800) of XL filtering compound to cook- ing well, and (4) Filter Cover. For best results change paper after each filter cycle. -
Page 40: Filtering Hints
Filter pan cover must be wiped clean after each filtering cycle. 7. Return clean Filter Pan (equipped with all necessary clean filter components including cover) under the fryer before operation. broaster.com Manual #17269 8/13 Rev 5/14... -
Page 42: Cleaning
5. Close drain valve. Fill cooking well aid instructions on container. (1600: 4.5 gallons OR 1800: 9 gallons) with warm tap water. Thoroughly dis- When cleaning with solve 4.5 oz. (1600) OR 9.0 oz. (1800) ® water, use Broaster ® of Broaster... -
Page 43: Food Basket
Clean daily along with the cover, see COVER. Wipe with a clean cloth or paper 6. Remove any oil or grease build-up towel. No lubrication is necessary. from Pressure Relief Valve and Pres- sure Gauge Ports on bottom of cover. broaster.com Manual #17269 8/13 Rev 5/14... -
Page 44: Splash Shield
Laundering will not remove the oil. Dispose of all oil-soiled papers and rags in a trash container that is in a ventilated area away from all cooking equipment or other heat sources such as direct sunlight. broaster.com Manual #17269 8/13 Rev 5/14... -
Page 45: Probe Guard & Basket Guides
Models 1600 and 1800GH, or a 7/ The probe guard and basket guides 16” wrench for the Model 1800E. can be placed in the cooking well Remove the probe guard. -
Page 46: Minimum Preventive Maintenance Requirements
After each filter- Clean Filter Pan Cover ing cycle Filter Cooking Oil See FILTERING Clean and Lubricate O-Ring Slide Rod Probe Guard & Basket Guides Note: If cooking volume is high, perform above requirements more frequently. broaster.com Manual #17269 8/13 Rev 5/14... -
Page 48: Shutdown
If at any time the controller stays on when the power switch is moved to the OFF position, disconnect the power to the unit and contact your local Broaster Company representative for service immediately. Rags or paper containing cooking oil can catch fire if exposed to heat. -
Page 50: Troubleshooting
11 - TROUBLESHOOTING All adjustments and repairs shall be made by an authorized Broaster Company representative. ELECTRICAL TIPS COMPLAINT CAUSE REMEDY 1. Open probe circuit 1. Replace Probe 2. Probe wires reversed 2. Correct wiring Probe Fault 3. Probe changes more than 3. -
Page 51: Solid State Controller Tips
(1800GH) 2. Pilot light will not light 2. Turn ON manual gas shut Display reads CHEC (1800GH) off valve 3. Oil temperature not rising 3. Turn power switch OFF. properly Contact service person. 11-2 broaster.com Manual #17269 8/13 Rev 5/14... -
Page 52: 1800Gh Gas Tips
2. Gas control OFF 2. Turn ON Main burner won’t ignite 3. Controller in Filter, Setup 3. Press COOK tab or Help mode 4. Controller in Filter, Setup 4. Press COOK tab. or help mode. 11-3 broaster.com Manual #17269 8/13 Rev 5/14... -
Page 53: Cover And Yoke Tips
2. Pressure regulating valve 2. Contact service person No pressure dirty or blocked open 3. Leaks around cover O- 3. Replace O-ring ring 1. Turn power switch OFF. Excess pressure Contact service person. 11-4 broaster.com Manual #17269 8/13 Rev 5/14... -
Page 54: Product Tips
2. Old product 2. Discard 1. Product stuck together 1. Float basket while load- White spots 2. Food basket overloaded 2. Decrease load size Dark spots 1. Dirty oil 1. Filter or replace 11-5 broaster.com Manual #17269 8/13 Rev 5/14... -
Page 55: Filtering Tips
1. See COOKING OIL CARE pumping when oil is level installed or crumbs under AND FILTERING with top of hold down, filter paper or hold down approximately 1 inch of oil in bottom 11-6 broaster.com Manual #17269 8/13 Rev 5/14... - Page 57 The Broaster Company 2855 Cranston Road, Beloit, WI 53511-3991 608/365-0193 broaster.com...
Need help?
Do you have a question about the 1600 and is the answer not in the manual?
Questions and answers