Broaster 1600 Operation Manual
Pressure fryer
Hide thumbs
Also See for 1600:
- Service manual (131 pages) ,
- Operation manual (57 pages) ,
- Installation manual (56 pages)
Table of Contents
Advertisement
"An American Tradition Since 1954!"
MODEL 1600 AND 1800
®
BROASTER
PRESSURE FRYER
OPERATION MANUAL
1988 THRU 1998
Be sure ALL installers read, understand, and have access to this manual at all times.
Broaster®, Broasted®, Broasted Chicken®, Broaster Foods®. and Broasterie® are registered trademarks.
Usage is available only to licensed opertors with written authorization from The Broaster Comany.
The Broaster Company
2855 Cranston Road, Beloit, WI 53511-3991
608/365-0193 www.broaster.com
Design Certified By:
1600: CSA, NSF and UL 1800: AGA, CGA, CSA, NSF and UL
Copyright 1997 The Broaster Company
Printed in U.S.A.
Manual 13897 10/97 Rev 11/14
Advertisement
Table of Contents

Related Manuals for Broaster 1600


Summary of Contents for Broaster 1600
- Page 1 Be sure ALL installers read, understand, and have access to this manual at all times. Broaster®, Broasted®, Broasted Chicken®, Broaster Foods®. and Broasterie® are registered trademarks. Usage is available only to licensed opertors with written authorization from The Broaster Comany. The Broaster Company 2855 Cranston Road, Beloit, WI 53511-3991 608/365-0193 www.broaster.com...
- Page 3 All adjustments and repairs shall be made WARNING: Rags or papers containing by an authorized Broaster Company repre- cooking oil can catch fire if exposed to sentative. heat. Laundering will not remove the oil. Dis-...
- Page 5 NEW OWNER OR RELOCATION NOTIFICATION If you are a new owner of a used unit or This card enables The Broaster Company to better serve you and keep you informed of ® have relocated your Broaster Pressure changes in equipment, condiments, or ser- Fryer, please take a minute to fill out one of vice bulletins.
- Page 6 The Broaster Company 2855 Cranston Road Beloit, WI 53511 The Broaster Company 2855 Cranston Road Beloit, WI 53511 Manual #13897 10/97...
-
Page 7: Table Of Contents
1800GH LIGHTING INSTRUCTIONS ..............5 - 3 Start Up ......................5 - 3 Shut Down......................5 - 3 6 - 1600 MECHANICAL CONTROL PANEL..............6 - 1 FAMILIARIZATION ....................6 - 1 7 - ROTARY DIAL SOLID STATE CONTROL PANEL ............ 7 - 1 FAMILIARIZATION .................... - Page 8 10 - COOKING OIL CARE AND FILTERING..............10 - 1 OIL CARE ......................10 - 1 FILTERING ......................10 - 1 FILTERING HINTS ....................10 - 3 11 - CLEANING......................11 - 1 COOKING WELL ....................11 - 1 FOOD BASKET ....................11 - 2 UNIT SURFACES ....................
-
Page 9: Limited Warranty
1 - LIMITED WARRANTY Subject to the terms and conditions of this warranty, The Broaster Company (Company) warrants that all equipment and parts manufactured or sold by the Company and purchased new from an authorized Company distributor are free from defects in material and workmanship for a period of one year from the date of installation, if installation is made by a qualified installer under supervi- sion by an authorized distributor in accordance with applicable laws and regulations. -
Page 11: Owners Responsibility
Broaster Company should be contacted at signs are in their original location and ® are legible. the time of sale or disposal of the Broaster Pressure Fryer so records may be updated. • Allow only properly trained personnel to ®... -
Page 13: Installation
Gas Conversion: Contact your local This can be done by installing the unit in Broaster Company representative for con- a battery of appliances, in an alcove or verting from one type of gas to another. -
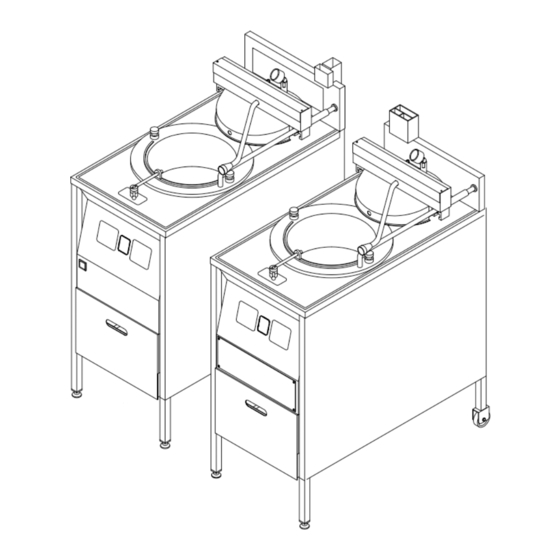
Page 15: Getting To Know Your Broaster ® Pressure Fryer
4 - GETTING TO KNOW YOUR ® BROASTER PRESSURE FRYER Model 1600: 4 - 1 Manual #13897 10/97 Rev 9/05... - Page 16 Model 1800: 4 - 2 Manual #13897 10/97...
- Page 17 1. Pressure Regulating Valve: Opens 8. Model 1800GH Manual Gas Shut Off and closes pressure regulating valve. Valve: Shuts off gas flow to the gas When cover and valve are CLOSED, valve. Gas will flow when handle is in this valve seals the cooking well allow- line with pipe.
- Page 18 If valve leaks during normal operation, DO NOT operate your unit until valve is replaced by an authorized Broaster Company representative. WARNING: Keep away from safety relief valve opening without heat and steam protective apparel.
- Page 19 CAUTION: Check oil level before turning cook/filter switch to COOK. 21. Exhaust Tank: Steam and vapors are 20. 1600/1800E Hot Oil Level: Indicates exhausted through this tank. proper level when oil is at operating temperature. 1800GH: HOT OIL 22.
-
Page 21: Pre-Cooking Preparations
OFF. DO NOT operate unit until it soft enough to be packed around and com- has been serviced by an authorized pletely cover heating elements on the 1600/ Broaster Company representative. 1800E and sides and bottom of cooking well on the 1800GH. -
Page 22: Oil Level
They have all been tested for the best possible results in your unit. By using ® Genuine Broaster condiments, you can obtain a Trademark Authorization allowing the use of The Broaster Company trade- marks in your advertising. 5 - 2 Manual #13897 10/97 Rev 9/05... -
Page 23: 1800Gh Lighting Instructions
1800GH LIGHTING INSTRUCTIONS Shut Down: 1. Turn cook/filter switch OFF. 2. Turn manual knob to PILOT. Then depress and turn OFF. 3. Turn gas shut-off valve OFF. Start Up: 1. Turn cook/filter switch OFF. 2. Depress and turn manual knob (1) on gas control OFF. -
Page 25: 1600 Mechanical Control Panel
6 - 1600 MECHANICAL CONTROL PANEL FAMILIARIZATION 1. Timer: Shows desired cooking time 6. Hi-Limit Control: Prevents oil tempera- and time countdown during a cook ture from exceeding 475° F. Turn unit cycle. OFF and DO NOT attempt to operate unit until it has been serviced by an 2. -
Page 27: Rotary Dial Solid State Control Panel
OFF and DO NOT attempt to operate gramming mode. until it has been serviced by an autho- rized Broaster Company representa- Cook Temperature Button tive. Cook Time button Note: It is possible for this control to trip during shipment. -
Page 28: Controller Programming
CONTROLLER PROGRAMMING Time: Action: Press cook time button twice CAUTION: Check oil level before within one second. turning cook/filter switch to COOK. Response: Programming mode has Action: Turn cook/filter switch to been entered. Flashing display reads COOK. “##:##.” (##:## = time value ie: 08:00) Response: Display alternates Action: If desired, turn rotary knob to between number values for cook tem-... -
Page 29: Cooking Weight, Temperature And Time
8 - COOKING WEIGHT, TEMPERATURE AND TIME FRESH PRODUCTS The charts below give suggested tempera- ture and time settings. Actual cook times ALWAYS COOK ALL BROASTER may vary depending on product weight and PRODUCTS UNTIL THE INTERNAL internal temperature. Times indicated below... -
Page 30: Frozen Iqf Chicken
Keep uncooked product frozen at 0°F or below at all times. ALWAYS COOK ALL BROASTER Maximum Load Size: RECIPE PRODUCTS UNTIL THE 1600: 2 chickens (16 pieces) INTERNAL TEMPERATURE REACHES 1800: 4 chickens (32 pieces) THE FOLLOWING MINIMUMS: Chicken, White - 170°F;... - Page 31 BROASTER RECIPE PRODUCTS COOKING CHART 8 - 3 Manual #13897 10/97 Rev 11/09...
-
Page 33: Product Preparation And Cooking
2 3/4 lb., 2 3/4 lb to 3 lb. or 3 lb. to 3 2. With food basket in hot oil, use long 1/4 lb. for consistent results. tongs to load a maximum 7 lbs (1600) or 14 lbs. (1800) of fresh unfrozen 2. Trim excess fat. Clean out kidneys, cut... -
Page 34: Condiment List For Fresh Product
360° F for 5 minutes or less. 150° F for two hours maximum. ® Used in combination with a Broaster pressure fryer and, if desired, ® CONDIMENT LIST Broaster Chickite Marinade or other ®... -
Page 35: Other Broaster Foods ® Recipes
8. Coat-N-Fry Coating - 40# Box: A sea- lbs. maximum in a Model 1800 and 2 soned heavy coating for unmarinated lbs. maximum in a Model 1600 at chicken and other products to be 360° F for 5 - 7 minutes. If desired, cooked in a pressure or open fryer at potatoes could be cooked with chicken. - Page 36 3. Cod: Purchase cod fillets. Cube into 2 4. Pork Chops: Purchase 3/4 inch thick inch squares. chops. Directions: Mix Fish & Chips Batter Directions: Coat with Fast-Bro Coat- and water in a stainless steel or plastic ing. Cook at 360° F for 4 - 5 minutes. container to the approximate consis- tency of pancake batter.
-
Page 37: Cooking Oil Care And Filtering
(3) and one cup (1600) or two more often if improperly maintained. Strain- cups (1800) of Bro-Clean filtering compound ing methods only remove crumbs. By using on top of filter paper and/or 5 oz. (1600) or ® a built in filter, Broaster filter paper and 10 oz. - Page 38 FILTER. After 5 seconds, push cover well using oil remaining in brush when assembly toward the rear of the unit. dipped in oil. Drain remaining oil and Pump approximately 4 inches (1600) crumbs. Close drain valve. or 8 inches (1800) of oil into cooking well.
-
Page 39: Filtering Hints
FILTERING HINTS Note: Ensure cook/filter switch is OFF to avoid splashing of oil if motor protector reset button is used. 1. Never allow solid shortening to solidify in filter pan or lines. CAUTION: Exceeding five minutes could cause motor protector to trip. 2. -
Page 41: Cleaning
(1600: 4.5 gallons OR 1800: 9 gallons) soaps and detergents. Cooking well cleaner with warm tap water. Thoroughly dis- removes unwanted contaminants while also solve 4.5 oz. (1600) OR 9.0 oz. (1800) neutralizing harmful acids. These acids, if ® of Broaster... -
Page 42: Food Basket
12. Close drain valve. Wipe inside of COVER cooking well dry before filling with new oil. FOOD BASKET Clean each time oil is filtered or when new oil is used. DO NOT put food basket in a dishwasher. Use warm water and a low suds organic household dish cleanser. -
Page 43: Splash Shield
7. After cleaning, completely dry. Lubri- cate O-ring with clean liquid shorten- ing. Install O-ring in O-ring groove. SPLASH SHIELD WARNING: Allow cover assembly to cool before cleaning. Hot surfaces could cause serious burns. If your unit is equipped with a two piece 4. - Page 44 The probe guard and basket guides probe guard using a flat screwdriver, can be placed in the cooking well while for Models 1600 and 1800GH, or a 7/ soaking. 16” wrench for the Model 1800E. Remove the probe guard. (See illustra- 5.
-
Page 45: Minimum Preventive Maintenance Requirements
MINIMUM PREVENTIVE MAINTENANCE REQUIREMENTS DAILY WEEKLY QUARTERLY Clean Cooking Well Clean Condensate Pan Clean O-Ring Clean Pressure Relief Valve Port & Pressure Gauge Port Clean Cover and Splash Guard Clean Food Basket Clean Temperature Sensor After each filtering Clean Filter Pan Cover cycle Filter Cooking Oil See FILTERING... -
Page 46: Nightly Shutdown
12 - NIGHTLY SHUTDOWN WARNING: Rags or papers contain- ing cooking oil can catch fire if 3. 1800GH: Turn gas valve and manual exposed to heat. Laundering will not gas shut off valve to OFF. remove the oil. Dispose of all oil-soiled papers and rags in a trash container that is 4. -
Page 48: Seasonal Shutdown
13 - SEASONAL SHUTDOWN WARNING: Rags or papers contain- ing cooking oil can catch fire if 4. 1800GH: Turn gas valve, manual gas exposed to heat. Laundering will not shut off valve and main gas supply remove the oil. Dispose of all oil-soiled OFF. -
Page 50: Troubleshooting
14 - TROUBLESHOOTING All adjustments and repairs shall be made by an authorized Broaster Company representative. ELECTRICAL TIPS COMPLAINT CAUSE REMEDY 1. Main power OFF 1. Turn ON 2. Cook/filter switch OFF 2. Turn to COOK POWER ON light not illumi- 3. -
Page 51: Solid State Controller Tips
SOLID STATE CONTROLLER TIPS COMPLAINT CAUSE REMEDY 1. There is a controller fail- 1. Turn cook/filter switch Display reads FAIL OFF. Contact service person. 1. Oil temperature too high 1. Turn cook/filter switch Display reads HI OFF. Contact service person. 1. -
Page 52: 1800Gh Gas Tips
1800GH GAS TIPS COMPLAINT CAUSE REMEDY 1. Gas valve OFF 1. Turn to PILOT 2. Air in pilot gas line 2. See MODEL 1800GH Pilot burner won’t ignite LIGHTING INSTRUC- TIONS 3. Gas shut-off valve OFF 3. Turn ON 1. Button not held in long 1. -
Page 53: Cover And Yoke Tips
COVER AND YOKE TIPS COMPLAINT CAUSE REMEDY 1. O-ring dry or dirty 1. Clean and lubricate Cover hard to CLOSE 2. O-ring groove dirty 2. Clean 3. Hard O-ring 3. Replace Cover won’t OPEN 1. O-ring dry or dirty 1. Clean and lubricate 2. -
Page 54: Product Tips
PRODUCT TIPS Fresh Chicken: COMPLAINT CAUSE REMEDY 1. Low oil temperature 1. Check cook temperature 2. No coating 2. Check procedures Product too light 3. Not done 3. Increase cook time 4. Food basket overloaded 4. Decrease load 1. High oil temperature 1. -
Page 55: Frozen Iqf Chicken
Frozen IQF Chicken: COMPLAINT CAUSE REMEDY 1. Low oil temperature 1. Check cook temperature Product too light 2. Not done 2. Increase cook time 3. Food basket overloaded 3. Decrease load 1. High oil temperature 1. Check cook temperature 2. Overcooked 2. -
Page 56: Filtering Tips
1. Filter paper or hold down 1. See COOKING OIL improperly installed CARE AND FILTERING Motor starts but will not 2. Not using enough ® 2. Add Broaster filtering pump or stops at any level ® Broaster filtering com- compound...
Need help?
Do you have a question about the 1600 and is the answer not in the manual?
Questions and answers