Rimage Everest Encore User Manual
Hide thumbs
Also See for Everest Encore:
- Setup and installation manual (2 pages) ,
- Setup and installation manual (2 pages)
Table of Contents
Advertisement
Advertisement
Table of Contents

Related Manuals for Rimage Everest Encore


Summary of Contents for Rimage Everest Encore
- Page 1 ® Rimage Everest Encore™ Printer User Guide...
- Page 2 Rimage Corporation reserves the right to make improvements to the equipment and software described in this document at any time without any prior notice. Rimage Corporation reserves the right to revise this publication and to make changes from time to time in the content hereof without obligation of Rimage Corporation to notify any person or organization of such revisions or changes.
-
Page 3: Table Of Contents
Label Design Requirements ............6 Change the Print Ribbon ............16 Print Requirements ..............7 Remove the Print Ribbon ................16 Identifying the Parts of the Everest Encore Printer .... 8 Install the Print Ribbon ................18 Change the Retransfer Ribbon ..........19 Front View ................8 Remove the Retransfer Ribbon ...............19... -
Page 4: Introduction
The Everest Encore printer is part of the Rimage series of printers. The For information specific to your autoloader or Rimage AutoPrinter refer to printer can be used as a stand alone printer, or with a Rimage autoloader or the product’s User Guide found at www.rimage.com/support. -
Page 5: Important Information
Europe Rimage Europe GmbH Email: support@rimage.de Rimage offers a variety of service and support options for the Everest Encore Albert-Einstein-Straße 26 printer including Exchange Services. Please contact your Rimage Value Telephone: +49 (0)6074.8521.0 Added Reseller or Rimage for additional information and pricing. -
Page 6: Safety Precautions
Do not disassemble or use tools on the printer. All service procedures should unplugging the cable. Rimage recommends installing the printer in a be performed by a Rimage-authorized technician, or sent in for Rimage- authorized repair. position that allows immediate disconnection of the power cable. Always hold the plug when disconnecting the cable from the outlet. - Page 7 L’exploitation est autorisée aux deux conditions suivantes : 1) l’appareil ne doit pas produire de brouillage; 2) l’appareil doit accepter tout brouillage radioélectrique subi, même si le brouillage est susceptible d’en compromettre le fonctionnement.” For more information visit www.rimage.com/support 2004001_A...
-
Page 8: Compliance Information
Important Information Compliance Information Product Name Rimage Everest Encore Printer Model CDPR23B Notice for USA NOTE: This equipment has been tested and found to comply with the limits for a Class A digital device, pursuant to part 15 of the FCC Rules. -
Page 9: Everest Encore Printer Requirements
Rimage only supports the use of Rimage brand ribbons in our printers. • Tip: The media that are in Rimage Media Kits have a printable area of Printer issues that occur as a result of using ribbons from manufacturers 118-24 mm. On most labels, print settings of 118 mm and 24 mm are other than Rimage are not included under your Rimage warranty or recommended. -
Page 10: Print Requirements
Any label you create and save through CD Designer is in the correct file format (.btw) for printing to an Everest Encore on a Rimage autoloader. You can also print labels saved as PDF files if your Everest Encore is on a Rimage autoloader. -
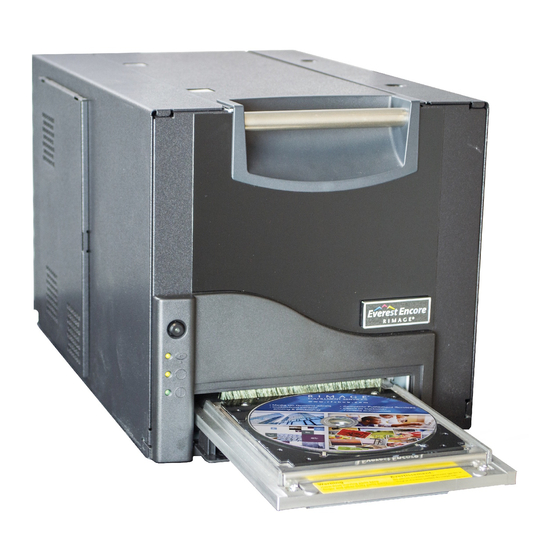
Page 11: Identifying The Parts Of The Everest Encore Printer
To resume normal operation, press the Operator button again. Error indicator light The Error indicator light There are two switches on the rear of the Everest Encore: the AC voltage (on the operator illuminates when operator action switch and the mode switch. -
Page 12: Back View
Identifying the Parts of the Everest Encore Printer Back View Disc Present The Disc Present indicator light indicator light illuminates when a disc is placed on the tray or when the disc is properly clamped. Printer Cable USB Connector Connector The Disc Present indicator light flashes when there is a problem. -
Page 13: Ac Voltage Switch
The mode switch is a rotary switch used to set the operational mode of the Everest Encore. The opening at the base of the cap on the switch indicates There are two switches on the rear of the Everest Encore: the AC voltages the selected mode. -
Page 14: Operating The Everest Encore Printer
Power On or Off the Everest Encore Printer Place a Disc on the Printer Tray The Everest Encore printer does not have a power switch. The printer is powered on and off according to your system setup. Refer to the sections Use this procedure to place a disc on the printer tray. -
Page 15: Set Your Printing Preferences
Access Printing Preferences This section provides the information needed to set up your printing preferences and check the amount of print and retransfer ribbon remaining Use one of the procedures below to access the Everest Encore Printing using a Windows PC. Preferences. -
Page 16: Access Printing Preferences When Printing Pdfs
Refer to page 12 for instructions. Important! The procedure below applies only if you are printing PDF labels using a Rimage autoloader. It does not apply if you are using an AutoEverest 2. Select the Advanced tab. AutoPrinter. When you use this procedure, the changes to the settings are 3. -
Page 17: Set The Printable Area
Select the desired Monochrome setting to modify the vertical Encore Printing Preferences window, select Apply. alignment for prints with a monochrome ribbon. 4. Select OK to close the Rimage Everest Encore Printing Preferences v. Select OK to save the changes. The Print Alignment Settings window. -
Page 18: Check The Ribbon Remaining
Select the desired Cyan, Magenta and Yellow settings to modify the color density. Tip: If you remove a ribbon from the Everest Encore printer and reinsert it, iii. Select the desired Black setting to modify the density for the system recognizes the amount of ribbon remaining in the consumable monochrome images. -
Page 19: Maintaining The Everest Encore Printer
Maintenance Schedule Change the Print Ribbon Before you change or install a new Everest Encore print ribbon, allow time Task Frequency Instructions for the new ribbon to become acclimated to the environment. Allow more... - Page 20 Maintaining the Everest Encore Printer 2. Access the print ribbon. Tip: Perform cleaning procedures while the print ribbon is removed. For Clean the Everest Encore Printer more information refer to the section on Latch 1 page 20. 3. Remove the print ribbon from the carrier.
-
Page 21: Install The Print Ribbon
Maintaining the Everest Encore Printer Maintaining the Everest 600 Printer Install the Print Ribbon e. Rotate the take-up roll clockwise so the ribbon is aligned and lies flat. You may need to lift the ribbon up from the tacky roller to 1. -
Page 22: Change The Retransfer Ribbon
Maintaining the Everest Encore Printer Change the Retransfer Ribbon 2. Remove the used retransfer ribbon. Retransfer Before you change or first install the Everest Encore retransfer ribbon, allow Retransfer Rolls time for the new ribbon to become acclimated to the environment. Allow Ribbon Carrier more time for greater temperature and humidity differences. -
Page 23: Install The Retransfer Ribbon
Close latches 1, 2, and 3. c. Close the side cover. The printer is ready for use. Clean the Everest Encore Printer Regular cleaning helps to keep your Everest Encore printer in optimal operating condition. Clean the Print Head Latch 1... -
Page 24: Clean The Tacky Rollers
Maintaining the Everest 600 Printer Maintaining the Everest Encore Printer 1. Access the print head. b. Use the sponge swab to wipe across the print head from one end to the other in the direction shown. a. Press the two side cover latches to release the side cover. -
Page 25: Clean The Rear Air Filter
Maintaining the Everest 600 Printer Maintaining the Everest Encore Printer Clean the Rear Air Filter a. Apply isopropyl alcohol to the sponge swab. b. Use the sponge swab to clean tacky roller 1. Tool Required: Phillips #2 screwdriver c. Use the sponge swab to remove any waxy buildup from other parts 1. -
Page 26: Clean The Side Air Filters
Maintaining the Everest 600 Printer Maintaining the Everest Encore Printer Clean the Side Air Filters 3. Remove the three air filters from the fan cover. 4. Clean the air filters. Tool Required: Torx T10 screwdriver 1. Open the side cover. -
Page 27: Clean The Platen Roller
Maintaining the Everest 600 Printer Maintaining the Everest Encore Printer 5. Prepare the printer for use. 1. Prepare to clean the platen roller. a. When the air filters are dry, position them on the inside of the fan a. Power off the printer. - Page 28 Maintaining the Everest 600 Printer Maintaining the Everest Encore Printer b. Lower the side cover. a. Remove the sponge swab and the swab handle from the Everest cleaning kit. c. Open latches 1, 2, and 3 inside of the printer.
-
Page 29: Clean The Sensors
Power On Switches For more information, refer to the section on page 10. and Off the Everest Encore Printer section on page 11 for instructions. g. Power on the printer. Important! Do not clean the printer sensors until the printer is The printer is ready for use. - Page 30 Maintaining the Everest 600 Printer Maintaining the Everest Encore Printer 4. Locate the swab handle found in the Everest Cleaning Kit. Remove the sponge swab from the swab handle if necessary. Sponge Swab Swab Handle Notch Tip: One end of the handle has a slot with a notch in it approximately ¼...
Need help?
Do you have a question about the Everest Encore and is the answer not in the manual?
Questions and answers