Rimage Everest III Setup Manual
Rimage everest iii: installation guide
Hide thumbs
Also See for Everest III:
- User manual (246 pages) ,
- Manual (8 pages) ,
- Operator-parts list manual (6 pages)
Advertisement
Available languages
Available languages
Quick Links
Download this manual
See also:
User Manual
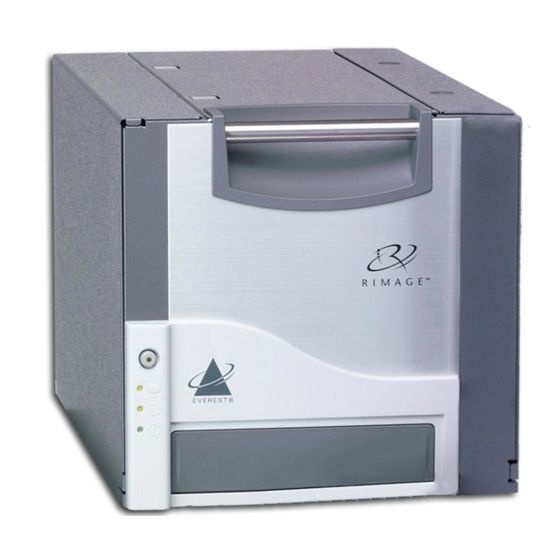
Rimage Everest III Printer™ setup guide
1
Move the shipping screw.
a. On the back of the Everest
printer, use a Phillips screwdriver
to remove the shipping screw.
b. Using a Phillips screwdriver,
install the shipping screw in the
location indicated by the caution
card.
2
Open the Everest printer.
a. To open the side cover,
press the two cover
latches and lower the side
cover.
b. Open latches 1, 2, and 3
as indicated by the arrows.
1
3
Remove the internal packing pieces.
Inside the Everest printer, remove the plastic packing pieces.
4
Install the print ribbon.
Cover Latches
a. To remove the ribbon carrier,
Side Cover
b. Install the ribbon around the
Latch 1
c. To tighten the ribbon, turn the
Latch 2
Latch 3
d. Insert the ribbon carrier into
grasp the ribbon carrier and pull
out.
Ribbon Carrier
ribbon guides and snap the
ends of the ribbon into the ribbon carrier.
Ribbon Guides
takeup roller clockwise as
indicated by the arrow.
the printer, but do not close the
latches.
5
Install the transfer ribbon.
a. To access the transfer ribbon
carrier, grasp the transfer ribbon
carrier and pull out.
Note: The transfer ribbon
carrier slides out from the
printer but remains attached.
b. Install the transfer ribbon around the
ribbon guides and snap the ends of
the ribbon into the ribbon carrier.
c. To tighten the ribbon, turn the takeup
roller as indicated by the arrow.
d. Slide the ribbon carrier into the
printer.
e. Close latches 1, 2, and 3 as
indicated by the arrows.
f. Close the printer side cover.
6
Learn more.
Takeup Roller
For more information about operating and maintaining the
Everest printer, refer to the Everest Printer User Guide included
with your product.
For autoloader or AutoPrinter information, refer to the
instructions included with your autoloader or AutoPrinter.
If you are upgrading from a Prism printer to an Everest printer,
use GemFlash or GemUtil to update the autoloader firmware.
Instructions on updating the autoloader firmware are available
at www.rimage.com/support.
Transfer
Ribbon
Carrier
Takeup
Roller
Tighten
Ribbon Guides
Latch 1
Latch 3
Latch 2
110876_C
Advertisement

Related Manuals for Rimage Everest III


Summary of Contents for Rimage Everest III
-
Page 1: Install The Print Ribbon
Rimage Everest III Printer™ setup guide Move the shipping screw. a. On the back of the Everest printer, use a Phillips screwdriver to remove the shipping screw. b. Using a Phillips screwdriver, install the shipping screw in the location indicated by the caution card. - Page 2 Rimage Everest III Printer™ Installationshandbuch Transportsicherungsschraube einsetzen. a. Entfernen Sie mit einem Kreuzschlitzschraubendreher die Transportsicherungsschraube auf der Rückseite des Everest- Druckers. b. Schrauben Sie die Sicher- ungsschraube mit dem Kreuzschlitzschraubendreher in das auf dem Aufkleber gezeigte Loch. Everest-Drucker öffnen. a. Drücken Sie zum Öffnen der...
- Page 3 Guide d’installation de Rimage Everest III Printer™ Déplacez la vis de transport. a. À l’arrière de l’imprimante Everest, utilisez un tournevis Phillips pour dévisser la vis de transport. b. Toujours en utilisant un tournevis Phillips, positionnez la vis de transport à l’emplacement indiqué...
- Page 4 Guía de configuración de la impresora Rimage Everest III Printer™ Mueva el tornillo de envío. a. En la parte posterior de la impresora Everest, use un destornillador Phillips para retirar el tornillo de transporte. b. Con un destornillador Phillips, coloque el tornillo de transporte en la ubicación indicada en la...
- Page 5 Rimage Everest III Printer™ シッピング スク リ ュを動かす。 a. Everest プリンタの後部で、 プラス ド ライバを使ってシッピング スク リ ュを 取外します。 b. プラス ドライバを使って、 注意書きカ ードが示す場所にシッピング スク リ ュ を取付けます。 Everest プリンタを開ける。 a. サイドカバーを開くには、 2つの カバー ラッチ カバー ラッチを押して、 サイ ド カバーを下げます。 サイドカバー...
- Page 6 Rimage Everest III Printer™ - Guida all’installazione Spostare la vite usata per la spedizione. a. Con un cacciavite a stella, rimuovere la vite usata per la spedizione, sulla parte posteriore della stampante. b. Con lo stesso cacciavite, avvitare la vite nel punto indicato dalla targhetta di avviso.
Need help?
Do you have a question about the Everest III and is the answer not in the manual?
Questions and answers