
Related Manuals for Parmco PPOV-6S-PYRO-2


Summary of Contents for Parmco PPOV-6S-PYRO-2
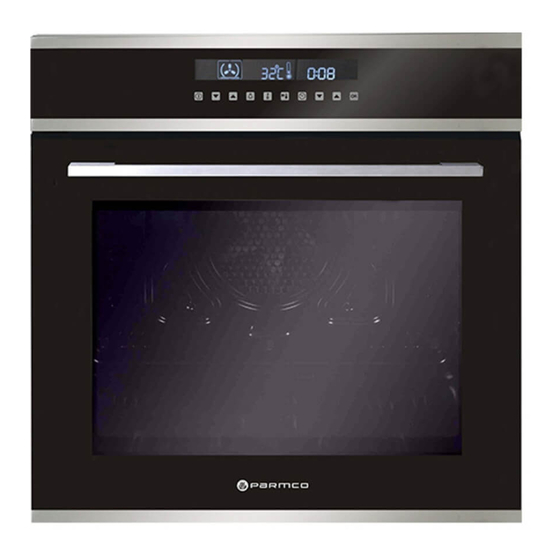
- Page 1 Installation and Operating Instructions Model: PPOV-6S-PYRO-2 For your convenience, we recommend to attach the serial number label HERE. 727626042017...
-
Page 2: The Warranty
• Normal or scheduled maintenance including blocked filters or ducting. Please retain this Warranty card together with receipt or other proof of purchase date when seeking service during the warranty period • Consumable items such as light bulbs. • Any damage to hobs caused by spills when cooking. • Any breakage or damage of glass items. • Any damage caused by non recommended product used for cleaning, Please contact Parmco at 09 573 5678 if your maintaining, lubricating or similar. appliance needs servicing under warranty. Please • Any aspect relating to the installation of the product, or damage caused have your model number and proof of purchase ready. during installation including blocked access for repair. Warranty repairs must be authorized by Parmco. • Any third party (including reseller) or consequential loss or damage (direct or indirect) however arising. Subject to updates without prior notice, please visit www.parmco.co.nz for E & O.E. 727626032017 the latest version. - Page 3 Dear Valued Customer, Thank you and congratulations on purchasing your new Parmco appliance. All Parmco products are made to the highest quality and design standards. We are sure you will enjoy your new appliance. As a note, please read through these instructions carefully. These will assist you in gaining a complete understanding of the functions and features o ered by your appliance.
-
Page 4: Table Of Contents
INDEX Safety instructions How to save energy Unpacking Description of the appliance Installation Operation Prior first use Electronic programmer Oven Cleaning and maintenance Operation in case of emergency Baking in the oven Technical information... -
Page 5: Safety Instructions
SAFETY INSTRUCTIONS The appliance becomes very hot during operation. Take care not to touch the heating elements inside the oven. WARNING: Accessible parts may become hot during use. To avoid burns young children should be kept away. Mains lead of adjacent appliances may be damaged by hobs or stuck between the oven doors and produce short circuit, therefore keep them at safe distance from the appliance. -
Page 6: How To Save Energy
HOW TO SAVE ENERGY Using energy in a responsible way not only saves money but also helps the environment. So let's save energy! And this is how you can do it: Make use of residual heat from the oven. If the cooking time is greater than 40 minutes, switch off the oven 10 minutes before the end time. -
Page 7: Description Of The Appliance
DESCRIPTION OF THE APPLIANCE Oven operation buttons Display Oven door handle Oven door CONTROL PANEL Oven guide levels Baking pans and accessories (oven grid, baking tray, etc) may be inserted into the oven in 5 guiding levels. Appropriate levels are indicated in the tables that follow. Always count levels from the bottom upwards! -
Page 8: Installation
INSTALLATION Installing the oven The kitchen should be dry and have effective ventilation according to the existing technical provisions Main lead behind the oven must be placed in such manner to avoid touching the back panel of the oven because of the heat it develops during operation Remove any packaging materials (foils, artificial foam, nails, etc.) from the reach of children, because they represent potential danger. - Page 9 Electrical connection Warning! All electrical work must be carried out by a suitably qualified and authorized electrician. No alterations or willful changes in the electricity supply should be carried out. ● Before attempting the connection, check whether the voltage indicated on the rating plate corresponds to the actual mains voltage.
-
Page 10: Operation
Colour code L=exterior live wires, usually coloured black, brown. N=neutral The colour is usually blue. Beware of the correct N-connection! E=earthing wire, the colour is green/yellow. OPERATION Prior first use ● Remove packaging, clean the interior of the oven. ● Take out and wash the oven fittings with warm water and a little non-abrasive washing liquid. -
Page 11: Oven
Button Explanation ON/OFF button For on / off the oven. Oven function For upward downward selection of functional. selection Oven lamp For on / off oven lamp. Select a function, the light will turn on. Clock Function Used to set the clock, alarm, cooking time and end of cooking time. - Page 12 the rapid cooking function is activated. 3. This time Top element+Grill+Bottom element+Fan simultaneously work to rapidly increase the internal temperature of the oven to reach the selected temperature in a shorter period of time. 4. After rapid heating to reach the set temperature,Icon “ ”...
- Page 13 When select oven cook time, its prior to the auto shut off function (assume that set shut off temperature to 201℃-250℃, set cook time to 5 hours, so oven will not auto shut off when working for 4hours, and keep working when reach 5 hours).
-
Page 14: Setting The Time
● Long press“ ” and “ ” can speed up temperature setting. Setting the time This is a 24 hour clock, make sure to set the right time before first use. “ ” in OFF position. The clock can be set when the ON/OFF button 1. - Page 15 2. Touch“ ”or “ to set the cooking time 3. Touch “ ” to confirm, the cooking time“ ” lights on, time set saved. 4. Set cook time run out, oven stop heating, alarm sounds, the cooking time icon “ ”...
- Page 16 oven start working at “ 2:30”and stop at “ 3:30” Caution The cooking time and the end of cooking time range: Cooking time range: 0<t≤10hours End of cooking time range: current time<end of cooking time≤current time+10hours. End of cooking time= current time+cooking time End of the work time priority display than the current time End of the work time priority display than the current time We suggest that you supervise the first few cooks to make sure time temperature are right.
- Page 17 Fan, bottom and top elements on At this knob position the oven executes the cake function. Conventional oven with a fan. Caution! When the functions with fan have been selected but the temperature knob is set to zero only the fan will be on.
- Page 18 Fan and bottom element on At this oven function, the oven actives the bottom heater and fan function. The mode is useful for baking loe pastry and preparation of preserved fruit and vegetables. \Pyrolytic Function This oven can clean itself by a process known as pyrolysis, heating the cavity to a temperature of approximately 430˚C.
-
Page 19: Cleaning And Maintenance
CLEANING AND MAINTENANCE By ensuring proper cleaning and maintenance of your oven you can have a significant influence on the continuing fault-free operation of your appliance. Before you start cleaning, the oven must be switched off and you should ensure that all knobs are set to the "0"position. - Page 20 IMPORTANT Never use screwdrivers or other utensils to remove the light cover. This could damage the enamel of the oven or the lamp holder. Remove only by hand Never replace the bulb with bare hands as contamination from your fingers can cause premature failure. Always use a clean cloth or gloves.
-
Page 21: Operation In Case Of Emergency
Removal of the internal glass panel Unscrew and unfasten the plastic latch that is in the corner at the top of the door. Next take out the glass from the second blocking mechanism and remove. After cleaning, insert and block the glass panel, and screw in the blocking mechanism. -
Page 22: Baking In The Oven
BAKING IN THE OVEN Baking pastry Most appropriate position for baking is the application of both upper and lower elements, and the fan, or circular fan element. Warning! The baking parameters given in tables are approximate and can be adjusted based on your own experience and cooking preferences. - Page 23 BAKING IN THE OVEN Type of pastry Guide Temp Guide Temp Baking time ) ) level(from (℃ level(from (℃ (in min) down down upwards) upwards) Sweet pastry Sponge cake/ 170-180 150-170 60-80 marble cake Victoria sponge 160-180 150-170 65-80 Base for a layer cake 170-180 150-170 20-30...
- Page 24 Roasting Best results are obtained with the engagement of both upper and lower elements. Best heating mode for each type of roasting pan is indicated by bold print in the Roasting Tables. Tips regarding roasting pans For best results, use light enamel pans, temperature resistant glass pans, clay dishes or cast iron dishes.
- Page 25 Roasting Table Type of meat Guide Temp Roasting time Temp Roasting ) ) level(from (℃ (in min) (℃ time bottom up) min) Beef Per 1 cm Roast beef or file rare 12-15 Oven warmed 15-25 juicy(“medium”) Oven warmed up “well 210-230 25-30 done”...
- Page 26 Turn the meat round after half of the grilling time has expired. Thinner slices will require only one turn, for larger chunks you might need to repeat the procedure. Always use barbecue tongs to avoid losing excessive juice from meat. Dark beef meat is grilled quicker than lighter pork or veal.
-
Page 27: Technical Information
TECHNICAL INFORMATION Model PPOV-6S-PYRO-2 Voltage rating 220-240V 50Hz Total power 2.8Kw Top element 800W Grill element 1000W Bottom element 1000W Circular element 1800W...
Need help?
Do you have a question about the PPOV-6S-PYRO-2 and is the answer not in the manual?
Questions and answers