
Related Manuals for Parmco PPOV-6S-DT-4


Summary of Contents for Parmco PPOV-6S-DT-4
- Page 1 Installation and Operating Instructions Model: PPOV-6S-DT-4 For your convenience, we recommend to attach the serial number label HERE. 727626072018...
- Page 2 Owned & Operated for over 25 Years warranty The Warranty: The Warranty is not valid: Liability under this warranty will not be accepted for: Subject to updates without prior notice, please visit www.parmco.co.nz for E & O.E. 727626042017 the latest version.
- Page 3 Dear Valued Customer, Thank you and congratulations on purchasing your new Parmco appliance. All Parmco products are made to the highest quality and design standards. We are sure you will enjoy your new appliance. As a note, please read through these instructions carefully. These will assist you in gaining a complete understanding of the functions and features offered by your appliance.
-
Page 4: Table Of Contents
TABLE OF CONTENTS Safety instructions ......................2 How to save energy .......................3 Unpacking ........................3 Disposal of the appliance ....................3 Description of the appliance ....................4 Installation ........................6 Operation ..........................9 Top natural convection ......................9 Bottom main fan oven .....................11 Cooking advice ........................14 Prior first use ........................15 Electronic programmer ....................15 Cleaning and maintenance .....................22 Oven ..........................22... -
Page 5: Safety Instructions
SAFETY INSTRUCTIONS IMPORTANT SAFEGUARDS & RECOMMENDATIONS Do not carry any cleaning or maintenance without first disconnecting the appliance from the electrical supply During and after use of the double oven, certain parts will become very hot. Do not touch hot parts. After use always ensure that the control knobs are in the “0”... -
Page 6: How To Save Energy
HOW TO SAVE ENERGY Using energy in a responsible way not only saves money but also helps the environment. So let's save energy! And this is how you can do it: Make use of residual heat from the oven. If the cooking time is greater than 40 minutes, switch off the oven 10 minutes before the end time. -
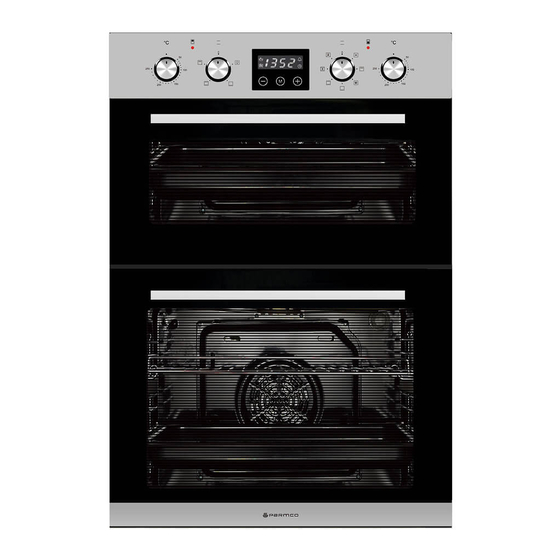
Page 7: Description Of The Appliance
DESCRIPTI ON OF THE APPLI ANCE... - Page 8 DESCRIPTION OF THE APPLIANCE Clock and timer (Bottom mains oven only) Function selector Function selector knob (Bottom mains oven) knob(Top oven) Top oven temperature Bottom mains oven indicator light temperature indicator light Oven temperature knob Oven temperature (Bottom mains oven) knob(Top oven) Top oven door handle...
-
Page 9: Installation
INSTALLATION coating. - Page 10 IMPORTANT: To avoid damage to the lower trim please note the following instructions. The lower trim is designed to allow for good air circulation and the correct opeening of the oven door. To ensure the trim is not damaged due to the appliance being placed on the floor. the appliance should be suitably supported as in above illustrations.
- Page 11 Electrical connection oven Earthing wire should be installed in such manner to be the last one pulled out in case the safety relief device of the mains lead should fail Mains lead behind the oven must be Before attempting the connection placed in such manner to avoid check whether the voltage indicated touching the back panel of the oven...
-
Page 12: Operation
OPERATION 850 W 1150 W 1100 W... - Page 13 OPERATION...
-
Page 14: Bottom Main Fan Oven
OPERATION Bottom Main Multifunction Oven... - Page 15 OPERATION Defrost (fan only) At this function, the fan only works. You can cool the dish or the oven chamber or defrost food Half Fan Grill When the knob is turned to this position, the oven activates the grill and fan function. In practice, this function allows the grilling process to be speeded up and an improvement in the taste of the dish, you should only use...
- Page 16 OPERATION Fan assisted (Fan+bottom heat+Top Heat) At this knob position the oven executes the cook function. Conventional oven with a fan. Static Grill (Grill and the top element) When the “combined grill” is active it enables grilling with the grill and with the top element switched on at the same time.
-
Page 17: Cooking Advice
OPERATION... -
Page 18: Prior First Use
OPERATION Prior first use Remove packaging,clean the interior of the oven with soft damp cloth and warm water and dry. Take out and wash the oven accessories with warm water ang a little washing-up liquid and dry thoroughly. Switch on the ventilation in the room or open a window. Heat the oven to a temperature of 250 ,for approx.30 minutes.Once oven has cooled wipe the inside of the oven with a soft damp cloth and dry. - Page 19 Setting the time At power on,displays “12.00", and flashes. The current time can be set with button 1 and 3, 5 secondsafter the time has been set ,the new data will be saved . and 59 minutes. Press button 2,until the display flashes“ ”....
- Page 20 When the set time is up the alarm signal will be activated and the signal function will begin to flash again. Press any button,the signal function“ ”and alarm signal turn off.Or the alarm signal will be turned off automatically after 2 minutes. Caution! Besides timer alarm,any other alarms can be turned off by pressing any button.If the alarm signal is not turned off manually,it will be turned off automatically after 2 minutes.
- Page 21 Caution! The cooking time and end of cooking time range < Cooking time range:0 10 hours < End of cooking time range:current time end of cooking time current time+10 hours End of cooking time =current time+cooking time When useing the semi-automatic operation,set either the cooking time or the end of cooking time. If you set the cooking time to 0 or set the cooking time be the current time,the auto function will be off.
- Page 22 Cooking time automatically changes to 3:00.5 seconds after the etting,the auto function is on.3 hours later,the current time shows“5:00”the alarm signal is activated. Automatic operation If the oven is to be swiched on for a specified period of time and switched off at a fixed hour then you should set the cooking time and the end of cooking time: Set the oven function knob and the temperature regulator knob to the setting at which you want the oven to operate.
- Page 23 Set the cooking time to be“3:00”with button 1 and 3. Set the end of cooking time to be“10:00”with button 3. 5 seconds after settings are selected the auto function is on. When it up to 7:00,the oven will begin to work. When it up to 10:00,the alarm signal is activated,the oven is swiched off automatically.
-
Page 24: Cleaning And Maintenance
Top Oven guide levels Bottom main Oven guide levels CLEANING AND MAINTENANCE... -
Page 25: Oven
IMPORTANT Never use screwdrivers or other utensils to remove the light cover This could damage the enamel of the oven or the lampholder by hand. IMPORTANT Never replace the bulb with bare hands as contamination from your fingers can cause premature failure. Always use a clean cloth or gloves. - Page 26 Cleaning Should the panels become heavily,they will need to be taken out of the oven and cleaned by hand.They should be soaked in warm ,soapy water for at least 2 hour sand then rinsed with clean water ,last wiped clean with a soft cloth.
- Page 27 Models With Wire Racks Assemble the wire racks to the oven walls using the2 screws(fig.4.1-4.2) Slide in ,on the guides, the shelf and the tray(fig.4.3-4.4). The shelf must be fitted so that the safety catch,which stops it sliding out, faces the inside of the oven. To dismantle, operate in reverse order.
-
Page 28: Operation In Case Of Emergency
OPERATION IN CASE OF EMERGENCY Switch off all working units of the oven Call the service centre Some minor faults can be fixed by referring to the instructions given in the table Knob are... -
Page 29: Baking In The Oven
BAKING IN THE OVEN Baking pastry Baking tips Is cake baked? Most appropriate position for baking is the hot air. Pierce the cake with a wooden skewer at the thickest part, if the dough does not stick to it, the cake is bake. You may switch off Warning! the oven and use the remaining heat. - Page 30 BAKING IN THE OVEN Pastry Baking Table Guide level Temp( Temp( Guide level Temp( Guide level Baking time ype of pastry from down from down from down ( in min.) upwards upwards upwards Sponge cake/ marble 60-80 170-180 150-170 160-170 cake Victoria sponge 160-180...
- Page 31 BAKING IN THE OVEN Attention when roasting! Roasting Tip regarding roasting pans Roasting tables indicate suggested temperatures, guide level and roasting For best results, use light enamel times. Roasting time largely depends upon the type of meat, its size and quality. So pans, temperature resistant glass you may expect some variations pans, clay dishes or cast iron dishes.
- Page 32 BAKING IN THE OVEN Roasting table Temp Temp Temp Roasting Guide level Guide level Guide level Type of meat (from (from time (from (from bottom up) (in min.) bottom up) bottom up) bottom up) per 1 cm Roast beef or fille 12-15 rare oven warmed up...
- Page 33 BAKING IN THE OVEN Roasting table Temp Temp Temp Roasting Guide level Guide level Guide level Type of meat (from (from time (from (from bottom up) (in min.) bottom up) bottom up) bottom up) per 1 cm Roast beef or fille 12-15 rare oven warmed up...
- Page 34 BAKING IN THE OVEN Tips for grilling Grilling Take extra precautions when grilling. Grilling should be carried out with the Intensive heat from infrared element oven door closed. makes the oven and the accessories extremely hot. Use protective gloves and Grilling tables indicate the barbecue accessories! recommended temperature, guide levels...
-
Page 35: Technical Information
TECHNICAL INFORMATION Model PPOV-6S-DT-4 Top oven Top element Grill element 1100W Bottom element Top oven power Bottom mains oven Top element Grill element 1100W Bottom element 1150W Circular element Bottom oven power 220-240V Voltage rating...
Need help?
Do you have a question about the PPOV-6S-DT-4 and is the answer not in the manual?
Questions and answers