Table of Contents
Advertisement
HP StorageWorks 1/8 G2 Tape Autoloader
User and Service Guide
Abstract
This guide provides information on installing, configuring, upgrading, and troubleshooting the Tape Autoloader. This guide is
intended for system administrators and other users who need physical and functional knowledge of the Tape Autoloader.
HP Part Number: AK377-96020
Published: June 2012
Edition: Sixth
Advertisement
Table of Contents

Related Manuals for HP BL536A


Summary of Contents for HP BL536A
- Page 1 HP StorageWorks 1/8 G2 Tape Autoloader User and Service Guide Abstract This guide provides information on installing, configuring, upgrading, and troubleshooting the Tape Autoloader. This guide is intended for system administrators and other users who need physical and functional knowledge of the Tape Autoloader.
- Page 2 Hewlett-Packard. The information is provided “as is” without warranty of any kind and is subject to change without notice. The only warranties for HP products and services are set forth in the express warranty statements accompanying such products and services.
-
Page 3: Table Of Contents
Contents 1 Features and overview................8 Autoloader options........................9 HP StorageWorks 1/8 G2 & MSL Encryption Kit..............9 Command View TL TapeAssure....................9 Interface specifications and requirements for parallel SCSI drives..........10 Parallel SCSI host bus adapters (HBAs).................10 Multiple LUN support......................10 Interface specifications and requirements for Fibre Channel drives..........11 Interface specifications and requirements for SAS drives...............11... - Page 4 Changing the system configuration..................46 Changing the drive configuration..................49 Changing the network configuration................50 Configuration: Network Management................52 Configuring HP Systems Insight Manager for the Tape Autoloader........54 Changing the administrator password................54 Setting the date and time....................55 Setting error log mode....................56 Setting event notification parameters................56 Saving and restoring the device configuration and restoring factory defaults......57...
- Page 5 Changing the administrator password (Configuration > Change Admin Password)....72 Setting the number of reserved slots (Configuration > Set Reserved Slot Count)......73 Configuring the mailslot (Configuration > Configure Mailslot)..........73 Bar code reporting format (Configuration > Barcode Format Reporting)........73 Changing the SCSI address — parallel SCSI devices (Configuration > Change Drive)....74 Setting behaviors (Configuration >...
- Page 6 Drive error codes......................122 Warning events........................123 Configuration change events....................126 Information events.........................127 Using HP Library & Tape Tools to diagnose problems..............128 6 Upgrading and servicing the Tape Autoloader...........130 Possible tools needed......................130 Removing and replacing a tape drive..................131 Removing and replacing a magazine..................133 Using the operator control panel..................133...
- Page 7 Class B equipment......................147 Taiwanese notices.........................147 BSMI Class A notice......................147 Taiwan battery recycle statement..................147 Laser compliance notices.......................148 English laser notice......................148 Dutch laser notice......................148 French laser notice......................148 German laser notice......................149 Italian laser notice......................149 Japanese laser notice.......................149 Spanish laser notice......................150 Recycling notices........................150 English notice........................150 Bulgarian notice......................150 Czech notice........................150 Danish notice........................151...
-
Page 8: Features And Overview
The Autoloader can support Ultrium half-height tape drives. To see the tape drives currently available for the 1/8 G2 Tape Autoloader, see the MSL QuickSpecs at www.hp.com/go/tape. For a list of all supported configurations, go to www.hp.com/go/ebs. -
Page 9: Autoloader Options
The Encryption Kit provides secure generation and storage of encryption keys. The Encryption Kit may be used with any HP StorageWorks 1/8 G2 Tape Autoloader or the MSL2024, MSL4048, MSL8048 and MSL8096 Tape Library with at least one LTO-4 or later generation tape drive. The Encryption Kit cannot be used with the MSL6000. -
Page 10: Interface Specifications And Requirements For Parallel Scsi Drives
Autoloaders use a separate SCSI ID for each tape drive, with dual LUNs on the master drive's SCSI ID to control the tape drive (LUN 0) and Autoloader robotic (LUN 1). HP recommends that each Ultrium tape drive be put on its own bus when possible. -
Page 11: Interface Specifications And Requirements For Fibre Channel Drives
4 Gb tape drive. Configure zoning so only the backup servers may access the Autoloader. Interface specifications and requirements for SAS drives The server must have an HP or third party SAS host bus adapter with an external connector. Table 8 SAS drive interface speeds LTO generation... -
Page 12: Lto-4 And Later Generation Tape Drives And Encryption
To make use of this feature you need: The HP StorageWorks 1/8 G2 & MSL Encryption Kit or a backup application that supports hardware encryption. LTO-4 or LTO-5 media; no encryption will be performed when writing LTO-3 and earlier generations of tape. -
Page 13: Using Application-Managed Encryption
Please refer to your application's user documentation for more information. If you are unable to supply the key when requested to do so, neither you nor HP Support will be able to access the encrypted data. -
Page 14: Back Panel Overview
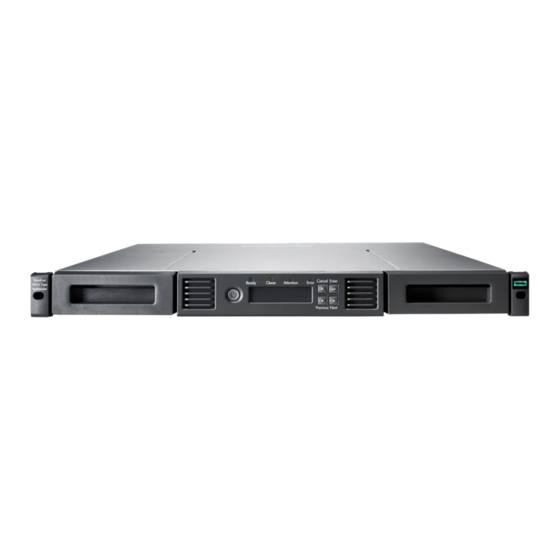
Figure 1 Front panel overview 1. Power button 2. Mailslot 3. Front panel LEDs 4. Front panel LCD screen 5. Control buttons 6. Air vents 7. Magazine The operator control panel includes four LEDs that indicate system status information as shown in Figure 2 (page 14). -
Page 15: Tape Drive Led
9. 68–pin parallel SCSI connector 10. Pull-out tab containing the serial number and other product information. 1 1. Tape drive LED Figure 4 Back panel overview with SAS tape drive 1. Power connector 2. Fan vent 3. Tape drive 4. Magazine release hole 5. -
Page 16: Controller Health Status Indicator
Controller health status indicator The controller health status indicator is a green LED that pulses on and off in approximately one second cycles during normal operation. The LED is located on the back of the device in the lower right corner, as shown in Controller health status indicator location (page 16). -
Page 17: Installing The Tape Autoloader
2 Installing the Tape Autoloader This chapter contains the information you need to install and configure your Tape Autoloader. The installation steps are: Preparing the host Planning the SCSI configuration, Planning the SAS configuration, or Planning the Fibre Channel configuration Choosing a location Unpacking the shipping container Identifying product components... -
Page 18: Planning The Parallel Scsi Configuration
The HBA also has a SCSI address, which is typically 7. NOTE: Use the HP Library & Tape Tools to check your server's parallel SCSI configuration. The HP Library & Tape Tools utility is available without cost at www.hp.com/support/TapeTools. Installing the Tape Autoloader... -
Page 19: Planning The Sas Configuration
The Autoloader uses two SCSI logical unit numbers (LUNs) and requires an HBA with multiple LUN support. Most HP SAS RAID controllers support Tape Libraries; many non-HP SAS RAID controllers to not support Tape Libraries. To verify the specifications of your HBA or find a list of compatible... -
Page 20: World Wide Identifiers
SAS signal rates require clean connections and a minimum number of connections between the HBA and the device. Do not use adapters or converters between the HBA and the device. HP recommends a maximum SAS cable length of six meters. -
Page 21: Unpacking The Shipping Container
Autoloader unless the optional tabletop conversion cover is installed. The tabletop conversion cover can support up to 15 kg (33 lb). Rack requirements HP Rack 5000, 10000 Series, HP Rack System/E Rack space 1U when mounted in the optional rack rails... -
Page 22: Attaching The Feet
4. Product documentation 5. Ethernet cable 6. Six support feet 7. HP OpenView Data Protector Express Single Server Edition CD Attaching the feet If you plan to mount the Autoloader in a rack or in the optional Tabletop Conversion Cover, skip... -
Page 23: Removing The Shipping Lock
Figure 10 Attaching the feet to the bottom of the Autoloader Removing the shipping lock The shipping lock prevents the robotic transport mechanism from moving during shipment. You must remove the shipping lock before powering on the device. The shipping lock is held in place with a piece of tape and is located in the top center of the device. -
Page 24: Mounting The Device In A Rack
Autoloader, and 3) obtain adequate assistance to lift and stabilize the Autoloader during installation or removal. The device easily installs into the HP Rack System/E, or the HP Rack 5000 or HP Rack 10000 series. You need a #2 and a #3 Phillips screwdriver for this procedure. -
Page 25: Installing The Tabletop Conversion Kit
To install the device on the rails and into the rack: Locate the captive screws on the front bezel (see Figure 15 (page 25)). Slide the device onto the rails. From the front of the device, secure the front bezel to the rack using a #2 Phillips screw driver placed through the small holes in the mounting bracket to tighten the captive screws on each side of the device. -
Page 26: Connecting The Parallel Scsi Cable (Parallel Scsi Devices Only)
To connect the parallel SCSI cable to the device: HP recommends that the host server be powered off before attaching new devices. Attach one end of the parallel SCSI cable (included in the accessory package) to one of the... -
Page 27: Connecting The Fibre Channel Cables (Fibre Channel Devices Only)
3) an unapproved power cord could fracture resulting in the internal contacts being exposed, which potentially could subject the user to a shock hazard. HP disclaims all liability in the event a non-HP-approved power cord is used. -
Page 28: Configuring The Device
L&TT may also be run from a CD, Compact Flash drive, or remote directory after installation on another computer. See the HP StorageWorks Library and Tape Tool User guide for instructions for installing L&TT on a computer other than the server. -
Page 29: Verifying The Installation
Upgrading firmware (Support > Autoloader FW Upgrade, Support > Drive FW Upgrade) (page 83). Using HP Library and Tape Tools (L&TT), which can be downloaded free of charge from www.hp.com/support/TapeTools. After configuring the Autoloader, you can save the configuration settings to a USB flash drive from the OCP or to a file from the RMI Configuration: Save/Restore screen. -
Page 30: Tape Cartridges And Magazines
Cartridge type Part number HP LTO3 Ultrium 800 GB RW Data Cartridge, yellow C7973A HP LTO3 Ultrium 800 GB WORM Data Cartridge, two-tone (yellow and white) C7973W HP Ultrium universal cleaning cartridge, (50 cleans), orange C7978A Table 13 Ultrium 1760 tape drive... -
Page 31: Using And Maintaining Tape Cartridges
Using and maintaining tape cartridges CAUTION: Do not degauss Ultrium data cartridges! These data cartridges are pre-recorded with a magnetic servo signal. This signal is required to use the cartridge with the Ultrium tape drive. Keep magnetically charged objects away from the cartridge. To ensure the longest possible life for your data cartridges, follow these guidelines: Use only the data cartridges designated for your device. -
Page 32: Write-Protecting Tape Cartridges
IMPORTANT: Misusing and misunderstanding bar code technology can result in backup and restore failures. To ensure that your bar code labels meet HP's quality standards, always purchase them from an approved supplier and never print bar code labels yourself. To order bar code labels from an HP-authorized reseller: In the United States, call 1-800-345- 1 518. -
Page 33: Read And Write Compatibility
The drive may not identify the media and return a load error before the application software times out waiting for the load. HP strongly recommends keeping your tape drives updated to the most recent firmware. Magazines The device has removable magazines. - Page 34 OCP or RMI. The magazine must only be removed manually when the OCP or RMI process has failed, or the device no longer has power. IMPORTANT: To manually release a magazine, see Releasing the magazines manually (page 104). However, this manual process should only be used if the magazine cannot be released using the operator control panel or the remote management interface.
-
Page 35: Operating The Tape Autoloader
4 Operating the Tape Autoloader The Tape Autoloader can be operated by the following methods: Remote management interface (RMI) — this interface lets you monitor and control the Autoloader from a web page. You can access most Autoloader functions from the RMI. Operator control panel (OCP) —... -
Page 36: Login
◦ Changing the administrative password (page 54) ◦ Setting date/time (page 55) ◦ Setting error log mode (page 56) ◦ Setting event notification parameters (page 56) ◦ Saving and restoring the device configuration and restoring factory defaults (page 57) Operations (page 58) ◦... -
Page 37: Status Pane
RMI. The Autoloader Time is updated when the system status is refreshed. The time of the most recent refresh is the Updated time at the top of the pane. If you call HP Service to request a temporary administrator password, refresh the system status with your browser reload button and then give the service engineer this Autoloader Time. -
Page 38: Getting Help
Getting help For additional information about fields on the RMI screens, click on Help in the upper right corner (see Figure 25 (page 38)). The help pages are updated with most firmware updates and often contain technical details that are not contained in this document. Figure 25 Help button Identity Viewing static device information... -
Page 39: Viewing Static Drive Information
◦ Random — the device will not automatically load and unload tapes. Instead, it will wait for commands from the backup software or the OCP to load and unload tapes. ◦ Sequential — the device will automatically unload the tape in the drive when the host software sends an unload command to the drive and then automatically load the tape from the next highest sequentially numbered full slot. - Page 40 Figure 29 Identity: Drive page (SAS) You can see, but not modify, the following: Vendor ID — will always be HP. Product ID — product identification information that is given by the drive. Serial Number — electronic serial number of the drive. It should match the physical serial number of the drive.
-
Page 41: Viewing Network Information
Autoloader LUN Hosted by Drive — Yes, if this drive is hosting the Autoloader at LUN 1. Will always be Yes for the 1/8 G2 Tape Autoloader. Data Compression — Yes, if the host has hardware compression turned on for the drive. Interface Type —... -
Page 42: Status
IPv4 DNS Server 1 and IPv4 DNS Server 2 — addresses of the configured DNS servers used when DHCP Addressing is not Enabled. DHCPv4 Addressing — When Enabled, the device will request an IP address from a DHCP server each time the device is booted. IPv4 Address —... -
Page 43: Viewing Dynamic Drive Information
Status — the overall status of the device The device is fully operational and no user interaction is required. User attention is necessary, but the device can still perform most operations. User intervention is required and the device is not capable of performing some operations. Cartridge in Transport —... - Page 44 Figure 33 Status: Drive page (FC) Figure 34 Status: Drive page (SAS) You can see, but not modify, the following: Status of the drive The drive is operating normally. The device is functional, but might have an issue that should be addressed. The drive is in a failed state.
-
Page 45: Viewing The Tape Cartridge Inventory
Internal Drive Temperature — internal temperature reported by the drive. The normal temperature range is provided for reference and varies depending on the type of tape drive. The tape drive will send out errors if there is any possibility of error due to temperature. NOTE: The Internal Drive Temperature is not the temperature of the tape path in the drive nor is this the operating environment temperature. -
Page 46: Configuration
Figure 36 Status: Inventory: Media details pane In the media details pane, Slot # — lists “Mailslot” or the index number of each slot in the magazine from lowest to highest. Attn — indicates an attention state for storage slots or provides information on the mailslot state. - Page 47 Figure 37 Configuration: System page Mailslot Configuration Enabled — configures the first slot as a mailslot or storage slot. Enabling the mailslot will reduce the total number of storage slots. The default is disabled. CAUTION: Since the mailslot is located where the lowest numbered storage slot would be, enabling and disabling the mailslot will re-number all of the other storage slots.
- Page 48 33). When Ignore Barcode Media ID is enabled, the device will move any tape to any tape drive. If the cartridge is incompatible with the tape drive, a message will be displayed. HP strongly recommends that all tape cartridges have barcodes with the correct Media ID.
-
Page 49: Changing The Drive Configuration
CAUTION: Use caution when choosing Loop mode because it makes it possible to overwrite data on previously written cartridges. Automatic mode — In Automatic mode, the device switches from Sequential mode into Random mode when it receives certain SCSI commands. Automatic mode is the default setting. Reserved Slots —... -
Page 50: Changing The Network Configuration
Addressing Mode — addressing mode when the port type is Loop: Hard, Soft, or Hard auto-select. If the Addressing Mode is Hard, you must configure a fixed ALPA address that is unique on the loop. If the Addressing Mode is Soft, the system will assign an ALPA during fabric login. - Page 51 Figure 41 Configuration: Network page You may change the: Protocol version — selects the Internet Protocols that will be enabled. Select IPv4 only, IPv6 only, or both IPv4 and IPv6 protocols. The default is the IPv4 protocol only. Host Name — enter the host name provided by your network administrator for the Autoloader. Domain name —...
-
Page 52: Configuration: Network Management
HP libraries. This data can be exported on demand or at scheduled times to a comma-separated values (.csv) file for analysis with spreadsheet programs or custom scripts. - Page 53 Figure 42 Configuration: Network Management page You may change the: SNMP Enabled — When checked, the device can be managed by computers listed in the SNMP Target IP Addresses field. SNMP Target IP Addresses — the IP addresses for up to three computers running IPv4 SNMP management software and up to three computers running IPv6 SNMP management software.
-
Page 54: Configuring Hp Systems Insight Manager For The Tape Autoloader
(SIM) and many other applications. To detect the Tape Autoloader using a remote management application, such as HP SIM, you must first add the IP address for the management system as an SNMP target using the network configuration. SNMP queries are only accepted from configured targets. -
Page 55: Setting The Date And Time
Figure 43 Configuration: Password page You may change the: Password — The password is exactly eight numbers, each from 0 to 9. Password Time Out — The number of minutes that the current administrator login session will remain logged in without user interaction. Setting the date and time Use the Configuration: Date/Time page... -
Page 56: Setting Error Log Mode
Setting error log mode Configuration: Log page can only be accessed by HP Service personnel. Figure 45 Configuration: Log page Setting event notification parameters Configuration: Alerts page lets you configure e-mail notification of device events. -
Page 57: Saving And Restoring The Device Configuration And Restoring Factory Defaults
Drive power: drive powered on Active slots: maximum possible Autoloader mode: Automatic Loop: No Event log levels and filter: continuous trace and all levels and filters active (for HP Service use only) Barcode reader label length: 8 Barcode reader alignment: Left... -
Page 58: Operations
SNMP: disabled, but saved addresses do not change E-mail notification: disabled, but configurations retained The following settings are not reset: Administrator password Network settings (network is always enabled and the network addresses are retained) Date and time To save the device configuration to a file, click Save and follow the instructions on the RMI to specify a file location. -
Page 59: Updating The Current Media Inventory
Figure 48 Operations: Move Media page To move a tape, select the source and destination and then click the Move button in the center of the screen to start the move. Updating the current media inventory Use the Operations: Inventory page to have the device re-scan the tapes to update the media inventory. -
Page 60: Support
Support: HP Service page page can only be accessed by service personnel to execute detailed tests on the different components of the device or special read/write diagnostics on the drives. Figure 52 Support: HP Service page Operating the Tape Autoloader... -
Page 61: Determining And Updating Firmware
The firmware files must be in the HP L&TT format with the .frm file extension. You can find firmware files on the HP Support website: www.hp.com/support. After the firmware is updated, the device or tape drive with updated firmware is reset. -
Page 62: Cleaning The Tape Drive
Second code — the main error code (89 in this example). See Error codes (page 105) for a list of error codes and recovery procedures. Third code — the sub-code (62 in this example). See Error sub-code descriptions (page 119) for a list of sub-codes. - Page 63 NOTE: LTO 2 and 3 tape drives must be empty to download support tickets. LTO 4 tape drives with firmware newer than B34W (parallel SCSI) or U24W (SAS) will automatically generate a support ticket during an unload and that ticket may be downloaded at any time. LTO 4 tape drives with older firmware must be empty to download a support ticket.
-
Page 64: Operator Control Panel (Ocp)
Operator control panel (OCP) The operator control panel on the front of the device includes a 2-line by 16-character green backlit liquid crystal display (LCD), four function keys, and four LEDs. This panel provides everything you need to monitor the device status and control its functions. The following functions are available through the OCP: Unlocking the mailslot (Unlock Mailslot) (page 69) Status/Information (page 69) -
Page 65: Led Indicators
◦ Rebooting the Autoloader (Operations> Reboot Autoloader) (page 81) ◦ Enabling password locks (Operations > Enable Autoldr Password Locks) (page 81) Support (page 81) ◦ Powering a drive on or off (Support > Power On/Off Drive) (page 81) ◦ Running the demonstration (Support > Run Demo) (page 82) ◦... -
Page 66: Operator Control Panel Buttons
Figure 59 Home screen Drive status definitions are listed in Table 16 (page 66). Table 16 Drive status Status Definition IDLE Drive has a tape inserted, but there is no activity Drive is reading Drive is forwarding Drive is writing Drive is loading a tape Drive is unloading a tape Drive is cleaning... -
Page 67: Understanding The Menu Structure
Figure 60 Operator control panel buttons Cancel Cancels the current menu option, returns to the previous menu level, or returns to the Home screen. Enter Enters the menu or selects the option displayed on the LCD screen. Previous Selects the previous item or value in the currently displayed menu. Next Selects the next item or value in the currently displayed menu. -
Page 68: Entering The Administrator Password
Figure 61 Autoloader menu tree The administrator password accesses all of the available functionality, except for the HP Service Area. A user without the administrator password has access to the Unlock Mailslot and Status/Information menus. Entering the administrator password TIP: By default, the administrator password is unset;... -
Page 69: Unlocking The Mailslot (Unlock Mailslot)
Unlocking the mailslot (Unlock Mailslot) The mailslot in the left magazine is used only with host system software that supports this feature. The mailslot feature allows you to insert or remove a single tape without removing the entire magazine. The benefit of using a mailslot is that the device will not inventory the rest of the slots in the magazine so the device can return to service sooner. -
Page 70: Autoloader Information (Status/Information > Autoloader Information)
Mailslot Left magazine Right magazine Drive Each location provides different information: Drive or Mailslot: The screen display may read Mailslot AESO32L3, where AESO32L3 is an example of the bar code number on the tape, or it may read Full or Empty. Left or right magazine: The screen display may read Left Magazine or Right Magazine. -
Page 71: Drive Information (Status/Information > Drive Information)
Press Previous or Next until the screen displays Autoloader Information. Press Enter to select. By using Previous or Next, you can select from the following information screens: Autoloader Time Firmware rev. Product ID Serial number SCSI ID and LUN (SCSI devices only) Slots and Mailslots Odometer Power On Time... -
Page 72: Configuration
Press Previous or Next until the screen displays Network Information. Press Enter to select. Press Previous or Next to access the following information: IPv4 Network Enabled or Disabled IPv6 Network Enabled or Disabled Host Name Domain Name MAC Address For IPv4 Network or IPv6 Network, press Enter and then use Previous or Next to access the network addresses and configuration. -
Page 73: Setting The Number Of Reserved Slots (Configuration > Set Reserved Slot Count)
The screen displays the second number flashing. Repeat Step 3 until you have entered all eight characters. Press Enter to select. After the last number has been entered, the password has been set to the new password. NOTE: If you forget the administrator password, you cannot enter a new password. You must call your customer service representative. -
Page 74: Changing The Scsi Address - Parallel Scsi Devices (Configuration > Change Drive)
The screen displays either Alignment Left or Alignment Right. Use Previous or Next to toggle between the two choices. Press Enter to select the correct alignment. Changing the SCSI address — parallel SCSI devices (Configuration > Change Drive) CAUTION: If you change the SCSI ID, you might need to cycle power on the host server and reconfigure your backup software before you can use the device. -
Page 75: Setting The Date And Time (Configuration > Autoloader Date/Time)
CAUTION: Use caution when choosing Loop mode because it makes it possible to overwrite data on previously written cartridges. Automatic mode: In Automatic mode, the device switches from Sequential mode into Random mode when it receives certain SCSI commands. Automatic mode is the default setting. To set a behavior mode: From the Home screen, press Previous or Next until the screen displays Configuration. -
Page 76: Configuring Automatic Cleaning (Configuration > Configure Auto Cleaning)
To configure IPv4 network settings: From the Home screen, press Previous or Next until the screen displays Configuration. Press Enter to select. Press Previous or Next until the screen displays Configure Network Settings. Press Enter to select. Press Previous or Next until the screen displays IPv4 Networking Enabled. Press Enter to select. Press Previous or Next until the screen displays DHCP Enabled. -
Page 77: Restoring Factory Defaults (Configuration > Restore Defaults)
Drive power: drive powered on Active slots: maximum possible Autoloader mode: Automatic Loop: No Event log levels and filter: continuous trace and all levels and filters active (for HP Service use only) Barcode reader label length: 8 Barcode reader alignment: Left... -
Page 78: Operations
This feature is also useful when installing multiple devices. Either save the configuration before configuring the network or ensure that only one device with the same network configuration is on the network at a time until they have unique network identities. To save the device configuration settings to a USB flash drive: Insert the USB flash drive in the USB port on the back of the device. -
Page 79: Cleaning The Tape Drive (Operations> Clean Drive)
When the Clean LED is on, the tape drive needs to be cleaned. Cleaning times can range from a few seconds to a few minutes during which time the Ready LED blinks. Use only the designated cleaning cartridge for your tape drive model. All cartridges are available at www.hp.com/go/ storagemedia. Use only Ultrium Universal cleaning cartridges. -
Page 80: Moving Tapes In The Autoloader (Operations > Move Tape)
Moving tapes in the Autoloader (Operations > Move Tape) Use this option to move a cartridge from a tape drive, a tape slot in any magazine or the mailslot to any other location not already holding a tape. You can also load and unload tape cartridges to and from the installed tape drives. -
Page 81: Rebooting The Autoloader (Operations> Reboot Autoloader)
NOTE: This command is only needed if the inventory in the device is different than the inventory displayed on the front panel, which would not happen under normal conditions. Rebooting the Autoloader (Operations> Reboot Autoloader) This option reboots the device and forces a new cartridge inventory, clearing any current error condition. -
Page 82: Running The Demonstration (Support > Run Demo)
Enter the administrator password, if prompted. The screen displays Drive. The second line in the display displays the current state, which is either Power ON or Power OFF. To change the power status, press Enter. The screen displays either Press Enter to Power off Drive, or Press Enter to Power on Drive. -
Page 83: Upgrading Firmware (Support > Autoloader Fw Upgrade, Support > Drive Fw Upgrade)
Remove the USB flash drive from the USB port. To upgrade drive firmware from a USB flash drive: Download current tape drive firmware using HP Library & Tape Tools or from the HP support website: www.hp.com/support/storage. Copy the firmware onto the USB flash drive. -
Page 84: Viewing Logs (Support > Autoloader Error Log)
Insert the USB flash drive into the USB port on the back of the device. From the Home screen, press Previous or Next until the screen displays Support. Press Enter to select. Press Previous or Next until the screen displays Drive FW Upgrade. Press Enter to select. Enter the administrator password if prompted. -
Page 85: Forcing The Drive To Eject A Tape (Support > Force Drive To Eject Tape)
Insert a USB flash drive into the USB port on the back panel. From the Home screen, press Previous or Next until the screen displays Support. Press Enter to select. Press Previous or Next until the screen displays Download Support Ticket. Press Enter to select. Forcing the drive to eject a tape (Support >... -
Page 86: Troubleshooting
(page 23)). TIP: For an online troubleshooting tool, go to www.hp.com/support/MSLG3Tstree. The problems and solutions in the troubleshooting tree are updated more frequently than this manual. Detection problems after installing a parallel SCSI device Problems encountered after installation are often caused by improper parallel SCSI bus configuration, application software configuration errors, or an incorrectly configured operating system. - Page 87 For a list of compatible parallel SCSI host bus adapters and application software, check with your parallel SCSI host adapter manufacturer, backup application vendor, or the HP support website at www.hp.com/go/ebs. Detection problems after installing a parallel SCSI device...
-
Page 88: Detection Problems After Installing A Sas Device
Verify that your HBA is supported by the host computer and qualified with the Autoloader. Refer to the EBS matrix at www.hp.com/go/ebs for current HBA compatibility information. If one of the ports on the device is not connected to another parallel SCSI device, the port must be terminated. -
Page 89: Fibre Channel Connection Problems
◦ Verify that your HBA is supported by the host computer and qualified with the Autoloader. Refer to the EBS matrix at http://www.hp.com/go/ebs for current HBA compatibility information. ◦ Verify that your HBA has the latest firmware. If the application software or operating system detects the tape drive, but not the Autoloader: ◦... -
Page 90: Operation Problems
If the screen shows Logged Out: Check that the Fibre speed is set to Automatic (on the RMI) or Auto Detect (on the OCP), or that the correct fibre speed is selected. If you are unsure of the speed of the HBA or switch that the is connected to, try Automatic (on the RMI) or Auto Detect (on the OCP). - Page 91 Table 19 Failure/attention indications displayed on the front panel Problem Solution “!” in operator panel inventory Export the data cartridge marked with an ! in the inventory. The cartridge is display. either damaged, incompatible with the drive, or the wrong type for the attempted operation.
- Page 92 Table 21 Media problems Problem Solution Cleaning or data cartridge Make sure you are using data and cleaning cartridges that are compatible incompatible with drive. with the drive and model of your device (see Tape cartridges (page 30)) and that you are using the correct cartridge type for the operation. The device automatically unloads incompatible cartridges, the Attention LED flashes, and an exclamation point (!) displays in the inventory display for the indicated slot number.
- Page 93 Table 22 Parallel SCSI device not detected Problem Solution Device not detected Check that the HBA supports multiple LUNs and this feature is enabled. If not, only the tape drive will be detected. Check for conflicting SCSI IDs. Power on the device before powering on the host computer. Make sure the Autoloader does not have the drive off line and that the Autoloader is not running a test.
- Page 94 Table 23 Attention LED is lit (continued) Problem Solution The Attention LED is lit but the The Autoloader was unable to complete the requested operation with the Cleaning LED is not lit after a cartridge selected tape cartridge. load. Use only cartridges that are compatible with the drive type (see Tape cartridges (page 30)).
-
Page 95: Performance Problems
Problem Solution The inventory labels the cartridge Full Verify that the label is an HP label. The bar code reader might not be able instead of showing its bar code to read other labels. Verify that the label is properly applied. See... -
Page 96: Average File Size
For backups with an average file size <64 k, HP recommends using a sequential/image backup that backs up the hard drive or LUN image instead of the individual files. -
Page 97: Connection From The Host Server To The Disks
Table 28 Performance impact of various file systems File system Performance impact Recommendations Disk array GOOD. Disk arrays typically provide None. excellent access to data. They usually include many disks, which improves bandwidth. Server or workstation VARIABLE. RAID uses a group of disks To achieve optimal performance, your array must with RAID to improve performance, and in the case... - Page 98 Table 29 Performance impact of various disk connections Connection type Performance impact Recommendations Fibre: 1 Gb For good performance, use a faster LTO-2: GOOD. When fully used, a 1 Gb fibre connection with LTO-3, LTO-4, and connection can provide enough bandwidth for two LTO-5 tape drives.
- Page 99 Table 29 Performance impact of various disk connections (continued) Connection type Performance impact Recommendations Parallel SCSI: Ultra If cables not designed for Ultra 320 LTO-2: GOOD. When fully used and assuming that speeds are used or there are more the connection to the disks does not force the speed than a couple devices on the bus, the to a lower parallel SCSI type, an Ultra 320 bus may slow down to Ultra 160...
-
Page 100: Operating System Configuration
Table 29 Performance impact of various disk connections (continued) Connection type Performance impact Recommendations Ethernet: 1 Gigabit Upgrade to Fibre Channel or 10 Gig LTO-2: MARGINAL. A 1 Gigabit Ethernet connection Ethernet if using LTO-3, LTO-4, or barely provides enough bandwidth for an LTO-2 LTO-5 tape drives. -
Page 101: Novell
are concerned about viruses and backup performance, perform a virus scan before starting the backup, and shut down the anti-virus software while the backup is running. Novell You might need to tweak some Novell operating system parameters to achieve good backup performance. -
Page 102: File-By-File With A Full-Featured Backup Application
If the file system has a lot of fragmentation, use a de-fragmentation utility to make the files contiguous again. If the average file size is less than 64 k, HP recommends that you use a sequential/image backup that backups up the hard drive or LUN image instead of the individual files. -
Page 103: Media
NOTE: Unlike most tape technologies, an LTO tape drive can write data as fast as the server can send it, even if the tape drive is not streaming. Find the performance impact of your system's Autoloader connection in Table 31 (page 103) Table 31 Performance impact of various Autoloader connections Connection type Performance impact... -
Page 104: Service And Repair
Repeat step 3 for the other magazine if necessary. If other tapes are still in the device, or if you were unable to manually remove the magazines and drive, contact HP customer service for further instructions. See HP technical support (page 139). -
Page 105: Error Codes
For complete testing, enable the mailslot and ensure that each corner slot contains a tape cartridge. The corner slot positions are M1, 3, 4, and 7 when the mailslot is enabled IMPORTANT: The Autoloader will remove any tape cartridge from the tape drive and go offline when running the Wellness test. -
Page 106: Finding Error Code Information On The Ocp
If the error persists, contact support personnel, see HP technical support (page 139). There are three ways to obtain error codes from the device: On the OCP On the RMI On an L&TT support ticket or report Finding error code information on the OCP... -
Page 107: Finding Error Code Information On An L&Tt Support Ticket Or Report
The log entries are displayed in order of most recent to oldest. The format for the log entries is: YY.MM.DD HH.MM.SS.ss LIB/ERR<80 89 62 40 YY.MM.DD — the date displayed as Year.Month.Day HH.MM.SS.ss — the time displayed as Hour.Minute.Second.Hundredths fo a second First code —... - Page 108 The top of the support ticket contains basic configuration information about the device, as shown Figure 72 (page 108). Figure 72 Support ticket in viewer Expand HP Event Logs to see events divided into three categories: Events in the last 24 hours Events in the last 31 days Events older than 31 days Set the Current Detail Level to see additional types of events: Normal will only show critical events or hard errors.
- Page 109 Figure 73 Critical event details The time stamp is in the format hours : minutes : seconds. The hours are in 24–hour clock format. For example, in this case 14 is 2 p.m. The date is in the format year/month/day. The event ID is the number on the header line, 0x006E in this example.
-
Page 110: Main Error Code Descriptions
Main error code descriptions Table 32 Main error codes Error code Description Details and solution Cannot initialize bar code reader Power-cycle the unit and retry the operation. No response from bar code reader Power-cycle the unit and retry the operation. Update the firmware to the latest version. - Page 111 Table 32 Main error codes (continued) Error code Description Details and solution Gripper obstructed Ensure that nothing is obstructing the gripper. If the device was moved, verify that each of the tape cartridges is properly seated in a magazine. Run the wellness test. Slider obstructed If this error occurs with subcode 45 and new...
- Page 112 Table 32 Main error codes (continued) Error code Description Details and solution cartridges did not come out of the magazines to obstruct the robotic. Ensure that nothing is stacked on top of the device because any weight on top of the device can bow the top cover down and interfere with the robotics.
- Page 113 Table 32 Main error codes (continued) Error code Description Details and solution Elevator reached a position beyond expected range Rotation reached a position beyond expected range Sled reached a position beyond expected range Cartridge present sensor not found Power cycle the device and retry the operation.
- Page 114 Table 32 Main error codes (continued) Error code Description Details and solution Rotation range of motion out of specification Remove all magazines and look for any obstructions to the robot. Run the wellness test. Sled range of motion out of specification Remove all magazines and look for any obstructions to the robot.
- Page 115 Cannot upgrade robotic firmware from Flash. Retry firmware upgrade. If not successful, attempt a different firmware upgrade method. If still not successful, contact HP customer support. ROM checksum incorrect Retry Autoloader firmware upgrade. Ensure that the firmware is correct for the device.
- Page 116 Table 32 Main error codes (continued) Error code Description Details and solution Firmware upgrade error This error can occur is an attempt is made to upgrade a drive with the wrong personality or version for that drive. Ensure that the correct drive firmware is being used to update the drive.
- Page 117 Retry the operation on a new key server token. Incorrect Key Server Toke Type. Token not Verify that the USB device is an HP key server supported within this device. token from the HP StorageWorks 1/8 G2 & MSL Encryption Kit.
- Page 118 Update the tape drive firmware to the current version. Invalid drive parameter Try the operation again. SDCI microcode error If the error occurs again contact HP customer support. Drive logged out Update the tape drive firmware to the current version.
-
Page 119: Error Sub-Code Descriptions
Sled: The part of the robotics assembly that moves the robot towards the OCP or back towards the drive. Error sub-code descriptions Table 33 Robotic error sub-codes Sub-code Description Mechanical initialization failure Connection to slave robotic failed Error motor initialization Error during gripper close Error slider... - Page 120 Table 33 Robotic error sub-codes (continued) Sub-code Description Error during sled movement in FLMoveRotation Command sending to robotic failed Error during elevator movement in FLMoveRotation function Error during rotation in FLMoveRotation function Error during elevator movement in FLMoveRotation function Error during sled movement in FLMoveSled function Error during sled positioning to sensor in FLMoveSled function...
- Page 121 Table 33 Robotic error sub-codes (continued) Sub-code Description Error during move sled to block Opening mailslot failed Error during movement to mailslot open position Error during moving back, sensor was found Movement to home position failed Elevator movement to home position failed Error during sled movement to rotation position...
-
Page 122: Drive Error Codes
Sled: The part of the robotics assembly that moves the robot towards the OCP or back towards the drive. Table 34 Device error sub-codes Error code Description Robotic load not reached Cartridge Present sensor No activity after Load command Time-out while loading tape No activity after load command Time-out drive Unload Drive terminated unsuccessfully... -
Page 123: Warning Events
The tape drive is not supported by the firmware in this device. Upgrade the device firmware to the most up-to-date version. Verify that the drive has an HP MSL-G3 or 1/8 G2 firmware revision. If firmware is not the correct type, the wrong tape Warning events 123... - Page 124 Table 36 Warning event codes (continued) Event code Description Details and Solution drive has been installed. Use only HP-approved support to insure that the correct tape drives are used. SCSI: incompatible magazine, magazine not Verify that a supported magazine for that slot is accessible inserted.
- Page 125 Table 36 Warning event codes (continued) Event code Description Details and Solution Wrong drive firmware — invalid drive firmware Drive firmware is specific to the drive model and type. interface. Select the drive firmware specific to this drive. If the firmware file could have been renamed, obtain a new copy of the firmware file No firmware downgrade possible.
-
Page 126: Configuration Change Events
Obtain a new cleaning tape for use when the cleaning operations remain. current cleaning tape expires. C bus recovery Contact HP Service if this unexpected condition occurs. VPD data recovery. Power cycle the device and retry the operation. External drive cooling fan failure (fan motion has Verify that the fan for the indicated drive sled is stopped). -
Page 127: Information Events
Table 37 Configuration change events (continued) Value Configuration event Description 0x45 Master drive assigned Drive master assigned 0x46 Drive sled added Drive sled added 0x47 Drive sled removed Drive sled removed 0x48 Library mode changed Library mode changed (automatic, sequential, random) 0x49 Element address... -
Page 128: Using Hp Library & Tape Tools To Diagnose Problems
Using HP Library & Tape Tools to diagnose problems With HP Library & Tape Tools installed on the host server you can: Identify all parallel SCSI devices connected to your system. View detailed configuration, identification, inventory, and drive information for the device. - Page 129 Generate a detailed support ticket that can be e-mailed or faxed to your support representative for analysis. The HP Library & Tape Tools diagnostic provides an intuitive graphical user interface with integrated context-sensitive help. It can be downloaded free of charge from www.hp.com/support/TapeTools.
-
Page 130: Upgrading And Servicing The Tape Autoloader
6 Upgrading and servicing the Tape Autoloader WARNING! The HP StorageWorks 1/8 G2 Tape Autoloader weighs 1 1.5 kg (25.4 lb) without media and 13.1 kg (28.9 lb) with media (8 cartridges). When moving the Autoloader, to reduce the risk of personal injury or damage to the Autoloader: 1) observe local health and safety... -
Page 131: Removing And Replacing A Tape Drive
HP tape storage products. L&TT includes several features designed for use by both HP storage customers and trained service personnel. L&TT is available for download at the following HP website at no cost: www.hp.com/support/TapeTools. - Page 132 Attach the cords and terminator, if necessary, that you removed from the old tape drive. Power on the tape drive. If necessary, upgrade the Autoloader and drive firmware using HP Library & Tape Tools, the RMI, or a USB flash drive.
-
Page 133: Removing And Replacing A Magazine
Failure to follow normal procedure can cause data loss and equipment damage. If possible, the magazines should be released using the OCP or RMI. HP recommends that you release the magazines using the OCP or RMI; however, if the OCP process fails, or if a magazine needs to be removed when the power to the device is off, you can release the magazines manually. -
Page 134: Using The Manual Magazine Release
Figure 80 Operations: Magazines page Using the manual magazine release From the back of the Autoloader determine which magazine needs to be removed using Figure 81 (page 134). Figure 81 Manual magazine release holes Right magazine release Left magazine release Push a small metal pin or paper clip about 1.5 cm (0.6 inch) into the appropriate release hole to push on the release latch (see Figure 82 (page... -
Page 135: Recording Configuration Settings
Reconfigure the Autoloader. WARNING! The HP StorageWorks 1/8 G2 Tape Autoloader weighs 1 1.5 kg (25.4 lb) without media and 13.1 kg (28.9 lb) with media (8 cartridges). When moving the Autoloader, to reduce the risk of personal injury or damage to the Autoloader: 1) observe local health and safety... -
Page 136: Removing The Base Chassis
Pull straight back on the tape drive handle to remove the tape drive from the Autoloader (see Figure 84 (page 136)). Figure 84 Removing the tape drive Removing the base chassis You will need a #2 Phillips screwdriver to remove and replace the base chassis assembly from the rack or cover. -
Page 137: Replacing The Base Chassis
Replacing the base chassis CAUTION: Lift the chassis from the side edges. Lifting the chassis from the magazine openings can damage the chassis. The shipping lock prevents the robotic transport mechanism from moving during shipment. You must remove the shipping lock before powering on the device. The shipping lock is held in place with a piece of tape and is located in the top center of the new chassis. - Page 138 Figure 88 Sliding the Autoloader into the cover Replace the tape drive. Replace the magazines. Replace the cords and cables. Reconnect the cables and power cord. Power on the Autoloader. Reconfigure the Autoloader. 138 Upgrading and servicing the Tape Autoloader...
-
Page 139: Support And Other Resources
7 Support and other resources HP technical support Telephone numbers for worldwide technical support are listed on the HP support website: www.hp.com/support. Collect the following information before calling: Technical support registration number (if applicable) Product serial numbers Product model names and numbers... -
Page 140: Customer Self Repair
HP customer self repair (CSR) programs allow you to repair your StorageWorks product. If a CSR part needs replacing, HP ships the part directly to you so that you can install it at your convenience. Some parts do not qualify for CSR. Your HP-authorized service provider will determine whether a repair can be accomplished by CSR. -
Page 141: Hp-Authorized Reseller
HP-authorized reseller For the name of your nearest HP-authorized reseller: In the United States, call 1–800–282–6672 Elsewhere, visit the HP website: www.hp.com, then click Contact HP to find locations and telephone numbers. HP-authorized reseller... -
Page 142: A Technical Specifications
A Technical specifications Physical specifications Table 41 1/8 G2 Tape Autoloader physical specifications: all models Characteristics Product alone Packaged Height 44 mm (1.73 inches) 250 mm (9.84 inches) Width 482 mm (18.98 inches) 580 mm (22.83 inches) Depth 809 mm (31.85 inches) 990 mm (38.98 inches) Weight 1 1.5 kg (25.35 pounds) - Page 143 Table 43 CSA test conditions (continued) Characteristic Tested condition or value Considered current rating (A) 20 A (branch circuit protection) Pollution degree (PD) PD 2 IP protection class IPX0 Altitude during operation (m) Max 2000 Altitude of test laboratory (m) Mass of equipment (kg) Max 25 kg Manufacturer's Declared Ambient (°C)
-
Page 144: B Regulatory Compliance And Safety
B Regulatory compliance and safety This section contains regulatory notices for the HP StorageWorks 1/8 G2 Tape Autoloader. Regulatory compliance identification numbers For the purpose of regulatory compliance certifications and identification, this product has been assigned a unique regulatory model number. The regulatory model number can be found on the product nameplate label, along with all required approval markings and information. -
Page 145: Declaration Of Conformity For Products Marked With The Fcc Logo, United States Only
(1) this device may not cause harmful interference, and (2) this device must accept any interference received, including interference that may cause undesired operation. For questions regarding your product, visit www.hp.com. For questions regarding this FCC declaration, contact us by mail or telephone: Hewlett-Packard Company P.O. -
Page 146: Japanese Notices
This compliance is indicated by the following conformity marking placed on the product: This marking is valid for non-Telecom products and EU harmonized Telecom products (e.g., Bluetooth). Certificates can be obtained from http://www.hp.com/go/certificates. Hewlett-Packard GmbH, HQ-TRE, Herrenberger Strasse 140, 71034 Boeblingen, Germany Japanese notices... -
Page 147: Class B Equipment
Class B equipment Taiwanese notices BSMI Class A notice Taiwan battery recycle statement Recovery mark: Recovery text: Four-in-one recycling “Please recycle waste symbol batteries” Taiwanese notices... -
Page 148: Laser Compliance Notices
Do not operate controls, make adjustments, or perform procedures to the laser device other than those specified herein. Allow only HP Authorized Service technicians to repair the unit. The Center for Devices and Radiological Health (CDRH) of the U.S. Food and Drug Administration implemented regulations for laser products on August 2, 1976. -
Page 149: German Laser Notice
German laser notice Italian laser notice Japanese laser notice Laser compliance notices 149... -
Page 150: Spanish Laser Notice
Spanish laser notice Recycling notices English notice Bulgarian notice Czech notice 150 Regulatory compliance and safety... -
Page 151: Danish Notice
Danish notice Dutch notice Estonian notice Finnish notice French notice Recycling notices... -
Page 152: German Notice
German notice Greek notice Hungarian notice Italian notice Latvian notice 152 Regulatory compliance and safety... -
Page 153: Lithuanian Notice
Lithuanian notice Polish notice Portuguese notice Romanian notice Slovak notice Recycling notices 153... -
Page 154: Spanish Notice
Spanish notice Swedish notice Turkish notice Türkiye Cumhuriyeti: EEE Yönetmeliğine Uygundur Battery replacement notices Dutch battery notice 154 Regulatory compliance and safety... -
Page 155: French Battery Notice
French battery notice German battery notice Battery replacement notices 155... -
Page 156: Italian Battery Notice
Italian battery notice Japanese battery notice 156 Regulatory compliance and safety... -
Page 157: Spanish Battery Notice
1.00 mm or 18 AWG, and the length of the cord must be between 1.8 m (6 ft) and 3.6 m (12 ft). If you have questions about the type of power cord to use, contact an HP authorized service provider. -
Page 158: C Electrostatic Discharge
Use conductive field service tools. Use a portable field service kit with a folding static-dissipating work mat. If you do not have any of the suggested equipment for proper grounding, have an HP authorized reseller install the part. NOTE: For more information on static electricity, or assistance with product installation, contact your HP authorized reseller. -
Page 159: Glossary
Glossary barcode reader A component of the robot that is used for cartridge identification and position calibration. cartridge The plastic housing around a cartridge tape. A plastic leader block is attached to the tape for automatic threading when loaded in transport. The spine of the cartridge contains a label listing the volume identification number. - Page 160 An acronym for host bus adapter, an interface card which plugs into the computer's bus and connects it to the network. host One or more computers that generate and communicate data to the device. hot-plug, hot swap The plugging in or removal of a drive into a system with the power turned on. HVDS High voltage differential signaling, also called differential SCSI.
- Page 161 robot An electro-mechanical device that transports tape cartridges to and from the magazines and drives. robotics unit The unit that includes the robotic components and that controls the movement of the robot between storage slots, drives, and load ports. Serial Attached SCSI. A computer bus technology and serial communication protocol for direct attached storage devices, including disk drives and high-performance tape drives.
-
Page 162: Index
Index RMI, date and time administrator password OCP, changing RMI, OCP, error log mode RMI, RMI, restoring to null event notification parameters RMI, RMI, setting mailslot OCP, OCP, alerts RMI, configuring network RMI, OCP, Autoloader modes RMI, OCP, network management RMI, RMI, automatic cleaning... - Page 163 prevention measures, unpacking, storing products, verifying the connection, transporting products, European Union notice, event notification parameters Japanese notices, configuring RMI, events Korean notices, configuration change, information, warning, laser compliance notices, log files viewing factory defaults OCP, restoring RMI, OCP, LTO generation RMI, product model, features,...
- Page 164 Subscriber's Choice, HP, password locks support enabling, cleaning the tape drive, power cord RMI, compliance notice, downloading a support ticket current rating, OCP, set,...
- Page 165 RMI, force ejecting tape, powering on and off, websites RMI, customer self repair, TapeAssure, technical support HP Subscriber's Choice for Business, work mat, static-dissipating, service locator website, wrist straps termination specifications, parallel SCSI, using, text symbols, toe straps, using,...
Need help?
Do you have a question about the BL536A and is the answer not in the manual?
Questions and answers