
Related Manuals for Qvis Pioneer-4


Summary of Contents for Qvis Pioneer-4
- Page 1 4 / 8 / 16 CHANNEL HDA DVR PIONEER-4 PIONEER-8 PIONEER-16 User’s Manual V1.0 12 / 2014...
-
Page 2: Table Of Contents
18 PTZ Control 19 System Setup 20 Web Monitoring 21 Special Function 22 Multi-Channel Playback 23 File Storage 24 FAQ: Troubleshooting Appendix 1: Remote controller operation Appendix 2: Mouse operation Appendix 3: Detailed Specification © Copyright QVIS® All documentation rights reserved. - Page 3 Reduces power consumption and extends device life-span. Special storage format which ensures data safety. Compression H.264 Real-time compression by each individual hard disk, which ensures that the audio and video signals have stable synchronisation. © Copyright QVIS® All documentation rights reserved.
- Page 4 Monitor recorded footage and real-time playback. Alarm linkage Alarm activated video recording, tour, message, buzzer, e- mail, and FTP. Communication interface RS485 interface provides a connection for the alarm input and PTZ control. © Copyright QVIS® All documentation rights reserved.
-
Page 5: Important Safeguards & Warnings
We are not liable for any problems caused by unauthorized modifications or attempted repair. 5.Environment The DVR should be installed in a cool, dry place away from direct sunlight, inflammable, explosive substances and etc. © Copyright QVIS® All documentation rights reserved. -
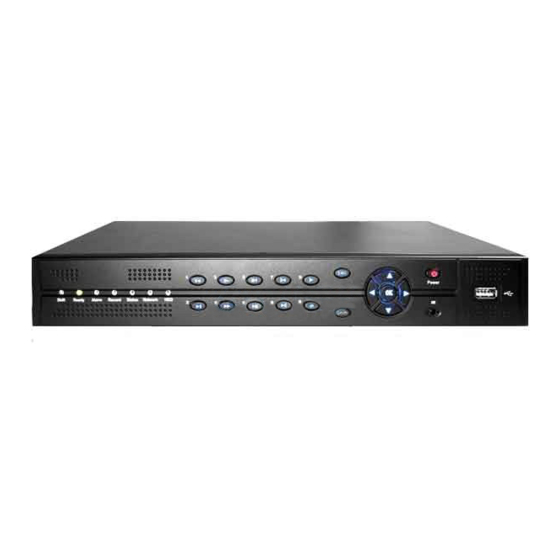
Page 6: Front & Rear Panels
8 10 12 14 16 18 9 11 13 15 17 19 KEY: Shift indicator Next File Record light System ready ESC button Slow Play indicator light Alarm indicator Fast Play Function Switching light © Copyright QVIS® All documentation rights reserved. -
Page 7: Rear Panel
(16 Channel device shown below) 8 9 11 RS485 Audio BNC Video RCA Audio Alarm inputs inputs output input/out puts HDMI Ethernet USB ports port Internet Stereo port inputs RS485 VGA video DC12V Port output Input (PTZ) © Copyright QVIS® All documentation rights reserved. -
Page 8: Basic Information
Alarm output cannot be connected to a high-power load (no more than 1Amp). When forming the output loop you must prevent high current levels from damaging the relay. Please use the contact isolator when there is a high- power load. © Copyright QVIS® All documentation rights reserved. -
Page 9: Startup
There are two methods to turn off the DVR, either the soft switch or the hard switch. Soft switch: Entering [Main menu] and choosing [Logout] in the [turn off the system] option. Hard switch: Pressing the power supply switch. © Copyright QVIS® All documentation rights reserved. -
Page 10: Login
(By rebooting the DVR after 30mins after being locked out, it will automatically allow access to the system login). To prevent this from happening, please revise and remember user name and password before logging back into the system. © Copyright QVIS® All documentation rights reserved. -
Page 11: Logout
You have two options: Logout, or Reboot. You can use the desktop shortcut menu or enter the [main menu] to access the Logout Menu. Logout window 【Logout】Quits the menu. Offer password next time you want to log back in. 【Reboot】Quits the system. Reboot up the system. © Copyright QVIS® All documentation rights reserved. -
Page 12: Main Menu
, PTZ, patrol, buzz, email and FTP upload. Set video loss alarm channel, linkage Video parameters: defending time section, alarm loss output, screen hint, recording, screen shot , PTZ, patrol, buzz, email and FTP upload © Copyright QVIS® All documentation rights reserved. - Page 13 Encode configuration stream control, image quality type, code configuration stream value, frame between value, video/audio enable. Set basic network parameters, DHCP and Network DNS parameters, network high speed configuration download © Copyright QVIS® All documentation rights reserved.
- Page 14 Online user tools attempted unauthorised access until next DVR reboot. Adjust upside, downside, nearside, Output adjust starboard distance, black margin vertical & horizontal. Automatic Set automatic reboot system and automatic maintenance deleting files. © Copyright QVIS® All documentation rights reserved.
- Page 15 Display hard disk capability and recording information time Display code stream information System Clear all log information according to the information information log video and time Edition Display edition information information Shut down Logout or reboot. © Copyright QVIS® All documentation rights reserved.
-
Page 16: Preview
(shown below). The menu includes: main menu, record mode, playback, PTZ control, High Speed PTZ, Alarm Output, color Setting, Output adjust, Logout, view mode shift, spot. Shortcut menu in full analog (DVR) © Copyright QVIS® All documentation rights reserved. -
Page 17: Recording Config
First HDD is a read-write disk; the second is a redundant disc ready as a spare. Length: Set the time length of each video file. 60 minutes is default length. Prerecord: Record 1-30 seconds before the action (file length is decided by the stream). © Copyright QVIS® All documentation rights reserved. -
Page 18: Backup
You can back up the video files to external storage device through these setup menus. Note:The storage must be installed before the file backup. If the backup is terminated, the already backup can playback individually. © Copyright QVIS® All documentation rights reserved. - Page 19 【Detect】Detect the storage connected with the DVR such as hard disk or universal disk. 【Backup】Click backup button and the dialog box is popped up. You can choose the backup file according to the type, channel and time. © Copyright QVIS® All documentation rights reserved.
- Page 20 Note:During backup you can exit the page layout to carry out other functions. 【Burning】the file will be burned synchronously after you have clicked this. 【Erase】Choose the file you wish to delete and click this button to delete the file. 【Stop】Stop the backup. © Copyright QVIS® All documentation rights reserved.
-
Page 21: Snapshot Storage
PreSnap: Set how many seconds of pre-recorded footage (stored in the memory) is added on to the beginning of the snapshot. You can refer to ‘6. Record Config’ section for a very similar description on how to setup the ‘Snapshot’ options. © Copyright QVIS® All documentation rights reserved. -
Page 22: Playback
Note: The hard disk that saves the video files must be set as read-write. Pic 4: Playback Key: Back up options File information File searching File backup Operation playback time code Playback control panel © Copyright QVIS® All documentation rights reserved. - Page 23 Local zoom: When the system is in single-window full-screen playback mode, you can drag your curser on the screen to select a section and then left click mouse to local zoom in or out. You can right click mouse to exit. © Copyright QVIS® All documentation rights reserved.
-
Page 24: Network Setup
According to the default setup, the default gateway is generally the router IP address, so enter IP address (e.g.192.168.1.10) in the web browser to be able to operate the security surveillance system from different PC terminals within the local network. © Copyright QVIS® All documentation rights reserved. -
Page 25: Alarm
【Manual】: Click the all button and the according channel is alarming no matter the channel in any state. 【Stop】: Click the stop button and the according channel stops alarming no matter the channel in any state. © Copyright QVIS® All documentation rights reserved. - Page 26 (click the ‘Set’ button next to ‘Region’), select the areas you want, the ‘Default’ setting will make all areas motion sensitive, then right click to choose ‘Up window’. In the second section of the motion detect options, you can customise: © Copyright QVIS® All documentation rights reserved.
- Page 27 PAL22X18. Red blocks represent the motion detect defensive area. White block means the unfenced area. You can set the area as followed, Drag the mouse and draw the area. Default: all selected blocks are the detection area. Select Region © Copyright QVIS® All documentation rights reserved.
- Page 28 【PTZ Activation】Set the PTZ activation when the alarm is turned on. Note:to link PTZ, you need to go [Shortcut menu]->[PTZ control] to set preset point, cruise between points & interval time, etc. © Copyright QVIS® All documentation rights reserved.
- Page 29 No Disk Space Network Disconnection IP Conflict (IP address is incorrect for remote connection) If one of these system errors occurs the device will alert you with such as show message and buzzer. © Copyright QVIS® All documentation rights reserved.
- Page 30 【Enable】 Select it to make sure abnormal function workable 【Show message】 Automatically alarm cue dialog box come out of the main screen 【Buzzer】 Device will have one long nosie “di” while alarm is happening © Copyright QVIS® All documentation rights reserved.
- Page 31 Intelligent Video Analysis Intelligent analysis function: you can set in two rules: picket line and picket area. You can only use the Video Analysis function on Record Channel 1; no other channels can be used. © Copyright QVIS® All documentation rights reserved.
- Page 32 Rules: you can choose to forbid bidirectional movement, entering or leaving footage frame, or movement in 3 different directions, so that when the moving objects meet these picket area rules the alarm will be activated. © Copyright QVIS® All documentation rights reserved.
- Page 33 Next you need to set the alarm control period steps. The taken linkage measures are the same as step 2 and step 3 in ‘Alarm setting’ 10.1. © Copyright QVIS® All documentation rights reserved.
- Page 34 When video analysis alarm is triggered, there will be red box line in the preview image. The intelligent analysis function mainly includes the 2 facets detailed below Touch line detection: bidirectional touch line, single-direction touch line. Area detection: enter alarm, leave alarm. © Copyright QVIS® All documentation rights reserved.
- Page 35 (see image below). Items stolen: object disappears within warning area, and the size of object meet the rules of minimum image distance, alarm will be triggered © Copyright QVIS® All documentation rights reserved.
- Page 36 Yes, return to previous page, click Yes, alarm rule setting if finished. Rule setting - items care © Copyright QVIS® All documentation rights reserved.
-
Page 37: Ptz Control
Click [main menu] > [system configuration] > [PTZ setup] to set the PTZ parameters. The PTZ functions are decided by the PTZ protocols. PTZ setup 【Speed】: Set the PTZ rotation range. Default range: 1 ~ 8. © Copyright QVIS® All documentation rights reserved. -
Page 38: System Setup
19 System Setup Set the system parameters such as: General, Encode Network Net service GUI display PTZ configure/RS485 device RS232 Tour setup Spot and digital © Copyright QVIS® All documentation rights reserved. - Page 39 【HDD full】Choose stop record: Stop recording when the hard disk is full. Choose overwrite: Cover the earliest recording files and continue recording when the hard disk is full. 【DVR No.】Only when the address button on the remote control and © Copyright QVIS® All documentation rights reserved.
- Page 40 This menu will allow you to set the video/audio code parameter: video file, remote monitoring and so on. Set every main stream parameter in the left part, and then set the extra stream parameter in the right part. © Copyright QVIS® All documentation rights reserved.
- Page 41 【Bit Rate】Set the code stream value to modify the image quality. The larger code stream value the better image quality: 1080P(1024~8192kbsp) 720P(1024~4096kbps) 960H(869~4096kbps) D1(512~2560kbps) HD1 (384~2048kbps) CIF (64~1024kbps) QCIF (64~512kbps) © Copyright QVIS® All documentation rights reserved.
- Page 42 & audio. The resolution, frame rate, bit rate type settings is the same as main stream. 19.3 Network Setup Network Menu 【Net Card】You can choose cable network card or wireless network © Copyright QVIS® All documentation rights reserved.
-
Page 43: Net Service
Otherwise image quality precedence is valid. 19.4 Net Service Choose the network service option and click the set button to configure the advanced network functions or double click the service button to configure the parameters. © Copyright QVIS® All documentation rights reserved. -
Page 44: Pppoe Setup
NetService Menu 【PPPoE setup】 © Copyright QVIS® All documentation rights reserved. -
Page 45: Ntp Setup
【EMAIL setup】 If the alarm is triggered or the alarm snapshots are taken, you can setup the DVR to send an email containing alarm information and the photos to an appointed email address. © Copyright QVIS® All documentation rights reserved. - Page 46 You can delete the set IP address by √ in the options. Note:When the same IP address is in the white and black list at the same time, the black list precedence is higher. © Copyright QVIS® All documentation rights reserved.
- Page 47 IP Filter 【DDNS】 DDNS setup © Copyright QVIS® All documentation rights reserved.
- Page 48 【Server IP】IP address for FTP server 【Port】Domain Port of FTP, default 21 【User Name】User name of FTP 【Password】Password of user 【Anonymous】:enable anonymous, no need to set user name and password © Copyright QVIS® All documentation rights reserved.
- Page 49 [User name] the user name that device can log in DDNS server [Password] the password related to the user name. [Refresh cycle]:Time interval between device and DDNS when synchronised. Note: Please set up server before using DDNS. © Copyright QVIS® All documentation rights reserved.
- Page 50 【Alarm Report】Tick it means to report alarm information to server. 【Log Report】Tick it, means to report log to server. 【Wireless Config】 ADSL through 3G net card, use CMS to visit and config the device © Copyright QVIS® All documentation rights reserved.
- Page 51 【Type】Dial type, default AUTO 【Wireless AP】3G access point 【Dial Number】3G Dial Number 【User Name】User name of 3G 【Password】Password of dial user 【IP Address】IP address, obtained from dial. © Copyright QVIS® All documentation rights reserved.
- Page 52 【TCP】: Router will automatically distribute TCP port for the device, when monitoring via CMS. 【Mobile Port】: Router will automatically distribute Mobile Port for the device when using your smart phone to monitor the DVR. © Copyright QVIS® All documentation rights reserved.
- Page 53 【Password】:wireless network password of router; 【IP address】: to set the IP address of device, default is 192.168.1.12 【subnet mask】:set subnet mask of device, default is 255.255.255.0 【gateway】:set gateway of device, default is 192.168.1.1 © Copyright QVIS® All documentation rights reserved.
-
Page 54: Gui Display
Encode output:In the network surveillance and video file mode include: channel title, time display, channel display, record status, alarm status, transparency and region cover. © Copyright QVIS® All documentation rights reserved. - Page 55 You can cover the arbitrary using mouse. (Black region is for output) 【Time display】and 【Channel display】 set the display position of channel title and time title. © Copyright QVIS® All documentation rights reserved.
- Page 56 【Protocol】choose related protocol of brand model 【Address】set with corresponding address, default is 1 【Baud rate】choose the baud rate that the related device uses, default is 115200 【Data bits】including 5-8 options,default is 8; © Copyright QVIS® All documentation rights reserved.
- Page 57 【interval】Set the patrol switch interval. The set range is 5-120 seconds. 【alarm tour】set the interval to shift alarm tour, range is 5-120 seconds, choose return when alarm ends, when alarm link to tour, system will auto shift to six-view after alarm finished. © Copyright QVIS® All documentation rights reserved.
-
Page 58: Channel Management
Manage each camera’s channel status and mode. Initial channel manage screen Channel Status: This menu screen shows the status of the entire range of available channels (the information includes: Max Resolution, This Resolution, Connection Status). © Copyright QVIS® All documentation rights reserved. - Page 59 For example: When a channel is added to the device but it is not enabled ‘Not Configured’ will be displayed: © Copyright QVIS® All documentation rights reserved.
- Page 60 Note:Read/Write Disk: The equipment can write or read data. Read-only Disk: The equipment can read data but can not write data. Redundant Disk: Double backup the video files in the write-read disk. © Copyright QVIS® All documentation rights reserved.
- Page 61 You can set the team as you wish. The user can appoint the purview in the group. The user management includes: group/ user. The group and user name cannot be the same. Each user only belongs to one group. © Copyright QVIS® All documentation rights reserved.
- Page 62 The blank ahead or behind the character string is invalid. The middle blank in the character string is valid. Note:The user who possesses the user control purview can modify his/her own or other users password. © Copyright QVIS® All documentation rights reserved.
- Page 63 Once you have chosen the team, the user purview is the subclass of the team. We recommend that the common user’s purview is lower than the advanced user. © Copyright QVIS® All documentation rights reserved.
- Page 64 【Add Group】Add a user group and set the purview. There are 33 different purviews: Which allows you to either shut down the equipment, real time surveillance, playback, record setting, video backup and more. © Copyright QVIS® All documentation rights reserved.
- Page 65 Add group 【Delete User】Delete the current user. Choose the user and click the delete user button. 【Delete Group】Delete the current group. Choose the group and click the delete group button. © Copyright QVIS® All documentation rights reserved.
- Page 66 To check the information of network user that connected with local device, also can tick the selected user to break up connection,(make √ at the box),then the user will be frozen after connection stopped, and will not log in until device reboot. Online user © Copyright QVIS® All documentation rights reserved.
- Page 67 The user can set the time to auto reboot and auto delete file. Auto maintain 19.9.5 Restore The system can be restored to its default settings . You can choose the items according to the menu. Restore to default © Copyright QVIS® All documentation rights reserved.
- Page 68 【Upgrade】choose USB interface. 【Upgrade file】choose the upgrade file. 19.9.7 Device Info This provides the device interface info like audio in, alarm in/out so that it can be conveniently used by the user. Device info © Copyright QVIS® All documentation rights reserved.
- Page 69 Users can export the log info and the configure file from device to connected flash stick, and also they can import related configure file from flash stick to settings, which greatly bring convenience to the customers. Import / Export interface © Copyright QVIS® All documentation rights reserved.
- Page 70 If the user needs to change the damaged hard disk, you must shut down the DVR and take out the damaged hard disk, then install a new one. © Copyright QVIS® All documentation rights reserved.
- Page 71 Set the time section to look the date up and click the look up button. The log information will display as a list (one page is 128 items). © Copyright QVIS® All documentation rights reserved.
- Page 72 Press Page up or Page down button to look up and press delete button to clear all the log information. Log information © Copyright QVIS® All documentation rights reserved.
-
Page 73: Web Monitoring
DVR to use the remote control functions. To do these please follow the steps below: Install the ActiveX, file name is “IE Plug_V1.1.0.78.exe”, which can also be located on the DVR CD-ROM disc (follow the instructions on how to install it). © Copyright QVIS® All documentation rights reserved. - Page 74 ‘admin’, there is no password to enter (leave blank). User should create a password for the admin user profile after login. ‘Pic 9’ is the interface view you will encounter after successfully logging in. CAM1 CAM2 © Copyright QVIS® All documentation rights reserved.
- Page 75 If the channel did not change, system will closed previous video and open the new one you choose. Note: User can choose the most appropriate image mode, when opening remote video control. © Copyright QVIS® All documentation rights reserved.
-
Page 76: Special Function
In order to achieve the best quality video playback on the network that you are connected to, adjust the settings accordingly until the desired quality level of video monitoring has been achieved. Encode © Copyright QVIS® All documentation rights reserved. - Page 77 (see 14.2). © Copyright QVIS® All documentation rights reserved.
-
Page 78: Multi-Channel Playback
On the search condition interface, choose file type, choose channel (channels can be combined freely), choose time period, click yes; On the playback page, choose the video file, press play or double click the file to play back. © Copyright QVIS® All documentation rights reserved. -
Page 79: File Storage
If the problems are not listed, please contact the local service or call the HQ service. We are willing to offer the service. The DVR cannot boot up normally. Possible reasons: A. The power supply is not correct. © Copyright QVIS® All documentation rights reserved. - Page 80 A. The program is not matched. Please update the program. B. The image brightness is all set to 0. Please restore the default setup. C. There is no video input signal or the signal is too weak. © Copyright QVIS® All documentation rights reserved.
- Page 81 C. The data line of the hard disk is damaged. D. The hard disk is damaged. The hardware of the DVR is damaged. There is no audio signal in the surveillance window. Possible reasons: © Copyright QVIS® All documentation rights reserved.
- Page 82 G. When multiple decoders are connected, the far port of the PTZ decoder line A(B) must connect a 120 resistance to reduce the reflection otherwise the PTZ control is not stable. H. The distance is too far. © Copyright QVIS® All documentation rights reserved.
- Page 83 C. Choose the play-in-team mode in the network setup of DVR. D. The region shelter or channel protection is set. The user has no surveillance purview. The real-time image of the hard disk recording machine itself is not clear. © Copyright QVIS® All documentation rights reserved.
- Page 84 B. The alarm output is turned on manually. C. The input machine is damaged or the connections are not correct. D. There are some problems for specific program edition, Please update the program. © Copyright QVIS® All documentation rights reserved.
- Page 85 B. There is no DX8.1 software or higher edition. C. There is no DivX503Bundle.exe file to play AVI video files. D. The DivX503Bundle.exe and ffdshow-2004 1012 .exe files must be installed in the windows XP system. © Copyright QVIS® All documentation rights reserved.
- Page 86 26. The time shows on digital channel is not the same as local side: A. Enable the time synchronise function of the digital channel. 27. Cannot see preview picture of analog channel Possible reasons: A. The camera did not connect to video interface © Copyright QVIS® All documentation rights reserved.
-
Page 87: Appendix 1: Remote Controller Operation
Multi-channels button Multi-channels preview Password input/number input/ channel Number button switch 【Esc】 Back to up window Direction button Direction and OK button Playback operate Playback Basic operation Record control Enter into record menu © Copyright QVIS® All documentation rights reserved. -
Page 88: Appendix 2: Mouse Operation
Add or subtract number value in the number setting Switch the items in the combo box Page up or down in the list Move mouse Choose the widget or move the item in the widget © Copyright QVIS® All documentation rights reserved. -
Page 89: Appendix 3: Detailed Specification
Backup mode Network backup、USB HDD, USB writer、SATA writer Video input 8 / 16 BNC Video output 1ch VGA,1ch HDMI Audio input 6ch RCA Interface Audio output 1ch RCA Alarm input Alarm output © Copyright QVIS® All documentation rights reserved. - Page 90 3G、WIFI (expand via USB) Power 12V/2A Other dimension 310mm(length)* 215mm(width)* 45mm(height) For further information and help on any products from the Qvis brand, please scan the QR code below to be directed to our website: WWW.ADATA.CO.UK © Copyright QVIS® All documentation rights reserved.
- Page 91 ENHANCE YOUR DVR WITH OUR WIDE RANGE OF QVIS CAMERAS OUR PRODUCTS ARE FULLY TESTED TO WORK TOGETHER FOR COMPATABLE CAMERAS; LOOK FOR THESE COLOUR ICONS ON THE SIDE OF THE BOX: DON’T SETTLE FOR LESS ALL OUR PRODUCTS CARRY QVIS LOGOS...
Need help?
Do you have a question about the Pioneer-4 and is the answer not in the manual?
Questions and answers