Table of Contents
Advertisement
Quick Links
Advertisement
Table of Contents

Related Manuals for Carf-Models SIAI Marchetti SF-260


Summary of Contents for Carf-Models SIAI Marchetti SF-260
- Page 1 SIAI Marchetti SF-260 Construction Manual Version 1.0 January 2013...
-
Page 2: General Information For Siai Marchetti Sf-260
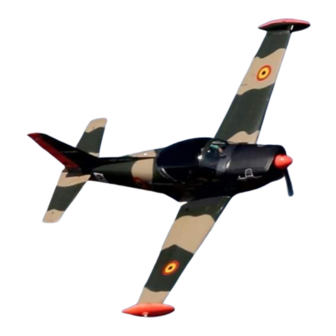
CARF-Models SIAI Marchetti SF-260 www.carf-models.com General information for SIAI Marchetti SF-260 SIAI Marchetti SF-260 The SF-260 is one of the world’s most revered military trainers, with some 880 aircraft in service and 27 different military customers around the world. It was, and still is, marketed also as an aerobatic plane as well. - Page 3 Fantasy Scheme, too… So, there was no way past doing this airplane one day. Motivated by a full scale SIAI Marchetti SF-260 pilot, Ralf Niebergall, CARF took over a half finished project from a small company in Germany, AeroFlug. In due course, most...
-
Page 4: Liability Exclusion And Damages
BY OPERATING THIS MODEL YOU ASSUME FULL RESPONSIBILITY FOR YOUR ACTIONS. It is important to understand that CARF-Models Ltd, is unable to monitor whether you follow the instructions contained in this instruction manual regarding the construction, operation and maintenance of the aircraft, nor whether you install and use the radio control system correctly. - Page 5 CARF-Models SIAI Marchetti SF-260 www.carf-models.com Please don’t ignore our warnings, or those provided by other manufacturers. They refer to things and processes which, if ignored, could result in permanent damage or fatal injury. Attention ! This large-scale aircraft is a high-end product and can create an enormous risk for both pilot and spectators, if not handled with care, and used according to the instructions.
-
Page 6: General Information About Fully-Composite Aircraft Structure And Design
CARF-Models SIAI Marchetti SF-260 www.carf-models.com General information about fully-composite aircraft structure and design All the parts are produced in negative molds, manufactured using vacuum-bagged sandwich construction technology. All parts are painted in the moulds, either single colour or designer colour schemes. The production method enables us to present this aircraft with incredible built-in strength, while still being lightweight, and for a price that nobody could even consider some years ago. -
Page 7: Accessories
Accessories Below are the things you may need to get your CARF SIAI Marchetti SF-260 into the air. Some of them are mandatory, some of them can be chosen by you. What we list here are highly recommended parts, and have been thoroughly tested. -
Page 8: Tools
CARF-Models SIAI Marchetti SF-260 www.carf-models.com 4. SIAI Marchetti Retracts Set with wheels (Item Number 100500) 5. SIAI Marchetti Pneumatic Pack (Item Number 100600) 6. SIAI Marchetti Wheel Brake Upgrade Set (Item Number 100550) 7. Engine: These instructions show the installation of the Moki 100BVT (4-stroke) and the carbon engine mount is originally designed for this engine. -
Page 9: Building Instructions
We know that even good things can be made better ! Did you read the warnings above and the complete instructions carefully? Did you understand everything in this manual completely? Then, and only then, let’s start assembling your CARF SIAI Marchetti SF-260! Building Instructions General Tips: We recommend that you follow the order of construction shown in this manual. -
Page 10: Wing
Note: It is very important to prepare the inside of the fuselage properly, by roughing up and cleaning the surface, before gluing any parts to it! Are you ready? Then let´s start to built your SIAI Marchetti SF-260! The following steps will describe, where necessary, primarily cutout and installation procedures. - Page 11 CARF-Models SIAI Marchetti SF-260 www.carf-models.com The first step is to set the gear leg connecting pins into the pivot blocks, locking each in place with the supplied set-screws. To each set screw, apply a drop of LOCTITE 243 (or other medium strength threadlocker).
- Page 12 CARF-Models SIAI Marchetti SF-260 www.carf-models.com IMPORTANT! These two bolts (with washers) must be installed and tightened before flying. They keep the wing panels in place – rather important for the extended life of the model! The gear assembly can now be slipped into place from the wheel well at a slight angle.
- Page 13 CARF-Models SIAI Marchetti SF-260 www.carf-models.com The socket-head screws and blind nuts for installing the gear are included in the accessory pack. To install the blind nuts, please proceed with the following sequence. Insert a screw, with two or more washers into the hole. Locate a blind nut under the screw (a set of curved tweezers or forcepts is helpfull here).
- Page 14 CARF-Models SIAI Marchetti SF-260 www.carf-models.com The fiberglass part has a factory built-in seam with integrated fabric hinge. In order that the hinge opens wide enough, lightly file the edges of the hinge-line at a shallow angle (see photo), taking care not to damage the hinge material.
- Page 15 CARF-Models SIAI Marchetti SF-260 www.carf-models.com The cover is then fixed to the wing with three 2.9 x 13mm wood screws. If preferred, blind nuts with corresponding machine screws may be substituted. With the completion of the landing gear/sear cover installation, the wing pnel can be separated from the fuselage.
-
Page 16: Installation Of The Aileron And Flap Servos
CARF-Models SIAI Marchetti SF-260 www.carf-models.com The following pictures illustrate the completely installed landing gear and gear covers. A 3mm ball-link setup is used. To prevent the main gear cover from fluttering and to assure a more positive sit within the recess, we added a lengthwise reinforcing strip. - Page 17 CARF-Models SIAI Marchetti SF-260 www.carf-models.com The servo is installed directly to the hatch cover with a plywood frame (frame glued to cover with 30 minute Epoxy) from parts included (see photo). Important: Rough up the gluing area with sandpaper and clean!
- Page 18 CARF-Models SIAI Marchetti SF-260 www.carf-models.com The servo opening must be opened up in order that the servo fits cleanly. Leave enough material in the corners to take the attachment screws. All parts needed for control surface hook- up is included in the accessory pack. For...
-
Page 19: Flap Servo Installation
CARF-Models SIAI Marchetti SF-260 www.carf-models.com 1.2.2. Flap servo installation Installation of the flap servos follows the same procedures as the aileron servos, including orientation. The only difference being that the linkage passes within the wing panel, the servo arm oriented to the inside. -
Page 20: Wing Wiring
CARF-Models SIAI Marchetti SF-260 www.carf-models.com 1.2.3. Wing Wiring Openings must be ground in the panel root ribs, using the approx. measurements provided, for the wiring and pneumatic lines. The corresponding openings in the fuselage may be cut smaller. The larger opening in the wing rib allows easier routing of the wires/tubes. A factory... -
Page 21: Tip Tanks
CARF-Models SIAI Marchetti SF-260 www.carf-models.com 1.2.4. Tip Tanks The wingtip tanks are factory ready for final installation with a single 3mm (M3) screw. The aluminum mounting tube is pre-threaded. For those wishing a scale lighting system, the conversion is fairly easy. As there are... -
Page 22: Horizontal Stabilizer
CARF-Models SIAI Marchetti SF-260 www.carf-models.com The shape of the position light cover dictates the shape of the baseplate that the lamps are attached to (some covers are simple teardrop shaped). Show is a version for position light and strobe. The baseplate is then glued to the tank using CA or Epoxy. -
Page 23: Hinging The Elevator
CARF-Models SIAI Marchetti SF-260 www.carf-models.com As shown here, an approx. 6mm thick plywood spacer is set on the front side of the mounting tabs (use here 2,9 x 25mm screws) so that the servo arm is centered in the slot of the stabilizer and does not rub. -
Page 24: Fuselage
CARF-Models SIAI Marchetti SF-260 www.carf-models.com 3. Fuselage 3.1. Vertical Stabilizer/rudder and Rear Fuselage 3.1.1. Rudder Servo and Linkage A hatch for the rudder servo is worked into bottom of the fuselage rear, with cover. This cover will be secured later with a screw in each corner. -
Page 25: Alternate Rudder Servo Installation
CARF-Models SIAI Marchetti SF-260 www.carf-models.com Alternate Rudder Servo Installation Future kits will provide an alternate method for mounting the rudder servo, together with an optional servo location for an air-tow release, installed directly behind the cockpit opening. The necessary parts will be included with the newer kits. - Page 26 CARF-Models SIAI Marchetti SF-260 www.carf-models.com The servos can be mounted once the glue has dried/cured. The rudder servo is installed first, with the output arm oriented toward the fuselage bottom and fixed in place, as one of the mounting screws will be partially blocked by the (optional) tow release servo.
-
Page 27: Motor
CARF-Models SIAI Marchetti SF-260 www.carf-models.com Note! If the aero-tow option is chosen, use a servo with at least 10 Kg or 130 in/oz of torque! To ease locating the proper placement of the complete unit, a 2mm hole is bored vertically thru the fuselage top, about 70mm to the rear of the canopy opening for the tow-line release pin. - Page 28 CARF-Models SIAI Marchetti SF-260 www.carf-models.com The opening beneath the motor bulkhead is for the carburetor air intake (from fuselage). The down thrust, built in at the factory, needs no adjustment. For the correct right-thrust, a spacer of about 2.5mm (washers or aluminum strip) needs to be placed between the motor mount and the bulkhead (left side, top and bottom, looking from the pilots’...
-
Page 29: Motor Installation: Da-100L Or 3W-110Ib2 An Similar Boxer Motors
CARF-Models SIAI Marchetti SF-260 www.carf-models.com 3.2.2. Motor Installation: DA-100L or 3W-110iB2 and similar Boxer Motors For true power flying and towing larger sailplanes, there is only one alternative to the 4- stroke, the gasoline fueled, 2-stroke Boxer! The motors are light, easily maintained, powerful and, once tuned, need little further attention. -
Page 30: Nose Gear Installation
CARF-Models SIAI Marchetti SF-260 www.carf-models.com The pushrods for the throttle (shown here with the choke set-up) should be installed before installing the nose gear unit, as you have perfect access from the wheel well to the front part of the fuselage and the servos. The photo also shows an intake filter made from a tea strainer that has been trimmed and “hand formed”... - Page 31 CARF-Models SIAI Marchetti SF-260 www.carf-models.com When making the cutout, be sure to take into account the movement of the servo with the gear leg! With the first “dress rehearsal”, it may be found that the length of the gear/wheel-well is a bit short.
-
Page 32: Engine Cowling
CARF-Models SIAI Marchetti SF-260 www.carf-models.com 3.4. Engine Cowling The cowling is a two part affair, split horizontally into an upper and lower section. The mounting holes are pre-drilled and require no further work. This type of cowling makes getting at the motor easy without having to remove the prop and spinner. It also makes motor installation and alignment easier. - Page 33 CARF-Models SIAI Marchetti SF-260 www.carf-models.com If a landing light is to be used, the corresponding marked area of the cowl must be cut open and cleanly sanded out to size. The gluing areas of the oil cooler scoop moulding - below the landing light - and the intake lip are lightly scuffed and cleaned prior to gluing.
-
Page 34: Landing Light (Not Included)
CARF-Models SIAI Marchetti SF-260 www.carf-models.com 3.4.1. Landing Light (not included) Landing light kits are offered from various manufacturers. We can help you to make the best choice – just ask! 3.4.2. Nose Gear Door First, the lower end of the nose gear door is to be ground/sanded to a semi-circular shape. -
Page 35: Canopy And Windshield
CARF-Models SIAI Marchetti SF-260 www.carf-models.com To prevent the door from fouling the scissor-link during gear cycling, a simple spacer can be made with a spare hinge, epoxied in place as shown. This simple fix assures appropriate clearance. If the model is to be transported with the gear retracted, the free-hanging door can pose a problem. - Page 36 CARF-Models SIAI Marchetti SF-260 www.carf-models.com After marking the separation line, the windshield is carefully cut free from the rest and trimmed to fit in the frame. Take your time, trimming a little bit at a time and checking the fit often.
-
Page 37: Fitting Out The Fuselage
CARF-Models SIAI Marchetti SF-260 www.carf-models.com 3.6. Fitting Out the Fuselage 3.6.1. Tank Installation (Fuel and Smoke Oil) In the standard fuel tank setup, the tank is placed on the mounting platform, within the previously glued-in locating frame, and secured with the supplied hook-and-loop strap. -
Page 38: Pneumatics Installation
CARF-Models SIAI Marchetti SF-260 www.carf-models.com For the Moki installation, the oil- feed line is routed above the nose- gear unit, into the engine compartment, and from there to each muffler (“T” or “Y” fitting). NOTE! Use only special, heat resistant rubber tubing (generally included with the smoke pump kit) between the “T”... -
Page 39: Scale Cockpit Kit Detailing
CARF-Models SIAI Marchetti SF-260 www.carf-models.com Shown here are the two 7.2V 2800mAh LiPo batteries. We recommend waiting till the build is in the final stages before installing them in a permanent location, as the relatively high weight can be used to advantage when setting the Center of Gravity. - Page 40 CARF-Models SIAI Marchetti SF-260 www.carf-models.com The rear of the seat-backs are closed using Depron or balsa, then the seams smoothed over with light body-filler. The seat-backs are then glued to the seat cushions. Before painting, the plastic surfaces should be “keyed” with a light sanding or wiping...
-
Page 41: Miscellaneous
CARF-Models SIAI Marchetti SF-260 www.carf-models.com 4. Miscellaneous 4.1 Tail Cone The (optional) white tail light should be installed before fitting the tail cone. The tail cone can be attached however preferred with silicone adhesive or screws (attachment materials are not included). -
Page 42: Center Of Gravity (Cg)
CARF-Models SIAI Marchetti SF-260 www.carf-models.com 4.3. Center of Gravity (CG) As described earlier, the CG can be achieved thru the positioning of the heavy components (batteries, etc.). The CG of the completed model (tank empty, wings mounted) is at the leading edge of the wing tube. -
Page 43: Appendix
CARF-Models SIAI Marchetti SF-260 www.carf-models.com Appendix: SIAI Marchetti SF-260, 1/3 scale kit (Version 1.0) Wing Pack Fuselage Pack 1 - 42 -... - Page 44 CARF-Models SIAI Marchetti SF-260 www.carf-models.com Fuselage Pack 2 Cockpit Pack - 43 -...
-
Page 45: Table Of Contents
CARF-Models SIAI Marchetti SF-260 www.carf-models.com Table of Contents Page General information for SIAI Marchetti SF-260 Liability Exclusion and Damages Supplementary Safety Notes General information about fully-composite aircraft structure and design Discription of Parts Accessories Tools Adhesives and Solvents Building Instructions... - Page 46 CARF-Models SIAI Marchetti SF-260 www.carf-models.com Fuselage 3.1. Vertical Stabilizer/Rudder and rear Fuselage 3.1.1. Rudder Servo and Linkage (Alternate Rudder Servo Installation) 3.2. Motor 3.2.1. Motor Installation Moki 100BVT 3.2.2. Motor Installation: DA-100L or 3W-110iB2 an similar Boxer Motors 3.2.3. Installing the Plywood Bulkhead in the Fuselage 3.3.
Need help?
Do you have a question about the SIAI Marchetti SF-260 and is the answer not in the manual?
Questions and answers