
Related Manuals for Carf-Models Composite-ARF Yak-55 SP


Summary of Contents for Carf-Models Composite-ARF Yak-55 SP
-
Page 1: Instruction Manual
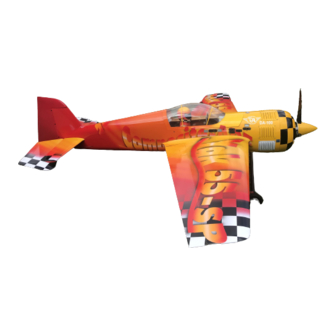
Composite-ARF Yak-55 SP (2.6m span) techsupport@composite-arf.com Instruction Manual Composite-ARF Yak-55 SP, 2.6m TAVS Technology version 1.0... - Page 5 Composite-ARF Yak-55 SP (2.6m span) techsupport@composite-arf.com Instructions for Yak-55 SP IMAC-Airplane Thank you very much for purchasing our Composite-ARF Yak-55SP all composite aircraft, made with the revolutionary Total Area Vacuum Sandwich (TAVS) technology Before you get started building and setting-up your aircraft, please make sure you have read this instruction manual several times, and understood it.
-
Page 6: Liability Exclusion And Damages
Composite-ARF Yak-55 SP (2.6m span) techsupport@composite-arf.com Liability Exclusion and Damages You have acquired a kit, which can be assembled into a fully working R/C model when fitted out with suitable accessories, as described in the instruction manual with the kit. -
Page 7: Danger Zones
Composite-ARF Yak-55 SP (2.6m span) techsupport@composite-arf.com Attention ! This IMAC-Aircraft is a high-end product and can create an enormous risk for both pilot and spectators, if not handled with care, and used according to the instructions. Make sure that you operate your Extra according to the AMA rules, or those laws and regulations governing the model flying in the country of use. -
Page 8: General Information About Fully-Composite Aircraft Structure And Design
Composite-ARF Yak-55 SP (2.6m span) techsupport@composite-arf.com General information about fully-composite aircraft structure and design All the parts are produced in negative molds, manufactured using vacuum-bagged sandwich construction technology. All parts are painted in the moulds, either single colour or designer colour schemes. - Page 9 Composite-ARF Yak-55 SP (2.6m span) techsupport@composite-arf.com than this. Make sure that the control horns are glued into the ailerons properly. The hole in the phenolic horn for the quick-link needs to be exactly perpendicular to the hinge axis line, and in this manual we show you a simple way to ensure that the horns in all pairs of control surfaces will be identical, making it easy to set up your R/C for accurate flying manoeuvres.
- Page 10 Composite-ARF Yak-55 SP (2.6m span) techsupport@composite-arf.com The Stabilisers: The stab parts are also vacuum bagged sandwiched. The rudder and elevator control surfaces are hinged with 4mm ø aluminium tubes, fitted through phenolic hinge bearing plates which are installed during manufacture for perfect alignment.
- Page 11 Composite-ARF Yak-55 SP (2.6m span) techsupport@composite-arf.com The ‘Paint Job’ Occasionally customers notice certain problem areas with composite parts. But the question is: Are these real problems, or are they just a misunderstood sign of high-tech construction, proving the high-end composite technology? Seams: ALL composite parts have seams.
- Page 12 Composite-ARF Yak-55 SP (2.6m span) techsupport@composite-arf.com In a ‘positive’ paint job some effects can never be done. Just think about the shadows, peel backs, highlights, and 3D effects - and all with a perfectly flat and uniform surface for opti- mum airflow and aerodynamics.
-
Page 13: Tools And Adhesives
Composite-ARF Yak-55 SP (2.6m span) techsupport@composite-arf.com Tools and Adhesives Tools etc: This is a very quick and easy plane to build, not requiring difficult techniques or special equip- ment, but even the building of Composite-ARF aircraft requires some suitable tools! You will probably have all these tools in your workshop anyway, but if not, they are available in all good hobby shops, or hardware stores like "Home Depot"... - Page 14 Did you read the hints and warnings above and the instructions carefully? Did you understand everything in this manual completely? Then, and only then, let’s start assembling your Composite-ARF Yak-55 SP. If not, please read it again before you start the assembly.
-
Page 15: Building Instructions
Composite-ARF Yak-55 SP (2.6m span) techsupport@composite-arf.com Building Instructions Please note that this Instruction manual shows photos of both the original Red/Blue/Yellow scheme, and also the new-for-2004 ‘Shulman 2000’ paint scheme. Some of the photos of the original scheme show the prototype fuselage, which had our ‘diagon- technique’... -
Page 16: Landing Gear
Composite-ARF Yak-55 SP (2.6m span) techsupport@composite-arf.com Landing Gear Finished in 2 hours The 1st job is to fit the landing gear legs (wheel pants can be done later) - and you can leave these in place, as they will protect the bottom of the fuselage during assembly. - Page 17 Composite-ARF Yak-55 SP (2.6m span) techsupport@composite-arf.com these photos is an optional part available from C-ARF, and is mounted with 4 sheet metal screws and 2 plastic ‘U’ brackets under the fuselage, screwed into the plywood reinforcement installed in the fuselage at the factory.
- Page 18 Composite-ARF Yak-55 SP (2.6m span) techsupport@composite-arf.com The split joint at the bottom of the cowling is reinforced with the CNC milled plywood parts supplied. Prepare all the mating surfaces carefully with some rough sandpaper and clean off the dust with alcohol. Tack glue the plywood parts in place with CA as shown, and add the small triangular pieces at the front and back to hold them at 90°...
- Page 19 Composite-ARF Yak-55 SP (2.6m span) techsupport@composite-arf.com (above) tape off about 5mm (1/4”) around grilles and sand to ensure a good glue bond. Canopy Frame and Canopy Finished in 3 hours The canopy frame fits the fuselage already. It is important to finish the mounts step by step as advised below.
- Page 20 Composite-ARF Yak-55 SP (2.6m span) techsupport@composite-arf.com space between the plywood plates and fuselage is com- pletely filled with epoxy. Drill a 3mm hole through the side of the fuselage in the cen- tre of the 4 front and rear mounting plates only (not the mid- dle 2 plates).
- Page 21 Composite-ARF Yak-55 SP (2.6m span) techsupport@composite-arf.com Note: Do NOT use any CA accelerator/kicker - you will immediately ‘fog’ the clear canopy! Tape the front of the canopy to the frame temporarily. Mount the canopy frame to the fuselage (use all 4 bolts), and tape the back of the canopy frame tightly to the fuse- lage.
- Page 22 Composite-ARF Yak-55 SP (2.6m span) techsupport@composite-arf.com Horizontal Stabs Finished in 2.5 hours The stabs are 99% finished at the factory, and only need the servos, horns and linkages installing. Insert the 20mm aluminium tube spar into the fuselage sleeve, and install both stabs to check the fit between the root ribs and the fuselage.
- Page 23 Composite-ARF Yak-55 SP (2.6m span) techsupport@composite-arf.com rately mark the position of the quick-link hole in the horn. Drill 1.5mm diameter and glue in a short piece of 1.5mm Ø wire with a drop of thin CA. Fit the control horn to the other elevator in the same man-...
- Page 24 Composite-ARF Yak-55 SP (2.6m span) techsupport@composite-arf.com Rudder Finished in 2 hours Trial fit the the double-sided phenolic control horn in the slot that is already milled in the base of the rudder, and mark the part that will be glued in. Remove it, mask the exposed parts and scuff the centre part on both sides with coarse sandpaper.
- Page 25 Composite-ARF Yak-55 SP (2.6m span) techsupport@composite-arf.com under the plate. Add a drop of Loctite to the nut before tight- ening to make sure it is secure. Join the 4 ball-links with 2 lengths of M3 x 60mm threaded rod, not forgetting the M3 locknuts.
- Page 26 Composite-ARF Yak-55 SP (2.6m span) techsupport@composite-arf.com Wings Finished in 3 hours Like the stabs, the wings are 95% finished at the factory, and have already been installed on your fuselage to check the alignment. Slide the wings onto the wing tube and check for a perfect fit.
- Page 27 Composite-ARF Yak-55 SP (2.6m span) techsupport@composite-arf.com parts supplied for each servo, using CA. Fix the servos into the mounts with the 2.8mm Ø screws provided in the kit, and place them on the hatch covers to check the alignment so that the servo arms are in the centre of the slots milled in the hatch covers, and also align with the aileron horn slots.
- Page 28 Composite-ARF Yak-55 SP (2.6m span) techsupport@composite-arf.com Engine and Exhaust Installation Finished in 4 -5 hours We strongly recommend that you complete the motor and exhaust installation before the fuel tank base and rudder servo plate are permanently installed. In the prototype we used a a Desert Aircraft DA-100 and a...
- Page 29 Composite-ARF Yak-55 SP (2.6m span) techsupport@composite-arf.com need to offset the motor mounts 4.5mm to the left (pilots view) and 3mm up to make sure that the centre of the spin- ner is central in the cowling. Mark the offsets on the firewall carefully, and then mark the positions of the 4 motor mount- ing holes using a 90°...
- Page 30 Composite-ARF Extra 330L (2.6m span) techsupport@composite-arf.com may need a little bending of the headers. All new kits shipped from mid-2004 will have this CNC milled plywood bulkhead and silicone bumpers included in the kit. Alternatively you can download a full-size template of it from our website.
- Page 31 Composite-ARF Yak-55 SP (2.6m span) techsupport@composite-arf.com Fuel Tank Base, Rudder Servo Finished in 1.5 hours Plate and Throttle servo mount The rudder servo plate, fuel tank base and throttle servo mount are assembled from a combination of CNC milled plywood and composite-balsa parts that have been lami- nated both sides with glasscloth, and vacuum-bagged, at the factory.
- Page 32 Composite-ARF Yak-55 SP (2.6m span) techsupport@composite-arf.com aligned centrally on the cockpit floor. Once happy, rough the (below) 3 photos of the tank base gluing surfaces up properly with coarse sandpaper, clean with alcohol and glue in place with slow epoxy (min. 30 minute) and milled fibre mixture.
- Page 33 Composite-ARF Yak-55 SP (2.6m span) techsupport@composite-arf.com R/C & Gear Installation Finished in 4 - 6 hours Everyone has their own favourite methods when fitting the R/C and gear, so the installa- tion shown here is a guide, and has worked perfectly in all of our planes flown by C-ARF factory staff, and many of our customers.
- Page 34 Composite-ARF Yak-55 SP (2.6m span) techsupport@composite-arf.com on the upper plywood plate behind the firewall. The ignition battery for the motor can be fitted in the same area, and of course both should be protected with foam sleeves, and fixed securely with cable-ties. Please make sure that all the Nicad batteries are fixed very securely in the plane, as the forces on these heavy items during high ‘G’...
- Page 35 Composite-ARF Yak-55 SP (2.6m span) techsupport@composite-arf.com the right side. These powerswitches are available as options from C-ARF, please see our website for current details. Composite-ARF advise you to keep all the cables between the motor ignition battery, ignition switch, and high voltage ignition unit as far away as possible from the receiver and R/C system.
- Page 36 Composite-ARF Yak-55 SP (2.6m span) techsupport@composite-arf.com Fuel tank The fuel tank is held to the tank base with 3 large cable-ties (see photo on page 30). We used a Dubro #690 tank, but depending on your choice, you might need to make some extra notches in the fuel tank base for the cables ties, as shown in the photo here.
- Page 37 Composite-ARF Yak-55 SP (2.6m span) techsupport@composite-arf.com Are the swage tubes crimped up nice and tight on the rudder cables? For added security add one small drop of Loctite/thread locking compound on all the bolts that hold the servo arms to the servos, especially important with digital types.
-
Page 38: Centre Of Gravity
Composite-ARF Yak-55 SP (2.6m span) techsupport@composite-arf.com Setting Up Your Aircraft Centre of Gravity: C of G: At the back edge of The Centre of Gravity should be set on the the wing spar tube. back edge of the wing spar tube, with the plane assembled. - Page 39 Composite-ARF Yak-55 SP (2.6m span) techsupport@composite-arf.com both sides. This is the perfect throw for nice high rate: maximum and crisp snaps. If you like you can add about low rate: 125mm 20% exponential to the low rate setting as well.
- Page 40 Composite-ARF Yak-55 SP (2.6m span) techsupport@composite-arf.com is slightly off. The aileron control surfaces have enough torsion flexibility so that damage to the servos should not occur. The big 3.3m Yak-55SP is known for very good and crisp ‘snapping’, and we think that the 2.6m version snaps even better.
-
Page 41: Packing List
Composite-ARF Yak-55 SP (2.6m span) techsupport@composite-arf.com Appendix Yak-55 SP, 2.6m Kit Packing List Main Items Art.-Nr. Quantity Description English Fuselage Right wing Left wing Right stabiliser Left stabiliser Right elevator Left elevator Rudder Cowling Canopy Frame Right wheel pant Left wheel pant... - Page 42 Composite-ARF Yak-55 SP (2.6m span) techsupport@composite-arf.com Wing Pack (2 Sets) Hardware Art.-Nr. Quantity Description English Sheet metal screws 2.9 x 13mm All Thread M3 x 70mm Nut M3 Spring steel clevises M3 Plastic nut M6 Sheet metal screw 2.2 x 9.5mm...
Need help?
Do you have a question about the Composite-ARF Yak-55 SP and is the answer not in the manual?
Questions and answers