Table of Contents
Advertisement
Quick Links
Advertisement
Table of Contents

Related Manuals for Recordex TechDisc Pro


Summary of Contents for Recordex TechDisc Pro
- Page 1 TechDisc Pro User’s Guide Commercial Grade CD Duplicator ENGLISH...
- Page 2 No part of this user’s guide may be reproduced in any Copyright ©2007 Recordex USA, Inc. All rights reserved. form without the express written permission of Recordex USA, Inc. Note: User’s are permitted to print copies of this guide for personal use.
-
Page 3: Warranty
If the duplicator develops a covered defect within the first year, Recordex will, at its option, either repair or replace the duplicator at no charge, provided that the duplicator is returned during the warranty period. - Page 4 Menu buttons that you press will appear in upper case bold typeface, I.e. UP, DOWN, ENT, ESC. Information that is displayed on the LCD will appear in this typeface: 1. Copy. • ©2007 Recordex USA, Inc. All rights reserved. Version: 1.2...
- Page 5 Chapter 3: Source & Target Discs......................................11 Chapter 4: Quick Reference.........................................12 Chapter 5: Advanced Features........................................14 Chapter 6: Advanced Setup.........................................28 Chapter 7: Trouble Shooting........................................31 Appendix A: Alerts & Error Messages.....................................34 Appendix B: Technical Support.........................................38 ©2007 Recordex USA, Inc. All rights reserved. Version: 1.2...
-
Page 6: Customer Support
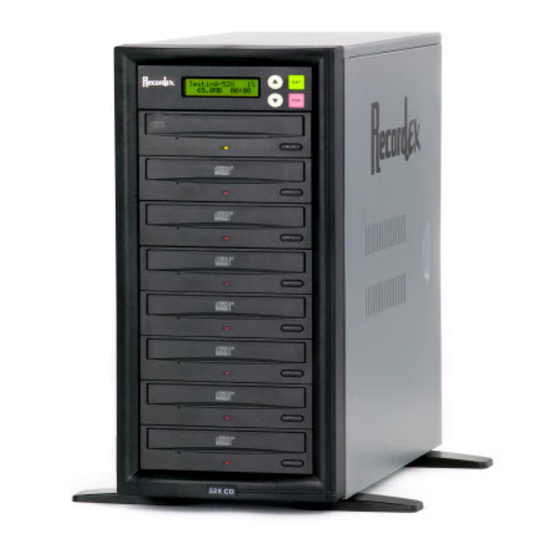
We strive to build the best product possible and we desire that every customer feel confident recommending Recordex products to their friends. If you are not fully satisfied please call our Customer Service Center today and we will do our best to make things right. - Page 7 Study the image below to familiarize yourself with your duplicator. Controller Figure 1.2 Master Drive* Side Air Vent Target Drives Stabilizing Feet Figure 1.3 Power Plug Cooling Fans Power Switche Side Air Vent ©2007 Recordex USA, Inc. All rights reserved. Version: 1.2...
-
Page 8: Control Panel
9-04.Image 9-08.Image Compare Image Edit NOTE: Do not worry at this point about understanding what all of the functions mean. They are explained in detail in Chapter 4: Loading An Image. ©2007 Recordex USA, Inc. All rights reserved. Version: 1.2... -
Page 9: Dvd/Cd Drive
User’s Guide ® Recordex TechDisc Pro DVD/CD Drive Drive Tray Eject Button ©2007 Recordex USA, Inc. All rights reserved. Version: 1.2... -
Page 10: Making Connections
This is normal and after about 20 seconds the test will be complete and the LCD panel will look like the reference image above. ©2007 Recordex USA, Inc. All rights reserved. Version: 1.2... - Page 11 Recordex TechDisc Pro Your TechDisc Pro™ is designed to make thousands of copies at high speed. For the best results we recommend that you use the highest grade media available. Higher grade media may cost a little more but the you will have fewer failures when copying at high-speed.
- Page 12 The controller will then read 9. Image. See Figure 4.4. Figure 4.3 You are now ready to start making copies. Load- A-18X 7:10 Figure 4.4 9-01.Image 9. Image Image Load OK Load ©2007 Recordex USA, Inc. All rights reserved. Version: 1.2...
- Page 13 4.6 except that the Copy display will look like figure 4.7: Figure 4.7 Check Target Please Wait % Complete Copying-18X Estimated time remaining 6:50 1. Copy Successful Copies OK: 07 ©2007 Recordex USA, Inc. All rights reserved. Version: 1.2...
- Page 14 After the test process is complete the successfully tested discs will be ejected. This makes it easier to identify which discs passed and which discs failed the test. This is a user selectable feature and can be changed through the Setup menu by changing the setting under the Eject Disc sub-menu. ©2007 Recordex USA, Inc. All rights reserved. Version: 1.2...
-
Page 15: Test & Copy
After the test process is complete the successfully tested discs will be ejected. This makes it easier to identify which discs passed and which discs failed. This is a user selectable feature and can be changed through the Setup menu by changing the setting under the Eject Disc sub-menu. ©2007 Recordex USA, Inc. All rights reserved. Version: 1.2... - Page 16 This is a user selectable feature and can be changed through the Setup menu by changing the setting under the Eject Disc sub-menu. Note: The system can only verify multiple discs at one time if all of the discs were copied from the same image. ©2007 Recordex USA, Inc. All rights reserved. Version: 1.2...
- Page 17 After the test process is complete the successfully compared will be ejected. This makes it easier to identify which discs passed and which discs failed. This is a user selectable feature and can be changed through the Setup menu by changing the setting under the Eject Disc sub-menu. ©2007 Recordex USA, Inc. All rights reserved. Version: 1.2...
- Page 18 ENT to start the Prescan process. The LCD panel will display the status of the Prescan test and indicate the estimated time left for the test. The controller will display the following: Figure 5.10 Preparing..% Complete Scanning-18X 6:50 Estimated time remaining Prescan OK! ©2007 Recordex USA, Inc. All rights reserved. Version: 1.2...
-
Page 19: Disc Info
Depending on the type of disc and the disc contents there may be more or less information displayed. Continue to press ENT to cycle through all of the disc information. Press the DOWN arrow button to cycle through the other target discs. ©2007 Recordex USA, Inc. All rights reserved. Version: 1.2... -
Page 20: Select Source
05 IDE5 Master list of available sources. Scroll down to view available sources Src: SUPER MULTI 00 IDE0 Slave Scroll down to view available sources Src: SUPER MULTI 01 IDE1 Master ETC. ©2007 Recordex USA, Inc. All rights reserved. Version: 1.2... - Page 21 You can assign a title and two sub-ti- is an easy way to get back to the main menu. Keep tles. pressing ESC until you are back to 9. Image. ©2007 Recordex USA, Inc. All rights reserved. Version: 1.2...
-
Page 22: Edit Track
NOTE: Press ESC to move back through the menu. This is an easy way to get back to the main menu. Keep pressing ESC until you are back to 10. Edit Track. ©2007 Recordex USA, Inc. All rights reserved. Version: 1.2... - Page 23 NOTE: Press ESC to move back through the menu. This is an easy way to get back to the main menu. Keep pressing ESC until you are back to 10. Edit Track. ©2007 Recordex USA, Inc. All rights reserved. Version: 1.2...
- Page 24 If burning the compilation to the hard drive then select a blank partition and press ENT. If you select a non-blank partition you will be asked if you wish to overwrite the existing data. ©2007 Recordex USA, Inc. All rights reserved. Version: 1.2...
-
Page 25: Auto Start
Auto Compare source disc. Any differences, if found, will be reported. The Continue on next page. default setting is off. ©2007 Recordex USA, Inc. All rights reserved. Version: 1.2... -
Page 26: Burn Mode
Erase function. The media will appear blank. NOTE: The data is not truly erased but the discs can now be used as blank me- dia. To fully erase a disc use the Full Erase function. Continue on next page. ©2007 Recordex USA, Inc. All rights reserved. Version: 1.2... -
Page 27: Full Erase
You can set the delay from 5 seconds to 50 seconds. NOTE: Press ESC to move back through the menu. This is an easy way to get back to the main menu. Keep pressing ESC until you are back to 11.Setup. ©2007 Recordex USA, Inc. All rights reserved. Version: 1.2... -
Page 28: Format Hdd
It is recommended that you do not modify advanced settings unless you are an experienced user or you have been instructed by Recordex technical support to make a change to the Advanced Setup options. The Advanced Setup menu is a hidden menu and can only be accessed by holding the ESC button down for 3 seconds. -
Page 29: Compare Firmware
12-14 CD-TEXT Certain audio discs include text files which provide a means for 12-14.Adv Setup certain players to display disc and track title information. En- CD-Text able CD-Text copying through menu 12-14. ©2007 Recordex USA, Inc. All rights reserved. Version: 1.2... -
Page 30: Frequently Asked Questions
Frequently Asked Questions Q: Do I need a computer to operate my duplicator? A: Definitely not. Your TechDisc Pro™ is a standalone duplicator which means that it can operate on its own and does not require a computer to be attached. - Page 31 Q: Are bigger hard drives better than smaller hard drives? A: The size of the hard drives limits how many images you can store. So bigger is better if you don’t want to run out of space. ©2007 Recordex USA, Inc. All rights reserved. Version: 1.2...
-
Page 32: Common Problems
6: The duplicator reports “Target Drive Not Ready” and the disc drives are ejected. This happens when the duplicator does not detect blank media in the target disc drives. Load the drives with blank me- dia and try again. ©2007 Recordex USA, Inc. All rights reserved. Version: 1.2... - Page 33 The disc on the DVD-RW device is not rewritable. Preparing The system is preparing to record. Press a Key to Eject Fail Disc Press any key to eject the failed disc after copying. ©2007 Recordex USA, Inc. All rights reserved. Version: 1.2...
- Page 34 HDD too small The capacity of hard disk is too small for the image being loaded. HDD too small to handle image! The hard disc partition is too small store the data image ©2007 Recordex USA, Inc. All rights reserved. Version: 1.2...
-
Page 35: Audio Editing
Insert next disc Insert the next audio disc (and select tracks to extract) NO AUDIO track in this disc. The source disc has no audio tracks. Only audio tracks can be extracted. ©2007 Recordex USA, Inc. All rights reserved. Version: 1.2... -
Page 36: Firmware Update
Update F/W xxx to yyy? Do you want to update the firmware version from xxx to yyy? Updating F/W The system is updating the firmware. DO NOT POWER OFF THE MACHINE. ©2007 Recordex USA, Inc. All rights reserved. Version: 1.2... -
Page 37: Contact Technical Support
Recordex TechDisc Pro Every TechDisc Pro™ is rigorously tested before it is shipped to ensure trouble free operation. However, if your duplicator stops working properly don’t hesitate to give us a call. Before calling make sure to have your dupcliator model number and serial number ready. - Page 38 Kodak waterproof media which provides unprecedented color reproduc- tion, archival ratings that professionals demand, and the Kodak waterproof finish. Available from Recordex Dealers in both CD-R and DVD-R formats and conveniently bulk-packaged in 45 piece cakeboxes so you can quickly and easily load your Studio...
Need help?
Do you have a question about the TechDisc Pro and is the answer not in the manual?
Questions and answers