Table of Contents
Advertisement
Quick Links
Advertisement
Table of Contents

Related Manuals for PSC Falcon PT40


Summary of Contents for PSC Falcon PT40
- Page 1 Falcon PT40 ® Product Reference Guide...
- Page 2 However, PSC reserves the right to change any specification at any time without prior notice. PSC is a registered trademark of PSC Inc. The PSC logo is a trademark of PSC. All other trademarks and trade names referred to herein are property of their respective owners.
-
Page 3: Table Of Contents
Document Conventions ....................vii Keys and Keystroke Conventions ................vii PT40 Labels .........................viii Chapter 1. Introduction ..................1-1 Overview of the PSC Falcon PT40 ..................1-1 PT40 Power Button and Reset ..................1-2 Turning the PT40 On ....................1-2 Auto-Off Timeout ....................1-2 Turning the PT40 Off ....................1-2 Resetting the PT40 ....................1-3... - Page 4 PT40 Dock, Serial Cable and Power Adaptor ............1-12 PT40 Batteries ....................1-12 PT40 Belt Clip ..................... 1-13 PT40 Soft Case ....................1-14 Falcon PT40 Product CD ..................1-14 Chapter 2. Data Collection with PT40 Software Applications ......2-1 Overview ........................2-1 Quick Start ........................2-2 Setting Up the PT40 ....................2-3...
- Page 5 Transmit Files ....................3-7 Receive Files ....................3-7 Downloading Applications with PPGXFER ................3-8 Removing Collected Data from Memory ................ 3-13 Appendix A. Falcon PT40 Batteries ..............A-1 Battery Overview ......................A-1 Main Battery Installation ....................A-3 Recharging the Batteries ....................A-4 Using the Dock Charging Slot (Battery only) .............A-4 Using the PT40 Dock (PT40 Unit) ................A-5...
- Page 6 Appendix E. Programming Parameters ............. E-1 Overview ........................E-1 Using Bar Codes ......................E-3 Using Predefined Defaults ..................E-3 Alternate Parameters for the Falcon PT40 ..............E-4 Guidelines for Creating Programming Bar Codes ............E-5 Using Multiple Bar Codes ..................E-5 Programming Parameters .....................E-6 Setting the Hour Format, Time, and Date ..............E-6 Time ......................E-6...
-
Page 7: Preface. About This Guide
How to Use This Manual This Product Reference Guide contains comprehensive instructions on the Falcon PT40’s software, batteries, dock, serial cable, data transfer. It also con- tains advanced user information such as pinouts, bar code configuration and parameters. This section of the manual provides both a general description of the product’s features and an overview of the manual’s contents and organiza-... -
Page 8: Registering Your Falcon Pt40
PT40, troubleshooting, and technical support. Registering Your Falcon PT40 PSC values your feedback. Please take a few moments and complete the Product Registration form located on PSC's website or on the PSC Manuals CD. Registering your products ensures that you will be informed of the latest product news, software updates and other future developments from PSC. -
Page 9: Document Conventions
They also indicate when you should take care to use the correct PSC accessories, parts and connectors. CAUTION Warnings indicate potential damage to the Falcon PT40, docks, and battery charg- ers if directions are not followed correctly. WARNING... -
Page 10: Pt40 Labels
About this Guide PT40 Labels These labels are for illustrative purposes only. Figure 1. Falcon PT40 Laser Label Figure 2. Falcon PT40 Battery Compartment Label Figure 3. Falcon PT40 Dock Label viii ® Falcon PT40... -
Page 11: Chapter 1. Introduction
Chapter 1 Introduction Overview of the PSC Falcon PT40 The Falcon PT40 is a rugged, handheld, portable data-collection terminal that allows bar code scanning technology anywhere. The PT40 automatically rec- ognizes and discriminates among the following bar code symbologies when... -
Page 12: Pt40 Power Button And Reset
Introduction PT40 Power Button and Reset Turning the PT40 On Press the green key displayed at left to turn the PT40 on. The first <PWR> screen that appears on the PT40, unless the software has been customized, is shown below. -Falcon PT40z- Ver 020.5/Z0.2 System RAM 256K... -
Page 13: Resetting The Pt40
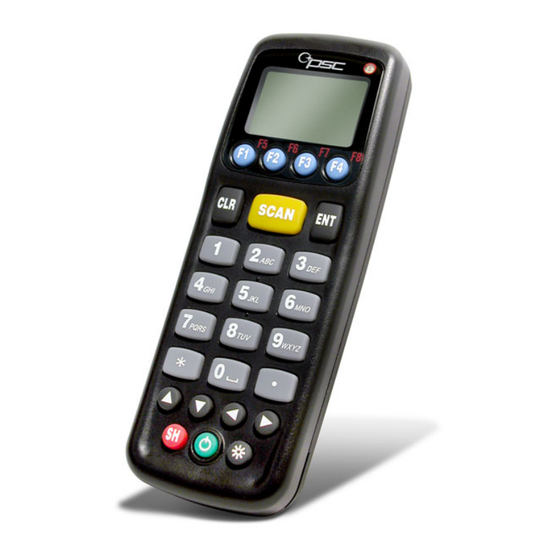
The keypad on the PT40 has three types of keys: action keys, function keys, and data keys. Each key produces a beep when pressed. • Refer to for an illustration of the Falcon PT40. Figure 1-2 on page 1-4 • Refer to for a list of data keys and cycles. -
Page 14: Data Keys
Introduction Figure 1-1. Falcon PT40 Keypad Function Keys Enter Key Clear Key Scan Key Data Keys Navigation Keys Shift Key Backlight Key Power Key Data Keys Use the twelve (12) data keys to enter letters, numbers, and other characters. If... -
Page 15: Function Keys
The Keypad Table 1-1. Inputting Characters Using Data Keys Normal Mode Shift Mode First Second Third Fourth Fifth Number/Symbol Keypress Keypress Keypress Keypress Keypress space space space * (Asterisk) In both Normal and Shift mode, press the * key to insert an asterisk. . -
Page 16: Action Keys
Introduction Action Keys Ten action keys, including the four navigation keys, are described in Table 1-1 Table 1-2. Falcon PT40 Action Keys Function Referred to Button Description /Mode Press to move the cursor back one position. <CLR> Clear <CLR> Press and hold to clear an entire line of text. -
Page 17: The Display Screen
Actual vs. Virtual Display The Falcon PT40's actual display screen is a window to a larger display area called the virtual display (refer to ). Most applications you will use Figure 1-3 will fit into the actual display. -
Page 18: Contrast
Figure 1-1 on page 1-2 The PT40 Laser The PT40 laser is an integral part of the Falcon PT40. Use the PT40 to scan bar code labels on flat, curved, or irregular surfaces at distances ranging from one inch to 18 inches. -
Page 19: Scanning Bar Codes With The Pt40
The tone, pitch, volume, number, and length of beeps can all be modified. Refer to Configuring with Bar Codes for more information on customizing your Falcon PT40. starting on page D-1 Product Reference Guide... -
Page 20: Pt40 Software Applications
No password is required for these applications. PT Program Generator (PPG) ™ v5.0 ( ™) is an application designed to work PT Program Generator with the Falcon PT40 to create custom applications that collect, verify, and 1-10 ® Falcon PT40... -
Page 21: Application And Data Flow
PC and PT40. Figure 1-5 Figure 1-4. Application and Data Flow on the PT40 PPG is designed to work with the Falcon PT40 to create custom applications that collect, verify, and store data. Refer to PT Program Generator (PPG) PPGXFER Use to download the operating system and applications. -
Page 22: Accessories
The PSC Falcon PT40 Dock, Serial Cable, and Power Adaptor are specifically designed for use with the Falcon PT40. Use the dock or serial cable for data transmission between the portable and a PC. They can also be used to recharge the portable’s rechargeable main Lithium-ion battery. -
Page 23: Pt40 Belt Clip
Accessories To recharge the PT40’s batteries and for more detailed information about the main and backup batteries, refer to Falcon PT40 Batteries on page A-1 Using the Dock to Recharge the Main Battery on page B-4 PT40 Belt Clip To install the belt clip, complete the following steps: 1. -
Page 24: Pt40 Soft Case
Adobe Acrobat Reader download from Adobe’s website at www.adoble.com A printed version of the Falcon PT40 Quick Reference Guide (QRG) shipped with your Falcon PT40. Use this document to get the Falcon PT40 up and running quickly. 1-14 ®... -
Page 25: Overview
Chapter 2 Data Collection with PT40 Software Applications Overview This section of the manual describes the following data collection processes with the PT40: • Quick Start starting on page 2-2 • Setting Up the PT40 starting on page 2-3 • Getting Started starting on page 2-3 •... -
Page 26: Quick Start
Data Collection with PT40 Software Applications If you want to work with PPG, please refer to the PPG User’s Guide, included on the CD that came with your PT40. Quick Start The Falcon PT40 comes with an application named loaded in PALPRO40 memory. -
Page 27: Setting Up The Pt40
Memory Table on page F-1 mine the amount of RAM you need. Getting Started Unless it has been customized, the Falcon PT40 is programmed from the fac- tory for basic data collection using PALPRO40 This chapter describes how to use the PT40 with its original PSC programming (i.e. -
Page 28: Switching Applications
Data Collection with PT40 Software Applications Switching Applications The PT40 can have as many as 4 different applications in memory, any one of which can be selected and run. To move to a different application from the application currently running, you must initiate a special key-sequence on the keypad. -
Page 29: Continuing The Application
Setting the Time and Date ¤ In the representations of the display of the Falcon PT40 that follow, the symbol indicates the blinking cursor. You can access the date and time prompts from other display screens and menus (such as the password prompt in ).). -
Page 30: Setting A Password
CAUTION After you enter your password, the text in is displayed. Figure 2-5 Figure 2-5. The PALPRO40 Opening Display PSC PALPRO40 08:18:04¤ 10/16/02 F-KEY=CONTINUE Press any function key to bring up the menu. The PT40 is PALPRO40 Options now ready to collect data. -
Page 31: Using Palpro40 To Collect Data
Using PALPRO40 to Collect Data Using PALPRO40 to Collect Data When finished setting up the PT40 (refer to the previous section), the menu appears on the display screen. Use the menu to PALPRO40 Options choose a application. PALPRO40 Installing PALPRO40 comes installed on your PT40 from the factory. -
Page 32: Changing Program Titles And Prompts
Data Collection with PT40 Software Applications If you select ), the next screen asks you to select one or two prompts INVPRO (refer to the ). Make a selection before going on to the next Steps on page 2-12 step. If you select the next screen asks you if you want to add a date/time TRACKPRO,... -
Page 33: Switching To Another Palpro40 Application
Using PALPRO40 to Collect Data 4. Enter the text for the second prompt (for example, ASSET NO.) fol- lowed by the key. <ENT> ENTER PROMPT 2 ASSET NO.¤ Switching to Another PALPRO40 Application To switch from one application to another, complete the following PALPRO40 steps: 1. -
Page 34: Using Assetpro
Data Collection with PT40 Software Applications Using ASSETPRO to track assets (such as furniture, phones, computers, and ASSETPRO electronic equipment) at various locations (e.g., departments, rooms, floors, buildings). With enter an identification code for a location, col- ASSETPRO, lect all the asset IDs at the location, and then enter an identification code for a different location. - Page 35 Using PALPRO40 to Collect Data 4. The location ID and item ID appear together on the third line of the screen, separated by a comma, and the second prompt remains on the screen. • The PT40 is ready to accept another ID for an asset at the current location.
-
Page 36: Using Invpro
Data Collection with PT40 Software Applications Using INVPRO Use this application to track inventory. provides a choice of one INVPRO prompt or two. For example, use one prompt to scan or enter an ID number or description for each item. Two prompts would be used to scan or enter an item ID and the quantity of that item. - Page 37 Using PALPRO40 to Collect Data 2. Scan the bar code for an inventory item, or use the keypad to enter the item’s ID number or description. Using a scanner, the code is entered automatically; with a keypad, press the key. <ENT>...
- Page 38 Data Collection with PT40 Software Applications 2. Scan the bar code for an inventory item, or use the keypad to enter the item’s ID number or description. The code is entered automatically with a scanner; with a keypad, press the key.
-
Page 39: Using Trackpro
Using PALPRO40 to Collect Data Figure 2-9. INVPRO Collected Data in ASCII text file R44-2173, 25 R44-2260, 12 R44-2278, 56 R44-2283, 30 R44-2285, 47 R44-2287, 16 R44-2289, 4 R44-2314, 85 Using TRACKPRO Use this application to record check-in and check-out of articles (e.g., supplies, books, files, tools, equipment) at one or more locations. - Page 40 Data Collection with PT40 Software Applications 3. From the application menu, select <F2> ITEM TRACKING¤ F2=COLLECT F3=FILE OPTIONS F5=EXIT 4. Press the key to record an item being checked in. Press <F1> <F2> record an item being checked out. F1=CHECK IN F2=CHECK OUT F4=EXIT¤...
- Page 41 Using PALPRO40 to Collect Data screen, and the PT40 is ready to accept another ID for an item at the current location. ITEM ID ¤ IN :MAIN,P203 F3=REV F4=EXIT If the application is set up to add a date/time stamp, the date and time that the item was checked out will follow the item ID on the third line.
-
Page 42: Other Data Collection Applications
Falcon Adv User’s Guide R44-2247 Falcon Developer’s Toolkit R44-2342 PT Program Generator User’s Guide v5.0 R44-2343 PPG Quick Start Guide v5.0 R44-2340 Falcon PT40 Product Reference Guide R44-2341 Falcon PT40 Quick Reference Guide R44-2260 UPG User’s Guide, v 3.0 2-18 ® Falcon... -
Page 43: Loading Item And Description Files Into The Pt40
Figure 2-4 on page 2-6 Loading Item and Description Files into the PT40 1. At the screen displaying the program name, press any function key to display the application menu. PSC DESCRIPT 08:17:32¤ 10/16/02 F-KEY=CONTINUE 2. From the application menu, select <F2>... - Page 44 Data Collection with PT40 Software Applications ERASE F2=PICKLIST F3=COLLECT F4=EXIT¤ 5. Press the key to return to the application menu, and select <F4> <F2> display the menu. Receive Lists 6. From the menu, select to download the item list or Receive Lists <F2>...
-
Page 45: Using Descript
Other Data Collection Applications To set a new date or time, refer to Setting the Time and Date on page 2-5 Using DESCRIPT 1. From the application menu, select <F1> F1=COLLECT F2=RECEIVE LISTS F3=FILE OPTIONS F4=EXIT¤ 2. The screen prompts you for an item identification. Scan the bar code for an item, or use the keypad to enter the item's ID number or description. - Page 46 Data Collection with PT40 Software Applications • The application adds the item ID to the item list and prompts you for a description of the item. Use the keypad to enter a description (e.g. UPG USER’S GUIDE). ENTER DESCRIPT ¤ •...
-
Page 47: Invmodem
2. From the menu, select File Options <F2> *FILE OPTIONS* F2=SEND FILE F3=ERASE FILE F4=EXIT¤ 3. Use a cable supplied by your PSC dealer to connect the PT40 to your modem, and select from the menu. <F3> Send File *SEND FILE* F2=SERIAL F3=MODEM F4=EXIT¤... - Page 48 Data Collection with PT40 Software Applications SELECT BAUD RATE F2=2400,N,8,1 F3=9600,N,8,1 F4=EXIT¤ 5. Enter the telephone number to dial. Be sure to use the format that your modem requires. (For example, you may need to use “9,” as a prefix for the number).
-
Page 49: Timestmp
Other Data Collection Applications TIMESTMP is a simple item-tracking application that records the date and time TIMESTMP that each item is entered into the PT40. Using TIMESTMP 1. At the screen displaying the program name, press any function key. TIMESTMP 08:17:32¤... -
Page 50: Changing The Date And Time Setting
Data Collection with PT40 Software Applications The code is entered automatically with a scanner; with a keypad, press the <ENT> key. Use the arrow navigation keys to scroll the display window to the right to see all the date and time information. •... -
Page 51: Reviewing The Collected Data
Reviewing the Collected Data 2. If the displayed date is correct, press the key. If the date is <ENTER> wrong, enter the correct date. Use two digits each for the month, for the day, and for the year (e.g. 101602). The program will automatically format the entry (e.g. - Page 52 Data Collection with PT40 Software Applications • The second line of the data-review screen tells the number of the cur- rently displayed record and the total number of records. The top line of the data-review screen offers options for moving through the records in memory.
- Page 53 PT40 to a PC. Use only the Falcon PT40 Dock or PT40 serial cable for data transfer. The use of another dock or serial cable could void your warranty. For a list of PT40 accessories and part numbers, refer to PSC’s Price Book at:...
-
Page 54: Chapter 3. Transferring Files And Data
XFER32 Falcon PT40 and a Host PC A copy of was included on the CD that XFER32 came with your Falcon PT40 and is installed with the PT40 applications auto- matically. ® Falcon PT40... -
Page 55: General Tab
Using XFER32 XFER32 Setup When you start , the user interface, shown in , opens. XFER32 Figure 3-1 Figure 3-1. XFER32 User Interface To prepare for data transfer between the PC and the PT40, click on the Setup button to open the dialog box, which contains three tabbed sections: Setup •... - Page 56 XON/XOFF is not supported by the PT40. None No flow control used. ZModem XON/XOFF NOTE: Protocol is NOT supported by the Falcon PT40. ZModem This feature is only available with protocol. RTS/CTS Hardware flow control that uses ), and Request to Send...
-
Page 57: Transfer Tab
Using XFER32 ZModem Crash Recovery NOTE: Protocol is NOT supported by the Falcon PT40. ZModem This feature is only available with protocol. Transfer Tab Select the tab to establish file transfer settings. Transfer Figure 3-3. Transfer Tab of the File Transfer Utility... -
Page 58: Logging Tab
Transferring Files and Data File Transfer Default Enter the folder for storing received File Transfer Default files. Use the button to locate a new location. Browse Logging Tab Select the tab to establish settings for the communications log. The Logging communications log can be helpful as a trouble-shooting aid. -
Page 59: Transmit Files
Using XFER32 Transmit Files 1. To transmit files from the Host PC to the PT40, select the Transmit button from the user interface. illus- Files XFER32 Figure 3-1 on page 3 trates the user interface. Figure 3-5. Send File to PT40 Window 2. -
Page 60: Downloading Applications With Ppgxfer
PPGXFER the PT40 from your Windows compatible PC. A copy of PPGXFER included on the CD that came with your Falcon PT40 and is installed auto- matically when you install The windows shown for were captured on a PC running Microsoft PPGXFER ®... -
Page 61: Product Reference Guide
3. The downloader requests a list of currently loaded applications from the Falcon PT40. The Falcon PT40 can hold up to four applications. Figure 8. Select an Application from the List of Options. 4. Choose the location where you want to load your new application. Once you select a location, your application is downloaded. - Page 62 Transferring Files and Data 5. Connect the PT40 to the PC (refer to PT40 Serial Configuration and Con- nection on page C-1 6. Double-click on the icon in the PSC PAL pro- Portable Programmer gram group to open the window. PSC PPGXFER Programmer Figure 3-9.
- Page 63 • The Compiler window appears momentarily as PPG compiles the program, translating it into a language understood by the portable. Figure 12. PSC Portable Compiler Window 3-11 Product Reference Guide...
- Page 64 Transferring Files and Data • The original *.scr file remains intact, and the compiled file is given the same name, but with a *.hex extension. It is this *.hex file that is downloaded into the portable. • When compilation is complete, the window opens, dis- PPGXFER playing the message...
-
Page 65: Removing Collected Data From Memory
Removing Collected Data from Memory Removing Collected Data from Memory After uploading a file from the PT40 to the PC, erase the file from the PT40’s memory. To do so, complete the following steps: 1. From the program menu on the PT40 (such as the one from TRACK- below), select to display the... - Page 66 Transferring Files and Data NOTES 3-14 ® Falcon PT40...
- Page 67 • Backup Battery page A-8 When you first remove your Falcon PT40 from the box, the main battery may require charging. Please check the charge on the battery prior to first use. PSC recommends that you purchase two main Lithium-ion batteries and keep a spare battery charging in the battery slot at all times.
- Page 68 Do not throw Lithium-Ion Batteries in the trash. CAUTION Use only a power adaptor and main battery supplied by a PSC dealer. The user of another adaptor or battery can damage the PT40 and void your warranty. For the correct power adaptor and main battery for the Falcon PT40, please refer to the PSC Price Book on www.pscnet.com...
- Page 69 Main Battery Installation Main Battery Installation To install the main lithium ion battery, complete the following steps as shown Figure A-2 on page A-3 1. Press the release button on the back of the unit, while sliding the battery cover down until it stops. Lift the cover off from the bottom of the unit. Figure A-2.
- Page 70 Falcon PT40 Batteries Recharging the Batteries If the PT40 will not turn on or if the message appears on the dis- Low Battery play, the main battery needs recharging. A full charge takes about 4 hours. There are three ways to recharge the main lithium ion battery of the PT40 portable.
- Page 71 Recharging the Batteries Figure A-4. Charging the Main Battery in the Charging Slot Step 3 4. Attach the small, round plug of the 9-volt power adapter to the round power input jack on the 9-pin connector at the end of the Dock's cable. 5.
- Page 72 Falcon PT40 Batteries Figure A-5. Charging the PT40 in the Dock 4. Plug the power adapter into a wall outlet or a power strip. The LED on the left front of the Dock will be red while it is powered.
-
Page 73: Backup Battery
Storing the Main Battery 2. Connect the PSC serial cable to the serial interface connector at the bot- tom of the PT40. (It is not necessary to have the other end of the cable connected to a PC when recharging.) 3. - Page 74 If the message does not disappear or occurs other than at initial use after pro- longed storage, then the backup battery may no longer be accepting a charge and should be replaced by an authorized PSC Service Center. ® Falcon...
-
Page 75: Overview
Power Adaptor Overview The PSC PT40 Dock and Serial cable are specially designed for use with the PT40. Use the Dock or Serial cable for transferring data and files between the PT40 and a PC, and for recharging the PT40’s batteries. - Page 76 Power Adaptor to transfer data using the serial cable, but it is required to transfer data using the Dock. Use only a 9-volt power adapter for your country supplied by PSC. The use of another adapter can damage the PT40 and void your warranty.
- Page 77 Attaching the PT40 to a PC Figure B-3. Falcon PT40 Power Adaptor 9-Volt Power Adaptor Power Connector Power Plug Power Cord Attaching the PT40 to a PC Use PT40 Dock or Serial cable to connect the PT40 to a PC. The PT40 9-volt power adapter is required in conjunction with the dock or serial cable to recharge the main battery on the PT40.
- Page 78 Using the Dock to Recharge the Main Battery There are two methods for using the PT40 Dock to recharge the main Lith- ium-ion battery of the Falcon PT40. • To use the first method, connect the PT40 to the dock connected to a power source, and charging takes place automatically.
- Page 79 Appendix C Connector Configurations Interface Cable Connector Determine which pins are which, based upon the location of the engagement keys, located in the corners of the side that the odd pins are located on. Figure C-1. Interface Cable Connector Pinouts Front (Keyboard Side) of PT40 Engagement Key Engagement Key...
- Page 80 Connector Configurations Docking Signal Name Connector Description (I=Input, O=Output) Pin #s O - TXD~ Transmitted Data I - Docked ~ Connected to GND in Dock Power and Signal Ground Power and Signal Ground I - V_CHARGE Battery Charging Voltage (~ 9 volts) I - V_CHARGE Battery Charging Voltage (~ 9 volts) O - VCC1...
- Page 81 Appendix D Configuring with Bar Codes This section provides bar codes for common setup parameters that can be used for programming the PSC PT40. Factory default settings are underlined. Predefined Defaults *$+$-D0EE* *$+$-D2EE* *$+$-D1EE* *$+$-C8EE* Serial defaults Code 39 ENABLE...
- Page 82 Configuring with Bar Codes *$+$-0130EE* MAXIMUM LENGTH *$+$-0210EE* *$+$-0240EE* *$+$-0220EE* *$+$-0250EE* *$+$-0230EE* *$+$-0260EE* ENABLE CHECKSUM *$+$-031EE* *$+$-030EE* SEND CHECKSUM *$+$-041EE* *$+$-040EE* FULL ASCII MODE *$+$-051EE* *$+$-050EE* ACCUMULATE MODE *$+$-061EE* *$+$-060EE* ENABLE AIAG ALTERNATE CHECK DIGIT *$+$-071EE* *$+$-070EE* ® Falcon PT40...
-
Page 83: Interleaved 2 Of 5
Interleaved 2 of 5 Interleaved 2 of 5 ENABLE *$+$-081EE* *$+$-080EE* MINIMUM LENGTH *$+$-0902EE* *$+$-0930EE* *$+$-0906EE* *$+$-0940EE* *$+$-0910EE* *$+$-0950EE* *$+$-0920EE* *$+$-0960EE* MAXIMUM LENGTH *$+$-0A10EE* *$+$-0A40EE* *$+$-0A20EE* *$+$-0A50EE* *$+$-0A30EE* *$+$-0A60EE* REQUIRED LENGTH (no default; overrides minimum and maximum settings) *$+$-09020A02EE* *$+$-09120A12EE* *$+$-09040A04EE* *$+$-09140A14EE* Product Reference Guide... - Page 84 Configuring with Bar Codes *$+$-09060A06EE* *$+$-09160A16EE* *$+$-09080A08EE* *$+$-09180A18EE* *$+$-09100A10EE* *$+$-09200A20EE* ENABLE CHECKSUM *$+$-0B1EE* *$+$-0B0EE* SEND CHECKSUM *$+$-0C1EE* *$+$-0C0EE* USE LENGTHS 6 AND 14 ONLY (case code) *$+$-0D1EE* *$+$-0D0EE* Codabar ENABLE *$+$-201EE* *$+$-200EE* MINIMUM LENGTH *$+$-2104EE* *$+$-2140EE* *$+$-2110EE* *$+$-2150EE* ® Falcon PT40...
- Page 85 Code 93 *$+$-2120EE* *$+$-2160EE* *$+$-2130EE* MAXIMUM LENGTH *$+$-2210EE* *$+$-2240EE* *$+$-2220EE* *$+$-2250EE* *$+$-2230EE* *$+$-2260EE* SEND STOP/START *$+$-231EE* *$+$-230EE* CONVERT CODABAR TO CLSI *$+$-241EE* *$+$-240EE* Code 93 ENABLE *$+$-2C1EE* *$+$-2C0EE* MINIMUM LENGTH *$+$-2D02EE* *$+$-2D30EE* Product Reference Guide...
- Page 86 Configuring with Bar Codes *$+$-2D10EE* *$+$-2D40EE* *$+$-2D20EE* *$+$-2D50EE* MAXIMUM LENGTH *$+$-2E02EE* *$+$-2E30EE* *$+$-2E10EE* *$+$-2E40EE* *$+$-2E20EE* *$+$-2E50EE* UPC-A ENABLE UPC-A *$+$-301EE* *$+$-300EE* SEND SYSTEM DIGIT *$+$-311EE* *$+$-310EE* SEND CHECK DIGIT *$+$-321EE* *$+$-320EE* CONVERT UPC-A TO EAN-13 *$+$-331EE* *$+$-330EE* ® Falcon PT40...
- Page 87 UPC-E UPC-E USE SYSTEM DIGIT 0 *$+$-341EE* *$+$-340EE* USE SYSTEM DIGIT 1 *$+$-351EE* *$+$-350EE* CONVERT UPC-E TO UPC-A *$+$-361EE* *$+$-360EE* SEND SYSTEM DIGIT *$+$-371EE* *$+$-370EE* SEND CHECK DIGIT *$+$-381EE* *$+$-380EE* EAN/JAN ENABLE EAN-8/JAN-8 *$+$-391EE* *$+$-390EE* ENABLE EAN-13/JAN-13 *$+$-3A1EE* *$+$-3A0EE* Product Reference Guide...
-
Page 88: Code 128
Configuring with Bar Codes CONVERT EAN-13 TO ISBN *$+$-3B1EE* *$+$-3B0EE* SEND CHECK DIGIT *$+$-3F1EE* *$+$-3F0EE* UPC/EAN/JAN Extensions ALLOW 2-DIGIT EXTENSIONS *$+$-3C1EE* *$+$-3C0EE* ALLOW 5-DIGIT EXTENSIONS *$+$-3D1EE* *$+$-3D0EE* REQUIRE EXTENSIONS *$+$-3E1EE* *$+$-3E0EE* Code 128 ENABLE *$+$-401EE* *$+$-400EE* MINIMUM LENGTH *$+$-4102EE* *$+$-4140EE* ®... - Page 89 Other Controls *$+$-4110EE* *$+$-4150EE* *$+$-4120EE* *$+$-4160EE* *$+$-4130EE* MAXIMUM LENGTH *$+$-4210EE* *$+$-4240EE* *$+$-4220EE* *$+$-4250EE* *$+$-4230EE* *$+$-4260EE* ENABLE UCC128 *$+$-431EE* *$+$-430EE* Other Controls ENABLE MANUAL RESET *$+$-B01EE* *$+$-B00EE* ADD CODE ID *$+$-B51EE* *$+$-B50EE* Product Reference Guide...
- Page 90 Configuring with Bar Codes AUTO-OFF (in minutes) *$+$-B200EE* *$+$-B230EE* *$+$-B205EE* *$+$-B260EE* *$+$-B210EE* *$+$-B290EE* BACKLIGHT DURATION (in seconds) *$+$-E200EE* *$+$-E215EE* Always On *$+$-E210EE* *$+$-E260EE* BEEPER VOLUME *$+$-BC08EE* *$+$-BC01EE* Increase *$+$-BC09EE* *$+$-BC07EE* Decrease High *$+$-BC00EE* ERROR TONE *$+$-BD01EE* *$+$-BD07EE* High *$+$-BD04EE* Medium D-10 ®...
- Page 91 Other Controls GOOD-READ TONE *$+$-B800EE* *$+$-B805EE* Medium High *$+$-B802EE* *$+$-B807EE* Medium Low High GOOD-READ BEEPS *$+$-B901EE* *$+$-B903EE* *$+$-B902EE* *$+$-B904EE* GOOD-READ TONE DURATION (in seconds) *$+$-BA01EE* *$+$-BA03EE* 0.07 0.22 *$+$-BA00EE* *$+$-BA02EE* 0.14 0.45 KEYPAD TIMEOUT (Intercharacter Delay in seconds) *$+$-E400EE* *$+$-E408EE* 2 Sec *$+$-E401EE* *$+$-E416EE*...
- Page 92 Configuring with Bar Codes *$+$-E404EE* *$+$-E499EE* 1 Sec 24 3/4 Sec KEYBOARD CLICK *$+$-DD1EE* *$+$-DD0EE* Clock and Calendar TIME / DATE FORMAT *%-* *%.* Set Time Set Date TIME FORMAT *$+$-D80EE* *$+$-D81EE* 12-Hour 24-Hour DATE FORMAT *$+$-D90EE* *$+$-D91EE* U.S. International Serial Parameters HOST SELECT (no default)
- Page 93 Serial Parameters *$+$-C101EE* *$+$-C103EE* 2400 *$+$-C104EE* *$+$-C107EE* 4800 38,400 *$+$-C105EE* *$+$-C108EE* 9600 76,800 *$+$-C106EE* 19,200 DATA BITS *$+$-C207EE* *$+$-C208EE* PARITY *$+$-C300EE* *$+$-C304EE* None Even *$+$-C303EE* STOP BITS *$+$-C401EE* *$+$-C402EE* ENABLE XON/OFF *$+$-C51EE* *$+$-C50EE* LINEFEED *$+$-C600EE* *$+$-C602EE* None Add LF D-13 Product Reference Guide...
- Page 94 Configuring with Bar Codes *$+$-C601EE* Strip LF PROTOCOL *$+$-CA00EE* *$+$-CA02EE* EOR only Xmodem *$+$-CA01EE* CR with checksum and ACK/NAK response TIMEOUT (in 100-millisecond units) *$+$-CD00EE* *$+$-CD50EE* *$+$-CD10EE* *$+$-CD75EE* *$+$-CD25EE* *$+$-CD99EE* D-14 ® Falcon PT40...
- Page 95 Appendix E Programming Parameters Overview The application PALPRO40 loaded some default parameter settings. (Refer to .) These settings work for most applications. Table E-2 on page E-3 This appendix provides specifics on all programmable parameter settings for the PT40. • , lists programmable settings and parameter terms.
- Page 96 Programming Parameters For information about using PAL, including installation instructions refer to Using , or to the Portable Applications PALPRO40 to Collect Data starting on page 2-7 Library (PAL) User’s Guide, available at from the www.pscnet.com Product Manuals link. For an overview of using PPG to program the PT40, refer to PT Program .
- Page 97 Using Bar Codes Using Bar Codes To program the PT40, scan Code 39 bar codes that contain the desired parameters and settings. This section provides several programming bar codes. Custom bar codes can be made using any bar code printing software that sup- ports Code 39.
- Page 98 PC’s serial port. With PT Program Generator (PPG), you can embed these codes in a PPG application. The Falcon PT40 recognizes the following bar code commands at all times: Table E-3. Scannable Bar Codes of Alternate Settings for the PT40...
- Page 99 Using Bar Codes Guidelines for Creating Programming Bar Codes Keep the following in mind when creating bar codes for programming the PT40: • Create custom programming bar codes using the extended (full ASCII) Code 39 character set.) • The first and last character of each bar code must be an asterisk (*), the start and stop character for Code 39.
- Page 100 Programming Parameters Commands cannot be split between two or more bar codes. It is not possible to have a parameter ID number at the end of one bar code and its setting or string at the beginning of the next. Programming Parameters For a description of serial parameters, refer to .
- Page 101 Programming Parameters Xmodem Protocol The PT40 supports the Xmodem (checksum) file-transfer protocol for serial communication, which is available in many commercially marketed products. Xmodem is a simple send-and-wait-for-response protocol using a fixed-length data field. The data field is embedded in an Xmodem packet, which also con- tains a packet number and a single-byte arithmetic checksum.
- Page 102 Programming Parameters Code 39 and ASCII Equivalents for Serial Characters provides Code 39 and ASCII equivalents for serial characters. Table E-5 Table E-5. Code 39 and ASCII Equivalents for Serial Characters ASCII ASCII ASCII ASCII “ & & < > ®...
- Page 103 General Programming Parameters General Programming Parameters Table E-6. General Programming Parameters Predefined Defaults Code Parameter ID # Type Acceptable Input Code 39 Enter 1 for On and 0 for Off. Enable On/Off On or Off Minimum length Value 00–60 Maximum length Value 00–60 Enable checksum...
- Page 104 Programming Parameters Predefined Defaults Code Parameter ID # Type Acceptable Input Universal Product Code-A (UPC-A) Enter 1 for On and 0 for Off. Enable On/Off On or Off Send system digit On/Off On or Off Send check digit On/Off On or Off Convert UPC-A to EAN-13 On/Off On or Off...
- Page 105 General Programming Parameters Predefined Defaults Code Parameter ID # Type Acceptable Input Other Controls Enter 1 for On and 0 for Off. Enable manual reset On/Off On or Off Add symbology identifiers On/Off On or Off 00–99 Auto-Off Value (minutes) 00-99 BackLight Timeout Value...
- Page 106 Programming Parameters Serial Parameters The PT40 is pre-configured at the factory with the parameter settings for serial communications found in Table E-7 Table E-7. Default Parameter Settings for Serial Communications Parameter Default Setting Baud rate 9600 Data bits Parity None Stop bits Enable Xon/Xoff Linefeed...
- Page 107 Serial Parameters Table E-9. Serial Programming Parameters Code Parameter ID # Type Acceptable Input Predefined Default (C8) Serial Programming Parameter Enter 1 for On and 0 for Off. 11 = ATs, PS/2s, and Host select Value compatibles None 15 = IBM terminals 00 = 300 01 = 600 02 = 1200...
-
Page 108: Falcon ® Pt40
Programming Parameters NOTES E-14 ® Falcon PT40... - Page 109 Memory Table shows the relationship between the number of characters, records, Table F-1 and files you can store on a Falcon PT40 based upon the amount of random access memory (RAM) installed on your PT40. Table F-1. Falcon PT40 Memory...
- Page 110 Memory Table NOTES ® Falcon PT40...
-
Page 111: Technical Support
Do not scratch the PT40’s screen. Do not drop the PT40 or subject it to strong impact. Do not immerse the Falcon PT40, docks, or battery chargers in liquid. Do not use abrasive paper, cloth, or abrasive or corrosive cleaners to clean the PT40. -
Page 112: Troubleshooting
PSC Falcon PT40 Product Reference Guide. The Falcon PT40 The Falcon PT40 is The Falcon PT40 turns off after a period turns itself off. inactive. of inactivity. This duration can be set from five to 60 minutes.Scan a bar code for the desired duration in the PSC Fal- con PT40 Product Reference Guide. - Page 113 Distance between exit Be sure you are within proper scanning window and bar code is range. incorrect. The Falcon PT40 is not Be sure the terminal is programmed to programmed for the bar accept the type of bar code you are code.
-
Page 114: Psc Website Support
Staff. Receive confirmation emails when answers to your questions are posted within 48 hours through TekForum. Telephone Technical Support If you don’t have access to the internet or email, contact PSC technical support toll-free at 1 (800) 547-2507 in the USA or (541) 683-5700 from outside the USA. - Page 115 NDEX $+$- in bar codes * (asterisk) in bar codes backlight troubleshooting bar code troubleshooting bar code symbologies accumulate mode displaying Code 39 bar codes D-2, E-9 bar codes action keys serial parameters D-12 AIAG check digit bar codes for programming D-1, D-14, E-4 bar codes for creating...
- Page 116 C-1, C-2 contrast, adjusting conversion options E-10 EAN-13 converting from UPC-A E-10 converting to ISBN E-10 see also European Article Numbering European Article Numbering (EAN) D-7, D-8 data extensions D-8, E-10 PSC Program Generator (PPG) v3.2...
- Page 117 Index programming parameters for E-10 see also EAN-13 Exit command 3-12 Japan Article Numbering (JAN) D-7, D-8 extended ASCII character set extensions D-8, E-10 bar codes for programming parameters for E-10 programming parameters for extensions (UPC, EAN, and JAN) programming parameters for E-10 keypad 1-3, 1-5...
- Page 118 E-6, E-9, E-11 resetting the portable predefined defaults resetting the PT40 bar codes for bar code for serial E-12, E-13 reviewing data 2-27, 2-28 programs testing protocol programming parameters for E-13 Xmodem PSC Program Generator (PPG) v3.2...
- Page 119 Index scanning Universal Product Code (UPC) troubleshooting conversion options E-10 screen (display) extensions 1-2, 1-6 send files to PT40 programming parameters E-10 serial communications see also UPC-A and UPC-E bar codes for UPC-A D-14 parameters converting from UPC-E E-13 E-10 parameters for converting to EAN-13 E-13...
- Page 120 Index NOTES PSC Program Generator (PPG) v3.2...
- Page 121 DECLARATION OF CONFORMITY PSC hereby declares that the Equipment specified below has been tested and found compliant to the following Directives and Standards: Directives: EMC 89/336/EEC Low Voltage 73/23/EEC Standards: EN 55022-B:1998 - Generic Emission CISPR 22-B:1997 - Generic Emission...
- Page 122 Telephone: [852]-2-584-6210 Telephone: [39] (0) 39/62903.1 Fax: [852]-2-521-0291 Fax: [39] (0) 39/6859496 Australia Japan PSC Asia Pacific Pty Ltd. PSC Japan K.K. North Ryde, Australia Shinagawa-ku, Tokyo, Japan Telephone: [61] 0 (2) 9878 8999 Telephone: 81 (0)3 3491 6761 Fax: [61] 0 (2) 9878 8688...
Need help?
Do you have a question about the Falcon PT40 and is the answer not in the manual?
Questions and answers